Smart gun owners know they need a good, solid gun safe. But when choosing a gun safe, what kind of lock should you select — electronic or mechanical? Both types have their advantages and disadvantages. This article will help you make the right choice for your needs and also get the most reliable performance from either type.
Gunsafes can be fitted with either an electronic keypad-style lock, or a conventional dial lock. In our Gunsafe Buyer’s Guide, we explain the important features of both dial and electronic lock systems. Many safe-makers will tell you that consumers prefer electronic locks for convenience. On the other hand, most of the locksmiths we’ve polled believe that the “old-fashioned” dial locks, such as the Sargent & Greenleaf model 6730, will be more reliable in the long run. CLICK HERE to learn more about the Pros and Cons of Mechanical (dial) Lock vs. Electronic (keypad) safe locking systems.
One safe supplier, The Safe Keeper, notes that mechanical (dial) locks tend to be more reliable over long periods: “When it comes to reliability, a mechanical lock is the way to go. Anything electronic is designed to fail sooner or later. For every 20 broken electronic locks we will get one mechanical. Bottom line is, it’s not that complicated to input a combination on a mechanical lock. Those extra 7 seconds just might save you from being locked out and having your safe drilled opened.”
This Liberty Safe video compares Mechanical (dial or key) vs. Electronic (keypad) safe locking systems.
Here is the opinion of RFB from Michigan. He is a professional locksmith with over two decades of experience servicing locks and safes of all brands and types:
What a Professional Locksmith Says:
For the convenience of quick opening, the electronic locks can’t be beat. However, for endurance and years of trouble-free use, the electronics can’t compare with the dial lock.
I’ve earned my living, the past 22 years, servicing locks of all types. This includes opening safes that can’t otherwise be opened. I do warranty work for several safe manufacturers (including Liberty). What I’ve learned in all those years is that manual dial locks have very few problems. The most common is a loose dial ring which can shift either left or right, which will result in the index point being in the wrong place for proper tumbler alignment. This is simple to fix.
Electronic locks, however, can have all kinds of issues, and none (except bad key-pad) are easy to fix, and when one goes bad, it must be drilled into to open it. IMO, it’s not a matter of ‘if’ an electronic lock will ultimately fail, but a matter of ‘when’ it will fail. Over the past 10 years or so, since electronics have become more and more prevalent, I’ve had to drill open bad electronic locks vs. bad manual dial locks on a ratio of about 20-1.
My professional opinion is to get the manual dial lock, unless you’ve got a good friend who is a locksmith/safecracker.
How Secure is Your Lock?
RFB tells us that both dial and electronic locks offer good security, provided it’s a good quality lock made by LaGard, Sargent & Greenleaf, Amsec, or Kaba/Ilco. However, RFB warns that “Some of the ‘cheaper’ locks (both manual and electronic) however, are very simple to bypass.
An electronic lock that’s glued or ‘stuck’ to the door with double-sided tape, and has its ‘brain’ on the outside of the lock in the same housing as the keypad, and merely sends power to an inner solenoid via a pair of wires through the door, is a thief’s best friend. The good ones have the brain inside the safe, inaccessible from the outside.
No amateur can ‘manipulate’ either a good manual or electronic lock. Both give you a theoretical one million possible combinations. I say ‘theoretical’ because there are many combinations that cannot, or should not, be used. You wouldn’t set your combo on a dial lock to 01-01-01 etc., nor would you set an electronic to 1-1-1-1-1-1, or 1-2-3-4-5-6.”
Tips for Dial Locks
RFB notes that “The speed, and ease of use, of a manual dial lock can be improved upon, simply by having your combo reset using certain guidelines. Avoid high numbers above 50. Having a 1st number in the 40s, 2nd number anywhere from 0-25, and 3rd number between 25 and 35 will cut dialing time in half, without compromising security. (For mechanical reasons I won’t get into here, the 3rd number of a good manual dial lock cannot — or should not — be set to any number between 95 & 20).”
Tips for Electronic Locks
Electronic locks can have the combination changed by the user much more easily than dial locks. That should be a good thing. However, RFB explains: “That can be a double-edged sword. More than a few times I’ve had to drill open a safe with an electronic lock that has had the combo changed incorrectly by the user, resulting in an unknown number that nobody can determine. Also, don’t forget that electronic locks have a ‘wrong-number lock-out’. I would NOT rely on the normal quickness of an electronic 6-number combo in an emergency situation. If for any reason (panic etc.) you punch in the wrong number several times, the lock will shut down for a 5-minute ‘penalty’.
Replace Electronic Lock Batteries Every Year
To get the most life out of any electronic (keypad Lock), you should change the battery at least once a year, whether it needs it or not. Low voltage won’t necessarily shut down the lock, but using it in a low voltage situation is bad for the electronics, and eventually will cause lock failure. So, If you do nothing else to maintain your digital-lock safe, replace the battery every year.
And get a fresh battery (with a release date) from the store — don’t just pull a battery out of a storage bin, even if it’s never been used. Old batteries can lost “juice” and physically degrade, even when in storage.
This article is Copyright 2023 AccurateShooter.com. No reproduction on any other website is authorized without payment of licensing fees or liquidated damages.
Welcome to 2025 — a new year, with new hunting opportunities in the months ahead. While we’re in the midst of winter, many readers are already thinking about hunting in the months ahead. And in some areas The National Shooting Sports Foundation (NSSF) has a large selection of online resources that can help hunters achieve success in the field in 2025. While fall is the most popular hunting period, in many states there is also a spring hunting season which begins in late March or April. During spring there are opportunities for hunting a variety of game such as wild turkey and various small game species. Specific season dates can vary by state and game species.
Visit WhereToHunt.org
There’s a great online resource for hunters that will help you find game locations in your state and ensure you have all the proper permits and game tags. WheretoHunt.org features an interactive map of the country. For all 50 states, the NSSF has compiled information about hunting license and permits, where to hunt, hunter education classes, laws and regulations and more. For each state you’ll also find a link for required applications and license forms.
Click Map to Get State-by-State Hunting INFO
Hunting Affiliation Groups
There are many good organizations dedicated to promoting hunting and preserving our hunting habitats. These groups all offer valuable information for hunters:
Winter is a good time to read about hunting, both to get motivated and to learn more about hunting skills. Here are some of the best books written about hunting.
Happy New Year to all our readers and site visitors, and especially the 76,550+ members of our AccurateShooter Forum. We hope 2025 brings you good times, fulfilment in your lives, and success in your endeavors. We also wish for high match scores, tight groups on target, and successful hunts in the New Year.
Forum Members — Upgrade Your Membership to Get Unlimited Classifieds for 12 Months.
Looking Forward to 2025 Every year we work to improve AccurateShooter.com. We have continued to upgrade the Forum, adding enhanced security measures, with background checks on all sign-ups and enhanced scammer detection. On the content side we have expanded our popular Deals of the Week and Sunday GunDay features. And we’ve added a Video Showcase every Saturday. We also now offer more product reviews in our Daily Bulletin. We hope you’ll continue to enjoy our feature articles, our Deals of the Week, our match reports, and our Forum Classifieds. The formula seems to be working — our audience is bigger than ever, with Forum membership growing substantially year after year.
Forum Membership Increased 7% in 2024
Our Shooters’ Forum grew significantly over the past 12 months. Total registered membership grew by about 7% as Forum ranks swelled to 76,550+ members! More people are successfully buying and selling through our Forum Classifieds services than ever before. Silver and Gold members get unlimited Classifieds for 12 months. Gold members also get custom Avatars and other privileges.
We need your support. For 20+ years the site has relied largely on volunteer efforts. But as the site grows, we need the assistance of Forum moderators, product testers, web gurus, and computer software experts. Those guys don’t work for glory alone.
Consider this — you could pay $30 for a couple medium pizzas. For the same thirty dollars you can become a Silver Forum member for an entire YEAR and help this site provide info, tests, tech tips, bargains, and shooting news.
And consider the benefits — Silver or Gold Members get unlimited classifieds for 12 months. If you were to sell just ONE $600 item through Gunbroker.com, you would pay $32.00 in fees! That’s more than our 12-month Silver Membership fee — just to sell one single $600.00 rifle or pistol.
In 2024 about 2600 site users have donated or upgraded their Forum membership. That’s less than 3.5% of the current membership. We thank all those who have generously contributed. But that still leaves tens of thousands of users who access the site every week without contributing. With more donations and more Forum upgrades, we can deliver more premium content and offer more services to our members.
How to Contribute
If you ARE a Forum member, you can help the site by UPGRADING your membership. CLICK HERE to UPGRADE.
If you are NOT a Forum member, you can still help by making a donation. Donating is simple and easy. Just click on the orange “Donate” button at right. If you have a credit card, you don’t need a PayPal account to contribute. Just choose the “Donate with Debit or Credit Card” Option.
IMPORTANT: After you click on the orange button a PayPal screen will load. You’ll see a field that says “$0″. Fill in the amount you want to give. For example, to give $30, type 30.00 in the amount field. You choose the amount.
Help Support this Site by Making a Secure Donation.
If You Don’t Like PayPal, You Can Send a Check.
Make the check payable to: Jeff Williams. Please list your Shooters’ Forum Log-In Name (if any), and mail the check to:
Jeff Williams
P.O. Box 240
Solon Springs, WI 54873
“22 Plinkster” is an avid shooter who has produced a number of entertaining videos for his YouTube Channel. In the video below, he tackles the question “Why Do Misfires Occur in .22 LR Rimfire Ammunition?” This is the most common question posed to 22 Plinkster by his many viewers. He identifies four main issues that can cause .22 LR misfires or faulty ignition:
1. Damaged Firing Pin — The dry firing process can actually blunt or shorten the firing pin, particularly with older rimfire firearms. Use of snap caps is recommended.
2. Poor Ammunition — Some cheap brands have poor quality control. 22 Plinkster recommends using ammo from a manufacturer with high quality control standards, such as CCI and Federal.
3. Age of Ammunition — Rimfire ammo can function well for a decade or more. However the “shelf life” of rimfire ammunition is not infinite. You ammo’s “lifespan” will be shortened by heat, moisture, and humidity. You should store your rimfire ammo in a cool, dry place.
4. Mishandling of Ammunition — Tossing around ammunition can cause problems. Rough handling can cause the priming compound to be dislodged from the rim. This causes misfires.
Preventing misfires is essential if you want to succeed in NRL22 competition and other rimfire competition disciplines run “on the clock”.
The NRA has produced a good video on general principles of gun safety. New shooters should definitely watch this video, which provides many important reminders for long-time gun owners as well. This video and other safety principles are featured in a Shooting Sports USA article.
While at the range, shooters should practice Three Basic Rules:
1) Always keep the gun pointed in a safe direction.
2) Always keep your finger OFF the trigger until ready to shoot.
3) Always keep the gun UNLOADED until ready to use.
In addition, whenever you are shooting, indoors or outdoors, know what is behind your target and never shoot if there is not a safe backstop. With a centerfire rifle at an outdoor range, just a few degrees of elevation can cause a shot to impact more than a mile away.
Store Guns Safely When Not in Use
After your range sessions or hunts, is vital to store all guns safely. We recommend storing all firearms (pistols, rifles, shotguns) in a sturdy gun safe with thick steel walls. Use a GoldenRod or other device to control humidity inside the safe. We also like to use Bore-Stores or other treated gun sacks to help protect against corrosion.
These days, online gun Auctions and Classifieds attract more attention than ever. With so many folks accessing the internet daily, many gun owners find it easier to sell their firearms online rather than in the local gun store. Online selling opens up a much larger audience. With over 76,500 members in the AccurateShooter Forum, we have a very active gun Classifieds area. And then of course, there are the big dogs — Gunbroker and GunsAmerica. You’ll find tens of thousands of guns for sale on those big sites.
Before selling your stuff online, you should survey the major online sales and auction sites, comparing their fees and features. The costs are NOT all the same. For example, though you can list an item on Gunbroker for free, if the gun sells you may end up paying a LOT of money. Confirm this with the Gunbroker FEE Calculator. Using Gunbroker’s Fee Calculator we determined that, for a $2500.00 gun, the seller will pay $108.00 in fees! Yes, that’s for a single sale.
That’s why many sellers prefer to list their rifles on Benchrest.com, or on the AccurateShooter.com FORUM Classifieds. Currently, basic Accurate Forum members get two (2) free adverts in a 12-month period, while Gold and Silver members get unlimited classifieds for 12 months. A $30 Silver membership is less than you’d pay to sell one single $600 item on Gunbroker ($32.00 fee).
SEVEN TIPS for Selling Your Gear Online
1. Include Good, Sharp Photos: A custom rifle or expensive optic will sell two to three times as quickly, at a higher price, if you include good sharp photos. We can’t over-emphasize the importance of good photos. For all products, show multiple angles, and include the original boxes if you still have them. For a rifle, include detail shots as well as a photo of the complete gun.
2. Resize Your Photos Before Posting: Half of users will probably be viewing your ads with a smartphone. So you don’t need huge photos. We recommend you size your photos down to 1000 pixels wide. This will make uploads more efficient and ensure the Forum server can handle the file sizes.
3. Be Fair and Complete in Your Description: Buyers appreciate honesty and thoroughness in product descriptions. Potential buyers want details. For a rifle, list the gunsmith, barrel-maker, round count, and provide the specifications. If the rifle has a winning competition history, say so. Always highlight the positives in your description, but you should disclose significant flaws. A buyer will be more willing to purchase if he thinks the seller is 100% honest.
4. Don’t Forget Contact Info: We’re amazed by how many adverts omit key contact info. In a forum classified ad, include a first name, e.g. “Ask for Dan.” We also suggest you list your residence city and state. Some buyers will prefer to buy from a seller in their home state. When communicating with a buyer, provide your phone number and email address. We recommend that all buyers and sellers actually talk live on the phone before concluding high-value deals.
5. Make the Price Attractive: Buyers, everywhere, are looking for good deals. If you want your item to move quickly, set the price accordingly and don’t expect top dollar. Check comparable listings and then discount by 10-15% if you want the item to move fast.
6. Include a Call to Action: Advertisements can be twice as effective if they include a “Call to Action”, i.e. a statement that directly inspires the potential buyer to respond. Sample calls to action are: “Free Shipping — today only.” Or, you can use a time limit: “Special Sale Price good ’til the end of the month”.
7. Always Follow ALL Applicable Laws: Even in states where private face-to-face gun sales are allowed, we recommend ALWAYS using an FFL for firearms transfers. This will protect YOU the seller. In addition, do your homework. Don’t sell to a buyer in a city or state (such as California) state or city where the particular firearm (such as an AR15) may be restricted
Classified Advert vs. Auctions For benchrest, F-Class, Silhouette, Tactical or High Power rifles, you may get the best results posting a For Sale ad on a Forum that caters to the right discipline. You want your ad to reach the right audience. On the other hand, a GunBroker.com auction will have tens of thousands of potential buyers. Realistically, however, if you price your rig attractively, it should sell quickly in a Forum Classified Advert. Plus with conventional Classifieds, you can sell immediately — you don’t have to wait for the auction to end. For scopes and reloading equipment (but not firearms, actions, barrels etc.), also consider eBay, which still allows many gun-related items.
You’ve probably heard of cut-rifling, but did you know this process was invented in Germany nearly 500 years ago? Read on to learn more about how a cut-rifled barrel is made…
The cut-rifling process, used by leading barrel-makers such as Bartlein, Blake, Brux, and Krieger can yield a very high-quality barrel with a long useful life. Cut-rifled barrels have been at the top in short- and long-range benchrest competition in recent years, and cut-rifled barrels have long been popular with F-Class and High Power shooters.
You may be surprised to learn that cut-rifling is probably the oldest method of rifling a barrel. Invented in Nuremberg around 1520, the cut-rifling technique creates spiral grooves in the barrel by removing steel using some form of cutter. In its traditional form, cut rifling may be described as a single-point cutting system using a “hook” cutter. The cutter rests in the cutter box, a hardened steel cylinder made so it will just fit the reamed barrel blank and which also contains the cutter raising mechanism.
Above is a computer animation of an older style, sine-bar cut-rifling machine. Some machine features have been simplified for the purposes of illustration, but the basic operation is correctly shown. No, the cut-rifling machines at Krieger don’t use a hand-crank, but the mechanical process shown in this video is very similar to the way cut-rifling is done with more modern machines.
Read About Cut-Rifling Process at FirearmsID.com
To learn more about the barrel-making process, and cut-rifling in particular, visit FirearmsID.com. There you’ll find a “must-read” article by Dr. Geoffrey Kolbe: The Making of a Rifled Barrel. This article describes in detail how barrels are crafted, using both cut-rifling and button-rifling methods. Kolbe (past owner of Border Barrels) covers all the important processes: steel selection, hole drilling, hole reaming, and rifling (by various means). You’ll find a very extensive discussion of how rifling machines work. Here’s a short sample:
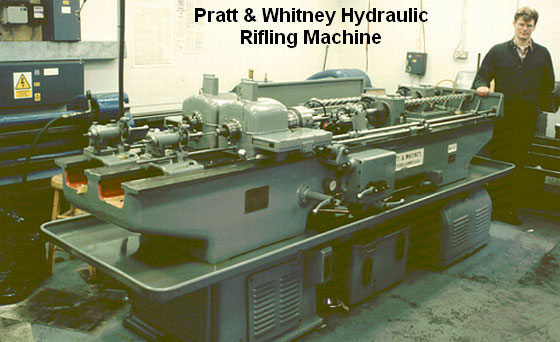
“At the start of World War Two, Pratt & Whitney developed a new, ‘B’ series of hydraulically-powered rifling machines, which were in fact two machines on the same bed. They weighed in at three tons and required the concrete floors now generally seen in workshops by this time. About two thousand were built to satisfy the new demand for rifle barrels, but many were broken up after the war or sold to emerging third world countries building up their own arms industry.
Very few of these hydraulic machines subsequently became available on the surplus market and now it is these machines which are sought after and used by barrel makers like John Krieger and ‘Boots’ Obermeyer. In fact, there are probably less of the ‘B’ series hydraulic riflers around today than of the older ‘Sine Bar’ universal riflers.
The techniques of cut rifling have not stood still since the end of the war though. Largely due to the efforts of Boots Obermeyer the design, manufacture and maintenance of the hook cutter and the cutter box have been refined and developed so that barrels of superb accuracy have come from his shop. Cut rifled barrel makers like John Krieger (Krieger Barrels), Mark Chanlyn (Rocky Mountain Rifle Works) and Cliff Labounty (Labounty Precision Reboring)… learned much of their art from Boots Obermeyer, as did I.” — Geoffrey Kolbe
Video find by Boyd Allen. Archive photos from Border Barrels in the UK.
Rimfire Benchrest can be fun and rewarding. It can also be frustrating because sourcing superior lots of ammo is a never-ending challenge. Still we like rimfire benchrest because you don’t need to load at the range. Plus rimfire barrels last a very long time (our friend Joe Friedrich set an ARA Benchrest record with a 100,000+ round-count barrel). Here’s a great video from the National Rimfire Benchrest Association of Ireland (NRBAI). Production quality is excellent! We highly recommend you watch this video, which does a great job illustrating both the fun and challenge of rimfire benchrest competition.
If you’ve never seen 50m Rimfire Benchrest competition, this video is well worth watching:
“If you need to get your mind away from everything… then look down a scope, concentrate, and be disciplined.”
“Comradery is one of our organization’s key traits… there are no barriers of gender, age or mobility. Just a very diverse, bunch of good people enjoying a sport together.”
“The skill, in brief, is having the ability to hit the equivalent of the top of a pinhead at 50 meters, in all conditions with a .22 round. Not easy, especially when you have to do it 50 times to get a maximum score of 500 [points], 250 per sheet.”
Back in the USA — The National 50 Benchrest League
If this article has motivated you to try rimfire benchrest competition back here in the good ol’ USA, there is a great organization that can help. Launched just a few years ago, the National 50 Benchrest League (N50) has easy-to-understand rules, and offers competition with a wide variety of rifles, even including air rifles. The whole idea was to make competition more affordable and get more shooters on the firing line. There are three classes — Pellet, Sportsman, and PRO. One can be very competitive in the Sportsman Class with a basic factory .22 LR rig or Air Rifle.
N50 competition is unique in allowing air rifle shooters to compete side-by-side with rimfire shooters. This allows folks to compete without the cost of expensive “top-dollar” rimfire ammo. Pellets are relatively inexpensive, and yes air is still free!
About N50 — The National 50 Benchrest League
Commentary by Joe Friedrich, Open Grove Benchrest
The National 50 Benchrest League (N50) offers a unique shooting experience. We shoot air rifles with pellets and slugs alongside .22 LR Rimfire shooters. We currently have sanctioned clubs throughout the USA offering competition and good fellowship.
N50 has three Classes: Pellet, Sportsman, and PRO. The first Pellet Class is strictly for pellet airguns ranging in calibers from .177-.30 using Diabolo-style pellets from various manufacturers.
The second class is the Sportsman Slug/Rimfire. This combined class allows any factory air rifle shooting commercially-made slugs in calibers from .177-.30 to compete against any factory rimfire that utilizes a factory-barreled action with no attachments to barrel. Pellet air rifles may also compete in this class.
The third class is the PRO Class, and no you do not have to have some magic card that says “Professional” to compete. This class allows purpose-built air rifles, and what we call “unlimited” rimfire rifles to compete. Three types of loads are allowed in PRO Class: .177 slug air-driven, .22 slug air-driven, and any .22 LR ammunition.
Another point — in N50, competitors are allowed to move up in class — you aren’t restricted to a “lower” division. For example, Pellet Class shooters can also move up to shoot in Sportsman and Pro. In addition, Factory rimfires are allowed in Pro Class. This way shooters with the less-expensive rifles can shoot more relays and also see how they compete with the unlimited rigs. It’s all about having fun.
We wanted to make N50 as simple as we could combining air rifles with rimfire so folks who have a factory rimfire can participate and have fun. We also did not want a lot of classes, so combining the two gun types would be simpler. To be honest we were worried that the rimfires will outpace the air rifles, but that was not the case at this year’s Nationals.
Air Rifle on beautifully crafted, plated Pappas Rest.
National 50 Benchrest League Rules and Course of Fire
The official N50 website, National50.net, lists N50 rules, classes, courses of fire, and membership requirements. There are currently 16 affiliated clubs nationwide, with more coming soon.
General Rules — Here are some of the more notable N50 General Rules that apply to N50 matches:
Target Distance: 50 yards
Match Times: 20 minutes per target
Targets: Official targets produced and distributed by N50
Aggregate Score: Cumulative score of 3 targets shot in sequence on same day
Scoring: No competitor shall score their own target
As far as hardware, N50 is pretty open. For all 3 classes, any scope is allowed and any trigger is allowed. For all 3 classes, stocks are unrestricted, stocks may be bedded, and rifle weight is unlimited. However, the Sportsman Class must retain factory barrel and action. N50 competitors in all classes may use 1-piece rests, 2-piece rests, bags, or bipods — whatever they prefer.
CLICK HERE for a free, printable version of the N50 practice target shown above. After clicking, SCROLL DOWN the page and you will see the left and right target sections that will print on 8.5×11″ paper. You can also purchase the Official N50 11″ x 17″ printed Match Targets for $25 per 100 plus shipping.
Credit Boyd Allen for finding this NRBAI Benchrest Video
Need some informative reading material for winter days? Here’s a vast resource available free from Sierra Bullets. Here are links to over 60 articles with information on bullets, ballistic coefficients, wind drift, up/down angles, temperature effects, tailwind effects and much more. Most of these resources come from the respected Sierra Reloading Manuals, 4th and 5th Editions. There are enough articles to read one per week for a year!
The U.S. Army Marksmanship Unit regularly publishes reloading “how-to” articles on the USAMU Facebook page. One very good article, part 5 of a 6-part series, focused on Progressive Presses. This article explains proper procedures for Auto-Indexing Progressives, which advance the shell-plate with every pull of the handle. Auto Progressives are very efficient, but they also require special attention and focus, because so many things are happening at once. You need to train yourself to watch every station. If you run a progressive press now, or are considering getting a progressive, we recommend you read this article. Visit the USAMU Facebook page for other helpful handloading guidance.
Progressive Loading Presses — Self-Advancing Shellplate Type
Recently, we addressed manually-operated progressive presses for the beginning handloader. This type press requires one to manually advance the shellplate after each handle stroke. An advantage for beginners is that nothing happens at any station until the loader wants it to. This helps users avoid problems from clearing malfunctions without noticing that the shellplate has advanced itself. (Read Previous USAMU Article on Manual Progressives.)
The next, more luxurious type progressive press advances the shellplate automatically whenever the handle is cycled. [Editor: This is also called an “Auto-Indexing” Progressive Press.] Typically, each stroke automatically sizes and primes a case, operates the powder measure (if used) and seats a bullet. Some also have case feeders that automatically put a new case in the shellplate with every cycle. Others require the loader to insert a case each cycle. With both types, the loader usually puts a bullet on each sized/primed/charged case.
[CAVEAT: While our Handloading Shop has several progressive presses, ALL of our powder charges are thrown/weighed by hand. We do not use powder measures on our presses. Our progressives are used for brass preparation, priming, seating, etc., but not for fully-progressive loading.]
The manually-advanced press can be a boon to beginners, but as one gains experience it can be a mixed blessing, depending on one’s style. If one pays close attention to every operation and loads without distractions, the manual press is very reliable and allows full scrutiny of each round as it is loaded. However, if one easily drifts into day-dreaming, or isn’t focused on paying careful attention at all times, the manual progressive can be a bit of a liability. The opportunity for forgetting a powder charge, leading to a squib load, is ever-present. [Editor: A lock-out die can help reduce the risk of a squib load, or a double-charge. See below.]
The automatically-advancing progressives help prevent this by ensuring a powder charge will be dropped each time the handle is operated. Experienced handloaders often appreciate this feature due to the savings of time and effort. Individual preferences between the two press styles are influenced by several factors. These include one’s comfort with more- vs. less-complicated mechanisms, how often one changes calibers (case feeders often must be converted, in addition to dies and shellplates), how many rounds one loads annually, relative ease of changing primer mechanisms from small to large, etc. Automatic progressives and their caliber conversion kits tend to be significantly more expensive than manual progressives and caliber conversions from the same maker.
One USAMU handloader, who likes simple, bullet-proof machines and maximum efficiency when converting presses, owns two manually-advanced progressives. One is set up for large primers, and the other for small primers. He can change calibers in the twinkling of an eye. As he loads for many different calibers, this fits his style. Another handloader here is just the opposite. He loads for a few calibers, but in larger quantities. He much prefers his self-advancing press with case-feeder for its speed. He makes large lots of ammo in a given caliber before switching, to improve overall efficiency. His caliber conversion kits are more expensive than those for the manually-advanced progressive, but he uses fewer of them.
Whichever type one chooses, it is VERY important to buy quality gear from a manufacturer with a long, well-established track record for quality, durability and good customer support. Avoid jumping on the “latest, greatest” model until it has a proven track record. For example, this writer knows a loader who got a brand-new, expensive, self-advancing model press some years back, shortly after its introduction. As is too often the case these days, the manufacturer released it before all the “bugs” were worked out.
Better Safe Than Sorry — the RCBS Lock-Out Die
RCBS Makes a “Lock-Out Die” that senses the powder charge. This will halt the Progressive press if you have a double charge, or an undercharge. Your Editor has the Lock-Out Die on his RCBS Pro 2000. It has “saved his bacon” a half-dozen times over the years. It can be used on Dillon and Hornady progressives as well as RCBS machines.
It would not fully seat primers to the correct depth. No amount of adjustment, extra force, or fiddling would do better than to seat primers barely flush with the case head. Any inattention could result in a slightly “high” primer, protruding above the case head. It created a risk for slam-fires, particularly in semi-autos without spring-retracted firing pins, such as the M1 or M1A. In desperation, he had a machinist buddy study the problem and machine a new part to correct it. No dice. Its engineering didn’t permit full primer seating, even with extended parts. He now wishes he’d heeded his shooting buddies’ advice to stick with the “tried and true,” reliable performer they all used.
Whichever press one selects, see if the maker has a kit or list of commonly-replaced parts. Having needed springs, pins, etc. on hand in the rare event that one breaks or “goes missing” can save the day when one is busy loading for a match! Another tip for improving one’s overall loading efficiency (rounds loaded with minimal set-up/tear-down time) is to plan one’s handloading by primer size. For example, if your machine is set to use small primers, load all the calibers that you intend to that take small primers, before converting the press to load large-primer calibers.
In our next chapter, we’ll discuss peculiarities of progressive loading for rifle cartridges, with remedies for problems such as excessive cartridge-case headspace variation when sizing, tips for ensuring best powder charge consistency, and so on. Until then, be safe, and good shooting!


 Gunsafes can be fitted with either an electronic keypad-style lock, or a conventional dial lock. In our Gunsafe Buyer’s Guide, we explain the important features of both dial and electronic lock systems. Many safe-makers will tell you that consumers prefer electronic locks for convenience. On the other hand, most of the locksmiths we’ve polled believe that the “old-fashioned” dial locks, such as the Sargent & Greenleaf model 6730, will be more reliable in the long run. CLICK HERE to learn more about the Pros and Cons of Mechanical (dial) Lock vs. Electronic (keypad) safe locking systems.
 Tips for Dial Locks
Replace Electronic Lock Batteries Every Year


 These days, online gun Auctions and Classifieds attract more attention than ever. With so many folks accessing the internet daily, many gun owners find it easier to sell their firearms online rather than in the local gun store. Online selling opens up a much larger audience. With over 76,500 members in the
 For benchrest, F-Class, Silhouette, Tactical or High Power rifles, you may get the best results posting a For Sale ad on a Forum that caters to the right discipline. You want your ad to reach the right audience. On the other hand, a GunBroker.com auction will have tens of thousands of potential buyers. Realistically, however, if you price your rig attractively, it should sell quickly in a Forum Classified Advert. Plus with conventional Classifieds, you can sell immediately — you don’t have to wait for the auction to end. For scopes and reloading equipment (but not firearms, actions, barrels etc.), also consider eBay, which still allows many gun-related items.
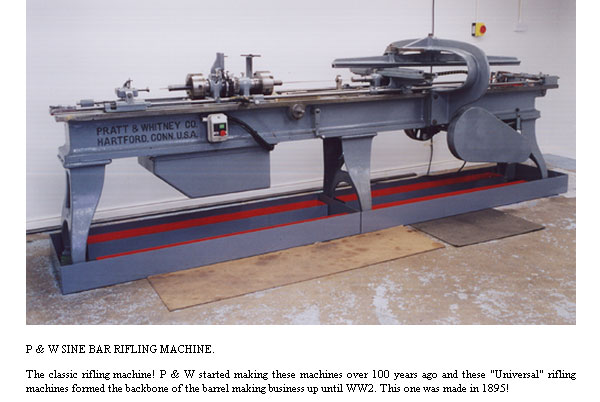


 If this article has motivated you to try rimfire benchrest competition back here in the good ol’ USA, there is a great organization that can help. Launched just a few years ago, the


