Well folks, Thanksgiving is just a week away. Looking for culinary inspiration for your holiday gatherings? The NRA Blog offers three special (and delicious) Wild Game Recipes for your family feasts: Honey Mustard Planked Wild Turkey Breast, Mushroom-Stuffed Wild Boar Roast with Black Truffle Sauce, and BBQ Brined Pigeon. These recipes come from some of the country’s best chefs, and they all seem mouth-watering. You’ll find a full list of ingredients plus step-by-step cooking tips.
One of the many advantages to hunting is the assortment of game you can gather that lasts for an extended period of time. Just because it’s Thanksgiving doesn’t mean you have to stick with a whole turkey from the store and a ham hock.
We have three unique spins on wild game recipes that will suit your dining table perfectly. Even if you’re one of those hunters who enjoys a quick hunt the morning of Thanksgiving, these recipes will make your holiday more delicious than ever. — NRABlog.com
Mushroom-Stuffed Wild Boar Roast with Black Truffle Sauce
Gettin’ Gobblers — Turkey Hunting Tips on GetZone Video
And for those folks who hope to harvest their own gobbler for the Thanksgiving holiday, GetZone.com offers a turkey hunting video with expert guidance on Turkey hunting, specifically stalking and shot placement: “When it comes to shotgun hunting, you don’t want to get BBs in the meat, so the most common (and lethal) shot with a shotgun is a headshot.”
This photo is from GetZone.com, a website that provides information on shooting and hunting. CLICK HERE to watch a GetZone video on turkey hunting. Work Warning: When you click photo, a loud audio track may start immediately, so turn down the audio volume.
NOTE: There are ten (10) shots in the group, but for simplicity we are only displaying five (5) shot circles. Adding more circles won’t change the measurement because the two most distant shots, which determine group size, ARE included.
What kind of 200-yard accuracy can you get in an enclosed, underground test range? Would you believe 0.162 MOA at 200 yards with a .338? Have a look at these test targets from Sierra Bullets. Like most bullet manufacturers, Sierra does live-fire bullet testing to ensure that Sierra projectiles perform as promised, with repeatable accuracy. Sierra tests bullets in its own underground test complex. Sierra’s 300-meter test range is the longest, privately-owned underground bullet test facility in the Western Hemisphere.*
Day in and day out, various bullet types are tested using a big collection of barreled actions. These barreled actions are clamped in stout, return-to-battery test fixtures. These big, heavy test fixtures provide near-perfect repeatability (with no human-induced holding or aiming errors).
Sierra Bullets 10-Shot Groups at 200 yards
Check out these 10-shot test groups shot at the Sierra Test Range at 200 yards. Note that the numbers listed on each sample are actual measurements in inches. To convert to MOA, cut those numbers in half (to be more precise, divide by 2.094, which is 1 MOA at 200 yards). For example, the 0.340″ middle group works out to 0.162 MOA at 200 yards.
Scan-Verified 0.162 MOA Accuracy at 200 Yards
To verify the accuracy of Sierra’s measurements, we measured the middle (.338 caliber) 10-shot group with our On-Target Group Measurement software. We registered a group size reading of 0.339″ — within one-thousandth of the Sierra measurement. The calculated group size in MOA (Minute of Angle) is 0.162.
That’s amazingly good for ten rounds of big .338 caliber bullets. A FIVE-shot 0.162 MOA group at 200 would be considered excellent at any benchrest match. But remember this target has TEN shots. The current, one-target IBS world record for ten shots at 200 yards is 0.245″, set by Ed Watson in 1999.
Bevy of Barreled Actions for Bullet Testing
Sierra Bullets uses dozens of barreled actions for testing bullets in its enclosed, 200-yard test range. Each barrel has its own logbook to track the barrel’s usage.
Click Photo to Zoom
*Even Longer Test Tunnels Exist in Europe: At Stadeln in Germany, RWS (now part of RUAG) owns a 500 meter tunnel (above ground level) which has existed for decades. In Thun, Switzerland, RUAG has a fully-instrumented 500 meter underground tunnel. Near Ulm, Germany, there is a 5-lane 300 meter underground shooting range that is open to the public.
Thanksgiving, November 28, is just 10 days away. In a few days, a large percentage of Americans will be on the road to visit relatives. We know many of our readers have concealed carry permits or will otherwise be traveling with firearms. When crossing into different states with guns in a vehicle, you need to be mindful of all state and local laws and restrictions.
Five Worst States for Traveling with Firearms
This article appears in the Cheaper Than Dirt Shooter’s Log.
The U.S. is a patchwork of confusing and cumbersome laws that change the rules of what you can carry, where you can carry, and whether you can possess the firearm, ammunition of magazine at without running afoul of the local laws. Now, if every state was like Vermont, law abiding gun owners could freely travel with their firearms with no worries. Unfortunately, many states have a history of being hostile to traveling gun owners.
The federal “Firearms Owner Protection Act” allows travel through any state as long as the firearm is unloaded, in a locked case, and not easily accessible to the passengers. However, that is not to say that certain states that are less friendly to firearms have not created their own laws that would snare unsuspecting otherwise law-abiding firearm owners. This led us to name the Top 5 States to Avoid while traveling with a firearm this holiday season.
CONNECTICUT
Connecticut does not have any gun reciprocity agreements with other states. This means nonresidents are not allowed to carry handguns in Connecticut under a permit issued by another state.
HAWAII
Every person arriving into the state who brings a firearm of any description, usable or not, shall register the firearm within three days of the arrival of the person or the firearm, whichever arrives later, with the chief of police of the county where the person will reside, where their business is, or the person’s place of sojourn. GET Hawaii Firearms INFO HERE.
MASSACHUSETTS
Massachusetts imposes harsh penalties on the mere possession and transport of firearms without a license to carry. Prospective travelers are urged to contact the Massachusetts Firearms Records Bureau at (617) 660-4780 or contact the State Police. GET Massachusetts Firearms INFO HERE.
NEW JERSEY
New Jersey has some of the most restrictive firearms laws in the country. Your firearm must be unloaded, in a locked container, and not accessible in the passenger compartment of the vehicle. The New Jersey Supreme Court ruled that anyone traveling within the state is deemed to be aware of these regulations and will be held strictly accountable for violations. If you’re traveling through New Jersey, the N.J. State Police website provides information regarding transporting firearms within state lines. GET New Jersey Firearms INFO HERE.
NEW YORK
Use extreme caution when traveling through New York state with firearms. New York’s general approach is to make the possession of handguns and so-called “assault weapons” illegal. A number of localities, including Albany, Buffalo, New York City, Rochester, Suffolk County, and Yonkers, impose their own requirements on the possession, registration, and transport of firearms. Possession of a handgun within New York City requires a New York City handgun license or a special permit from the city Police Commissioner. This license validates a state license within the city. Even New York state licenses are generally not valid within New York City unless a specific exemption applies. Possession of a shotgun or rifle within New York City requires a permit, which is available to non-residents, and a certificate of registration.
More Scary States for Gun Owners
Here are six other jurisdictions (five states and DC) where you need to be wary when traveling. California, for example, treats all handguns in vehicles as “loaded” if there is ammunition loaded into an attached magazine. It’s wise, when in California, to have handguns unloaded in a LOCKED case, with all ammunition or magazines in a separate section of the vehicle. These states (and DC) all have laws that can trap unsuspecting gun-owners. Be wary.
California
Delaware
Dist. of Columbia
Illinois
Maryland
Rhode Island
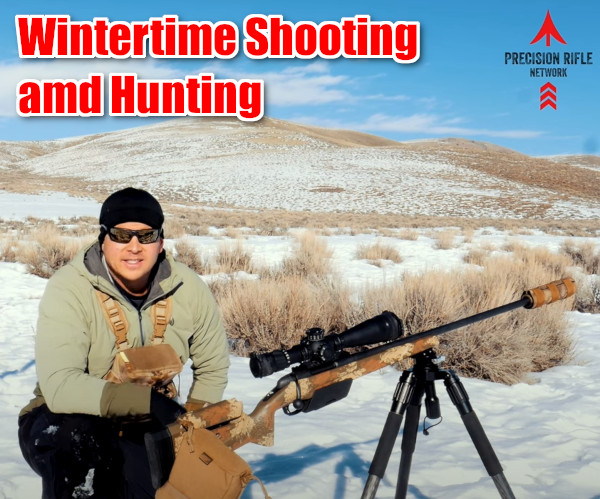
Winter is right around the corner, with December just two weeks away. Even now there is snow on the ground in Montana, Wyoming, Colorado and other northern and mountain states. And a major winter storm is predicted to hit America with snow and cold temperatures ahead of Thanksgiving week travel. Last week Denver had 20 inches of snow — the biggest November snowfall in over 40 years.
If you plan to go shooting or hunting in the weeks ahead, while the weather is below freezing and snow is on the ground, you need to be prepared. You should always have the right equipment and make sure that you can contact help if something goes wrong (such as not being able to start your vehicle).
The folks at the Precision Rifle Network have created a good video on winter shooting and hunting. Host Marcus Hom provides his TOP 10 TIPS for wintertime shooting/hunting adventures. We recommend that any 4-season shooter watch this video.
TOP 10 TIPS for Winter Shooting and Hunting:
1. Wear Good Sunglasses — With snow on the ground, wearing sunglasses is a must because of the extra reflected light. You can get good sunglasses that also have ANSI Z87.1-approved impact protection.
2. Wear Protective, Moisture-Proof Clothing — Wear a set of Bibs and a long jacket. This will prevent you from getting snow inside your clothing when shooting prone.
3. Take Care of Your Hands — Bring good winter gloves, preferably with a waterproof outer layer. Make sure the inner gloves can work with your trigger/trigger guard.
4. Bring a Good Tripod — A tripod keeps you elevated so you can avoid laying down in snow or slush. That, in turn, avoids body heat loss. “Keeping out of the snow and shooting from an elevated position is pretty important in the wintertime.”
5. Protect Optics and Action — Keep your scope lenses and action clear of moisture, snow, and fog. You will want to have good caps on both lenses. Make sure the action remains closed, and consider some kind of wrap over the action until you’re ready to load and shoot.
6. Ranging Challenges — Laser range-finders don’t perform optimally with intense, bright, ambient light. Also, if it’s showing you may get false readings from snow particles. So take multiple readings to ensure you have the right distance. Also, if you have a reticle with MOA or MIL marks, and you know the size of your target, then you can range the target with the scope.
7. Drop and Windage Info (DOPE) Chart — Bring a waterproof, hard copy dope chart. Out in the field on cold days, a phone battery dies fast, and you’ll want to preserve that battery for emergency phone use if needed. So, you should keep a good old-fashioned drop chart in a waterproof laminate.
8. Muzzle Velocity Issues — Cold temperatures can lower muzzle velocity. Before you go, get an idea of how your velocity will change with low temperatures. Some powders are more sensitive to temperature than others, causing a noticeable reduction in muzzle velocity. A load you’ve worked out in summer may shoot LOW in winter because the actual velocity is low. Even with a “temperature stable” powder you may see a 10 fps slow-down. Do some winter velocity testing if you can before you go.
9. Keep Your Ammo Warm — A simple way to avoid muzzle velocity changes with low ambient temperatures is to keep you ammunition ON YOUR BODY. Have a pouch under your layered clothing where the ammo can be kept relatively warm. See video: 07:50
10. Safeguard Keys and Valuables — Keep keys and valuables in a secure, zippered pocket. “There is nothing worse than losing something… keys, phone, wallet. It’s really hard to find something when its buried under [many] inches of snow”. We also recommend keeping a spare vehicle key hidden on your car/truck. There are magnetic holders that can keep that spare key secure but safely hidden from view.
Winter Hunting — Success with Snow on the Ground
There has been snow on the ground for much of November in many areas of the country. Hunters have had to cope with the snow and cold temperatures. Our hunting editor, Colton Reid, recently returned from a successful deer hunt in the mountains of Utah. He said it was beautiful, but you needed really high-quality outdoor clothing — otherwise you could get in trouble. You need to stay warm and dry.
With careful planning, and some skilled tracking, Colton had success, making a perfect hit on a buck at 300 yards. The animal dropped instantly. Colton brought back a good harvest of deer meat, which formed part of the Thanksgiving feast for his family.
Colton offered these 5 TIPS for hunters. These apply in any season, but are even more important in winter with freezing temps and snow on the ground:
1. Have a Plan — know where you plan to go and when. Try to be where you want in the early morning and early evening hours when deer are likely most active.
2. Take Your Time — If you spot a deer and get too excited and don’t take your time you may spook him. Go slow and glass. If possible, wait for the animals to bed down and relax. Then work out the best way to approach your prey. Remember, “You get so few opportunities, don’t screw it up!”
3. Glass More, Walk Less — Let your eyes do the walking — get good binoculars and use them. With their heightened senses of smell and hearing, deer/elk are able to spot you way better than you can spot them. If you are walking around a lot, chances are you are getting spotted by your prey.
4. Pace Yourself When Packing Out — If you DO succeed, and bring down a big buck, will you be able to dress the animal and carry out the meat? Always be prepared to hike out with extra weight. If you are successful, make sure not to waste the meat you worked so hard for. Choose a pack that can help you carry a heavy load. Remember, this is not an insignificant challenge — you may be carrying 60 to 100 extra pounds in addition to your other gear. Again, take your time. Rest as needed. Don’t hurt yourself.
5. Always Enjoy the Experience — Have fun, and appreciate your hunt, whether you bag a buck or not. It is a privilege to experience the wilderness and to get away from the city. Enjoy it while you’re out there. And keep your spirits up. You may get tired, but remember that ‘comes with the territory’. At the end of the day, yes you may be exhausted. And you may want to quit and go home. But stay positive, stay focused. Be patient, the experience is worth it.
Winter Solace in the Backcountry
There is a nice thread in our Forum appropriately entitled “Winter Time”. You’ll find some great backcountry images taken by our Forum members. Winter is a special time in the outdoors. Forum member JDP explains: “Winter is the best time to shoot! One of the few of life’s ironies that works in my favor. The range is empty and barrels keep cool, no bugs, no waiting on people, no mirage. Yup, this world needs more thin blooded snow birds. This cool weather is terrible and dangerous, tell your friends! Do people get lonely while shooting or something? It’s the true holiday season in multiple ways.”
Forum member DNorton posted: “I live way up north where our white sandy beaches look like this!”
The NRABlog has interviewed seven prominent lady shooters, asking them for tips for other lady shooting sports enthusiasts, particularly new shooters. Top female competitors such as 2016 Bianchi Cup Winner Tiffany Piper and Team S&W Co-Captain Julie Golob offer good advice on competitive shooting as well as using firearms for self-defense. Read the full article here.
Here Are Some of the Top Tips from Leading Ladies:
Theresa Vail, Hunter and Host of NRA All Access “If you’re new to shooting or wanting to start, find some girlfriends that are interested in trying it with you. Having female friends go to the range with you takes the pressure off and makes a typically male-dominant arena much less intimidating. There is such thing as strength in numbers!”
Tiffany Piper (Action Pistol): The best piece of advice I would give is practice makes perfect. In New Zealand, we barely get enough range time with our noise restrictions so muscle memory and technique are key. Study up on shooting techniques, watch YouTube videos of other professional women shooters, and try out what you see. Don’t get intimidated thinking it’s a male’s sport[.]”
Julie Golob (Team S&W, 3-Gun and Pistol): “If something isn’t clear, just ask about it! Shooters are some of the best people you’ll ever meet, but we can be confusing and use a lot of shooter slang and lingo. When in doubt, ask!”
Tori Nonaka (Team Glock): “I always recommend to new shooters to first concentrate on the basics of gun safety. That way they will be more comfortable when they next learn about the particular gun…. Their confidence will grow as they familiarize themselves with their specific weapon. Then, it’s all about practice at the range.”
Corey Cogdell (Olympic Trap Shooter): “It’s empowering for women to know how to use a firearm in a sporting atmosphere as well as for self-defense. So if you are new to firearms, check out your local gun club and take a lesson! There you’ll find instructors and other shooting sports enthusiasts who will be more than willing to help you.”
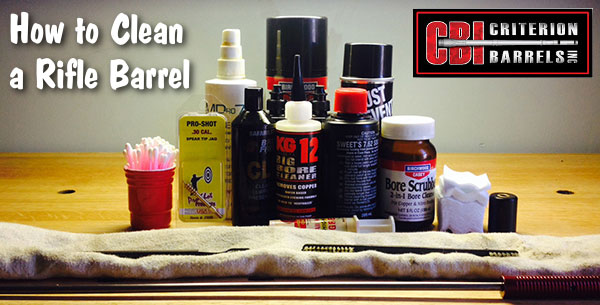
This article comes from the Criterion Barrels website. It provides good, conservative advice about barrel cleaning. Understand that cleaning methods may need to be adapted to fit the amount and type of fouling (and the particular barrel). In general, we do try to minimize brushing, and we follow the procedures Criterion recommends respecting the crown/muzzle. We have also had very good success using wet patches followed by Wipe-Out bore foam. Along with the practices outlined by Criterion below, you may want to try Wipe-Out foam. Just be sure to use a fitted cleaning rod bore guide, to keep foam out of the action recesses and trigger assembly.
The above video shows how to apply Wipe-Out or other bore-cleaning foam. We use a slightly different method. First, we use 3-4 wet patches to remove loose carbon fouling. Then we apply the foam as shown, but usually from the muzzle end (with bore guide in chamber). Here’s the important point — after 20-30 minutes, once the bubbles have dissipated, we apply the foam a second time, getting more of the active ingredients into the barrel. We then patch out, as shown, after 3-4 hours.
What is the Best Way to Clean a Rifle Barrel?
We are asked this question quite frequently alongside requests for recommended break-in procedures. Improper barrel cleaning methods can damage or destroy a barrel, leading to diminished accuracy or even cause a catastrophic failure. When it comes to barrel maintenance, there are a number of useful techniques that we have not listed. Some techniques may work better with different barrel types. This series of recommendations is designed to incorporate a number of methods that the Criterion Barrels staff has used successfully both in the shop and on their personal rifles. Please feel free to to list your own recommendations in the below comments section.
We recommend the use of the following components during rifle cleaning:
• Cloth patches (sized for the appropriate caliber)
• Brass jag sized properly for your bore [Aluminum and Nylon Jags also work]
• One-piece coated cleaning rod
• General bore cleaner/solvent (Example: Hoppes #9)
• Copper solvent of your choosing (Example: Sweets/KG 12)
• Fitted cleaning rod bore guide
• Plastic AP brush or toothbrush
• Q-Tips
• Plastic dental picks
• CLP or rust preventative type cleaner
There are a number of schools of thought relating to the frequency in which a barrel should be cleaned. At minimum we recommend cleaning a barrel after each shooting session to remove condensation, copper, and carbon build-up. Condensation is the greatest immediate threat, as it can cause the barrel to rust while the rifle sits in storage. Copper and carbon build-up may negatively impact future barrel performance, increasing the possibility of a failure in feed or function. Fouling should be removed whenever possible.
The below tips will help limit the wear of different parts of your barrel during routine maintenance, helping extend the life of the barrel and improving its performance.
The Lands and Grooves
This portion of the barrel may experience reduced efficiency due to copper fouling and cleaning rod damage. If copper fouling takes place during the initial break-in of the rifle, make sure to check our barrel break-in article.
For regular maintenance we suggest using a single piece coated cleaning rod rather than the traditional segmented rod or bore snake. While segmented rods and bore snakes may be convenient for field use, the corners between the segments may bow out and catch on the lands, scraping along the length of the rifling. Residual grit and particles from expended cartridges may also get caught between segments, resulting in an abrasive surface working its way down the length of the barrel. Most bore snakes will remove significant amounts of carbon fouling, but may fall short in the removal residual carbon buildup and copper fouling during deep cleaning. Good rods can be sourced from multiple manufacturers, but we have found good results using both Pro-Shot and Dewey brand products.
General cleaning requires the use of patches rather than nylon or brass bore brushes. Brass brushes may be required when aggressive cleaning is required, but can lead to unnecessary wear on the barrel if used frequently. This is not due to the nature of the soft brushes themselves, but from the abrasive particles of grit that become embedded in the material that is being run repeatedly through the bore. We recommend the use of bore guides when cleaning from both the muzzle and breech. These bore guides will help serve to protect the crown and throat from cleaning rod damage.
If significant resistance develops while running the cleaning rod through the bore, no attempt should be made to force it in further. Back the rod out and inspect the barrel to determine the cause of the resistance. The jag may be pushing between a bore obstruction and the rifling, digging a divot into the barrel before pushing the obstruction back through the muzzle. One way to minimize the risk of a stuck rod is by utilizing a slightly smaller patch during the initial push.
The process of cleaning the length of the rifling is relatively straightforward:
1. Check to make sure the rifle is safely unloaded.
2. Carry out any necessary disassembly procedures prior to cleaning.
3. Remove bolt (if possible) and insert fitted cleaning rod bore guide in action.
4. Soak a patch in bore solvent (similar to Hoppes #9).
5. Center and affix the patch on the brass jag, inserting it into the chamber end of the barrel. A misaligned patch may cause the jag to damage the lands of the rifling, so make sure the patch is centered on the jag. [Note, an aluminum or nylon jag will not show a “false positive”.]
6. Run the patch the full length of the barrel, retracting it upon reaching the end of the muzzle.
7. Let the solvent sit for a minute.
8. Continue to run patches through the bore until carbon residue is minimized.
9. Run a dry patch through the bore to ensure carbon residue has been removed.
10. Soak a patch in copper solvent (Sweet’s or KG-12).
11. Run the patch through the bore, leaving it to sit for 3-5 minutes (do not let solvent sit for more than 15 minutes.*)
12. Repeat this process until no blue residue remains on the patches.
13. Run a patch of Hoppes #9 and a dry patch through the bore to neutralize the copper solvent.
14. Inspect the barrel prior to reassembling the rifle, verifying that no bore obstructions remain.
*Please note that some ammonia-based copper solvents may prove to be corrosive if left sitting in the barrel for an extended period of time. It is essential that these solvents be removed within 15 minutes to avoid ruining the bore.
The Crown
The crown is the portion of the barrel where the bullet loses contact with the lands and grooves and proceeds to exit the firearm. The area most critical to accuracy potential is the angle where the bullet last touches the bore of the barrel.
Avoid damage to this area by using a plastic toothbrush and CLP type cleaner to scrub the crown from the exterior of the barrel. Even the most minimal variation in wear to the crown will negatively impact barrel performance, so be careful to avoid nicking or wearing away this part of the barrel.
The 30 BR is an amazing little cartridge. However, 30 BR shooters do have to neck-up 6mmBR or 7mmBR brass and then deal with some issues that can arise from the expansion process. One of our Forum members was concerned about the donut that can form at the new (expanded) neck-shoulder junction. Respected bullet-maker Randy Robinett offers tips on how to deal with the “dreaded donut”.
The Forum member was concerned about thinning the brass if he turned his 30 BR necks after expansion: “Everything I have found on 30 BR case-forming says to simply turn off the bulge at the base of the neck caused by the old 6BR shoulder. I expanded my first case and measured the neck at 0.329″ except on the donut, where it measures 0.335″. Looking inside the case… reveals a groove inside the case under the donut. Now, it is a fact that when I turn that neck and remove the donut, the groove is still going to be there on the inside? That means there is now a thin-spot ring at the base of the neck that is .005 thinner than the rest of the neck. Has anyone experienced a neck cracking on this ring?”
Randy Robinett, who runs BIB Bullet Co., is one of the “founding fathers” of the 30 BR who help prove and popularize the 30 BR for benchrest score shooting. Randy offers this advice on 30 BR case-forming:
While the thinner neck-base was one of our original concerns, unless one cuts too deeply INTO the shoulder, it is not a problem. For my original 30BR chamber, thirty (30) cases were used to fire 6,400 rounds through the barrel. The cases were never annealed, yet there were ZERO case failures, neck separations, or splits. The case-necks were turned for a loaded-round neck diameter of .328″, and, from the beginning, sized with a .324″ neck-bushing.
The best method for avoiding the ‘bulge’ is to fire-form prior to neck-turning (several methods are successfully employed). Cutting too deeply into the shoulder can result in case-neck separations. I have witnessed this, but, with several barrels and thousands to shots fired, have not [personally] experienced it. The last registered BR event fired using that original barrel produced a 500-27x score and a second-place finish. [That’s] not bad for 6K plus shots, at something over 200 firings per case.
Check Out the 30 BR Cartridge Guide on AccurateShooter.com
You’ll find more information on 30 BR Case-forming in our 30 BR Cartridge Guide. Here’s a short excerpt from that page — some tips provided by benchrest for score and HBR shooter Al Nyhus:
30 BR Case-Forming Procedure by Al Nyhus
The 30 BR cartridge is formed by necking-up 6mmBR or 7mmBR brass. You can do this in multiple stages or in one pass. You can use either an expander mandrel (like Joe Entrekin does), or a tapered button in a regular dies. Personally, I use a Redding tapered expander button, part number 16307. This expands the necks from 6mm to .30 cal in one pass. It works well as long as you lube the mandrel and the inside of the necks. I’ve also used the Sinclair expander body with a succession of larger mandrels, but this is a lot more work and the necks stay straighter with the Redding tapered button. This button can be used in any Redding die that has a large enough inside diameter to accept the BR case without any case-to-die contact.
Don’t be concerned about how straight the necks are before firing them the first time. When you whap them with around 50,000 psi, they will straighten out just fine! I recommend not seating the bullets into the lands for the first firing, provided there is an adequate light crush-fit of the case in the chamber. The Lapua cases will shorten from approx. 1.550″ to around 1.520″ after being necked up to 30-caliber I trim to 1.500″ with the (suggested) 1.520 length chambers. I don’t deburr the flash holes or uniform the primer pockets until after the first firing. I use a Ron Hoehn flash hole deburring tool that indexes on the primer pocket, not through the case mouth. — Al Nyhus
Splatterburst 1″ circles, 62 per sheet, 10-pk $9.99. These can be pasted on other paper backers.
We’ve all seen conventional splatter targets with a single large black bullseye. When a shot hits the target, a halo (usually neon yellow) appears around the bullet hole. This makes it easier to see your shot placements indoors, or at long range outdoors. Today we feature a variety of other targets that also offer the cool halo/splatter effect. We’ve found grids, multiple bull targets, sheets with 62 one-inch circle pasters, handgun training targets, and even white background splatter targets (that produce black halos). Try out some of these targets for fun (kids love plinking with splatter targets).
Ruger has created a helpful set of online resources for new Firearm owners. The New Firearm Owner Resources site features a Fundamentals of Firearms Ownership Video Series, Industry Resources for local “hands-on” training, as well as information on safe storage. In addition, this online Resource Center offers a full library of product instruction manuals along with suggestions for recommended safety equipment.
There are a variety of informative videos, hosted by Mark Gurney, Ruger Director of Product Management. These short (2 min. on average) videos provide key information for new gun owners. If you have friends or family members who are new gun owners, they should watch these videos.
Introduction for New Firearms Owners
Safety Rules — The FOUR Fundamental Safety Rules
Range Safety Equipment — What You Need
This video reviews essential Eye and Ear Protection for shooters.
As wintertime approaches, many of our readers will be switching to indoor shooting for a few months. Practicing at indoor ranges can be fun with both handguns and rifles (with permitted chamberings). But indoor shooters must be aware of noise issues and general safety concerns.
There are important safety and behavior rules you need to follow at a gun range. Sometimes bad range etiquette is simply annoying. Other times poor gun-handling practices can be downright dangerous. The NRA Blog has published a useful article about range safety and “range etiquette”. While these tips were formulated with indoor ranges in mind, most of the points apply equally well to outdoor ranges. You may want to print out this article to provide to novice shooters at your local range or club.
8 Tips for Gun Range Etiquette
Story by Kyle Jillson for NRABlog
Here are eight tips on range etiquette to keep yourself and others safe while enjoying your day out [at the range]. Special thanks to NRA Headquarters Range General Manager Michael Johns who assisted with this article.
1. Follow the Three Fundamental Rules for Safe Gun Handling
ALWAYS keep the gun pointed in a safe direction.
ALWAYS keep your finger off the trigger until ready to shoot.
ALWAYS keep the gun unloaded until ready to use.
This NSSF Video Covers Basic Gun Range Safety Rules:
2. Bring Safety Gear (Eye and Ear Protection)
Eye and Ear protection are MANDATORY for proper safety and health, no matter if “required” by range rules or not. It is the shooter’s responsibility to ensure proper protection is secured and used prior to entering/using any range. Hearing loss can be instantaneous and permanent in some cases. Eyesight can be ruined in an instant with a catastrophic firearm failure.
3. Carry a Gun Bag or Case
Common courtesy and general good behavior dictates that you bring all firearms to a range unloaded and cased and/or covered. No range staff appreciates a stranger walking into a range with a “naked” firearm whose loaded/unloaded condition is not known. You can buy a long gun sock or pistol case for less than $10.
4. Know Your Range’s Rules
Review and understand any and all “range specific” rules/requirements/expectations set forth by your range. What’s the range’s maximum rate of fire? Are you allowed to collect your brass? Are you required to take a test before you can shoot? Don’t be afraid to ask the staff questions or tell them it’s your first time. They’re there to help.
5. Follow ALL Range Officer instructions
ROs are the first and final authority on any range and their decisions are generally final. Arguing/debating with a Range Officer is both in poor taste and may just get you thrown out depending on circumstances.
6. Don’t Bother Others or Touch Their Guns
Respect other shooters’ privacy unless a safety issue arises. Do NOT engage other shooters to correct a perceived safety violation unless absolutely necessary – inform the RO instead. Shooters have the right and responsibility to call for a cease fire should a SERIOUS safety event occur. Handling/touching another shooter’s firearm without their permission is a major breech of protocol. Offering unsolicited “training” or other instructional suggestions to other shooters is also impolite.
7. Know What To Do During a Cease Fire
IMMEDIATELY set down your firearm, pointed downrange, and STEP AWAY from the shooting booth (or bench). The Range Officer(s) on duty will give instructions from that point and/or secure all firearms prior to going downrange if needed. ROs do not want shooters trying to “secure/unload” their firearms in a cease fire situation, possibly in a stressful event; they want the shooters separated from their guns instantly so that they can then control the situation as they see fit.
8. Clean Up After Yourself
Remember to take down your old targets, police your shooting booth, throw away your trash, and return any equipment/chairs, etc. Other people use the range too; no one wants to walk up to a dirty lane.


 Scan-Verified 0.162 MOA Accuracy at 200 Yards


 With careful planning, and some skilled tracking, Colton had success, making a perfect hit on a buck at 300 yards. The animal dropped instantly. Colton brought back a good harvest of deer meat, which formed part of the Thanksgiving feast for his family.


 The 30 BR is an amazing little cartridge. However, 30 BR shooters do have to neck-up 6mmBR or 7mmBR brass and then deal with some issues that can arise from the expansion process. One of our Forum members was concerned about the donut that can form at the new (expanded) neck-shoulder junction. Respected bullet-maker Randy Robinett offers tips on how to deal with the “dreaded donut”.


