At the request of our Shooters’s Forum members, we’re repeating an excellent article by Steven Blair on wind reading. Steven, a top F-Class shooter, talks about mirage, topography effects, tail winds, and other subtle factors that can cause frustration for shooters. Steve explains that wind effects can be complex — there’s more going on than just velocity and angle. You need to notice things like berm locations and effects of temp changes over the course of the day.
Wind Reading Tips for Competitive Shooters by Steven Blair, Past California State Long Range F-Open Champion
Assess the Terrain and How the Wind Will Interact with It
Before you begin a match, take a few minutes to look around the range at the terrain, any obstructions, range topography (berms and backstop), and trees, buildings or structures that could affect wind flow over the range. Imagine what might happen if the wind was from the left or right, headwind or tailwind. Depending upon the direction, significant effects may be seen on range. A head or tail wind may ripple across the berms, causing elevation changes, both high and low. A tall side berm, like the east side berm at Ben Avery, may cause turbulence when the wind comes from that direction. Blocking features might shield most of the wind but a break along the range can funnel strong gusts through the gap with no other indications. Take a few notes about the effects of different wind directions and refer to them if the prevailing direction changes. (Tip courtesy Tony Robertson.)
Use a Spotting Scope, Even When Shooting a Scoped Rifle
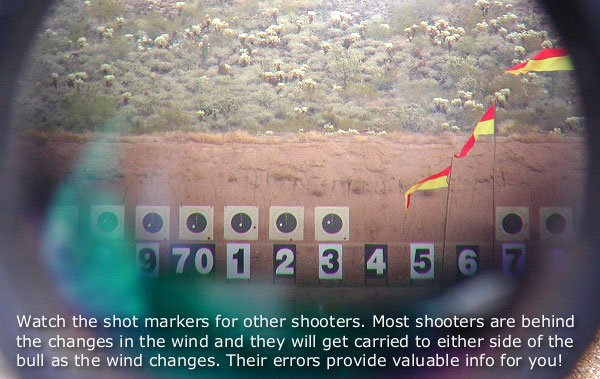
A good spotting scope can “see” mirage much more clearly than even an expensive rifle scope. Take your spotting scope to the line and position it as sling shooters do, close enough to use without much movement. Focus the scope approximately 1/3 of the way down range or where the most significant wind effects are likely to occur. Take a quick look while waiting for pit service, glance at the flags and compare to your scope sight picture. I often see ambiguous indications at the target through the rifle scope, but see a clear indication of wind direction and speed through the spotting scope at the shorter distance. When shooting the Arizona Palma Championship at Ben Avery last weekend, I was scoring while the wind was coming from the east. Shooters up and down the line were out to the left, losing points. Mirage at the target looked moderate and the flags weren’t indicating strong wind. As I focused the spotting scope back, the mirage suddenly looked like it was flowing twice as fast around 500 yards than it was closer or farther. It wasn’t until I realized that the access road cut through the berm there that I understood what was happening. (Tip courtesy Gary Eliseo.)
Don’t Over-React to Something That May Be an Anomaly
On ranges with sizable berms, a headwind or tailwind can cause significant elevation problems. It is generally not possible to see or predict when this will occur. When the conditions exist that cause elevation changes and other competitors are experiencing the same problem, the best strategy is to ignore it. Certainly, avoid shooting when the head or tail wind is gusting, the same as you would in a crosswind. But, if you react to random, range-induced elevation changes, the only likely result is to make it worse. Whether the problem is caused by range or ammunition, maintain your waterline hold until you have evidence that something has fundamentally changed.
My .284 Shehane will usually require a click or two down during a string as the barrel warms. That is normal and manageable. But, if your shots are just bouncing up and down in the 10 ring, leave it alone. The same is also true of an occasional gust pushing a shot into the 9 ring. If the conditions have not changed and one shot just went out, it may be the result of a random occurrence that was not predictable. (Tip courtesy “School of Hard Knocks”.)
Adjust Spotting Scope Focus and Magnification as Needed to View Mirage vs. Target Details
In F-Class we only need to see mirage, spotters, and scoring disks. That does not take a lot of magnification. My scope is a Nikon 25-75x82mm ED. It is a superb scope for the money and makes it trivial to see minor variations in mirage. It is good to have the high magnification available, and it can always be reduced if necessary. I use different power settings for different situations.
Setting Magnification Levels
During a match, in very good viewing conditions, I set my spotting scope at 75X, full power. The mirage is more subtle in the morning and greater magnification is needed.
During a match with heavy mirage I set my spotting scope at about 40X. I have no problem seeing mirage, even at this magnification.
When practicing at 300 yards or closer I set my spotting scope at max power (75X) so I can see the little 6mm holes from my 6BR rifle. I usually need to focus back and forth between shots to see both bullet holes and mirage.
Steven Blair, 2012 California State Long Range F-Open Champion, has been shooting since childhood and competing for over 30 years. Before retiring, Steve spent 16 years in Engineering and IT with General Atomics. He has held Engineering and Marketing positions with several firearms companies and worked on projects from pistols to 155mm howitzers.
In our Shooters’ Forum, there’s an interesting thread about a very light hunting rifle. Featuring a Defiance ultra-light all-steel action, this 6.5×57 Lapua lightweight tips the scales at just 4.93 pounds including scope and rings! For reference, a half-gallon of milk weighs 4.3 pounds, so this rifle is LIGHT! Here’s a report from the proud owner who built the rifle for a future Kodiak Island Alaska mountain goat hunt.
Ultralight Rifle Report by Forum Member Dave
I decided I wanted the challenge of a Mountain Goat hunt after I turn 60. It was the perfect excuse to put together an ultralight, something I had wanted to do for years. I wanted to see how light a bolt action rifle could actually be. My goal was to stay under 5 pounds, without going to a Titanium action, including rings and scope. I knew this would be difficult but I did manage to achieve the goal.
I started with a Defiance anTi model Rem Model 7 short action. This is an extremely smooth action that weighs just 19.2 ounces in this size. I had Carson Lilja of Lilja Barrels program a barrel taper to my dimensions for a 6.5mm 1:8″-twist stainless, 3-groove 22″ barrel. As fitted in the rifle, the barrel is free-floated except for the first inch or so forward of the action.
Other rifle components are: Bix n Andy Dakota trigger, aluminum trigger guard, blind magazine with an aluminum follower, titanium action screws, and a Leupold 3-9X lightweight optic in Talley rings. I also had an aluminum adapter installed in the for-end to accept a magnetic mount Javelin carbon fiber bipod.
The rifle was chambered up in 6.5×47 Lapua by my friends at Sportsman’s Outfitters in Knox, Pennsylvania. Then I sent the barreled action to Wayne at Oregunsmithing (Pendleton, OR) to have a Kevlar stock built. The stock weighs a whopping 14 ounces! When it came back I had everything Cerakoted (see bottom photo before coating). This stock was a full custom, built around my barreled action. Wayne’s work was reasonably priced with a 3-month turn around.
Excellent Accuracy — 5/8″ Three-Shot Groups at 100 Yards
Now it was time to shoot the rifle and I was not disappointed. It shoots both Barnes TTSX 100s or Swift Scirocco II 130s into 5/8″ at 100 yards. Off a bipod at 400 yards, three go into 3″ or so. This thing is crazy light even though it wears a 22″ barrel.
Without scope and rings, before Cerakoting the action and barrel, this 6.5×47 rifle tipped the scales at a mere 4.20 pounds (67.2 ounces). Check it out:
The 2024 NRA National Matches at Camp Atterbury, Indiana commence next week on July 22, 2024, and then run through August 19, 2024. Top rifle competitors will be looking to have their names associated with famous NRA perpetual trophies. This article covers the history of notable trophies including the Leech Cup, the Wimbledon Cup, and the Palma Team Trophy.
Shooting Sports USA has a fascinating article about the Perpetual Trophies awarded in national-level NRA matches. The story recounts the history behind the elaborate trophies, some from the 1870s. SSUSA’s Jennifer Pearsall writes: “The pieces of wood, stone and precious metal … are more than just instant recognition of achievement. They are the link of the American shooter’s present to his or her patriotic past. As you read this legacy of the NRA ranges, their founders, and the long list of cups, bowls, and plaques, realize that the history of competitive shooting is undeniably a significant part of the foundation of this country”. Read Full Trophy Story HERE.
The NRA was co-founded by Col. William Church and Gen. George Wood Wingate (ranked Captain at the time). Both Church and Wingate hoped to improved the marksmanship skills of American soldiers. One of the newly-formed NRA’s first actions was to issue: “An Act to Establish a Rifle Range and Promote Skill in Marksmanship”. That led to the opening of the famed Creedmoor Range, with a special inaugural match in June of 1873.
Many of the awards presented in the first NRA matches were cash or firearms. Some of these firearms were heavily embellished works of art. In the very first match, a member of the 22nd New York Regiment took home a gold-mounted Winchester Model 1866 valued at $100 — big money for the time.
In the 1870s shooting competitions were social as well as sporting events. Ladies and gentlemen came to watch and cheer the winners. This illustration, originally from Harpers Weekly, portrays the shooters and the viewing gallery at the 1876 Grand Centennial Championship—the “Palma” Match.
The Leech Cup — A Gift from Ireland
The Leech Cup was created for the first meeting of the American and Irish shooting teams. The elaborate cup was presented by Major Arthur Leech, captain of the the Irish team, to the Amateur Rifle Club of New York. This masterpiece of Irish silversmithing was later given to the NRA in 1901 by the New York Club. Today, the Leech Cup is the oldest trophy offered in overall NRA competitive target shooting, awarded through the National High Power Long Range Championships.
Michelle Gallagher with Leech Cup in 2013.
The Wimbledon Cup
The Wimbledon Trophy was a gift from the NRA of Great Britain. It was given, as a gesture of sportsmanship, after the the U.S. Team was denied the ability to compete in England’s Elcho Shield match, then limited to Britain, Scotland, and Ireland. To maintain friendly competitive relations, the British presented the Americans with a large, engraved, lion-footed tankard trophy to be awarded each year to the Champion U.S. long-distance rifleman.
The Palma Team Trophy
Originally named the Centennial Trophy, in honor of the Centennial celebration of the independence of the United States of America, the Palma Trophy was commissioned from Tiffany’s at a cost of $1,500. The trophy was a full-sized replica of a Roman Legion standard, executed in bronze with silver and gold inlay. On the banner of the standard was the legend, “In the name of the United States of America to the Riflemen of the world”. Above the banner was an eagle, bearing in its talons a wreath of palm leaves and a plaque on which was the single word, “PALMA”, the Latin word for palm tree, which was used by the Romans to signify victory, or the ultimate in excellence.
Because the word Palma was so easily seen, the trophy soon became known as the “Palma Trophy”, and by 1878 was referred to officially by that name. The original seven and one-half foot trophy is now lost, having not been seen since at least 1954. Serving in its place is a copy which was commissioned by Dr. Herbert M. Aitken of Eau Claire, WI. The copy was made from the original Tiffany blue-prints at a cost of $32,500. Dr. Aitken has given this copy of the Palma Trophy to the NRA for use in the Palma Match. The trophy is retained by the winning team until the next Palma Match.
In 2008, the Palma Trophy was returned to the NRA, and it was decided that the trophy, once refurbished, will travel to the host nation for the match every four years, then returned to the NRA for safekeeping.
The first competition for the Palma Team was a challenge match for which the British Commonwealth nations were invited. The match was fired in 1876 at the old Creedmoor Range on Long Island as part of the Centennial celebration of the United States. Teams representing Scotland, Ireland, Canada, Australia, and the United States took part. The match is currently fired on a four-year interval.
Adam Scepaniak, of The Guns and Gear Store, has written an interesting story about Prairie Dog Hunting in North Dakota. If a P-Dog safari is on your “bucket list”, you’ll want to read the full story in the Sierra Bullets Blog. Adam provides many tips that can help you plan a successful prairie dog adventure.
Prairie Dog Hunting in North Dakota with Sierra Bullets
It’s that time of year where lots of men and women point their vehicles westward and try to push the limits of their rifles on prairie dogs. [A few seasons back] I was a part of this group of people… while in northwestern North Dakota. CLICK HERE to Read Full Story.
Little Missouri National Grassland
Once my hunting party arrived at the Little Missouri National Grassland in North Dakota we immediately began scouting for prime prairie dog towns. There is a certain amount of strategy involved in choosing a prairie dog town … for several reasons. For one, you should try to always stay “above” the prairie dogs.
Small objects like rocks, cactuses, and prairie vegetation can easily obstruct your view if you’re shooting prone on a level plane. We encountered this in the first small prairie dog town we stopped and shot at. The prairie dog town was very visible while walking and standing, but once we laid down with our rifles on bipods the two-foot prairie grass became a severe obstruction. We shortly moved on because the small town became quick-studies to our shooting.
The second prairie dog town we hunted was at the base of a small ridge with a dried, cattle creek at the bottom. This area offered better shooting opportunities because we were above most of the prairie dog holes, and if we were not above them, a deep ravine separated us from the prairie dogs removing any obstructions from our rifle scopes which was our previous problem. This area had its own disadvantage though because of some other wildlife present. There were approximately fifty head of cattle in our close vicinity grazing, which was to no surprise because many ranchers utilize the National Grassland for grazing. We had to wait for the cattle to leave our area as to not have an incidental hit due to a rare ricochet. As the sun passed over the horizon we decided to return to this spot the next morning, but would change our shooting position to increase our advantage.
This Location Offered a Nice Overlook.
Zoomed Image Shows Individual Prairie Dog Mounds.
My previous varminting best was a 275-yard shot near Mobridge, South Dakota on a separate prairie dog hunting trip. With more experience and better reloading, Here in North Dakota I was able to make a solid hit on a prairie dog just over 400 yards which made me ecstatic! For a central Minnesota, shotgun-raised guy, I was pretty happy that my bullet selection and hand-loading ability produced a 125-yard improvement.
Once we cleaned and cased our rifles for the journey home we had shot a little over 200 rounds of my Sierra® reloads. This was a lot less than previous prairie dog trips I have been a part of, but our hit percentage was substantially higher as well. Traveling into a new area meant a lot more scouting and experimentation for us as a group. In future trips or hunts of your own, it can be very beneficial to schedule an extra day just for scouting[.]
Little Missouri National Grassland is a National Grassland located in western North Dakota. At 1,033,271 acres, it is the largest grassland in the country. Within its borders is Theodore Roosevelt National Park. The Little Missouri National Grasslands was once a part of the Custer National Forest, but is now a part of the Dakota Prairie Grasslands, a National Forest unit consisting entirely of National Grasslands. A predominant feature of the grassland is colorful and beautiful badlands, a rugged terrain extensively eroded by wind and water. It is a mixed grass prairie, meaning it has both long and short grass.
The boundaries of the grasslands on certain maps can be misleading. Within the boundaries of the national grassland are significant portions of state-owned and privately-owned land, much of it leased by cattle ranchers for grazing.
The grassland is administered by the Forest Service as part of the Dakota Prairie Grasslands from offices in Bismarck, ND. There are ranger district offices in Dickinson and Watford City.
The 2024 F-Class National Championships is just one month away. The event will be held in Lodi, Wisconsin from August 10th through the 17th, 2024 at the Winnequah Gun Club. The Mid-Range Championships run August 10-13, while the Long Range Championships run August 14-17.
We know many of our readers will be attending the F-Class National Championships, and a good percentage of them will be flying in from around the country. For these F-Class competitors, and other readers who will be flying with firearms this summer, we provide this article with practical tips for transporting your rifles.
Traveling with Firearms — Important Advice
Savage Arms offers a series of Shooting Tips in the Savage Blog. Here is a helpful article from Team Savage Shooter Stan Pate. This covers how to ship your rifle safely, and then re-establish zero properly when the gun is reassembled after transport.
Traveling with firearms can be stressful. You must comply with multiple regulations and then trust your expensive guns to airline baggage handlers. And after arrival you’ll need to put your rifles back together and confirm the zeros. This article offers helpful travel advice from Team Savage shooter Stan Pate. Pate has traveled the globe competing with match rifles. Here he shares his tips for making trips easier on you and your firearms.
Easier Air Travel With Firearms
TSA isn’t nearly as careful with your rifles as you are. Proper storage before sending your firearm up a conveyer belt and into the belly of a plane is critical. Stan Pate spends lots of time each year traveling the skies and has devised a system for keeping his rifle safe when going to and from.
“Never travel with your firearm completely assembled,” Pate cautions. “A fully assembled firearm is much heavier [as a total unit] than one that has been broken-down and stored [in separate sections]. More weight creates more in-the-case movement, which can result in damage. I learned this the hard way years ago. My rifle was actually broken in half when traveling to an international competition. Record your torque settings, use those settings during reassembly and your return to zero should be no problem.”
“Be sure to check on current TSA rules and regulations before travel to be aware of any changes that may effect how you pack your rifles,” says Pate.
Rifle Reassembly and Resetting Zero
The quicker you can reestablish your zero, the quicker you can relax and stop worrying about if your rounds are going to hit their mark during competition. Pate, over the years, has developed a system for rifle reassembly and getting back to zero as quickly as possible. While his torque settings may not be the same as yours, the process can still be used.
“The barreled-action goes back on the stock, and then I tighten all three receiver screws finger tight,” says Pate. “Next, I tighten the front two receiver screws down to 35-inch pounds. The rear receiver screws on this particular rifle likes 15-inch pounds. [Note: Proper torque settings will vary with your action and stock type. Most actions have TWO screws, not three.] Scope attachment comes next, and I follow manufacturer settings when tightening it down. All that’s left to do now is go zero your rifle.”
This video explains an efficient method to Re-Zero your rifles
In the archives of The First Shot (the CMP’s Online Magazine), SGT Walter E. Craig of the USAMU discusses physical conditioning for competitive shooters, particularly High Power competitors. Fitness training is an important subject that, curiously, is rarely featured in the shooting sports media. We seem to focus on hardware, or esoteric details of cartridge reloading. Yet physical fitness also matters, particularly for High Power shooters. In his article, Craig advocates: 1) weight training to strengthen the Skeletal Muscle System; 2) exercises to build endurance and stamina; and 3) cardiovascular conditioning programs to allow the shooter to remain relaxed with a controlled heart beat.
SGT Craig explains: “An individual would not enter a long distance race without first spending many hours conditioning his/her body. One should apply the same conditioning philosophy to [shooting]. Physical conditioning to improve shooting skills will result in better shooting performance[.] The objective of an individual physical training program is to condition the muscles, heart, and lungs thereby increasing the shooter’s capability of controlling the body and rifle for sustained periods.”
In addition to weight training and cardio workouts (which can be done in a gym), SGT Craig advocates “some kind of holding drill… to develop the muscles necessary for holding a rifle for extended periods.”
For those with range access, Craig recommends a blind standing exercise: “This exercise consists of dry-firing one round, then live-firing one round, at a 200-yard standard SR target. For those who have access only to a 100-yard range, reduced targets will work as well. Begin the exercise with a timer set for 50 minutes. Dry-fire one round, then fire one live round and without looking at the actual impact, plot a call in a data book. Continue the dry fire/live fire sequence for 20 rounds, plotting after each round. After firing is complete, compare the data book to the target. If your zero and position are solid, the plots should resemble the target. As the training days add up and your zero is refined, the groups will shrink and move to the center.”
Fitness training and holding drills help position shooters reach their full potential. Here is 6-Time U.S. National Long Range Champion John Whidden.
Training for Older Shooters
Tom Alves has written an excellent article A Suggested Training Approach for Older Shooters. This article discusses appropriate low-impact training methods for older shooters. Tom explains: “Many of the articles you will read in books about position shooting and the one mentioned above are directed more toward the younger generation of shooters in their 20s. If you look down the line at a typical high power match these days you are likely to see quite a few folks who are in their middle 30s and up. Many people in that age range have had broken bones and wear and tear on their joints so a training program needs to take that into account. For instance, while jogging for an extended period for heart and lung conditioning may be the recommended approach for younger folks, it may be totally inappropriate for older people.”
Most bolt-action rifle shooters work the bolt with their trigger-pulling hand. This is because most rifles sold to right-handed shooters come with right-side bolts, while “lefty” rifles come with left-side bolts. This “standard” configuration requires the shooter to take his dominant, trigger-pulling hand off the stock to cycle the bolt, then re-position his hand on the stock, and “re-claim” the trigger. Often the shooter must lift or move his head to work the bolt, and that also requires him to re-establish his cheek weld after each and every shot. Not good.
This really doesn’t make much sense for precision shooting with fore-end support*. There is a better way. If you leave your trigger hand in position and work the bolt (and feed rounds) with the opposite hand, then you don’t need to shift grip and head position with each shot. All this requires is a weakside-placed bolt, i.e. a left bolt for a right-handed shooter or a right bolt for a left-handed shooter. The video below shows a “Lefty” working a right bolt. Note how efficient this is:
As our friend Boyd Allen explains: “If you think about it, if you are going to work with a factory action where your options are left bolt and left port or right bolt and right port, and you are building a rifle that will only be shot from a rest, using the left/left for a RH shooter or using a right/right for a LH shooter works better than the conventional configuration”.
Shoot Like a Champ and Work the Bolt with Your Weakside Hand
Derek Rodgers is a recent F-TR World Champion, a King of 2 Miles champion, AND is the only person to have won BOTH the U.S. F-Open and the U.S. F-TR National Championships.
And guess what? Derek runs this kind of “opposite” bolt set-up. Yep, Derek shoots right-handed with a left bolt. Though Derek is a right-hander, he shoots with a Left Bolt/Left Port (LBLP) action. He pulls the trigger with his right index finger, while working the left-side bolt with his left (weakside) hand. This allows him to stay in position, and maintain his cheekweld. He places his right hand on the grip, while manipulating the bolt (and feeding rounds) with his non-trigger-pulling hand.
Past F-TR World Champion and Past King of 2 Miles Derek Rodgers
This is the rifle with which Derek won the 2013 F-TR National Championship.
*For true standing, off-hand shooting (whether in competition or on a hunt), a conventional strongside bolt placement makes sense, since the non-dominant arm must support the front of the rifle all the time. When shooting from bipod or rest, it’s a different story.
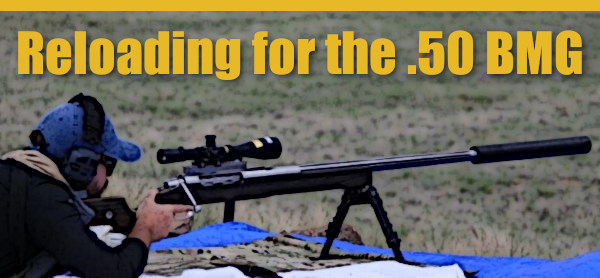
For today’s Sunday GunDay story we offer a short history of the legendary .50 BMG cartridge, tips on loading, and some fun photos from FCSA matches in the Western USA.
Fans of Heavy Artillery should visit Fifty Caliber Shooters Association (FCSA) website. There you’ll find range maps, photo collections and animated slide-shows On the FCSA photo gallery page, you’ll find a map. Click on any gray range link to see images from that venue. There are also a series of articles covering FCSA competition along with the “care and feeding” of the big 50-caliber rifles.
About the .50 BMG Cartridge
The .50 Browning Machine Gun (.50 BMG, aka 12.7×99mm NATO or 50 Browning) is a cartridge developed for the Browning .50 caliber machine gun in the late 1910s, entering official service in 1921. Under STANAG 4383, it is a standard cartridge for NATO forces as well as many non-NATO countries.
John Browning had the idea for this round during World War I in response to a need for an anti-aircraft weapon, based on a scaled-up .30-06 Springfield design, used in a machine gun based on a scaled-up M1919/M1917 design that Browning had initially developed around 1900. According to the American Rifleman: “The Browning .50 originated in the Great War. American interest in an armor-piercing cartridge was influenced by the marginal French 11 mm design, prompting U.S. Army Ordnance officers to consult Browning. They wanted a heavy projectile at 2700 FPS, but the ammunition did not exist. Browning pondered the situation and, according to his son John, replied, ‘Well, the cartridge sounds pretty good to start. You make up some cartridges and we’ll do some shooting’.”
Are you a died-in-the-wool .50 BMG fan? Got a hankerin’ for heavy artillery? Then visit the FCSA Photo Gallery page. There you’ll find hundreds of photos from Fifty Caliber Shooting Association (FCSA) matches and 50 Cal fun shoots in eleven states plus Australia, Switzerland, and the United Kingdom. To access the photos from the Gallery Page, start by selecting a shooting club and state with the brown buttons. After selecting the location, then click on the colored buttons for the event date.
Photo sets go all the way back to 2002, so you can see the evolution of the hardware over the years. Sample multiple archives to see the differences in terrain from one range to another — from Raton’s alpine setting to the hot, dry Nevada desert. This Gallery is really a treasure-trove of .50-Cal history. Here are a few sample images.
Reloading Powder and Special Tools for .50 BMG
Alliant’s Powder for 50-Caliber Applications
In 2009 Alliant unveiled Reloder 50, a slow-burn-rate powder designed primarily for long-range, .50-caliber rifle shooters. According to Alliant, the burn rate is “a little slower than Winchester 860″ and the powder is showing excellent lot-to-lot consistency. Load density is optimized for the 50 BMG and similar cases. Like Reloder 17, Reloder 50 employs a process which penetrates the kernels with the burn-rate-controlling chemical. This should allow a longer, flatter pressure curve, yielding more velocity than conventional powders can deliver. Alliant says that Reloder 50 offers “superior velocity and the ability to burn cleaner (with less residue)”. Reloder 50 comes in both 1-lb (#150527) and 8-lb (#150528) containers.
Forster and Lyman .50 BMG Trimmers
Big Fifty enthusiasts asked for a dedicated .50 BMG case trimmer, so Forster and Lyman created .50 Cal trimmers specifically for that cartridge. The cutter tip on the Forster .50 BMG Case Trimmer is much sharper than the cutter on the Lyman 50 Cal AccuTrimmer. However, with the Forster tool you will pay more for that superior cutting ability — the Forster .50 BMG trimmer is $125.18 at Precision Reloading compared to $85.21 on Amazon for the Lyman .50 BMG trimmer. Our advice is go ahead and pay the extra money for the Forster — the cutter head is much sharper, and we prefer the Forster’s collet-style case-holder. The Forster gets the job done more quickly, with less effort. NOTE: Grab the Forster while you can — we believe Forster has halted production (but it is still in stock at Precision Reloading and some other vendors).
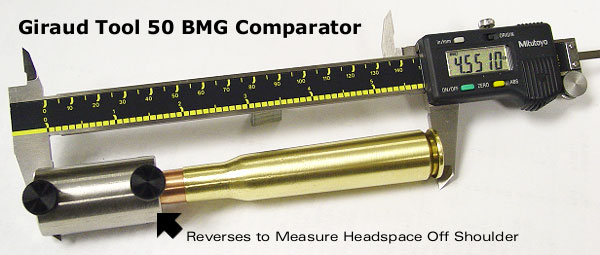
Giraud .50 BMG Case/Bullet Comparator Giraud Tool makes a comparator for 50-Cal cartridges. The double-ended comparator is quite versatile. In one orientation you can measure base-to-ogive bullet length and also measure cartridge OAL from rim to bullet ogive. When reversed, you can use the comparator to measure cartridge headspace. The $33.00 Giraud .50 BMG Comparator gauge is constructed of 303 stainless and fits most any vernier, dial, or digital caliper. CLICK HERE for more info.
Here is an important safety reminder for readers who employ hand priming tools with trays of multiple primers. In this instance a primer detonated while being seating in a pistol cartridge case. This caused a “flash-over” which instantly ignited multiple other primers in the tray. That, in turn, caused a small explosion which broke the tray and Hornady Handheld Priming Tool. The user, a Forum member, reported this in our Shooters’ Forum in 2021.
Report by Forum Member about Primer Flash-Over Incident
I had a small scare the other day while reloading. My experience might be a helpful reminder to people to keep safe and follow proper procedures and not be sloppy.
A primer popped (went off) when being seated and (while hot) flashed over into the tray causing other primers in the tray to detonate. That, in turn, broke my Hornady Handheld Priming Tool and injured my hand.
Here is my loading area after the incident. Note the damage to the hand priming tool. I’m not not sure where the rest of the pieces are.
Injuries to User — Multiple Cuts on Hand and Forearm
This photo shows the resulting cuts to hand. Fortunately they seem superficial. Note — I was wearing latex gloves so my hand had some protection.
The blast also blew my glasses off my face and they landed about six feet away. Be careful folks and wear your eye protection! EDITOR: Guys — This is yet more compelling evidence why handloaders should always wear eye protection!
More Details — Primers Were Federal LP, Case Primer Pockets Had Been Checked
The forum member noted: “Just in case people are interested, I didn’t notice anything different from usual. Cases were Privi Partizan (PPU) factory brass on their fourth firing. The primers were Federal Large Pistol. The cases had been ultrasonic cleaned and the primer pockets checked prior to priming. I had primed around 50 cases during this session before the accident.”
Here is a close-up of “flashed” primers — note the empty but dented cups and triangular “anvils”:
Two other Forum members reported feeding issues with this particular Hornady handheld priming tool and one other member, Kiwi Greg, suffered a multi-primer detonation causing injury: “I had the same thing happen a few years ago now with the same Hornady hand primer with 50-75 [Federal 215M primers] in the tray. Made a bit of a mess of both my hands, blew primers and tray all around my large workshop. Scared the [heck] out of my employee who was near me at the time. Some stitches, bandages and it was all good, [but with] some wicked scars… I think a primer had turned side-on when being put into Bertram .408 CT brass which had nice tight pockets and required more force than usual. I use RCBS [priming tools] now with a flat bar that slides across to prevent sympathetic detonations. I hadn’t heard of it before, but found out it wasn’t that uncommon after it happened.”
Are you looking to get started in tactical/practical competitions? Or perhaps you already have have some PRS/NRL experience but want to upgrade your equipment and enhance your match results. Here are eight videos that can help you improve your game. These videos feature top PRS/NRL competitors and knowledgeable manufacturers’ representatives. You’ll find other related videos on the Long Range Precision Shooters YouTube channel.
How Accurate Are the Top PRS Shooters?
In this video, MDT put three top centerfire PRS shooters to the test, running them through some of the most difficult stages. The goal? To showcase the level of accuracy and precision these top shooters can achieve. From shooting off barricades to hitting targets from rooftops and rocks, these shooters demonstrate why they are considered among the best in the world. Top-tier modern PRS/NRL rifles when shot prone from a bipod at 100 yards can do 1/3-MOA or better for three shots.
Building a Custom PRS/NRL Rig
Action, trigger, barrel, chassis, rails, and optics — this video from Burris covers all the key components of the modern PRS/NRL rifle. This video discusses the pros/cons of various configurations and the explains what to look for in a PRS/NRL riflescope.
PRS Tactical Division Explained
In this video MDT Shooter Matt Stiner explains the basics of competition in the PRS Tactical division. The video covers rifle, cartridge choice, optics, and key accessories. He also explains how to set up your PRS Tactical rig for best results. In addition Matt talks about bullet and brass options.
Shooting a PRS Match for the First Time
Here’s an amusing video from the land Down-Under — Australia. The video covers a club PRS match, showing various shooting positions. Around the world, the PRS discipline is growing rapidly, particularly with younger marksmen under 35. The matches are fun and fast-paced and the sport is much more dynamic and physically challenging than benchrest or F-Class competition.
Building Your Rig — Gear and Cartridge Selection for PRS/NRL
Part of a Firearms Depot PRS mini-series, this video covers gear and cartridge. Host Adam delves into the core elements that craft a winning setup. The video covers factors to consider when choosing a cartridge. The video also discusses chassis and barrel selection. Along with the gear talk, the video covers factors to consider when selecting a smith to help with chambering and rifle building.
Road to the PRS
This video from Kestrel offers good advice on getting started in PRS/NRL shooting. Experts demonstrate multiple shooting positions and offer advice on shooting from barricades. Topics covered include rate of fire, scope use, and equipment selection.
Savage 110 Elite Precision — Good Production Class Choice
This Alabama Arsenal video shows the Savage 110 Elite Precision on PRS Match stages using bags, tripods, and bipods, firing from stone barriers, field frames, and wood platform supports. If you are in the market for a PRS rifle, this video, which now has 355,000 views, is well worth watching. It covers specific features including trigger, chassis, magazines, and Atlas attachment. NOTE: The price limit for Production Class has risen significantly over the years, with a current MSRP max of $3000 for the rifle and $2500 for the optic.
PRS on a Budget — Converting a Basic Rifle for PRS Use
Top of the line rifles for competition are exceedingly expensive, but there is another option if you have a rifle in the safe that doesn’t get much use. Top F-Class shooter and wind coach Keith Glasscock notes: “I converted my .223 Remington varmint rifle into a Tactical class/PRS training rifle to save costs on ammunition and barrels so I can get better, faster.” Keith shows a very logical way to get started in the PRS/NRL game.


 Setting Magnification Levels


 The Palma Team Trophy
 Little Missouri National Grassland


 In the archives of


 For today’s Sunday GunDay story we offer a short history of the legendary .50 BMG cartridge, tips on loading, and some fun photos from FCSA matches in the Western USA.


 Alliant’s Powder for 50-Caliber Applications

 Report by Forum Member about Primer Flash-Over Incident


