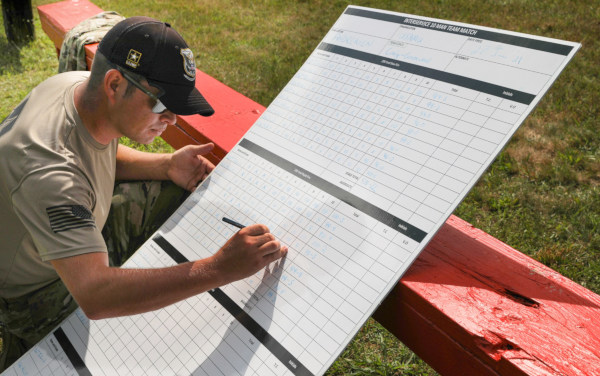
Each summer for the past 100 years, the nation’s top Service Rifle Teams have competed in National Trophy Infantry Team (NTIT) Match at Camp Perry, Ohio. In this match, known informally as the “Rattle Battle”, six-member teams shoot at 200, 300, 500 and 600 yards with time limits — 384 rounds total. To win this match, the six shooters must work like a finely-tuned machine. This is a popular match with spectators as there is plenty of action in a short time span.
The National Trophy Infantry Team Match (NTIT) was first fired in 1922. Only four civilian teams have ever won the prestigious Infantry Trophy that goes to the winner of this match. The first civilian team to win this honor (we are told) was the Massachusetts Team in 1929 followed by a Nebraska Civilian Team in 1930. Seventy-nine years later, in 2009, the California Grizzlies Junior Team won the Infantry Trophy.
The Infantry Trophy Team Match is a unique event where scoring is based on how many hits six-person teams, which begin the match with 384 rounds of ammunition, can score on banks of eight silhouette targets at distances of 600, 500, 300 and 200 yards during 50-second firing periods. The NTIT is sometimes called the “Rattle Battle” because it requires firing, moving to the next firing point with all gear in tow. The match emphasizes extremely fast, accurate fire and good communication among teammates. CLICK HERE for more information.
This video shows the winning 2011 NTIT team at Camp Perry. Six USAMU shooters started with a combined load of 384 rounds to be fired at 8 targets from 600 and 500 yards prone, then 300 yards seated, and finally 200 yards standing.
For the past two years (2021 and 2022) the USAMU-Greenwood Team has won the title with a 1431 score in 2021 and 1344 in 2021. The record team score for this match is 1466, set by the USAMU-Remily Team in 1996. For more information about this great team event, read Unraveling the Mystery of the Rattle Battle on the Shooting Sports USA website.
The National Trophy Infantry Team Match (NTIT) was first fired in 1922 and has been part of the the CMP’s annual National Rifle Matches at Camp Perry. The NTIT is called the “Rattle Battle” because it emphasizes extremely fast, accurate fire.
Our friend Grant U., who runs the Precision Shooting Journal on Facebook, says the NTIT is a special match, a real “crowd-pleaser: “The National Trophy Infantry Team Match (Rattle Battle)… was always one of my favorite team events. It takes a hell of a lot more planning, practice, and precision than one might expect. You get one shot at it and the entire team had better be running on all cylinders because there are no alibis. Each team of six shooters is allocated 384 rounds and when the teams fire at 600 and 500 yards, it sounds like a war.”
SFC Brandon Green, one of the nation’s finest marksmen, won the 2018 NRA High Power Rifle Championship at Camp Atterbury, Indiana.
PHOTOS courtesy U.S. Army Marksmanship Unit. U.S. Army photos by Michelle Lunato/released. See more on USAMU Facebook Page.
The U.S. Army Marksmanship Unit (USAMU) has created a series of instructional videos about High Power Rifle shooting, Service Rifle shooting, 3-Gun matches, and pistol competition. We’ve linked five of these informative USAMU videos today along with a special profile video on Amanda Elsenboss, who, as a USAMU shooter, has won both the Long Range and High Power National Championships in recent years.
In addition, as a major BONUS, we link twenty (20) informative articles authored by expert USAMU shooters and coaches. Those excellent, detailed articles covering a wide range of topics including rifle positions, wind reading, fitness training, trigger control, nutrition, training plans, and much more.
Amanda Elsenboss — National HP and Long Range Champion
The gifted SSG Amanda Elsenboss won the 2019 NRA Long-Range Championship and the 2021 High Power National Championship. In 2022 Amanda also won the National President’s Rifle Match, the first woman ever to do so. Those accomplishments place Amanda among America’s legendary shooters. Amanda started shooting at age 8 with her father, then began competitive marksmanship at age 13. In 2009, she joined the U.S. Army as part of the USAMU rifle team. She has left full-time service, but is now a member of the Pennsylvania National Guard.
Sight Alignment and Trigger Control
In this USAMU Shooter’s Corner instructional video, SFC Kenneth Rose explains key elements of using sights on a service rifle. Rose also explain how to make the trigger pull at the optimum moment when the sights are perfectly aligned and steady.
How to Set Up Sling and Rifle for Prone Shooting
In this video, the USAMU’s SGT Jonathan Wannemacher explains how to set up a service rifle sling for prone rifle shooting. Wannemacher has earned a number of coveted awards including the the Distinguished Rifleman Badge and President’s Hundred Tab.
Rifle Grip, Stance, and Body Position for 3-Gun Action Matches
SFC Daniel Horner, now with SIG Sauer, is arguably the best 3-Gun action shooter on the planet. Horner has won multiple major 3-Gun Championships, shooting rifle, shotgun, and pistol in timed action matches. Horner’s speed, accuracy, and mobility is without peer. In this video, Horner shows techniques for AR-type rifle shooting in 3-Gun competition.
Amazing Trick Shot with Air Rifle
In this Trick Shot Tuesday video SPC Ivan Roe shoots a pill (at two different angles) off the top of a balloon. Very impressive shooting! Ivan hails from Manhattan, Montana and has been a notable member of the USAMU International Rifle Team.
How to Use Data Books During Matches
Data books can be very valuable tools during marksmanship training. In this video, USAMU shooter SGT Lane Ichord explains Data Book basics and how to log information during practice and matches.
BONUS: 20 Marksmanship Articles from USAMU Experts
USAMU shooters and coaches have written an excellent series of articles on highpower and service rifle shooting. Many of these originally appeared in The First Shot, the CMP’s on-line magazine. Here are twenty notable USAMU expert articles:
In recent years, the California Legislature has passed a series of laws restricting the rights of California gun owners. The latest example of anti-gun legislation will hit gun owners in their pocketbooks….
If you want to practice your marksmanship in California from now on, get ready to open your wallet and pay the taxman. With the passage of AB 211, signed into law by Gov. Gavin Newsom, California shooters who use paper targets at indoor ranges will have to pay a fee for every hole they put in paper — literally. This new law, codified in the California Penal Code, states that commercial gun ranges must collect a charge of $0.38 per shot, as established by holes made in approved paper targets. This fee, the “Target Tax”, can be raised in the future at the discretion of the California Dept. of Justice.
Here’s how it will work, starting June 1, 2023, when the new Target Tax law goes into effect at California indoor ranges. First, all shooters must purchase California DOJ-approved paper targets (you may no longer bring your own). When you purchase a certified target at an indoor range, your name and the number of targets you have purchased will be recorded in a state database. Then, after your shooting session, the targets must be scanned, with the number of shot holes recorded. A charge of $0.38 per scanned hole will be added as a line item for your range session, along with the DOJ target-processing fee of $5.00 per target.
With 30 holes, the new California target tax on this left target would be 30 x $0.38 or $11.40. Conversely, the tax on the target on the right would be just 38 cents, because there is only one hole, though five shots went through the same hole. Obviously, exceptional marksmanship skills can help reduce your target tax liabilities.
California Targets Must Be Culturally Tolerant and Non-Discriminatory
AB 211 also includes a series of provisions which specify the types of targets which may be purchased. First, as you might expect, all targets must be printed on recycled paper. Second, no target may contain any “hate speech” or “micro-aggressions”. Third, while targets may still show human silhouette-style outlines, any targets which depict a protected minority type or non-binary gender type are forbidden. Likewise, any target that shows discernable culture, religion, or national origin are forbidden. So, a target showing a bearded male wearing a turban would be forbidden. If you had such a target, the range owner would be required, under AB 211, to confiscate it. Shown below are two types of targets that would be illegal in California under AB 211. NOTE: It is unclear whether a zombie target would be allowed, if the Zombie is unknown gender, ethnicity, or culture.
by Colton Reid
In hunting, great opportunities are a rare and precious thing. Their scarcity and the difficulty in distilling clear lessons from those opportunities is what makes hunting one of the most challenging and yet most rewarding activities I have ever pursued. As Tom Hanks succinctly stated in A League of Their Own, “The hard is what makes it great.” But, in my recent hunt in Utah’s high country I was given not only a chance at some of the biggest deer in my life, but also two opportunities to harvest a trophy buck after a heartbreaking series of hard lessons learned.
About the Gear — Tikka T3 Lite in .30-06, SWFA Scope, Leica GeoVid 3200.com LRF Binoculars
Colton was using a Tikka T3 Lite* chambered for the .30-06 Springfield. The scope was an SWFA Super Sniper 3-15x42mm with 0.1 MRAD clicks. Colton painted the Tikka rifle and scope himself with a combination of colors for camouflage. The cheek pad is a piece of balsa wood Colton sanded to correct height and covered with a SKD tactical PIG rifle stock pack. For spotting and ranging Colton employed a set of Leica Geovid 3200.com 10×40 LRF binoculars. Carry bags were from Badlands.
Ammunition: For this hunt, Colton handloaded his .30-06 ammunition with Lapua brass and Sierra 165gr SBT GameKing bullets. Drop was approximately 13″ at 300 yards.
October Hunt in Utah’s Central Mountain Range
In late October I traveled to Utah’s central mountain range for one week trip in pursuit of mule deer. I have never hunted this area before and, to add difficulty, there were several snowstorms expected throughout the week. Simply stated, I was in for a tough hunt. Given the newness of the area and no opportunity to scout pre-season, my strategy was to spend the first couple of days hiking slowly between various vantage points to locate the best animal activity. I saw several mature bucks during this period, but none that I chose to harvest. On day three, my efforts were rewarded with one of those rare opportunities.
This buck was sighted early in the hunt in a family group of does. This image was taken through my Swarovski spotting scope. The buck was about 150 yards away.
Six inches of snow covered the ground. A storm had crept in the night before and began to color a forest of green and brown pines in a picturesque winter white. Snow was still falling as I started my morning hunt in a new area. The temperature, now in the low teens, was a constant reminder to keep my layers on and jacket zipped. I started my hike down a rugged ridgeline road, and periodically peeked through the adjacent pine trees to glass a hillside across a small valley. After several instances of stopping to glass with my Leica Geovid 3200.com 10×40 LRF binoculars, I spotted a monster grazing the exposed grass at the edge of a group of bare poplar trees. At 1100 yards I could easily tell this was a nice 4×4+ buck.
I sat and watched him for several minutes and noticed he was grazing near a group of does that were slowly moving down their hillside and towards the base of mine. The buck, however, was slowly moving up and to the right. If he continued this path he would soon be around the corner of his hill where I could not see. Concerned that he would move out of sight, I decided to attempt a speedy stalk in the hopes of cutting him off. My first mistake. Gathering up my gear, and not knowing the terrain, I took the most direct path I could see. My second mistake. The hope was a direct path would put me into an equivalent altitude on his hillside, where I could make an ethical and successful shot. At least, that was the plan.
As I descended the hillside, I soon realized that the does I spotted were funneling directly towards me. To avoid spooking them I began to traverse the hillside at my current elevation and move to an area that completely changed my site picture of the hillside and where I saw the buck. Great, I had “solved” one problem and created another.
In this new area, I proceeded to again move down my hill and up the buck’s hillside in the hopes of reaching my previously planned location. But, I had no idea what was in front of me. I could not see this “new” area when glassing on the ridge. And now I was close enough to the buck’s area that spooking another deer would likely push the buck. So I had to go slow, and waste time I didn’t think I had.
Moving along the hillside I eventually spotted the poplars that marked where I had seen the buck last. 600 yards away, the trees now obscured the area where the buck had been feeding. Seemingly my only option, I pressed on through the snow. As I reached the 400-yard mark I spotted a young buck and doe less than 50 yards in front of me. I was now faced with a choice to proceed forward and spook these two deer in front of me or move downhill around them and try to climb up directly below where I spotted the big one. I chose the latter. Mistake number 3. Once I moved 100 yards below the young buck and doe, I traversed sidehill directly below where I had spotted the 4×4+ and started my climb.
This buck was spotted among trees early in the hunt. Scroll down to see the larger buck that Colton took on Day 3 of his Utah adventure.
Creeping up to the edge of the poplar trees I saw lots of fresh sign and decided to load a round in the chamber. I couldn’t see very far in front of me due to the snow and slope of the hill, but it seemed I was close. Moving further into the trees I saw nothing but bare trunks and a snow-covered ground. A feeling of disappointment and frustration washed over me. I had missed my window. Without thinking I let my guard down and stood up, mistake number 4. Out of the corner of my eye I saw a blur of brown and white bound away through the trees, only catching glimpses a white rump and large antlers as the buck moved out of the poplar trees and around the corner where I lost sight of him. I was heartbroken. Exhausted and defeated I started back toward the ridge.
In the higher elevations there was snow everywhere. Winter wonderland in October Utah.
My long hike back to the road gave me time to think. I walked along the ridge of the hill where I spotted the buck and found that this location intersected with the road. As I trudged up the road to my truck, I learned that simply following the road would have given me a good vantage point of the poplar trees and obscured me from view until I reached the ridgeline of the buck’s hill. If only I had known this before!
The whole night I replayed the events in my head. Where did I go wrong? What could I have done better? I decided that my best way to learn from it and that the first hasty decision put me in a tough situation from which I made more poor decisions. If I had sat and watched the deer bed, I would have had more time to figure out an easier stalking route (like the road!) to get a clean and ethical shot above the animal. And since I saw lots of sign in that area, I decided to give it a second try the next day.
The next morning, I was back on the road and stopping at periodic vantage points to glass across the valley. The whole time I was thinking “will I really get a second bite at the apple”?
When I started to glass at the first opening, I slowly and methodically scanned the poplars where I had seen deer the day before and caught a glimpse of a brown spot moving through the trees. I pulled out my tripod for more stability and focused on where I had seen movement.
Lo and behold a nice buck was limping along the trees toward a small grass patch. Yes limping. Having the failure of yesterday’s stalk very fresh in my head I decided to wait until I saw the buck stop moving. After some slow grazing, the buck bedded at the base of a large tree just above his grazing area. Now was the time to move above him.
Because the buck was moving slowly from his limp, I figured I had time to work my way around to the ridgeline that would offer me an ethical shot. Again, learning from yesterday’s failures, I walked along the ridgeline road and periodically glassed the area where the buck was bedded.
During these periodic checks I was not able to see the buck, but there was no reason to think the buck had moved. It also offered several advantages: I refreshed my site picture as I moved to different positions, I checked my range to the poplars, and I found the location and range to where I wanted to shoot. While I walked, I noticed a storm rolling in that would soon be make this stalk much harder. I continued along the road until I found the ridge of the buck’s hill intersected, and I turned to make my way towards the buck.
Click Photo for large, full-frame image of stalking path.
Walking through the trees and slightly below the ridgeline I moved to a spot perpendicular to where the buck should be bedded and crept toward the ridgeline. As I crested the ridge I moved carefully from tree to tree, checking the wind was anywhere but behind me and used my binoculars at each stop to relocate the buck. As I approached a large grassy opening between my trees and the poplars, I spotted him bedded down right where I saw him lay down. He was 330 yards away, but I didn’t have a good angle for a clean vital shot. Where I stood the trees were thinning and I had no intention of blowing my stalk by being seen in the last 30 yards. Dropping to the ground I took off my backpack and army crawled in the snow to a downed log where I could rest my rifle for a shot.
For this Utah hunt, Colton’s bullet choice was the Sierra 165gr SBT GameKing. In this photo, the cartridge in the Tikka magazine has a 168gr Barnes all-copper TSX bullet.
I checked my range and angle — 301 yards and a 5-degree decline from me to the target. No significant wind in any direction. I had sighted in my rifle at 1000 feet above sea level in 75 degree weather and was now at 9500 feet with the temperature a bone-chilling cold. Instead of the 1.1 MRAD dope I estimated 1 MRAD and held directly over vitals. With slow steady breaths I calmed my heartrate, took a deep breath, exhaled halfway and held. A smooth squeeze of the trigger and the rifle roared. Maintaining my sight picture, I re-acquired the buck and cycled the bolt. He was on his side making a last attempt to run. Like a dog chasing a rabbit in his sleep. 20 seconds later and his chase had ended.
When I moved my head from behind the scope, I noticed snow steadily falling all around me. The storm had held until the job was done. As if my rifle was the signal for the heavens to let loose. To say that I was happy in this moment is a gross simplification of what this experience meant to me. I was happy with my success, I was thankful for the opportunity, I was sad at the loss of life of such a majestic creature, I was proud of having learned my lesson from the day before and having executed the best stalk of my life, while also harvesting the biggest buck of my life. My hunt was successful. My hunt was over. And now, the real work had started.
Arriving at the downed deer I checked for life. He had passed. My shot went directly through the buck’s heart, and he had lost most of his blood in the first 15 seconds. As ethical as it gets. The storm was starting to really gain momentum now, so I had to choose to either quarter the deer and hang it for tomorrow or gut it and drag it to the road, which was approximately a mile away. With the snow blanket from previous storms, I decided it would be easiest to drag the deer using my body harness (Muddy Deluxe Deer Drag Harness).
The drag back to the road reminded me of grandpa’s route to school: 20 miles in the snow and uphill both ways. The drag was tough. Each incline felt like I was climbing vertically with a 100-lb. pack. Fortunately, the snow helped the body slide and I made it to my truck in about an hour.
My drive back to camp was dead quiet. I tried to soak in the experience as much as I could. To fully appreciate the opportunity, I had been given. The sacrifice my family had made so that I could be here.
And as Vince Lombardi once noted: “Any man’s finest hour, the greatest fulfillment of all that he holds dear, is that moment when he has worked his heart out in a good cause and lies exhausted on the field of battle — victorious.”
* Colton Reid has the Tikka T3 Lite, which has been superseded by the T3X LITE, which has some enhanced features. The notable T3X LITE upgrades are covered in this Tikka Product Video.
This article is Copyright 2023 AccurateShooter.com. Any republication on any another website gives rise to damages for copyright violations.
The Legal Brief is a feature of TheGuncollective.com that focuses on firearms rules and regulations. In this Legal Brief video, Attorney Adam Kraut explains key State and Federal regulations governing firearms, and explains how to ensure compliance with all applicable laws.
This five-minute video explains barrel length rules for rifles and shotguns, and also explains the best (and most fool-proof) methods to measure your barrel. In addition, the video explains how to measure firearm overall length. A rifle or shotgun which is less than 26 inches overall can also be classified as a “Short-barreled” rifle/shotgun subject to the NFA. NOTE: Under federal law “If the rifle or shotgun has a collapsible stock, the overall length is measured with the stock EXTENDED”.
Highlights of LEGAL BRIEF Discussion of Barrel Length and Firearm Overall Length
The ATF procedure to measure the length of a barrel is to measure from the closed bolt or breech face to the furthest end of the barrel or permanently attached muzzle device. ATF considers a muzzle device that has been permanently attached to be part of the barrel and therefore counts towards the length.
How to Measure Barrel Length: Drop [a] dowel or rod into the barrel until it touches the bolt or breech face, which has to be closed. Mark the outside of the rod at the end of the muzzle crown (if you don’t have a permanently attached muzzle device) or at the end of the muzzle device if it is permanently attached. Remove the rod and measure from the mark to the end of the rod. That is your barrel length[.]
Remember, if the barrel length is less than 16 inches, it is possible that the firearm could be a short barrel rifle (if you are building a rifle or it is already on a rifle) and if the barrel length is less than 18 inches, it is possible the firearm could be a short barrel shotgun (again if you are building a shotgun or it is already a shotgun). Both of these firearms would be subject to the purview of the National Firearms Act and would require the firearm to be registered accordingly.
How to Measure Overall Length:The overall length of your rifle or shotgun may also classify it as a Short Barrel Rifle or Short Barrel Shotgun. The overall length of a firearm is the distance between the muzzle of the barrel and the rearmost portion of the weapon measured on a line parallel to the axis of the bore. … If the rifle has a permanently attached muzzle device, that is part of the overall length. … If the rifle or shotgun has a collapsible stock, the overall length is measured with the stock extended.
Many guys getting started in long range shooting are confused about what kind of scope they should buy — specifically whether it should have MIL-based clicks or MOA-based clicks. Before you can make that decision, you need to understand the terminology. This article, with a video by Bryan Litz, explains MILS and MOA so you can choose the right type of scope for your intended application.
You probably know that MOA stands for “Minute of Angle” (or more precisely “minute of arc”), but could you define the terms “Milrad” or “MIL”? In a helpful video, Bryan Litz of Applied Ballitics explains MOA and MILs (short for “milliradians”). Bryan defines those terms and explains how they are used. One MOA is an angular measurement (1/60th of one degree) that subtends 1.047″ at 100 yards. One MIL (i.e. one milliradian) subtends 1/10th meter at 100 meters; that means that 0.1 Mil is one centimeter (1 cm) at 100 meters. Is one angular measurement system better than another? Not necessarily… Bryan explains that Mildot scopes may be handy for ranging, but scopes with MOA-based clicks work just fine for precision work at known distances. Also because one MOA is almost exactly one inch at 100 yards, the MOA system is convenient for expressing a rifle’s accuracy. By common parlance, a “half-MOA” rifle can shoot groups that are 1/2-inch (or smaller) at 100 yards.
What is a “Minute” of Angle?
When talking about angular degrees, a “minute” is simply 1/60th. So a “Minute of Angle” is simply 1/60th of one degree of a central angle, measured either up and down (for elevation) or side to side (for windage). At 100 yards, 1 MOA equals 1.047″ on the target. This is often rounded to one inch for simplicity. Say, for example, you click up 1 MOA (four clicks on a 1/4-MOA scope). That is roughly 1 inch at 100 yards, or roughly 4 inches at 400 yards, since the target area measured by an MOA subtension increases with the distance.
MIL vs. MOA for Target Ranging
MIL or MOA — which angular measuring system is better for target ranging (and hold-offs)? In a recent article on his PrecisionRifleBlog.com website, Cal Zant tackles that question. Analyzing the pros and cons of each, Zant concludes that both systems work well, provided you have compatible click values on your scope. Zant does note that a 1/4 MOA division is “slightly more precise” than 1/10th mil, but that’s really not a big deal: “Technically, 1/4 MOA clicks provide a little finer adjustments than 1/10 MIL. This difference is very slight… it only equates to 0.1″ difference in adjustments at 100 yards or 1″ at 1,000 yards[.]” Zant adds that, in practical terms, both 1/4-MOA clicks and 1/10th-MIL clicks work well in the field: “Most shooters agree that 1/4 MOA or 1/10 MIL are both right around that sweet spot.”
Every month Shooting Sports USA (SSUSA), an NRA publication, releases a new issue with a variety of feature stories on gun industry products and important pistol, rifle, and shotgun competitions. SSUSA also regularly posts valuable guides for handloaders, plus instructional articles that can help shooters improve their skills.
The March 2023 Digital Edition of Shooting Sports USA is packed with interesting content. There is a guide to Sighting in New Shooters which covers Eye and Hand Dominance. In addition, there is a big 6-page article on the Best New Products from SHOT Show 2023. But the feature that really caught our attention is a summary of new .22 LR rimfire ammunition.
Match Grade .22 LR Ammunition Offerings for 2023
With the rapid growth of NRL22, NRL22X, PRS 22 and other rimfire rifle sports, we were pleased to see a four-page SSUSA feature on match grade .22 LR ammunition offerings for 2023. This covers new (or notable) rimfire ammo from Lapua, ELEY, Norma, SK, RWS, Aguila, and Wolf.
New for 2023, Norma has released innovative XTREME LR-22 ammo, which features a unique, patented bullet design. This has a special base with a cone (see diagram). Norma claims that this “rocket tail” design reduces drag by creating less negative pressure at the back end of the bullet. It will be interesting to see how this new bullet design works in rimfire ELR competition.
Lapua recently introduced its impressive Super Long Range and Long Range rimfire ammunition. These two new ammo types are optimized for long range accuracy and consistency. The goal was to have extremely low extreme spread (ES) and standard deviation (SD), to yield the highest precision down range. Shooters competing in disciplines such as NRL22X and Rimfire ELR should benefit.
The February 2013 edition of Shooting Sports USA magazine has an interesting feature by Glen Zediker, who sadly passed away in October 2020. In this Transporting Success, Part I article, Zediker explains the advantages of loading at the range when you are developing new loads or tuning existing loads. Glen, the author of the popular Handloading for Competition book, discusses the gear you’ll need to bring and he explains his load development procedure. In discussing reloading at the range, Glen focuses on throwing powder and seating bullets, because he normally brings enough sized-and-primed brass to the range with him, so he doesn’t need to de-prime, re-size, and then re-prime his cases.
Zediker writes: “Testing at the range provides the opportunity to be thorough and flexible. You also have the opportunity to do more testing under more similar conditions and, therefore, get results that are more telling. Once you are there, you can stay there until you get the results you want. No more waiting until next time.”
Zediker starts with three-shot groups: “I usually load and fire three samples [with] a new combination. I’ll then increase propellant charge… based on the results of those three rounds, and try three more. I know that three rounds is hardly a test, but if it looks bad on that few, it’s not going to get any better.”
Glen reminds readers to record their data: “Probably the most important piece of equipment is your notebook! No kidding. Write it down. Write it all down.”
There’s More to the Story…
Editor’s Note: In Zediker’s discussion of loading at the range, he only talks about throwing powder and seating bullets. In fact, Glen opines that: “There is little or no need for sizing.” Well, maybe. Presumably, for each subsequent load series, Zediker uses fresh brass that he has previously sized and primed. Thus he doesn’t need to de-prime or resize anything.
That’s one way to develop loads, but it may be more efficient to de-prime, re-size, and load the same cases. That way you don’t need to bring 50, 80, or even 100 primed-and-sized cases to the range. If you plan to reload your fired cases, you’ll need a system for de-priming (and re-priming) the brass, and either neck-sizing or full-length sizing (as you prefer). An arbor press can handle neck-sizing. But if you plan to do full-length sizing, you’ll need to bring a press that can handle case-sizing chores. Such a press need not be large or heavy. Many benchresters use the small but sturdy RCBS Partner Press, for sale now at Amazon for $114.99. You may even get by with the more basic Lee Precision Compact Reloading Press, shown in Zediker’s article. This little Lee press, Lee product #90045, currently retails for $44.99 at Midsouth.
The RCBS Lock-Out Die can also be used with some Dillon and Hornady progressive presses.
If you load pistol or rifle ammo with a progressive press, we strongly recommend you get a Lock-Out Die from RCBS. This unique reloading die will prevent your progressive press from advancing if the dispensed powder charge is more or less than about 0.3 grains too high or too low. The Lock-Out Die really works. Your Editor uses it on his RCBS 2000 progressive press. I can affirm that a Lock-Out Die has “saved my bacon” a half-dozen times over the years when there was an over-charge (which could cause a Kaboom) or a low charge (which could cause a squib load).
The Lock-Out Die works by using a central die detection rod that sets its vertical position based on the height of the powder column in the case. Through an ingenious design, if the powder column height is too low or too high, the rod locks in place as you start to pull the press handle. This halts the press before the ram can lift and the cartridge plate can advance. Unlike a beeping alarm system (which can be ignored or defeated), the Lock-Out Die physically stops the movement of the press ram and prevents a bullet being seated in the “problem” case.
It takes a bit of tweaking to get the Lock-Out Die detection rod setting just right, but once it is correctly positioned, the Lock-Out Die works smoothly in the background. The Lock-Out Die won’t interfere with the loading process unless it detects a high or low charge — and then it positively stops the progressive loading cycle.
While crafted for use in RCBS progressive presses, the RCBS Lock-Out Die can also be used on a Dillon XL Progressive (see video below) or Hornady Lock-N-Load progressive — though it does take up one station which could otherwise be used for a final crimp die (after the seating die). The RCBS 2000 has one more station than a Dillon 550/650, so it’s an ideal platform for using the Lock-Out Die.
Learn More at UltimateReloader.com
On the UltimateReloader.com website, run by our friend Gavin Gear, you’ll find an excellent two-part series on the function and set-up of the RCBS Lock-Out Die. Part One explains how the Lock-Out Die functions, using cut-away illustrations. Part Two shows how to install and adjust the Lock-Out Die on various progressive presses. The Ultimate Reloader video at the top of this article shows setup of the RCBS Lock-Out Die on the Dillon XL-650 progressive press, while the Reloading Bench video below shows the Lock-Out Die on a Hornady LnL progressive.
The United States Postal Service allows shipment of long-barreled rifles and shotguns via the U.S. Mail. However, regular citizens who do not possess an FFL are NOT allowed to mail handguns at all.* For handguns (all pistols and revolvers), you must use UPS or FedEX and ship FROM an FFL business in most situations.
432.1 General
Mailers must comply with the Gun Control Act of 1968, all of the provisions of postal law in 18 U.S.C. 1715, and all other all federal and state regulations and local ordinances affecting the movement of firearms. The following also applies:
a. The Postal Service may require the mailer to open parcels containing firearms or air guns or give written certification that the weapon is unloaded and not concealable (see note 1).
b. Short-barreled rifles or shotguns that can be concealed on the person are non-mailable.
c. No markings of any kind that indicate the nature of the contents may be placed on the outside wrapper or container of any mailpiece containing firearms.
d. Mailable matter must be properly and securely packaged within the general packaging requirements in DMM 601.1-7.
e. Except for shipments between licensed dealers, manufacturers, or importers, all regulated firearms must be mailed using a USPS product or Extra Service that provides tracking and signature capture at delivery (see note 2).
432.3 Rifles and Shotguns
Except under 431.2, unloaded rifles and shotguns are mailable. Mailers must comply with the rules and regulations under 27 CFR, Part 478, as well as state and local laws. The mailer may be required by the USPS to establish, by opening the parcel or by written certification, that the rifle or shotgun is unloaded and not ineligible for mailing (see note 1). The following conditions also apply:
a. Subject to state, territory, or district regulations, rifles and shotguns may be mailed without restriction when intended for delivery within the same state of mailing. These items must:
1. Bear a “Return Service Requested” endorsement.
2. Be mailed using a class of mail, product, or Extra Service that provides tracking and signature capture at delivery.
b. A rifle or shotgun owned by a non-FFL may be mailed outside the owner’s state of residence by the owner to himself or herself, in care of another person in the other state where he or she intends to hunt or engage in any other lawful activity. These mailpieces must:
1. Be addressed to the owner.
2. Include the “in the care of” endorsement immediately preceding the name of the applicable temporary custodian.
3. Be opened by the rifle or shotgun owner only.
4. Be mailed using a class of mail, product, or Extra Service that provides tracking and signature capture at delivery.
d. Mailing of rifles and shotguns between licensed FFL dealers, manufacturers, or importers are not restricted. The Postal Service recommends that these items be mailed using a class of mail, product, or Extra Service that provides tracking and signature capture at delivery.
e. Except as described in 432.3a, licensed curio and relic collectors may mail firearms meeting the definition of curios or relics under 27 CFR 478.11 domestically to licensed FFL curio and relic collectors in any state. These items must be mailed using a class of mail, product, or Extra Service that provides tracking and signature capture at delivery.
f. Firearms meeting the definition of a rifle or shotgun under 431.4 which are certified by the curator of a municipal, state, or federal museum, which exhibits firearms to be curios or relics of museum interest, may be accepted for mailing without restriction when mailed between governmental museums.
g. Air guns (see 431.6) that do not fall within the definition of firearms under 431.1a are mailable. A shipment containing an air gun with a muzzle velocity of 400 or more feet per second (fps) must include an adult signature service under DMM 503.8. Mailers must additionally comply with all applicable state and local regulations.
FOUR TIPS for Safer, More Secure USPS Firearms Shipping
Here are some other helpful suggestions when shipping long guns via USPS:
1. Bring a copy of the destination FFL holder’s license to the Post Office, just in case the staff asks for confirmation.
2. Use a Shipping Mode that Requires Signature on Delivery for confirmation.
3. Ship Priority Mail for faster delivery and BUY INSURANCE to cover complete replacement value of the firearms. Some guns may be damaged, but insurance is needed to cover full gun value with a lost/stolen shipment.
4. Double tape the ends of the box, and put plenty of padding around the muzzle and buttstock INSIDE the box.
* While ordinary (non-FFL) person may never mail handguns, there are some types of handgun mail shipments allowed by manufacturers etc. to Government and U.S. Military recipients:
432.21 Authorized Persons
Subject to 432.22, handguns may be mailed by a licensed manufacturer of firearms, a licensed dealer of firearms, a licensed importer of firearms, or an authorized agent of the federal government or the government of a state, territory, or district, only when addressed to a person in one of the following categories for use in the person’s official duties, and upon filing the required affidavit or certificate:
a. Officers of the Army, Coast Guard, Air Force, Navy, Marine Corps, or Organized Reserve Corps.
b. Officers of the National Guard or militia of a state, territory, or district.
c. Officers of the United States or of a state, territory, or district, whose official duty is to serve warrants of arrest or commitment.
d. USPS employees authorized by the Chief Postal Inspector.
e. Officers and employees of enforcement agencies of the United States.
f. Watchmen engaged in guarding the property of the United States, a state, territory, or district.
g. Purchasing agent or other designated member of agencies employing officers and employees included in 432.21c through e.
432.23 Manufacturers, Dealers, and Importers
Handguns may also be mailed between licensed manufacturers of firearms, licensed dealers of firearms, and licensed importers of firearms in customary trade shipments, or for repairing or replacing parts.
This article is Copyright 2023 AccurateShooter.com. Any entity reproducing this article without permission is liable for compensatory and punitive damages.


 The next morning, I was back on the road and stopping at periodic vantage points to glass across the valley. The whole time I was thinking “will I really get a second bite at the apple”?


 There’s More to the Story…
 If you load pistol or rifle ammo with a progressive press, we strongly recommend you get a Lock-Out Die from RCBS. This unique reloading die will prevent your progressive press from advancing if the dispensed powder charge is more or less than about 0.3 grains too high or too low. The Lock-Out Die really works. Your Editor uses it on his RCBS 2000 progressive press. I can affirm that a Lock-Out Die has “saved my bacon” a half-dozen times over the years when there was an over-charge (which could cause a Kaboom) or a low charge (which could cause a squib load).


