This popular video, viewed nearly 1.9 million times on YouTube, provides a clear explanation of Minute of Angle (MOA) and how that angular measurement is used. Among novice shooters, there is much confusion over this term. In this NSSF Video, Ryan Cleckner, a former Sniper Instructor for the 1st Ranger Battalion, defines the term, “Minute of Angle” (MOA) and explains how you can adjust for windage and elevation using 1/4 or 1/8 MOA clicks on your scope. This allows you to sight-in precisely and compensate for bullet drop at various distances.
For starters, Ryan explains that, when talking about angular degrees, a “minute” is simply 1/60th. So a “Minute of Angle” is simply 1/60th of one degree of a central angle, measured either up and down (for elevation) or side to side (for windage). At 100 yards, 1 MOA equals 1.047″ on the target. This is often rounded to one inch for simplicity. Say, for example, you click up 1 MOA. That is roughly 1 inch at 100 yards, or roughly 4 inches at 400 yards, since the target area measured by 1 MOA increases in linear fashion with the distance.
More Minute of Angle (MOA) Explanatory Videos
This Gunwerks video explains that Minute of Angle subtends approximately 1″ for each 100 yards (well, 1.047″ to be exact). That means a Minute of Angle increases in actual measured size the greater the distance of the target from the shooter.
This lengthy (24-minute) video defines Minute of Angle, and uses multiple diagrams to illustrate how MOA angular measurements works. The video also how MOA-based click values translate to point-of-impact changes at various distances.
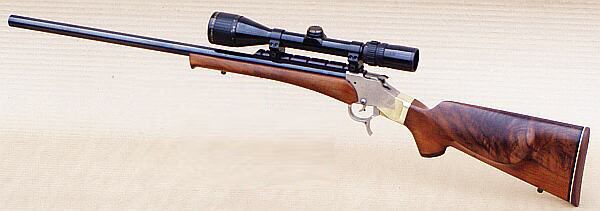
This week’s featured firearm belongs to John “SnakeEye” Seibel, founder of the VarmintsForFun website. In recent years, John has become a “true believer” in the little 20-Caliber cartridges. He says this light-recoiling 20 PPC, Rampro-actioned pistol is perfect for a quick shot on a critter, taken from the front seat of his truck. John tells us: “A long-range pistol is an ideal truck gun in my opinion. It stows in a small area and doesn’t take up the room a rifle does. Just keep ear protection near by at all times! I’ve taken varmints as far as 400+ yards with this 20 PPC pistol, so why would you need a rifle?”
Perspectives on Pistols for the Varmint Hunter
by John Seibel
I decided to try my hand at shooting varmints with a pistol one day when I grew tired of wrestling a rifle around in the truck for a quick shot. Many times when traveling around on the farm you’ll spy a groundhog or fox that usually isn’t more than 200 yards away. A single-shot pistol like the Thompson Contender could fit the bill. With its compact length, around 20 inches, a long-barrel pistol can lay on the truck’s passenger seat for easy access. I usually keep my two leather brick-style sandbags laying beside the console and seat. I have a box made from hard rubber that I lay across the top of the door. I then lay the two bags on top. This makes a nice platform to rest the pistol’s forearm. I like to use a forearm that is at least two inches wide. That lets the gun lay steady—almost like you are shooting from a bench rest. For the shooting hand, I prefer a pistol grip with finger grooves and a slight overhang or flare for the web of your hand.
As for optics, I tried long-eye-relief pistol scopes but they lacked the magnification you need for long-range target shooting or varminting. Those pistol scopes have really long eye-relief because they are designed to work with the pistol held at arm’s length. When shooting at the bench or from a truck that’s not what you want. By the time you find the target and get your eye in the exact location, the varmint has moved on or died of old age! After much fiddling around with pistol-type scopes, I finally decided to use rifle scopes on my long-range pistols. The minimum I use is a 4.5-14×40. Eye relief on a Leupold 4.5-14x40mm is about 3.5 inches at 4.5 power. Field of view is better with rifle scopes too and it’s easier to acquire your target. For this type of shooting a light-recoiling caliber is essential or you will have scope-eye bad! I currently have three long-range pistols and use them to shoot 17M4, 20 PPC, 22 BR, and .223 Rem. The featured gun may be the most accurate of my pistols, and your editor thinks it’s the most handsome of the three.
The Rampro Pistol Project — Working with John Illum
A couple of years ago I called John Illum of Rampro about building the ultimate long-range pistol. It just so happens that John was a big time long-range pistol shooter. I told him that I wanted a gun that didn’t recoil badly and wouldn’t torque when fired. As I am a quadriplegic, with no grip in my hands, the gun had to handle well under recoil so I didn’t drop it. Recoil had to be straight back–no twisting.
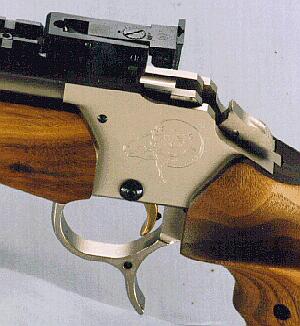
Well Illum listened to me and came up with a gun that performs just the way I wanted. Illum suggested a rear grip stock of his own design. It has a 2.25″ wide forearm and a rear grip with a slight palm swell that fits your hand perfectly. Another nice feature is the finger grips. It has an extended overhang or “beavertail” that fits comfortably in the web of your hand. Of course it had to be walnut! I chose Rampro’s STP small action with a PPC bolt. His bolt uses a Sako-type extractor. The action is a single-shot. Being right-handed, I chose a right bolt, left port configuration. This works really well in a pistol. You can load with your left hand and see the round laying in the action–that’s what you want in a pistol without a safety.
Gun Specifications John Illum’s Rampro actions are chrome-moly steel. Commonly you’d see them blued, but I had him put a brushed nickel finish on the action and rings. From a few feet away it looks like stainless. The trigger is Illum’s own design set at 8 ounces, and there’s no creep that I can detect. The action has Remington barrel threads and will accept Remington type triggers. One neat thing is that the action was milled with an integral recoil lug (much like the current Surgeon Action). And the bolt is milled all in one piece–no soldered-on handles. My only gripe with this bolt handle is that it could be a tad longer, but it still is manageable for a single-shot. You’ll also note how slick and streamlined the scope rings are. Illum made those as well. His rings mount to the action via two screws from the inside of the ring, a very elegant set-up for sure. (I currently have a 6.5-20x40mm Nikon scope on this gun. If I had to do this project over again the only thing I would change would be installing a 30mm scope because I like ‘em!).
The barrel is a PacNor Super-Match heavy taper with flutes milled by John Illum, who did all the gunsmithing on this pistol. Twist rate is 1 in 12 inches, with an 11° crown, polished to a mirror finish. The barrel was bead-blasted on the exterior to cut glare. I had Illum cut a 20 PPC minimum-spec chamber, with a .237″ neck. That way I don’t have to turn necks on the Lapua Brass (220 Russian necked down to .204). This is a varmint gun–there’s no need for turned necks. [Editor’s Note: Rampro is no longer in business. However, John tells us “I haven’t had any problems with the action so far. If I did, most competent gunsmiths could fix them easily.”]
Handgun Handling Tips
If you want to shoot a long-range pistol but have never have shot this kind of gun before, try to find a mentor — someone with a gun like this who can school you a bit in the correct technique. The first thing you notice is that you have no comb or cheek piece to help align your head and neck. And getting used to the optics takes some practice. Most people fit a pistol-type (long eye-relief) scope, but these can be awkward to use, and somewhat frustrating at first — the field of view is very restricted. Move your head very slightly and you can lose the sight picture completely. You can solve that problem by using a standard rifle scope, but that will put your head very close to the eye-piece — just three to four inches. With that arrangement, if you don’t hold the gun correctly … POW instant scope-eye!
Now once you get the hang of shooting a long-range pistol you will find it can be just as accurate as a rifle. But there is a trick to shooting them. Shooting a long-range pistol is a whole new world — you need to hold it just right. If you don’t let the gun roll back a little (i.e. if you grip too hard) you will get vertical stringing. I hold my hand against the back of the grip to guide the gun but let it almost free recoil. Looking at how compact the pistol is, you might think “Hey, this would make an ideal ‘walking-around’ varminter.” Well, that’s not really the case. For real precision shooting a solid benchrest type set-up is a must. You can attach a bipod to a long-range pistol, but you would need a flat surface. A fence-post top would work pretty well without a bipod if you carry a small light bag. Overall though, this type of pistol works best as a sandbag gun. For a walking-around gun, you’d be happier with a rifle I think.
Load Development and Accuracy
When I built this gun, Hornady had just released the 32gr V-Max (see footnote), a good match for my barrel’s 1:12″ twist. I choose the 20 PPC because of the very good Lapua brass (220 Russian parent case). I figured teaming Lapua brass with the little .204 bullet would offer excellent accuracy combined with very low recoil. My expectations were fulfilled. The brass proved to be excellent and the PacNor loved the little V-Max pills.
I tried quite a few different loads and most powders that I tried worked very well. These included: H322, Benchmark, AA 2460, and Reloader 7. Amazingly, with just 14″ of barrel, all of these powders delivered impressive velocities–ranging from 3914 to 4074 fps. I settled on 48 Harrell’s clicks of Accurate Arms (AA) 2460, which drives the 32gr V-Maxs to 3995 fps.
With AA 2460 the gun will shoot in the low 3s at 100 yards consistently — as long as I steer the gun right, which takes some practice. I think groups in the low 0.3″ range is excellent for a non-benchrest factory bullet. Despite having no buttstock to grab, recoil on my 20 PPC pistol is very minimal — it just rocks back into your hand. The main problem is to keep the scope from smacking you, since I used a rifle scope with short eye-relief. Muzzle flash and noise are tolerable but DO NOT shoot one of these without good ear protection. Your ears are very close to the muzzle.
I also have a 20 PPC rifle built on a BAT action with a Richard’s #008 laminated stock cut down in size. That gun’s 1:9″-twist Lilja barrel lets me shoot the Berger 50gr LTB bullets. In the wind, these perform quite a bit better than the 32s. My two favorite loads for the 50 grainers are: a) 26.0gr VV N135, CCI 450 primers, 3615 fps; and b) 27.3gr Hodgdon Varget, CCI 450s, 3595 fps. The BAT 20 PPC also shoots really well with the 40gr V-Max, pushed by N135 and Fed 205M primers.
Pistol Action Legal Issues
One important thing to remember if you build a pistol is to make sure the receiver came from the factory as a pistol and was titled as a pistol. Rifle actions are illegal to use as a pistol. Yes, that’s a nonsensical law, but it’s still on the books. You can use factory pistol actions such as the XP 100.
If you want a new custom action such as a BAT (my favorite), you can order it as a pistol action and when you get it, register it as a pistol. Note, in some states there may be additional fees, waiting periods, or restrictions for pistol actions (as opposed to rifle actions). Check your local laws before ordering the action.
Future Trends in Varmint Hunting — Plenty of Twenties
I think these sub-caliber rounds, both 20s and the 17s, are the future of recreational varminting, at least out to medium distances. The Twenties offer low recoil, excellent accuracy, and components keep getting better and better. The bullet-makers are finally making high-quality bullets in appropriate weights. Compared to something like a 22-250, I’ve noticed that my 20 PPC rifle has a lot less noise, a plus when you want to be quiet around other people and varmints.
The flat trajectory is another big advantage in the field. With the 20 PPC, zeroed at 100 yards, I can pretty much hold dead center and get hits out to 300 yards or so without touching the scope to add elevation. [Editor: The same is true with the 20 Practical cartridge, basically a .223 Rem necked down to .20 Caliber. It has proven very accurate and easy to tune.]
The 20-Caliber cartridges we have now, in particular the 20 PPC and 20 BR, are very well-refined. You don’t have to do a lot of tuning or tinkering to have a very accurate, effective varmint-slayer. In fact, if I could dream up a signature “20 VFF” (Varmints For Fun) cartridge it would basically be the 20 PPC. In truth, nearly any of the popular 17- or 20-Caliber cartridges will perform well if you start with top-quality brass. The sub-calibers have less recoil and burn less powder, and there are very good components for most varmint and target-shooting applications. To me it seems that these small calibers work so well because of good components, low recoil, and efficient cartridge designs (particularly in the VarTarg and PPC cases).
WARNING: For your own safety, ALWAYS reduce all starting charges by 10% and work up carefully! Ambient temperature changes, powder lot variations, and differences in barrel friction can result in significantly increased pressures.
20 PPC LOAD MAP
Bullet GR
Maker
Powder
Charge
Primer
Case
Velocity fps
Barrel Twist
Comments
32
Hornady V-Max
H322
27.6
Rem 7½
Lapua
4000
Lilja 1:12
WarrenB Form Load
32
Hornady V-Max
AA 2460
29.5
Rem 7½
Lapua
3995
PacNor 1:12
SnakeEye Pistol Load
32
Hornady V-Max
H4198
25.1
CCI BR4
Lapua
4222
PacNor 1:12
A. Boyechko Load
39
Sierra BlitzKing
H322
26.0
Rem 7½
Lapua
3700
Lilja 1:12
WarrenB Load
39
Sierra BlitzKing
VV N540
28.8
CCI BR4
SAKO
4064
PacNor 1:12
D.Moore, Low 2s
40
Hornady V-Max
VV N135
27.8
Fed 205m
Lapua
3950
Lilja 1:9
SnakeEye Load
50
Berger LTB
VV N135
26.0
CCI 450
Lapua
3615
Lilja 1:9
SnakeEye Load
50
Berger LTB
Varget
27.3
CCI 450
Lapua
3595
Lilja 1:9
SnakeEye Load
Footnote: When first manufactured, the small Hornady 20-Caliber V-Max bullet was actually 33 grains, not 32 grains as sold currently. I still have some of the 33-grainers. I’ve observed no functional difference between the 33s and the current 32-grainers.
Our take on Bore-Store Gun sleeves is simple: They work great, so buy them and use them — for ALL your valuable firearms.
These thick, synthetic-fleece sacks cushion your guns, preventing nicks and scratches. The breathable fabric wicks away moisture, and the fibers are coating with corrosion inhibitors. I personally use Bore-Stores for in-safe storage with all my guns, and I have never had one of my guns rust inside a Bore-Store, even when I lived a stone’s throw from the ocean.
Bore-Stores are offered in a wide range of sizes that fit everything from a Snub-nosed revolver to a 33″-barrelled Black Powder Rifle. Bore-Stores can be purchased for $9.97 – $29.97 from Borestores.com. For most scoped rifles, we recommend the 10″x46″ SCR-1 case. The Bore-Store manufacturer, Big Spring Enterprises will also craft custom sizes on request. For a long-barreled F-Class or ELR rig you may need a custom length. Or you can remove the scope and use the 7″x60″ MUS-1 Musket Bore-Store.
Get Your Guns Out of Foam-lined Cases — They Are Rust Magnets
Just about the worst thing you can do for long-term storage (short of leaving your rifle outside in the rain) is to store firearms in tight, foam-padded cases. The foam in these cases actually collects and retains moisture from the air, acting as the perfect breeding ground for rust. Even in warm summer months, humid air can leave moisture in the foam.
Remember, those plastic-shelled cases with foam interiors are for transport, not for long-term storage. Don’t repeat the mistake of a wealthy gun collector I know. He stored four valuable Colt Single Action Army (SAA) revolvers in individual foam-padded cases, and locked these away in his gun safe. A year later, every one of his precious SAAs had rusted, some badly.
Consider Military-Style, Triple-Layer Bags for Long-Term Storage
While we prefer Bore-Stores for regularly-used guns, if you have heirloom firearms that will be kept in storage for very long periods without seeing any use, you may want to grease them up and place them in the thin, but rugged three-layer storage bags sold by Brownells. The bags are made from a three-layer laminate of polyester, aluminum, and polyethylene film, with a shiny silver exterior. Though the laminate is thin, the Brownells storage bags are puncture-resistant, and have a 0% moisture transmission rating so moisture can’t get inside. These bags are also resistant to petroleum-based chemicals and they won’t break down even in contact with soil or moisture.
Here’s one VITAL bit of advice for using these bags. Be absolutely sure, before you seal up the bags, that your guns are DRY and that all metal surfaces have been coated with an effective anti-corrosive, such as BoeShield T9 or Eezox. Brownells’ storage bags are inexpensive. A three-pak of 12″x 60″ rifle sacks (item 083-055-003WB) costs just $21.99 — about seven bucks a gun. That’s cheap insurance for rifles and shotguns that may cost thousands of dollars.
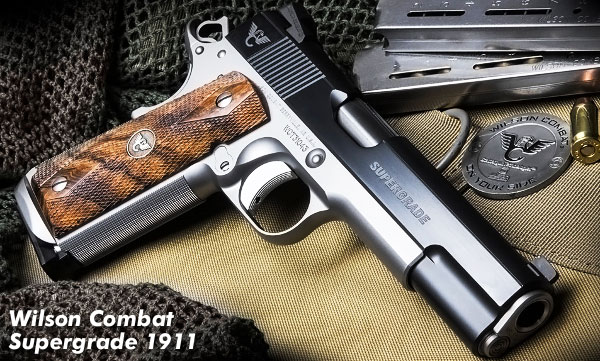
Todd Jarrett is one of the world’s best handgun shooters. A multi-time World Champion, Todd knows a thing or two about semi-auto pistols, particularly 1911s and 1911-based raceguns. Jarrett holds four World titles, nine National titles and has won more than 50 Area championships, as well as many other action shooting events. Jarrett is the only USPSA Triple Crown Winner and he holds four USPSA National titles: Open, Limited, Production, and Limited-10. Jarrett revealed in an interview that between 1988 and 2001 he shot about 1.7 million rounds during practice: “I had a gun in my hand for two hours every day for 10 years to develop my skill level”.
In the video below, Todd explains how to get the proper grip on your handgun, and how to employ a proper stance. We’ve watched many videos on pistol shooting. This is one of the best handgun instructional videos we’ve seen. Todd explains, in easy-to-understand terms, the key elements of grip and stance. One very important point he demonstrates is how to align the grip in your hand so that the gun points naturally — something very important when rapid aiming is required. If you watch this video, you’ll learn valuable lessons — whether you shoot competitively or just want to have better control and accuracy when using your handgun defensively.
Related Article: Thumbs-Forward Shooting Grip for 1911s
“Shooting semiautomatic pistols using the thumbs-forward method really becomes useful … where speed and accuracy are both needed. By positioning the thumbs-forward along the slide (or slightly off of the slide) you are in essence creating a second sighting device: wherever your shooting thumb is pointing is where the pistol is pointing. This makes it incredibly fast to draw the pistol, get your proper grip, and press forward to the target without needing to hunt around for the front sight.” — Cheaper Than Dirt Blog.
Have you ever wondered how Olympic-class position shooters hold their aim so steady? Those bulky shooting coats help, but there is a lot of bio-mechanics involved also. Top shooters employ their body structure to help support the weight of their rifles, and to steady their aim. This interesting video, produced by GOnra Media, demonstrates rifle hold and body alignment for prone, standing, sitting, and kneeling positions. Olympic Gold Medalist Jamie Corkish (formerly Jamie Gray) demonstrates the proper stance and position of arms and legs for each of the positions.
Ideally, in all of the shooting positions, the shooter takes advantage of skeletal support. The shooter should align the bones of his/her arms and legs to provide a solid foundation. A shooter’s legs and arms form vertical planes helping the body remain stable in the shooting position.
Jamie Corkish, London 2012 Gold Medalist in Women’s 3 X 20, has retired from top-level competitive shooting. However, Jamie remains involved in the shooting sports as a Public Relations/Marketing representative for ELEY, a leading maker of rimfire ammunition. Jamie also works with shooting clubs and educational institutions to promote smallbore target shooting.
Images are stills from GOnraMedia video linked above.
Brownells’ Do-It-Yourself (DIY) video series provides logical, step-by-step installation help for triggers, stocks, and springs. Nine separate videos cover Brownells various DIY Kits. Not sure if you’re up to the project? Just watch each video to see what’s involved. The nine DIY kits are:
This video shows Remington 700 after-market trigger installation:
In the Do-It-Yourself videos, Brownells’ Gun Techs proceed step-by-step, showing you exactly how to install the parts on your gun. Each kit also comes with complete, illustrated instructions you can take to the bench. To learn more, click the links above, or CLICK HERE to visit Brownells’ DIY Kit online page.
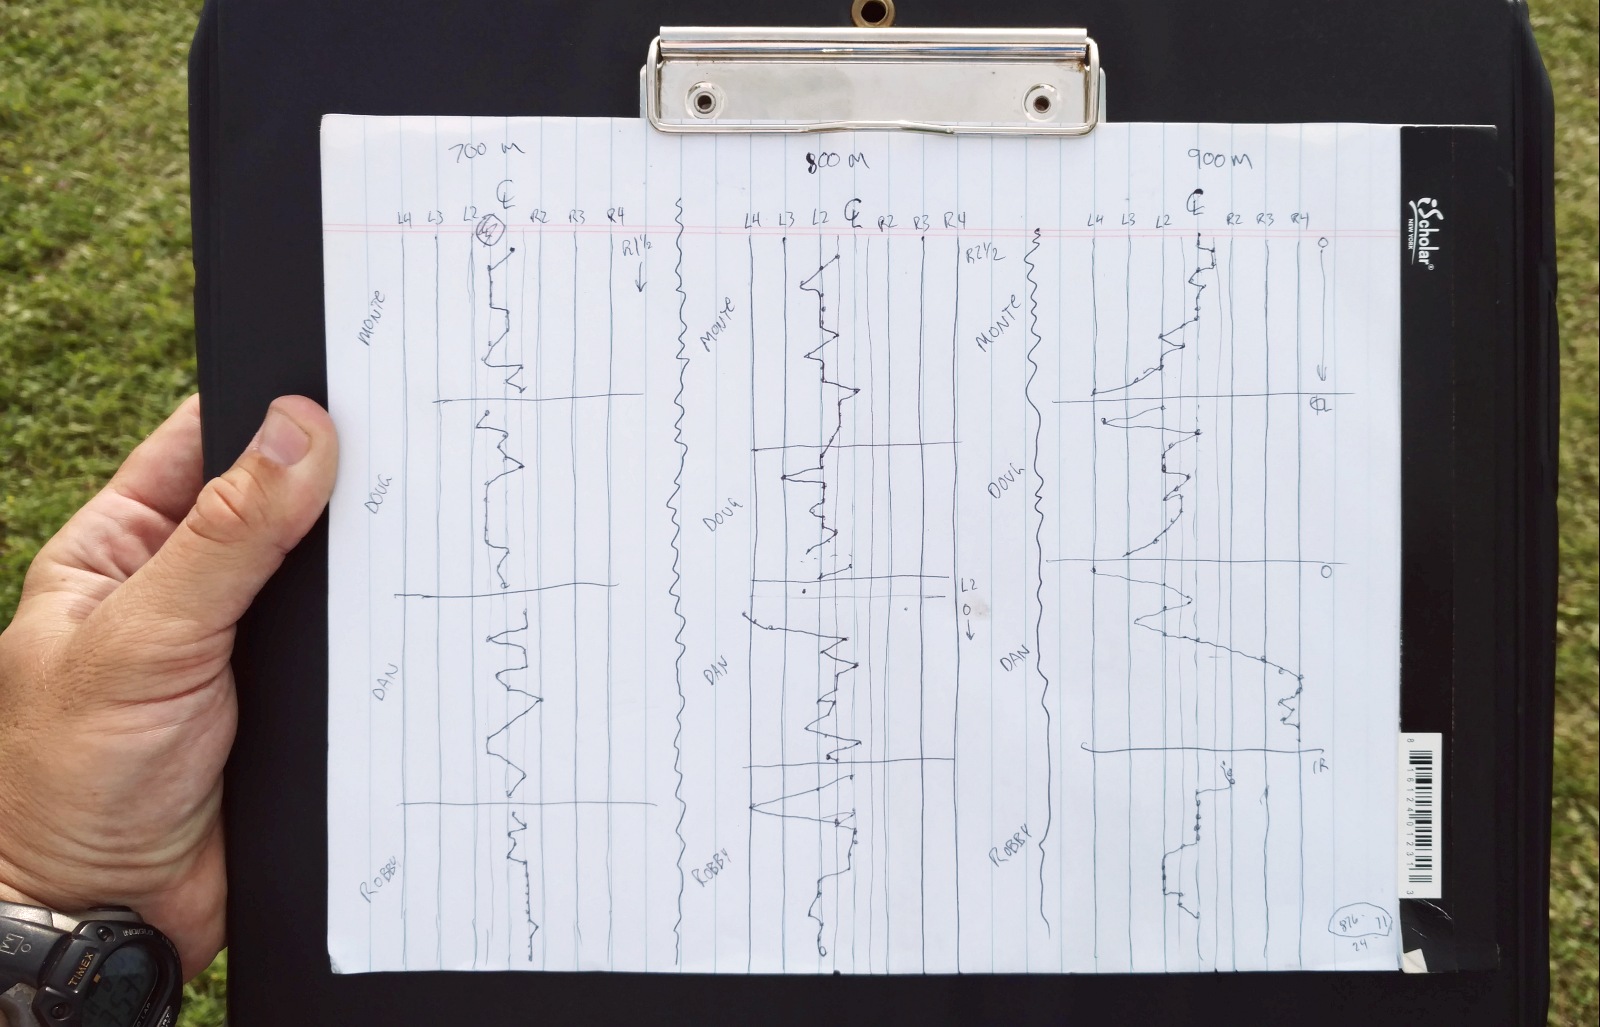
CLICK HERE to see full-screen version of Wind Plot.
Team shooting is very different than individual competition. Typically a team coach makes the wind calls for the shooters. In some cases (where the rules allow), the wind coach even dials elevation and windage changes for the active shooter. For the wind coach to do his job effectively, he must follow the changes in the wind and determine what the correct wind call should have been for each shot. (In other words — what was the “right call”)
Bryan Litz, founder of Applied Ballistics and Past USA F-TR National Champion, served as wind coach for the winning 4-man F-TR Team at the 2017 Canadian F-Class Championships, which preceded the F-Class World Championships also held in Canada. Here Bryan explains how he has used a Wind Plot to make better wind calls, helping his team-mates maximize their scores.
Wind Plot Methodology by Bryan Litz
The wind plot I use is a running history of what the correct wind call was for every shot fired. The more you shoot, the more history you have in a condition, and I find that very useful information. This kind of plot IS NOT showing where the bullet hit, and is NOT showing what you held. It’s showing what you should have held to center each shot. IMO, this is the most valuable information to have when guessing where to hold next for each shot. Here are some key points:
1. I always look for blocks of stable conditions to shoot in and wait out the rest.
2. If the wind plot shows drastic changes, either I’m not picking the right time to shoot or it’s just a really unstable wind condition.
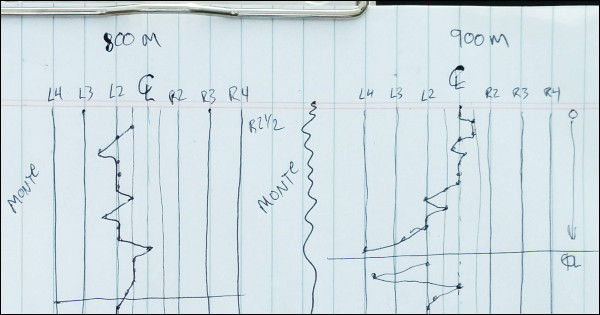
3. When you see many shots using the same hold (e.g. Robby’s 700m and 900m strings on plot), it can indicate very fast shooting and fast pit service.
Q. What are the numbers and Markings on this Wind Plot?
Litz: The wind plot represents the rings on the target. Left 2 for example, is the 5 line on the international target, while Left 2 is the 10 line on the USA target. F-Class shooters and coaches talk about wind holds in relation to these rings. A Left 2 hold isn’t left 2 MOA or 2 MILS, it’s the second ring from center. The vertical lines on the plot represent the rings going out from center, 4 or 5 in each direction. A left or right 5 hold is edge of black on the int’l target.
Q: What Does this Specific Plot Reveal?
Litz: Looking at the plot, from left to right is 700m, 800m, and 900m that we shot progressively through the day. Top to bottom shows each shooter in sequence (shooters names are shown by their blocks). To the right I note what was on the gun for that shooter, and note when it changes. Often times we run the same wind on the gun for several shooters but if it changes, I note what the new windage is and continue on. For example if we’re settled into a condition where we’re shooting Vs with a right 3 hold, I might adjust the scope 1 MOA right because a right 3 hold is equal to 1 MOA. So we can move the scope and start shooting with a center hold.
Q. Are you Plotting Where the Bullet Hits?
Litz: Not exactly. This kind of plot IS NOT specifically showing where the bullet hit, and IS NOT showing what the shooter held. It’s showing what the shooter should have held to center each shot. IMO, this is the most valuable information to have when guessing where to hold next for each shot.
On each shot, the shooter or coach takes a guess about where to hold, and fires the shot. If the bullet hits the center, you plot the point right where you held because it was the correct hold. However, if you miss the call, you plot what hold was required to put that shot in the center. For example if you shoot a right 3 and hit where you held, the correct call would have been “center”. In this way, you’re building a history of what you should have done, which may or may not be what you actually did. This shows you the trends, and brackets which can be used to make future decisions.
Q: Is this Type of Wind Plot Something New?
Litz: I didn’t invent this method, it’s been around a long time. Vertical can be plotted the same way. In team matches, we have a plotter who is advising on elevation trends and suggesting corrections. But, as wind coach, my job is the horizontal so I only keep the wind plot. I have learned lots of strategies from my coaches Emil Praslick and Steve Hardin.
There are many ways to plot and many standard work sheets for this. They’re all tools and the key is to find something that works for you in different situations. I don’t keep a plot when I am personally behind the trigger string firing because I lose more points when I take the time to do it vs. just shooting fast. When pair firing or coaching, I can keep the wind plot without compromising the shooting.
Here Team Australia used plots and communication gear linking coaches. This helped the Aussies win the 2013 F-Open Team World Championship held at Raton, NM.
Know Your Goal — Keep It Simple
Know your goal of plotting. The simplest plot is where you write the shot number where it hit on a target face. This kind of plotting is useful for evaluating shooter performance because it shows how big the group is (in particular the vertical dispersion). However keeping a plot like this does little to help you figure out the wind. It just shows you what shots you messed up on. It does nothing to help you find the center. [Editor: That’s a whole different matter with many variables.] The wind plot I use is a running history of what the correct wind call was for every shot fired. The more you shoot, the more history you have in a condition, and I find that very useful information.
The 2022 NRA Annual Meetings & Exhibits will be held May 26-29, 2022, at the George R. Brown Convention Center in Houston, Texas. Starting Thursday evening the 26th, the NRA Annual Meetings will include numerous special events over the four days preceding Memorial Day (Monday May 30th). The NRA will have a powerhouse lineup of political speakers, country music artists, plus workshops and seminars. Below major events are listed. Along with these events, the Exhibit Hall will showcase over 14 acres of the latest guns and gear from shooting industry companies. Over 540 exhibitors.
Major Scheduled Events at 2022 NRA Annual Meetings
NRA-ILA Leadership Forum
May 27, 2022 | General Assembly Hall, George R. Brown Convention Center I
Confirmed Speakers will include: Wayne LaPierre (NRA Exec. VP), Jason Ouimet (NRA-ILA Exec. Director), Texas Governor Greg Abbott, U.S. Senator John Cornyn, U.S. Senator Ted Cruz, Congressman Dan Crenshaw, Kristi Noem, South Dakota Governor, Mark Robinson, North Carolina Lt. Governor.
While a 16.5-pound benchrest gun is wonderfully stable on the bench, it’s not what you want in a field rifle. There is much to be said for a slim, light-weight, and easy-handling firearm when it comes to a walking varmint adventure. Eben Brown, who runs E. Arthur Brown Company, has created just such a rifle — the Model 97D Falling Block. When chambered for the 6PPC cartridge it delivered quarter-MOA accuracy in a splendidly portable package that tips the scales at just over six pounds without scope. The Model 97D is fairly unique in its lightweight and compact format — that makes it a great field-carry varmint rig. [Editor’s Note: This is an older article and we use some more recent photos of other model 97D Rifles to better illustrate the design and layout.]
Catalog photo of EABCO Model 97D Falling Block rifle.
Excellent Accuracy Made Easy for Sport Shooters
by Eben Brown, E. Arthur Brown Company
You don’t have to be a benchrest competitor to enjoy shooting one of the most accurate centerfire cartridges in the world, the 6mm PPC. With no complicated brass forming or finicky reloading processes, you can be shooting near half-inch groups right from the start and hone your skills to near quarter-inch groups by your second outing–at least that’s how it worked for me, and I’m NOT a good bench rest shooter! Developed by Louis Palmisano and Ferris Pindell, the 6PPC has won more bench rest accuracy competitions than any other cartridge. Easily made from Lapua .220 Russian brass, the 6mm PPC has a small primer and uniquely small flash hole that is credited for much of its inherent accuracy. The “short, fat” shape and nearly straight body contribute to efficient, consistent powder burning and stable chamber performance (it grips the chamber well during ignition).
The Brown Model 97D — A Slim, Accurate 6-Pound Rifle
The 97D was developed from the EABCO “BF” falling block silhouette pistols that have won world championships and set 500-meter distance records. In operation, the 97D falling block slides perpendicularly and closes the breech with absolutely zero camming leverage. This makes it a perfect test-bed to measure the chamber performance needed for hand-loading most other single-shot rifles accurately. At the reloading bench, I worked up a load with the now fully shaped 6mm PPC brass. I full-length sized the brass, trimmed, and primed each case the same as I would with any other cartridge, and began loading. With the resultant load, I easily shot a 5-shot 1/4″ group, a personal best for me. See target photo at right.
Making 6mm PPC Cartridges
Full-length size, prime, charge with powder, and seat a bullet… sounds like what you do with any other cartridge, doesn’t it? In fact, the only difference with 6mm PPC is that it has to be fired once (fire-formed) to expand to its final shape and size. But even fire-forming shots produce exceptional accuracy. I shot several 3/4″ groups while fire-forming at 100 yards, with my best group at nearly half-inch–so the time spent fire-forming was wonderful! In the photo, the parent .220 Russian case is on the left, while the fire-formed 6PPC case is on the right.
The EABCO 6mm PPC Chamber – 6PPC without Neck-turning!
We dimensioned our 6mm PPC chamber reamer to cut a chamber that fits Lapua 220 Russian brass closely without neck-turning. Naturally we recommend you use the Lapua brass for best results.
[Editor’s Note: We asked Eben if he had tried a 6BR chambering in a model 97D. He explained that, because of the extractor design, the falling block action works better with a smaller rim diameter: “The larger .308 rim width creates some issues. This design works best with cartridges no wider than the 30/30 case, or the 7.62×39 case, from which the 22 Russian case was derived. Cases with .308-sized rims develop more bolt thrust and work best with a different type of extractor than we use in the 97D. I love the 6BR, but I recommend the 6PPC for our 97D.”]
6mm PPC Reloading Data for Model 97D
The following loads were worked up in a Model 97D Rifle with 24″ barrel chambered for 6mm PPC with the chamber neck reamed to .275″ to fit Lapua brass without neck-turning. Lapua 220 Russian brass was full-length sized and fire-formed to 6mm PPC using 65gr V-Max bullets, CCI BR4 primers, and 24.5gr of VV N135 powder. Eben cautions: Load at Your Own Risk — Always start 10% low and work up
The following optimum loads were worked up with Vihtavuori N135, 58gr and 65gr V-Max bullets, and CCI BR4 primers. Please Note: There really is no “standard” for 6mm PPC. It can be finicky. But once you find what works best for you, the cartridge performs superbly. The accuracy will astound you.
Model 97D Specifications
OAL (with 24″ Barrel): 38″
Approx. Weight without Scope: 6-6.5 lbs.
Barrel: 17-26″ Chromoly or Stainless
Stock: Walnut w/Hardwood Grip Cap
Trigger: Tuned 16-24 ounces
This video shows the Loading Technique for Model 97D Rifle
Powder Selection — Choosing the Right Propellant
I’ve found that my maximum single-shot loads reach the same level of performance as bolt gun loads when I use one level slower burning powder type and proper chamber preparation. For example, when the VihtaVuori loading guide shows a maximum with VV N133, my best single shot load ends up being with the slower burning VV N135. Here’s the simplest way to proceed: Use a starting load from the loading guide and increase the powder charge until you detect some resistance to block movement with your thumb. Next, charge a case with that same amount of powder, tap it to settle, and look to see if the case is full to the base of the neck. If it’s not full, step up to the next slower-rated powder and repeat the load development process. There’s a powder burn rate chart for all brands of powder in the front of the current VihtaVuori Loading Guide. When you have the maximum load that will fill the case and still allow the 97D single-shot to open and eject freely after firing, you’re ready to shoot some groups!
Loading for Best Chamber Performance
In the model 97D rifle you can check chamber performance easily. After firing a shot, see if you can press the block downward with only your thumb on the top of the block. If it moves freely, you’ve got good chamber performance.
I use three pressure indicators when developing loads on the Model 97D. First I check the block with my thumb. Then I check to see if the cartridge sticks at all when ejecting. And finally, I check the primer for the excessive flattening that would indicate too much pressure. Generally, the hottest load that still allows the gun to open and eject freely ends up being my most accurate shooting load.
Chamber Preparation
Best chamber performance happens when a cartridge grips the chamber and does not drive backward significantly. When you want something to grip (rather than slip), you want to make sure there is no lubricant on the gripping surfaces. Case forming lube and gun oil are the two lubricants you want to remove. Clean your 6mm PPC cases after sizing (I wipe mine with a paper towel and Windex). Clean your chamber with a chamber sized jag and patch wetted with acetone. (Note: protect your chamber with a thin coat of Clenzoil when you’re not out shooting.)
Conclusions of a Single-Shot Sport Shooter
I love the 6mm PPC! It was easy to hand-load for the cartridge and it was easy to get excellent results. The group shot on this page was with the 65gr bullet and a rifling twist of 1:10. I usually recommend a 1:12 twist and the 58gr bullet because customers have reported superb accuracy (better groups than I can shoot). But the 5-shot ¼” group I shot with this set-up is my personal best ever–so naturally I’m thrilled!
While it’s hard to beat the 6PPC’s accuracy in a Model 97D rifle, my company currently offers the rifle in a variety of chamberings including 17 Hornet, 219 Donaldson Wasp, and 6mm BRM. The 97D Standard features a blued 24″ chrome-moly barrel, French Gray receiver, anodized buttstock transition, 2-ring scope mount and swivel studs.– Eben Brown
About the production Model 97D Rifles: “The 97D is a small frame single shot rifle that’s suitable for big game as well as small game and varmint hunting. It originally evolved from our World Champion long range silhouette pistol action and incorporates the same accurate gun making processes. The 97D action itself is inherently accurate and simple. Onto this we fit an EABCO Accuracy Barrel, precision turned and threaded between centers. Each chamber is individually reamed on-center and individually head spaced. We feel the crown is so critical to accuracy that we leave it until after the gun is finished. Our 11 degree target crowns are cut last and left bright — our trademark finishing touch.”
GunsAmerica Digest has a new Suppressor Academy webpage that provides host of helpful information about suppressors (aka “silencers” and “cans”). The Suppressor Academy online resource page features in-depth articles with important information for anyone considering acquiring a suppressor. The articles explain the key benefits of suppressors, how to choose a suppressor, and how to comply with Federal and state laws regulating suppressors. Below we link to four Suppressor Academy articles. Click the title for each topic to read the full-length article.
Suppressors are now legal in 42 U.S. States. There are certain legal requirements for obtaining a suppressor, including paying a $200 Tax Stamp. To own a suppressor you must be legally eligible to purchase a firearm, pass a BATFE background check, pay a one time $200 Transfer Tax, and satisfy age requirements. (SEE ALL Requirements). In most (but not all) of those states you can use a suppressor for hunting. The eight (mostly blue) states which still prohibit civilian suppressor ownership are: California, Delaware, Hawaii, Illinois, Massachusetts, New Jersey, New York, and Rhode Island. READ FULL ARTICLE on GunsAmerica Digest.
Suppressors serve one main purposes — to reduce the sound levels produced when firing pistol or rifle rounds. But GunsAmerica Digest editor True Pearce notes there are many other reasons to own a suppressor. A suppressor can reduce muzzle blast and felt recoil. The suppressor may prevent hearing damage that occurs through bone conduction better than earplugs and muffs because it reduces the noise energy at the source. When hunting, the reduced shot noise can help avoid spooking game. Having a suppressor also makes it easier to communicate when working as a team on a hunt. And, when compared to a muzzle BRAKE, suppressors are much less likely to kick up dust, dirt, sand, and snow when you shoot prone. READ FULL ARTICLE on GunsAmerica Digest.
There is some confusion surrounding the laws concerning suppressors, which are now legal in 42 U.S. States. In most jurisdictions that allow suppressor ownership, no additional state permit or license is required. But you do have to comply with Federal requirements when acquiring the suppressor. You may wish to create a trust to own the suppressor — there are some important practical advantages to having a suppressor trust. The Traditional NFA Gun Trust allows multiple responsible parties, i.e. “trustees”, to legally have possession of the suppressor. Each trustee must be verified and for each suppressor owned by the trust there will be a $200 Tax Stamp. READ FULL ARTICLE on GunsAmerica Digest.
When shopping for a suppressor there are many factors to consider: price, build quality, materials, sound level reduction effectiveness, weight, ease of mounting, and ease of cleaning and maintenance. We recommend that all suppressor buyers research the options. Check the manufacturer’s reputation, check diagrams for disassembly and maintenance. There are always trade-offs. Shorter suppressors may save some weight, but if they don’t cut the decibels as well you may be disappointed. You also need to consider the caliber — will your suppressor be used on multiple firearms? If so then get one that fits the largest caliber you will shoot. READ FULL ARTICLE on GunsAmerica Digest.


 John Illum’s Rampro actions are chrome-moly steel. Commonly you’d see them blued, but I had him put a brushed nickel finish on the action and rings. From a few feet away it looks like stainless. The trigger is Illum’s own design set at 8 ounces, and there’s no creep that I can detect. The action has Remington barrel threads and will accept Remington type triggers. One neat thing is that the action was milled with an integral recoil lug (much like the current Surgeon Action). And the bolt is milled all in one piece–no soldered-on handles. My only gripe with this bolt handle is that it could be a tad longer, but it still is manageable for a single-shot. You’ll also note how slick and streamlined the scope rings are. Illum made those as well. His rings mount to the action via two screws from the inside of the ring, a very elegant set-up for sure. (I currently have a 6.5-20x40mm Nikon scope on this gun. If I had to do this project over again the only thing I would change would be installing a 30mm scope because I like ‘em!).
 Handgun Handling Tips
 Load Development and Accuracy
 Pistol Action Legal Issues
 I think these sub-caliber rounds, both 20s and the 17s, are the future of recreational varminting, at least out to medium distances. The Twenties offer low recoil, excellent accuracy, and components keep getting better and better. The bullet-makers are finally making high-quality bullets in appropriate weights. Compared to something like a 22-250, I’ve noticed that my 20 PPC rifle has a lot less noise, a plus when you want to be quiet around other people and varmints.
 Remember, those plastic-shelled cases with foam interiors are for transport, not for long-term storage. Don’t repeat the mistake of a wealthy gun collector I know. He stored four valuable Colt Single Action Army (SAA) revolvers in individual foam-padded cases, and locked these away in his gun safe. A year later, every one of his precious SAAs had rusted, some badly.
 Here’s one VITAL bit of advice for using these bags. Be absolutely sure, before you seal up the bags, that your guns are DRY and that all metal surfaces have been coated with an effective anti-corrosive, such as BoeShield T9 or Eezox. Brownells’ storage bags are inexpensive. A


 The Brown Model 97D — A Slim, Accurate 6-Pound Rifle
 Making 6mm PPC Cartridges
 The EABCO 6mm PPC Chamber
 The following optimum loads were worked up with Vihtavuori N135, 58gr and 65gr V-Max bullets, and CCI BR4 primers. Please Note: There really is no “standard” for 6mm PPC. It can be finicky. But once you find what works best for you, the cartridge performs superbly. The accuracy will astound you.
 Loading for Best Chamber Performance