Shooting Sports USA (SSUSA) offers a wide selection of informative articles on marksmanship techniques. If you shoot prone, “hard-holding”, you know how important proper positioning and technique can be. There is a SSUSA article that every prone shooter should read — whether you shoot air rifle, smallbore, or High Power. Compiled wtih the help of some of the country’s best prone marksmen, this article, How to Master Prone Shooting, provides a step-by-step guide to perfecting your prone position technique.
How to Master Prone Shooting — SSUSA by NRA Staff
The prone position is the most precise of the rifle shooting positions. It is used in many different shooting events at distances as close as 5 meters and as far away as 1,000 yards, and beyond that in long-range disciplines such as PRS and NRL. Prone shooting is very popular among shooters whose training time is limited, because it does not require as much practice. Age has little effect on a shooter’s ability to do well in prone; many older shooters are able to continue competing successfully in prone matches.
Here is a sample, listing STEP ONE, the basics of the prone position:
Step One: Study the Position
The prone position is steady because it is low, which gives a wide base of support to help keep the rifle still. Below are the key features of the prone position.
1. Straight line form left hand through left arm, side and leg.
2. Head tipped down comfortably.
3. Right hand grips rifle lightly.
4. Body lies behind rifle. Angle to rifle is 10 to 20 degrees.
5. Right knee bent slightly, toe pointing out.
6. Rifle lies on heel of left hand, fingers relaxed.
7. Left elbow rests to left of rifle.
8. Sling (if present) supports weight of rifle. Left arm relaxed.
9. Body rests slightly more on left side.
10. Left leg straight, toe pointing inward or straight back.
There are FIVE MORE STEPS described in detail with specific actions to perform, in the FULL Article. For example, in STEP FOUR (Sling Adjustment), the article explains: “Put the sling high on the arm and tighten the sling keeper. Wrap the arm around the sling so that the sling comes across the left hand and forearm.”
“A bullet launched at a higher altitude is able to fly slightly farther (in the thinner air) for every increment of downward movement. Effectively, the bullet behaves as if it has a higher ballistic coefficient.”
Last month a good friend ventured to the high country of Colorado to pursue elk. He recently zeroed his rifle in California, at a range just a few hundred feet Above Mean Sea Level (AMSL). He wondered if the higher altitude in Colorado could alter his ballistics. The answer is a definite yes. However the good news is that free ballistics calculators can help you plot reliable drop charts for various shooting locations, high or low.
The question has been posed: “What effect does altitude have on the flight of a bullet?” The simplistic answer is that, at higher altitudes, the air is thinner (lower density), so there is less drag on the bullet. This means that the amount of bullet drop is less at any given flight distance from the muzzle. Since the force of gravity is essentially constant on the earth’s surface (for practical purposes), the bullet’s downward acceleration doesn’t change, but a bullet launched at a higher altitude is able to fly slightly farther (in the thinner air) for every increment of downward movement. Effectively, at higher altitudes, the bullet behaves as if it has a higher ballistic coefficient.
Forum member Milanuk explains that the key factor is not altitude, but rather air pressure. Milanuk writes:
“In basic terms, as your altitude increases, the density of the air the bullet must travel through decreases, thereby reducing the drag on the bullet. Generally, the higher the altitude, the less the bullet will drop. For example, I shoot at a couple ranges here in the Pacific Northwest. Both are at 1000′ AMSL (Above Mean Sea Level) or less. I’ll need about 29-30 MOA to get from 100 yards to 1000 yards with a Berger 155gr VLD at 2960 fps. By contrast, in Raton, NM, located at 6600′ AMSL, I’ll only need about 24-25 MOA to do the same. That’s a significant difference.
Note that it is the barometric pressure that really matters, not simply the nominal altitude. The barometric pressure will indicate the reduced pressure from a higher altitude, but it will also show you the pressure changes as a front moves in, etc. which can play havoc w/ your calculated come-ups. Most altimeters are simply barometers that read in feet instead of inches of mercury.”
As Milanuk states, it is NOT altitude per se, but the LOCAL barometric pressure (sometimes called “station pressure”) that is key. The two atmospheric conditions that most effect bullet flight are air temperature, and barometric pressure. Normally, humidity has a negligible effect. It’s important to remember that the barometric pressure reported on the radio (or internet) may be stated as a sea level equivalency. So in Denver (at 6,000 feet AMSL), if the local pressure is 24″, the radio will report the barometric pressure to be 30″. If you do high altitude shooting at long range, bring along a Kestrel, or remember to mentally correct the radio station’s pressure, by 1″ per 1,000 feet.
Trajectory of Bullet fired at Sea Level
Trajectory of Bullet fired at 20,000 feet
You can do your own experimental calculations using JBM Online Ballistics (free to use). Here is an extreme example, with two printouts (generated with Point Blank software), one showing bullet trajectory at sea level (0′ altitude) and one at 20,000 feet. For demonstration sake, we assigned a low 0.2 BC to the bullet, with a velocity of 3000 fps.
To learn more about all aspects of Exterior Ballistics, Hornady has a useful discussion of External Ballistics including the effects of altitude and temperature. To dig deeper, Sierra Bullets has a comprehensive Exterior Ballistics Resource Page with multiple sections from the Sierra Manual (4th and 5th Editions), including:
Example from Section 3.0: “When a bullet flies through the air, two types of forces act on the bullet to determine its path (trajectory) through the air. The first is gravitational force; the other is aerodynamics. Several kinds of aerodynamic forces act on a bullet: drag, lift, side forces, Magnus force, spin damping force, pitch damping force, and Magnus cross force. The most important of these aerodynamic forces is drag. All the others are very small in comparison when the bullet is spin-stabilized.”
Ever wonder how rifles, actions, stocks, optics, suppressors, and ammo components are produced in factories around the world? Today’s Saturday at the Movies installment features fascinating videos filmed inside major firearms industry factories including BAT Machine, ZEISS, Norma, SAKO, Nosler, CCI and Federal.
BAT Custom Rifle Actions — Factory Tour and Owner Interview
BAT Machine Co. makes some of the finest custom actions you can buy. Numerous national and world records have been set with BAT actions. To create this video, Ultimate Reloader’s Gavin Gear visited the BAT Machine production center in Post Falls, Idaho. Gavin talked with BAT’s founder Bruce Thom. The video features extensive footage of advanced CNC machines used to produce the superb BAT actions. If you own a BAT action, or hope to acquire one some day, definitely watch this video. CLICK HERE for Full Story.
Norma Ammunition Factory — Cartridge Creation Start to Finish
Norma has released a fascinating video showing how bullet, brass, and ammunition are produced at the Norma Precision AB factory which first opened in 1902. You can see how cartridges are made starting with brass disks, then formed into shape through a series of processes, including “hitting [the cup] with a 30-ton hammer”. After annealing (shown at 0:08″), samples from every batch of brass are analyzed (at multiple points along the case length) to check metal grain structure and hardness. Before packing, each case is visually inspected by a factory worker.
The video also shows how bullets are made from jackets and lead cores. Finally, you can watch the loading machines that fill cases with powder, seat the bullets, and then transport loaded rounds to the packing system. Guys, watch this video! You won’t be disappointed. The camera work and editing are excellent — there are many close-ups revealing key processes such as annealing and head-stamping.
SAKO Factory Tour in Finland
SAKO produces some of the best hunting rifles you can buy. SAKO, along with its sister company Tikka, operates sophisticated production facilities in Finland. In the video below, Canadian journalists visit the SAKO factory where rifles are made. It is interesting to see how stocks are made and barrels are bored and contoured. SEE More HERE.
Nosler Bullet Manufacturing
Ever wanted to see how Nosler bullets and cartridges are made? Here’s your opportunity. The Rocky Mountain Elk Foundation (RMEF) has produced a video (“Quality First”) that offers a behind-the-scenes look inside Nosler’s Oregon factory that produces bullets, brass, and ammunition. RMEF representatives visited Nosler’s famously-guarded manufacturing plant to show the technology used by Nosler to produce bullets and ammunition. After the intro, this video illustrates Nosler’s bullet construction techniques with a cool animation sequence. The video then showcases the Nosler ballistics lab, inspection room, and packaging line. SEE more HERE.
Video Showcases Nosler Production Facility and Ballistics Lab
ZEISS Sport Optics
ZEISS is a world leader in lens and optics technology. Along with ultra-high quality lenses used in production of computer chips and special optics for high-tech medical equipment, ZEISS produces great optics for hunters and shooters. ZEISS lenses are renowned for their sharpness, clarity, and high light transmission. ZEISS has a new series of LRP S3and LRP S5 First Focal Plane scopes which promise to be favorites among PRS/NRL competitors and long-range hunters.
Silencerco Suppressor Fabrication Start to Finish
Here’s a cool video that shows the entire production process for a SilencerCo Octane pistol suppressor start to finish. Beginning with the raw materials, this video shows a wide variety of cutting, milling, drilling, burnishing, fitting, metal bathing, surface finishing, and laser etching processes. If you have any interest in production methods you’ll want to watch this video all the way through, and maybe a second time.
Rimfire Ammo Production at CCI/Speer and Federal Factories
YouTube host 22Plinkster got a chance to tour the CCI/Speer production facility in Lewiston, Idaho. This large plant produces both rimfire and centerfire ammunition. While touring the plant, 22Plinkster was allowed to capture video showing the creation of .22 LR rounds from start to finish. This is a fascinating video, well worth watching.
This revealing video shows all phases of .22 LR ammo production including cupping, drawing, annealing, washing, drying, head-stamping, priming, powder charging, bullet seating, crimping, waxing, inspection, and final packaging.
Field & Stream Tours Federal Ammo Plant in Minnesota
A while back Field & Stream toured the Federal ammunition production facility in Anoka, Minnesota. This large plant produces both rimfire and centerfire ammunition. While touring the plant, the reporter was allowed to capture video showing the creation of .22 LR rounds from start to finish. This is a fascinating video, well worth watching. Click speaker icon for sound.
Note to Viewers — After Starting Video, Click Speaker Icon to HEAR audio!
The Manufacturing Process for .22 LR Rimfire Ammunition Shooting Sports USA explains: “Rimfire cartridge cases are the oldest self-contained cartridge in existence, having been in continuous production since the mid-1850s. Rimfire cases are drawn from a thin piece of brass and formed with a hollow rim. A priming compound is then forced into the case using centrifugal force, where it is charged with powder and a bullet is seated in the mouth of the case. The case is then crimped around the bullet to ensure sufficient push and pull when the round is fired. When the firing pin strikes the thin brass rim of the case, the hollow rim is crushed and the primer is ignited.” Source: SSUSA.org 9/2/2017.
Progressive reloading presses offer shooters speed and efficiency in producing custom-tailored rifle and pistol ammunition. However, there is a wide choice of Progressive Presses and a bewildering array of options to consider. In this video, the 6.5 Guys and UltimateReloader.com’s Gavin Gear provide an overview of the leading Progressive Presses on the market along with key considerations for precision rifle shooters. If you are considering getting a Progessive for rifle ammo reloading, you should watch this informative, 25-minute video.
10 Tips for Reloading Rifle Ammo on a Progressive Press:
1. Make sure the brass is very clean. Don’t mix old range pick-up brass with newer brass.
2. Apply a thin, spray lube to all cases before the sizing/loading cycle.
3. Consider priming your brass separately (with a hand or bench tool) before the operation. Then inspect the primers before loading powder and bullets.
4. Always wear eye protection when loading with the Progressive, particularly if you are priming cases.
5. With masking tape, mark the powder measure/dropper with the powder type and cartridge charge weight. Check the charge mass multiple times (see below).
6. Cycle a few cases, sizing and adding powder but NOT seating bullets. Weigh the powder charges to ensure the powder measure is dispensing the correct charge. Sometimes this will change a couple tenths as it “settles down” after the first few charges.
7. Check the brass for shoulder bump and bullet seating depth carefully for the first few rounds, then check again periodically.
8. Try to maintain a steady pace and operate the handle the same way every time.
9. Visually inspect the powder charge in each case (before bullet seating), and use a lock-out die if your Progressive Press has enough stations.
10. Never, ever mix pistol and rifle powders! If you have previously loaded pistol ammo with your Progressive, make sure ALL the powder (every flake and kernel) is removed from all parts of the powder-dropping system before you add rifle powder.
Visit these sites for more Reloading and Precision Shooting Videos:
This week, Shooting USA TV spotlights the 2022 GAP Grind, the largest PRS Pro-Am Tactical match with nearly 400 competitors. The 10th Annual GA Precision/Elite Tactical GAP Grind PRO-AM was held September 30 through October 2, 2022 at the K&M Shooting Complex in Tennessee. The GAP Grind, the largest, most popular PRS match in the world, drew nearly 400 amateur and pro shooters from across the USA and from many other nations. Recognized as the premier PRO-AM precision rifle match with both individual and team competition, the GAP Grind has introduced thousands of new shooters to the sport since its inception. It was great to see the GAP Grind successfully mark its 10th Anniversary.
SHOW TIMES: This Shooting USA Episode airs Wednesday, November 16, 2022 at 9:00 PM Eastern and Pacific; 8:00 PM Central. If you miss the regular broadcast, you can stream the show at any time on Vimeo for $0.99 per episode.
In this video Eagle Eye Shooting Shares Highlights from the 2022 GAP Grind
Excellent Attendance at 10th Annual GAP Grind Event
The year’s largest PRS match drew hundreds of attendees, and more than 80,000 rounds were fired throughout the three-day event. In addition to competition stages, the GAP Grind featured a vendor area, live music and entertainment. Bushnell gave out $5,000 to the top place finishers and added over $5,000 worth of product to the prize table. Trophies were awarded to the top 5 teams, top 5 professionals, and to the top 5 amateurs.
Lots of Action, with 20+ Stages
The GAP Grind is a challenging, “high tempo” match with minimal down-time between stages. Over the course of 20+ stages, competitors will fire 200+ shots at a variety of steel, paper, moving, and reactive targets out to 1,200 yards. Targets vary in size/difficulty based on the shooter’s position, distance, and time allotted. Most stages include “stressors” — i.e. time limits or required movement(s).
This extensive, 45-minute video shows many of the 2022 GAP Grind Stages
GAP Grind Pro-Am Format — Seasoned Shooters Help Newcomers
The GAP Grind typically attracts nearly 400 competitors — half experienced shooters and the other half newcomers to the sport. The key to growing the shooting sports is attracting new shooters. The best way to bring in “new blood” seems to be the Pro-Am type format. At the GAP Grind, experienced shooters share their knowledge and guide the new shooters through the competition.
GAP Grind Hardware
You’ll find the latest and greatest PRS hardware at the GAP Grind. Over the past few seasons, most top competitors have “stepped down” from the 6.5/6mm Creedmoor to the smaller, more efficient 6mm Dasher, 6BRA, 6 GT and other 6mm cartridges. The Dasher offers excellent accuracy with less recoil than the 6.5 Creedmoor. Also, many competitors will be switching to the impressive new Zeiss FFP LRP S3 and S5 scopes in the months ahead.
NOTE: There are ten (10) shots in the group, but for simplicity we are only displaying five (5) shot circles. Adding more circles won’t change the measurement because the two most distant shots, which determine group size, ARE included.
What kind of 200-yard accuracy can you get in an enclosed, underground test range? Would you believe 0.162 MOA at 200 yards with a .338? Have a look at these test targets from Sierra Bullets. Like most bullet manufacturers, Sierra does live-fire bullet testing to ensure that Sierra projectiles perform as promised, with repeatable accuracy. Sierra tests bullets in its own underground test complex. Sierra’s 300-meter test range is the longest, privately-owned underground bullet test facility in the Western Hemisphere.*
Day in and day out, various bullet types are tested using a big collection of barreled actions. These barreled actions are clamped in stout, return-to-battery test fixtures. These big, heavy test fixtures provide near-perfect repeatability (with no human-induced holding or aiming errors).
Sierra Bullets 10-Shot Groups at 200 yards
Check out these 10-shot test groups shot at the Sierra Test Range at 200 yards. Note that the numbers listed on each sample are actual measurements in inches. To convert to MOA, cut those numbers in half (to be more precise, divide by 2.094, which is 1 MOA at 200 yards). For example, the 0.340″ middle group works out to 0.162 MOA at 200 yards.
Scan-Verified 0.162 MOA Accuracy at 200 Yards
To verify the accuracy of Sierra’s measurements, we measured the middle (.338 caliber) 10-shot group with our On-Target Group Measurement software. We registered a group size reading of 0.339″ — within one-thousandth of the Sierra measurement. The calculated group size in MOA (Minute of Angle) is 0.162.
That’s amazingly good for ten rounds of big .338 caliber bullets. A FIVE-shot 0.162 MOA group at 200 would be considered excellent at any benchrest match. But remember this target has TEN shots. The current, one-target IBS world record for ten shots at 200 yards is 0.245″, set by Ed Watson in 1999.
Bevy of Barreled Actions for Bullet Testing
Sierra Bullets uses dozens of barreled actions for testing bullets in its enclosed, 200-yard test range. Each barrel has its own logbook to track the barrel’s usage.
Click Photo to Zoom
*Even Longer Test Tunnels Exist in Europe: At Stadeln in Germany, RWS (now part of RUAG) owns a 500 meter tunnel (above ground level) which has existed for decades. In Thun, Switzerland, RUAG has a fully-instrumented 500 meter underground tunnel. Near Ulm, Germany, there is a 5-lane 300 meter underground shooting range that is open to the public.
Readers often ask us: “Is there an inexpensive way I can get started in position shooting?” The answer is “yes” — across the country CMP-affiliated clubs host Rimfire Sporter matches. You can use a wide variety of .22 LR rimfire rifles — manual actions (such as a Winchester model 52) or semi-automatics (such as a Ruger 10/22). There are prone, sitting/kneeling, and standing stages. CMP rules provide separate classifications for scoped rifles, open-sighted rifles, and aperture-sighted rifles. The matches are fun, the ammo is inexpensive, and everyone has a good time while improving their marksmanship.
Rimfire Sporter Match Basics
The CMP Rimfire Sporter Rifle Match is an inexpensive, fun-oriented competition using .22 caliber sporter rifles (plinking and small game rifles) commonly owned by most gun enthusiasts. To compete, all you need is a basic rifle, safety gear, and ammunition. No fancy, high-dollar rifles are required.
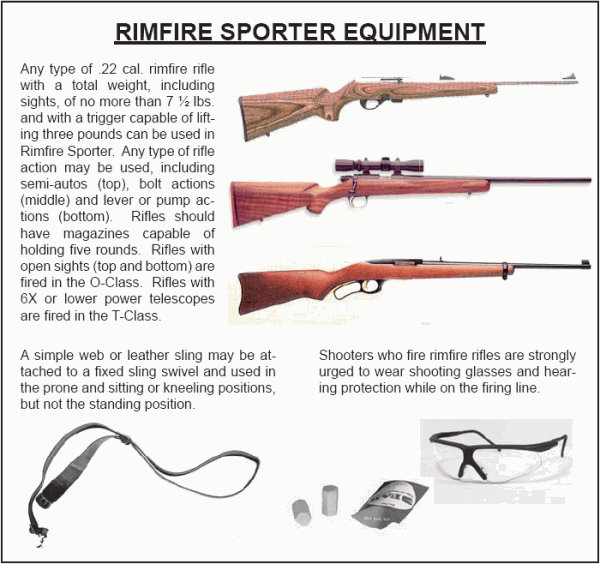
The event is shot with standard sporter-type, rimfire rifles weighing no more than 7.5 pounds, with sights and sling. Rifles may be manually-operated or semi-automatic. Rifles may be manually operated or semi-automatic, with three classes.
The three classes of competition are: 1) standard “O Class” for open-sighted rifles; 2) “T-Class” for telescope-sighted and rear aperture-sighted rifles; and 3) “Tactical Rimfire” class, which is a .22 caliber A4 or AR15 style rifle.
Firing for all classes is done at 25 and 50 yards on a target with a 1.78″ ten-ring and an 18″ outer one-ring. Even new shooters can get hits on this target, but it’s still challenging.
Rimfire Sporter Excellence
Above, young Samuel Payne won the inaugural Talladega 600 Rimfire Sporter event. In 2015, Payne became the first-ever Rimfire Sporter competitor to fire a perfect 600 x 600 score (600-50X) in a CMP-sponsored competition. Payne shot the perfect score at the CMP Eastern Games at Camp Butner, NC.
Rimfire Sporter Competition is fun for all ages — including senior shooters.
Rimfire Sporter Course of Fire
In a CMP Rimfire Sporter match, competitors will complete slow fire prone, rapid fire prone, slow fire sitting or kneeling, rapid fire sitting or kneeling, slow fire standing, and rapid fire standing shot sequences.
The CMP has adaptive Rimfire Sporter programs for shooters with physical impairments.
Rimfire Sporter Local Matches with Modified Rules
One great thing about the rimfire shooting discipline is that you can start with a very inexpensive rifle and still be competitive and have fun. The matches involve multiple stages including standing, kneeling/sitting, and prone. There are classes for both scoped rifles and iron-sights rifles.
Our friend Dennis Santiago helps run CMP Rimfire Sporter Matches in Southern California. Dennis observes: “You want something challenging? Well that X-Ring 50 yards away is the diameter of a 50 cent piece, and there are people out there that can womp that thing with iron sights.”
Dennis notes: “There are six (6) stages of fire on a tough little target. Notice the rifles that can be used run the gamut from pump and bolt actions to variations on the semi-auto theme. All still require a good eye and a steady hold to earn one’s bragging rights for the day. A match takes about an hour and a half per relay. The slowest part of the match is initial sighting in. It’ll take longer than the allocated 5 minutes for the typical first timer coming to a club match.”
At Dennis’s Burbank Rifle & Revolver Club (BRRC), procedures are modified a little bit: “What we typically do at BRRC is run two relays. Experienced competitors shoot per the full rulebook. New shooters are afforded a bit more relaxed environment to make the experience more fun and inviting. We do the same thing in our M-1 Garand Clinic/Match series.”
Official CMP Guide to Rimfire Sporter Competition
The Civilian Marksmanship Program (CMP) has a CMP Guide to Rimfire Sporter Shooting. This FREE, 50-page digital publication covers equipment, positions, course of fire, rules, scoring and much more. You’ll find helpful “how-to” sections on aiming, sight picture, hold control, and trigger control. Reading these instructional sections can benefit any prone or three-position competitive shooter.
Rimfire Sporter competitors should read Gary Anderson’s Rimfire Sporter Guide Part II. This well-illustrated, 8-page, 2014 publication covers shooting positions, sling use, sight picture, trigger technique and more.
Highlights from the 2016 National Rimfire Sporter Match at Camp Perry:
* Shooting Sports USA notes: “Samuel Payne had an unforgettable 2015. At just 16, he dominated the Rimfire Sporter events at the Civilian Marksmanship Program’s (CMP) Eastern Games, National Matches, Western Games and the Talladega 600, while also setting two new National Records during the year. Sam’s photo also graced the cover of the 10th Edition of the CMP Guide to Rimfire Sporter Shooting — and rightfully so. He proved his undeniable talent at every event he entered, not only winning the matches, but also setting the bar high for competitors in the future.”
Hunting season continues in many areas of the nation, so many game hunters have questions about terminal performance and particular caliber/cartridge combinations. Bryan Litz of Applied Ballistics says there are really a number of questions that need to be answered:
1) What’s the max range that the shooter/rifle is capable of hitting the intended target?
2) What’s the max range that a bullet can kill the intended game?
3) How do bullets kill?
4) Effects of Muzzle Velocity on Lethality.
(Your MV may be lower in winter with temp-sensitive powders).
5) Long Range Lethality and the Ballistic Coefficient.
You’ll find answers to these and other questions in Bryan’s book, Applied Ballistics for Long-Range Shooting. These topics are covered in Chapter 15: Lethality of Long Range Hunting Bullets. Bryan says: “For responsible hunting, knowing your limits and your rifle’s limits, is important.”
Bryan’s book also includes Bullet Lethality Charts for a variety of calibers and cartridge types. These charts feature categories for 600-lb, 300-lb, and 150-lb Game animals so you can match performance to the size of your prey. Bryan explains: “If I wanted to know how a Medium Capacity Cartridge shooting the 6mm Berger 115 VLD will perform on 300-pound game, I can reference the bullet-specific chart.”
Here is an interesting project by one of our Forum members. Martin C. (aka “Killick”) modified an Anschutz 1411 Match 54 rimfire prone stock to become a comfortable, great-tracking F-Class Open Division Stock. No Killick didn’t sacrifice a perfectly good rimfire rifle for this project — he bought the Anschutz stock by itself on eBay, then transformed it…
Killick explains: “This project started about seven years ago. I bought the Anschutz prone stock on eBay and whittled it a bit into a Palma rifle with a Barnard action and block and a Doan Trevor cheek piece and scope rail. Then about two years ago I decided to re-task the stock/action assembly into an F-Open rig. With more whittling, gluing, sanding, body fillering, sanding, filling, sanding, more sanding…and sanding, forming, priming, sanding, painting, waiting, painting, painting…painting and before you know it, Bob’s your uncle.”
Here is the eBay-sourced Anschutz 1411 stock, with new high-gloss blue finish, as initially modified for use in Killick’s centerfire Palma rifle. Looks nice!
Next step was the addition of a 3″-wide wood fore-end for F-Open duties with front rest:
Almost done here… just needs priming and final painting:
Here is Killick’s completed F-Open rifle with its much-modified Anschutz stock now finished in fire-engine red lacquer. This image shows the detail of the grip and customized cheekpiece.
“On that day, let us solemnly remember the sacrifices of all those who fought so valiantly, on the seas, in the air, and on foreign shores, to preserve our heritage of freedom, and let us reconsecrate ourselves to the task of promoting and enduring peace so that their efforts shall not have been in vain.”
– 1954, President Dwight D. Eisenhower, Veterans Day proclamation.
104 Years Later…
On the 11th hour, of the 11th day, of the 11th month of 1918, bugle calls signaled the ‘cease fire’ ending the First World War. (The official Armistice was signed earlier that morning.) To those who endured it, WWI was the “Great War”, “the War to End All Wars.” Tragically, an even greater conflict consumed the world just two decades later.
Today, 104 years after the end of WWI, Americans mark the anniversary of the WWI Armistice as “Veterans Day”. In Canada it is known as Remembrance Day. On this solemn occasion we honor all those who have served in the military in times of war and peace.
While more veterans pass away each year, there are still about 19 million veterans in the United States. Take time today to honor those soldiers, sailors, and airmen who have served their nation with pride. Today we remember that… “All gave some, and some gave all.” History of Veterans Day.
Former Secretary of Veterans Affairs Dr. James Peake asked Americans to recognize the nation’s 19 million living veterans and the generations before them who fought to protect freedom and democracy: “While our foremost thoughts are with those in distant war zones today, Veterans Day is an opportunity for Americans to pay their respects to all who answered the nation’s call to military service.”
On Veterans Day we especially need to remember the seriously wounded combat veterans. These men and women summon great courage every day to overcome the lasting injuries they suffered in battle. Some of these soldiers have lost limbs, yet volunteered to return to combat duty. That is dedication beyond measure — true patriotism.
National Veterans Day Ceremony
The Veterans Day National Ceremony is held each year on November 11th at Arlington National Cemetery. The ceremony commences precisely at 11:00 a.m. with a wreath laying at the Tomb of the Unknowns and continues inside the Memorial Amphitheater with a parade of colors by veterans’ organizations. The ceremony is intended to honor and thank all who served in the U.S. Armed Forces. Major regional ceremonies and events are also held throughout the country.


 The question has been posed: “What effect does altitude have on the flight of a bullet?” The simplistic answer is that, at higher altitudes, the air is thinner (lower density), so there is less drag on the bullet. This means that the amount of bullet drop is less at any given flight distance from the muzzle. Since the force of gravity is essentially constant on the earth’s surface (for practical purposes), the bullet’s downward acceleration doesn’t change, but a bullet launched at a higher altitude is able to fly slightly farther (in the thinner air) for every increment of downward movement. Effectively, at higher altitudes, the bullet behaves as if it has a higher ballistic coefficient.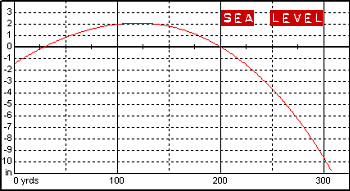


 Norma has released a fascinating video showing how bullet, brass, and ammunition are produced at the


 Scan-Verified 0.162 MOA Accuracy at 200 Yards




 You’ll find answers to these and other questions in Bryan’s book,


