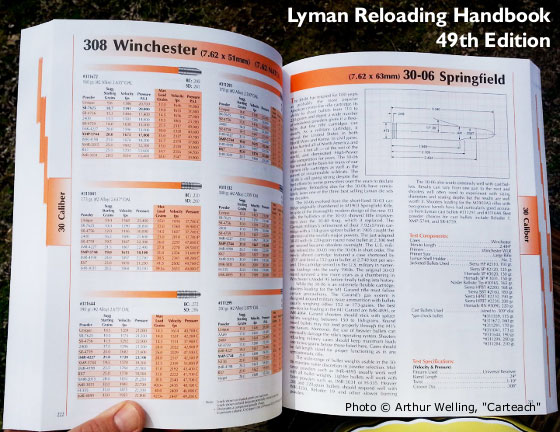
What’s the best book for folks getting started in metallic cartridge reloading? According to our Forum members, the best manual for “newbie” reloaders is the Lyman Reloading Handbook. In our Shooters’ Forum, a newcomer to reloading was looking for a basic reloading guide that also included load data. The most recommended book was the Lyman Handbook, now in its 50th Edition (just released). Along with “how-to” advice on reloading procedures, the Lyman Manual features cartridge specifications and load data for the most popular cartridges.*
Here are some comments from Forum members:
“The Lyman book is an excellent manual with a large section describing the process of reloading. I heartily recommend it. As a beginning reloader, you may want to consider purchasing more than one book in order to get different perspectives on the reloading regimen. One can never be too careful. A ‘minor’ mistake can be costly.” — Cort
“In my opinion, the Lyman Manual is one of the best for the beginning reloader since it covers all the basics and some advanced methods. If possible, you would be also well served to hook up with an experienced reloader, preferably a target shooter or long-range varmint hunter, who can also give you some very useful pointers on precision reloading.” – K22
Editor’s NOTE: K22 echoes the advice we give to new hand-loaders. We suggest that novices find an experienced mentor who can “show them the ropes” and guide them through the basics.
Another gun blogger agrees that the Lyman Manual is a logical choice for new handloaders:
Carteach Review: The Lyman Reloading Manual
“[Lyman publishes] an excellent manual for any handloader, but especially for those new to the craft. Perhaps the best judgment of a handloader’s regard for a reloading manual is which one he chooses to give someone new to the fold. The needs of a new reloader differ from those of someone with long experience, and the right manual can set the foundation for years of safe procedures. Here is the one I choose to give a good friend embarking down the path:”
Carteach adds: “Lyman has always taken pains to provide very clear and understandable instruction on the basic process of reloading cartridges. The imaging is helpful and to the point. The load data Lyman provides is comprehensive, and [Lyman] takes the time to note special circumstances which new loaders need to be aware of. As example, the .30-06 section has some words regarding the M-1 Garand and its special needs. For someone who has never loaded for the Garand, these few sentences are golden!”
*We recommend that you always double-check printed load data with the latest web-based data from the actual powder manufacturers. Powder properties can change. The most current powder data is usually found on the powder-makers’ websites.
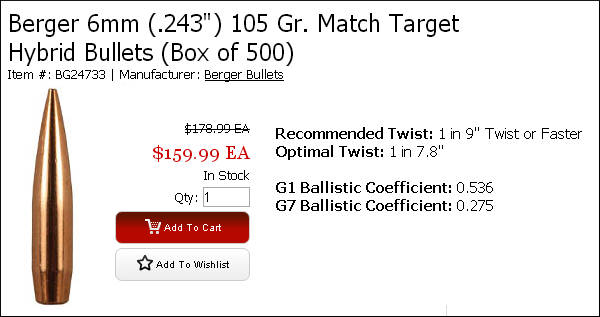
Need top-quality 6mm match bullets for your 6mmBR, 6mm Dasher, 6XC, 6mm Creedmoor, 6-6.5×47, or .243 Win? Then get out your checkbook, because this is a very good deal on hard-to-find Berger 6mm 105gr Hybrid Match Bullets.
Right now Precision Reloading offers big, 500-count boxes of 105gr 6mm Hybrids for just $159.99. That works out to just $31.99 per 100, a lot less than you’d pay normally. These .243-diameter premium bullets hold many records and have won many important shooting competitions. You may want to act quickly — supplies are limited. When Precision Reloading runs out of sale inventory, prices will go up. To order, visit PrecisionReloading.com
The wait is over… Creedmoor Sports is now producing some of the best .223 Rem target ammo you can buy. Three “match-grade” types are offered with Sierra bullets and NEW Lake City cartridge brass. If you shoot Service Rifle, you may find that this new Creedmoor ammo rivals good handloads — and that’s quite an achievement. Creedmoor General Manager Dennis DeMille, a past National Service Rifle Champion, states: “As a National Rifle Champion and having fired probably a Gazillion rounds down range (mostly hand loads), I would not hesitate to compete with this ammunition on a National Level!”
Creedmoor currently offers .223 Rem competition ammo loaded with three of the most popular projectiles: 69 grain Sierra TMK (Tipped MatchKing), the 77 grain Sierra TMK, and the 77 grain Sierra BTHP. All three ammo types are loaded in Creedmoor’s new production facility using brand new Lake City Brass. As with all Creedmoor Ammo, each lot is pressure tested and velocity tested prior to every round being hand-inspected and packaged. That gives you confidence that this ammo is consistent lot to lot. Given the quality of this ammo, it is VERY affordable, starting at $34.75 per 50-round box. That works out to $0.69 per round. At that price, when you consider hand-loading, you have to ask yourself “what’s your time worth”? Would that time be better spend practicing?
Quantity Discounts and FREE Shipping on Large Orders
Creedmoor offers quantity discounts on the .223 Rem ammo: “Order Five (5) or more boxes of any one round to get your first price break. Order Ten (10) boxes of ANY combination of Creedmoor Ammo (Rifle or Pistol, Mix and Match) you get free shipping.”
There’s an all-new book from Applied Ballistics. Modern Advancements in Long Range Shooting – Volume II, is now available for pre-order from the Applied Ballistics eStore. This 356-page hardcover resource is chock full of information, much of it derived through sophisticated field testing. The pre-order price is $34.95, $5.00 off the regular $39.95 price. The books are expected to ship in July, 2016.
AUDIO FILE: Bryan Litz Talks about Modern Advancements in Long Range Shooting, Volume 2. (Sound file loads when you click button).
Volume II of Modern Advancements in Long Range Shooting contains all-new content derived from research by Applied Ballistics. Author Bryan Litz along with contributing authors Nick Vitalbo and Cal Zant use the scientific method and careful testing to answer important questions faced by long range shooters. In particular, this volume explores the subject of bullet dispersion including group convergence. Advanced hand-loading subjects are covered such as: bullet pointing and trimming, powder measurement, flash hole deburring, neck tension, and fill ratio. Each topic is explored with extensive live fire testing, and the resulting information helps to guide hand loaders in a deliberate path to success. The current bullet library of measured G1 and G7 ballistic coefficients is included as an appendix. This library currently has data on 533 bullets in common use by long range shooters.
Bryan tells us that one purpose of this book is to dispel myths and correct commonly-held misconceptions: “Modern Advancements in Long Range Shooting aims to end the misinformation which is so prevalent in long range shooting. By applying the scientific method and taking a Myth Buster approach, the state of the art is advanced….”
Bullet Dispersion and Group Convergence
Part 1 of this Volume is focused on the details of rifle bullet dispersion. Chapter 1 builds a discussion of dispersion and precision that every shooter will benefit from in terms of understanding how it impacts their particular shooting application. How many shots should you shoot in a group? What kind of 5-shot 100 yard groups correlate to average or winning precision levels in 1000 yard F-Class shooting?
Chapter 2 presents a very detailed investigation of the mysterious concept of group convergence, which is the common idea that some guns can shoot smaller (MOA) groups at longer ranges. This concept is thoroughly tested with extensive live fire, and the results answer a very important question that has baffled shooters for many generations.
Part 2 of this Volume is focused on various aspects of advanced hand-loading. Modern Advancements (Vol. II) employs live fire testing to answer the important questions that precision hand loaders are asking. What are the best ways to achieve MVs with low ES and SD? Do flash hole deburring, neck tension, primer selection, and fill ratio and powder scales sensitivity make a difference and how much? All of these questions are explored in detail with a clear explanation of test results.
One of the important chapters of Part 2 examines bullet pointing and trimming. Applied Ballistics tested 39 different bullet types from .224 through .338 caliber. Ten samples of each bullet were tested for BC in each of the following configurations: original out of the box, pointed, trimmed, pointed and trimmed. The effect on the average BC as well as the uniformity in BC was measured and tabulated, revealing what works best.
Part 3 covers a variety of general research topics. Contributing author Nick Vitalbo, a laser technology expert, tested 22 different laser rangefinders. Nick’s material on rangefinder performance is a landmark piece of work. Nick shows how shooters can determine the performance of a rangefinder under various lighting conditions, target sizes, and reflectivities.
Chapter 9 is a thorough analysis of rimfire ammunition. Ballistic Performance of Rifle Bullets, 2nd Edition presented live fire data on 95 different types of .22 rimfire ammunition, each tested in five different barrels having various lengths and twist rates. Where that book just presented the data, Chapter 9 of this book offers detailed analysis of all the test results and shows what properties of rimfire ammunition are favorable, and how the BCs, muzzle velocities and consistency of the ammo are affected by the different barrels.
Chapter 10 is a discussion of aerodynamic drag as it relates to ballistic trajectory modeling. You will learn from the ground up: what an aerodynamic drag model is, how it’s measure and used to predict trajectories. Analysis is presented which shows how the best trajectory models compare to actual measured drop in the real world.
Finally, contributing author Cal Zant of the Precision Rifle Blog presents a study of modern carbon fiber-wrapped barrels in Chapter 11. The science and technology of these modern rifle barrels is discussed, and then everything from point of impact shift to group sizes are compared for several samples of each type of barrel including standard steel barrels.
Ever wonder how (and where) Sierra tests its bullets? The answer is underground, in a 300-meter test tunnel located under Sierra’s factory in Sedalia, Missouri. The photo above shows the construction of the tunnel back in May, 1990. Like most bullet manufacturers, Sierra does live-fire bullet testing to ensure that Sierra projectiles perform as promised, with repeatable accuracy. Sierra’s 300-meter test range is the longest, privately-owned underground bullet test facility in the world. Sierra offers free tours of the test tunnel as part of Sierra’s Factory Tour Program.
Sierra Bullets tests every new bullet design and each lot of bullets. Sierra tells us: “When [we] change to a new bullet they are continually shooting them until they get the bullet properly set up and running and the range releases them to run (meaning the bullets shoot to spec). [Testers] are required to shoot at any lot change and periodically throughout the lot … even if it is just a press operator change. Lot sizes can vary from 5,000 to over 100,000 thousand. If anything changes — it is a new lot. When a new operator comes on — it is a new lot.”
Bevy of Barreled Actions for Bullet Testing
Sierra Bullets uses dozens of barreled actions for testing bullets. These barreled actions are clamped in stout, return-to-battery test fixtures. These heavy test fixtures provide near-perfect repeatability (with no human-induced holding or aiming errors). Each barrel has its own logbook to track the barrel’s usage. Interestingly, Sierra does not have a specific round count for barrel life. When a barrel starts “opening up”, i.e. showing a decline in accuracy, then the barrel is replaced, whether it has 800 rounds through it or 5,000.
Click Photo to Zoom
Sierra Bullets 10-Shot Groups at 200 yards
What kind of 200-yard accuracy can you get in an enclosed, underground test range? Would you believe 0.162 MOA at 200 yards with a .338? Check out these 10-shot test groups shot at the Sierra Test Range at 200 yards. Note that the numbers listed on each sample are actual measurements in inches. To convert to MOA, cut those numbers in half (to be more precise, divide by 2.094, which is 1 MOA at 200 yards). For example, the 0.340″ middle group works out to 0.162 MOA at 200 yards.
At the request of our readers, we provide select “Deals of the Week”. Every Monday morning we offer our Bargain selections. Here are some of the best deals on firearms, hardware, reloading components, and shooting accessories. Be aware that sale prices are subject to change, and once clearance inventory is sold, it’s gone for good. You snooze you lose.
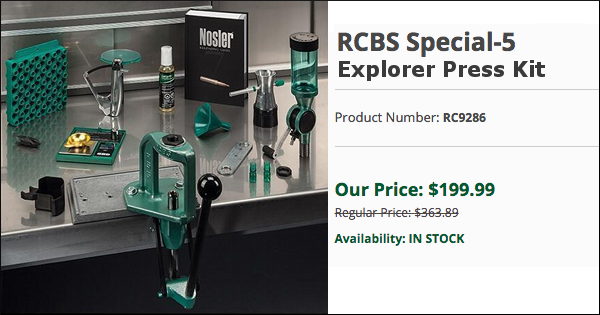
1. Natchez — Special 5 Reloading Press Kit, $199.99
This is an excellent entry-level reloading kit, which is on sale for $199.99 at Natchez Shooters Supply. We like the relatively compact Special 5 press for most reloading duties. Eventually you many want to add an additional large heavy press, but this will get the job done. This kit includes an RCBS Powder Measure, Digital Scale, Powder Trickler, Hand Priming Tool, Load Manual, Loading Tray, and more. It’s hard to beat this combination of tools for under $200.00.
2. CDNN Sports — Remington 597 for $149.99
Looking for a “first rifle” for a family member? Consider this semi-auto Remington 597. It currently retails for just $149.99. That’s right, for under $150 you can get a reliable, self-feeding rimfire rifle that will provide years of fun for a young shooter. The 597 has a stock that’s sized right for both youngsters and adults. Receivers are dovetailed for standard rimfire rings and are also drilled and tapped to allow mounting of Weaver-style bases.
3. Grafs.com — Forster Co-Ax Reloading Press on SALE
If you’ve been patiently waiting to acquire a Forster Co-Ax® reloading press, now’s the time to strike. Grafs.com has Co-Ax presses on sale this week at $289.99. That includes shipping charges (with one flat $7.95 handling charge per order).
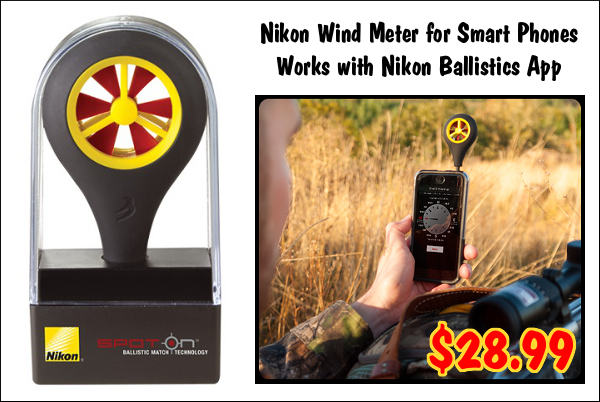
4. Grafs.com — NEW Nikon Wind Meter for SmartPhones, $28.99
Here’s a great new gadget for under $30.00. Nikon’s new Spot On™ Ballistic Wind Meter plugs directly into the headphone port on most popular smart phones. The Spot On Wind Meter reads both wind speed and direction and inputs the data directly into Nikon’s free Spot On Ballistics Mobile App (available for iOS and Android). This allows you to quickly determine and calculate wind drift corrections without needing a separate, dedicated wind meter. When not in use, the Nikon device easily fits in a pocket.
Everyone needs a good .22 LR rimfire handgun, and the Browning Buck Mark is a classic. This stainless, bull barrel version is marked down this week to $379.99. That’s a very good price. Buckmarks, with their excellent triggers and great ergonomics, are fun to shoot and VERY accurate. This is a pistol you can keep for a life-time and pass on to your kids. Browning says: “Every Buck Mark starts out as a solid piece of aircraft-grade 7075 aluminum alloy, and then is CNC machined to exacting tolerances. The crisp single-action trigger, hand reamed chamber, target crowned barrel and finely adjustable target sights mean the Buck Mark comes ready for fun straight from the box.”
In this video, Forum member Erik Cortina shows how to create a custom modified case for use with the Hornady Lock-N-Load Overall Length Gauge (formerly the Stoney Point Tool). While Hornady sells modified cases for many standard cartridges, if you shoot a wildcat such as the 6mm Dasher or .284 Shehane, you’ll need to create a custom modified case*. And even if you shoot a standard cartridge such as the .308 Winchester you can get more consistent measurements if you make a custom modified case from a piece of brass fired in your chamber.
The process is straight-forward. Take a piece of brass fired in your chamber and full-length size it (with about .002″ shoulder bump). Then you need to drill out the primer pocket. Erik uses a mini-lathe for the operation, but this general process can be done with a drill press or other tools. Erik shows how to do this with a 0.290″ HSS (High Speed Steel) drill bit on a mini-lathe. After drilling the hole comes the tricky part — you need to tap the case with the precise 5/16″ x 36 threads per inch (tpi) right-hand thread that matches the male thread on the O.A.L. Gauge. This 5/16″ x 36 tpi tap is pretty uncommon, but you can order it from Amazon.com if you can’t source it locally.
If you use a mini-lathe, Erik suggests loosening the tailstock slightly, so it can float while cutting the threads. Erik also says: “Make sure you get the tap on pretty tight — it’s going to want to spin.” Erik turns the case at about 100 rpm when tapping the threads. Once the case and tap are rigged, the actual tapping process (see video at 6:00) takes only a few seconds. While the mini-lathe makes the tapping process go more quickly, the threading can also be done with other systems.
TIP: Don’t just make one modified case, make three. That gives you one for your range kit, one for your home reloading bench, plus a spare (since you WILL eventually lose or misplace one).
Here’s the Stuff You Need
5/16″-36 TPI Threading Tap
The required thread is somewhat uncommon. You need a 5/16″ – 36 tpi Right Hand Thread Tap. If you can’t find it locally, Amazon.com carries the correct tap. Erik notes: “The 5/16-36 tpi tap is not a common size. I think Hornady did this on purpose to make it more difficult for the average guy to make his own modified cases.”
0.290″ Drill Bit
Erik uses an 0.290″ HSS “L” drill bit. (This “L” Letter Gauge code designates a 0.290″ diameter bit). A close metric equivalent would be 7.3 mm (0.286″). Erik says: “A 9/32″ drill will also work but it will be harder to run the tap in since the hole will be .281″ instead of .290″ with the Letter Gauge L bit.”
Tips for Using O.A.L. Gauge with Modified Case
We’ve noticed that many folks have trouble getting reliable, consistent results when they first start using the Hornady O.A.L. Gauge (formerly the Stoney Point Tool). We’ve found this is usually because they don’t seat the modified case properly and because they don’t use a gentle, consistent method of advancing the bullet until it just kisses the lands.
Here is our suggested procedure for use the O.A.L. Gauge. Following this method we can typically make three of four measurements (with the same bullet), all within .001″ to .0015″. (Yes, we always measure multiple times.)
1. Clean your chamber so there is no build-up of carbon, debris, or lube. Pay particular attention to the shoulder area.
2. Screw the modified case on to the O.A.L. Gauge. Make sure it is seated firmly (and doesn’t spin loose). Note, you may have to re-tighten the modified case after insertion in the chamber.
3. Place your selected bullet so that the ogive (max bullet diameter) is behind the case mouth. This prevents the bullet from “snagging” as you insert the tool in the action.
4. Insert the O.A.L. Gauge into your chamber smoothly. Push a little until you feel resistance. IMPORTANT — You need to ensure that the shoulder of the modified case is seated firmly against the front of your chamber. You may have to wiggle and twist the tool slightly. If you do not have the modified case seated all the way in, you will NOT get a valid measurement.
5. Advance the bullet slowly. (NOTE: This is the most important aspect for consistency!). Push the rod of the O.A.L. tool gently towards the chamber. DON’T shove it hard! Easy does it. Stop when you feel resistance.
6. IMPORTANT. After gently pushing on the rod, give the end of the rod a couple forward taps with your finger. If your bullet was slightly skewed, it may have stopped too far back. Adding a couple extra taps will fix that. If the bullet moves after the taps, then again push gently on the rod. NOT too much! You just want to push the bullet until it just “kisses” the lands and then stops. Do NOT jam the bullet into the rifling. If you do that you will never get consistent results from one measurement to the next.
* For a $15.00 fee, Hornady will make a custom modified case for you if you send two fired pieces of brass. Send fired cases and $15.00 check to: Hornady Manufacturing, Attn: Modified Cases, 108 S. Apollo St., Alda, NE 68810. More Info HERE.
The USAMU recently published a “how-to” article about bullet sorting. While many of us may sort bullets by base-to-ogive length (and/or weight), the USAMU story explores the “how and why” of sorting bullets by Overall Length (OAL). Read the article highlights below, and make your own decision as to whether OAL sorting is worth the time and effort. Bryan Litz of Applied Ballistics says that sorting by OAL is not a bad idea, but base-to-ogive bullet sorting probably represents a better investment of your time.
Bullet Sorting by Overall Length
We’d like to share a specialized handloading technique which we’ve long found beneficial to our long-range (600 yards and beyond) accuracy. Sorting of bullets for extreme long range (LR) accuracy is not difficult to do, but some background in theory is needed.
Here at USAMU’s Handloading Shop, we only sort individual bullets for the most demanding Long-Range applications and important competitions. Only the most accurate rifles and shooters can fully exploit the benefits of this technique. The basic sorting process involves measuring the Overall Length (OAL) of the bullets, and grouping them in 0.001″ increments. It’s not unusual to find lots of match bullets that vary as much as 0.015″-0.020″ in length throughout the lot, although lots with much less variation are seen as well. Even in bullet lots with 0.015″ OAL variation, the bullet base-to-ogive length will show much less variation. Hence, our basic sort is by bullet OAL. One obvious benefit of sorting is easily seen in the attached photo. The few bullets that are VERY different from the average are culled out, reducing probable fliers.
How does one know what OAL increments to use when sorting? The answer is simple. As each lot of bullets is unique in its OAL distribution, it’s best to sample your bullet lot and see how they are distributed. In the attached photo, you will see a set of loading trays with a strip of masking tape running along the bottom. Each vertical row of holes is numbered in 0.001″ increments corresponding to the bullets’ OAL. A digital caliper makes this task much easier. As each bullet is measured, it is placed in the line of holes for its’ OAL, and gradually, a roughly bell-shaped curve begins to form.
Note that near the center, bullets are much more plentiful than near the edges. At the extreme edges, there are a few that differ markedly from the average, and these make great chronograph or sighting-in fodder. We recommend using a sample of 200 bullets from your lot, and 300 is even better. Some bullet lots are very consistent, with a tall, narrow band of highly-uniform bullets clustered together over just a few thousandths spread. Other lots will show a long, relatively flat curve (less uniform), and you may also see curves with 2 or more “spikes” separated by several 0.001″ OAL increments.
Bullet Sorting (OAL vs. Base-to-Ogive vs. Weight) — Litz Talks
I’m often asked what is a the best measure to sort bullets by, and the answer (to this and many other questions in ballistics) is: it depends.
Choosing to sort by overall length (OAL), base to ogive (BTO), bearing surface, weight, etc. can get overwhelming. Shooters typically look for something they can measure, which shows a variation and sort by that. It’s common for dimensional variations to correlate. For example, bullets which are longer in OAL are typically also shorter in BTO, and have longer noses. All these are symptoms of a bullet that was pushed a little further into the pointing die, or possibly had more than average lube while being swaged. So in essence, if you sort by BTO, you’re measuring one symptom which can indicate a pattern in the bullets shape.
So, the question still stands — what should you measure? You’ll always see more variation in OAL than BTO, so it’s easier to sort by OAL. But sometimes the bullet tips can be jagged and have small burrs which can be misleading. Measuring BTO will result in a lower spread, but is a more direct measure of bullet uniformity.
Then there’s the question of; how much variation is too much, or, how many bins should you sort into? Shooters who see 0.025” variation in BTO may choose to sort into 5 bins of 0.005”. But if you have only 0.005” variation in the box, you’ll still sort into 5 bins of 0.001”. What’s correct? You have to shoot to know. Live fire testing will answer more questions, and answer them more decisively than any amount of discussion on the subject. The test I recommend is to identify bullets on the extreme short end of the spectrum, and some on the extreme long end. Load at least 10 rounds of each, and take turns shooting 5-shot groups with them. If there is a difference, it will be evident. The results of the testing will answer your question of: should I sort based on X, Y, or Z?”
You can read more discussion on this and other similar subjects in the new Ballistics & Bullets board in the Accurateshooter.com forum. Heres a link to the thread which is discussing bullet sorting: Bullet Sorting Thread
In our Shooters’ Forum, a member recently noted that he needed to pull down (disassemble) some ammunition that was loaded incorrectly by one of his shooting buddies. You can use an impact puller to do this task, but if you have more than a dozen rounds or so, you may prefer to use a collet-style bullet puller. These work very quickly and positively, making quick work of big jobs. The efficiency of the collet-style puller is worth the investment if you frequently disassemble ammo. These devices retail for under $25.00 (collets sold separately). Normally, you’ll need a specific collet for each bullet diameter. But collets are not that costly, so this isn’t a big deal, particularly if you only load a few calibers, such as .223, 6mm, and .308.
Hornady and RCBS use different mechanisms to tighten the collet around the bullet. On Hornady’s Cam-Lock Bullet Puller, a lever-arm on the top of the bullet puller serves to tighten the collet around the bullet. Simply rotate the lever from the vertical to the horizontal position to grab the bullet. Lower the ram to remove the case. The bullet will drop out when you return the lever arm to the vertical position. This is demonstrated in the video below:
Hornady Cam-Lock Bullet Puller Demonstrated
Collet bullet-pullers resemble a loading die with a lever or handle on the top. They screw into a standard reloading press. Hornady and RCBS both make collet-style bullet pullers. They use the same basic principle — the device tightens a collet around the bullet, and then the bullet is separated from the case by lowering the press ram. NOTE: Collet pullers may leave small marks on your bullets, unlike impact (kinetic) pullers.*
Like the Hornady tool, the RCBS Bullet Puller employs a collet to grab the bullet. However, the RCBS tool tightens the collet in a different way. The head of the RCBS tool is threaded internally. By rotating the lever arm clockwise in a horizontal circle you squeeze the collet around the bullet. To remove the bullet, after lowering the press ram, simply spin the lever arm back in the opposite direction. The use of the RCBS tool is demonstrated in this video:
RCBS Collet Bullet Puller Demonstrated:
WARNING: When removing bullets from loaded cartridges, always make sure there are no obsructions or debris in your shell-holder or under the loaded round. NEVER engage a primer seating accessory on your press when working with loaded rounds. You can cause a round to discharge by contacting the primer! Also, we recommend you keep your head and torso away from the bullet puller tool at all times.
*By contrast, impact pullers rarely mark bullets, particularly if you put a little bit of foam or paper wadding in the closed end of your impact puller. When dismantling loaded rounds, powder kernels can get trapped in the wadding, so you should remove and replace the wadding before changing to cartridges loaded with a different powder type (assuming you intend to save the powder).
There is nothing more frustrating (or embarassing) than sending a live round into your expensive new chronograph. As the photo below demonstrates, with most types of chronographs (other than the barrel-hung Magnetospeed), you can fatally injure your expensive chrono if it is not positioned precisely.
When setting up a chrono, we always unload the rifle, remove the bolt and bore-sight to ensure that the path of the bullet is not too low. When bore-sighting visually, set up the rifle securely on the sandbags and look through the bore, breech to muzzle, lining up the barrel with your aim point on the target. Then (during an appropriate cease-fire), walk behind the chronograph. Looking straight back through the “V” formed by the sky-screens, you should be able to see light at the end of the barrel if the gun is positioned correctly. You can also use an in-chamber, laser bore-sighter to confirm the visual boresighting (see photo).
Adjust the height, angle and horizontal position of the chronograph so the bullet will pass through the middle of the “V” below the plastic diffusers, no less than 5″ above the light sensors. We put tape on the front sky-screen supports to make it easier to determine the right height over the light sensors.
Use a Test Backer to Confirm Your Bullet Trajectory
You can put tape on the support rods about 6″ up from the unit. This helps you judge the correct vertical height when setting up your rifle on the bags. Another trick is to hang a sheet of paper from the rear skyscreen and then use a laser boresighter to shine a dot on the paper (with the gun planted steady front and rear). This should give you a good idea (within an inch or so) of the bullet’s actual flight path through the “V” over the light sensors. Of course, when using a laser, never look directly at the laser! Instead shine the laser away from you and see where it appears on the paper.
Alignment of Chronograph Housing
Make sure the chrono housing is parallel to the path of the bullet. Don’t worry if the unit is not parallel to the ground surface. What you want is the bullet to pass over both front and rear sensors at the same height. Don’t try to set the chrono height in reference to the lens of your scope–as it sits 1″ to 2″ above your bore axis. To avoid muzzle blast interference, set your chronograph at least 10 feet from the end of the muzzle (or the distance recommended by the manufacturer).
Rifles with Elevated Iron Sights
All too often rookie AR15 shooters forget that AR sights are positioned roughly 2.4″ above the bore axis (at the top of the front sight blade). If you set your bullet pass-through point using your AR’s front sight, the bullet will actually be traveling 2.4″ lower as it goes through the chrono. That’s why we recommend bore-sighting and setting the bullet travel point about 5-8″ above the base of the sky-screen support shafts. (Or the vertical distance the chronograph maker otherwise recommends). NOTE: You can make the same mistake on a scoped rifle if the scope is set on very tall rings, so the center of the cross-hairs is much higher than the bore axis line.
TARGET AIM POINT: When doing chrono work, we suggest you shoot at a single aiming point no more than 2″ in diameter (on your target paper). Use that aiming point when aligning your chrono with your rifle’s bore. If you use a 2″ bright orange dot, you should be able to see that through the bore at 100 yards. Using a single 2″ target reduces the chance of a screen hit as you shift points of aim. If you shoot at multiple target dots, place them in a vertical line, and bore sight on the lowest dot. Always set your chron height to set safe clearance for the LOWEST target dot, and then work upwards only.
Other Chronograph Tips from Forum Members:
When using a chronograph, I put a strip of masking tape across the far end of the skyscreens about two-thirds of the way up. This gives me a good aiming or bore-sighting reference that’s well away from the pricey bits. I learned that one the hard way. — German Salazar
A very easy and simple tool to help you set up the chronograph is a simple piece of string! Set your gun (unloaded of course) on the rest and sight your target. Tie one end of the string to the rear scope ring or mount, then pull the string along the barrel to simulate the bullet path. With the string showing the bullet’s path, you can then easily set the chronograph’s placement left/right, and up/down. This will also let you set the chrono’s tilt angle and orientation so the sensors are correctly aligned with the bullet path. — Wayne Shaw
If shooting over a chrono from the prone position off a bipod or similar, beware of the muzzle sinking as recoil causes the front of the rifle to drop. I “killed” my first chronograph shooting off a gravel covered firing point where I’d not given enough clearance to start with and an inch or two drop in the muzzle caused a bullet to clip the housing. — Laurie Holland





 Part 2 of this Volume is focused on various aspects of advanced hand-loading. Modern Advancements (Vol. II) employs live fire testing to answer the important questions that precision hand loaders are asking. What are the best ways to achieve MVs with low ES and SD? Do flash hole deburring, neck tension, primer selection, and fill ratio and powder scales sensitivity make a difference and how much? All of these questions are explored in detail with a clear explanation of test results.






 Like the Hornady tool, the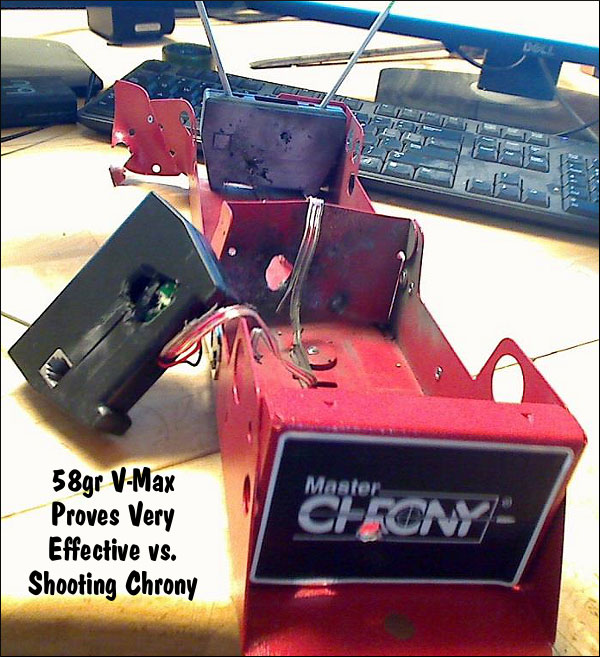
 When setting up a chrono, we always unload the rifle, remove the bolt and bore-sight to ensure that the path of the bullet is not too low. When bore-sighting visually, set up the rifle securely on the sandbags and look through the bore, breech to muzzle, lining up the barrel with your aim point on the target. Then (during an appropriate cease-fire), walk behind the chronograph. Looking straight back through the “V” formed by the sky-screens, you should be able to see light at the end of the barrel if the gun is positioned correctly. You can also use an in-chamber, laser bore-sighter to confirm the visual boresighting (see photo).


