This article first appeared in 2011.
JayChris, AccurateShooter.com’s IT “guru”, has tested three different digital scales. The first is the relatively inexpensive ($150.00) GemPro 500, the second was the $333.00 Sartorius AY123, which is very similar to the Denver Instrument MXX123 and Acculab-123. Lastly, JayChris tested his $1225.00 Sartorius GD503 lab scale. The 3-way comparison test produced interesting findings. We learned that the AY123 had some serious shortcomings when used to weigh powder. The GemPro 500 performed well for the price, but was quite a bit slower than the big GD503. In speed of response, accuracy of measurement, resistance to drift, and overall reliability, the GD503 was the clear winner in our comparison. Sometimes you do get what you pay for. CLICK HERE for GD503 Review with Videos.
BATTLE of the BALANCES
Three-Way Comparison Test: GemPro 500, Sartorius AY123, Sartorius GD503 Testing Report by JayChris
Precision Weighing Balances, www.balances.com, an authorized Sartorius Distributor, shipped me an AY123 (same as Denver MXX123, Acculab 123, etc.) along with a high-end GD503 force restoration scale. I had purchased the GD503, while the AY123 was a loaner for this comparison test. I included in this test a GemPro 500 scale that I already had. My key objective in this comparison test was to test each scale for measurement drift over time. We wanted to see if the displayed weight of a given object (here a certified test weight), would change over time, or with repeated measurements.
The first test was a “quick” test, where I measured the same weight ten (10) times, in the same order, about every 30 seconds or so. I did this at about the same speed as weighing out powder, maybe a bit slower. This took about 5 or 6 minutes. The second test was more-or-less an overnight test, where I measured the same weight in lengthening intervals, starting every 10 minutes, then every 30, then every 60, and so on. You can see the time series on the included graphs.
TEST SETUP:
– I used the same 100 GRAM Sartorius certified check weight for every test (see photo). Note: 100 GRAMS = 1543.233 GRAINS
– I calibrated each scale within 30 seconds of each other before starting the test.
– I tare’d each scale within a few seconds of each other
– All three scales are connected to the same line conditioning PDU and are located in the same environment (right next to each other)
Measurement Resolution and Display Increments
– The Sartorius AY123 measures to the nearest hundredth of a grain (.00). Increments are in 0.02 grain divisions, i.e. the nearest two hundredth of a grain.
– The Sartorius GD503 measures to the nearest thousandth of a grain (.000). Increments are in 0.005 grain divisions, i.e. the nearest five thousandth of a grain.
– The GemPro 500 measures to the nearest half-tenth of a grain (.05).
NOTE: When weighing powder, I weigh to the nearest .05 grain so any of these provide adequate (or more-than) resolution.
FIRST SERIES Quick Test:
* X-axis is weighing series iteration
SECOND SERIES Time-based:
* X-axis is a time series in minutes-from-0.
THIRD SERIES AY123 “Stable” vs. “Unstable”:
* X-axis is a weighing series iteration
This is a test of the AY123 in “Stable” vs. “Unstable” environment mode. The GD503 was used for comparison. I ran this test to compare the AY123 in “Stable” conditions mode (default) vs. “Unstable” conditions mode, based on anecdotal reports that the “Unstable” mode produces more consistent results. I did not find that to be so. In addition, I found that the weighing time for the “Unstable” mode was extremely slow — taking nearly 5 – 7 seconds per instance to complete a measurement. It then takes a few seconds to return to zero. In the AY123’s default “Stable” mode, it takes a second or so. Based on my testing then, there is no advantage to running the AY123 (or similar clones) in the “unstable mood”. It will simply slow you down.
Observations and Conclusions
Overall, the GD503 was the most consistent, never varying more than .005 (five-thousandths) of a grain, which is about ten times less drift than the next closest scale. The GemPro was “close” behind, never varying more than .05 of a grain. The AY123 was consistently variable and lost significant resolution over time. It was difficult to plot the AY123 results because it rarely settled at a weight for longer than a few seconds — it would routinely come up with a different weight every few seconds, varying by as much as .04 of a grain. I selected the first reading it “settled” on as the “official” reading.
The one thing this test does NOT demonstrate is trickling — our previous Review of the GD503 has a video that shows that nicely. The GD503 gives you near instantaneous read-outs when trickling. By contrast, both the AY123 and GemPro 500 require a “trickle-and-wait-for-update” plan. The GD503 is really dramatically better in its ability to return a “final” weight very quickly. This allows efficient trickling. CLICK HERE for GD503 Review with Videos.
[UPDATE: One of our readers observed that there is a setting which can make the AY123 more responsive (and accurate) when trickling charges: “Note that the video shows the 123 jumping as powder is added. The reason is the scale is in the default setting, which is for single weightings. When changed to ‘Filling’ mode, the scale reacts very quickly, and in my case accurately. Trickling is easy in the ‘Filling’ mode. My experience is that the AY123 is an excellent scale, but is sensitive to environmental factors. The GD503 is way better and is also way more expensive.” — Matt P.]
GemPro 500 Performed Well — Drift Was Usually Minimal and Charges Settle Fairly Quickly
I’ve used the GemPro 500 for quite a while now and have found it to be fairly reliable. However, over one previous loading session I have seen it drift as much as .150 of a grain. I had to go back and re-weigh charges because of this. Therefore, I tend to tare it every five (5) weighings or so which is probably overkill based on one case. I’ve not had that problem since so I am guessing something happened environmentally (maybe I bumped it or something). Overall, the GemPro is not overly sensitive to environment and settles fairly quickly and reliably.
Charges Weighed by SD503 Have More Consistent Velocities, with lower SDs
I’ve loaded a few hundred rounds with the GD503 now. I have not found it to drift more than .010 of a grain in that time. So, now, I only tend to tare it once at the beginning of a load session. I have gotten extremely consistent velocities from charges loaded with this scale, with single-digit standard deviations. By contrast, previously, my best efforts usually resulted in standard deviations (SDs) in the low teens.
Based on my experience testing the AY123, I would not choose this scale to load powder with. The readings are just too variable. The slightest environment factors (breathing, hand movement, etc.) cause large changes in results. I tried to load some rounds using this scale (backed by my GD503 to verify) and I couldn’t do better than a few tenths of a grain, and that was with considerable effort. The Sartorius AY123 is really the wrong tool for the job when it comes to measuring powder.
Thanks to Precision Weighing Balances for providing the AY123 for comparison. The other two scales, the GemPro 500 and GD503, I purchased on my own nickel. [Editor’s Note: When purchased in 2011, Jay’s GD503 cost approximately $900.00. The current 2012 price at Balances.com is $1225.00.] All three of these digital scales can be purchased through the Precision Weighing Balances webstore:
After our recent post on ammo boxes for benchrest-sized cartridges, Forum Member Dave Berg let us know that MTM Case-Gard has introduced a new series of R-50 Ammo Boxes with mechanical hinges. The new mechanical hinge on the improved MTM R-50 series box allows the box lid to open fully and lay flat, providing unimpeded access to your rounds. This is smart — no longer will shooters have to struggle with a box lid that wants to spring back over your ammo.
For some guys this makes the MTM R-50-series ammo boxes easier to use both on the bench and at the range. Dave notes: “The new and improved MTM RS-S-50… has a real mechanical hinge that just flops the lid back out of the way. The dimensions are virtually identical to the 512. [The RS-S-50 box is] tall enough that long-seated 6mm 108gr bullets will just fit and the walls between the compartments are high enough the empties can’t jump out.” The new MTM R-50 series are made from tough UV-resistant polypropylene that won’t crack. The mechanical hinge is warranteed for 25 years. The MTM CaseGuard R-50 series is offered in eight (8) sizes to fit everything from 17 Hornet all the way up to .375 Rem Ultra-Mag. For .204 Ruger, .223 Rem, and .223 Rem shooters, get the RS-50 box. For 22-250, 22BR, 6PPC, 6mmBR, 30BR, and 7.62×39, you should order the RS-S-50 box, shown below. For other rifle cartridge types, CLICK HERE for Chart showing the right-size MTM box.
Consumer NOTE: Some online vendors still may still have older-inventory MTM R-50 series Ammo Boxes with the older-style lid attachment. The newer, hinged version shares the same product names, for example RS-50 and RS-S-50, so you’ll need to ask for the newer versions when ordering. (NOTE: The two-tone boxes all have the new hinges.) When shopping online, you may see extended product codes, such as “RS50-24″, and “RS50-16T”. The suffixes are box color codes, “-24″ referring to blue, and “-16T” referring to green/black, with “T” for two-tone. The RS-50 series comes in four (4) color options, each with its own suffix.
Here’s good news for owners of Shooting Chrony Chronographs — you can purchase a Chrony LED Lamp (CLL) upgrade kit that allows your Chrony to work indoors. In addition, the new LED illuminators will enhance outdoor performance in uneven or shaded lighting conditions. The CLL kit costs $87.95 and can be ordered directly from the Shooting Chrony Website, or from vendors such as MidwayUSA.com.
Why the LED Illuminator Kit Is Needed
Shooting Chronys are popular “entry-level” chronographs. They are inexpensive to purchase and they stow compactly with their signature “folding box” design. This Editor used a Shooting Chrony (Beta Master model) for a few years with generally good results. However, I quickly learned that the Shooting Chrony gave the most reliable readings in diffuse mid-morning light with mildly overcast skies (thin cloud layer). The unit did not like to work in the late afternoon with the sun at a low angle. Likewise, uneven, shady conditions caused problems. In summertime, the ultra-bright, noontime summer sun, directly overhead, seemed to “over-power” the diffusers, causing errors. So, I learned to do my speed tests only when conditions were most favorable for the Shooting Chrony. Now, admittedly, not all Shooting Chronys are so temperamental — I’ve seen a few that worked great in bright overhead sunlight. But most Shooting Chronys do seem to struggle with shady conditions or low-angle sunlight.
LED Lamp Kit Components and Accessories
To improve Shooting Chrony reliability in all light conditions, Shooting Chrony offers a $87.95 LED kit (Item #110) that comes with LED-equipped 14″ white diffusers mounted on 16″ wire support rods. The LEDs provide a constant, consistent light source, so you can shoot in the late afternoon and evenings. The kit includes a 120V/220V AC Adapter, output 12VDC @500mA. If AC power is not available, you can run the LED Lamp with an optional 12v dc “Power Station” battery pack (Item #111, $47.95), or you can draw 12v current through an available cigarette lighter-style adapter (Item #112, $10.00).
LED Kit Users Say It Works
We haven’t tested the LED kit ourselves yet, but here’s what one kit buyer had to say:
“If you shot in poor light, you are going to miss velocities no matter what chronograph you are using. You go to all the work of assembling your handloads, set up the chronograph, and then shoot at the target through the detectors… only to get ‘Err 2′ or ‘Err 9′ and use up most or all of the carefully assembled handloads without getting any velocity data. The Chrony LED Lamp assembly has been perfect. Bright sun/no clouds, hazy/cloudy, or shadows/shade makes no difference — all the readings come through without a single ‘Err X’ code. Current draw is also surprisingly low. With the C.L.L. on for five straight hours, the battery pack still shows a full charge.”
When Hornady (and CCI) developed the 17 HMR cartridge, they really hit a homerun. And the rifle manufacturers quickly marketed some nice rifles to chamber this 17-cal rimfire round. But unlike .22 LR rifles which, typically, require very little cleaning, 17 HMRs demand frequent bore cleaning to maintain good accuracy. That’s because 17 HMRs shoot copper-jacketed bullets at 2550 fps velocities.
17-Cal Bore Guides — The Challenge
The problem is, it’s hard to find a well-designed, quality bore guide for 17-caliber rimfire rifles. With many 17 HMR (and 17 Mach 2) rifles, you encounter mechanical interference when you try to use a standard bore guide to protect the delicate chamber edge and the bottle neck area of the chamber. A fixed ejector is in the way. On many 17 HMR rifles, this little “shark fin” ejector is right in line with the chamber and is fixed — it doesn’t retract. Therefore the kind of bore guide you might use for centerfire rifles won’t work in 17 HMRs — it will hang up on the ejector.
Polymer bore guides exist for this type of action, but they are typically open-bottom designs that do not enter and seal the chamber. These open-bottom designs don’t protect the delicate chamber edge or the bottleneck area of the chamber, and they also allow some seepage of solvents out of the chamber. That’s why Roy Bertalotto created his RVB Precision Bore Guide for 17 HMR rifles. The 7075 aluminum tube on his Bore Guide is thin enough to pass by the ejector, yet it is extremely rigid. (Photos below.)
Roy explains: “My bore guide is made of 7075 anodized aluminum tubing, which is totally unaffected by any type of cleaning solution. One end is swagged down to fit completely into the chamber of a 17 HMR rifle. This guides your cleaning rod perfectly to the bore without touching the chamber walls or front edge of the chamber. The tight fit of the bore guide in the chamber also stops cleaning solvents from getting into the action, magazine, and trigger housing.” (Editor: Solvent seepage can do damage. We had a 17 Mach 2 rifle that rusted internally because solvents leaked past an open-bottom bore guide.)
Using the RVB 17 HMR Guide – Once the bore guide is in place, slide the supplied aluminum bushing over the tube, and gently push the bushing into the rear of the action. This centers the guide rod in the action to keep the guide rod tube aligned. Once the guide rod and bushing are in place, you can use a 17-caliber cleaning rod* with patches and/or brushes to clean the barrel. Use the rod normally, but make sure your patches are quite small and don’t apply too much pressure as these small-diameter rods can kink if you try to force over-size patches down the bore.
The RVB Precision 17 HMR Bore Guide costs $19.95 plus $5.00 shipping. To order, email Roy Bertalotto via rvb100 [at] comcast.net. Roy will then send you shipping/payment details.
* NOTE: You really do need a dedicated .17-cal cleaning rod for this job. Most other rods are too fat to pass through the barrel. Dewey Mfg. makes a decent 17-caliber cleaning rod that is reasonably stiff and doesn’t kink too readily. It is available sizes from 7″ to 36″, either bare stainless or with a nylon coating. We prefer the nylon-coated version, in either 26″ or 36″ lengths, depending on barrel length.
If you have a high comb on your rifle, you may need extra length to avoid interference with the rod handle. Use this formula to determine correct rod length: Length of barrel + action or breech rod guide length + 2-3″ clearance + high comb if applicable = total rod length needed.
There are other quality 17-cal cleaning rods, but we’ve used the Dewey and it functioned well. The nylon coating cleaned easily and was gentle on the throat and crown. You should clean the coating before and after each use to ensure it does not embed grit or other contaminants.
Some clever F-Class competitors, such as Forum Member Peter White, have fitted remote flexible-drive-shaft windage controls to their front rests. This allows you to easily adjust windage with the twist of a knob without leaving your shooting position. Until recently, if you wanted a flex-drive windage system on your rest you had to fabricate it yourself.
Now you can enjoy the advantages of remote flex-drive windage adjustment in a ready-made product. Bald Eagle Precision Products has introduced a trio of front rests with “factory” flex-drive windage controls. There are three (3) models. The model BE1006 boasts a heavy, cast-iron slingshot-style base with heavy-duty 1/2″ x 13 TPI threaded feet. Weight is 20 pounds without front bag. This heavyweight model BE1006 should be popular with F-Classers shooting the 7mm and magnum calibers, as the added mass provides great stability.
The slingshot base design has a longer rear leg, bringing the windage control closer to the shooter’s hand. Bald Eagle’s model BE1005, shown below, shares the clever slingshot design of the ME1006 along with remote windage adjustment, but the BE1005’s base is cast aluminum. This drops total weight to 11 pounds (without front bag), making the BE1005 easier to carry than its heavyweight cousin. The aluminum-based BE1005 saves you 9 pounds compared to the BE1006.
The third new Bald Eagle front rest, model BE1004, features a more conventional triangle pedestal design. Like the model BE1005, it has a cast aluminum base, and weighs 11 pounds without front bag. All three Bald Eagle rests, BE1004, BE1005, and BE1006 can be equipped with over-size disc-type feet (item BE1007) for greater stability in soft or soggy ground.
SEB-Made Bags with MicroFiber Tops Available for Bald Eagle Rest
Bald Eagle offers high-quality front bags to fit its line of front rests. These bags are crafted by SEB and feature a low-friction, smooth microfiber surface. We have used SEB front bags with micro-fiber tops and we think they are some of the best available. The microfiber allows your rifle to slide easily without powders, silicon sprays, or other surface lubricants. Having two fill spouts, the front bags are also easy to fill to the firmness level your gun prefers. The front bags measure 4-5/8″ wide by 1-3/4″ tall, and come in three configurations: 3″ wide for F-Class and Benchrest; 2-1/4″ wide for medium-wide flat forearms; and a 3″ radius for sporter/hunting stocks.
All Three Bald Eagle Rests, Front Bags, F-Class Feet, and other accessories can be purchased from Grizzly Industrial and other retailers nationwide. Here are “street prices” of the three rests, as sold on Grizzly.com:
BE1006 is priced at $475.00 but has an introductory sale price of $425.00. BE1005 is priced at $450.00 but has an introductory sale price of $399.95. BE1004 is priced at $450.00 but has an introductory sale price of $399.95.
Review by German Salazar, Contributing Editor Tom Sziler, a very talented machinist and shooter, is now offering handsome billet aluminum loading blocks through CNCshooter.com. I recently bought a set and am very impressed with their quality. You can see I have the cartridge type engraved on my .30-06 block. Tom makes these in all case head sizes and will engrave just about anything you like on the side. Tom’s been a bit backlogged lately, but for a custom product, delivery was more than speedy. I received mine in about three weeks.
2011 Update (By AccurateShooter.com Editor)
Tom has recently expanded his line of CNC-milled loading blocks, which are sold through his website, CNCshooter.com. There are now four price levels for the 50-round blocks: $16.50 for .22LR blocks (Small); $28 for most centerfire cartridges (Standard); $31 for very large cartridges such as .338 Lapua, .45-70, etc. (Large); and $33 for BMG, CheyTac, etc. (Jumbo). Tom also offers an “economy” version of his 50-rd loading block for just $19.00. These are made to the same quality and precision as the original loading block; however, they are crafted from 3/4″ aluminum and have NO engraving.
New Products: 25-round Block and Range Tray
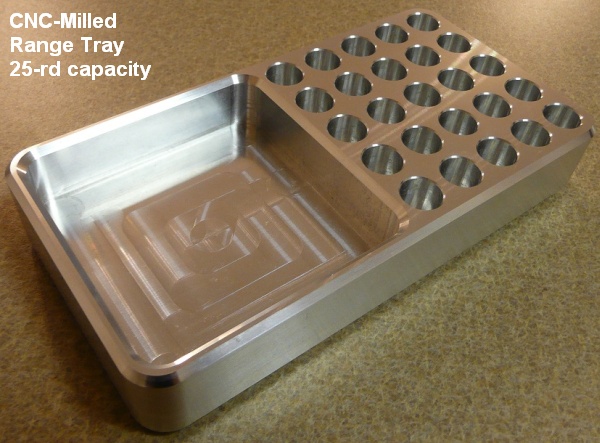
New this year from Tom is a smaller, 25-round loading block, priced at $17.50. This has the same basic design (with engraving) as the 50-rounder, but it is half the length (with half the capacity). This is perfect for low-quantity handloading. Some guys like to use the 25-round ammo block when shooting in competition. It makes for a quick, handy ammo caddy. But even better for competition is Tom’s new Range Tray shown below. It has a milled-out tray for empty brass or small parts. Price is $28.00 for most cartridges up to WSM head diameters.
If you order from Tom, add $5 for shipping up to 2 pieces, or $10 for 3-7 pieces. Loading blocks ship in USPS flat-rate boxes. Tom prefers to receive payment by way of U.S. Postal Money Order. Send money order, order specs and your shipping address to:
Tom Sziler
5521 W 110th Street, Ste 6
Oak Lawn, IL 60453
tom.sziler[at]gmail.com
This report was first published in 2011. Due to numerous requests, we are republishing the story. The time is right because the Giraud Annealer is currently on display on vendors’ row at Camp Perry. Doug Giraud will be at Perry through the morning of August 4th.
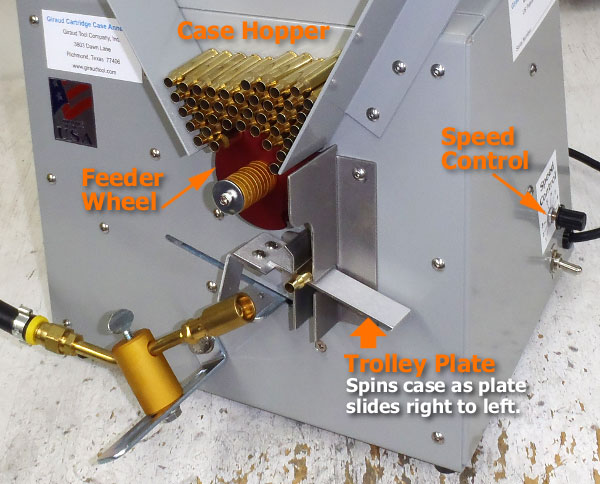
Doug Giraud of Giraud Tool Company has created a new bulk Cartridge Annealing Machine that uses an innovative vertical hopper feed. Giraud’s patent-pending design allows the machine to process as many as 700 .223 Rem cases with no hand-feeding required. The new Giraud Cartridge Case Annealer, using a single propane torch, will anneal most cases in 6-8 seconds (that dwell time will melt 750° Tempilaq inside the neck). Annealing dwell times can be adjusted using a simple rotary knob on the right side of the machine. During annealing, each case is rotated in the flame through the motion of a Trolley Plate which moves right to left under the case. At the left-most limit of Trolley Plate movement, each case drops vertically down for air cooling. CLICK HERE for Giraud Annealer Users’ Manual (PDF)
The Giraud annealer uses a large, V-shaped hopper to hold up to 700 .223 Rem cases or 450 .308 Win cases for annealing. You can switch from small cases to larger cases by swapping out the rotary Feeder Wheel below the hopper. Changing Feeder Wheels takes a couple minutes. Five available Feeder Wheels (with different size cartridge slots) let you anneal pretty much any size cartridge — from .17 Remington all the way up to .50 BMG. The common .223 Rem and .308-sized cases used by High Power shooters are served by the Red Feeder Wheel and Blue Feeder Wheel respectively. The Blue Wheel will also work with 6mmBR, .243 Win, and .30-06 cases. The three other Feeder Wheels are: Black (.300 Win Mag); Purple (WSM, RUM, RSAUM, Lapua and Norma Mags); and Green (.50 BMG). For the large mags you also need to switch to a wider Trolley Plate.
Watch Video to See Giraud Annealer in Action
Giraud Annealer Can Process Hundreds of Cases in One Session
The biggest advantage of this machine is its ability to run with minimal user “intervention”. Once you’ve determined the right dwell time for your cartridge type, you can stack hundreds of cases in the V-shaped hopper, turn on the torch and let the machine do its thing. With a typical 8-second dwell time, the Giraud annealing will process about 450 cases an hour. While other multi-torch annealing machines may be faster, Giraud prefers the single-torch design: “With a single torch, you can control total heat input over a longer time. You don’t over-cook the case in a half-second — you have a lot more leeway with a 6-9 second dwell time.”
Yes the case spins in the flame — the Trolley Plate running under the case rotates it. The user may wish to experiment with the speed control knob on the right side panel near the power switch. Typical annealing operations will require the cartridge cases to be positioned in the torch flame for between 6 and 9 seconds.
Much smart thinking went into the Giraud Annealer design. Doug Giraud tells us: “We went through a couple different ideas. Our key goal was to vertically stack a large quantity of cases that would self-feed. The automatic feeding capability of the machine means that the operator can perform another task while the machine is running. The user doesn’t have to load cases one by one. I would caution, however, that you don’t want to turn on the annealer and just walk out of the room… but you can be doing some other reloading task while the annealer is running nearby.”
Giraud wanted a machine that could process lots of cases cheaply and efficiently. The machine’s single torch is optimized to run on inexpensive propane gas. Doug says: “You can process 15,000 cases on a single $2.00 disposable propane bottle.” If the user wants faster processing, the torch is rated for MAP gas, but Doug cautions that, “with more heat, you’ll have to adjust the dwell time accordingly.”
Giraud Annealer Impresses High Power Shooters
The new Giraud Cartridge Case Annealer has already attracted considerable interest. Doug took some early production models to Camp Perry in 2011, and he immediately got orders for 50 machines. Doug told us: “The response from the High Power guys was amazing. There was a pent-up demand for a simple, robust annealer that can process hundreds of cases without having to feed them one by one, and that’s what we created. We’re selling these units as fast as we can build them.”
Giraud Annealers Cost $435.00 — Delivery in Six Weeks from Order Date
Doug has components for 100 more machines, and he’s producing them at a rate of 15 units per week. He’s been back-ordered, but if you order soon, Doug believes he can ship the Annealing machines in about six weeks from date of order. The basic price, with one Feeder Wheel and one Trolley Plate, is $435.00. Additional Feeder Wheels cost $20.00 while extra Trolley Plates are $10.00. For more information, visit GiraudTool.com. To place orders, call (281) 238-0844 Monday through Friday between 9am and 5pm CST. You can also email doug [at] giraudtool.com.
Giraud Tool Company, Inc.
3803 Dawn Lane
Richmond, Texas 77406
281-238-0844 (orders)
281-232-0987 (fax)
Website: www.GiraudTool.com
Talented tool-maker Curt Knitt has designed a better mousetrap — a new Concentricity Gauge that makes it easier than ever to get fast, repeatable results when measuring case and bullet run-out (aka “eccentricity”). The breakthrough design feature is the large-diameter wheel which spins the case. With most other concentricity gauges you must rotate the case with your finger(s). Anyone who has tried this knows that it is difficult to get a full, 360° rotation of the case without disturbing the indicator. Typically you can get two-thirds of a rotation or so, but then you have to reposition your finger to complete the rotation. Moving your finger often causes the case to jiggle or move slightly, and more often than not, the dial indicator jumps a bit, interrupting your measurement. Been there, done that.
Drive Wheel Smoothly Spins Cases for Fast, Error-Free Readouts
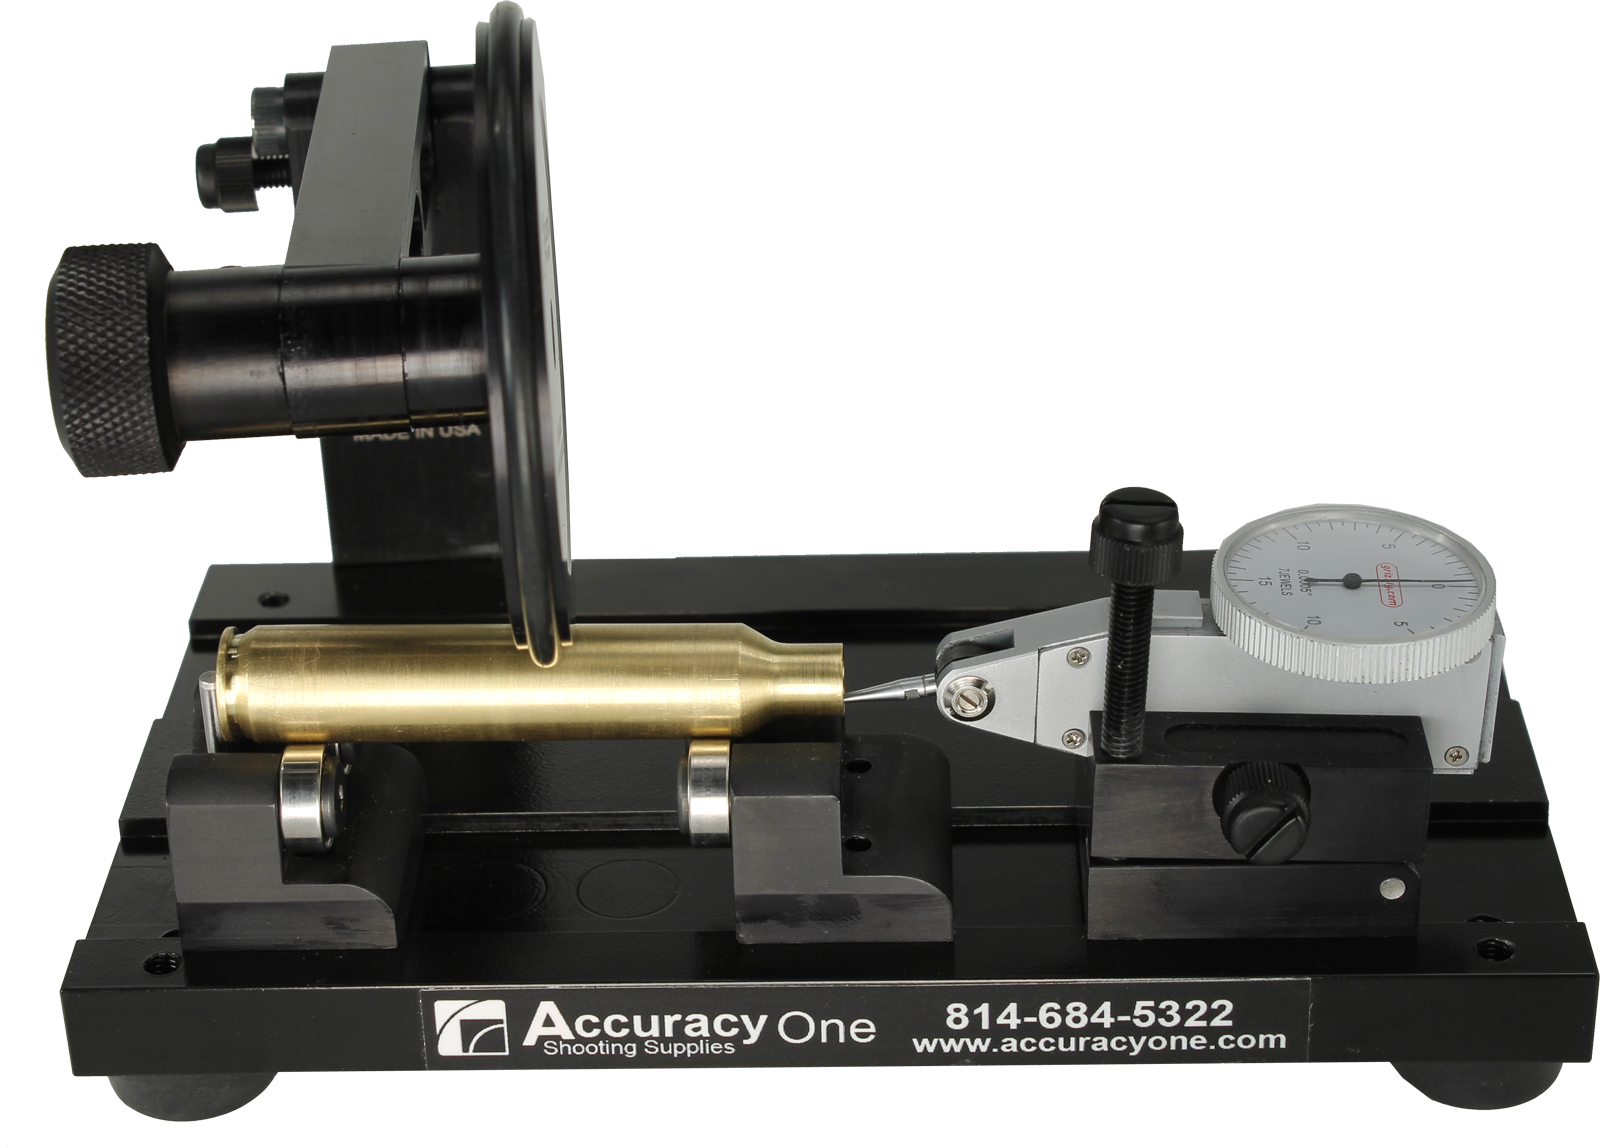
With the new Accuracy One Concentricity Gauge from CTK Precision, the rubber-rimmed drive wheel has a much larger diameter than any cartridge case (7:1 diameter ratio on magnums). So, when you rotate the drive wheel just a half-turn or so (using knurled knob on the wheel axis), you can easily and smoothly turn the cartridge three (or more) full rotations. The drive wheel maintains a constant, even load on the case, so the case doesn’t wobble and the dial indicator gives a continuous, un-interrupted read-out. What’s more, clever cartridge support design geometry pulls the case back against the rim stop as you engage the drive wheel. This holds the case in position laterally during measurement. Morever, this allows very fast one-handed operation. You don’t have to hold the case down with your fingers while maintaining side force against the case rim stop.
Watch Video Showing Concentricity Gauge Used with Small and Large Cartridges
The Accuracy One Concentricity Gauge works with the full range of cartridges — everything from .22LR to .50 BMG. Adjusting the tool for different-length cases is incredibly easy, because the roller blocks (case supports) are held in place by magnets. You just slide the blocks to the desired position — no tools needed! The indicator stand is also held by magnets so it can slide to any position you want along the case body or bullet. And, the indicator can be moved to the front rail and rotated 90°. This way you can measure on the inside of the case neck.
Does this new design really work? Absolutely — it works brilliantly and it’s FAST. Watch the video and see for yourself. We could do two-rotation (720°) measurements on cases in a third the time it takes to do a one-rotation gauging operation with other tools. And the actual measuring operation can be done one-handed, leaving your free hand to pic up the next case (or bullet) to be measured. And yes, this tool can also measure bullet concentricity — measured from tip, ogive, bearing surface, and/or boatail.
1. Directional Drive Wheel pushes the cartridge or bullet into the stop for accurate, repeatable readings with equal pressure. The replaceable rubber drive ring will not harm cartridges or bullets.
2. Two-position bullet and cartridge stop.
3. Precision ball bearings provide friction-free movement.
4. Heavy steel base with E-coat finish and bolt-on rubber feet.
5. Indicator stand and roller blocks ride in machined slots and are held in place by N42 Neodymium magnets. This allows rapid, smooth, tool-free adjustments.
6. Indicator stand can be place in front OR rear machined slots. This allows for both internal and external measurements.
7. Fine-Adjustment Horizontal Indicator Stand allows very precise indicator angle/load adjustments.
8. Indicator Stand will accept horizontal indicators that are .350″ wide or narrower, and are 1.75″ to 2.25″ from the indicator contact point to the center of the main body.
9. Adjustable mechanical arm stop holds the arm up for one-handed operation.
10. Precision Drive Wheel has a 13:1 ratio for .22 rimfire, 7:1 for magnums, and 3.7:1 for 50BMG.
11. Concentricity Gauge accepts cartridges from .22LR rimfire to .50 BMG.
The Accuracy One Concentricity Gauge is available from BulletTipping.com. Price for the unit, complete with quality horizontal indicator, is $325.00. Price, without indicator, is $280.00. The initial run of Concentricity Gauges is now in final production. Gauge sets should hit the market in 4 to 6 weeks. To place an advance order, fill out the PDF Order Form, or call (814) 684-5322. To learn more about setting up and using this new tool, read the Concentricity Gauge Instructions, and watch the video above.
Hey Burris, Leupold, Sightron and Weaver — are you reading this? If you want to dominate the market for varmint scopes, give us a large elevation knob offering at least 20 MOA in a single revolution. IOR and U.S. Optics already offer this “one-rev” option on tactical scopes and it is clearly superior when moving back and forth between multiple yardages. Schmidt & Bender offers a single-turn option on some S&B PMII Tactical scopes, along with a color-coded, double-turn elevation turret option.
IOR’s big 9-36×56 scope offers 25 MOA of elevation in ONE ROTATION (and about 75 MOA overall). If you use the zero stop, that one rotation (25 MOA) will get most rifles to 850 yards with ease (and very few varmint shots are made beyond that). That means you should never loose track of your elevation setting. Right in front of your nose is a large visible number that corresponds to your actual come-up: “7” for 7 moa, “12” for 12 moa, and so on. Wow–this is so easy compared to other systems that require multiple revolutions and leave you staring at unlabeled hash marks wondering how many clicks you just dialed in or out.
When this Editor first tried a one-rotation elevation knob I had the same reaction I did years ago when I watched a ultra-high-grade flat screen TV for the first time. Then I thought… “wow, this flat screen is just better in every respect and, eventually, will change everything.” Scopes aren’t TV sets, but I think the large one-rotation knob IS a huge advancement — a breakthrough in scope design. When used with a come-up table showing the elevation needed for various yardages (50-1000 yards), the one-rev system makes it really hard to be “way off” in your elevation. With conventional elevation knobs it is very easy to lose track of clicks (and whole revolutions) as you move up and down to different yardages.
The IOR and U.S. Optics products offering 20+ MOA in one-revolution are large, heavy, expensive scopes. The big elevation knob on the IOR Ultra Long Range scope has about 125 MOA total elevation (25 MOA per turn) with 1/4-MOA clicks. The large flat EREK (Erector Repositioning Elevation Knob) on the U.S. Optics scopes offers 22.5 MOA per revolution, with a total of about 62 MOA in a 5-25 SN-3 model with 1/4-MOA clicks.
Scope-Makers Should Adapt Technology to Varmint Scopes
It’s time for the mainstream scope makers to bring this techology to the market. Adding a one-revolution elevation knob (with 25 moa of travel) to a $600.00 varmint scope would make a huge difference in practical functionality in the field. You could reliably click back and forth between yardages all day long and never lose track of your elevation setting. This is almost as easy as a yardage-calibrated elevation knob (but not limited to a single load.) So, you scope makers out there… How about giving us a one-revolution elevation knob on an affordable hunting scope?
Peltor folding ‘Shotgunner’ ear muffs are on sale right now at Amazon.com. Available in red (#97013), dark green (#97012), or black (#97011), the muffs cost about $17.00, and you can get free shipping with an order over $25.00. That’s a good deal for a good product. This Editor owns two sets of these muffs. They are very lightweight and comfortable. Because they fit well, with gel foam cushions, they actually seem to work better than some big bulky muffs (with higher NRRs) that don’t seal so well.
Peltor’s Shotgunner muffs feature tapered ear domes, cutaway on the lower half for stock clearance. We have not found any other muffs on the market that allow a better cheek weld, with less interference with the comb on a riflestock. These muffs also fold up into a very compact package. You can keep one set in your range kit and a spare set in your vehicle for back-up or if a friend needs hearing protection.
USER REVIEW: Because I am a firearm instructor I own a half-dozen muffs including a pair of electronic Peltors. These [folding shotgunner muffs] are my favorite at 10% of the cost of electronic muffs. I bought them for trap/skeet. My Browning has an adjustable comb but these do NOT interfere with mounting the shotgun or getting a proper cheek weld as do the large electronic muffs. I highly recommend these to you. They are inexpensive but are EXTREMELY COMFORTABLE and WORK VERY WELL. What more could you ask? — F.M. (Idaho)
Ear Plugs vs. Muffs
Personally I prefer using foam earplugs, because they have a better Noise Reduction Rating (NRR) than the Shotgunner Muffs. However, there are times when the muffs come in handy, as when I am scoring for a fellow shooter and need to hear range instructions. I also like to keep a spare pair of muffs in my vehicle at all times. It always seems that, when we go to the range, someone forgets ear protection, or doesn’t like to use plugs.
For Indoor Use — Add Plugs Underneath
For indoor use, particularly on a tight firing line (with a guy shooting a .44 Mag right next to you), you’ll want muffs with a higher NRR. Alternatively, wear ear plugs under the muffs. Peltor Shotgunner folding muffs have a NRR of 21 db — compare that to 25-30 db NRR for big, heavy muffs and 29-33 db NRR for good ear plugs, such as the Howard Leight Max UF plugs (33 NRR). Of course, to achieve those 30+ Noise Reduction Ratings, earplugs must be inserted correctly.


 17-Cal Bore Guides — The Challenge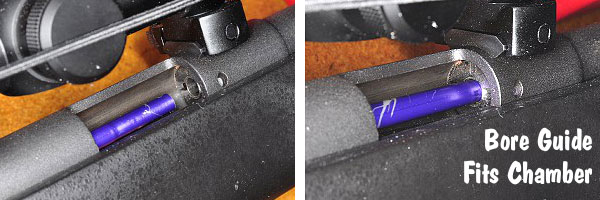

 Using the RVB 17 HMR Guide – Once the bore guide is in place, slide the supplied aluminum bushing over the tube, and gently push the bushing into the rear of the action. This centers the guide rod in the action to keep the guide rod tube aligned. Once the guide rod and bushing are in place, you can use a 17-caliber cleaning rod* with patches and/or brushes to clean the barrel. Use the rod normally, but make sure your patches are quite small and don’t apply too much pressure as these small-diameter rods can kink if you try to force over-size patches down the bore.

 Now you can enjoy the advantages of remote flex-drive windage adjustment in a ready-made product.
 The third new Bald Eagle front rest, model BE1004, features a more conventional triangle pedestal design. Like the model BE1005, it has a cast aluminum base, and weighs 11 pounds without front bag. All three Bald Eagle rests, BE1004, BE1005, and BE1006 can be equipped with over-size disc-type feet (item BE1007) for greater stability in soft or soggy ground.


 If you order from Tom, add $5 for shipping up to 2 pieces, or $10 for 3-7 pieces. Loading blocks ship in USPS flat-rate boxes. Tom prefers to receive payment by way of U.S. Postal Money Order. Send money order, order specs and your shipping address to:

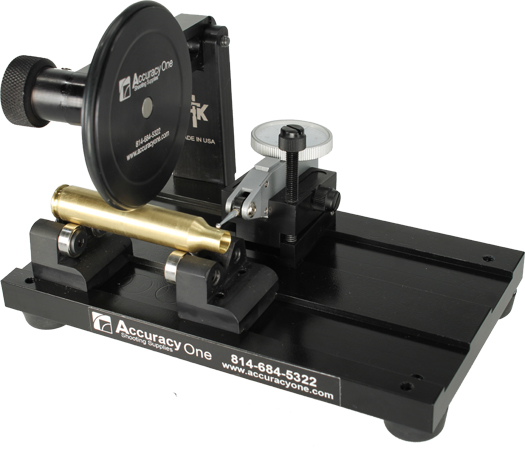
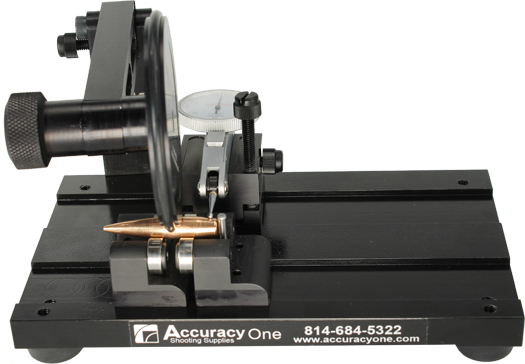
 The Accuracy One Concentricity Gauge works with the full range of cartridges — everything from .22LR to .50 BMG. Adjusting the tool for different-length cases is incredibly easy, because the roller blocks (case supports) are held in place by magnets. You just slide the blocks to the desired position — no tools needed! The indicator stand is also held by magnets so it can slide to any position you want along the case body or bullet. And, the indicator can be moved to the front rail and rotated 90°. This way you can measure on the inside of the case neck.
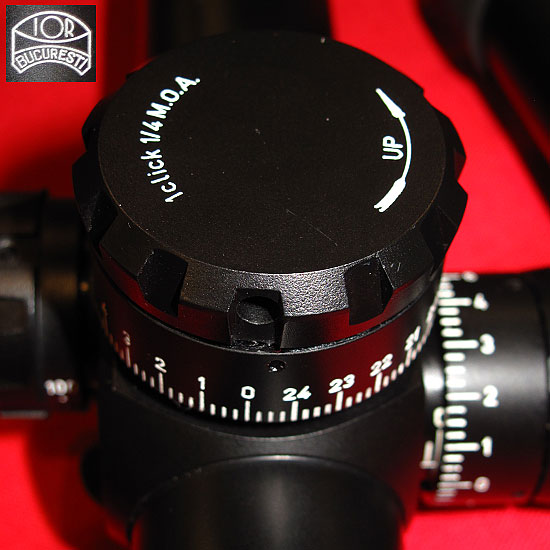

 The IOR and U.S. Optics products offering 20+ MOA in one-revolution are large, heavy, expensive scopes. The big elevation knob on the IOR Ultra Long Range scope has about 125 MOA total elevation (25 MOA per turn) with 1/4-MOA clicks. The large flat EREK (Erector Repositioning Elevation Knob) on the U.S. Optics scopes offers 22.5 MOA per revolution, with a total of about 62 MOA in a 5-25 SN-3 model with 1/4-MOA clicks.
 Ear Plugs vs. Muffs


