The much-loved Shilen SWAP MEET will take place in Ennis, Texas on Saturday, March 15, 2025 from 8:00 am through 2:00 pm CDT. This will be at Shilen’s new, bigger and better production facility. If you are looking for some great bargains on gun gear, and are near the Dallas-Fort Worth area, definitely mark this date on your calendar. The Shilen Swap Meet is one of the best events of its kind, and Team Shilen will even deliver a complimentary lunch to attendees. Plus machines will run from 8:00 am to 11:00 am so you can see how Shillen crafts top-quality barrels.
No Vendor Fees, No Entry Fees, and FREE Lunch!
ANYONE can come and ANYONE can be a vendor. There are NO entry or vendor fees and the event will proceed rain or shine. There will be gun stuff everywhere –buy and sell as much as you like. There will be free lunch, as always.
There will be prize drawings — get signed up when you arrive so you can have a chance to win some free stuff. If you want to sell products let Shilen add you to the list of vendors on Shilen’s website. This is not required, you can just show up and set up. Call 972-875-5318 or send email to comments@shilen.com.
SHILEN SWAP MEET HIGHLIGHTS
Watch Barrel-Making. A Shilen crew will run barrel-making machines from 8:00 am to 11:00 am. Watch precision barrels being made. The techs will answer all your questions about the process.
Sign up for Door Prizes — Shilen Merchandise. There will be multiple drawings for free or discounted Shilen apparel or merchandise. Go to the sign-up table to be entered in the drawings.
Get Shilen Barrels and Actions at Huge Discounts. Shilen Barrels, Actions, and Barreled Actions will be sold at huge discounts on Saturday. “Swap Meet Barrels” were originally ordered by Shilen customers throughout the year, but orders were canceled or customers changed their mind on contour, chamber, etc. These barrels were placed back in stock for resale. When Swap Meet Time arrives any such barrels still remaining in stock are sold at huge discounts. NOTE: These barrels are in NO WAY factory “seconds” or any lower quality. The warranty on these barrels is the same as any other Shilen barrels.
Sell Your Own Gear. At the Shilen Swap Meet, you can Bring Your Own Table (BYOT). Register to sell anything gun-related: presses, reloading gear, stocks, triggers, scope rings — you name it. Vendor Space is available on a first come-first served basis, starting Saturday morning at 7:00 am. Email or call Shilen for more information. Email: comments@shilen.com. Call: 972-875-5318.
TIPS for Visitors: The SWAP MEET concludes at 2:00 pm. The best stuff sells fast, so if you are looking for something particular get there early! Keep an eye on the Shilen’s Swap Meet page for a preview of Vendors and the products they’ll be selling.
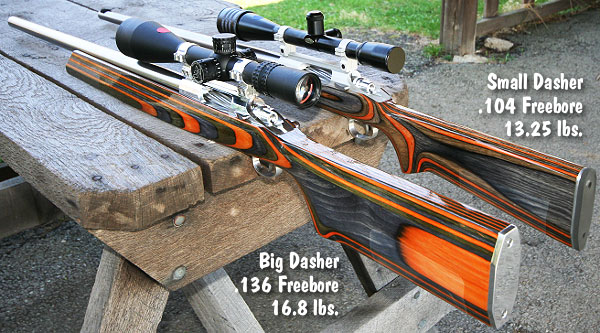
The 6mm Dasher wildcat cartridge is very popular among competitive benchrest shooters, varminters, and even PRS competitors. So this Sunday we thought we’d showcase a matched Duo of Dasher rifles belonging to a Forum member Chuck L. (aka “Ridgeway”). The 6mm Dasher began as a wildcat improved version of the 6mmBR Norma cartridge. The Dasher has been very successful in competition, and now factory Peterson 6mm Dasher brass is sold by Grafs.com. And Alpha Munitions also offers high-quality 6mm Dasher cartridge brass.
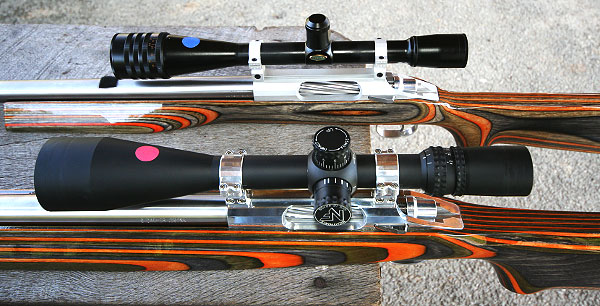
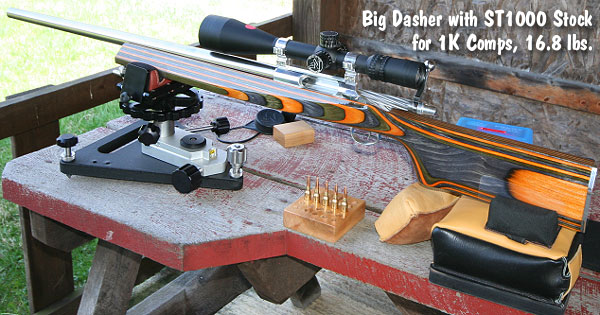
Chuck has a prize pair of 6mm Dashers for competitive benchrest and varmint matches in Pennsylvania. Both guns feature Kelbly Panda RBLP actions, Bartlein 8-twist barrels, and Shehane Laminated Tracker Stocks. However, the two rifles are not exact twins, as you can see. One, which we’ll call the Big Dasher, is built on a Shehane ST1000 Tracker stock. The other gun, the Small Dasher, sports Shehane’s “Baby Tracker” stock — a design used with great success by Richard Schatz. The Big Dasher, optimized for 1000-yard competition, has a slightly longer freebore — 0.136″ vs. 0.104″ for the Small Dasher.
Specifications for the Dasher Duo:
Small Dasher (13.5-pounder): Chambered for 6mm Dasher with approximately .104 freebore and a .264 NK. (No way of knowing exactly since its freebore was set in a separate operation by Kelbly.) Components are: Shehane Baby Tracker laminated stock, Kelbly Panda RPLB action, Bartlein 1:8″ LV barrel at 26 ¾”, Kelbly Rings, Weaver T36, Jewell trigger. The barrel was chambered by Kelblys and the stock was bedded, glued and balanced by a shooting buddy (Forum Member johara1). Chuck clear-coated the stock with auto urethane. Total weight is 13 lbs., 4 ounces.
Big Dasher (1K Light Gun, 17-pounder): Chambered for 6mm Dasher with a .136 freebore and .264 neck (PTG Reamer). Components are: Shehane ST-1000 laminated stock, Kelbly Panda RPLB action, Bartlein 1:8″ HV 5R barrel at 28″, Shehane +20-MOA rings, Nightforce NXS 12-42x56mm, Jewell trigger. The barrel work, pillar installation, and bedding was done by Dave Bruno. The stock was clear-coated by Chuck with auto urethane. Chuck also made the rear butt plate and balanced the rifle. Total weight: 16 lbs., 13 ounces.
Chuck tells us: “I don’t get out shooting competition as much as I want due to time and family, but when I do compete, I shoot a Groundhog match at Southfork Rifle Club in Beaverdale, PA. Info on Southfork Club events can be found at Southforkrifleclub.com. The Southfork match is basically a 100-, 300- and 500-yard match with one sighter the entire match and 5 shots at each yardage for score. The Small Dasher, with the shorter ‘Baby Tracker’ stock, was set up for the Southfork Rifle Club’s ‘Light Unlimited’ class which has a 13.5-lb max weight.” (Editor: ‘unlimited’ is a misnomer for a weight-limited category.)
Chuck adds: “The Big Dasher with the heavy ST-1000 stock is set up for 1000-yard benchrest matches in Light Gun class. I shoot 1K matches with it at Reade Range in southwest Pennsylvania. One ironic thing is, it shoots the same load I’m shooting out of the lighter gun rather well. The only difference between the two chambers is the freebore is roughly thirty thousandths longer on the 1K gun (Large Dasher). I will also shoot this at Southfork in the ‘Heavy Unlimited’ class.”
Both Dashers Group in the Ones at 100 Yards
Chuck favors 107gr Sierra MK bullets in both Dashers. Other components are: Reloder 15 powder, Lapua cases, and CCI 450 primers. His main load for the Small Dasher is 33.0 grains of Reloder 15. This load shoots in the ones at 100 yards. For the Big Dasher Chuck reported: “I’m still working on a load, although the same 33.0 grain load shoots in the ones in the heavier gun as well. I’m still looking for more velocity and my ‘max’ node.”
Dasher Brass — Four Options
1. Buy Peterson 6mm Dasher Brass
In years past, you had to create your own Dasher brass, by fire-forming (with or without projectiles), or by hydro-forming. However, Peterson Cartridge now offers quality factory-made 6mm Dasher brass. This brass is available right now at Grafs.com.
If you do not want to waste time with fire-forming or hydro-forming, you can look for Peterson 6mm Dasher brass. This is excellent quality brass that has earned high praise from purchasers. The price — $62.99 for 50 cases at Graf’s (i.e. $1.26 per case) — is less than what you’d pay for Lapua 6mmBR brass, which is $143.28 for 100 cases or $1.43 per case. The advantage is that you save time, barrel life, and you won’t lose any cases to split necks. Peterson brass can be ordered from Grafs.com.
2. Buy Alpha Munitions 6mm Dasher Brass
Another great source for ready-to-run 6mm Dasher cartridge brass is Alpha Munitions. The made-in-USA Alpha 6mm Dasher brass is long-lasting and has been very popular with Benchrest and PRS/NRL competitors. Alpha 6mm Dasher brass costs $135.00 per hundred, or $1.35 per case. Unfortunately, as of 2/23/2025, this Alpha 6mm Dasher brass is out of stock, but it should be available later this spring.
One tip — as the capacity may vary slightly from Lapua 6mmBR brass fire-formed to 6mm Dasher, you should work up your load. Also, if you are chambering a new barrel you should get a chamber reamer that is optimized for the Alpha 6mm Dasher brass dimensions. User reviews of the Alpha 6mm Dasher brass have been highly positive: “Fantastic packaging and fantastic brass! It’s pricier than some other brands but there is a reason for that. It’s a quality product worth every penny.” — Chris Vaughn.
3. Fire-Form Dasher Brass with Bullets Hard in Lands
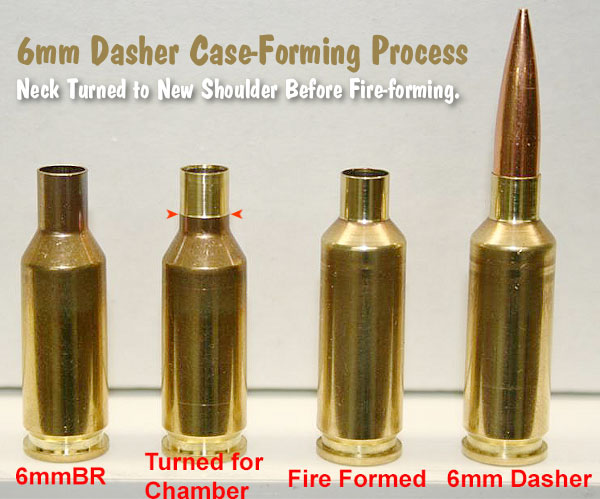
Chuck fireforms his Dasher brass for both rifles. Because he has a tighter-neck chamber, he neck-turns the brass first: “To fireform, I turn my cases down to fit the chamber and stop where the false shoulder makes snug contact with the chamber. Fire-forming rounds are loaded up with a 29-grain charge of H4895 or Varget and a 108gr Berger bullet seated hard into the lands about 0.020″ past initial contact with the rifling. It takes about three firings to make a nice clean Dasher case with a sharp shoulder.”
Chuck anneals his Dasher brass regularly to help maintain consistency: “I anneal about every 3-4 firings. I have many cases that have about 10+ firings on them and they are still shooting well. The primer pockets are a little looser, but still hold a primer.”
4. Have Darrell Jones Hydro-Form Your 6BR Brass to 6mm Dasher
DJ’s Brass can hydro-form a wide variety of cases for a modest fee
Fire-forming all your own 6mm Dasher brass takes time, costs money (in bullets and powder), and consumes precious barrel life. Well there IS a better solution — you can have your new brass hydro-formed by DJ’s Brass to your exact specifications for a $60.00 per hundred, which includes annealing.
DJ’s Brass Service now offers custom case hydro-forming to your exact specs. Darrell Jones offers this service for a variety of popular cartridges: 6 PPC, 30 PPC, 30 BR, 6 BRA (BR Ackley), 6mm Grinch, 6 BRDX, 6 BRX, .260 Ackley, .284 Shehane and of course the very popular 6mm Dasher. After hydro-forming your brass, Darrell can also neck-up or neck-down the cases to meet your needs. He can also turn the necks to your specs for an additional $0.60 per case.
Editor: Many new barrels will deliver higher velocities with the same load after 100-150 rounds through the bore. The exact reasons for this speed-up are not 100% certain, and velocity increases (if any) will vary from one barrel to the next. But this “speeding up” phenomenon is common, so be prepared if this happens with your next barrel. If you do experience a significant velocity increase you should probably re-tune your load AFTER the velocity stabilizes at the higher level.
From the Sierra Bullets Newsletter Article by Mark Walker, Sierra New Product Development Director
In a previous post, I discussed a couple of methods to tune a load to your barrel to help achieve the best accuracy possible. People most often work on load tuning if they get a new rifle or have a different barrel installed. In both instances, the barrel is new and has not been fired very much. According to most competitive shooters, this is the most accurate your barrel will ever be, so getting it tuned and shooting accurately is a priority.
The Speed Up Phenomenon After 100-150 Rounds
Even though after you work up a load and your new barrel is shooting great, a lot of shooters notice that at around 100 to 150 rounds their rifle may stop shooting as accurately. I had this happen to a rifle and I was confused as to why something that worked so well to begin with would all of a sudden quit shooting. I decided to break out the chronograph to do another load work up to see what was going on. To my surprise, the velocity had increased around 80 fps over the original velocity! After performing another ladder test and adjusting the seating depth, the rifle was once again shooting well.
There are several thoughts on why this may happen, however, you can rest assured that it does happen. One thought is that as the barrel breaks in, the tooling marks in the throat of the chamber smooth out and allow less resistance to the bullet as it exits the bore thereby increasing speed. Another idea is that the throat area starts to get a little rough which in turn causes more resistance which increases pressure and therefore more velocity. I’m sure there are some out there who have a better understanding as to why this happens, but it can definitely affect the accuracy of your rifle. So be aware and never be afraid to rework a load to keep your rifle in tune.
Experts Confirm That Barrel Speed-Up Is Common Two respected shooters have observed an increase in velocity with new barrels, typically after 100 rounds. Gunsmith and Hall-of-Fame benchrest shooter Thomas “Speedy” Gonzalez has documented barrel speed-up with testing. Moreover, Speedy’s bore-scope barrel inspections revealed a smoothing of the barrel lands. Jim See, a top PRS competitor, has encountered barrel speed-up many times. Accordingly, he re-tunes his load at 150 rounds.
“Alex Lipworth and I documented this phenomenon about four years ago and I have told all my customers about this. My son Mikee would shoot 100 rounds through all new barrels we planned on shooting before we would begin to do load development. We had a shooting snail that caught all the bullets set up in front of an indoor bench. We called it a wear-in process because upon careful examination of the bore when the ‘Speed Up’ takes place the cut-rifled bore resembles that more of a button-rifled barrels with the lands taking on more the softer look of a buttoned bore.” — Speedy Gonzalez
“Seen it [barrel velocity increase] too many times to count. All my match barrels get a ‘generic round’ loaded for them, which has worked well in barrels historically. After I hit 150 rounds I fine-tune the load and never look back, until the tube starts to slow down at it’s life end.” — Jim See
Ever wish you could look inside your rifle, to see how the trigger and fire-control system work? Well now that is possible with the magic of 3D computer graphics. Modern software allows detailed “cutaway” side-views (see below), as well as 3D views with 360° rotation. The software can also provide X-Ray-type views into the gun’s internals — as you can see above. And computer animation can show the complete firing process from trigger pull to chambering of the next round.
Rem 700 Cutaway View from Right Side
This article provides some very cool 3-D “Cutaway View” animations of the popular Remington 700 action, probably the most successful American bolt-action ever created.
READERS — Take the time to watch the video! The Rem 700 animation is really outstanding! EVERY bolt-action shooter should watch this video all the way through.
Cutaway 3D Animation of Rem 700 Action — Watch Video
The Model 700 series of bolt-action rifles have been manufactured by Remington Arms since 1962. All are based on basically the same centerfire bolt action. They are typically sold with an internal magazine depending on caliber, some of which have a floor-plate for quick-unloading, and some of which are “blind” (no floor-plate). The rifle can also be ordered with a detachable box magazine. The Model 700 is a development of the Remington 721 and 722 series of rifles, which were introduced in 1948.
The Remington 700 is a manually-operated bolt action with forward, dual opposed lugs. It features “Cock On Opening”, meaning the upward rotation of the bolt when the rifle is opened cocks the firing pin. A cam mechanism pushes the firing pin’s cocking piece backward. The bolt face is recessed, fully enclosing the base of the cartridge. The extractor is a C-clip sitting within the bolt face. The ejector is a plunger on the bolt face actuated by a coil spring. The bolt is of 3-piece construction, brazed together (head, body. and bolt handle). The receiver is milled from round cross-section steel.
This video was made with the help of the World of Guns: Gun Disassembly interactive encyclopedia with 3D rendering. This remarkable web-based software allows users to view the inner workings of hundreds of different rifles and pistols — everything from a .22 LR Ruger to a .55-caliber Boys Anti-Tank rifle. There are also 25,000+ parts diagrams. This is a remarkable technical resource. SEE MORE HERE.
Photo courtesy NRA MuseumClick Photo to View Larger Image
With today’s polymer-framed Glocks and Kel-Tecs, aesthetics have been sacrificed on the altar of functionality. Not so in the early 20th century — in that period, the best firearm designers created guns that looked as good as they worked. One example is the classic Colt Woodsman. This design came from the legendary John Moses Browning and was later refined by Colt before the pistol’s introduction in 1915. The Colt Woodsman’s frame design evolved over time in three distinct series: Series One 1915–1947, Series Two 1947–1955, and Series Three 1955–1977. Shown above is a stunning Carbonia-blued and engraved Third Series model with ivory grips.
Engraved Colt Woodsman from NRA Museum
In the NRA Museum’s Robert E. Petersen Gallery are many fine engraved arms. This Colt Woodsman .22 pistol is one of the Third Series guns that were made until 1977. Heavy barrels in either 4.5 or 6 inch lengths were offered in this variation. The Museum’s staff says: “We think the poised golden rattlesnake near the serial number is the [best] embellishment without putting down in any way the ivory grip panels or gold outline inlays.”
You can see this lovely Colt and countless other fine firearms at the NRA Museum in Fairfax, Virginia. The Museum is open every day from 9:30 am to 5:00 pm, and admission is free.
The Colt Woodsman was made in many variations, with different barrel lengths and contours and finishes. Here is a Colt Woodsman Third Series Match Target with 6″ Blued frame and slab barrel. Photo from Sam Lisker’s ColtAutos.com.
Here is a Colt Woodsman First Series Match Target with 6.5″ undercut slab match barrel and basic blued finish. Photo from Heritage Auctions.
Here is a Colt Woodsman Bullseye Match Target Pistol (6.5″ barrel) with blued finish and early factory “elephant ear” stocks with Colt medallions. This was owned by Philip Judd, an avid marksman who was 1952 Camp Perry Champion in the 500-yard .30-06 rifle competition. Photo from Sam Lisker’s ColtAutos.com.
Many of our readers have been interested in learning how modern bullets are made. While a “boutique” bullet-maker, supplied with appropriate cores and jackets, can craft bullets using relatively simple hand dies and manual presses, factory production is different. The major bullet-makers, such as Barnes, employ huge, complex machines to craft their projectiles on an assembly line.
Modern hunting bullets are made with a variety of sophisticated (and expensive) machines, such as Computer Numerical Control (CNC) lathes, giant multi-stage presses, and hydraulic extruding machines that draw lead ingots into lead wire. Barnes offers an “inside look” at the bullet production process in a series of videos filmed at its Mona, UT factory. We’ve embedded four videos from the series here. These videos can also be viewed on the Barnes Bullets YouTube Channel.
Milling Slots in TSX All-Copper Bullet
This video shows how the slots (between the drive bands) in the TSX all-copper bullet are cut. The slots reduce the bearing surface that contacts the rifling. This helps reduce friction and heat, extending the life of barrels used with all-metal, drive-band bullets:
Varminator Bullets Produced in Jumbo Transfer Press
Here is the transfer press used in the production of Varminator and MPG Bullets. The process begins with a giant spool of flat copper material. The copper is stamped into jackets and eventually the formed Varminator bullets are ejected one by one into a bucket.
CNC Lathe Turns Bullets Automatically
In the video below, a Bar-Feed CNC crafts mono-bloc bullets from metal bar stock. Barnes uses a small CNC lathe to turn .50-caliber bullets from brass bar stock. We’re not sure which bullet is being made in this video. The material looks to be sintered metal. In the close-ups you can gold-colored shavings from when the machine was previously used for CNC-turned brass bullets.
Accuracy Testing in 100-yard Tunnel
Barnes regularly tests bullet samples for accuracy. In the video below, a Barnes technician loads sample rounds and tests them for accuracy in a 100-yard tunnel. The rounds are shot through a special fixture — basically a barreled action connected to parallel rods on either side. This allows the testing fixture to slide straight back on recoil (see it move back at 1:07-08 minute mark).
Upside-Down Trigger — Application for Unlimited Benchrest Competition?
Note how the tester actuates the trigger, which points UPWARDS, just the opposite of a normal rifle. The technician lightly taps the upward-pointing trigger shoe with a metal rod. Could this upside-down trigger work in benchrest shooting — perhaps with railguns? It could make for an interesting experiment.
Story suggestion by EdLongrange. We welcome reader submissions.
This 6 PPC features a Nesika Extended ‘C’ action, Krieger 1:13.5″-twist LV barrel, Kelbly stock, and stunning paint by Mike Lavalle of killerpaint.com. For an eye-catching R-Rated paint surprise, Click HERE.
One of the most popular items in our Shooters’ Forum is the ongoing “Pride and Joy” thread. Since 2009, Forum members have posted photos and descriptions of their most prized firearms. Here are some of the most recent “Pride and Joy” rifles showcased in our Forum. Do you have a gun you’d like to see featured there? Register for the Forum and you can add your favorite gun to the list.
Click image to view large, full-screen photo!
For this week’s Sunday GunDay we’ve selected five fan favorites from the Pride and Joy archives. First up is this custom 30 BR brought to you by ANSHUTER2013 and built by Dave Bruno. We were captivated by the clean lines and handsome looks of the Roy Hunter Curly Maple stock. Nestled in that stock is a BAT B action fronted by a 1:17″-twist James Lederer 24″ HV barrel. A Jewell trigger with fixed 42x44mm Nightforce scope round out this beauty.
This state-of-the-art 6 PPC boasts all top-tier components. And owner Wes R. shoots it with a superb rest/bag/pad set-up that inspires envy. This “Bughole 6 PPC” features a Bat DS action, Bix’N Andy trigger, with Bartlein 1:13.75″-twist barrel. The stock is a super-low-profile Scoville with carbon strengthening. The front rest is a SEB NEO, while in the rear is the new Lenzi sandbag. Folks tell us the Lenzi is super stable, which improves tracking from shot to shot. Note the timer attached to the front rest as well as the nice Edgewood leather bench “blanket” and arm-rest pad.
Forum Member Killick attached PickleForks to his handsome blue Eliseo R1 TubeGun now chambered in .284 Winchester, a top choice for the F-Open discipline. Killick explains: “Behold! An Eliseo R1 F-Classer. This started out as an R1 Long Range sling rifle (6XC) with a Borden TubeGun action. It is now rebarreled in .284 Win with Gary’s PickleFork fore-end adaptor. Props to Gary Eliseo at Competition Machine LLC.”
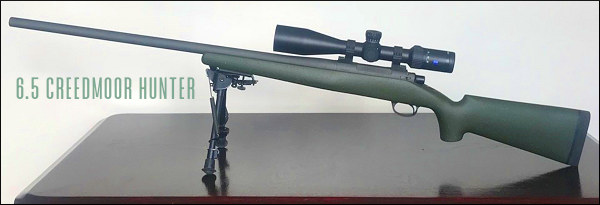
Sometimes clean and simple is the way to go — particularly with a hunting rifle. WEATHERBYFAN’s 6.5 Creedmoor is built around a Stiller Predator single-shot action in a texturd, green Wildcat Var-Tac stock. The 1:8″-twist Bartlein barrel is finished at 28″. That’s pretty long for a hunting rig, but it delivers added velocity. Finishing off this nice rigle is a Zeiss 6-24x50mm optic. Sometimes less is more and this is a perfect example of that.
Our final offering is from Forum member 300_WHISPER. Completed just months ago by gunsmith CALEB85, this .308 Win rifle features a Bighorn TL3 action with a Bartlein M40 26″ 1:10″-twist barrel, and Manners TA Elite stock. Other components include Trigger Tech Special, Area 419 self-timing muzzle brake, and a Weaver Tactical 3-15x50mm FFP mil/mil optic. When test-fired by Caleb with ammo using Berger 175gr OTM Tactical bullets, this nice .308 Win delivered a 1.6″ 5-shot group at 400 yards. The owner says “It’s my dream rifle. I couldn’t be happier”.
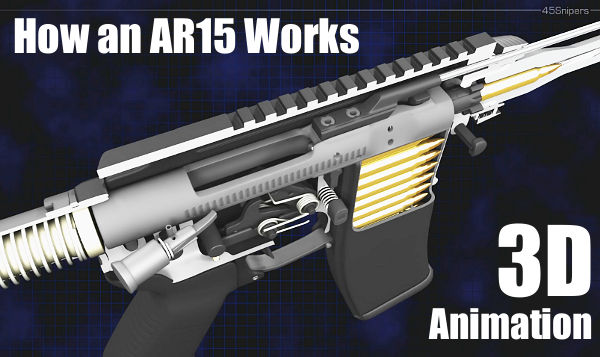
Ever wondered how the parts inside an AR15 work together? Just exactly how does the reciprocating bolt carrier feed rounds from the magazine? How do the elements in the trigger group work and reset after each shot? How does the gas system bleed gas from the barrel and operate the bolt carrier? These and other questions are answered in this eye-opening video from 45Snipers. Using “cutaway” 3D computer animation, this 5-minute video shows all features of an AR15 inside and out. This fascinating firearms animation allows the viewer to look inside the upper and lower receivers, into the bolt carrier, chamber, barrel, and magazine.
This video starts off slow and has annoying background music, but it is well worth watching if you own or shoot any AR-platform rifle. It illustrates all the key operations during the charging, loading, firing, and ejection processes. The cutaway animation shows how rounds are stripped from the magazine and then chambered. It then shows how every part of the trigger group works, and how the firing pin strikes the primer. You can even watch the bullet move down the barrel before the empty shell casing is removed from the chamber and tossed out the ejection port. Here are sample frames from the video:
Video find by Grant Ubl. We welcome reader submissions.
SHOT Show 2025, the biggest gun industry trade show, kicks off Tuesday, January 22nd, in Las Vegas. Over 2700 exhibitors will showcase thousands of new products at the Venetian Expo and Caesars Forum which together provide more than 800,000 net square feet of displays. The official SHOT Show Product Planner offers a “sneak peak” at 340 new-for-2025 products for hunters and shooters. Here are 6 cool new items in the SHOT Show New Product showcase (product profiles are based on descriptions provided by the manufacturers). That’s followed by six more interesting products featured in Shooting Industry Magazine.
Kestrel 5700X WEZ Ballistics Weather Meter
Company: Kestrel Ballistics
Advanced Kestrel 5700X Ballistic Weather Meter with AB Elite ballistics solver and WEZ analysis. This unit operates seamlessly without additional electronics and can calcualte P-HIT probability. Price: $999.00.
Vision Pro Chassis
Company: GCP Rifle Co.
The Vision Pro chassis is a Precision Rifle chassis with high-grade components. List $1599.00.
TAPCO Tactical Henry Model X Rifle Handguard & Stock Package
Company: TAPCO
The Henry Model X stock/handguard package is a stock upgrade with modern tactical/precision features including an adjustable cheek plate and universal 6-round ammo quiver. You can fit M-LOK accessories on the tactical Henry handguard. Price is $449.98.
Pelican Reset Case Interior System
Company: Pelican Products Inc.
The Pelican Reset interior system has customizable foam pegs in a grid frame that can be raised or lowered to create cavities for guns and gear. A middle panel can be removed for extra space. Reset foam works with 1700, 1720 and 1750 Protector cases.
SPACE Smart Safes
Company: SPACE Smart Safes
Advanced smart safe with cameras and smartphone App.
Shooting Industry Magazine 2025 New Product Showcase
See more cool new products in the Shooting Industry Magazine 2025 New Product Showcase. You can view all editions in the Monthly Issue Archives
Savage Arms Model 334 bolt-action rifle will be available a Mossy Oak Terra Gila camo stock and two new calibers: .30-06 Springfield and .270 Win (along with 8 other chambering types). The Model 334 has a 3-position safety, a 60-degree bolt lift, and three locking lugs.
Bolt Action AR-type Rifle
Bear Creek Arsenal BC-15 Bolt Action Style Complete Upper and Rifle in .350 Legend and .450 Bushmaster. The BC-15 Bolt Action Style Upper fits any standard AR-15 lower.
Rise Triggers — Match and Hunting
RISE now offers Reliant triggers for Rem 700 and Rem 700 clone rifles. The Reliant Hunter Trigger has a preset pull weight of 3.5 lbs. For Precision shooters, the Reliant Pro Trigger has a lighter preset pull weight of 2 lbs., with pull-weight adjustment from about 1 lb. to over 3 lbs. maximum. The Reliant Hunter is available in a curved blade only, while the Reliant Pro has flat and curved blade options. Additional features include unibody cassette-style installation, NoWay take-up for a clean break and NiB-coated steel key components.
The new MDT CRBN Rifle Stock is a lightweight carbon fiber stock with an internal mini-chassis weighing 27 ounces. Crafted from foam-filled carbon fiber, the MDT CRBN Rifle Stock features an ARCA rail, adjustable comb, adjustable length-of-pull, M-LOK slots, QD attachment points, and a 20-degree grip angle.
Silencer Central
Meat-Eater Suppressor
Silencer Central has worked with Banish to develop a new 30-caliber “Meat Eater” suppressor for cartridges up to .300 RUM. The maker claims this suppressor can reduce sound levels by 32 decibels and reduce recoil by up to 40% via its integrated “anchor brake”. This light-weight suppressor weighs 10.3 oz., and measures 5.85″ long. It employs an industry-standard hub mount.
Vudoo Gun Works
Precision Rifle Bag
The impressive Vudoo Precision Rifle Bag has thick foam padding on all sides, 3 Zippered mesh pockets, removable scope cover, muzzle cover with bungee, Velcro interior walls, and cleaning rod sleeve. The fully customizable compartments keep gear organized, while thick, high-density padding shields your firearm from the toughest conditions. This case costs $225.00.
CLICK HERE to read the full monthly digital editions of Shooting Industry Magazine online. Access to ALL articles is free via these Online Editions.
This barrel’s shoulder was 0.025″ off the action because Red Locktite had been used on the threads.
Gunsmith Thomas ‘Speedy’ Gonzales offered this interesting report about how NOT to headspace a barrel. Hopefully you never discover something like this…
“A good friend and customer sent this rig in for repair after FedEx damaged the rifle during inbound transport from another smith. After repairing the stock and rebedding it, I decided to re-polish the barrel to make the repair perfect. Well this just added insult to injury as the barrel did not want to come off. After a few choice words, the barrel finally broke free only to reveal something very disturbing. It seems the barrel had been ‘headspaced’ by using RED Loctite to hold it in place.” [Editor: That’s definitely NOT how barrels should be fitted.]
Speedy was not happy: “I hope the smith that did this sees the photos and realized what jeopardy he put my customer in or anyone who shot the rifle for that matter. When cleaned up, the shoulder on the barrel was over 0.0250″ (25 thousandths) away from the face of the receiver.” [Editor: That’s a lot in this business]. Check out the images below to see how much the barrel rotated further inward when cleaned up. The barrel spun in nearly another eighth-turn or more. Not good.






 Fire-forming all your own 6mm Dasher brass takes time, costs money (in bullets and powder), and consumes precious barrel life. Well there IS a better solution — you can have your new brass hydro-formed by DJ’s Brass to your exact specifications for a $60.00 per hundred, which includes annealing.

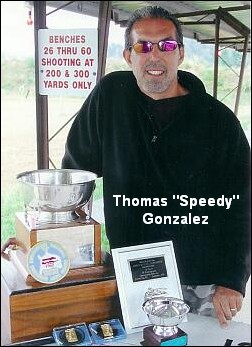 Two respected shooters have observed an increase in velocity with new barrels, typically after 100 rounds. Gunsmith and Hall-of-Fame benchrest shooter Thomas “Speedy” Gonzalez has documented barrel speed-up with testing. Moreover, Speedy’s bore-scope barrel inspections revealed a smoothing of the barrel lands. Jim See, a top PRS competitor, has encountered barrel speed-up many times. Accordingly, he re-tunes his load at 150 rounds.


 This video was made with the help of the
 Engraved Colt Woodsman from NRA Museum


 Many of our readers have been interested in learning how modern bullets are made. While a “boutique” bullet-maker, supplied with appropriate cores and jackets, can craft bullets using relatively simple hand dies and manual presses, factory production is different. The major bullet-makers, such as






 Rise Triggers — Match and Hunting


