The 6mm Creedmoor has become one of the most popular cartridges for PRS/NRL competition, and it also works great in the varmint fields. There are many 6mm Creedmoor factory rifle options now, such as the Savage Model 10 in GRS stock and the Ruger Precision Rifle (6mm Creedmoor).
Do-It-Yourself 6mm Creedmoor Rifle Project — UltimateReloader.com
Another cost-effective option for 6mm Creedmoor fans is to build your own rifle, starting with a Howa barreled action. The Howa 1500 is a mag-fed, flat-bottomed bolt action that ships with the excellent HACT 2-stage trigger. Howa barreled actions have been available with a variety of barrel lengths and contours, starting at about $440.00 at Brownells. (However, many are currently out-of-stock).
There are quite a few good stocks/chassis systems now offered for Howa 1500 actions, including the excellent KRG Bravo Chassis, which features an ergonomic composite outer shell over a precision-machined inner chassis.
Gavin Gear fitted a KRG enclosed fore-end and Mystic Precision MPOD to his 6mm Creedmoor rifle.
Our friend Gavin Gear of UltimateReloader.com has built a nice 6mm Creedmoor rifle using a Howa 1500 heavy-barreled action and KRG Bravo Chassis. This project has proven very successful. The rifle has shown impressive accuracy and outstanding reliability. Gavin hopes to use this rifle in practical/tactical competitions later this year.
In this video, Gavin fits KRG’s enclosed fore-end to the KRG Bravo chassis. This accessory fore-end features a top Picatinny rail and various attachment options on the sides and lower section. Here you can see the enclosed fore-end (upper right) next to the factory forend included with the KRG Bravo (lower left):
Gavin then fits a Mystic Precision MPod from EGW. This stable, wide-base bipod uses a T-Slot rail for rifle attachment, and has legs that adjust independently for height. The video shows the rifle coming together step-by-step. This is something the average guy can do with simple tools — no gunsmithing is required, because the Howa barreled action is pre-chambered for the 6mm Creedmoor cartridge.
In the video above Gavin unboxes his Howa 1500 barreled action from Brownells. He then mounts the barreled action to the KRG Bravo stock, checking the torque levels. Next Gavin borescopes the hammer-forged barrel (5:55) noting: “What I saw I liked — there are practically no tooling marks. The finish on the lands and grooves looks really good”. Lastly, Gavin tested the trigger with his TriggerScan TS-11 (6:24), confirming a two-stage pull weight of about 2.25 pounds out of the box.
Rimfire Benchrest can be fun and rewarding. It can also be frustrating because sourcing superior lots of ammo is a never-ending challenge. Still we like rimfire benchrest because you don’t need to load at the range. Plus rimfire barrels last a very long time (our friend Joe Friedrich set an ARA Benchrest record with a 100,000+ round-count barrel). Here’s a great video from the National Rimfire Benchrest Association of Ireland (NRBAI). Production quality is excellent! We highly recommend you watch this video, which does a great job illustrating both the fun and challenge of rimfire benchrest competition.
If you’ve never seen 50m Rimfire Benchrest competition, this video is well worth watching:
“If you need to get your mind away from everything… then look down a scope, concentrate, and be disciplined.”
“Comradery is one of our organization’s key traits… there are no barriers of gender, age or mobility. Just a very diverse, bunch of good people enjoying a sport together.”
“The skill, in brief, is having the ability to hit the equivalent of the top of a pinhead at 50 meters, in all conditions with a .22 round. Not easy, especially when you have to do it 50 times to get a maximum score of 500 [points], 250 per sheet.”
Back in the USA — The New National 50 Benchrest League
If this article has motivated you to try rimfire benchrest competition back here in the good ol’ USA, there is a new organization that can help. Launched just a couple seasons ago, the National 50 Benchrest League has easy-to-understand rules, and offers competition with a wide variety of rifles, even including air rifles. The whole idea was to make competition more affordable and get more shooters on the firing line. There are three classes — Pellet, Sportsman, and PRO. One can be very competitive in the Sportsman Class with a basic factory .22 LR rig or Air Rifle.
N50 competition is unique in allowing air rifle shooters to compete side-by-side with rimfire shooters. This allows folks to compete without the cost of expensive “top-dollar” rimfire ammo. Pellets are relatively inexpensive, and yes air is still free!
About N50 — The National 50 Benchrest League
Commentary by Joe Friedrich, Open Grove Benchrest
The new National 50 Benchrest League (N50) is a unique shooting experience. We shoot air rifles with pellets and slugs alongside .22 LR Rimfire shooters. We currently have sanctioned clubs throughout the USA offering competition and good fellowship.
N50 has three Classes: Pellet, Sportsman, and PRO. The first Pellet Class is strictly for pellet airguns ranging in calibers from .177-.30 using Diabolo-style pellets from various manufacturers.
The second class is the Sportsman Slug/Rimfire. This combined class allows any factory air rifle shooting commercially-made slugs in calibers from .177-.30 to compete against any factory rimfire that utilizes a factory-barreled action with no attachments to barrel. Pellet air rifles may also compete in this class.
The third class is the PRO Class, and no you do not have to have some magic card that says “Professional” to compete. This class allows purpose-built air rifles, and what we call “unlimited” rimfire rifles to compete. Three types of loads are allowed in PRO Class: .177 slug air-driven, .22 slug air-driven, and any .22 LR ammunition.
Another point — in N50, competitors are allowed to move up in class — you aren’t restricted to a “lower” division. For example, Pellet Class shooters can also move up to shoot in Sportsman and Pro. In addition, Factory rimfires are allowed in Pro Class. This way shooters with the less-expensive rifles can shoot more relays and also see how they compete with the unlimited rigs. It’s all about having fun.
We wanted to make N50 as simple as we could combining air rifles with rimfire so folks who have a factory rimfire can participate and have fun. We also did not want a lot of classes, so combining the two gun types would be simpler. To be honest we were worried that the rimfires will outpace the air rifles, but that was not the case at this year’s Nationals.
Air Rifle on beautifully crafted, plated Pappas Rest.
National 50 Benchrest League Rules and Course of Fire
The official N50 website, National50.net, lists N50 rules, classes, courses of fire, and membership requirements. There are currently 16 affiliated clubs nationwide, with more coming soon.
And the 2022 N50 National Championship is coming up soon. The event, for rimfire rifles and air rifles, will be held August 26-28, 2022 at the Whittington Center in Raton, New Mexico
General Rules — Here are some of the more notable N50 General Rules that apply to N50 matches:
Target Distance: 50 yards
Match Times: 20 minutes per target
Targets: Official targets produced and distributed by N50
Aggregate Score: Cumulative score of 3 targets shot in sequence on same day
Scoring: No competitor shall score their own target
As far as hardware, N50 is pretty open. For all 3 classes, any scope is allowed and any trigger is allowed. For all 3 classes, stocks are unrestricted, stocks may be bedded, and rifle weight is unlimited. However, the Sportsman Class must retain factory barrel and action. N50 competitors in all classes may use 1-piece rests, 2-piece rests, bags, or bipods — whatever they prefer.
CLICK HERE for a free, printable version of the N50 practice target shown above. After clicking, SCROLL DOWN the page and you will see the left and right target sections that will print on 8.5×11″ paper. You can also purchase the Official N50 11″ x 17″ printed Match Targets for $25 per 100 plus shipping.
Credit Boyd Allen for finding this NRBAI Benchrest Video
You may have heard the phrase “blueprinting an action”, but do you know what that really means? Do you know what operations are done to an action during the blueprinting process? To help you understand, gunsmith Bill Marr of RifleShooter.com has created a helpful article showing a Rem 700 blueprinting job start to finish. This article spotlights how the procedures can be done with manual tools. Bill, who runs 782 Custom Gunworks Ltd., can also perform many of these operations with modern automated machinery. In fact, Bill has written a follow-up article on Truing a Rem 700 receiver with a Lathe.
Bill explains: “Blue-printing, or truing a rifle action, ensures the receiver face, threads, lugs, bolt lugs, and bolt face are square to the center line of the receiver.” In Bill’s informative article, Bill shows how he blueprints a Remington 700 short action receiver with .308 Win bolt face. He covers the following procedures step by step:
Action Disassembly
Ream Minor Diameter of Receiver Threads
Square the Receiver Lugs
Square the Face of the Receiver
Lap the Bolt Lugs
Square the Bolt Face
We use the bushings to guide the receiver tap. This chases the threads and ensures they are square.
2. Truing the Receiver Face
Using the receiver facing tool, the front of the receiver is trued. The tool is placed over the tap and turned by hand. We used Do Drill to lubricate it.
3. Lapping the Lugs
The bolt lapping tool screws into the front of the action and applies rearward pressure on the bolt face. A little bit of lapping compound is placed on the front of the receiver lugs. The bolt handle is then raised and lowered repeatedly. Note — it is critical that we do not get any lapping compound on any other surfaces.
4. Truing the Bolt Face
On this bolt, the central part of the bolt face was low. After the truing operation, this Rem 700 bolt face is now completely square to the action.
IMPORTANT: Rifleshooter.com states: “This article highlights our project and is presented for information purposes only. This provides an overview of the process and should not be attempted without the guidance and supervision of an experienced gunsmith“.
Sako, and its subsidiary Tikka, make some of the finest hunting rifles you can buy. These offer smooth actions, and very good out-of-the-box accuracy for factory rifles. In addition, Sako and Tikka now offer high-tech carbon fiber stocks, along with Sako’s handsome wood stocks. With the three videos showcased today, you get a virtual tour of the Sako/Tikka production facilities in Finland.
Tour of Finland SAKO/Tikka Factory — 22-Minute Video
In this informative video, the Canada in the Rough team tours the Sako/Tikka factory in Riihimäki, Finland. All aspects of the production process are covered — crafting actions, barrel-making, stock fitting and more. It was interesting to see the hammer-forging process for barrels, and the exacting measurements that are performed on the actions and bolt assemblies. If you have an interest in rifle production and the type of modern, computer-controlled machinery now being used, definitely watch this video.
Visit to SAKO/Tikka Carbon Fiber Stock Factory
This Sako-produced video shows how the company’s modern carbon-fiber stocks are produced. The stock production process is highly automated, to ensure that the finished stocks have very precise dimensions. These carbon Sakos are some of the nicest carbon-fiber stocks we’ve ever seen.
SAKO Factory Tour in Riihimäki, Finland
In this segment, huntress and outdoor video host Mia Anstine tours the Sako manufacturing facility in Riihimäki, Finland. This video covers both firearms production and ammunition manufacturing. In a follow-up video posted below, Mia tests Sako rifles and Sako ammunition at a Finland range. Mia also reported on her Sako factory tour in the Beretta Blog. She notes: “Sako built its original manufacturing facility during World War I. To this day they still utilize the original buildings but have also grown over the years to include larger production areas and updated equipment.”
Canada in the Rough Video Tip from Boyd Allen — we welcome reader submissions
This thought-provoking article has been one of the most popular Daily Bulletin features in recent years. We are republishing this story today for readers who may have missed it the first time around…
Here’s a little known fact that may startle most readers, even experienced gunsmiths: your barrel wears out in a matter of seconds. The useful life of a typical match barrel, in terms of actual bullet-in-barrel time, is only a few seconds. How can that be, you ask? Well you need to look at the actual time that bullets spend traveling through the bore during the barrel’s useful life. (Hint: it’s not very long).
Bullet-Time-in-Barrel Calculations
If a bullet flies at 3000 fps, it will pass through a 24″ (two-foot) barrel in 1/1500th of a second. If you have a useful barrel life of 3000 rounds, that would translate to just two seconds of actual bullet-in-barrel operating time.
Ah, but it’s not that simple. Your bullet starts at zero velocity and then accelerates as it passes through the bore, so the projectile’s average velocity is not the same as the 3000 fps muzzle velocity. So how long does a centerfire bullet (with 3000 fps MV) typically stay in the bore? The answer is about .002 seconds. This number was calculated by Varmint Al, who is a really smart engineer dude who worked at the Lawrence Livermore Laboratory, a government think tank that develops neutron bombs, fusion reactors and other simple stuff.
On his Barrel Tuner page, Varmint Al figured out that the amount of time a bullet spends in a barrel during firing is under .002 seconds. Al writes: “The approximate time that it takes a 3300 fps muzzle velocity bullet to exit the barrel, assuming a constant acceleration, is 0.0011 seconds. Actual exit times would be longer since the bullet is not under constant acceleration.”
We’ll use the .002 number for our calculations here, knowing that the exact number depends on barrel length and muzzle velocity. But .002 is a good average that errs, if anything, on the side of more barrel operating life rather than less.
So, if a bullet spends .002 seconds in the barrel during each shot, and you get 3000 rounds of accurate barrel life, how much actual firing time does the barrel deliver before it loses accuracy? That’s simple math: 3000 x .002 seconds = 6 seconds.
Gone in Six Seconds. Want to Cry Now?
Six seconds. That’s how long your barrel actually functions (in terms of bullet-in-barrel shot time) before it “goes south”. Yes, we know some barrels last longer than 3000 rounds. On the other hand, plenty of .243 Win and 6.5-284 barrels lose accuracy in 1500 rounds or less. If your barrel loses accuracy at the 1500-round mark, then it only worked for three seconds! Of course, if you are shooting a “long-lived” .308 Win that goes 5000 rounds before losing accuracy, then you get a whopping TEN seconds of barrel life. Anyway you look at it, a rifle barrel has very little longevity, when you consider actual firing time.
People already lament the high cost of replacing barrels. Now that you know how short-lived barrels really are, you can complain even louder. Of course our analysis does give you even more of an excuse to buy a nice new Bartlein, Krieger, Shilen etc. barrel for that fine rifle of yours.
Forum member F-Class John is an avid F-Class competitor and expert handloader. John reviews reloading hardware and shooting-related products for his popular F-Class John YouTube Channel, which now boasts 300+ videos. John also does important product testing for AccurateShooter.com. Through his YouTube channel, John has reviewed many of the latest and greatest reloading tools and accessories. For today’s Video Showcase, we selected eight F-Class John tool and reloading product reviews.
If you like these informative videos, consider joining F-Class John’s Patreon Channel for live video meetings, more in-depth videos, and detailed explanations.
AndiScan Micro A2 Doppler Radar Chronograph
This is break-through technology folks. Imagine a device that replaces a big, bulky chronograph and is a small fraction of the size and weight. The revolutionary AndiScan Micro A2 chronograph records bullet velocity with great precision. Yet it can fit in your pocket, and be easily mounted on your rifle or front rest. This recent video follows up on F-Class John’s initial AndiScan Test Video. And yes folks, this product is now, finally, in production according to the maker: “(6/July/2022) Model A2 will be available on e-shop in several supply batches. Batches of first small production series will be available during July and August.”
The AndiScan Micro A2 is an advanced 24 GHz Doppler radar for measuring velocity of projectiles. This extremely small form-factor device can be directly mounted on your rifle. This makes set-up fast and easy. Plus the AndiScan Micro A2 can be used in dynamic situations, such as multiple distance matches, multi-position stages, or PRS/NRL courses. SEE: AndiScan Micro A2 Product Information.
21st Century Hydro Press and Standard Arbor Press
John notes: “You can’t really talk about precision reloading without taking about inline dies and arbor presses. For my money there’s nothing better than the lineup from 21st Century Shooting. They offer the Hydro Seater which is hands-down the best manual seater out there as well as their standard arbor press which is great for taking on the road to push back bullets as needed.”
Zero Turret Press with Whidden Sizing Die
The new Zero Press from Area 419 is arguably the best turret press ever crafted. It offers unrivaled precision, along with the highest-capacity turret head with NINE die/tool stations. Milled from billet aluminum and stainless steel, this press moves with the help of 14 bearings. In this video, F-Class John shows how to use a Whidden Gunworks full-length sizing die on the Zero Press. And John has two other video reviews of the $1200 Zero Press: 1. Zero Press First Thoughts Video; 2. Loading on a Zero Press.
Dillon 750 Tips and Tricks
The Dillon XL 750 is a favorite of high-volume reloaders. With the optional case feeder, the XL 750 offers high output with great reliability. And Dillon offers one of the best warranties in the business. In this video, F-Class John features upgrades including the Armanov tool-head holders from Europe. These are drilled and tapped for all FIVE stations allowing the user to put threaded dies in any station.
Concentricity Checking with Accuracy One Gauge
Every serious hand-loader needs a quality concentricity gauge. The Accuracy One Concentricity Gauge boasts a smart design that delivers precise, repeatable results. We like the unit’s easy adjustability and its ability to work in a variety of configurations. The Accuracy One Gauge measures internal and external neck runout of cartridge cases as well as seated bullet runout. It can also measure the runout of the ogive, bearing surface, and boat-tail of individual bullets. And it can even measure your primer pocket runout.
Teslong Rigid (Shaft) Borescope with Monitor
Seeing inside your barrel can provide clues to how well you’re cleaning and the bore’s overall health. One of the best tools on the market is the Teslong Rigid Borescope. This features a solid rod for easy use in barrels. Plus it comes with a self-contained high-definition viewing monitor so no smartphones or WiFi tablets are needed. If you’re looking for something more portable and a bit more versatile, try the Teslong Flexible Borescope, $99.99 including monitor. John was impressed with the new rigid Teslong he tested, and he likes having a dedicated monitor (no WiFi required).
Lyman Powered Case Trimmer Review
The Lyman Case Trim Xpress is an efficient, precise unit that allows easy adjustment of trim length with a click-adjustable collar. The trimmer comes with a set of cartridge-specific bushings that index off the case shoulder. One nice feature is a variable speed control. For the price, $154.99 on Amazon, this trimmer delivers excellent performance. F-Class John has another video review of the Lyman Case Trim Xpress which shows set-up and operation.
Primal Rights Competition Priming Seater (CPS) Review
If there is a Ferrari of priming tools, it has to be the Primal Rights Competition Primer Seater (CPS). This impressive bench-mounted tool allows very precise control over primer seating depth. A vertical tube holds primers ready for insertion. The action is smooth and precise. John believes that this is definitely the best priming tool on the market, though it may not be for everyone given its premium $600.00 price.
Gunsmithing Torque Wrench Comparisons
When you are working on custom rifles that might cost $5000+, and mounting scopes that can run $3000 (or more), you need to use very high-quality tools. Precise torque settings are essential, both to avoid damage to valuable parts, and to have the rifle and optic perform optimally. In this video, F-Class John looks at a variety of torque wrenches suitable for gunsmithing duties.
One of the most popular features of our Shooters’ Forum is the ongoing “Pride and Joy” thread. Since 2009, Forum members have posted photos and descriptions of their most prized firearms. Here are some of our favorite “Pride and Joy” rifles recently showcased in our Forum. Do you have a gun you’d like to see featured there? Register for the Forum and you can add your favorite gun to the list. The photo above shows multiple wood-stocked Palma rifles belonging to Forum member SParker.
We hope these “pride and joy” rifles may provide inspiration for our readers, whetting their appetite for their next competition, varminting, or hunting rifle project.
22 BR Savage Varminter — Accuracy on a Budget
This 22 BR Savage, with upgrades from Sharpshooter Supply, is the “pride and joy” of Forum member Maynard. Note the heavy-contour custom barrel with brake. That 22 BR cartridge is a very effective choice for varmint work, as the ground hog in the photo proves. The 22 BR and 22 Dasher are capable of outstanding accuracy with a large variety of bullets and powders. A 22 Dasher can rival the ballistics of a 6mmBR out to 500+ yards, but with reduced recoil.
Daughter’s First Rifle — Built by Dad
Above is a nice field rifle built up by a father for his daughter. Forum member FrankZ explains: “This is my favorite rifle and it will become my daughter’s first centerfire. The action is from the first rifle I purchased with my own money 21 years ago (700VSS).” The rifle now sports a 24″ Brux barrel chambered in 6mm Creedmoor, with aftermarket PT&G Bolt and DBM metal.
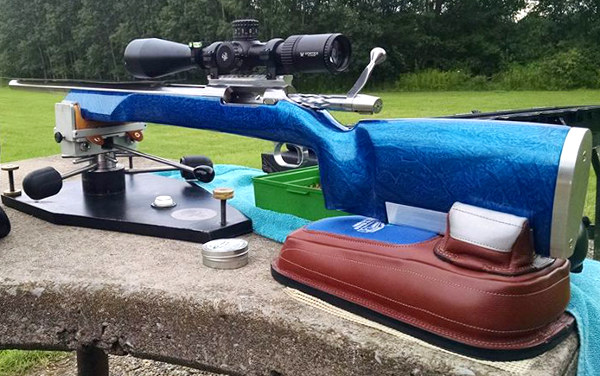
6BR Ackley Improved from Alex Wheeler
Here is a 6BR Ackley Improved (6BRA) built by Alex Wheeler. This blue marble-painted beauty features a BAT “B” action timed by Alex, fitted with Jewell trigger, and Borden trigger guard. The barrel is a Hawk Hill HV contour finished at 28 inches. The stock is a Deep Creek Tracker with 4″ forearm and rudder system (the toe of the stock adjusts for angle, allowing better tracking). This scope is a Vortex 15-60x52mm Golden Eagle riding in Burris Signature Zee rings.
F-Open Rifle with Borden Action + McMillan Kestros ZR Stock
This state-of-the-art .284 Shehane F-Open rifle belongs to Forum member Willow. This has a McMillan Kestros ZR stock fitted with a RAD (spring-loaded buttpad) system with custom spring. Other components are: Borden BRMXD LBRP DLC-coated action, Bartlein 32″, 4 groove, 1:8.5″-twist 400MOD steel barrel, and TriggerTech Diamond trigger. On top is a March HM 10-60x56mm scope in March Gen 3 rings. Below is a video by Editor F-Class John, showing the features of the Kestros ZR stock.
6BRX in the Country
Forum member Grimstod posted this nice 6BRX in a scenic setting: “Bill Goad at Premier Accuracy crated this fantastic 6BRX. It shoots better then I do.” The rifle features a single-feed Alpin action, with Hart 26″ 1:8″-twist barrel, chambered for the 6BRX (6mmBR wildcat) with .269 neck. Grimstod currently runs 95gr Berger VLDs in Lapua brass. On top is a Leupold 40x45mm scope on a Picatinny rail that Grimstod machined himself. The stock is an HS Precision painted by Premier Accuracy.
6mm Dasher for Benchrest Silhouette Matches
Here’s a gorgeous green 6mm Dasher. Forum Member Gunnermhr states: “This is my new 12-lb Dasher for the 1000 Yard Benchrest silhouette matches. My good friend at CRS Custom Rifle Stocks in Aaronsburg, PA made and painted the stock. It’s similar to a Tooley MBR with a few modifications. It still supported on a 3″ forearm and is full length. Hard to imagine it still makes weight with a wood stock and a 36 power Leopold. Crossed the scale at 11.7lbs. The rifle features a BAT “B” Action. The paint is Candy Apple Green, the forearm has a white base-coat, center section is gray base coat and the buttstock is black base coat, all covered with five coats of clear. It’s the new pride of the fleet as it shoots as good as it looks. This gun hammers with 105gr Berger Hybrids.”
Two Dashers and a Rimfire for Fun
Courtesy Forum member Dan H., here are two red-stocked Dashers plus an Anschutz 54.30 (Benchrest Stock) to make it a trio. Dan says: “The Anschutz provides good practice in trigger-pulling. It’s amazing what you can learn from a rifle that is as sensitive as this one.”
1917 Enfield Upgraded with Hand-Carved Figured Maple Stock
This impressive rifle features an “antique” 1917 Enfield action chambered for the .338 Win Magnum cartridge. The lovely Maple stock was hand-carved by Forum member Spitfire_ER. He tells us: “I found this piece of wood as a return at a lumber yard about 7-8 years ago. I asked the guy in the yard about it and he said it had been returned because it had too much figure for the job the customer was working on. First thing I thought was, ‘That would make a nice stock’.”
New 6PPC with Borden Action, Lederer Barrel, Loker Tuner
Here’s a modern, low-profile, short-range Benchrest rifle, finished proudly in bright red. Forum Member JimmyMac posted: “Picked up my new 6 PPC today. This red rig features a Borden B action (Jewell trigger) fitted with a Lederer 1:14″-twist barrel with a Loker tuner. The barrel action rides in a Roy Hunter stock. On top is a Nightforce 42x44mm Competition scope in BAT rings. The rifle was smithed by Dave Bruno.”
Here’s a really great video about firearms crafting produced by Beretta, a legendary Italian gun-maker founded in 1526 — nearly 500 years ago. This movie, entitled “Human Technology”, is one of most impressive videos we’ve ever featured on this site. It’s that good. You’ll see an amazing blend of modern technology along with old-world artisanship — “a mesmerizing meld of the high-tech and the traditional”. (Daniel Xu, Outdoor Hub.)
“Human Technology is a singular and symbolic movie, its cast entirely made up of Beretta workmen, thus illustrating the perfect synthesis between craftsmanship and technology,” Beretta writes. This artistic movie by Ancarani Studio illustrates all the aspects of the manufacturing of a high-end Beretta shotgun. This video is a study in contrast. The movements of robotic assembly machines are juxtaposed with the centuries-old craftsmanship of stock carvers. Beautifully filmed and edited, this video should amaze and entertain anyone who loves fine firearms. (Full-screen HD Recommended.)
Editor: Many new barrels will deliver higher velocities with the same load after 100-150 rounds through the bore. The exact reasons for this speed-up are not 100% certain, and velocity increases (if any) will vary from one barrel to the next. But this “speeding up” phenomenon is common, so be prepared if this happens with your next barrel. If you do experience a significant velocity increase you should probably re-tune your load AFTER the velocity stabilizes at the higher level.
From the Sierra Bullets Blog Article by Mark Walker, Sierra New Product Development Director
In a previous post, I discussed a couple of methods to tune a load to your barrel to help achieve the best accuracy possible. People most often work on load tuning if they get a new rifle or have a different barrel installed. In both instances, the barrel is new and has not been fired very much. According to most competitive shooters, this is the most accurate your barrel will ever be, so getting it tuned and shooting accurately is a priority.
The Speed Up Phenomenon After 100-150 Rounds
Even though after you work up a load and your new barrel is shooting great, a lot of shooters notice that at around 100 to 150 rounds their rifle may stop shooting as accurately. I had this happen to a rifle and I was confused as to why something that worked so well to begin with would all of a sudden quit shooting. I decided to break out the chronograph to do another load work up to see what was going on. To my surprise, the velocity had increased around 80 fps over the original velocity! After performing another ladder test and adjusting the seating depth, the rifle was once again shooting well.
There are several thoughts on why this may happen, however, you can rest assured that it does happen. One thought is that as the barrel breaks in, the tooling marks in the throat of the chamber smooth out and allow less resistance to the bullet as it exits the bore thereby increasing speed. Another idea is that the throat area starts to get a little rough which in turn causes more resistance which increases pressure and therefore more velocity. I’m sure there are some out there who have a better understanding as to why this happens, but it can definitely affect the accuracy of your rifle. So be aware and never be afraid to rework a load to keep your rifle in tune.
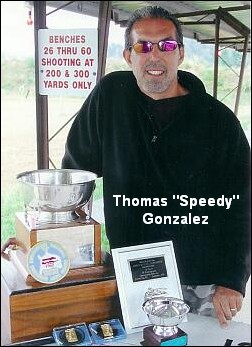
Experts Confirm That Barrel Speed-Up Is Common Two respected shooters have observed an increase in velocity with new barrels, typically after 100 rounds. Gunsmith and Hall-of-Fame benchrest shooter Thomas “Speedy” Gonzalez has documented barrel speed-up with testing. Moreover, Speedy’s bore-scope barrel inspections revealed a smoothing of the barrel lands. Jim See, a top PRS competitor, has encountered barrel speed-up many times. Accordingly, he re-tunes his load at 150 rounds.
“Alex Lipworth and I documented this phenomenon about four years ago and I have told all my customers about this. My son Mikee would shoot 100 rounds through all new barrels we planned on shooting before we would begin to do load development. We had a shooting snail that caught all the bullets set up in front of an indoor bench. We called it a wear-in process because upon careful examination of the bore when the ‘Speed Up’ takes place the cut-rifled bore resembles that more of a button-rifled barrels with the lands taking on more the softer look of a buttoned bore.” — Speedy Gonzalez
“Seen it [barrel velocity increase] too many times to count. All my match barrels get a ‘generic round’ loaded for them, which has worked well in barrels historically. After I hit 150 rounds I fine-tune the load and never look back, until the tube starts to slow down at it’s life end.” — Jim See
Get WAY Better Groups with New Criterion Pre-Fit Custom Barrel
In our Shooters’ Forum, you’ll find a lengthy thread about accuracy problems with a Savage LRPV, chambered in 6mmBR. The gun would repeatedly split groups at 100 yards, and at 300 yards, the “flyers” would open up the groups to 1.5 MOA or larger. Interestingly, the factory test target (at right) showed a split group — not a good sign.
The gun’s owner, forum member LR_Shooter, tried a variety of tweaks: “I did this, done that… [changed] torque, tang floated, bedded action, recut chamber, and [adjusted firing pin]”. But nothing really helped. Frustrated, LR_Shooter asked his fellow Forum members for help. Much advice was proffered, including the novel idea of removing the middle action screw in the Savage 3-screw target action. Some of the advice proved helpful, but none of the suggested remedies produced a major improvement. This rifle, out of the box, tossed flyers and no amount of tweaking (or changes in shooting technique) really cured the basic problem. That is, until, the factory barrel got replaced…
New Criterion Pre-Fit Barrel Works Wonders
LR_Shooter acquired a Criterion pre-fit barrel from Jim Briggs at Northland Shooters Supply (NSS). These pre-fits are designed for easy installation with the standard Savage barrel nut. Wouldn’t you know it, with a new 30″ heavy-contour barrel on the LRPV, the gun started shooting way better. No more crazy fliers, no more split groups, no more excessive vertical. And the improvement came without any other major modifications. LR_Shooter reports: “I got a replacement barrel from Jim at NSS. It is a 30″ bull Criterion barrel. So far, without playing with torque screws and having my old setup… I’m very satisfied with the barrel I got. Now I have no problem getting [groups] under 0.25 MOA. Finally this thing can shoot!” The targets below, shot with the new Criterion barrel, speak for themselves. The left target was shot at 100 yards, while the target on the right was shot at 300 yards (very impressive).
Targets Shot with Savage LRPV Fitted with Criterion Barrel
Moral of the Story — Sometimes A New Barrel Really Is the Right Solution
All of us have struggled at times with a rifle that won’t live up to expectations. This Editor personally struggled for over a year with a .260 Rem Savage with a factory tube. The gun tended to split groups and the POI walked as the barrel heated. I tried one powder/primer combination after another, working through a variety of seating depths over many months. I was persistent. Out of stubbornness, I just believed that sooner or later I’d find the magic load.
Well folks, sometimes there’s really nothing you can do about a sub-par barrel. It is what it is. To really improve a gun’s accuracy (particularly a gun with a factory tube), you may need to open your wallet and get a quality aftermarket barrel. Spending months trying one recipe after another may simply be an overwhelming waste of powder, bullets, and your precious time.
Albert Einstein supposedly said: “Insanity is defined as doing the same thing over and over again, and expecting different results.” Well that sort of describes my efforts with my .260 Rem. Once I had enough evidence that my barrel split groups no matter what load combo (and seating depth) I tried, it was time to pony up for a new barrel. When I did finally screw on a nice PacNor 3-groove SuperMatch, that Savage suddenly became a true tack-driver. As re-chambered in 6mmBR with the Pac-Nor, in calm conditions, my Savage will now consistently shoot in the twos with heavy bullets, and it can sometimes dip down into the ones with Berger 80gr flat-base bullets. The moral of the story here is simple — don’t waste weeks or months chasing your tail with a barrel that just won’t deliver (after a reasonable amount of testing). Save up for a custom barrel, get it chambered properly, and stop your cycle of frustration.


 If this article has motivated you to try rimfire benchrest competition back here in the good ol’ USA, there is a new organization that can help. Launched just a couple seasons ago, the


 Gone in Six Seconds. Want to Cry Now?


 Two respected shooters have observed an increase in velocity with new barrels, typically after 100 rounds. Gunsmith and Hall-of-Fame benchrest shooter Thomas “Speedy” Gonzalez has documented barrel speed-up with testing. Moreover, Speedy’s bore-scope barrel inspections revealed a smoothing of the barrel lands. Jim See, a top PRS competitor, has encountered barrel speed-up many times. Accordingly, he re-tunes his load at 150 rounds.


 In our


