In Brownells’ GunTech™ Archive of instructional articles and videos, Eric Kiesler has written an informative Guide to Metal Prep for bluing or bake-on resin coatings. Eric’s “how-to” advice will be useful for prepping something as small as a scope ring or as large as a complete barrelled action. Here is a selection from Eric’s article:
Gunsmith’s Guide to Metal Prep for Baking & Bluing
By Eric Kiesler
Prior to bluing or the application of a bake-on coating, a steel surface must be properly prepared. In either case, at a minimum the work piece must be thoroughly and completely degreased. There are many acceptable ways to degrease steel parts, so long as no residue remains the method used is not critical. We typically recommend TCE (#083-060-024) for degreasing prior to the application of Brownells Baking Lacquer (#083-046-801) or Oxpho Blue (#082-024-004). The TCE in the spray can is preferable as it allows you vigorously spray the surface, start at the top of the part and hose it down to the bottom chasing the grease off.
Prior to hot caustic Bluing (#082-005-007) the parts are immersed in a heated detergent bath using Dicro-Clean (#082-005-008) because (like TCE) we know it will have no adverse after effects or residue that could cause problems later on. Once the degreasing is complete, the part could be blued or coated, however, with bake on coatings, adhesion is greatly enhanced if the surface of the parts are roughed up. This can be accomplished by sanding them with a fine abrasive cloths, sand paper, Emory Cloth (#657-110-120) or by abrasive blasting. Abrasive blasting is preferable because it will typically reach areas that sand paper might not.
For the Gun Kote (#083-051-001) brand of bake-on finish, aluminum oxide (#084-206-060) must be used as the abrasive blasting media in your abrasive blaster. For our other bake on coatings (and even Aluma-Hyde) sand or glass beads may be used in the blaster. If you do abrasive blast the part (highly recommended), it should be degreased afterwards because the blasting media may have contaminants in it. You don’t want to coat a highly polished part since shiny metal resists the coating, but a highly polished part could certainly be blued.
Here’s a little known fact that may startle most readers, even experienced gunsmiths: your barrel wears out in a matter of seconds. The useful life of a typical match barrel, in terms of actual bullet-in-barrel time, is only a few seconds. How can that be, you ask? Well you need to look at the actual time that bullets spend traveling through the bore during the barrel’s useful life. (Hint: it’s not very long).
Bullet-Time-in-Barrel Calculations
If a bullet flies at 3000 fps, it will pass through a 24″ (two-foot) barrel in 1/1500th of a second. If you have a useful barrel life of 3000 rounds, that would translate to just two seconds of actual bullet-in-barrel operating time.
Ah, but it’s not that simple. Your bullet starts at zero velocity and then accelerates as it passes through the bore, so the projectile’s average velocity is not the same as the 3000 fps muzzle velocity. So how long does a centerfire bullet (with 3000 fps MV) typically stay in the bore? The answer is about .002 seconds. This number was calculated by Varmint Al, who is a really smart engineer dude who worked at the Lawrence Livermore Laboratory, a government think tank that develops neutron bombs, fusion reactors and other simple stuff.
On his Barrel Tuner page, Varmint Al figured out that the amount of time a bullet spends in a barrel during firing is under .002 seconds. Al writes: “The approximate time that it takes a 3300 fps muzzle velocity bullet to exit the barrel, assuming a constant acceleration, is 0.0011 seconds. Actual exit times would be longer since the bullet is not under constant acceleration.”
We’ll use the .002 number for our calculations here, knowing that the exact number depends on barrel length and muzzle velocity. But .002 is a good average that errs, if anything, on the side of more barrel operating life rather than less.
So, if a bullet spends .002 seconds in the barrel during each shot, and you get 3000 rounds of accurate barrel life, how much actual firing time does the barrel deliver before it loses accuracy? That’s simple math: 3000 x .002 seconds = 6 seconds.
Gone in Six Seconds. Want to Cry Now?
Six seconds. That’s how long your barrel actually functions (in terms of bullet-in-barrel shot time) before it “goes south”. Yes, we know some barrels last longer than 3000 rounds. On the other hand, plenty of .243 Win and 6.5-284 barrels lose accuracy in 1500 rounds or less. If your barrel loses accuracy at the 1500-round mark, then it only worked for three seconds! Of course, if you are shooting a “long-lived” .308 Win that goes 5000 rounds before losing accuracy, then you get a whopping TEN seconds of barrel life. Anyway you look at it, a rifle barrel has very little longevity, when you consider actual firing time.
People already lament the high cost of replacing barrels. Now that you know how short-lived barrels really are, you can complain even louder. Of course our analysis does give you even more of an excuse to buy a nice new Bartlein, Krieger, Shilen etc. barrel for that fine rifle of yours.
We’ve been giving a lot of coverage to tactical rigs and gas guns lately, so we though it was time to showcase a purebred, state-of-the-art 1000-Yard Benchrest rig. This article features the impressive .284 Shehane Light Gun used by Henry Pasquet to capture the 2013 IBS 1000-yard Nationals.
With a 5″-wide “hammerhead” front and a special 3″-wide bag-rider plate in the rear, this 17-lb rig is ultra-stable in the bags, and tracks like a dream. In this story, Henry explains his set-up plus his processes for loading super-accurate ammo. Every long-range shooter can benefit from some of tips revealed here. And F-Class guys — if you’re shooting a .284 Win-based case in F-Open you should definitely read Henry’s precision reloading advice.
EDITOR: Guys, there is a ton of solid gold information in this article — take your time and read it carefully.
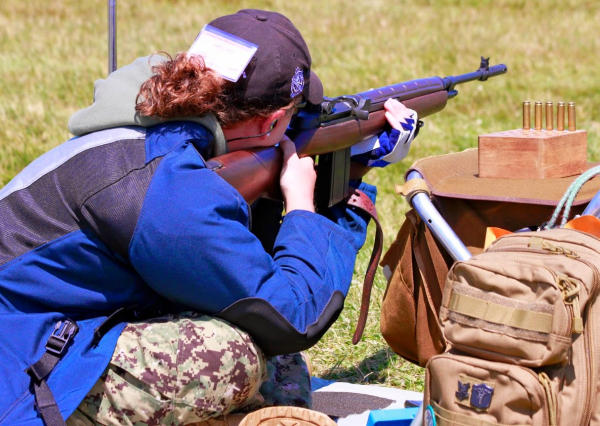
Yes old dogs can learn new tricks. Just five years ago Forum member Henry Pasquet (aka “HenryP”) got started in 1000-yard benchrest shooting. He was 66 at the time. Henry worked hard, learned fast, and pursued accuracy with a vengence. That all paid off when Henry won the 2013 IBS 1000-yard Nationals this summer, finishing as the Two-Gun Overall National Champion. Henry was kind enough to talk about his rifle, his reloading methods, and his strategy for success. In fact, Henry was eager to share “everything he knows, so that other guys can fast-track their learning process”. Henry told us: “I want to share every lesson I’ve learned, so that other guys can improve their game and enjoy the sport more.” Henry also wants to encourage other senior shooters: “If you pay attention to details (when reloading), and get a good rifle with a good barrel, age is not a handicap. With a good set-up, older guys can compete with anyone out there. This is one sport where you can be a champion in later life.”
Click on Rifle Photos to View Full-screen Versions
Q&A with Henry Pasquet, IBS 1000-Yard National Champion
Q: First, do you have any advice for older shooters getting started in their golden years?
Henry: You’re never too old. In this sport, you can excel even in your 60s, 70s and beyond. At this stage in life, we now have the time and money to get good equipment and rifles. Plus, our years of work experience help us to think, analyze, and thereby make progress. In this game, we older guys can definitely compete on a par with younger shooters.
HARDWARE
Q: Tell us about your Nationals-winning rifle and bench gear. Is there anything unique about your hardware that gave you an edge?
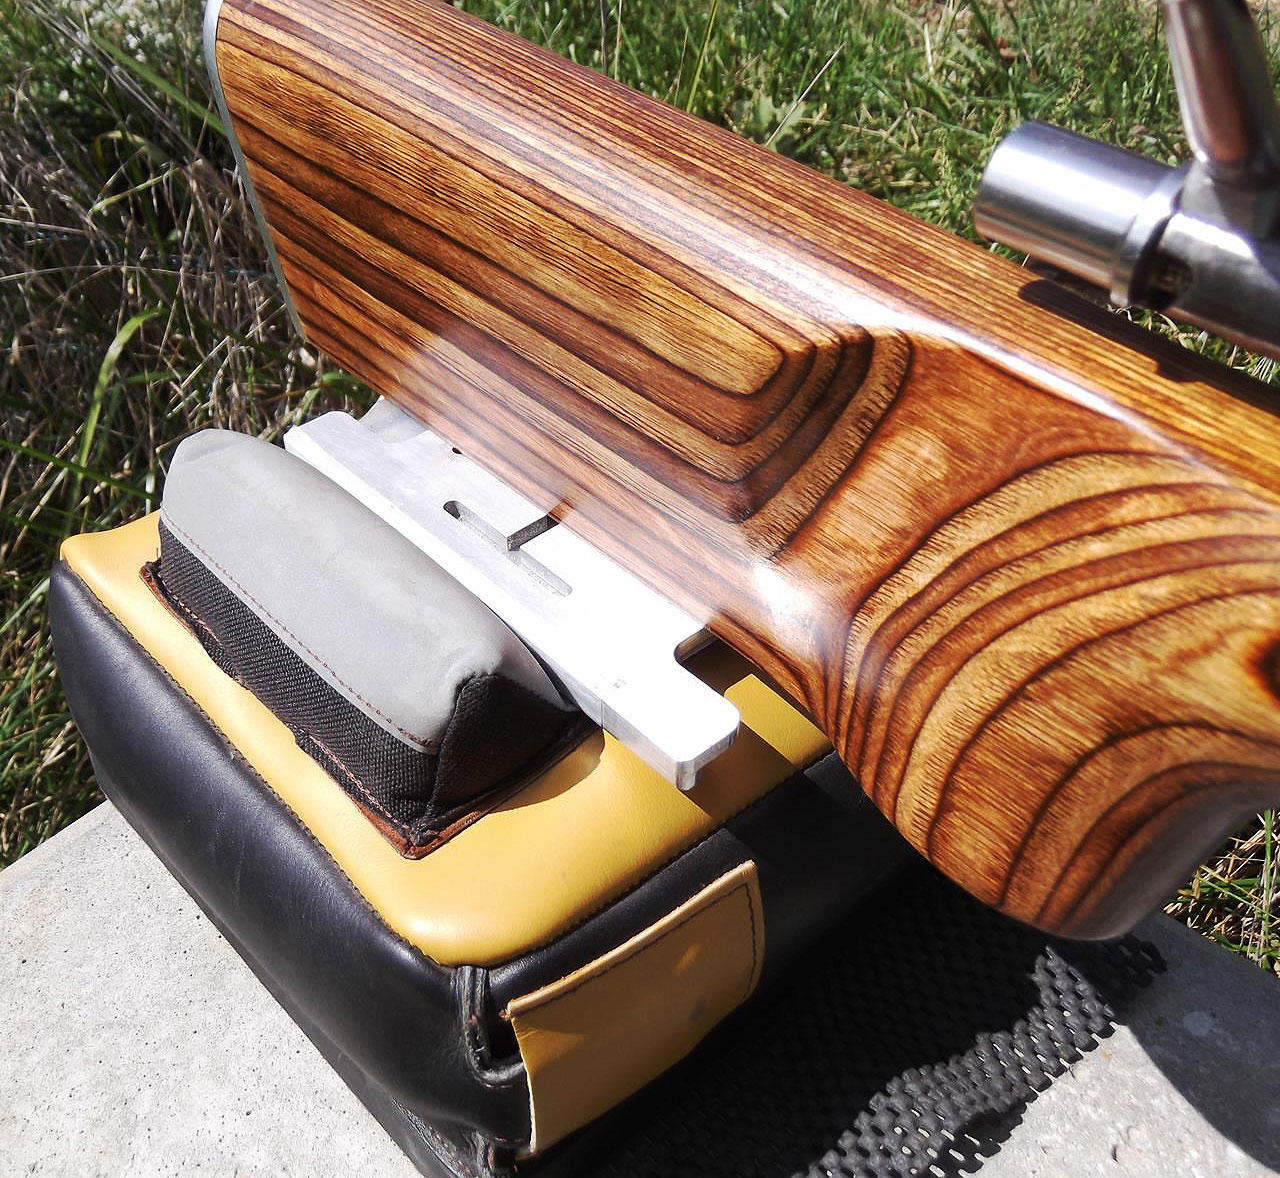
Henry: At the Nationals, I used my 17-lb Light Gun for both Light and Heavy Class. This rifle has a 1.55″, round BAT LP/RE action, fitted with a Bartlein barrel chambered for the .284 Shehane (an improved version of the .284 Winchester). The barrel was near-new; this was the first time I had used it this year. A great barrel and great batch of Berger 180gr VLDs all made a difference. Jay Cutright chambers my barrels. Jay’s metal-work is so precise that I can screw any barrel he’s chambered to any BAT action I own. The laminated stock was modified by Tommy Shurley from a standard 3″-wide fore-end to a 5″-wide True-Trac with an adjustable 3″-wide rear plate. It’s not pretty but it tracks like a Heavy Gun stock. Tommy made my other stocks as well.
On top is a Nightforce 12-42x52mm Benchrest scope with CH-3 reticle. I used a Fulghum (Randolph Machine) front rest with an Edgewood bag made with the low-friction 3M material. In the rear I use a special-order Protekor rear “Doctor” bag with ears spaced 3 inches apart. The rear bag also has the new 3M material on contact surfaces (photo at right).
Q: During the Nationals, at the last minute you switched guns. Why did you go from a 6mm Dasher to a 7mm Shehane?
Henry: I had planned to use my Light and Heavy Dashers, but after placing the Dasher on the ready line, decided to switch to the .284 Shehane. It was still early in the morning and I felt that the heavier bullets would be easier to see against the berm. The Dasher had actually been giving tighter groups under perfect conditions, but seeing the impact is important.
Q: Tell us about the combined tuner/muzzle brake on some of your barrels. How does this improve rifle performance and how do you set the “tune”? Do you tune the barrel to the load?
Henry: I use a tuner or tuner/brake on every barrel. I started with Time Precision tuners. Art Cocchia advised getting a load with a good known accuracy node with minimum extreme spread, which controls vertical. Do not go for the hottest loads, which just reduces brass life. Then use the tuner and tune the barrel to the load. The .284 Light Gun needed a muzzle brake and tuner. I had a local gunsmith cut a thread on the muzzle brake for a tuner I got from Sid Goodling. (Eric Bostrom developed an almost identical unit at the same time. I use Eric’s tuner/brakes on all my new barrels.) Just before Nationals, I tried going up and down one marker. Down one mark cut the group in half! Think how much range time (and barrel life) that saved me. Using a tuner is easier than messing around changing loads and tweaking seating depths. Tuners definitely can work. Last year I shot a 3.348″ 10-shot group at 1000 with my .284 Win Heavy Gun fitted with a Time Precision Tuner.
Q: What are the advantages of your stock’s 5″-wide fore-end and 3″-wide rear plate? Is there a big difference in tracking and/or stability? Does the extra width make the rifle easier to shoot?
Henry: I had true Heavy Guns with 5-inch fronts and 3-inch rears. They tracked well. I felt the same result could be had with a Light Gun. I talked two stock makers into making them. I initially had the standard rear stock until Tommy Shurley and Mike Hearn came out with an adjustable rear plate. The stocks track perfectly. You can see your scope’s crosshairs stay on the target the whole time and push the rifle back for the next shot. There is no torquing (gun wobbling) when cycling the bolt. Us old guys need all the help we can get. I am getting rid of my 45-pound Heavy Guns and replacing them with Light Guns with heavy barrels.
Q: Some people say the .284 Shehane is not as accurate as the straight .284 Winchester. You’ve proved them wrong. Why do you like the .284 Shehane? More speed, less pressure?
Henry: The reason I rechambered my 7mm barrels to .284 Shehane was not velocity, pressure, or brass life. It was all about bolt lift. My straight .284 almost required me to stand up to eject brass. I damaged an extractor and had to send the bolt back to BAT. With the .284 Shehane, my bolt cycles like there is no case to eject.
Reloading Methods
Q: People want to know about your load and your loading methods. What can you reveal?
Henry: For my .284 Shehane at the Nationals, I loaded 52.5 grains of Hodgdon H4350 and Federal BR-2 primers behind Berger 180gr VLDs. I usually anneal the brass each winter. I have used the same brass for years. I use Redding bushing dies, apply Imperial sizing wax, resize, wipe off wax, clean and uniform the primers pockets using the RCBS Trim Mate Case prep center, then apply Imperial dry neck lube with a bore mop.
To dispense powder, I use a RCBS ChargeMaster set 0.1 grain below my desired load and then weigh them on a Sartorius GD-503 magnetic force restoration scale to get identical charges. I use a K&M Arbor Press with seating force gauge when seating the bullets with a Wilson inline die. My “target” seating force on the K&M dial is 20-23 units for Dashers and 35-40 units for the .284 Shehane. I put any variables aside for sighters. I do not weigh brass, bullets, or primers. My bullets were so consistent that I did not sort by bearing surface. I did trim the Berger VLDs to the shortest bullet length with a Hoover Trimmer, and then pointed the meplats just enough to close them with a Whidden pointer. I sort my bullets to 0.005″ overall length, rejecting about five percent.
Q: What kind of precision are you looking for in your reloads? Do you trickle to the kernel? Does this really help reduce extreme spread?
Henry: I try to keep my charge weights consistent to one kernel of powder. I use the Omega powder trickler with a Sartorius GD-503 lab-grade balance to achieve that. For accurate dispensing, put very little powder into the Omega so you can drop one kernel at a time. Single digit ES (Extreme Spread) is the goal. This does make a difference at 1000 yards. If you get the same push on the same bullet with the same neck tension, good things are going to happen.
Q: You believe consistent neck tension (i.e. grip on the bullet) is really important. What methods are you using to ensure consistent bullet release?
Henry: I apply Imperial dry neck lube to the inside of my case-necks with a bore mop. The K&M arbor with seating force gauge shows the need to do this. If you put a bullet into a clean case, it will be jerky when seating the bullet. You may see 40 units (on the K&M dial) dropping to 20, then slowly increasing pressure. I explained to a friend that not lubing the neck is like overhauling an engine without lubing the cylinders. Smooth entry gives the bullets a smooth release.
Barrel Cleaning
Q: You go 60-80 rounds between cleaning and the results speak for themselves. What is your barrel cleaning procedure? Do you think some guys clean too often or too aggressively?
Henry: I cringe when I see people wearing out their barrels with bronze brushes between relays. I clean my barrels at the end of each day when I get home. I shot my best-ever 1K Heavy Gun group (3.348″) at day’s end after 60 to 80 rounds. After trying other solvents, I have gone back to Wipe-out’s Carb-Out and Patch-Out products. I use about four patches of Carb-Out, let it sit a few minutes, then use one stroke of a nylon brush followed by Patch-Out until the barrel is clean. I use a bore mop to clean inside the chamber, then some Break Free LP on the bolt followed by bolt grease on the lugs and cocking part. I use a bore guide when anything goes down the barrel.
Shooting Skills and the Learning Process
Q: Henry, you can shoot long-distance on your own property in Missouri. How important is practice, and what do you do during a typical practice session?
Henry: I can shoot 1000 yards on my farm. I have a concrete bench using a slab from a yard furniture place on concrete blocks. Two 4 x 8 sheets of plywood hold four IBS targets. I never practice. I only test, keeping a notebook with all the info. I do most of my testing at 300 to 500 yards, shooting off my deck so I can see my shots immediately.
Q: How much of your success do you credit to really accurate rifles, versus superior shooting skills?
Henry: I do not consider myself another Carlos Hathcock or some master marksman. I am an average 1000-yard shooter, but I do work hard getting the most out of my rifles. Four other people have shot their first 1000-yard matches with my rifles, including my wife, and all of them won relays! I loaned my Dasher to another shooter two years ago and he got second at the 600-yard Nationals. Others will tell you that the rifle must be “on” to win. If your barrel or bullets are average, don’t expect to perform above average in competition.
Q: What you do enjoy most about long-range benchrest shooting? What are the attractions of this sport?
Henry: The sport offers good people and a real challenge. 1000-yard shooting keeps us all humble, but we still keep trying to see how good we can do. I am thankful for Robert Ross providing the only match location that I can shoot regularly.
Q: Henry, you have been a Forum member for many years. Have you learned important techniques from other Forum members and other shooters?
Henry: I have followed the AccurateShooter Forum since 2008. At my age I am not good at computers. I copied and analyzed many articles, especially on the .284 and the Dashers. Without AccurateShooter.com, I would probably still be shooting double-digit (10″+) groups at 1000 yards, and I sure wouldn’t have my name on a National Championship trophy.
Q: You are in your 70s now and have only been shooting competitively for a few years. How did you get so good so fast? How did you manage to beat shooters who are decades younger?
Henry: I had 20/10 vision when I was young, but am down to only 20/20. I have been interested in long range shooting for a long time including ground hog hunting. I went to some VHA jamborees also. In 2008, I went to the Williamsport Benchrest School with a friend from Pennsylvania, John Haas. We would compare notes frequently. I bought a BAT three lug from Tom Mousel in Montana. We also compared notes and made each other better. At IBS matches I studied other shooters’ equipment and techniques. I tried some, accepting some and rejecting some.
Here’s my advice:
Always be ready to learn something new. If it makes sense, try it. I would also encourage other older shooters not to quit. Stick to it. You can make enormous progress in a few seasons.
TEN Shots in 0.303″ (0.289 MOA) at 100 Yards
How does Dan’s XP-100 pistol shoot? Look at that target showing TEN shots at 100 yards, with eight (8) shots in the main cluster at the top. The ten-shot group measures .303″ (0.289 MOA), as calculated with OnTarget Software. Not bad for a handgun! What do you think, can your best-shooting rifle match the 10-shot accuracy of this XP-100 pistol?
Report by Boyd Allen
This pistol belongs to Dan Lutke, a Bay Area benchrest shooter who publishes the results for the Visalia matches to the competitors and the NBRSA. He has been an enthusiastic competitor for an number of years, at various ranges, notably Visalia and Sacramento. The action is a Remington XP-100, to which a Kelbly 2 oz. trigger has been fitted. On top is an old Japanese-made Tasco 36X scope (these were actually pretty darn good). The Hart barrel (a cast-off from Dan’s Unlimited rail gun) was shortened and re-chambered for the 6x45mm, a wildcat made by necking-up the .223 Remington parent case. The custom stock/chassis was CNC-machined by Joe Updike from 6061 Billet Aluminum to fit the XP-100 action and mount a target-style AR grip with bottom hand rest. The gun was bedded and assembled by Mel Iwatsubu. In his XP-100 pistol, Dan shoots 65gr custom boat-tails with Benchmark powder.
This diagram shows the most common 6x45mm wildcat, which is a necked-up version of the .223 Remington parent cartridge. NOTE: The dimensions for Dan Lutke’s benchrest version of this cartridge may be slightly different.
ACAD drawing by Peter Gnanapragasam CC by SA 3.0, via Wikimedia Commons. Title Added.
Story tip from Boyd Allen. We welcome reader submissions.
Do you own a Springfield M1A (or wish you did)? Then you should watch this 5-minute video from the American Gunsmithing Institute (AGI). This video shows the basics of the operation of the popular M1A rifle, the civilian version of the military M14. In this video, gunsmith John Bush field-strips the M1A and shows how the bolt, op rod, and trigger group fits together and operates. This video contains excerpts from the M1A Rifle Armorer’s Course, AGI Course #1584. The full Armorer’s Course is available on DVD from www.AmericanGunsmith.com.
Watch Highlights of AGI M1A Rifle Armorer’s Course:
Registration Opens for 2017 CMP Springfield M1A Match
The 11th annual Springfield Armory M1A Match will take place during the 2017 National Trophy Rifle Matches. The CMP will host the event on Saturday, July 22, following the John C. Garand Match. Competitors of all experience levels are encouraged to bring their M1A rifles to Camp Perry and compete. Registration for the match will open April 1, 2017, and is open to all individuals ages 12 and above, with an entry fee of $50 (junior $25).
The Springfield Armory M1A match began with one man’s idea and passion. Springfield Armory’s Mike Doy witnessed the waning of classic M1 Garand and M1A rifles from the competitive High Power firing lines. “I really wanted to get those M1A rifles out of safes and closets and back out onto the field. So 11 years ago, I promoted the idea of running an M1A-specific match at Camp Perry. That first year we had over 600 competitors and spectators.” Now the match offers some of the biggest pay-outs at Camp Perry. In recent years, Springfield Armory has donated over $25,000 worth of cash and prizes, including a $2,000 cash award to the overall winner.
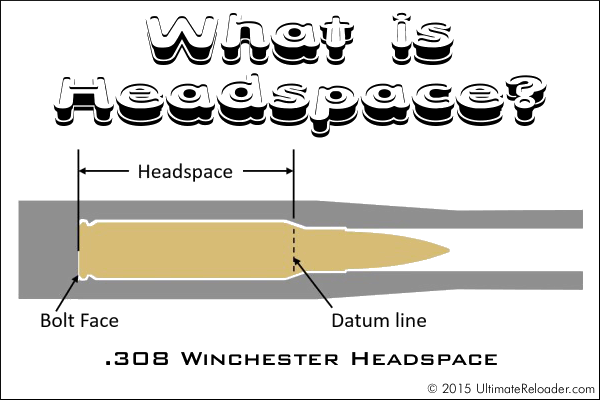
This illustration shows headspace measurement for the popular .308 Winchester cartridge, which headspaces on the shoulder. Image copyright 2015 Ultimate Reloader.
In this Brownells Tech Tip, Brownells gun tech Steve Ostrem explains what headspace is and why it’s one of the most critical measurements for nearly all firearms. Even if you’re an experienced rifle shooter, it’s worth watching this video to refresh your understanding of headspace measurements, and the correct use of “GO” and “NO-GO” gauges.
Headspace Definition
In firearms, headspace is the distance measured from the part of the chamber that stops forward motion of the cartridge (the datum reference) to the face of the bolt. Used as a verb, headspace refers to the interference created between this part of the chamber and the feature of the cartridge that achieves the correct positioning. Different cartridges have their datum lines in different positions in relation to the cartridge. For example, 5.56x45mm NATO ammunition headspaces off the shoulder of the cartridge, whereas .303 British headspaces off the forward rim of the cartridge.
If the headspace is too short, ammunition that is in specification may not chamber correctly. If headspace is too large, the ammunition may not fit as intended or designed and the cartridge case may rupture, possibly damaging the firearm and injuring the shooter. (Source: Wikipedia)
Headspace Gauges
Headspace is measured with a set of two headspace gauges: a “Go” gauge, and a “No-Go” gauge. Headspace gauges resemble the cartridges for the chambers they are designed to headspace, and are typically made of heat-treated tool steel. Both a “Go” and a “No-Go” gauge are required for a gunsmith to headspace a firearm properly. A third gauge, the “Field” gauge, is used (as the name implies) in the field to indicate the absolute maximum safe headspace. This gauge is used because, over time, the bolt and receiver will wear, the bolt and lugs compress, and the receiver may stretch, all causing the headspace to gradually increase from the “factory specs” measured by the “Go” and “No-Go” gauges. A bolt that closes on “No-Go” but not on “Field” is close to being unsafe to fire, and may malfunction on cartridges that are slightly out of spec. (Source: Wikipedia)
To learn more, read Brownell’s longer article Headspace Gauges and How to Use Them. Among other things, this explains the relative lengths of “Go”, “No-Go”, and “Field” gauges. The “Field” is actually the longest: “The GO gauge corresponds to the SAAMI (Sporting Arms & Ammunition Manufacturer’s Institute) minimum chamber length, while the FIELD gauge usually matches the maximum chamber depth, or slightly less. NO-GO gauges are an intermediate length between minimum and maximum, that, technically, is a voluntary dimension. A firearm that closes on a NO-GO gauge and does not close on a FIELD gauge may not give good accuracy and may have very short cartridge case life from the ammunition re-loader’s standpoint.”
A little work with the hand axe, after a trip through the band saw…
A while back, Forum member Preacher crafted a nice varmint rifle for fellow Forum member Dave 0. (aka “Waskawood”). But rather than buy an off-the-shelf stock, Preacher crafted this stock all by hand, starting from a laminated blank panel. He calls this stock project his “Axe Job”.
CLICK for Full-size Photo
This stock is being used on a prairie dog rifle, chambered for a 17-caliber wildcat, the 17 VHA, which is based on an H&K 4.6x30mm parent case. With about nine grains of 300 MP pistol powder, the 17 VHA drives 20-grainers at about 3850 fps. (SEE details at end of article).
The ‘Axe Job’
Report by Preacher
I like carving with the laminates because all the lines are right there in front of my eyes, so it’s easy to follow along and get it just right, until it’s pleasing to the eye. I never use a template, I just keep checking the lines as I go along. I have all the needed equipment to power build one of these, but I really enjoy the time spent on the hand work. From start to completely ready-to-install, I’ll have about six (6) weeks into one of these stock projects. A lot of that is drying time for the clear coats.
The majority of the laminated blank panels I use for my gunstocks are purchased directly from Cousineau Wood Products or from Rutply.com. You have to buy at least four full panels at a time, all the same color, but that will yield eight (8) stocks. Seems like I have a little over $150.00 in a blank large enough to start making a full-sized, benchrest-style stock.
A little work with a chisel…
A little work with a rasp. (Before I was rich and famous and could afford really good rasps, I used a good old horse shoe rasp.)
A little more work with the chisel…
Preacher’s Advice on Carving Your Own Stock
The one main advantage of being older that dirt, and tormented with MS the past 40 years, is lots of free time to enjoy what ever I can do these days, as long as I can set down to do it, and I can make a lot of wood chips setting down.
Any one can do this if they have the time to devote to it. All it takes is time and a good eye for details. I made a lot of firewood over the years, until I got the hang of it. Most all those problems were inletting, and screw hole spacing. Get those right the first time and you’re on your way….
A little more work with the rasp…
A few coats of Auto clear has it about buttoned up…
Micro 17 VHA Wildcat Here’s the finished rifle built by Preacher for Dave, using the ‘Axe Job’ stock. Dave tells us: “Preacher chambered the rifle for the 17 VHA, a wildcat based on the H&K 4.6x30mm MP7 PDW case necked down to 17 caliber. There are numerous articles in the Varmint Hunter’s Magazine about it. This efficient little round shoots 20gr ballistic tips at 3850+ fps. That’s not too shabby for ‘nine point something’ grains of pistol powder.”
“My intentions for my 17 VHA rifle are to plop down in the middle of a PD town with my swivel bench and shoot prairie dogs. I also thought it would be a nice platform to test the accuracy of the cartridge. If I like the little round as well as I think, I plan to build a more practical rifle that I can carry. I really want to thank Preacher for his patience with me through this project, as it was my first custom build.”
Forum member Bill Goad’s 6XC II Hunter Rests in a Whitetail Rack taken this past year.
One of the most popular items in our Shooters’ Forum is the ongoing “Pride and Joy” thread. Since 2009, Forum members have posted photos and descriptions of their most prized rifles. Here are some of the most recent “Pride and Joy” rifles showcased in our Forum. Do you have a gun you’d like to see featured there? Just Register for the Forum and you can add your favorite gun to the list.
TT Freestyle’s Husband and Wife Borden Benchrest Rifles
Here’s a pair of “His and Hers” rigs delivered by Santa in December. Forum member TT Freestyle reports: “After our rookie year in Short Range Benchrest with good used equipment, my wife and I decided we liked it enough to get two new Bordens for Christmas!”
FalconPilot’s Fabulous F-Classer in Shurley Claro Walnut Stock
This beauty belongs to Forum member FalconPilot. He tells us that his “Lastest F-Classer features a Shurley Brothers SOD stock in beautiful Claro Walnut.” Components include Bat M action, Bix-N-Andy trigger, and Nightforce Comp scope. FalconPilot has several barrels for this Open-Class rig, including tubes chambered for .284 Win and 6mm Dasher.
Eric’s Blacktical .308 Win for Precision Rifle Series
Forum member Eric32 spent months building out this rifle, “getting it to work just right for PRS”. Designed for practical/tactical matches, this rugged rig features a blue-printed Rem 700 action (with 1.5-lb 40X trigger) in an XLR Element chassis. On the end of the .308 Bartlein 5R barrel is a JP brake. Other components include: PiG skins barricade grips, Atlas Bipod, and GGG bungee sling. On top is a SWFA HD 5-20x50mm optic with Vortex scope level and custom throw-lever.
Forum member Willow reports: “Here is my new F-Open gun. It features a hydro-dipped LowBoy stock and LH Barnard Model P action with ‘V’ bedding block. The barrel is a straight profile 32″, 1:8.5″ twist Bartlein 5R, chambered in 280AI by Matt Paroz”. On top is a Vortex 10-60x52mm Golden Eagle in a Spuhr 3001 mount. Willow says his lightning bolt rig is a shooter: “After 42 rounds through the barrel, I’m liking what I am seeing so far”. Check out that trick aluminum base for his rear Edgewood bag.
Stinnett’s 6.4×47 Lapua Tactical Rig
Forum member Stinnett tells us: “This is my third 6.5×47 Lapua rifle — the 6.5×47 is the best cartridge ever! I’m not a huge fan of muzzle brakes. I look at them as tools — use the correct tool for the job. The ’47 doesn’t need a brake. .308 Winchester and up need muzzle brakes. For this rifle, I’m going to start out with 123gr Scenars and Reloder 15. I also like to shoot the 123gr SMKs and Varget. The SMKs are much less seating-depth sensitive. Very easy to find a load! Also gonna try the Berger 130 Hybrids and H4350.”
Components: McMillan A5 adjustable stock in GAP Camo, Stiller TAC 30 A/W action, Jewell HVR trigger, Badger bottom metal and DBM, Atlas Bipod, Nightforce NXS F1 3.5-15×50 with MLR 2.0 reticle. Metal has been Cerakoted graphite black.
6mm BRX Benchgun with Home-Made Cherry/Redheart Stock
You have to give credit to a guy who crafts his own custom wood stock. This 6mm BRX benchgun features a custom-built laminated stock featuring Cherry wood with vivid Redheart pieces on the sides and Redwood Burl on the buttplate. The front of the stock is 4″ wide. The action is a Benchrest Borden RBLP Right Eject unit, with custom titanium scope rings on top. Owner Erick C. is proud of this stock, saying it is “the best one I’ve built so far”. We agree it’s a beauty.
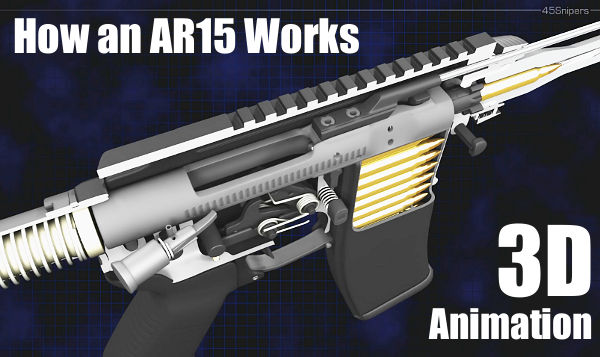
Ever wondered how the parts inside an AR15 work together? Just exactly how does the reciprocating bolt carrier feed rounds from the magazine? How do the elements in the trigger group work and reset after each shot? How does the gas system bleed gas from the barrel and operate the bolt carrier? These and other questions are answered in this eye-opening video from 45Snipers. Using “cutaway” 3D computer animation, this 5-minute video shows all features of an AR15 inside and out. This fascinating firearms animation allows the viewer to look inside the upper and lower receivers, into the bolt carrier, chamber, barrel, and magazine.
This video starts off slow and has annoying background music, but it is well worth watching if you own or shoot any AR-platform rifle. It illustrates all the key operations during the charging, loading, firing, and ejection processes. The cutaway animation shows how rounds are stripped from the magazine and then chambered. It then shows how every part of the trigger group works, and how the firing pin strikes the primer. You can even watch the bullet move down the barrel before the empty shell casing is removed from the chamber and tossed out the ejection port. Here are sample frames from the video:
Video find by Grant Ubl. We welcome reader submissions.
With all the blacktical rifles and tacticool camo gear on display at SHOT Show, it was nice to see some old style craftsmanship — hand-built rifles with colored case-hardened receivers, fine engraving, and beautiful wood. We found just that at the Shiloh Sharps booth. The heritage style of the Shiloh Sharps rifles harkens back to another era, when the West was still wild, and gifted smiths crafted rifles with pride, skill, and true artistry.
The cartridges shown in the photo (left to right above rifle) are: 45-110, 50-100, 45-90, and 40-70.
This video shows how Shiloh Sharps crafts its rifles, from “Foundry to Finish”:


 In Brownells’ GunTech™ Archive of instructional articles and videos, Eric Kiesler has written an informative Guide to Metal Prep for bluing or bake-on resin coatings. Eric’s “how-to” advice will be useful for prepping something as small as a scope ring or as large as a complete barrelled action. Here is a selection from Eric’s article:
Prior to hot caustic Bluing (#082-005-007) the parts are immersed in a heated detergent bath using Dicro-Clean (#082-005-008) because (like TCE) we know it will have no adverse after effects or residue that could cause problems later on. Once the degreasing is complete, the part could be blued or coated, however, with bake on coatings, adhesion is greatly enhanced if the surface of the parts are roughed up. This can be accomplished by sanding them with a fine abrasive cloths, sand paper, Emory Cloth (#657-110-120) or by abrasive blasting. Abrasive blasting is preferable because it will typically reach areas that sand paper might not.
For the Gun Kote (#083-051-001) brand of bake-on finish, aluminum oxide (#084-206-060) must be used as the abrasive blasting media in your abrasive blaster. For our other bake on coatings (and even Aluma-Hyde) sand or glass beads may be used in the blaster. If you do abrasive blast the part (highly recommended), it should be degreased afterwards because the blasting media may have contaminants in it. You don’t want to coat a highly polished part since shiny metal resists the coating, but a highly polished part could certainly be blued.

 Gone in Six Seconds. Want to Cry Now?
 Yes old dogs can learn new tricks. Just five years ago Forum member Henry Pasquet (aka “HenryP”) got started in 1000-yard benchrest shooting. He was 66 at the time. Henry worked hard, learned fast, and pursued accuracy with a vengence. That all paid off when Henry won the 2013 IBS 1000-yard Nationals this summer, finishing as the Two-Gun Overall National Champion. Henry was kind enough to talk about his rifle, his reloading methods, and his strategy for success. In fact, Henry was eager to share “everything he knows, so that other guys can fast-track their learning process”. Henry told us: “I want to share every lesson I’ve learned, so that other guys can improve their game and enjoy the sport more.” Henry also wants to encourage other senior shooters: “If you pay attention to details (when reloading), and get a good rifle with a good barrel, age is not a handicap. With a good set-up, older guys can compete with anyone out there. This is one sport where you can be a champion in later life.”

 On top is a Nightforce 12-42x52mm Benchrest scope with CH-3 reticle. I used a Fulghum (
 To dispense powder, I use a RCBS ChargeMaster set 0.1 grain below my desired load and then weigh them on a Sartorius GD-503 magnetic force restoration scale to get identical charges. I use a K&M Arbor Press with seating force gauge when seating the bullets with a Wilson inline die. My “target” seating force on the K&M dial is 20-23 units for Dashers and 35-40 units for the .284 Shehane. I put any variables aside for sighters. I do not weigh brass, bullets, or primers. My bullets were so consistent that I did not sort by bearing surface. I did trim the Berger VLDs to the shortest bullet length with a Hoover Trimmer, and then pointed the meplats just enough to close them with a Whidden pointer. I sort my bullets to 0.005″ overall length, rejecting about five percent.
 Q: You go 60-80 rounds between cleaning and the results speak for themselves. What is your barrel cleaning procedure? Do you think some guys clean too often or too aggressively?


 Headspace Gauges


 Here’s the finished rifle built by Preacher for Dave, using the ‘Axe Job’ stock. Dave tells us: “Preacher chambered the rifle for the 17 VHA, a wildcat based on the H&K 4.6x30mm MP7 PDW case necked down to 17 caliber. There are numerous articles in the Varmint Hunter’s Magazine about it. This efficient little round shoots 20gr ballistic tips at 3850+ fps. That’s not too shabby for ‘nine point something’ grains of pistol powder.”