|
|
April 30th, 2017

Even seen an integrally suppressed rifle? Ruger offers this technology with its new Silent-SR ISB, a multi-baffle integrally suppressed barrel (ISB) for Ruger 10/22 takedown models. This system reduces sound levels to an average of 113.2 dB with standard velocity ammunition. That’s very impressive — consider that an unsuppressed .22 LR firearm can produce noise levels as high as 140 dB with standard velocity ammunition. That’s well above the threshold where irreversible hearing damage begins. (Source: NC Silencers).
Even if you are not interested in a suppressed rimfire rifle (or live in a state where suppressors are forbidden) we think you’ll be interested in Ruger’s technology. The Silent-SR employs a long, multi-element “baffle stack” that can be easily removed for cleaning.

Watch Integrally Suppressed Barrel in Action. CLICK HERE to View Video on Ruger Site. Scroll to bottom of Ruger page after jump!

Here’s what Ruger says about its new ISB (Integrally Suppressed Barrel) for the 10/22 Take-down:
The Silent-SR ISB quickly and easily assembles to any Ruger 10/22 Takedown or 22 Charger Takedown, and features an induction-hardened breech with cold hammer-forged barrel that provide easy takedown and accurate return-to-zero.
Reducing sound pressure levels of .22 LR to an average of 113.2 dB with standard velocity ammunition, a 10/22 Takedown rifle equipped with the Silent-SR ISB is as quiet as a bolt-action rifle with a thread-on silencer. The relatively long barrel of the Silent-SR ISB (compared to other integral suppressors) means the bullet generates energy near that of a 16″ gun for consistent, accurate and effective performance on target. The pushed-cone baffle geometry has been stretched to utilize the volume under the barrel maximizing suppression of the gunshot without disturbing the travel of the bullet.

Disassembly for cleaning is as simple as separating the barrel from your firearm and loosening the Silent-SR ISB’s single assembly screw using the included 5/32″ hex key tool. Once loose, pull the screw to remove all six 17-4 stainless steel baffles, spacer and front cap free of the sleeve for cleaning. The sealed baffles keep the fouling away from the serialized sleeve, yet easily come apart even after thousands of rounds. Finished with Cerakote, the Silent-SR ISB is engineered and built for a lifetime of hard use without clogged ports, seized components or loss of suppression that often plague other integrally suppressed rimfire barrels.
April 24th, 2017

Remington Arms Company celebrated its 200th year in business in 2016. The Remington enterprise was founded in 1816 by Eliphalet Remington in Ilion, New York, as E. Remington and Sons. Remington is America’s oldest gun maker and is still the largest U.S. producer of shotguns and rifles.
CLICK HERE for 200 facts about the 200-year-old company.
This week, Shooting USA TV spotlights Remington, exploring the company’s 200 years of continuous production. The show covers the rich history of Remington Arms Company, and focuses on many of the company’s most noted firearms.
The Shooting USA Hour Airs Tuesdays and Wednesdays on the Outdoor Channel:
Eastern Time:
Tuesday 3:00 PM
Wednesday 9:30 PM, 1:00 AM
Central Time:
Tuesday 2:00 PM
Wednesday 8:30 PM, Midnight |
Mountain Time:
Tuesday 1:00 PM
Wednesday 7:30 PM, 11:00 PM
Pacific Time:
Tuesday 12:00 PM (noon)
Wednesday 6:30 PM, 10:00 PM |
 The Founding of a Great Enterprise The Founding of a Great Enterprise
Eliphalet Remington II grew up in the countryside of Herkimer County, New York, learning the blacksmith trade. Eliphalet told his father he wanted a gun, so his father told him to build one himself. And, so he did in 1816 with the help of a hired gunsmith to bore and rifle his barrel. Eliphalet then took the finished flintlock to a local shooting match.
“And apparently it was a very successful barrel. His gun shot well,” says Remington Historian Richard Shepler. “So, neighbors, friends said, ‘ could you make me a barrel?’ Over time there was more and more demand.”
By 1828, Eliphalet moved into a factory in Illion, New York. In 1845, he jumped at the opportunity to buy the first of many government contracts. When the Civil War broke out, Remington stayed busy producing firearms. While later in the 1890s during peacetime, Remington manufactured cash registers, sewing machines, knives and even the first successful typewriter. The storied history continues, from the Remington Double Derringer to the Remington Model 700, unquestionably the most successful American sporting rifle.

April 22nd, 2017

This stunning flame-painted PPC belongs to Chris from Australia. This rifle features a Stiller Viper action, Speedy (Robertson) BRX stock, and Maddco (Australian) 14-twist barrel chambered in 6PPC.
In our Shooters’ Forum you’ll find a thread in which readers can post photos of their “pride and joy” — their favorite rifle. You’ll find a wide range of guns, from “big boomers” to .17-caliber varminters. Here are some of our favorite entries in the “Pride and Joy” Gallery.
The Bear’s Barbed-Wire Barnard

BarryO, aka ‘the Blue-eyed Bear’, posted his beautiful 6mm Dasher, with its unique barbed wire 3D finish. (There’s a story behind that design.) This rifle was smithed by John King in Montana, with stock bedding work by Leo Anderson. The gun features a Barnard ‘P’ action (with trigger), and 28″ Broughton 5C fluted barrel with VAIS muzzle brake. The Barnard sits in a Tom Manners carbon fiber BR stock decorated with amazing graphics by Mad Shadow Custom Paint.
Sebastian’s Radical Swallowtail 6PPC

Sebastian Lambang is the designer and builder of SEB Coaxial Rests. He’s a smart, creative guy, so you knew when he designed a short-range benchrest stock it would be something special. It needed to be lightweight, yet very rigid. Using “out of the box” thinking, Seb employs a truss-style structure to provide great strength with minimal weight. The rear section is equally radical. There are two splayed “keels” in the rear, forming what this Editor calls a “swallowtail” rear design. Others have called it a “catamaran buttstock.” Below is a side-view of the prototype SEB stock before painting.

Brad’s 6CM Long-Range Match Rifle

Chambered in the 6mm Competition match cartridge, this handsome rig features a Surgeon RSR Action, Bartlein Barrel, and LRB stock. Barrel work was done by Chad Dixon at LongRifles, Inc. and paint by AT Custom Painting.
Varmint Special with Figured Walnut Stock

Here’s a handsome varminter with a beautifully-figured walnut stock. This is one of three rifles Forum Member Dan Hall posted in the Pride and Joy thread.
A Trio of Pealescent Bench Guns

DixiePPC served up not one but THREE pretty bench rigs, all with pearlescent paint jobs. We’d be proud to own three eye-catching rifles like that. Click the image to see a full-screen version.
Zebra-Skinned Match Rifle
And here is Mark Walker’s amazing Zebra-skin BR rifle. With that wild-looking paint job, this rifle turns heads whenever Mark brings it to the range…

April 14th, 2017

A few years back our friend Danny Reever acquired the PMA Action Cleaning tool. He’s now used it for many seasons and it’s still working great. If you shoot a precision rifle, it deserves to have a clean action and lug recess area. This handy tool speeds up the cleaning process, letting you do a more thorough job in less time.
PMA Action Cleaning Tool Kit Review by Danny Reever
I’ve been using the PMA Action Cleaning Tool Kit for quite some time. Previously, I used one of the old style (round knob) Sinclair action-cleaning tools with cylindrical cotton rolls. With the Sinclair tool, I was pretty satisfied that I was getting my actions reasonably clean. But, as I explain below, I think the newer PMA Action Cleaning Tool Kit is easier to use, and possibly achieves better results.
PMA Tool Kit Extensively Tested with Many Action Types
PMA tried a variety of options before finalizing the PMA Action Cleaning Tool Kit. PMA explains that several shooters did a lot of testing “with various sizes of die-cut foam, patches, felts and cotton rolls with various bolt action types (BAT two- and three-Lug, Kelblys, Halls, Remingtons, Winchesters and Savages). [Testers all agreed] that the foam disc is far superior to felts and cotton rolls [and] we decided to include two different sizes of foam discs.”
The PMA Action-Cleaning Tool uses round foam discs in two included sizes: 1″ diameter and 1.25″ diameter. Both size discs can be used alone, or with a 3″ patch wrapped around them. The handles of the tools are CNC-machined blue-anodized aluminum with a silicone sleeve for grip. The PMA tool handles are a bit longer than those of my old Sinclair action-cleaning tool. I like the added handle length, and I find the design of the handle easier to use compared to the old-style round knobs.
The PMA tools are quality items. They are an improvement over my older Sinclair action-cleaning set-up. But do the PMA tools they actually clean the action better or easier than the old style cotton rolls? Well, based on my experience, the answer is a definite “maybe”.
Comparison Testing — Cotton Rolls vs. PMA Foam Discs (with and without patches)
Starting with the old-style cotton roll system, I cleaned my actions to a level I considered “clean” in the past. I then tried the included PMA foam discs. I found that, for my Remington-style actions, the larger 1.25″-diameter disc seemed to work better than the smaller 1″-diameter disc. Wrapping the larger disc with a 3″ patch definitely brought out more crud from my previously cleaned actions than the old style cotton rolls. Well, you might ask, what if you wrap the old-style cotton roll with a patch? Yes that will remove more crud too, but perhaps not as much as the PMA system. Moreover you would have to buy both cotton rolls AND 3″ patches. Not many places sell the cotton rolls.
Is it worth plunking down the $49.95 for the complete PMA system? Well, if you want to upgrade to a quality-made tool with better handles the answer is yes. Is getting that last bit of crud out of your action every time you clean it that important to you? You have to decide that for yourself. From my own perspective, I was due for an upgrade so the answer was easy. I like the PMA system, especially the new improved handles. Also, with the PMA system I don’t have to fool around with a tiny Allen screw to secure the cotton rolls — that was annoying. So my final take on the PMA Action Cleaning Tool Kit is that it is a good product with some real advantages over other action-cleaning systems.

PMA Tool charges $49.95 for the complete Action Cleaning Tool Kit that includes a chamber cleaning handle and cotton swab. PMA offers the lug recess action cleaning tool by itself with four foam cleaning discs and five 3″ patches. Cleaning discs are also available separately in your choice of 1″- and 1.25″-diameter in a five pack.
Action Cleaning Tool Kit (complete): $49.95
Lug Recess Tool Only (includes 4 Cleaning Discs): $38.95
Chamber Swab Tool (includes Cotton Chamber Swab): $14.95
Additional 1″ Cleaning Discs: $4.95
Additional 1.25″ Cleaning Discs: $4.95
April 9th, 2017
A friend of ours recently took delivery of a new barrel which was chambered by a smith who had done the original build on the rifle, but who had not headspaced the barrel on the action itself this time. The smith headspaced based on his old records. Our friend happily screwed on his nice, new barrel and headed to the range. After the first few rounds, with known, safe loads, he was seeing deep craters on his primers, and then he even pierced a few primers with loads that should never have done that. Interestingly, the brass was not showing any of the other pressure signs. This was with bullets seated .015″ out of the rifling.
We were thinking maybe too much firing pin extrusion or maybe he got a hot lot of powder. Then I asked him to email me dimensions off his fired cases compared to new, Lapua brass. He emailed me that his shoulder moved 0.0105″ forward. I sent an email back saying, “hey, that must be a typo, you meant 0.0015″ right — so your shoulder moved one and a half thousandths correct?” The answer was “No, the shoulder moved over TEN thousandths forward”. Ahah. This explained some of the cratering problem in his brass. His cases were able to bounce forward enough in the chamber so that the primer material was smearing over the firing pin. And now he has brass that is “semi-improved”.

The point of the story is always check your headspace when you receive a “pre-fit” barrel, even from the smith who built the rifle. Purchase Go/No Go gauges for all your calibers. Headspace is not just an accuracy issue, it can be a safety issue. Pierced primers are bad news. The debris from the primer cup can blow into the firing pin hole or ejector recess causing a myriad of problems.
April 4th, 2017

 We know that many of our readers have never seen a “Hammerhead” benchrest stock before. This is a design with an extra wide section in the very front, tapering to a narrow width starting about 6″ back. When paired with a super-wide front sandbag, the hammerhead design provides added stability — just like having a wider track on a racing car. Some folks think mid-range and long-range benchrest stocks can only be 3″ wide. Not so — IBS and NBRSA rules now allow much wider fore-ends. While F-Class Open rules limit fore-end width to 3″ max, there is not such restriction on IBS or NBRSA Light Guns or Heavy Guns for 600- and 1000-yard competition. Here’s a 5″-wide Hammerhead design from Precision Rifle & Tool (PR&T). We know that many of our readers have never seen a “Hammerhead” benchrest stock before. This is a design with an extra wide section in the very front, tapering to a narrow width starting about 6″ back. When paired with a super-wide front sandbag, the hammerhead design provides added stability — just like having a wider track on a racing car. Some folks think mid-range and long-range benchrest stocks can only be 3″ wide. Not so — IBS and NBRSA rules now allow much wider fore-ends. While F-Class Open rules limit fore-end width to 3″ max, there is not such restriction on IBS or NBRSA Light Guns or Heavy Guns for 600- and 1000-yard competition. Here’s a 5″-wide Hammerhead design from Precision Rifle & Tool (PR&T).
Ray Bowman of PR&T sent us some photos of another hammerhead benchrest rig. Ray reports: “Here’s another benchrest rifle that Precision Rifle & Tool crafted. The customer shot this rifle at the 2014 IBS 1000-yard Nationals in West Virginia.” This IBS Light Gun sports PR&T’s “Low Boy Hammer Head” stock in red/black laminate. Other components are a 6mm BRUX 30″, 1:8″-twist barrel, Borden BR Action, and a PR&T 20 MOA scope rail.


March 19th, 2017

Photo courtesy NRA Museum Click Photo to View Larger Image
With today’s plastic-framed Glocks and Keltecs, aesthetics have been sacrificed on the altar of functionality. Not so in the early 20th century — in that period, the best firearm designers created guns that looked as good as they worked. One example is the classic Colt Woodsman. This design came from the legendary John Moses Browning and was later refined by Colt before the pistol’s introduction in 1915. The Colt Woodsman’s frame design evolved over time in three distinct series: Series One 1915–1947, Series Two 1947–1955, and Series Three 1955–1977. Shown above is a stunning Carbonia-blued and engraved Third Series model with ivory grips.
Engraved Colt Woodsman from NRA Museum
 In the NRA Museum’s Robert E. Petersen Gallery are many fine engraved arms. This Colt Woodsman .22 pistol is one of the Third Series guns that were made until 1977. Heavy barrels in either 4.5 or 6 inch lengths were offered in this variation. The Museum’s staff says: “We think the poised golden rattlesnake near the serial number is the [best] embellishment without putting down in any way the ivory grip panels or gold outline inlays.” In the NRA Museum’s Robert E. Petersen Gallery are many fine engraved arms. This Colt Woodsman .22 pistol is one of the Third Series guns that were made until 1977. Heavy barrels in either 4.5 or 6 inch lengths were offered in this variation. The Museum’s staff says: “We think the poised golden rattlesnake near the serial number is the [best] embellishment without putting down in any way the ivory grip panels or gold outline inlays.”
You can see this lovely Colt and countless other fine firearms at the NRA Museum in Fairfax, Virginia. The Museum is open every day from 9:30 am to 5:00 pm, and admission is free.
March 11th, 2017

Ed Connors placed three consecutive shots all on target at 2160 yards for a sub-3/8 MOA group. Wow.
Amazing shooting — that’s how we’d describe what Ed Connors accomplished recently with his Speedy-built .338 Lapua Magnum LR rifle. Ed nailed a 3-shot group at 2160 yards that would be great at 1000 yards. Check out the target above. Now consider that the shooter was a full mile PLUS 400 yards away. That is truly remarkable accuracy.
At this distance, 2160 yards, one MOA is 22.61″. This three-consecutive-shot group, measuring about 8 inches, works out to less than 3/8 MOA. Think about that — most guys would be elated to shoot 3/8 MOA at two hundred yards. Ed did that at over two thousand yards!
That takes a great rifle, as well as great ammo. Ed says: “I believe in loading like a benchrest shooter to achieve these ultra long-range shots”.

|
Rifle Specifications:
– .338 LM Rifle built by SG Rifles, LLC
– Surgeon Rifles Action (blueprinted by Speedy)
– Jewell Trigger (blueprinted by Speedy)
– McMillan Fiberglass Stock
– Nightforce 5-25x56mm ATACR Scope
– Bartlein 1:9″-twist 32″ Barrel, Speedy contour
– Amer. Prec. Arms “Fat Bastard” Muzzle Brake |
Ammunition Specifications:
– Lapua .338 LM Brass turned with Nielsen “Pumpkin” turner.
– Hodgdon H1000 Powder, 90.8 Grains
– Remington 9 1/2 Magnum Primers
– Berger .338 Cal 300 grain Hybrid OTM Tactical Bullets seated .005″ off lands.
– Velocity: 2875 fps / SD 5.0 |

Gunsmith Thomas “Speedy” Gonzalez writes: “Anytime you build a customer a rifle to work out beyond the 1000-yard mark you must work hand-in-hand with your customer and explain everything you are doing to ensure performance at distances most shooters never even contemplate (except in their dreams).
Ed was involved in all aspects of the projects from the reamer print to what we needed for both single-shot work and mag-fed function in timed competition. This was Ed’s very first work-out with his reborn Surgeon-actioned .338 Lapua Magnum. He did great to say the least!”
Pretty Darn Good at One Mile as Well…
While “tuning up” for his 2160-yard session. Ed also produced some very impressive results at one mile (1760 yards). Once he got “dialed in” he delivered three shots you can cover with the palm of your hand. That’s spectacular consistency at one mile.

March 11th, 2017

Planning a rimfire build in the future, or want to get the exact specifications for your 17 Mach 2, 17 HMR, 17 WSM, .22 LR, or .22 WMR rifle? Then we’ve got you covered. CLICK HERE to download an official SAAMI document with specs for all popular rimfire ammunition. This FREE 89-page PDF includes complete Cartridge and Chamber drawings and headspace specifications. The document even includes info on pressure terminology, headspace gauges, and test barrels.
SAAMI, the Sporting Arms and Ammunition Manufacturers’ Institute, is an association of the nation’s leading manufacturers of firearms, ammunition and components. Founded in 1926, SAAMI promulgates industry standards for firearms ammunition safety, interchangeability, reliability and quality.
SAAMI offers diagrams for ALL popular, modern rimfire cartridges:

Here’s the Official SAAMI Drawing for the 17 HMR Cartridge:

SAAMI Website Also Offers Centerfire Cartridge and Shotshell Diagrams
From the SAAMI website you can also access hundreds of FREE official cartridge diagrams and chamber drawings for all centerfire ammo types and Shotshells. Click on the Cartridge and Chamber Drawings link, then go to the SAAMI Standards Page. On the Standards Page, choose your ammo type: Rimfire (Z299.1), Shotshell (Z299.2), Pistol and Revolver (Z299.3), Rifle (Z299.4). This will then load large PDF files which include multiple cartridge diagrams.
The older indexing system was more convenient:

March 7th, 2017

Shooters contemplating purchase of a .338 LM rifle often ask: “What length barrel should I get?” Rifleshooter.com recently performed a test that provides interesting answers…
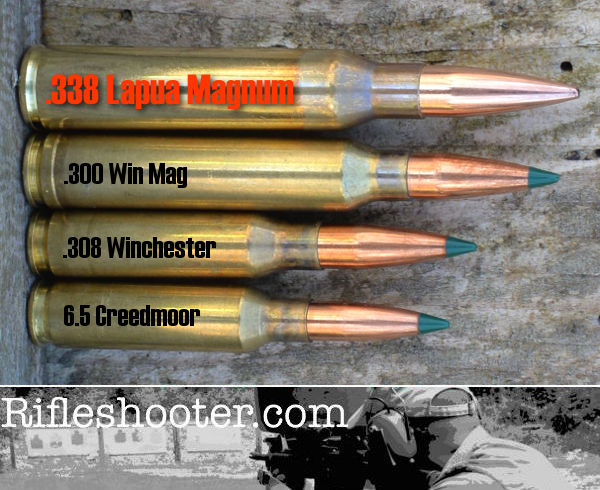
Our friends at RifleShooter.com like to slice and dice — barrels that is. They have done barrel length cut-down tests for popular calibers like the .223 Rem, 6.5 Creedmoor, and .308 Winchester. But now they’ve tackled something way bigger — the .338 Lapua Magnum, a true “Big Boomer”. Starting with a beefy 30″-long Pac-Nor Barrel, RifleShooter.com chopped the tube down in one-inch increments all the way down to 17 inches (that’s 14 different lengths). At each new (shorter) barrel length, velocity was measured with a MagnetoSpeed chronograph using two different loads, 250gr SMKs with H4831sc and 300gr SMKs with Retumbo. Four shots were fired at each length with each load, a total of 112 rounds.
Load #1: 250gr Sierra MK, Lapua brass, CCI #250 primer, H4831SC, OAL 3.720″.
Load #2: 300gr Sierra MK, Lapua brass, Win WLRM primer, Retumbo, OAL 3.720″.
The .338 Lapua Magnum is a jumbo-sized cartridge, that’s for sure…
Donor Barrel Sacrificed for Science
Rifleshooter.com’s Editor explains: “Brandon from Precision Addiction offered to send us his .338 barrel for our .338 Lapua Mag test. I took him up on his offer and he sent me his used Pac-Nor chrome-moly barrel with about 600 rounds though it. This thing was a beast! A heavy 1.350″ shank that ran straight for 6″, until tapering to 1″ at 30″ in length.”

Results Summary
.338 Lapua Magnum with 250gr Sierra MatchKings
After shortening the barrel from 30″ to 17″, total velocity reduction for the 250-grainers was 395 FPS, an average loss of 30.4 FPS per 1″ cut. The amount of velocity loss per inch rose as the barrel got shorter, with the biggest speed reduction, a loss of 55 FPS, coming with the cut from 18″ to 17″.
Start Velocity: 2942 FPS | End Velocity: 2547 FPS | Average Loss Per Inch: 30.4 FPS
.338 Lapua Magnum with 300gr Sierra MatchKings
Shooting the 300-grainers, total velocity reduction was 341 fps, an average of 26.2 FPS loss per 1″ cut (30″ down to 17″). However, the speed actually increased with the first cut from 30 inches to 29 inches. The tester noted: “The 300 SMK load showed a slight increase from 30″ to 29″. I’ve recorded this in other tests and it seems to be more common with a heavier load. I suspect it is primarily due to the small sample sizes being used along with the relative proximity of muzzle velocities in adjacent lengths.”
Start Velocity: 2833 FPS | End Velocity: 2492 FPS | Average Loss Per Inch: 26.2 FPS*
*Velocity rose with first cut. Velocities ranged from 2,871 FPS (29″) to 2,492 FPS (17″) for a total velocity loss of 341 FPS.
RifleShooter.com crunched the velocity numbers in some interesting ways. For example they analyzed rate of velocity loss, concluding that: “after the initial rate change, the rate of the change in velocity is fairly consistent.” (View Rate of Change Graph)
How Velocity Loss Alters Long-Range Ballistics
The testers wanted to determine how the velocity reductions “affect our ability to hit targets downrange”. So, Rifleshooter.com plotted changes in elevation and wind drift at all barrel lengths. This revealed something interesting — drift increased significantly below 26″ barrel length: “Above 26″ things look pretty good, below 22″ they change quickly.”
We highly recommend you read the whole story. Rifleshooter.com put in serious time and effort, resulting in solid, thought-provoking results. The data is presented in multiple tables and graphs, revealing inch-by-inch velocities, change “deltas”, and SDs at each length.
|


