Harrell’s Precision sells “semi-custom” full-length bushing dies for the PPC and 6BR chamberings. While the Harrell brothers do not cut the die to spec, they carry a large selection of dies made with slightly different internal dimensions. When you send in your fired brass, the Harrells choose a die from inventory with just the right amount of sizing (diameter reduction) at the top and bottom of the case. Given the quality, and precise fit, Harrell’s full-length dies are a good value at $75.00 plus shipping.
Bump Measuring Collar
The Harrell brothers provide a nice bonus item with each full-length die — a neat, little shoulder bump measuring device as shown in the photo at right. Hornady/Stoney Point sells a stand-alone tool that does the same job, but the Harrell’s bump collar is simpler and faster. To measure your shoulder bump, simply place the Harrell’s bump collar over the upper section of your deprimed case (before sizing) and measure the OAL with your calipers. The collar should seat on the shoulder without any wobble. After taking the measurement, then size the case in your full-length die, replace the collar and repeat the measurement. You want to set your die so the shoulder moves back about .001″ to .0015″ for most applications. (With semi-auto guns you may want more bump — .003″ or more.)
When measuring for shoulder bump, you need to remove the primers first. Our friend Boyd Allen explains: “Use a decapping tool or die to remove the fired primer before taking the initial measurement. When working to thousandths, even the raised edge of a crater or a slightly raised primer can throw you off by a significant amount.”
AR this, AR that… sometimes it seems the gun world has gone AR crazy. There is even a book specifically dedicated to reloading for AR-platform rifles. This may seem superfluous when there are so many other reloading manuals on the market. However, there are some special factors to consider when reloading for ARs and other semi-automatic rifles. Cases should be full-length sized, with adequate shoulder bump and neck clearance (more than you might run with a bolt gun). Cartridge pressures must be appropriate for the AR platform, and you want to select powders that minimize fouling. Also, when loading for an AR you may want to experiment with cannelured bullets and crimping. And of course, rounds must be loaded to mag-length. Lastly, with the advent of the 300 AAC Blackout (and similar cartridges), many AR shooters now are experimenting with heavy 30-cal bullets in subsonic applications. AR owners will experience a “reloading learning curve” when moving from .223 Rem to the more exotic, subsonic 30-caliber cartridges.
These and other concerns are covered in Lyman’s new AR Reloading Handbook. This comprehensive reloading guide provides the AR shooter with reloading data for nearly all popular AR-platform chamberings. In addition to data for the standard .223 Rem, the following cartridges are also covered: 6.8 Rem, 300 AAC Blackout, 7.62×39, 450 Bushmaster, 50 Beowulf and others.
Lyman touts its new book: “Reloaders will appreciate the wealth of AR-specific reloading data [for] all popular brands of bullets and powders. Specialty cast bullet and sub-sonic data further expand the usefulness of the handbook. Interesting articles by well known and popular firearms journalists are also included. These cover such areas as ‘Reloading for Suppressors’ and ‘Cartridge Interchangeability”. Finally all this AR data is presented in a full size, easy-to-use 8 1/2″ x 11″ format.”
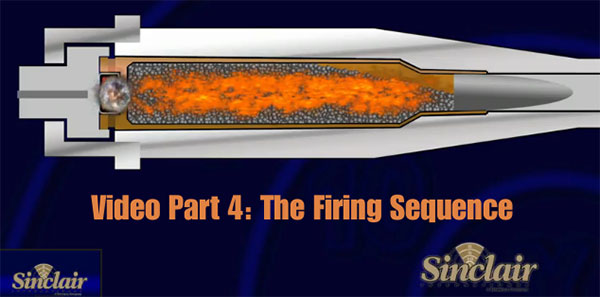
Sinclair International has produced an eight-part video series on metallic cartridge reloading, hosted by Sinclair’s former President Bill Gravatt. The entire series can be viewed (for free) via Sinclair’s “How-To Videos” archive. While this set of videos starts with the basics, it covers many more advanced aspects of reloading as well. Accordingly, both novice and experienced reloaders can benefit from watching the eight videos. We think everyone should watch Video No. 2, which outlines the hazards of reloading and provides guidelines for safe reloading practices.
We also strongly recommend Video No. 4 to readers who are getting started in reloading. This “How Things Work” segment covers the sequence of events inside the chamber (and barrel) when the cartridge is fired. The video includes helpful graphics that show what happens to the primer, powder, cartridge, and bullet when the round is fired. The video also illustrates “headspace” and explains how this can change after firing. We think this video answers many common questions and will help reloaders understand the forces at work on their brass during the firing process.
Our IT guy, Jay (aka JayChris in the Forum), was having some issues with his .260 AI. A load with known accuracy had suddenly and mysteriously stopped shooting well. Jay couldn’t figure out what was going wrong. Then he remembered he had cleaned his brass using a powerful ultrasonic machine.
He inspected his brass carefully and saw that the ultrasonically-cleaned necks were so “squeaky clean” that he was actually scratching the jackets on his bullets when seating them. As well, Jay noticed that it took more force to seat the bullets and the seating force became less uniform case to case. Jay solved the problem by applying NECO Moly dry-lube inside the necks of his brass before seating the bullets.
The Perils of Ultrasonic Brass Cleaning by JayChris
I rotate my brass so that I can keep track of each firing, so I keep a “clean/ready to load” bin and a “fired” bin. I have 400 pieces of .260 AI brass. So, all of it was on its first firing (after doing a Cream of Wheat fire-forming) until I hit the 400-round mark. To my surprise, things went south at the 500-round mark. The first time I noticed it (according to my range log) was at a match last year, when I dropped several points and had some vertical stringing issues. After that match, I had 400 rounds through the barrel and all of my brass had a single firing on it. So, it was time to clean.
I have used an ultrasonic cleaner for a while now. I recently got a more powerful Ultrasonic cleaner, although I don’t know if that makes a difference. My brass comes out dry and squeaky. Emphasis on the “squeaky”.
I found that my new US machine may have been getting the necks TOO clean. After ultrasonically cleaning my brass, I had noticed that it required a little more force to seat the bullets, but I didn’t really think too much about it. But then, after going over my ordeal with a shooting buddy and going over my process in minutiae, we had an “AH HA” moment when it came to cleaning (he uses good ol’ vibratory cleaning).
So, I used some moly dry-lube to pre-lube the case necks and took some rounds out to test at 200 yards. I used my last known good load and sure enough, the vertical flyers disappeared! I shot two, 10-rounds groups with .335 and .353 MOA vertical dispersion, which is consistent with the results I was originally getting.
Other folks have suggested necks may get “too clean” after ultrasonic cleaning. It was pretty sobering to actually witness, first hand, what can happen when brass is “too clean”. I had read some discussions of issues with neck friction/bullet seating after ultrasonic cleaning, but, frankly, I dismissed the idea. Now I understand. The “too clean” effect doesn’t seem to affect my Dasher at all (perhaps because Dasher necks are very short), but on the bigger .260 AI, it definitely does.
Close-Up Photos of Case-Necks
Here are photos Jay took with a microscope. You can see the difference between tumbled brass and ultrasonically-cleaned brass. Jay says: “Here, in sequence, are the Ultrasound-squeaky-clean case neck, a case neck after treatment with NECO moly dry-lube (you can see the particles that will help coat the neck during seating), and, finally, the neck from a case cleaned with corncob media in a vibratory tumbler. You can clearly see how much smoother the inside of the tumbled neck is. Yes, it’s dirty, but it’s also very, very smooth.
Close-Up of Scratched Bullet
Here is a close-up of a bullet that was seated in an ultrasonically-cleaned (“squeaky clean”) neck, with no lubrication. You can clearly see the damage done to the jacket — in fact, in a couple spots you can see the lead core through the scratches! Jay also observed that quite a bit more seating force was required to seat the bullet in a “squeaky clean” neck.
NOTE: The bullet jacket is naked — NOT coated in any way. It looks a little dark because of the shadow from the microscope lens, and the high contrast.
Anyone who shoots 3-Gun matches, or who burns through a lot of pistol ammo, can benefit from a quality progressive reloading press. These machines have multiple stations with a rotating shell-holder plate that advances the cartridges. Once you’ve got everything set up and running, you can crank out hundreds of rounds per hour, producing a loaded round with every pull of the press handle.
Right now, Midsouth Shooter’s Supply is offering a great deal on the 5-Station Hornady Lock-N-Load AP (Auto-Progressive) reloading press. This high-quality machine, which sells for $450.00 or more elsewhere, is now ON SALE at Midsouth for just $389.99. To sweeten the deal even more, when you buy the L-N-L AP press you qualify for free bullets. That’s right — buy the Hornady AP Press and get 500 free bullets (retail value $70-$120).
The video below, created by our friend Gavin Gear for UltimateReloader.com, illustrates the features and functions of the Hornady Lock-N-Load AP Press. You can see how the dies are positioned in the tool head, and how the rotating cartridge plate moves cartridges from station to station:
AccurateShooter Forum member Allan, aka “1066”, has improved the performance of his RCBS balance-beam scale with some simple hardware modifications. In addition, Allan has cleverly fitted an inexpensive video camera to one end of his scale. This camera outputs a signal to Allan’s laptop computer, giving Allan a magnified, “big-screen” view of the pointer tip of his scale. That lets Allan observe ultra-small movements of the beam. With the hardware upgrades and video display, Allan has crafted a system with usable sensitivity to a single grain of Varget powder.
Hardware “Mods” Enhance Scale Reliability and Sensitivity
To upgrade his scale, Allan first fabricated a new U-shaped pan suspension hanger on the end of the scale. This allowed the pan to center more reliably and consistently. Next Allan extended the pointer arm at the opposite end, and attached a very fine graduated vertical scale to provide a more precise visual read-out. This scale has marks corresponding to 0.1 grains (one-tenth of a grain).
To improve the function of the beam itself, Allan “cleaned-up” the knife edges on which the beam moves, and Allan also fabricated a simple “approach to weight” fixture (with foam cushion) that gives the beam a smoother transition as it nears max travel.
Inexpensive Video Camera Displays on Laptop Screen
Allan’s real genius was in fitting an inexpensive video camera to display a magnified image of the pointer at the end of the beam. Seeing the “big picture” really helps get the best precision from the scale. Allan acquired a cheap web-cam and attached it via a simple bracket to the RCBS scale. A USB cable delivers the video output to Allan’s laptop. Allan says the web-cam cost less than $20.00 on eBay and required no special software. It was a “plug and go” installation. With the video camera running, the onscreen image is “super-sized” so Allan can track the smallest movements of the pointer tip. You can see how the whole system works in the video below. To dispense powder, Allan uses a slick automated trickler, explained next.
TargetMaster Automatic trickler Uses “Electric-Eye” for Automatic Shut-off
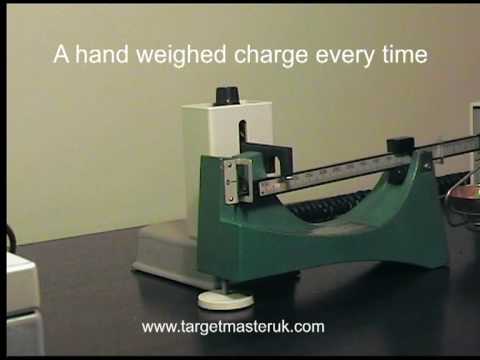
The final element in Allan’s high-tech balance beam scale system is a Targetmaster automatic trickler. This unique UK-made trickler is very advanced. It has two components — a dispenser, and a remote sensor that “watches” the movement of the balance beam. Allan pushes a button to start the powder flowing. As the load in the pan approaches the correct weight, an electric eye senses the position of the balance beam. Once the beam “hits the mark” for a correct load, the remote sensor shuts off the trickler. It sounds complicated but it works perfectly.
TargetMaster Trickler Components and Operation
The TargetMaster automated Trickler is a pretty impressive piece of kit that can be adapted to a wide variety of balance beam scales. The components and functions of the TargetMaster automated trickler are shown in the video below, provided by the manufacturer in the UK. To learn more about this reloading accessory, visit TargetMasterUK.com.
When he chooses to measure his loads or sort bullets by weight, Forum Member Boyd Allen likes his trusty RCBS 10-10 scale. He finds that it works predictably, time after time, and it doesn’t suffer from the drift and calibration issues that plague some of the less-expensive electronic scales on the market.
To make it easier to see the balance point, Boyd has adapted a magnifying glass with a mirror. This makes the end of his balance beam easier to view from his normal position on the bench. Boyd explains: “This set-up uses a cheap magnifier with positioning arms that was probably designed to hold and magnify small objects while soldering them. I think that it came from Harbor Freight many years ago. The mirror lets you look at the scale as if is was at eye level, and of course the magnifier makes the image easier to see.”
1000-yard Benchrest competitor James O’Hara set four (4) new IBS Records in 2013. These multi-match Light Gun Agg records were secured with O’Hara’s solid performance at the 2013 Virginia 1000-yard Benchrest State Championship. Here are the new records set by O’Hara in 2013:
During the VA state championships, O’Hara was on fire. All four groups were centered for 50s, with three groups under 3″ and the fourth a 3.715″. That’s consistency.
Target 1- Group 2.996” Score 50.2
Target 2- Group 2.433″, Score 50.1
Target 3- Group 3.715″, Score 50.4
Target 4- Group 2.188″, Score 50.1
Group Average 2.833″, Score Average 50.2
On 1000-yard benchrest targets, the 10-ring is just seven inches in diameter, while the X-Ring is a mere 3 inches in diameter. At the Virginia 1K Championships, James managed to keep all his shots within the seven-inch 10 Ring with eight of the shots inside the 3 inch X-Ring. That is amazing accuracy and consistency. David Goodridge says: “This is truly a remarkable example of superb marksmanship, rifle design, assembly, load development and equipment maintenance.” (O’Hara had previously set a 10-match Aggregate Light Gun World record of 4.5389″ in 2012).
Click image for Full-screen view
James O’Hara Talks About Record-Setting Rifles and Ultra-Accurate Long-Range Loads
James generously agreed to share his knowledge and experiences on the many facets of IBS 1000-yard benchrest preparation, reloading and shooting techniques in an intereview with Australian David Goodridge. This feature originally appeared in Australian Target Rifle Magazine. A few of O’Hara’s responses have been updated, based on a conversation with James on April 8, 2014.
Goodridge: James on behalf of the Australian LRBR community I would like to congratulate you on your achievements in 1000-yard Benchrest and thank you for [doing this] interview. To begin, could you provide an outline on your background and the reasons or factors that led you to becoming involved in 1000-yard BR at the Virginia Club.
O’Hara: I started short-range Benchrest in 1996 for a brief time and won my first 100-yard IBS match and I was hooked. Loss of eye-sight in one eye put a damper on it and I quit shooting for while, and I started shooting trap to try to switch over to left-handed. It worked and I started to pick up a gun left-handed so I went back to the rifle and built a tube gun.
I tried the local groundhog matches but the rules changed every match. I then found the Reade Range and 1000-yard matches. I restocked my gun with a long-range stock and started 1000-yard Benchrest. Finding I enjoyed the challenges associated with long range benchrest, I began 1000-yard Benchrest competition at Harry Jones Range and White Horse Range, two IBS ranges in West Virginia. I basically started after the year was under way in 2011 and I must say it was a very humbling experience. I soon learned that my previous short range [techniques] were not working.
New scales, a K&M arbor press with a force indicator, led to improvements. Then designing and obtaining reamers to my own specifications led to further substantial improvements, with the end result being that the same loads now seem to work from barrel to barrel.
James O’Hara Equipment Details
Gunsmithing: I do all the work myself, except barrel chambering/fitting is done by Dave Bruno.
Favored Caliber: I use a 6mm Dasher with a .266 neck and a .135 free bore. My load is a 103gr Spencer bullet trimmed and pointed with Hoover tools. Load is Alliant Reloder 15, 33.0+ grains weighed on a GD503 scale, with a CCI 450 primer. Right now I’m jumping the bullet about .006″. Previously, I shot them about .010” into the rifling but it was pulling the bullets or pushing them back.
Actions: For the IBS record groups I used a Bat 1.350” Bat B action in a Roy Hunter Stock. Other actions in use include a 1.530” Bat B and a Kelby F-Class Panda. Barrels: The record barrel was a Brux Heavy Varmint, 1:7.83″ twist, finished at 28″, and fitted with a Harrell’s brake. Stocks: I have two Roy hunter stocks and a PR&T and all track very well. They are balanced at two inches ahead of the receiver. All three stocks are glued with liquid Devcon and are pillared, so they are “glued and screwed”. I think this is the best system. Scopes: The PR&T-stocked rifle has a March 10-60X and the two Hunter-stocked guns have Nightforce 12-42x56mm NXS scopes. Rests: My front rest is a Sinclair Competition model that I modified with a cartridge holder that holds cartridges up by the port. I use the new super slick bag by Protektor and a rear Doctor Bag with leather ears. Scope Mounts: Rings are Burris Signature Extra High (the ones with inserts).
Case Preparation and Reloading Techniques:
My cases are three years old, with close to 100 firings. They are all from the same lot. I anneal the cases dirty to save some work and I anneal every time to have consistent neck tension. I punch the primers out and clean the pockets and run the flash hole uniformer in to make sure there is no carbon build-up. You can use the same tool as you use to prep the new cases. Flash holes are uniformed to .0625″. (Flash holes, “out of the box”, are less consistent than you may think.)
I turn necks to .0102″ with a K&M tool. Some competitors don’t turn necks, but without uniform neck tension you will have vertical. I use a K&M VLD chamfering tool and a Wilson case trimmer for new cases and when I trim fired cases. I use a nylon brush for inside the necks and clean the cases outside with 0000 steel wool using a small power station or a drill to spin them. The cases are sized on a Forster Coax press with a Harrell’s full length bushing die. Priming is done by hand using a K&M priming tool. I throw a “close” charge with Harrell’s bench rest powder measure. That charge goes in the pan of my Sartorius GD503 scale and then I trickle up to weight with an Omega powder trickler.
For bullet seating, I now use the 21st Century Hydraulic arbor press with seating force indiciation. I previously used the K&M arbor press with force indicator — it was good, but the 21st Century unit is more sophisticated, more precise, and easier to read. I have a loading block that is color-coded in the pounds of force needed to seat the bullet. I try to keep rounds in sets of 3-lb seating force settings. Each loaded round is put in the appropriate column (based on measured seating force). All loaded rounds are color-coded to avoid mixing. Leftovers from matches are used at a later date.
Click image for Full-screen view
I have now made a tool from an old bearing surface comparator. It will contact the ogive of the loaded round and it will check the seating depth while it is sitting on a granite block. Relying completely on the force and feel of the dial indicator allows seating depths to be held to .0005″ (i.e. one-half-thousandth). Compared to others means, this seems a more accurate way to check seating depth.
Bullets are spun on a Juenke machine after they are trimmed on a Hoover trimmer and pointed on the Hoover tool. For the next step, a Tubb Bearing Surface Comparator is used to sort bullets to plus/minus .0005″. I don’t discard any bullets — if I have some small lots of bullets that have a shorter or longer measurement they are used for testing. With the Spencer and BIB bullets there are not many that are not within plus/minus .001”. I quit weighing cases because of the outside variations. I only do what makes a difference [on target] and I only test and do load development at 100 yards, where I can control the conditions.
Barrel Freezing (Cryogenic treatment)
For the 2013 season, I cut barrels back to 28″ and had them “frozen” (cryo-treated) at Cryo Plus. I think that both barrels are average in the wind, but the first shot from a clean barrel is in the group. I shot around seven 100s with my other Light Gun. In Heavy Gun, I even won the group Aggregate at the Virginia State shoot. I have cryo-treated all of my barrels and I believe I have proof that it does produce benefits. I talked to George Kelbly about this before I did it. My results agreed with what George had indicated: fire cracking was less, chambering was easier and the major benefit was that the groups did not ‘walk’ as the barrels became heated.
Bench Set-up and Shooting Procedures
I use a spotting scope to help see the flags and the mirage. The mount is a Sinclair for the bench. This really helps because I can’t see the flags far out. I think the most important part of the set up is getting the gun to track, it has to come back in the box every time and shooting under the same condition every shot. I know everybody likes to run them — I do if the condition holds — but if it doesn’t you must pick them one at a time. This is where the direction and the speed of the wind come into play; you must shoot in the same condition you zero in.
When I set up to shoot, I line up the gun on my target and I move it back and forth till I can get it coming back in the ten ring and then I set my scope. I load my record rounds in my holder and I use my sighters out of the box. I now am watching and timing the conditions and I now make the decision of the one I will use and this is the only one I sight-in with. If I have some big guns beside me with brakes, I will wait till they are done or try to get in between their shots (this doesn’t always work).
Trigger control is a must and you have to be consistent. I will give up a perfect sight picture for a perfect trigger pull. I use free recoil and only my finger is on the trigger. After the rifle recoils back, I hold the fore-arm and open the bolt — you have to be careful not to upset the gun in the bags. After loading the next round, I close the bolt and push the gun forward with my right hand on the fore-arm. I am guiding [the stock] forward in between the bags. This gives me less chance to make a mistake, and maybe half of the shots need no or very little adjustment. I know it’s hard to get accustomed to, but try not to take your eye out of the scope so you are watching the mirage and not to get caught in a change. For the best part, I shoot free recoil and do all my testing at 100 yards in my backyard range. I zero dead on at 100 and come up 24 minutes for 1000 yards.
Bore Cleaning Procedures
I never try to get the gun super clean at a match, I like to see a little gray on a clean patch. I don’t want the barrel to be squeaky clean — I like to see a little haze on a patch. When it’s like that, after one fouling shot, the next shot usually goes right where it’s supposed to. When it’s squeaky clean, it may take five shots to foul in.
I used a product called WartHog 1134, and it has served me well for a long time but now that the Hazmat stopped the shipment of it, so I went to over-the-counter products and all are equally bad compared to what I had used but they do the job, it just takes longer. I never pull a patch or brush back through (across the crown), I go one way only (outward) out and then unscrew the brush or take the patch off at the muzzle. I use a 50/50 mix of Hoppies and Kroil after I clean. Just before I shoot I run a smaller patch down the bore to leave a very thing film of oil in the bore. I never want to shoot over a dry bore. If you shoot over a squeaky clean, dry bore, you’ll get copper every time.
What the Future Holds for O’Hara
My goal last season was to set the Agg records. Now I only have one more goal — that is the single target group, so I will back off shooting the Heavy Gun. I have three excellent Light Guns and a bunch of barrels to do it… so maybe! I think the greatest enjoyment is the people you shoot with, the common interest is the bond I guess but I wouldn’t change it for anything. — James O’Hara
Goodridge: James, on behalf of all Australian IBS 1000-yard BR competitors, I would like to thank you for your great patience and cooperation in preparation of this article, and for the valuable and interesting insight that you have provided into what is required to achieve success at the highest levels of 1000-yard BR competition. Not that you need it, but good luck for the 2014 shooting season.
As a cartridge case is reloaded multiple times, burnt powder residue and carbon builds up on the inside of the case. Unless the case interior is cleaned in some fashion, eventually you’ll see a reduction in case capacity. One of our Forum members from Australia wonders about the effects of reduced case capacity: “If the capacity of the case decreases as the crud builds up, then it effectively reduces the chamber size. Wouldn’t that change the pressure produced from that of an equivalent clean case?”
Ultrasonic Cleaning Example:
Interesting Test of Case Capacity Changes
Forum member Fred Bohl has actual test results that can help answer the above question. Fred proved that, over a 20-reload cycle, the case capacity of uncleaned cases did, indeed, decline a small amount. However, surprisingly, this did not seem to affect the actual chronographed velocity of the load. ES did increase, but Fred believes the higher ES was due to changes in case-neck tension, rather than due to the slight reduction in case capacity.
Fred reports: “Back when beginning to use ultrasonic case cleaning, part of the motivation was to get the inside clean based on the assumption that allowing burnt residue to build up inside cases would affect capacity, and, ultimately, performance. An experiment was done to test this hypothesis. The load used, 30.5 grains of RL15 behind 107gr SMKs in a 6mmBR, was selected for best group and lowest ES in prior load development. It turned out to be 92% of initial case capacity and neither “full” or compressed. (I would suspect that different powders, load weight, and total case capacity might produce very different results.)
We took 30 cases of identical initial capacity and tracked three lots of 10 each:
LOT 1: No Internal cleaning LOT 2: Cleaned with media in tumbler LOT 3: Cleaned with Ultrasound machine
Each case (in each lot) was shot and reloaded 20 times. The simplified results after 20 reloads of each lot were as follows:
Lot 1 (not cleaned) – 0.3 to 0.4 gr. loss of capacity, 5 to 8 fps greater ES.
Lot 2 (tumble cleaned) – 0.1 to 0.3 gr. loss of capacity, 4 to 6 fps greater ES.
Lot 1 (ultrasonic cleaned) – no loss of capacity, no detectable change in ES.
FINDINGS There was no detectable correlation of velocity change to the lots. An oddity was that on very hot days Lot 1 velocities were, occasionally, slightly higher. [Editor’s note: That does suggest that the carbon build-up inside the uncleaned cases might cause a slight increase in pressure that shows up on hot days. Fred has posted that “A local shooter reported doing the 20 reload, no clean test on a .308 that gave a loss of capacity of 2.0 grains, doubled ES and signficant velocity changes. However, I don’t have any details on his load weight or powder.”]
NOTE: From results of another ongoing test, I believe the above differences in ES are probably due more to variance in bullet grip tension than case capacity. The ultrasound cleaned cases (LOT 3) did maintain the lowest ES, but we are not 100% sure of the reasons why. More consistent bullet seating might be the reason.
[Editor’s comment: Jason found that with his ultrasonically-cleaned cases, the inside of the necks got so “squeaky clean” that he needed to use dry lube in the necks. Jason uses the $10.95 dry lube kit from Neconos.com. This applies ultra-fine Moly powder to the neck using small carbon steel balls]
Here’s big (and small) news for reloaders — get ready for smaller powder containers. The U.S. Department of Transportation (DOT) recently approved new smaller containers for shipment of smokeless powder. The new containers are designed to hold 1000 grains, exactly one-seventh of a pound. That works out to 2.29 ounces of powder — quite a bit less than you are getting currently with one-pound (16 oz.) containers.
Here how it works out:
7000 grains = 1 pound = 16 ounces
1000 grains = 0.143 pounds = 2.29 ounces
Many products — from cereal boxes to Snickers bars — have been down-sized in recent years. Now downsizing has come to the powder marketplace. The strategy behind the smaller containers is simple. In a market where demand vastly outstrips available supply, the smaller containers allow powder-makers to generate more revenue with a given amount of powder inventory. Will consumers accept the smaller powder containers? Probably so — 1000 grains is enough to load 20-22 rounds of .308 Winchester. In the current marketplace (with many powders virtually impossible to find), most consumers would probably prefer to get 2.3 ounces of their favorite powder, rather than nothing at all. (NOTE: The major powder suppliers will continue to offer popular powders in 1-lb, and 8-lb containers. The new 1000-grain containers will be phased-in over time, as an alternative to the larger containers).
Why the small bottles? One industry spokesman (who asked not to be named) explained: “We’ve had a severe shortage of smokeless powder for nearly two years. The powder production plants are running at full capacity, but there’s only so much finished product to go around. By moving to smaller containers, we can ensure that our customers at least get some powder, even if it’s not as much as they want.”
Why are the new containers 2.3 ounces rather than 8 ounces (half a pound) or 4 ounces (one-quarter pound)? One of the engineers who helped develop the new DOT-approved container explained: “We looked at various sizes. We knew we had to reduce the volume significantly to achieve our unit quantity sales goals. Some of our marketing guys liked the four-ounce option — the ‘Quarter-Pounder’. That had a nice ring to it, but ultimately we decided on the 1000 grain capacity. To the average consumer, one thousand grains sounds like a large amount of powder, even if it’s really only 2.3 ounces. This size also made it much easier to bundle the powder in six-packs. We think the six-packs will be a big hit. You get nearly a pound of powder, but you can mix and match with a variety of different propellants.”
Less Bang for Your Buck?
We’re told the new 2.3-ounce powder bottles will retail for around $8.50, i.e. about $3.70 per ounce. At that price, it may seem like you’re getting less bang for your buck. Currently, when you can find it, high-quality reloading powder typically sells for $25-$30 per pound (in 1-lb containers). At $30 per pound, you’re paying $1.88 per ounce. That means that the new mini-containers will be roughly twice as expensive, ounce-for-ounce, as current one-pounders ($3.70 per ounce vs. $1.88 per ounce).
Why is the DOT getting involved in powder packaging? Well, powders are considered hazardous materials, subject to many rules and regulations. Before a powder manufacturer or distributor can ship any propellant, all the hazmat packaging has to be first approved by the DOT to ensure safe shipping.
Along with the 2.3-ounce containers, the DOT has approved “six-pack” consolidated delivery units that will hold six, 1000-grain containers. Some manufacturers plan to offer “variety packs” with a selection of various powders in the 1000-grain bottles. Wouldn’t it be cool to have a six-pack with H322, H4895, Varget, H4350, H4831sc, and Retumbo?


 Harrell’s Precision sells “semi-custom” full-length bushing dies for the PPC and 6BR chamberings. While the Harrell brothers do not cut the die to spec, they carry a large selection of dies made with slightly different internal dimensions. When you send in your fired brass, the Harrells choose a die from inventory with just the right amount of sizing (diameter reduction) at the top and bottom of the case. Given the quality, and precise fit, Harrell’s full-length dies are a good value at $75.00 plus shipping.
 Bump Measuring Collar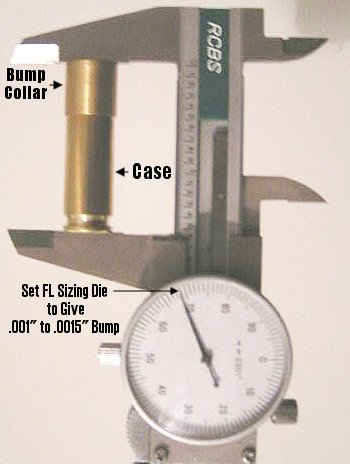


 Our IT guy, Jay (aka JayChris in the Forum), was having some issues with his .260 AI. A load with known accuracy had suddenly and mysteriously stopped shooting well. Jay couldn’t figure out what was going wrong. Then he remembered he had cleaned his brass using a powerful ultrasonic machine.
 I have used an ultrasonic cleaner for a while now. I recently got a more powerful Ultrasonic cleaner, although I don’t know if that makes a difference. My brass comes out dry and squeaky. Emphasis on the “squeaky”.


 AccurateShooter Forum member Allan, aka “1066”, has improved the performance of his RCBS balance-beam scale with some simple hardware modifications. In addition, Allan has cleverly fitted an inexpensive video camera to one end of his scale. This camera outputs a signal to Allan’s laptop computer, giving Allan a magnified, “big-screen” view of the pointer tip of his scale. That lets Allan observe ultra-small movements of the beam. With the hardware upgrades and video display, Allan has crafted a system with usable sensitivity to a single grain of Varget powder.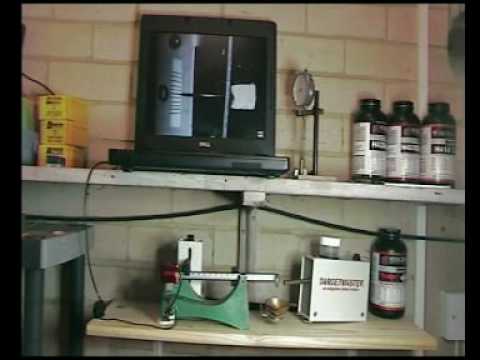

 1000-yard Benchrest competitor James O’Hara set four (4) new IBS Records in 2013. These multi-match Light Gun Agg records were secured with O’Hara’s solid performance at the 2013 Virginia 1000-yard Benchrest State Championship. Here are the new records set by O’Hara in 2013:


 Barrel Freezing (Cryogenic treatment)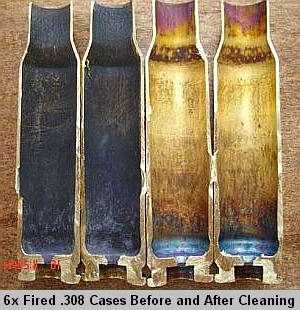

 Here’s big (and small) news for reloaders — get ready for smaller powder containers. The U.S. Department of Transportation (DOT) recently approved new smaller containers for shipment of smokeless powder. The new containers are designed to hold 1000 grains, exactly one-seventh of a pound. That works out to 2.29 ounces of powder — quite a bit less than you are getting currently with one-pound (16 oz.) containers.
 Why is the DOT getting involved in powder packaging? Well, powders are considered hazardous materials, subject to many rules and regulations. Before a powder manufacturer or distributor can ship any propellant, all the hazmat packaging has to be first approved by the DOT to ensure safe shipping.


