Many novice hand-loaders believe that neck bushing Inside Diameter (ID) size is the only important factor in neck tension. In fact, many different things will influence the grip on your bullet and its ability to release from the case neck. To learn more about neck tension and “case grip”, take the time to read this article carefully. We bet you’ll gain knowledge that will let you load more accurate ammo, with better ES/SD.
Editor: Guys, this is a VERY important article. You really should read it over carefully, twice. Variations in the force required to release a bullet can significantly affect accuracy and ES/SD. You really need to know how the grip on bullet can be altered by many different factors.
Neck Tension (i.e. Grip on Bullets) Is a Complex Phenomenon
While we certainly have considerable control over neck tension by using tighter or looser bushings (with smaller or bigger Inside Diameters), bushing size is only one factor at work. It’s important to understand the multiple factors that can increase or decrease the resistance to bullet release. Think in terms of overall brass-on-bullet “grip” instead of just bushing size (or the internal neck diameter in non-bushing full-length sizing dies).
Bullet grip is affected by many things, such as:
1. Neck-wall thickness.
2. Amount of bullet bearing surface (shank) in the neck.
3. Surface condition inside of neck (residual carbon can act as a lubricant; ultrasonic cleaning makes necks “grabby”).
4. Length of neck (e.g. 6mmBR neck vs. 6mm Dasher).
5. Whether or not the bullets have an anti-friction coating.
6.The springiness of the brass (which is related to degree of work-hardening; number of firings etc.)
7. The bullet jacket material.
8. The outside diameter of the bullet and whether it has a pressure ridge.
9. Time duration between bullet seating and firing (necks can stiffen with time).
10. How often the brass is annealed.
11. Amount (length) of neck sized (e.g. you can size only half the neck).
12. Interior diameter of bushing, or neck section of non-bushing die.
– and there are others…
One needs to understand that bushing size isn’t the beginning and end of neck tension questions, because, even if bushing size is held constant, the amount of bullet “grip” can change dramatically as the condition of your brass changes. Bullet “grip” can also change if you alter your seating depth, and it can even change if you ultrasonically clean your cases.
5-time U.S. National Long-Range Champion John Whidden adds: “Our tests show us that the condition of the necks in regards to lubed or not, carbon inside or not, squeaky clean or not, etc., matter even more than the size of the bushing used. An ultrasonically cleaned or brand new dry case neck make for some quite high seating force.”
In our Shooters’ Forum a reader recently asked: “How much neck tension should I use?” This prompted a Forum discussion in which other Forum members recommended a specific number based on their experience, such as .001″, .002″, or .003″. These numbers, as commonly used, correspond to the difference between case-neck OD after sizing and the neck OD of a loaded round, with bullet in place. In other words, the numbers refer to the nominal amount of interference fit (after sizing).
While these commonly-used “tension numbers” (of .001″, .002″ etc.) can be useful as starting points, neck tension is actually a fairly complex subject. The actual amount of “grip” on the bullet is a function of many factors, of which neck-OD reduction during sizing is just one. Understanding these many factors will help you maintain consistent neck tension as your brass “evolves” over the course of multiple reloadings.
Seating Depth Changes Can Increase or Decrease Grip on Bullet
You can do this simple experiment. Seat a boat-tail bullet in your sized neck with .150″ of bearing surface (shank) in the neck. Now remove the bullet with an impact hammer. Next, take another identical bullet and seat it with .300″ of bearing surface in another sized case (same bushing size/same nominal tension). You’ll find the deeper-seated bullet is gripped much harder.
Neck-Wall Thickness is Important Too
I have also found that thinner necks, particularly the very thin necks used by many PPC shooters, require more sizing to give equivalent “grip”. Again, do your own experiment. Seat a bullet in a case turned to .008″ neckwall thickness and sized down .003″. Now compare that to a case with .014″ neckwall thickness and sized down .0015″. You may find that the bullet in the thin necks actually pulls out easier, though it supposedly has more “neck tension”, if one were to consider bushing size alone.
In practical terms, because thick necks are less elastic than very thin necks, when you turn necks you may need to run tighter bushings to maintain the same amount of actual grip on the bullets (as compared to no-turn brass). Consequently, I suspect the guys using .0015″ “tension” on no-turn brass may be a lot closer to the guys using .003″ “tension” on turned necks than either group may realize.
Toward a Better Definition of Neck Tension
As a convenient short-cut, we tend to describe neck tension by bushing size alone. When a guy says, “I run .002 neck tension”, that normally means he is using a die/bushing that sizes the necks .002″ smaller than a loaded round. Well we know something about his post-sizing neck OD, but do we really have a reliable idea about how much force is required to release his bullets? Maybe not… This use of the term “neck tension” when we are really only describing the amount of neck diameter reduction with a die/bushing is really kind of incomplete.
My point here is that it is overly simplistic to ask, “should I load with .001 tension or .003?” In reality, an .001″ reduction (after springback) on a thick neck might provide MORE “grip” on a deep-seated bullet than an .003″ reduction on a very thin-walled neck holding a bullet with minimal bearing surface in the neck. Bushing ID is something we can easily measure and verify. We use bushing size as a descriptor of neck tension because it is convenient and because the other important factors are hard to quantify. But those factors shouldn’t be ignored if you want to maintain consistent neck tension for optimal accuracy.
Consistency and accuracy — that’s really what this all about isn’t it? We want to find the best neck tension for accuracy, and then maintain that amount of grip-on-bullet over time. To do that you need to look not only at your bushing size, but also at how your brass has changed (work-hardened) with time, and whether other variables (such as the amount of carbon in the neck) have changed. Ultimately, optimal neck tension must be ascertained experimentally. You have to go out and test empirically to see what works, in YOUR rifle, with YOUR bullets and YOUR brass. And you may have to change the nominal tension setting (i.e. bushing size) as your brass work-hardens or IF YOU CHANGE SEATING DEPTHS.
Remember that bushing size alone does not tell us all we need to know about the neck’s true “holding power” on a bullet, or the energy required for bullet release. True bullet grip is a more complicated phenomenon, one that is affected by numerous factors, some of which are very hard to quantify.
Here’s a late-breaking deal. If you need high-BC 6mm match bullets for benchrest, F-Class, PRS/NRL, or silhouette matches, head over to Precision Reloading. While Berger bullets have been in very high demand lately, Precision Reloading has a large inventory of Berger 6mm match bullets IN STOCK now. Chose from 90gr, 95gr, 105gr, 108gr, and 115gr 6mm bullets. PLUS there are Coupon CODES good today to save $10 Off $100, $25 Off $250, and $50 Off $500. But you better act soon, these bullets may sell out quickly, and those Coupon CODES expire tonight, 10/31/2022 at 11:59 PM CST.
Coating bullets with a friction-reducing compound such as Molybdenum Disulfide (Moly) offers potential benefits, including reduced barrel heat, and being able to shoot longer strings of fire between bore cleanings. One of the effects of reduced friction can be the lessening of internal barrel pressures. This, in turn, means that coated bullets MAY run slower than naked bullets (with charges held equal).
To restore velocities, shooters running coated bullets are inclined to “bump up” the load — but you need to be cautious.
Be Careful When Increasing Loads for Coated Bullets
We caution shooters that when your start out with coated bullets in a “fresh barrel” you should NOT immediately raise the charge weight. It may take a couple dozen coated rounds before the anti-friction coating is distributed through the bore, and you really start to see the reduced pressures. Some guys will automatically add a grain or so to recommended “naked” bullet charge weights when they shoot coated bullets. That’s a risky undertaking.
We recommend that you use “naked” bullet loads for the first dozen coated rounds through a new barrel. Use a chronograph and monitor velocities. It may take up to 30 rounds before you see a reduction in velocity of 30-50 fps that indicates that your anti-friction coating is fully effective.
We have a friend who was recently testing moly-coated 6mm bullets in a 6-6.5×47. Moly had not been used in the barrel before. Our friend had added a grain to his “naked” bullet load, thinking that would compensate for the predicted lower pressures. What he found instead was that his loads were WAY too hot initially. It took 30+ moly-coated rounds through the bore before he saw his velocities drop — a sign that the pressure had lowered due to the moly. For the rounds fired before that point his pressures were too high, and he ended up tossing some expensive Lapua brass into the trash because the primer pockets had expanded excessively.
LESSON: Start low, even with coated bullets. Don’t increase your charge weights (over naked bullet loads) until you have clear evidence of lower pressure and reduced velocity.
Procedure After Barrel Cleaning
If you shoot Moly, and clean the barrel aggressively after a match, you may want to shoot a dozen coated “foulers” before starting your record string. Robert Whitley, who has used Moly in some of his rifles, tells us he liked to have 10-15 coated rounds through the bore before commencing record fire. In a “squeaky-clean” bore, you won’t get the full “benefits” of moly immediately.
To learn more about the properties of dry lubricants for bullets, read our Guide to Coating Bullets. This covers the three most popular bullet coatings: Molybdenum Disulfide (Moly), Tungsten Disulfide (WS2 or ‘Danzac’), and Hexagonal Boron Nitride (HBN). The article discusses the pros and cons of the different bullet coatings and offers step-by-step, illustrated instructions on how to coat your bullets using a tumbler.
Hydro Press and Arbor Press from 21st Century Shooting
Gear Review by F-Class John
Inline dies, used with arbor presses, continue to dominate the world of precision reloading. While arbor presses have remained mostly unchanged, 21st Century Shooting offers the Hydro Bullet Seating Press, a radical departure from your average arbor press. If you are looking for improved “feel” and feedback on bullet seating pressure, you should definitely check out the Hydro Press. This design has been around for a while now but has remained unchallenged since its inception. The 21st Century Hydro Press still remains a category leader (and the choice of many top competitors) for good reason. It is offered for $300.00 or, with a variety of gauge options, for $367.00. You can add an extended base with loading block another $85.00. CLICK HERE for ordering options.
Arbor presses have traditionally worked by using a gear-driven ram operated with a rotating handle. This allows for a compact design but often lacks the tactile feel and smooth operation that many reloaders want. The 21st Century Hydro Bullet Seater works by using simple mechanical leverage coupled with a hydraulic pressure gauge to seat bullets in a smooth motion all while helping you keep track of seating pressures.
Editor: Many top shooters believe they can seat bullets with greater precision using the 21st Century Hydro Press. I personally get more consistent seating, which seems to improve accuracy and even help a bit with lowering ES. The Hydro Press gives you excellent feedback when seating bullets. That has helped me detect a case with too much neck tension, or a case that may have doughnut issues. When the gauge does something odd or spikes, you are alerted to a possible issue.
In this video, John Perkins of 21st Century Shooting Shows how the Hydro Seater functions.
You might be asking why or how simple a simple mechanical lever gives you an advantage over gear driven systems and the answer is simple, leverage. The Hydro Seater is equipped with a long arm that comes straight up and out from the front and uses a set of hinges that connect to the ram. This elongated arm provides lots of leverage allowing easy force modulation. This smoothly applies pressure to the seating die in one fluid motion. This transfer of power helps seat bullets smoothly in even the tightest of necks without any jerky or stuttering movements.
Working at the same time is a hydraulic pressure gauge using internal oil. I found this gauge was incredibly sensitive, accurate, and repeatable compared to spring-driven gauges. The Hydro gauge read-out really gives the user the chance to sort ammo by seating pressure should they choose. In my particular case I only use it to cull out noticeably high or low ones as “blow off” rounds and am perfectly happy if the rest fall within a given pressure range. The nice thing is that the press allows you to be as picky as you want.
Compact 21st Century Standard Arbor Press
Not to be outdone by its big brother, 21st Century offers a Standard Arbor Press as well, in both right-hand and left-hand versions. Affordably priced at $128.00, this small arbor press in made to the same exacting standards as the Hydro Seater and has some nice features of its own compared to other small arbors.
The large, knurled adjustment knob is one of my favorite features. It tightens securely, yet it allows for easy raising or lowering of the head unit without the need for hex wrenches. 21st Century’s basic arbor press also has a slightly canted lever arm which allows the user to apply pressure more easily and consistently compared to some other arbor presses. While this press is small enough to fit many range bags, it can be disassembled quickly with a single Allen wrench.
While I own the 21st Century Hydro Press for use at home, the Standard Arbor Press goes with me to out-of-town events, so I can adjust bullet seating depth at the match. I love using it for this purpose since the little press is so easy to transport, and then set up and use on the road. The seating action is smooth, and there is plenty of leverage.
Seating my bullets long before I travel gives me the ability to set them to adjust for any throat erosion that may occur. This also ensures my bullets are seated correctly, by eliminating any potential bullet weld or problems from the bullets accidentally bouncing in your luggage. I like the confidence of knowing that my bullets are properly seated before a big match, especially when it has been days or weeks since I loaded them.
New Generation Arbor Press from 21st Century
UPDATE: In addition to the Standard Arbor Press, 21st Century now offers a New Generation Arbor Press for $185. This features direct leverage action plus a light-weight return spring that provides enhanced “resistive feedback” when seating bullets. This Editor has used this New Generation Arbor Press and it does have improved seating “feel”. An extended base with loading block is available at extra cost.
21st Century explains: “Our New Generation Arbor Press is the perfect upgrade for shooters looking to get the most out of their hand dies. With many truly unique features… this press features a butter-smooth direct leverage action. The tight tolerances of this design and exclusion of friction-inducing gears ensures that the press exerts consistent pressure through its full range of motion with minimal effort. Leverage is increased through the incorporation of an extra-long press handle, reducing hand and arm fatigue. The return springs are strong enough to reset the press but do not diminish the operator’s ability to feel the resistive feedback generated by neck tension. Press head clearance is adjustable up to 9 inches.”
SUMMARY — 21st Century Makes Great Bullet Seating Presses
Whether you need a premium bullet-seating Press such as the Hydro Bullet Seater or a basic, easy-to-transport Arbor Press, 21st Century Shooting has a excellent option for you. The Hydro Press offers outstanding bullet seating “feel” and consistency, with an ultra-smooth operation. The basic Arbor Press is well-made, compact, and also yields excellent results. Both these presses are built for a lifetime of use, using high-quality materials.
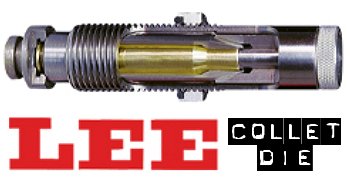
For those who prefer to neck-size their brass (rather than full-length-size), the LEE Collet Die is a popular, inexpensive option. It works by having collet tangs or “fingers” press the neck against a central mandrel. The benefit is that you get a very straight neck, which is sized consistently from top to bottom. Canadian shooter Jerry Teo explains: “LEE Collet Dies produce sized cases with very low runout (measured runout is under .001″ using a Sinclair concentricity gauge). You also don’t get the build-up of brass at the base of the neck, as can happen with bushing neck dies. The neck-shoulder junction stays nice and crisp.”
NOTE: For most handloading, we recommend FULL-LENGTH sizing of cases. You should always have a good Full-length sizing die for your brass. But there are some situations where neck-sizing may be useful. This article explains how to neck-size effectively with a LEE Collet Die.
Here’s a good video that explains how to use a Lee Collet Die to Neck-Size .243 Win brass:
TIP ONE — Adjusting Tension
LEE Collet dies don’t have a specific mechanical adjustment for neck tension. But you CAN easily modify the die to provide more or less tension. If you want to adjust the neck tension using a Lee Collet die, you can simply chuck the mandrel in a drill and reduce the diameter with some sand-paper (to increase neck tension) or you can order a mandrel the next caliber larger and turn it to whatever diameter you want (the larger the mandrel diameter, the less the neck tension). You can also order custom mandrels from Lee sized to any diameter you want.
Regarding neck tension, Boyd Allen makes an important point: “The only way to properly get more neck tension with collet dies is to either reduce the diameter of the mandrel, or order a smaller-diameter mandrel from Lee. I remind folks that adjusting the die position to have more toggle at the top of the ram stroke (not the factory recommended method), or leaning on the press handle with more force than recommended will NOT increase neck tension.”
TIP TWO — Polish and Tune for Easy Case Removal
Some users have complained that their Collet Dies grab the case-neck too firmly, making the case hard to remove. There are solutions to this problem. First inspect the collet fingers and smooth the inner surface up a bit with polishing compound or an extra-fine sanding pad. Second, you can open up the fingers a little bit. LEE recommends that if your Collet Die is sticking, take a steel punch and tap the fingers apart a little bit so that the natural “unloaded” position is wider. Lastly, you should lightly lubricate the outside of the collet fingers (see arrows) before you re-assemble the die. This will ensure they slide smoothly. Also, to prevent the collet fingers from closing too tight, never load up the die with your press without putting a case in place first. Without a case neck between the collet fingers and the mandrel, the collet can clamp itself too tight as you raise the ram.
TIP THREE — Always Have a Case Inside When Operating Collet Die
Our friend Boyd Allen tells us that you need to follow directions and NEVER operate the die without a case inside. Boyd explains: “This is because doing so will spring the quadrants of the collet inward so that they interfere with the insertion of a case, and the user will have to figure out how to undo the damage if the die is to operate properly. This advice would not be needed if everyone read the instructions before using the die…. but many times, they don’t. Another thing that I tell new users is to take the die apart so that they will have a better chance of understanding how it works.”
TIP FOUR — Size Twice and Spin Your Case 1/8th Turn
After reaching fully “down” on your press handle, withdraw the case about an inch and manually rotate it about 1/8th (NOT 1/4 or 1/2) turn while still in the shell-holder, then size again. This will place the die’s collet petals on the four “high spots” of the case neck and will result in a rounder, more evenly-sized neck with slightly more bullet tension. This takes only about one second more per case and is well worth the slight extra effort. (We thank reader Stonecreek for this smart tip).
Get CUSTOM Lee Collet Dies for Your Brass
Yes LEE does make custom collet neck-sizing dies! LEE Precision currently offers Custom Collet Neck-Sizing Dies, made from two of your fired cases. LEE offers custom standard-thread (7/8×14) collet dies for $100.00 (plus S/H) and custom large-thread (1¼x12) collet dies for $300.00 (plus S/H). This is a good option if you run wildcats or have unusual chamber dimensions. CLICK HERE to ORDER.
It’s great to be able to access online load data for your cartridges. You can quickly get load data for a particular powder and bullet weight. However, there are times when we prefer to consult old-fashioned printed/bound load manuals. The primary reason is that manuals produced by bullet- and tool-makers will, for a particular cartridge, include data for powders from multiple manufacturers. Having a single source can save you time and trouble. For example, if you want to find 6.5 Creedmoor loads using H4350 (Hodgdon), Reloder 16 (Alliant), and N150 (Vihtavuori) you would have to visit three different powder-maker websites, one after another. OR you can pick up a modern load manual and find everything in one place.
There are many excellent printed load manuals on the market. We have used the Berger Manual, Sierra Manual, Speer Manual, Lyman Manual, and Hornady Manual. We like the Berger and Sierra manuals for match rifle cartridges, and the Lyman and Hornady manuals for hunting loads and pistol cartridges.
The Lyman Reloading Manuals have earn praise over the years:
“Every other reloading book I’ve used favors their own bullets over every other manufacturers. With Lyman you get an honest representation of a wide variety of different… manufacturers. [Lyman has] a ton of reloading data on just about any bullet style you can imagine. I’ve tried a wide range of their recipes and everyone I’ve tried has been spot on. The overall breadth of information this book covers is impressive.” Review by RangetoReal.com.
Nosler #9 Manual Features New Cartridges
If you are looking for up-to-date cartridge/bullet/powder information, in late 2020 Nosler released the Nosler Reloading Guide #9, the latest in a respected series of Nosler load manuals.
This 800-page guide covers 101 cartridge types. New in this edition you’ll find the popular 6mm Creedmoor, 6mm XC, 6.5 PRC, and 7.62×39, along with 20 Nosler, 22 Nosler, 24 Nosler, 27 Nosler and 33 Nosler. This manual is a good resource for PRS shooters and hunters. The Nosler #9 book draws from thousands of hours in the Nosler Ballistic Lab, along with the experience of many respected experts.
The book is available for $24.99 at Midsouth or $29.95 on Amazon. Keep in mind that much of the book’s latest load data is available for free on the Nosler.com online LOAD DATA Center. But to get ALL the data, PLUS all the technical articles, you’ll need to buy the book.
Along with the new Nosler #9 Manual, here are four other recommended Reloading Manuals:
Here Are Four General Instructional Books That Cover Reloading Procedures:
POWDER BURN RATE TABLE
Here is the most recent powder burn rate chart from Hodgdon/IMR that we could find. Click links below to access printable PDF. Note, some readers have suggested a couple powder ranking issues in the table. However, this is the latest official version from the IMR website, released in November 2019.
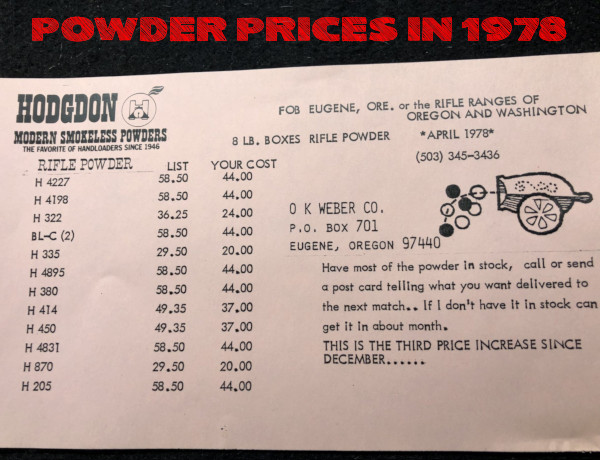
Have inflation (and supply chain shortages) affected the price of powder? You bet. Probably WAY more than you could imagine. Forum member “Two Time HM LR” posted this interesting photo (above) showing Hodgdon powder prices from 1978, as sold by O.K. Weber in Oregon.
Now the prices — $20 to $44 — may not get your attention at first. But take note that these numbers are for EIGHT pound jugs. Yep eight-pounders were all under $45! For example, H4895 was $44 for 8 pounds back in 1978, 44 years ago. And H335 was $20 for eight pounds — that’s just $2.50 per pound!
These days a single pound of a desirable powder such as H4831 might cost $65 at some stores IF you can find it at all. On Hodgdon’s web site, H4831 powder is priced at $60.99 per pound in October 2022. Using that current $60.99/lb figure, H4831 is now ELEVEN times higher than it was in 1978, when H4831 cost $44 for 8 pounds, i.e. $5.50 per pound.
Here are some comments from our Forum Members:
“Heck those prices are just about the same as current ones, just a little smaller container now.” — Joe
“I’ve got some H4831 in a can marked ‘WWII Surplus Powder’ with a price tag of $2.75. We’ll never see that again either.” Rick in Oregon
“1978 prices and 2022 income would be nice. Unfortunately that doesn’t work. If you compare prices and income, powder cost about the same. You also have to discount the temporary gouging that we are seeing.” — Tmwinds
“So I used to buy gas for 10 cents per gallon and they’d pump it, check the oil, and clean the windshield.” — Pirate Ammo
One comment suggests that the powder price hike actually tracks general U.S. currency inflation over the last four decades. So perhaps powder price increases are not as bad as they seem, when compared to how all prices have risen since 1978:
“Using H4895 as a comparison basis at $58.50 (list price) in 1978 calculates it to $246 in todays money. Looking at Powder Valley prices it looks like around $256 for the same item in todays money, so it really hasn’t gone up. Availability is another issue though and if someone is really needing powder they may well have to pay above suggested retail.” — Drover
The U.S. Army Marksmanship Unit (USAMU) has published a series of reloading “how-to” article on the USAMU Facebook page. In this article, the USAMU’s reloading gurus address a question frequently asked by prospective handloaders: “Should I buy a single-stage press, or a progressive?” The USAMU says the best answer is Solomon-esque in both its wisdom and simplicity: “Get BOTH!” However, there is definitely more to the issue, as the USAMU explains below.
Bottom line, the USAMU recommends that novice handloaders start with a single-stage press. That press will always be useful for many tasks, even if a multi-station progressive is later acquired.
Progressive Press Safety Considerationsby USAMU Staff
Many are the beginning handloaders who have asked a friend about their “setting up” a progressive press for them. The idea is that the newbie could then just feed in components and crank out buckets of practice ammo without needing to really learn much about handloading. Tempting though this might be, that’s simply not how it works. Such an approach might be ok if there were never a malfunction with either press or operator, but that’s unrealistic. Our hypothetical newbie would then lack the knowledge to problem-solve most situations.
Worse yet, several different handloading operations would be occurring at different stations on the progressive press at the same time. It takes an experienced operator to keep track of, and truly understand the significance of, all those potential mini-problems. Loading without this experience is a recipe for potential disaster — such as a double powder charge (especially with pistol cartridges) dropped while the loader was attending to some other function, etc. Progressives are an animal unto themselves, and while they offer many benefits, they do take some getting used to – even by experienced handloaders!
ILLUSTRATIVE HORROR STORY
Here, enter a 40-year veteran handloader who decided to jump onto the progressive bandwagon late in his career, having used only single-stage presses all his life. A High Master NRA High Power Rifle competitor, he had no background in competitive pistol shooting, where historically most progressive presses are found.
Experienced Action Pistol shooters have typically encountered multiple episodes in which shooters “skipped” a powder charge for some reason, leading to a squib round and a bullet possibly lodged in the bore. Thus, at matches, it’s reflexive for them to yell “STOP!” in unison if they see a shooter get a “click” vs. a “bang”, and rack the slide to keep firing. This writer has personally seen several pistols saved in just such scenarios over the years.
Better Safe Than Sorry — the RCBS Lock-Out Die
RCBS Makes a “Lock-Out Die” that senses the powder charge. This will halt the Progressive press if you have a double charge, or an undercharge. Your Editor has the Lock-Out Die on his RCBS Pro 2000. It has “saved his bacon” a half-dozen times over the years. It can be used on Dillon and Hornady progressives as well as RCBS machines.
Click No Bang — What NOT to Do
Our High Master set up a popular progressive press and began turning out .223 Rem 100-yard practice ammo with abandon. He was using a moly-coated 52gr match bullet and an economical, fast-burning surplus powder that gave great accuracy. Once on the range, he began practicing strings of rapid-fire. All was well, until he heard “Click!” rather than “Boom”.
Lacking the above experience or onlookers to halt him, he reflexively operated the charging handle on his expensive, custom NM AR15 Service Rifle, and the next trigger squeeze reportedly registered on seismographs over at least a three-state radius. He sat, uninjured but bewildered, until the hail of expensive bits and pieces quit raining down around him.
When the smoke cleared, he immediately cursed the horrid, evil, demonically-possessed progressive press for this, his first-ever reloading mishap. His $1400 NM upper was ruined, but thankfully, his $800 pre-ban lower… and he had escaped injury.
This tale is told not to discourage the use of progressive presses, but to emphasize the need to EASILY and IMMEDIATELY KNOW what is happening with the press at each station, every time the handle is cranked. Not to do so is, as they say, “bad ju-ju.”
It illustrates why we at the USAMU Handloading Shop agree in recommending that new handloaders should begin with a single-stage press. Once one thoroughly learns the steps in each phase of handloading by repeated experience, then one will be qualified to move on to a progressive press.
The single-stage press will REMAIN virtually indispensable for one’s entire handloading career, even after having purchased a progressive press (or two). There are endless small projects that are best handled on a single-stage press, and a poll of USAMU’s Handloading staff reveals that not one would willingly be without his single-stage press, despite owning at least one progressive.
I have seen it time and time again, shooters on the line wrestling with their rifle trying to get the bolt closed while the wind is switching. They were too focused trying to get their bolt to close and getting their rifle settled back on the bags that they missed the wind switch. Bang… Eight! The straw that broke the camel’s back for me was at the 2017 Canadian Nationals. I was paired up with a young girl and she would try really hard to close the bolt on her rifle. The majority of the time she would get it to close, but often times she could not even get the round to chamber. She was focused on her rifle the entire time rather than on the conditions. When we completed our strings, she had five rounds that did not chamber our of 15! That is way too many!. I told her she needed to think about Full-length sizing with 0.002″ shoulder bump, or Controlled Full-length Sizing like I call it. I told her not to worry about losing accuracy. I told her that I full-length size all my rounds and asked if she noticed how smooth my bolt was and noticed my score. She said yes, they were both great!
Controlled Full-length Sizing Does NOT Harm Accuracy
I have found that Controlled Full-length Sizing does NOT hurt accuracy or shorten brass life. I find that I can focus much more on the conditions when I don’t have to think about chambering a round nor extracting it. It has become second nature. After firing, I keep my head welded to the stock, I open the bolt by placing my thumb on top of stock and rotating hand upwards. I reach in and retrieve spent case, place it back in ammo box, and pick up another loaded round and put in chamber. I verify conditions and when ready, I push the bolt in and close it with my index and middle finger.
With Controlled Full-length Sizing you “bump” the shoulder around .002″ for bolt guns.* Image courtesy Sinclair International which carries a variety of Full-length dies.
Whidden Full-Length Sizing Dies by AccurateShooter.com Editor
For proper Full-length sizing, you want a quality die that’s a very good match to your chamber. For our project rifles we usually turn to Whidden Gunworks which offers both bushing and non-bushing FL dies. And if you want the hot new option, check out Whidden’s patent-pending, click-adjustable FL-sizing die. This gives instant, precise control over shoulder bump. It works great.
*With gas guns, such as the AR10, you may want to increase shoulder bump to .003″ or more. With some benchrest cartridges, .0015″ bump may prove optimal. But .002″ is a good starting point.
The U.S. Army Marksmanship Unit (USAMU) has published a series of reloading articles on its Facebook Page. In this article, the second in a 3-part series, the USAMU covers the process of loading competition pistol ammunition. The authors focus on two key elements — the taper crimp and the quality/uniformity of the original brass. If you shoot pistol competitively, or just want to maximize the accuracy of your handguns, read this article. The taper crimp tips are very important.
Loading Accurate Competition Pistol Ammunition — Part 2 of 3
Today, we resume our series on factors affecting accuracy in pistol handloads. Readers who missed Part One can visit our USAMU Facebook Page. Scroll down to March 28, 2018 to find that first installment which is worth reading.
One often-overlooked aspect of handloading highly-accurate pistol ammunition is the amount of taper crimp used, and its effect on accuracy. (NOTE: this article pertains to loading for semi-autos – revolver crimp techniques involve some quite different issues.) Briefly, different amounts of taper crimp are used with various handloads to obtain best accuracy. The amount is based on bullet weight, powder burn rate and charge, plus other factors such as case neck tension. During machine-rest testing of experimental Service Pistol ammunition, many variables are examined. Among these, our Shop often varies a load’s crimp in degrees of 0.001″ when re-testing for finest accuracy.
How to Measure Taper Crimp on Pistol Cartridges
One question that often arises is, “How do I measure the taper crimp I’m putting on my cartridges?” Using the narrow part of one’s dial caliper jaws, carefully measure the case diameter at the exact edge of the case mouth on a loaded cartridge. It’s important to take several measurements to ensure consistency. Also, be sure to measure at several places around the case mouth, as case wall thickness can vary. After measuring 2-3 cartridges with a given crimp setting, one can be confident of the true dimension and that it can be repeated later, if needed.
However, for good results, one must use brass from one maker due to variances in case wall thickness. For example, the same degree of crimp that imparts a measurement of 0.471″ with Brand X brass may result in 0.469″ with Brand Y. Thus, for best accuracy, using brass from the same manufacturer is important — particularly for 50-yard Slow Fire. In a perfect world, it is better still to use brass from one lot number if possible. With the popularity of progressive presses using interchangeable tool heads, keeping separate tool heads adjusted for each load helps maximize uniformity between ammunition lots.
Brass Uniformity and Accuracy
Brass is important to pistol accuracy. While accurate ammunition can be loaded using brass of mixed parentage, that is not conducive to finest results, particularly at 50 yards. It is important for the serious competitor to pay attention to his brass – even if only for the 50-yard “Slow Fire” portions of “Bullseye” matches and practice. By segregating brass as described above, and additionally keeping track of the number of times a given batch of cases has been fired, one can ensure case neck tension and case length are at their most uniform.
Given the large volumes of ammunition consumed by active pistol competitors, using inexpensive, mixed surplus brass for practice, particularly at the “short line” (25 yards), is understandable. In NRA Outdoor Pistol (“Bullseye”), the 10-ring is relatively generous — especially for a well-trained shooter with an accurate pistol and load. However, for the “long line” (50 yards), purchasing and segregating a lot of high-quality brass to be used strictly for slow-fire is a wise idea. To keep track of your brass on the line, use a unique headstamp marking with 1 or 2 colors of marking pen ink.
Uniform Cartridge Overall Length is Important
Cartridge case Overall Length (OAL) uniformity as it comes from the factory is important to achieving utmost accuracy. More uniform case lengths (best measured after sizing) contribute to greater consistency of crimp, neck tension, ignition/burn of powder charge, headspace (rimless cartridges), etc. Cartridge case-length consistency varies noticeably by maker and, with lesser manufacturers, also from lot to lot. Some manufacturers are more consistent in their dimensions than others, and also in the hardness/ductility of their brass. Similarly, pay attention to primer brands, powder lot numbers, etc.
Consider Using a Lock-Out Die with Progressive Presses
When reloading pistol ammo with a Progressive press, we strongly recommend the use of a lock-out die, or other system that can detect double charges or low charges. If your progressive is manually advanced, the possibility of a double charge is very real — and that can have disastrous consequences.
On UltimateReloader.com website you’ll find an excellent two-part series on the function and set-up of the RCBS Lock-Out Die. This die prevents loading if a high or low powder charge is detected. The video below shows setup of the RCBS Lock-Out Die on the Dillon XL-650 progressive press.


 In our Shooters’ Forum a reader recently asked: “How much neck tension should I use?” This prompted a Forum discussion in which other Forum members recommended a specific number based on their experience, such as .001″, .002″, or .003″. These numbers, as commonly used, correspond to the difference between case-neck OD after sizing and the neck OD of a loaded round, with bullet in place. In other words, the numbers refer to the nominal amount of interference fit (after sizing).
 Neck-Wall Thickness is Important Too


 TIP ONE — Adjusting Tension
 TIP TWO — Polish and Tune for Easy Case Removal
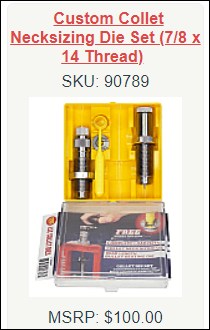

 Nosler #9 Manual Features New Cartridges