by Tommy Todd, Sierra Bullets Chief Ballistician for Sierra Bullets Blog
I have shot several disciplines of shooting competitions over the years and have learned a few things regarding ammunition and bullet function during this time. Frequently the matches I shoot require 40 to 100 shots before a person gets a chance to clean his rifle. Just as frequently, a good shooting match rifle will still shoot very good scores and groups with that many rounds fired through them. However, those guns do not deliver the same accuracy as when they were clean, but the drop-off in accuracy is not a huge change unless a set of accumulative issues arise.
In one situation, very dirty powder created more serious problems…
Pressure Issues — Extraction Problems Caused by Bad Fouling
Problem: Pressures Increased as Powder Fouled Barrel and Carbon Ring Formed
Solution: Clean Barrel Every Ten Rounds.
I witnessed a set of problems that occurred with a fellow competitor’s rifle at a recent F-Class match. He was using a large case capacity cartridge for the bore diameter and he was shooting a powder that was burning extremely dirty. As the match progressed, the carbon buildup caused most likely a carbon ring in the throat of the rifle and pressures kept increasing to the point that the cases were hard to extract, bolt lift was excessive, and eventually he quit shooting the rifle due to these issues. Accuracy also suffered as could be evidenced by the gun’s performance on target. This load looked fine when he was developing it, none of the excessive pressure signs appeared when he worked the load up, but he was cleaning the gun every ten shots.
When he was shooting multiple, 20-shot strings during the match is when the issues appeared. He was able to give the gun a thorough cleaning and the issues went away, for several rounds and then the pressures started appearing again. These pressure signs were not due to ambient temperatures as it was a cool spring morning and the temperature was in the low 40° range.
Accuracy Issues — Tune Lost with Higher Ambient Temps
Problem: Accuracy Lost When Outside Temp Much Hotter than When Load Developed
Solution: Pull Bullets, Reload Ammo with Lighter Charge
A couple of years ago, I attended a match early in the shooting season and it was unusually hot for that time period. I heard a competitor worrying before the match about his gun “blowing up”. At first I was concerned, but after thinking about what he had said I realized that he meant his “accuracy” blowing up, meaning he knowingly had loaded his ammunition at the top end of an accuracy tune that he established via a ladder test. The next day I asked him how his scores were and he said the gun was not shooting very well initially, but he had found enough equipment from friends that were at the match and had pulled the bullets, reduced the powder charge by a few tenths of a grain and re-seated the bullets and his gun was now shooting normally. The temperature difference between his home range the weekend before when he established his load and the match conditions was about 30 degrees and that was enough to cause an accuracy change at 1000 yards.
To learn more about how ambient temperature (and primer choice) affect pressures (and hence velocities) you should read the article Pressure Factors: How Temperature, Powder, and Primer Affect Pressure by Denton Bramwell. In that article, the author uses a pressure trace instrument to analyze how temperature affects ammo performance. Bramwell’s tests yielded some fascinating results.
For example, barrel temperature was a key factor: “Both barrel temperature and powder temperature are important variables, and they are not the same variable. If you fail to take barrel temperature into account while doing pressure testing, your test results will be very significantly affected. The effect of barrel temperature is around 204 PSI per F° for the Varget load. If you’re not controlling barrel temperature, you about as well might not bother controlling powder temperature, either. In the cases investigated, barrel temperature is a much stronger variable than powder temperature.”
Here is a simple, low-cost way to get reliable readings of case headspace when you “bump” the shoulder back on your 6BR, .243 Win, or .308 Win brass. Credit Boyd Allen for this tip. First, you’ll need one .45 acp case, with primer removed. Make sure the .45 acp case is trimmed square and that it is round. We recommend you first run it through an expander, then size it, trim it and chamfer. Next, take the .45 acp case and slip it over the neck of a fired, unsized rifle case with the primer removed. Align the two cases between the jaws of your calipers and note the length from rim to rim (See photo below, with striped case).
OK, now you have the length for a fired rifle case BEFORE sizing. Next, take a full-length sized rifle case (without primer) and do the same thing, placing the .45 acp case over the neck of the FL-sized case (Bottom Photo). The difference between the two numbers is the amount of “bump” or set-back you are applying to the shoulder. Here the difference is .0015″. The amount of bump you need varies with your chamber and your load, but .0015-.002″ is a good initial setting. By using this simple tool, you can avoid bumping the shoulder too much. This will also help you set-up the depth of your full-length die to get the proper amount of bump each time.
At the request of our readers, we provide select “Deals of the Week”. Every Monday morning we offer our Best Bargain selections. Here are some of the best deals on firearms, hardware, reloading components, optics, and shooting accessories. Be aware that sale prices are subject to change, and once clearance inventory is sold, it’s gone for good. You snooze you lose.
SUNDAY Special — We normally we release our Deals of the Week on Monday. However, because there are so many Memorial Day Specials that expire Monday night (or on Tuesday), we wanted to release this Deals Edition a day early. That gives our readers more time to take advantage of these great deals.
1. EuroOptic — 20% Off Nightforce NXS Scopes Through 5/28/19
Nightforce Optics scopes almost never go on sale. This weekend is one of those rare opportunities to acquire a Nightforce scope at a significant discount — 20% off. From May 23 through May 28, 2019, you can SAVE 20% on all Nightforce NXS scopes. This promotion covers the entire NXS line-up:
2. SWFA — 10% OFF Everything Including Optics, Ammo, Rifles
Wow — EVERYthing on the SWFA website (including big brand optics) is 10% Off now through 11:59 PM on May 28, 2019. Save on scopes, ammo, guns, and shooting accessories. SWFA carries top optics brands including Vortex, Schmidt & Bender, Kahles, Swarovski, Zeiss, U.S. Optics, Leupold, Leica, Nikon, Burris, IOR Valdada and more. If you are considering any of these brands, or a SWFA house-label optic, get over to SWFA.com. Along with a huge range of optics, SWFA also sells firearms including Howa (Legacy), Masterpiece Arms (MPA), Tikka, Ruger, Remington, Savage, and Weatherby rifles. And SWFA sells H&K, SIG Sauer, Smith & Wesson, and Walther handguns (to name a few). SWFA’s 10% Off Sale runs through 5/28/19 at 11:59 pm. NOTE: You even get FREE Shipping for $99.99+ purchases.
3. Precision Reloading — Intellidropper $189.99 with Code
The impressive new Frankford Arsenal Intellidropper™ powder scale/dispenser can be controlled by your mobile device. And right now you can get the Intellidropper for just $189.99 at Precision Reloading. It’s sale-priced at $199.99 but you get an additional $10.00 Off with Code MD191 Code (good through 5/18/19).
The Intellidropper features an advanced brain that can “talk” to a Mobile App on your smartphone via BlueTooth. This way you can store powder and load information on your smartphone and then control the scale/dispenser from the App. The App also has bullet, cartridge, and powder databases. The Intelli-dropper can also manually trickle.
4. Graf and Sons — 10% Off All Lyman Products
Last year, Lyman Products rolled out three great new reloading presses — an 8-station turret press, a beefy O-frame press, and a versatile C-Frame compact press. This year, Lyman introduced a cool variable-speed case trimmer along with a high-quality shooting mat. There are many Lyman products we like and use, including Reloading Presses, the Case Prep Center, the Lyman BoreCam, and the new Case Trimmer. Here’s your chance to save on the full line of Lyman Products — Grafs.com is offering 10% Off all Lyman products. For example, the Case Prep Xpress is marked down from $149.99 to $134.99. To sweeten the deal even more, if you buy at least $100 of Lyman products you get a Universal Bore Guide for FREE.
5. Natchez — 10% OFF, OR Free Hazmat, OR Free Shipping
Natchez offers three ways to save with this Memorial Day Promotion. With a $99.99+ purchase you can either: 1) Get 10% off the purchase price; OR 2) Get FREE HazMat for primer/powder purchases; OR 3) Get FREE Shipping for your entire order. You, as the customer, decide which option saves you the most money (there are different discount codes for each offer). That FREE Hazmat is good for at least $20.00 savings, but the 10% off saves you more if you buy an item over $200.00. NOTE: Don’t delay, act soon. This triple-option promo ENDS Monday May 27, 2019 at 11:59 pm EST.
6. Midsouth — Hornady 6.5mm Bullets, $59.99 for 250
If you shoot a 6.5 Creedmoor or 6.5×47 Lapua in PRS or Tactical matches, these Hornady 123gr bullets may perform quite well, while saving you money. Yes the BC is a bit lower than the 140gr class of 6.5mm bullets, but these 123-grainers are accurate, and not “fussy” about seating depths. Plus you can drive them much faster than 140s, even at modest pressures. Get some H4350 or Reloder 16, and you’re good. You may be surprised that you get better accuracy, with less recoil, than the 140s. Right now with this Midsouth deal you get 250 bullets for $59.99. That’s just 24 cents each, or $24 per hundred — half what you might pay for other 6.5mm match bullets.
7. Remington — $75 Cash Back on Rem 700 Varmint Rifles
Right now Remington is offering $75 Cash Back on all Model 700 Varmint rifles purchased from May 1st through the end of July, 2019. Many different configurations are available. For example you can choose either a synthetic stock or a wood laminated stock. NOTE: This Rebate Offer is valid on Rem 700 Varmint rifle purchases made from 5/1/19 through 7/31/19. All requests must be postmarked by 8/31/19. Important — Firearms Consumer Rebates are MAIL-IN ONLY. You MUST include your original cash register receipt AND the barcode from your owners manual (no exceptions). CLICK HERE for REBATE FORM (PDF).
8. Mc3 Stocks — 20% Off All Mc3 Stocks with Code
Mc3™ Stocks is running a big Memorial Day sale. Now through May 28, 2019 ALL Mc3 stocks are available for 20% OFF with promo code Memorial19. All Mc3 stocks come from the factory with precision inletting and aluminum pillars for a precise, drop-in fit. Mc3 stocks combine field-proven designs with advanced materials to deliver a custom feel in a cost-conscious package. Visit www.MC3STOCKS.com and use promo code MEMORIAL19 at checkout to receive 20% OFF.
9. Palmetto State Armory — Memorial Day Sale on AR Stuff
Save on AR components, accessories, and ammo with Palmetto State Armory’s big Memorial Day Sale. Get a stripped lower for just $39.99, or a complete lower with MagPul stock for just $149.99. There are dozens of other great deals. Put the money you save into a premium barrel and first-rate optics. In addition, a wide variety of ammunition is on sale. Some of the .223 Rem ammo is so inexpensive, you may think twice about loading your own.
If you enjoy hunting small varmints (such as ground squirrels), or plinking out to 200 yards, you really should get a 17 HMR. This little rimfire cartridge is very effective on small varmints and is much flatter shooting than a .22 LR. What 17 HMR to buy? Well if you’re on a tight budget, consider the Rossi RB17. This handy bolt gun boasts a nicely designed stock, a 5-round magazine, 21″ barrel, plus scope bases attached to the action. And you can get one for just $125.60! Right now the RB17 is just $125.60 at Guns Midwest. If that sells out, the RB17 is $135.99 at Gensec Armament. (Compare More Vendors).
11. Amazon — Neiko Digital Calipers, $17.85
Even if you have a good set of calipers, you may want to get one of these Neiko 01407A Digital Calipers. The #1 best-selling digital caliper on Amazon.com, this Neiko tool features a large LCD Screen and measures up to 6.0 inches. With over 3800 customer reviews, this product has earned an overall rating of 4.4 out of 5 stars. It’s hard to go wrong for $17.85, even if you just use these as a spare set for measuring group sizes and case trim lengths.
At the request of our readers, we provide select “Deals of the Week”. Every Monday morning we offer our Best Bargain selections. Here are some of the best deals on firearms, hardware, reloading components, optics, and shooting accessories. Be aware that sale prices are subject to change, and once clearance inventory is sold, it’s gone for good. You snooze you lose.
1. Weatherby Rifles — Save up to $200
Weatherby rifles and attention to detail go hand in hand but it’s always at a cost but that’s about to change. For a limited time you can pick up a Weatherby rifle and save $100 or $200 with factory rebate. It’s as simple as heading to your favorite Weatherby dealer, purchase an approved rifle, complete the Weatherby rebate form and mail it in. With 25 models to choose from there’s no better time to pick one up. Some qualify for $100 rebate; other models have a $200 rebate.
2. EuroOptic — MASSIVE Nightforce Scope Sale, May 23-28
We’ve seen Nightforce scopes on sale before but never this many for this cheap. Head over to EuroOptic.com and check out what is easily the best Nightforce Optics sale we’ve seen in a long time. You can pick out any of the new NXS scopes for an amazingly low 20% off. Deals like this don’t come often on Nightforce and especially the newest models so if you’re in the market don’t hesitate to jump on this deal. NOTE: The 20% OFF discounted prices will not appear on the website until May 23, 2019!
3. Graf’s — Buy 8-lb keg of select powder, get FREE 1-pounder
This is one of the best Powder Promos of the year. Right now at Graf & Sons, if you buy an 8-lb keg of select Hodgdon or IMR powders, you get a FREE one-pound or 14-ounce container of the same powder. This deal works with fourteen (14) popular Hodgdon and IMR powders. So if you’re running low and need to stock up on your favorite powders, here’s your chance to cash in on some savings. That free one-pounder can be worth up to $32.00. CLICK HERE for POWDER DEAL.
4. Grizzly Bald Eagle — Great rifle Case and Range Bag Sale
Grab one of these Bald Eagle rifle cases or range bags at up to 50% off. These are way better than typical too-skinny rifle cases or flimsy fabric bags. The rifle cases have plenty of storage for your match needs and the padding is very good. The box-style range bags have thick closed-cell foam panels in the base, top, and sides. That gives these bags good “wall strength”, so they don’t collapse like typical range bags. These are more like a quality camera-case.
Here’s a very handy gun cradle that helps you clean and maintain your rifles while at the range. The Compact Range Vise folds and collapses to 11-1/4″, so it is easily transported. Two padded “V” brackets hold the rifle while protecting the finish during cleaning/maintenance operations. Made from solvent-resistant polymer, the Compact Range Vise is durable and should last for years. Note this is not suited for wide-forearm benchrest or F-Open rigs, but for typical hunting and varmint rifles it works well. This is really a great option for travel because it is so light and compact when folded.
6. Amazon — CVLIFE 6-9″ Adjustable Bipod with Adapter, $18.99
Do you have multiple rifles that are all sharing one bipod and you’re tired of switching it back and forth? Grab a couple of these CVLIFE 6-9″ Tactical Rifle Bipods for the crazy low price of $18.99 and outfit all your rifles properly. At that price you can even give some bipods to your buddies as gifts. Though inexpensive, this CVLIFE bipod has earned a 4.5 Star rating with more than 3,800 buyer reviews.
7. Graf’s — Hornady Ammo with FREE Vest, Targets, Ammo Can
With this promotion, when you buy Hornady ammo from Grafs.com, you get free stuff — lots of free gear. Here’s how it works — first purchase $100 or more of select Hornady tactical ammo. Then when you view your shopping cart you’ll automatically see a FREE Tactical Vest, FREE ammo can, and FREE targets. You even get FREE shipping. This deal applies to 44 varieties of Hornady ammunition.
8. Creedmoor Sports — Barrelcool Mini Brass Drying Tray, $40.95
If you wet-tumble or ultrasonically clean your brass you’re always left with wet brass that needs to be dried before you can reload. People use a variety of processes to dry their brass, but most take a lot of time, or use a lot of space. The people over at Barrelcool have come up with a brass dryer that’s compact and effective. This brass drying tray holds 50 pieces of brass and runs off a simple USB plug. It delivers high air flow in a small footprint. With most people struggling for bench space that’s a win-win for most reloaders.
9. Bullet Central — 10% off cleaning supplies and accessories
You can’t shoot without having to clean your guns, and nobody likes paying too much for cleaning supplies. Now you can save on gun cleaning products with the Bullet Central’s Spring Cleaning Sale. Save 10% off all cleaning supplies and accessories. Simply spend $30 or more, enter Code SPRINGCLEAN19 during check-out and you’ll save 10% on all your cleaning supplies.
This is a grim tale. A man almost lost the use of his right hand, and did suffer terrible injuries to his fingers. All because he picked the wrong bottle of powder off the shelf. We have run this story before, and we will continue to run it every year, as a caution to our readers. This mistake is easy to make, but the consequences can be dire. Always, always double-check your powder labels before you start the hand-loading process. If you don’t, you may not have a hand to load with next time…
Similar Labels, Disasterous Consequences
The shooter, Denny K., was assembling some rounds for his brand new 7mm-08 Savage hunting rifle. He thought he was loading with Hodgdon Varget. Instead he had filled his powder measure with Hodgdon TiteGroup, a fast-burning pistol powder. The labels are similar, so the mistake is understandable. But the results were devastating. Here’s what 41 grains of TiteGroup can do in a 7mm-08:
Posting on the Firing Line, in a thread entitled “Lucky to Be Alive”, Denny writes:
“This is the hardest post to post. I know if I had read it a week ago my comment would have been: ‘You have no business reloading’. I had everything perfect, except pouring the wrong powder in the powder measure. I type this slowly with my left hand, embarrassed but … possibly saving someone else a tragedy or, like me, a long drive to the Emergency Room and surgery to save my finger.”
The Still-Sealed Bottle of Varget
Denny did not initially comprehend exactly why the kaboom happened. He thought maybe his new Savage rifle was at fault. Then, on his return home, he discovered something…
Denny wrote: “The seven-hour period it took to go to ER, transport to Trauma Center and surgery made me think it was a Savage rifle issue. Brand new rifle, new brass, triple-checked loading data. The next day I was humbled when I realized the Varget powder was still sealed.
I knew what powder to use. I thought [Varget] was what I used. Not until the following day did I realize the Varget was still sealed.”
At that point, Denny realized what caused the accident — “operator error”. He knew he had to warn others about using the wrong powder: “I knew I needed to share my mistake, even though it is embarrassing, just to remind people. I’ve been reloading for 30 years…”
Editor’s Comment: Denny was not a novice reloader. His experience demonstrates that this kind of mistake can be made by any hand-loader, even one with decades of experience. Be safe guys, take your time when you load your ammo. Remove powders from measures after your loading sessions (pistol powders can look very similar to rifle powders). And by all means CHECK the LABEL on the jug. As the TiteGroup label says: “A little goes a long way.”
It’s not a bad idea to separate your pistol powders from your rifle powders, or perhaps even load for pistol in a separate part of your workshop.
Need primers? Here’s a great way to save on primers this summer. Now through August 15, 2019, There is a 25% factory rebate on Winchester primers. Here’s how it works. If you purchase at least $80 worth of Winchester-brand primers, you qualify for a $20 manufacturer’s rebate. That works out to a 25% savings ($20 is one-quarter of $80). Money saved is money earned!
And if you buy a larger quantity of primers you save even more. For example, if you buy $100 worth of Winchester primers, you get a $25.00 rebate. If you buy $200 worth of Winchester primers you get the maximum $50 back under this promotion.
This Winchester Rebate is good on purchases made on or before August 15, 2019, so you have plenty of time to shop. The rebate offer applies to virtually ALL Winchester brand primers – pistol, rifle, and shotshell. While we use Federal and CCI primers for most of our rifle hand-loads, we’ve favored Winchester pistol primers for many of our pistols. We’ve found Winchester pistol primers to be very reliable with all types of pistols and revolvers, and they work great with progressive reloading presses.
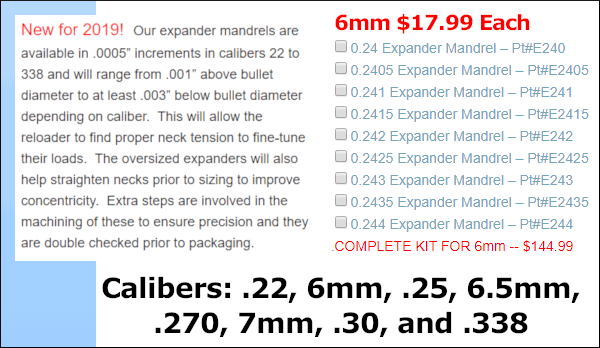
You can benefit from these precision mandrels, trust us…
Controlling cartridge neck tension is a critical aspect of accurate reloading. A very small change in the amount of grip on the bullet can actually have a noticeable effect on accuracy (and group size). You can tune neck tension with different size bushings used with FL-sizing or neck-sizing dies. You can also adjust neck “grip” by annealing your brass, or turning your necks for reduced neck-wall thickness.
But perhaps the most precise way to tune neck grip on the bullet is to use Precision Expander Mandrels. Many top shooters size their case necks down pretty far with a full-length sizing die then use a precision neck mandrel as a final step. This expands the neck back to the precisely-desired neck diameter. Because you are working from the “inside out”, variances in neck-wall thickness become less important. This also ensures you have a perfectly-round internal neck geometry for seating your bullet. (Yes, unfortunately some neck bushings are not perfectly round inside.)
For guys who want ultra-precise control over neck tension (and “grip” on the bullet), 21st Century Shooting now offers Precision Expander Mandrels in .0005 (one-half thousandth) increments. These will be available for most popular match calibers including: .224, 6mm, .25, 6.5mm, .270, 7mm, .308, and .338 calibers. These mandrels cost $17.99 each, or you can get a complete set of nine mandrels in .0005 increments (for one caliber) for $144.99. Listed below are the nine 6mm mandrels:
John Perkins, owner of 21st Century tells us: “Finally! We have our expander mandrels up and ready to order on our website here: http://www.xxicsi.com/expander-mandrels.html.” This is a big deal. James Crofts, past National F-TR Champion, says “WooHoo — great news!”
To get best results with these precision mandrels, John recommends using the 21st Century Expander Die Body, part #904. Watch video for set-up tips:
John adds: “We are still in the midst of turning all of these so some calibers will ship when they are completed. Should have them all done by end of next week or so! Thanks for your patience while we got these set up and in process!”
by Sierra Bullets Ballistic Technician Philip Mahin for Sierra Bullets Blog
A lot of calls that come into the Sierra Customer Service Center are made by shooters [of retirement age]. Most of the time the shooter used to reload back when they were [younger] and stopped in order to raise a family, pursue a career, or both. Maybe their father or grandfather taught them back in the day and they are looking for an answer to the new whatchamacallit they found on the internet. The point is they are coming back to it because it was fun.
Reloading Can Provide Stress Relief
As a father of three, a husband, a brother, a son and son-in-law, and a friend and neighbor, I get pulled in a lot of directions. In all honesty, reloading and shooting has become a stress relief for me even though I work in the shooting industry.
Sometimes, the shooting gets put on hold for other more important things but there will always be another project or repair to accomplish. There are a lot out there that have found a way to balance the work life, the family life, and the play life. I would like to applaud you on your efforts because it is a hard thing to accomplish.
Remember to take time and relieve that stress. Do something fun, especially if it is shooting that special hand-load you just made.
AccurateShooter Comment — Hand-Loading and the Creative Process
Reloading your own precise ammo can be rewarding in many ways. First it allows you a temporary escape from work pressures, “Honey-Dos”, filing your taxes — whatever. It’s just you and Mr. Rockchucker spending quality time in the loading room. Second, hand-loading is a creative process that engages the mind. During load development, you are like an inventor, selecting a powder charge, choosing the bushing size, experimenting with seating depths, working to perfect your load.
Lastly, the process of hand-loading is rewarding because you are building something start to finish. You begin with components — bullets, brass, and powder, and end up with a finished product that (hopefully) is better than the best factory ammo you could buy. It is enormously satisfying to start with piles of bullets and brass and end up with beautiful hand-loads that can deliver great accuracy.
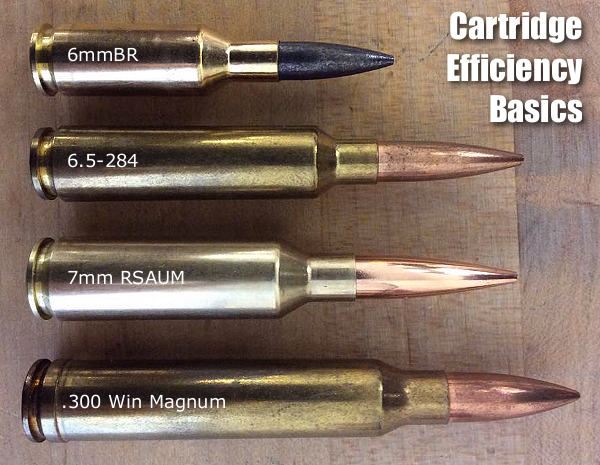
Efficient cartridges make excellent use of their available powder and case/bore capacity. They yield good ballistic performance with relatively little recoil and throat erosion.
Cartridge Efficiency: A Primer (pun intended!)by USAMU Staff
Each week, the U.S. Army Marksmanship Unit (USAMU) publishes a reloading article on its Facebook Page. In this week’s article, the USAMU discusses cartridge case efficiency and its benefits. While this is oriented primarily toward NRA High Power Rifle and Long Range (1000-yard) competition, these factors also apply to medium/big game hunters. Assuming one’s rifle and ammunition are accurate, key considerations include ballistic performance (i.e., resistance to wind effects, plus trajectory), recoil, and throat erosion/barrel life.
Efficient cartridges make excellent use of their available powder and case/bore capacity. They yield good ballistic performance with relatively little recoil and throat erosion. A classic example in the author’s experience involved a featherweight 7x57mm hunting/silhouette rifle. When loaded to modern-rifle pressures, just 43-44 grains of powder pushed a 139gr bullet at 2900 fps from its 22” barrel. Recoil in this light rifle was mild; it was very easy to shoot well, and its performance was superb.
An acquaintance chose a “do everything” 7mm Remington Magnum for use on medium game at short ranges. A larger, heavier rifle, it used ~65 grains of powder to achieve ~3200 fps with similar bullets — from its 26″ barrel. Recoil was higher, and he was sensitive to it, which hampered his shooting ability.
Similarly efficient calibers include the 6mm BR [Norma], and others. Today’s highly-efficient calibers, such as 6mm BR and a host of newer developments might use 28-30 grains of powder to launch a 105-107gr match bullet at speeds approaching the .243 Winchester. The .243 Win needs 40-45 grain charges at the same velocity.
Champion-level Long Range shooters need every ballistic edge feasible. They compete at a level where 1″ more or less drift in a wind change could make the difference between winning and losing. Shooters recognized this early on — the then-new .300 H&H Magnum quickly supplanted the .30-06 at the Wimbledon winner’s circle in the early days.
The .300 Winchester Magnum became popular, but its 190-220gr bullets had their work cut out for them once the 6.5-284 and its streamlined 140-142gr bullets arrived on the scene. The 6.5-284 gives superb accuracy and wind performance with about half the recoil of the big .30 magnums – albeit it is a known barrel-burner.
Currently, the 7mm Remington Short Action Ultra-Magnum (aka 7mm RSAUM), is giving stellar accuracy with cutting-edge, ~180 grain bullets, powder charges in the mid-50 grain range and velocities about 2800+ fps in long barrels. Beyond pure efficiency, the RSAUM’s modern, “short and fat” design helps ensure fine accuracy relative to older, longer cartridge designs of similar performance.
Recent design advances are yielding bullets with here-to-fore unheard-of ballistic efficiency; depending on the cartridge, they can make or break ones decision. Ballistic coefficients (“BC” — a numerical expression of a bullet’s ballistic efficiency) are soaring to new heights, and there are many exciting new avenues to explore.
The ideal choice [involves a careful] balancing act between bullet BCs, case capacity, velocity, barrel life, and recoil. But, as with new-car decisions, choosing can be half the fun!
Factors to Consider When Evaluating Cartridges
For competitive shooters… pristine accuracy and ballistic performance in the wind are critical. Flat trajectory benefits the hunter who may shoot at long, unknown distances (nowadays, range-finders help). However, this is of much less importance to competitors firing at known distances.
Recoil is an issue, particularly when one fires long strings during competition, and/or multiple strings in a day. Its effects are cumulative; cartridges with medium/heavy recoil can lead to shooter fatigue, disturbance of the shooting position and lower scores.
For hunters, who may only fire a few shots a year, recoil that does not induce flinching during sight-in, practice and hunting is a deciding factor. Depending on their game and ranges, etc., they may accept more recoil than the high-volume High Power or Long Range competitor.
Likewise, throat erosion/barrel life is important to competitive shooters, who fire thousands of rounds in practice and matches, vs. the medium/big game hunter. A cartridge that performs well ballistically with great accuracy, has long barrel life and low recoil is the competitive shooter’s ideal. For the hunter, other factors may weigh more heavily.
Cartridge Efficiency and Energy — Another Perspective
Lapua staffer Kevin Thomas explains that efficiency can be evaluated in terms of energy:
“Cartridge efficiency is pretty straight forward — energy in vs. energy out. Most modern single-based propellants run around 178-215 ft/lbs of energy per grain. These figures give the energy potential that you’re loading into the rifle. The resulting kinetic energy transferred to the bullet will give you the efficiency of the round. Most cases operate at around 20-25% efficiency. This is just another way to evaluate the potential of a given cartridge. There’s a big difference between this and simply looking at max velocities produced by various cartridges.”
Shown are funnel with ultra-long drop tube (which helps get more kernels in the cases), RCBS Chargemaster (in wood box), and Hood Press (similar to Harrell’s Combo press).
Loading at the range remains important in the Benchrest for Group discipline. In a Special Report below, IBS President Jeff Stover explains how loading methods (and hardware) have evolved over the years. The advent of accurate, affordable electronic powder dispensers, such as the RCBS ChargeMaster and Frankford’s new Intellidropper, have changed the game and made it easier to load efficiently at the range. And quality manual powder measures are fast and can be very consistent, with a little practice. Loading at the range permits competitors to tune their load to the conditions, change seating depths, or even choose different bullets to suit the barrel’s preferences on any given day.
Although pre-loading is not uncommon, most 100/200-yard group shooters usually load at the match, often between relays. The goal is to shoot smaller groups by staying “in tune”. In a game where 5-shot groups “in the 1s and Zeros” is the goal, tuning loads for the conditions helps deliver match-winning accuracy. Nearly all competitors in this short-range discipline shoot the 6mm PPC cartridge, or a PPC variant.
Loading at the Range — Then and Now
In benchrest shooting for group, loading at the range has been de rigueur for decades. In the Score discipline, preloading is usually the custom. The main reason is that, in Score competition, only one Aggregate (warm-up match and five record targets) per day is usually shot. That would be less than 50 shots, assuming a few sighter shots. Also, the 30BR, the dominant Benchrest-for-Score cartridge, is very amenable to pre-loading.
By contrast, the Group discipline includes 21 targets (two warm-ups and twenty record targets) over a weekend, usually shot with 6PPC-chambered rifles. Many times, the 6PPC shooters may tweak their loads through the day given changing atmospheric conditions or simply trying to find the correct tune to “dot up”. This term, “Dot up”, means the shots are essentially going through the same hole, or closely so.
Loading at the range was a bit different when benchrest competition was in its infancy. The 1951 book, Modern Accuracy by Bob Wallack, is the best of the early benchrest books. Copies can be found, from time to time, on eBay or Alibris. It is a fascinating survey of benchrest as it existed more than six decades ago. There’s even coverage of a controversial target that was argued over at the time. In it, there is a photo of Wallack using the rear bumper of a car at the bench to clamp his reloading tools. Things have come a long way compared to the range loading set-ups of modern shooters. Here you can see Bob Wallack way back in 1950:
Modern loading bench set-ups shown in this Special Report belong to top shooters Howie Levy, Bob Hamister, and Kent Harshman.


 To learn more about how ambient temperature (and primer choice) affect pressures (and hence velocities) you should read the article


 The impressive new Frankford Arsenal Intellidropper™ powder scale/dispenser can be controlled by your mobile device. And right now you can get the Intellidropper for just