At the request of our readers, we provide select “Deals of the Week”. Every Monday morning we offer our Best Bargain selections. Here are some of the best deals on firearms, hardware, reloading components, optics, and shooting accessories. Be aware that sale prices are subject to change, and once clearance inventory is sold, it’s gone for good. You snooze you lose.
1. Bud’s Gun Shop — Howa American Flag Chassis Rifle, $1180.38
Legacy Sports offers a special American Flag Chassis Rifle with a USA flag-theme red, white, and blue Cerakote finish and 3-chamber muzzle brake. Components include APC modular chassis and Luth-AR adjustable butt-stock. This special edition is sold with a Nikko 4-16x50mm scope and shipped in a hard case. Choose from the .308 Win version ($1180.38 at Bud’s GunShop) or 6.5 Creedmoor version ($1239.00 at GunPrime.com). Note: Act soon — these special editions are almost sold out!
Right now CostCo is offering the Cannon CS72 Executive Series 72-Gun Safe for just $749.99 DELIVERED! That’s a great price for a HUGE safe with 43.8 cubic feet of internal space. This 649-pound behemoth measures 59″H x 45″W x 28″D and weight 696 pounds (over 1/3 of a ton!). This is built strong with 1″ thick composite door, six 1″-diameter locking bolts, and 60-minute fire rating. NOTE: The $749.99 price includes “Standard shipping via common carrier” to the lower 48 states. This is a great value. You could easily pay $1600 or more for a safe this size from a local vendor.
3. MidwayUSA — Bullseye AmmoCam, $199.99 or $299.99
Want a wireless Target Camera but short on cash? You can now get the Bullseye AmmoCam basic system for just $199.99, a $100.00 savings. We suggest you go with the Long Range version for $299.99, which has an external antenna. The Long Range model should work to 1000 yards and beyond in flat terrain. The system generates its own WIFI Hotspot so you do not need Internet or Cellular service! Works anywhere, all you need is an iPhone, iPad, or Android Device. The external antenna on the Long Range version allows you to shield the box without disruption of the WIFI signal. COMMENT: AccurateShooter.com recommends TargetVision systems over these AmmoCams. However, for shooters on a limited budget, these Bullseye systems should suffice, and you’ll save hundreds of dollars.
4. Graf’s — Platinum Case Prep & Trim + EZ Tumbler, $179.99
If you want to step up your brass preparation game, here’s a great deal. Graf’s is offering the Frankford Arsenal Case Prep & Trim PLUS the EZ Tumbler for only $179.99. That’s an amazing deal considering you could pay $199.99 or more for the Prep & Trim unit by itself, and the EZ Tumbler is regularly $50 or more. This Grafs.com combo deal represents a savings of nearly $70.00.
5. Harbor Freight — Rolling Security Case (Carry-On Size), $69.99
How would you like to be able to carry your Spotting Scope, Laser Rangefinder, Kestrel, Binoculars, Camera, Target Cam, and other valuables in a secure, lockable, foam-filled hard-case? Or use that case to hold your front rest and other vital hardware. And wouldn’t it be great if that same rugged case worked as carry-on luggage, so you could bring it with you onboard airline flights, rather than risk it with baggage handlers. Harbor Freight now offers the Apache 5800 rolling hard-case with “pluckable” foam. Sized 22″ x 14″ x 9″ (like a carry-on), this costs just $69.99 with coupon. The equivalent rolling Pelican 1510 case costs $189.95. The Apache 5800 case lists for $89.99 but you can get it for just $69.99 with COUPON Code 89000237. Enter Code #89000237 during online checkout to save $20.00.
6. Amazon — Nikon Buckmaster II Scope Bundle, $142.95
Need a good, basic, reliable name-brand scope for your deer rifle or varmint rig? Here’s one of the best scope deals we’ve seen in 2019. You get a nice 4-12x40mm Nikon Buckmaster II by itself for just $121.90 with FREE shipping. Or get the same 4-12x40mm Nikon optic PLUS lens covers, Nikon Lens Pen, Nikon micro-fiber lens cleaning cloth, AND a Lumintrail keychain light for $142.95 with FREE Shipping. That’s still less than you might pay for a deluxe set of rings. These scopes are new production optics, fully covered by the Nikon no questions asked warranty. If you prefer less magnification, you can get the 3-9x40mm Buckmaster II for $129.95 with all the same accessories.
7. Midsouth — Aguila .22 LR Ammo, 500 Rds $17.99
Plinking is fun. Especially when your ammo is really cheap. If you need low-cost .22 LR rimfire ammo for range sessions with friends and family, check out this crazy good deal from Midsouth. You get 500 rounds of Aguila 38gr HiVel .22 LR ammo for just $17.99 (marked down from $32.99). That works out to 3.6 cents ($0.036) per round. We’ve used this stuff. It’s not match-grade, but it’s more than adequate for .22 LR handguns and rifles with fun targets, such as dueling trees and rimfire poppers.
Guys, here’s just what you need (maybe) to convince the significant other to join you for a day at the range — a combo set of “high-fashion” ear muffs and ANSI-rated safety glasses. The comfortable, zebra-print muffs provide 21 dB of noise reduction (we recommend running plugs underneath them). The stylish, tortoise-shell pattern Bella Ballistica™ shooting eyewear has passed MIL-PRF-31013 ballistic tests and meets ANSI Z87+ high-velocity requirements with a chic designer appearance. The lady in your life just might appreciate the stylish eyewear and distinctive muffs, earning you “bonus points”. And she’ll never suspect you only spent five bucks!
9. Cabela’s — Lyman 36″ x 10″ Maintenance Mat, $14.99
Here’s something we all can use — a chemical-resistant cleaning mat. This Lyman 36″ x 10″ mat provides a cushioned surface for your fine firearms. Multiple dividers hold small parts. The molded, raised edges help contain spills and excess solvents. Chemical-resistant design won’t break down with use and is easy to clean with soap and water. Made from synthetic rubber, this handy mat rolls up for easy storage. Cabela’s is offering a great price ($14.99) — this very same mat sells for $24.76 on Amazon.
10. Amazon — Two Rolls of 3″ Neon Target Stickers, $14.99
We like these bright, Neon 3″ target stickers. They are big enough to see easily at 600 yards, giving you a 1/2 MOA target center at that distance. For $14.99 at Amazon.com, you get 250 3″-diameter self-adhesive centers (125 targets per roll) that stick to almost any surface The high-contrast fluorescent red/orange color provides an excellent HI-VIZ aiming point, along with good contrast for bullet holes that fall within the 3″ circle. To help line up your reticle cross-hairs, the target centers feature black markers at 3, 6, 9, and 12 0’Clock. NOTE: These stickers may qualify for FREE Shipping with combined orders over $25.00.
At the request of our readers, we provide select “Deals of the Week”. Every Monday morning we offer our Best Bargain selections. Here are some of the best deals on firearms, hardware, reloading components, optics, and shooting accessories. Be aware that sale prices are subject to change, and once clearance inventory is sold, it’s gone for good. You snooze you lose.
1. Sportsman’s Guide — Ruger 10/22, $189.99 with CODE
If there’s one gun that’s synonymous with shooting sports, it’s the Ruger 10/22. This classic rimfire rifle is inexpensive to buy, yet very reliable. If you’ve been looking to pick one up or buy your kid his or her first rifle, here’s your chance to get a wood- or synthetic-stocked 10/22 from Sportsman’s Guide. Member Price is $199.49 while non-member price is $209.99. But it gets better — use Code GUNSNGEAR to save an additional $20.00. With that Code, SG members can snag one for just $179.49! The non-member price is $189.99 with Code. NOTE: The GUNSNGEAR $20 OFF Code works with or without a membership.
2. Grizzly Industrial — Bald Eagle Mini Arbor Press, $74.95
Have you been looking for a low-cost arbor press to get started with in-line seating? Perhaps you’d like to load your bullets long initially, and then adjust the bullet seating depth during load development (or even at matches). Arbor presses are great for bullet seating tasks at the range. If you need a compact arbor press for your loading duties — here is really good deal. Grab a Bald Eagle Mini Arbor press and you’ll be off and running for the low price of $74.95.
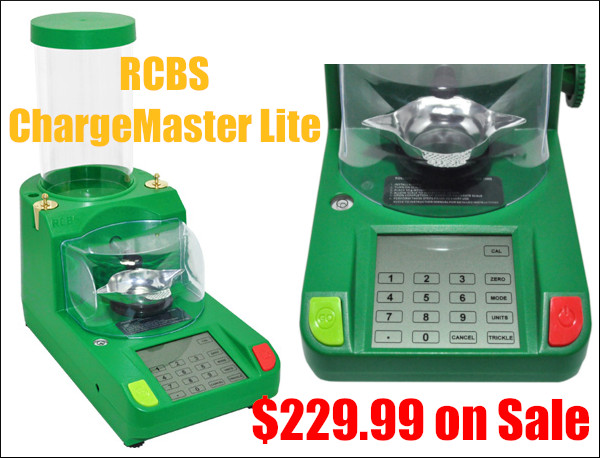
3. Midsouth — RCBS ChargeMaster Lite, $229.99
Do you need an electronic powder scale and dispenser? Check out this great deal at Midsouth Shooters Supply. Suggested retail for the ChargeMaster Lite is $299.99. Amazon’s best price for this unit is $269.49. But now you can get it for just $229.99 at Midsouth. So you can save at least $40 with this Midsouth sale. Put the money saved into bullets or powder. The RCBS ChargeMaster Lite is the modern second generation Scale/Dispenser, descended from the original ChargeMaster. The ChargeMaster Lite features an easy-to-use LCD touchscreen. Dispenser precision is plus/minus 0.1 grains. The unit comes with twin check weights and a convenient plastic cover for the powder pan.
4. Graf’s — Platinum Case Prep & Trim + EZ Tumbler, $179.99
If you want to step up your brass preparation game, here’s a great deal. Graf’s is offering the Frankford Arsenal Case Prep & Trim PLUS the EZ Tumbler for only $179.99. That’s an amazing deal considering you could pay $199.99 or more for the Prep & Trim unit by itself, and the EZ Tumbler is regularly $50 or more. This Grafs.com combo deal represents a savings of nearly $70.00.
5. Bruno Shooters Supply — Labradar w/ FREE SHIPPING
Labradar is considered the class leader in shooting chronographs. The ultra-accurate, state-of-the-art Labradar chronos have become so sought-after that they’re hardly ever discounted. While that may be true, Bruno’s is doing the next best thing and offering the Labradar with FREE SHIPPING as well as any accessories you buy along with it. This is a great time to grab the most advanced chrono on the market, along with genuine Labradar accessories.
6. Midsouth — 350 Rds 9mm FMJ in Container, $74.99
Nearly all gun guys (and gals) own one or more 9mm pistols. Here is some very cost-effective Aguila 9x19mm ammo that lets you train more often. Right now Midsouth is offering 350 rounds of 9mm FMJ plus a nice ammo can for the low price of $74.99, a great deal. At that price you can may want to buy 1000 rounds or more. We’ve shot this ammo. It is reliable and the brass is reloadable.
7. Black Widow — Refurbished Trim-II with Die, $79.50
Trimming your brass to length can be a chore with manual trimmers. There are high-end motorized trimming systems, but some of these cost hundreds of dollars. Fear not as Black Widow Shooters now has the refurbished trim-II w/ free die for only $79.50! That’s a savings of over 50% off the normal price. The beauty of this unit is that you simply attach it to any drill, adjust it to length and start trimming. It’s just that easy. Once you use a tool like this you may never go back to manual trimmers.
8. Midway USA — Wheeler Scope Mounting Kit, $79.99
Does the thought of mounting your own scope scare you but you’re tired of paying someone else to do it? With the help of the Wheeler Engineering Scope Mounting Kit your fears will be put at ease. This $79.99 Kit includes everything you need including a torque wrench, alignment bars, levels and more. All of this comes packaged in convenient transport case.
Have you ever been ready to run to the range and blow off a few rounds only to find that you’re out of targets? If you’re like us that’s one of the most frustrating things that can happen when heading to the club and nobody likes using printer paper and a marker to make a target. Pick up this 100 count set of sight-in targets and you won’t have to run to the store last minute or dig through the range trash cans hoping to find a barely-used target. This is a great value — only 13 cents per target! Great deal.
Our friend Jim See of Elite Accuracy LLC recently tested the depth-adjustable hand priming tool from Frankford Arsenal. This product, called the Platinum Series Perfect Seat Hand Primer has some unique features. Primer seating depth can be adjusted with a handy wheel in the tool’s center handgrip. Each “click” of the wheel moves the primer post .001″ (one one-thousandth of an inch). Additionally, the design of the case-holder allows quick and easy removal of a primed case. The unit ships with a full set of shell-holders to match all types of cases. Like many other hand priming units, the primers are loaded into a flip tray that attaches to the head of the tool.
Here is Jim See’s quick review of the Frankford priming tool:
“The Frankford Arsenal perfect hand-priming tool is legit. The tool is built heavy and strong. The only plastic parts in it are the tray and lid. The [primer] seating depth adjustment… is simple and accurate. Easy to operate. I primed 1000 cases, averaging 23 per minute. I adjusted the depth of seating between two different lots of brass in seconds. The system seats primers easily with one hand operation. The cases slide out on their own after seating. Insert, seat, reach for a new case at the same time as you are operating the lever, case slides out and you are inserting the next piece.”
Overall, Jim was “Super impressed with the quality and the results. This thing is super smooth — way less pressure needed than my Lee or RCBS. It’s a lot faster too.” Jim add that one can switch from small to large primer posts in 10-15 seconds.
This Video Shows the Frankford Priming Tool in Operation:
Even with premium brass you may want to adjust your primer seating depth: “Every thing has a tolerance that is acceptable in manufacturing. If primer pocket depth has a .005″ tolerance and the primers themselves have a .002″ tolerance you can see why adjustments would be needed. In this case the two lots were manufactured on year apart. Could you expect them to be identical?”
The Giraud power trimmer indexes off the shoulder of the case. It is costly, but offers high production rates, trimming to length and chamfering in one operation.
The folks at PMA Tool, makers of arbor presses, neck-turning tools, and other case-prep tools, offer some good advice about case trimming on the PMA Tool Blog. Here we reprint a PMA blog post that explains case trimming basics and helps you choose the right case-trimming tool for your needs.
Case Trimming Basics
Trimming the cartridge case to the proper length is a crucial step in case preparation that should not be overlooked or underestimated. The cartridge case or the rifle can be damaged, or even worse you get badly injured. In most instances cases should be trimmed after firing and sizing. Trimming new brass is necessary for a lot of wildcats and can be beneficial in some instances, but by and large, trimming new brass is not necessary for most situations (unless you are neck-turning). Cases should be trimmed after you have sized the case, because the expander ball on the decapping pin can (and will) stretch the neck. Those of us who neck size should get into the habit of trimming after sizing as well. This is a good rule of thumb to go by, and hopefully it will keep you safe during the reloading and shooting process.
There are so many case trimmers out there that work, deciding which one is right for you can be confusing. Even though I have trimmed thousands of cases, using about every method possible, I can’t answer the question of what case trimmer is right for you because of all the variables that may be involved. I can, however shed some light on the subject.
The two most popular designs of trimmers either index (1) off the base or the head of the case, (2) off the shoulder or datum line of the case. There are pros and cons to each and it all depends on what you are willing to live with.
Indexing off the Base (Case Head)
Let’s talk about the first one I have listed, indexing off the base, or the head of the case. The pros to this method are that you can achieve a very accurate over all length and that is after all, what it is all about. The cons to this method are that you can get some variation doing it this way. Let me explain, the base is not always square to the body or can be damaged during firing especially if it is fired through a military style rifle with a very aggressive ejector. These cases should be discarded, but sometimes they can be overlooked. This condition can lead to an over all length that is incorrect. The case head being out of square will be corrected upon firing, however that case will wind up being shorter than the rest of your cases, possibly creating a difference in the neck tension on the bullet. The more you can do to eliminate variables in your reloads the better off you are going to be. This method can also be very slow, and if the user gets careless the result will be a inconsistent over all length.
Indexing off the Shoulder (Datum Line)
The second method I mentioned, trimming off the shoulder or the datum line of the case, has its pros as well. I have found this to be the quickest of the methods and very accurate as well. After the case has been sized through the die the dimensions (particularly the headspace) of the cases are usually very uniform and exact, this allows the case to be trimmed by indexing off the shoulder. This method can be done very quickly, by hand, or by powering either the case, or the trimmer. You also don’t have to worry about the case heads being out of square with the body using this method. Generally the trimming time is cut in half, and this leads to greater focus on the job, without becoming careless.
The PMA Micro-Adjust Case Trimmer indexes case length off of the shoulder of a properly fire-formed and full-length re-sized case. We accomplish this through the use of interchangeable Delrin™ inserts which capture the shoulder and neck of the case. This insert is contained in a spring-loaded tool head that rides on a linear bearing. When the case is captured within the tool head the tool head rotates along with the case, the spring allows for the case to self-align squarely to the cutter and allows you to control the feed rate into the cutter.
— Indexes off shoulder for easy, consistent trim length
— Fully rotating head with bearing for smooth operation keeps cuts square
— Large, ergonomic design fits the hand well
— Sharp carbide cutter for quick, smooth cuts with minimal bur
— Cases captured in Delrin™ (completely non-marring material)
— Spring loaded head allows complete control of rate of feed.
Our trimmer can be used in three ways. The first method utilizes our PMA Tool caseholder drivers and your power screwdriver, drill, case lathe, drill press or lathe. Trimming via this method the case is spun and fed into the trimmer while it is held in your hand. In the second method, the trimmer’s adjustment knob is removed (after adjusting and locking the setting) and the cutting shaft is chucked in a drill, drill press or lathe. Using this method, the case itself is held by hand and fed into the cutter. We’ve found this to be the quickest method to trim.
Summary
The choice is yours to make. I hope that this was some help to you, whether you are looking for your first trimmer or looking to replace the trimmer you have. Just remember to always put safety first and accuracy second, and you will start making little bug holes in no time.
Story Tip by EdLongrange. User submissions are welcome.
Do you need an electronic powder scale and dispenser? Check out this great deal at Midsouth Shooters Supply. Suggested retail for the ChargeMaster Lite is $299.99. Amazon’s best price for this unit is $269.49. But now you can get it for just $229.99 at Midsouth. So you can save at least $40 with this Midsouth sale. Put the money saved into bullets or powder.
The RCBS ChargeMaster Lite is the modern second generation Scale/Dispenser, descended from the original ChargeMaster. We have a 10-year-old first gen RCBS ChargeMaster in our loading room that is still going strong. The ChargeMaster Lite features an easy-to-use LCD touchscreen with many nice features. The hopper holds nearly one pound of powder. The unit comes with twin check weights and a convenient plastic cover for the powder pan. Your choice of propellant can be measured out 2 to 300 grains with a plus or minus accuracy of 0.1 grains.
Each Wednesday, the U.S. Army Marksmanship Unit (USAMU) publishes a reloading “how-to” article on the USAMU Facebook page. A while back, the USAMU’s reloading gurus addressed a question frequently asked by handloaders: “How much neck tension is optimal, and how should I select a neck bushing size?” The USAMU offers a straight-forward answer, suggesting that hand-loaders start with a neck bushing that sizes the neck so that it is .003″ less than the loaded outside diameter with bullet in place. From there, you can experiment with more or less tension, but this is a good starting point for many popular cartridge types.
Determining Optimal Case-Neck Tension
This week, we examine determining the correct case neck tension for optimum accuracy. Our method is simple, but relies on the use of case sizing dies which accept interchangeable neck diameter bushings graduated in 0.001″ increments. (Those readers using fixed-diameter dies with expander balls aren’t forgotten, however. Methods of tailoring these dies for proper neck tension will be found below.)
In our experience across many calibers, sizing case necks 0.003″ under the loaded-case neck diameter usually yields excellent accuracy. In other words, the sized case neck expands 0.003″ when the bullet is seated.
Bushing Choice for Optimal Sizing
Over the years, we have periodically experimented with increasing neck tension to possibly improve accuracy. In testing with machine rests at 300/600 yards, accuracy often deteriorated as neck tension increased; thus, 0.003″ expansion (from sized neck to loaded neck) is where we usually start.
Using the .260 Remington as an example, our loaded cartridge case necks measure 0.292”. Simply subtract 0.003” from that, and use a bushing that sizes necks to 0.289” (after springback). There are exceptions — sometimes, brass may be a bit soft or hard. Some case necks might need, say, 0.001” more tension, but in general, this works well.
This .003″ standard of neck tension works very well for single-loaded, long range cartridges. Depending on your caliber and firearm, it MAY also work very well for magazine-fed cartridges. If this neck tension proves inadequate for your purpose, one can increase neck tension as needed while monitoring for possible accuracy changes.
Special Considerations for Coated Bullets: If you are using moly-coated bullets, this significantly reduces the “grip” of the case neck on the bullet, and you can expect to have to tighten your case necks accordingly — particularly for magazine-fed ammunition. In any event, we do not crimp rifle cartridges, and advise against it for accuracy handloads.
Tips for Using Expander Balls
Many savvy handloaders avoid the use of expander balls in high-accuracy reloading, if possible. These can stretch cases and/or disturb the concentricity of the case neck vs. case body. If using a die with an expander ball, tapering both ends of the ball and polishing it to a mirror finish can significantly reduce these effects. (Special carbide expander ball/decapping stem sets are available for this as well.)
The typical dies used with expander balls are intended to take any cases the user may find, and size them down well below the ideal “spec” to ensure any cases will give good neck tension. The necks are then expanded up to provide heavy to medium neck tension as the expander ball exits the neck. The brass is over-worked, leading to premature work-hardening, and seated-bullet concentricity may suffer. However, the cartridges produced are perfectly adequate for most handloaders. Those who seek finest accuracy generally prefer not to over-work their brass if possible.
Another Option — Custom-Honed FL Dies
There are companies which offer to convert one’s standard dies to accept neck bushings, and that gives excellent flexibility. Another, more “old-school” approach, is to have the neck of one’s FL die honed out to the desired diameter for sizing, based on one’s case neck thickness. The expander ball may then be reduced until it barely touches the case necks after sizing, or it may be eliminated entirely. However, once performed, this modification is permanent and leaves fewer options than the bushing route, if one later changes case neck thickness.
Those shooters who turn their case necks for optimum neck wall thickness uniformity, or for a tight-neck chamber, will want to take the reduced neck wall thickness into consideration. For example, when setting up a 7mm match rifle to use a standard hunting die without an expander ball, the slightly thinner necks resulted in a perfect 0.003″ reduction in the fired-neck diameter. The result was a low-cost die that fit with custom precision and yielded excellent, match accuracy!
At the request of our readers, we provide select “Deals of the Week”. Every Monday morning we offer our Best Bargain selections. Here are some of the best deals on firearms, hardware, reloading components, optics, and shooting accessories. Be aware that sale prices are subject to change, and once clearance inventory is sold, it’s gone for good. You snooze you lose.
1. Midsouth — Rock Chucker Supreme Reloading Kit, $269.99
Everything you see above can be yours for just $269.99. Amazing Deal. Right now, Midsouth is selling the Rock Chucker Supreme Master Reloading Kit for $269.99, a fine price considering all the hardware you get: Press, Primer Tool, Scale, Powder Measure, Loading Tray, Reloading Manual and more. Heck, the Rock Chucker press alone is worth $165.00+. This is good starter kit for any reloader with sturdy items (such as the Rock Chucker press), that will last a lifetime.
2. Amazon — Plano 52″ Two-gun Case, $81.15
This Plano two-gun case is Amazon’s #1 Best Seller in wheeled, heavy-duty firearms cases. This is offered in three sizes: 36″, 42″, and 52″. We like the biggest 52″ version, as it is long enough inside to fit most scoped match rifles. Alternatively, if you have a really long F-Class, ELR, or Palma rig, you can detach the barreled action from the stock, and run the two sections in the shorter 42″ case. The big case lets you easily carry TWO scoped hunting rifles. This case is strong enough for airline travel, meeting FAA requirements for checked baggage. Yes a Pelican 1750 is somewhat better, but that will cost $270.00.
Specifications for 52″ Case:
Exterior Size: 53.5″ x 17″ x 7″
Interior Size: 51.5″ x 14″ x 5.5″
Dri-loc Seal and Pressure Release Valve
Dual Stage Lockable Latches for Travel
Customizable Pluck-to-fit Foam
Easy Glide Enclosed Wheels
3. Savage — 10% Rebate on Savage, Stevens, and Fox Firearms
Get a 10% Factory Rebate for ALL Savage, Stevens, and Fox firearms purchased from now through May 15, 2019. This Tax Season Rebate could easily save you $50, $100, or even $150 on a fine hunting, tactical, or rimfire rifle. During this Tax Season Savings Event, you’ll receive 10% back on your purchase with a maximum $150 Rebate. The Rebate amount is calculated from the retail purchase price excluding taxes and shipping/handling fees. Rebate submission deadline is 6/14/2019. REBATE FORM HERE.
4. Midsouth — Frankford Arsenal Rotary Tumbler LITE, $99.99
Wet-tumbling with stainless media gets large quantities of cartridge brass clean inside and out. If you’ve wanted to try wet-tumbling, here’s your chance. Midsouth has the Frankford Arsenal Platinum LITE Tumbler on sale for just $99.99 — a total steal. If you run large quantities of brass, you can get the larger-capacity Frankford Arsenal Platinum Tumbler for $179.99. Either one of these is a reliable, durable (and watertight) machine that should provide years of worry-free tumbling.
This is a great deal. MSRP on the Weatherby Vanguard Modular Rifle in 6.5 Creedmoor was $1519.00. Now you can buy this rig for just $799.99 on sale. That’s less than you’d pay for most custom actions by themselves. Yes this Weatherby rifle qualifies for PRS Production class — it’s 100% within the rules. Put the hundreds of dollars you save into optics, ammo, and a suppressor — the 20″ barrel comes pre-threaded for brake or suppressor. This rifle has a nice 2-stage trigger, and Luth AR adjustable buttstock fitted to a CNC-machined anodized aluminum chassis. Weatherby guarantees SUB-MOA accuracy with premium ammo.
Looking for a new bipod that can work with a Picatinny rail? You’re in luck because we just found this 6″ – 9″ adjustable Carbon Fiber Bipod and M-Lok adapter combo for the amazingly low price of $25.99 including a handy adapter allowing you to securely attach the bipod to a standard Picatinny Rail. There are also versions with KeyMod or M-Lok Adapters for $27.99. Purchasers have given this unit high praise, with a 4.5-star rating. Here is an actual buyer review:
“Excellent bipod at an excellent price. It seems well-built and is far more rigid and sturdy than others like it. The bipod came with a Picatinny adapter [M-Lok or KeyMod optional]. Mounting was quick and easy. Overall I think this is by far the best bang-for-your-buck bipod.”
7. Midway USA — Magnetospeed V3 Chronograph, $324.86
All serious shooters need a modern, reliable chronograph to determine load velocity (and consistency). You need good velocity data for your ballistics AND to evaluate the consistency of your hand-loads. The Magnetospeed V3 Chronograph is one of the best on the market. Now you can get this fine Chrono for just $324.86, marked down from $380.00, a $55 savings! We like Magnetospeed chronos because you never need to go downrange to set up tripods and screens. Data can be downloaded to your mobile device.
8. Walmart — Keypad Handgun and Valuables Safe, $59.00
This compact Tracker Safe features a digital keypad system that works with 3- to 8-digit passcodes you set. This allows fast access in an emergency — once you enter your code, the spring-loaded door flies open for immediate access to your weapon. You can also lock/unlock the safe with provided manual keys. Walmart offers this safe for just $59.00 with FREE shipping. That’s a bargain. This safe comes with mounting hardware for wall or floor installation. The interior has one shelf plus carpet-type padding.
A clean gun is a happy gun and since patches are the core of any cleaning regimen why not grab some great patches for a great price? Amazon sells 1000-count packs of Boosteady Professional Cleaning Patches starting at just $8.99 for 1″ square patches — a great bargain for 1000. Now you won’t feel so bad running a few extra patches every time you clean just make sure you got the last bit of crud out. Boosteady patches are very highly rated by purchasers and come in 1″ square ($8.99), 2″ square ($11.99), and 2.5″ square ($13.99) sizes, inside a convenient box.
10. Amazon — Universal Cleaning Mat, $19.99
If you’re like most people you spread out a towel before tearing your gun apart. This often leads to missing parts, a messy work area and when you spill anything it just soaks into your pad. Now you can pick up this universal cleaning mat that also includes a MAGNETIC parts keeper on the side. It’s nearly 4 feet long and is made of a oil and solvent resistant material for easy cleanup.
The .260 Remington and the 6.5×55 Swedish (aka 6,5x55mm SE) are both very popular cartridges with hunters and target shooters. The 6.5×55 has a long military heritage and a great record as a hunting round. The .260 Rem, essentially a .308 Win necked down to .264 caliber, is a more recent cartridge, but it grows in popularity every year, being one of the top cartridges for tactical/practical competitions. It offers better ballistics and less recoil than the parent .308 Win cartridge. In our Shooter’s Forum, respected UK gun writer Laurie Holland provided a good summary of the differences between the two chamberings. Laurie writes:
The 6.5×55 case has 6 or 7% more capacity than the .260s, even more in practice when both are loaded to standard COALs with heavy bullets, which sees them having to seated very deep in the .260 Rem using up quite a lot of powder capacity. So loaded up for reasonable pressures in modern actions, the 6.5×55 will give a bit more performance.
The issue for many is what action length is available or wanted, the 6.5×55 requiring a long action. So sniper rifle / tactical rifle competitors will go for the .260 Rem with the option of the many good short-bolt-throw designs around with detachable box magazines (DBMs). If a bit more performance is needed, the .260 AI (photo right) can yield another 100-150 fps velocity, depending on bullet weight.
Useful reloading gear does not have to be costly. Here are ten handy (and very inexpensive) items that belong on your loading bench or in your range kit.
• Magnifying Glass – We use a flat, 2″x2″ pocket 4x-8x magnifier. This folds up on itself. Very handy, we use it to inspect bullets and brass. Use this to check your flash holes for burrs, and check the meplats of your bullets before loading.
• Clear 35mm Film Cannister – Use this to transfer the thrown powder charge to the little measuring cup that sits on your scale. That way you don’t get any kernel splash. Also if the charge weight is obviously off, it’s easy to dump back in the measure. A film canister works pretty well as a trickler too.
• Compressed Air in a Can -- Get these at office supply stores. Use the can (with tube attached) to blow crud out of cases after cleaning the neck with a brush, and blast loose debris out of primer pockets.
• Pin Vise – A simple pin vise with a #53 bit is perfect for deburring Lapua PPC and BR flash holes without reaming the flash-holes any larger. The Lapua PPC/BR flash-hole diameter is 1.5 mm, or 0.059″. Amazon.com sells a handy $8.28 pin vise kit with 10 bits, including the ideal 1.5mm bit. Other vendors offer a #53 pin vise bit that measures .0595″ or .060″ (depending or source). You can find pin vises and bits at hobby stores. Note — The model shown below is currently out of stock, but there are many pin vise sets offered from $7 to $15.
• Bounce Dryer Sheets – The common dryer sheets eliminate “static cling” on your plastic reloading parts such as powder measure cylinders, powder funnels, and reloading press plastic bins. Thanks to Doc76251 for this tip.
• Ballistol Aerosol – Try using this versatile lubricant/solvent for full-length sizing. Spray some on a patch and you can wipe the carbon of your case necks. Then, continue to apply a very small amount of Ballistol on the case bodies — just thin sheen is all you need. Ballistol is super slippery, and easy to remove. For general full-length sizing (on small cases) it works great and doesn’t leave a gooey, waxy, or chalky residue. For heavier case-forming jobs, we recommend Imperial Die Wax.
• Shotgun Mop – Stick this in the chamber when using Wipe-Out foaming bore cleaner. This will seal off the chamber so the foam doesn’t flow into your action. For long chambers screw on one section of cleaning rod to aid extraction.
• Colored Sharpie Marking Pens – Mark your bullets ahead of the bearing surface, and the color transfers to the target. This way you can shoot multiple loads at the same point of aim and discern which load shoots the tightest. (Recommended for 300 yards and beyond). With colored bullet tips you can test multiple loads “round robin” to equalize wind effects. When testing seating depths for example, you can mark the longer-seated set of bullets red and the shorter-seated set green and shoot them during the same sequence. Just look at the colored marks on the target to see which grouped better.
• Thin Latex Gloves – You should keep a box of inexpensive, disposable latex gloves (the kind doctors use) in your loading room. These will prevent contamination of primers or powder kernels that you handle directly. Also, use the gloves when handling fine blued tools or firearms to prevent transfering body oils and salts that promote rust.
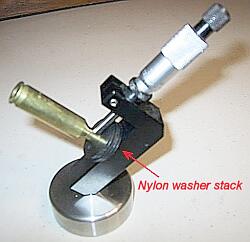
• Plastic Washers for Neck Mic – If you use a Sinclair Neck-wall Micrometer Gauge with integral stand, you can use thin plastic washers to adjust the height of the case on the mandrel. This makes it much easier to measure the same point on the case neck every time. Thanks to MikeCR for this tip (and photo).
At the request of our readers, we provide select “Deals of the Week”. Every Monday morning we offer our Best Bargain selections. Here are some of the best deals on firearms, hardware, reloading components, optics, and shooting accessories. Be aware that sale prices are subject to change, and once clearance inventory is sold, it’s gone for good. You snooze you lose.
1. Midsouth — Frankford Arsenal Rotary Tumbler LITE, $99.99
Wet-tumbling with stainless media gets large quantities of cartridge brass clean inside and out. If you’ve wanted to try wet-tumbling, here’s your chance. Midsouth has the Frankford Arsenal Platinum LITE Tumbler on sale for just $99.99 — a total steal. If you run large quantities of brass, you can get the larger-capacity Frankford Arsenal Platinum Tumbler for $179.99. Either one of these is a reliable, durable (and watertight) machine that should provide years of worry-free tumbling.
2. Grizzly Bald Eagle — Great Range Bag and Rifle Case Sale
Grab one of these Bald Eagle rifle cases or range bags at up to 50% off. These are way better than typical too-skinny rifle cases or flimsy fabric bags. The rifle cases have plenty of storage for your match needs and the padding is very good. The box-style range bags have thick closed-cell foam panels in the base, top, and sides. That gives these bags good “wall strength”, so they don’t collapse like typical range bags. These are more like a quality camera-case.
AccurateShooter.com Editor’s Bald Eagle 20″ Range Bag with Spotting Scope:
As you can see, the Bald Eagle 20″ range bag is quite big inside with lots of padding. We use this bag to carry our spotting scope and a small tripod, plus lots of other gear in the pockets. The near-full-width front pocket is very handy. We really like this 20″ range bag, which is a total steal at just $15.97. In fact the Editor likes his 20″ Bald Eagle bag so much he just ordered a second, along with two 15″ bags.
3. Graf’s — Frankford Arsenal M-Press + Extras, $249.99
Frankford Arsenal has been getting a lot of press since SHOT Show with a bounty of new products. Topping the list of must-have items is the M-Press. This press takes all the proven concepts of a Co-Axial press and improves on them. It has reversible cam-over bars plus an LED light, quick-adjusting shell-holders, and many other notable features. Right now Grafs.com is offering the new Frankford M-Press for $249.99. If you need any more incentive, Graf’s is offering a FREE set of three (3) additional die blocks, plus a handy kinetic bullet puller. Nobody else is offering anything like this especially since the M-Press is so new. [Editor: Watch for our M-Press review later this month.]
4. Midsouth — Sierra Loaded Ammunition Sale
Sierra is renowned for making quality bullets but did you know Sierra also produces great loaded ammo for hunters? Available in many of the most popular calibers and featuring GameKing bullets, Sierra’s GameChanger Ammunition could just be the edge you’re looking for on your next hunt. Midsouth has GameChanger ammo on sale right now. Stock up before hunting season arrives and prices go up.
5. Bruno Shooters Supply — Nightforce NXS 5.5-22 Scope, $1699
Nightforce NXS scopes are some of the best optics in their price range. Given their popularity, it’s rare to find NXS models on sale. Right now Bruno’s is discounting these fine scopes, so this is a great buying opportunity. Grab either the Nightforce NXS 5.5-22x50mm or the Nightforce NXS 5.5-22x56mm at a blow out price of $1699. This power range is one of the most popular out there so to buy one of these for over $300 off is a deal you can’t pass up.
6. Bullet Central — Bix’N Andy Trigger with Free Cleaning Kit
Bix’N Andy makes some of the very best trigger systems on the planet. It’s rare that you ever see them associated with any kind of promotion. If you’ve been waiting for a good reason to get a Bix’N Andy trigger, here is your chance. Bullet Central is now offering a free 8 oz. ThorroClean kit with every Bix’N Andy purchase. ThorroClean by Iosso works is a two-part bore flush/bore cleaning package that removes fouling with minimal dwell time. Trust us, you won’t be disappointed with a Bix’N Andy trigger, and the deal provides a little extra incentive.
7. Amazon — 60 Jourdak Quality Earplugs for $12.95
Ever arrived at the range and realized you left your earmuffs at home? It’s happened to us all. That’s why you should keep some extra ear-plugs in your rifle cases and range bags. Right now you can buy a 60-count bottle of Jourdak soft earplugs for $12.95. Buyers say these SNR 35 dB plugs, which “heat-mold” to your ear canal, are very comfortable and effective. Plus there is a 10% Off instant coupon for the Jourdaks. We also recommend the Howard Leight Max-1 ear-plugs. These NRR 33 plugs are comfortable and easy to insert. You can get 20 pairs of Max-1s for just $4.95. Either option comes with free shipping. Remember, always wear effective hearing protection while at the range.
TECH NOTE Concerning NRR (Noise Reduction Rating) and SNR (Single Number Rating)
The highest NRR rating for earplugs is 33, and the highest available NRR rating for earmuffs is 31. These values reflect the level of noise protection available for each device when worn alone. Combining earplugs with earmuffs can offer a NRR protection level of 36. The SNR (single number rating) is a rating system used in the European Union to indicate the amount of protection offered by correctly-fitted hearing protection devices. Source: Protectear.com
8. Palmetto State Armory — S&W M&P 15-22, $299.99
In our view, every gun guy (and gun gal) should own a nice self-loading .22 LR rimfire rifle. And if you own an AR, it makes sense to have a rimfire rig with the same balance and ergonomics. That’s what the M&P 15-22 is all about — AR ergos with rimfire economy. With bulk .22 LR ammo, your cost-per-shot is under nine cents per round! Right now at Palmetto State Armory, the popular Smith & Wesson M&P 15-22 Sport is just $299.99 on sale. That’s not much more than a basic Ruger 10/22 and we like this S&W 15-22 much better — it’s great for plinking and rimfire action disciplines. This rifle can use most AR15-family accessories, and it comes with Magpul MBUS sights, and M-Lok rails.
9. Amazon — TACVASEN Long Sleeve Tactical Shirt, $29.99
Let’s face it, looking good at a match can be almost as important as feeling good. Now you can do both with lightweight TACVASEN Long Sleeve Shirts. The TACVASEN Men’s Slim Fit Long Sleeve Combat Shirt is available in nine different colors, including four with camo sleeves. PRS guys would like these shirts. They fit right so you can run stages without snagging range carts or barriers. These zip-collar shirts feature 65% polyester, 35% cotton fabric for breathability and quick drying. These shirts have earned a 4-star rating with 163 buyer reviews.
Are you considering the Frankford Arsenal tumbler featured above? It’s a great machine. But you’ll also need stainless media for it. Here’s your solution. Amazon sells 2.5 lbs of stainless tumbling media for a mere $19.50. Amazon also offers even larger quantities of stainless steel tumbling pins if you need more than a couple pounds for those really big jobs.


 Bushing Choice for Optimal Sizing


 Looking for a new bipod that can work with a Picatinny rail? You’re in luck because we just found this 6″ – 9″ adjustable


 The 6.5×55 case has 6 or 7% more capacity than the .260s, even more in practice when both are loaded to standard COALs with heavy bullets, which sees them having to seated very deep in the .260 Rem using up quite a lot of powder capacity. So loaded up for reasonable pressures in modern actions, the 6.5×55 will give a bit more performance.
 • Magnifying Glass – We use a flat, 2″x2″ pocket 4x-8x magnifier. This folds up on itself. Very handy, we use it to inspect bullets and brass. Use this to check your flash holes for burrs, and check the meplats of your bullets before loading.
 • Ballistol Aerosol – Try using this versatile lubricant/solvent for full-length sizing. Spray some on a patch and you can wipe the carbon of your case necks. Then, continue to apply a very small amount of Ballistol on the case bodies — just thin sheen is all you need. Ballistol is super slippery, and easy to remove. For general full-length sizing (on small cases) it works great and doesn’t leave a gooey, waxy, or chalky residue. For heavier case-forming jobs, we recommend Imperial Die Wax.