Wouldn’t it be great if you could put up one BIG target that would handle a myriad of important tasks at the range: Zeroing, Load Development, Click Value Verification, and Click Tracking Repeatability Tests. Well the team at Box to Bench Precision (B2B) has developed what may be the most versatile (and biggest) precision targets ever developed. With ultra-accurate grid geometry, and razor-sharp printing, B2B’s targets set a new standard for target precision.
Click Tracking Grid Target The best procedure for checked the true value of your scope click values is to use a tall target that can dial in at least 25 MOA of “up”, and check where your cross-hairs air compared to exact pre-measured reference lins. B2B developed an advanced target just for that task. The 30″ tall by 23.5″ wide Rex Grid Target (shown below) provides a highly precise grid for testing elevation and windage clicks. The unique grid design has small tics denoting 1/4 MOA, 1/2 MOA, and 3/4 MOA. 1 MOA is marked with a “+” and the 5, 10, 15, 20, & 25 MOA elevation lines are bolded for better visibility. There are aiming points at 5 MOA intervals over the full grid.
This same target can also be used for “Box Tests” that verify click values and repeatability. with a box test you start in one corner with the initial shot (we recommend doing this with a warm barrel after a couple foulers). They you add “up” clicks to go straight up and take a second shot. Next add horizontal clicks to go across for the third shot. Then click down (the same number of cliks you went up) for the fourth shot. As a last step you reverse your horizontal clicks and take a fifth shot. If you have a good rifle and the scope clicks are repeatable, your fifth and final shot will be touching the first shot.
B2D’s Rex Grid Target can be used for Box Tests, as can B2B’s popularhttps://bit.ly/2BBe1jYLoad Development and Scope Tracking Target (left below) and B2B’s Sniper’s Hide 100-yard Target (right below).
B2B’s 100 Yard Long Range Load Development and Scope Tracking Target will perform many functions. This big, 30″ x 23.5″ target has specific aiming points for various tasks. In the upper left, there are 11 small orange circles for precision load testing. Over on the upper right are 7 more small, orange circles for doing a Seating Depth Comparison test.
The bottom half of the target has larger black-on-white circles that serve multiple functions. Use the corner circles to do a “Box Test” to confirm scope tracking. There’s another great feature on this target — running up the center of the target is a tall line that shows elevation in both MILs and MOA. That helps you confirm the TRUE click values of your optic. You’d be surprised how many scopes are slightly off — not exactly 1/4 MOA, 1/8 MOA, or 1/10 Mil as advertised. That’s why Long Range shooters absolutely need to verify their click values.
Buyers Praise the B2B Targets
We’ve handled the B2B Targets, which are printed on high-quality, tear-resistant card stock. We can attest the printing is very precise — with accurate elevation and windage values. These aren’t your ordinary targets — they are LARGE — nearly three feet tall. Verified buyers praise these targets:
“Thank you for talking to me about the MIL and MOA markers on your targets. They are very accurate. While using the Long Range 100-Yard Load Development/Scope Tracking target and my new scope, it helped me realize that my scope wasn’t tracking correctly (both turrets). So, I sent the scope to the manufacturer. When it came back, and using your target as my known constant… the scope is now ‘spot-on’ accurate. These targets are a great tool to gain a better understanding of your rifle, scope, turrets etc., all on one sheet.” — Stan, 2018
“Almost too nice to put holes in. I was in the printing industry for 35 years and these are really well done. Quality paper and precise printing … able to see bullet holes easily with these!” — Dan, 2018
Along with these popular cartridge types, DJ’s Brass can hydro-form 6 PPC, 30 PPC, 6 BRA, 30 BR, .260 AI, .284 Shehane and other wildcats.
Do you shoot a popular wildcat (such as the 6 BRA), but hate the hassle of fire-forming all your own cartridge brass? That takes time, costs money (in bullets and powder), and consumes precious barrel life. Well there IS a better solution — you can have your new brass hydro-formed to your exact specifications for a reasonable cost.
DJ’s Brass Service now offers custom case hydro-forming to your exact specs. Darrell Jones offers this service for a variety of popular cartridges: 6 PPC, 30 PPC, 30 BR, 6 BRA (BR Ackley), 6mm Grinch, 6 BRDX, 6 BRX, .260 Ackley, .284 Shehane and of course the very popular 6mm Dasher. After hydro-forming your brass, Darrell can also neck-up or neck-down the cases to meet your needs. For example, if you shoot a 22 Dasher, Darrell can hydro-form the cases to a 6 Dasher and then neck them down to .22 caliber. He can also turn the necks to your specs (for an additional charge).
Darrell is a hydro-forming wizard who has perfected the process over the last couple of years. He has learned a few special techniques along the way to ensure uniform case-forming.
Without revealing any trade secrets, we can say the Darrell has very special dies and Darrell doesn’t use a mallet or hammer — he has a system that is much more consistent. Darrell tells us: “Many of my customers take this brass and load it ‘as is’ and go straight to a match and shoot some very nice groups.”
With Darrell’s hydro-forming service you don’t have to buy any special dies or other equipment. Darrell says: “Simply send me the brass you need or have it dropped-shipped to me along with a fired case that has not been sized. If you need formed brass for a new build (gun not yet fired), let me know and I will size the brass to fit within .001 of a PT&G GO gauge.”
Hydro-forming by Darrell costs $0.60 (sixty cents) per case with a minimum order of $60. Neck-turning is an additional $0.60 (sixty cents) per case (or $0.75 for magnums) plus actual return shipping. The turnaround is usually less than five days.
NOTE: After cases are hydro-formed by Darrell, every case is washed, cleaned and re-annealed. This cleaning and annealing process is included in the $0.60 (sixty cents) per case price — that’s all part of the Hydro-forming service.
For more information, visit DJsBrass.com, or call Darrell at (205) 461-4680. IMPORTANT: Contact Darrell for shipping instructions BEFORE sending brass for processing. In a hurry, don’t have time? Just call Darrell and he’ll make something work for you.
Hydro-Forming Customer Reports
Here are testimonials from recent customers.
“Recently had Darrell Jones of DJ’s Brass Service hydro-form 6 BRX brass for me. The turn around time was very fast and the brass was to the exact specification I ask for. I actually shot the hydro-formed brass in a match [without further fire-forming]. It shot a 3.597″ — pretty amazing. Let DJ do the work for you!” — Mike Wilson (3 Time IBS Record Holder; 2013 and 2014 1000-yard IBS Shooter of the Year.)
“Darrell Jones of DJ’s Brass Service went far beyond the call of duty, to assist me [with my first] IBS match. I have had an interest in 1000-yard competition for many years and finally got the opportunity to try it. After researching the winning competitors, rifles, and rounds I ordered a Panda action with Krieger barrel in 6mm Dasher from Kelby’s. It was one week before the match and I had a rifle and no rounds. I contacted Darrell to hydraulically form 6mm Dasher from Lapua 6mm BR brass. He formed the brass and had it in the mail the next day[.] Since I have only reloaded for hunting or magazine fed rifles I was not familiar with proper seating to allow land engagement of the bullets for 1000-yard accuracy. Darrell took the time to advised me every step of the way to allow me to shoot a 3.158″ (5) shot group to win my first round of my first competitive match ever.” — Mike Youngblood
Assembly Diagram: Here are all the components of the target frame. The overall maximum assembled dimensions are roughly 26″ wide, 41″ deep, and 66″ tall (the cardboard is 2 x 3 feet).
One of the easiest ways to build a portable target stand is to use PVC pipe and connectors. Utah .308 Shooter “Cheese” has created a simple yet sturdy target frame, and he’s shared his design so you can build a similar frame easily and at low cost. The components are wood furring strips, 2″-diameter PVC pipes (and connections), and a 2’x3′ sheet of cardboard. The PVC base can be glued together, or, for easier transport and storage, you can leave some or all of the connections free. “Cheese” tells us: “I didn’t glue any of it together so I could disassemble it, shove it in a bag and take it anywhere.”
“All the parts are just pushed together and not glued. That way I can break it down and carry it all in a bag. Also, if a buddy (not me!) happens to shoot the stand, I can easily replace just the damaged piece. The last 6 inches of the furring strips are wittled-down a bit so they can be pushed into the upright pipes with a little friction. The cardboard is 2 x 3 feet, and I use a staple gun to attach it to the furring strips. Then I just staple the target onto the cardboard and go at it.
Of course you can modify the dimensions as desired. I chose the black ABS pipe over white PVC simply for cost — black ABS is a little cheaper. You can also glue some or all of the parts together, it’ll just be larger for transporting. In windy conditions, the thing likes to come apart. Duct tape might work well.
For weight, I thought about filling the two end pipes with sand and gluing test caps on each of their ends. The test caps still allow the pipes to slip into the elbows.”
Add Anchors or Internal Weight for Stability
On a very windy day, a PVC stand can shake or even topple over. There are a couple solutions to this. Some people fill the PVC pipe sections with sand to add weight, or you can put short sections of Re-BAR inside the long legs. One GlockTalk forum member noted: “I built [a frame] almost identical to this. I also take four pieces of wire coathanger bent into an inverted “U” shape to anchor the frame to the ground. It is so light that wind will knock the stand over [without anchors].”
You can find photos of a similar home-made PVC target stand (with a slightly different rear section) on the Box of Truth website. This also employs a PVC tubing base with wood uprights. We’ve also seen all-PVC target stands, but we’ve found that it is easier to attach the cardboard to wood strips than to PVC pipe. Also, if the upper section is wood, you can fit different height targets, while using the same base.
This image is from multi-time Nat’l Long Range Champion Nancy Tompkins, author of Prone and Long Range Rifle Shooting. Nancy loves to photograph the Aurora Borealis.
As a Christmas present for our readers, today we showcase eight very informative videos from AccurateShooter Forum member F-Class John. A talented F-Class competitor with a smart, technically-focused mind, John has created a series of videos about reloading and precision loading tools, along with rifle and shooting accessories. Many of John’s product reviews are the most thorough and detailed you’ll find in video format. You’ll find over 120 informative videos on F-Class John’s popular YouTube Channel.
21st Century Hydro Press and Arbor Press — Product Review
Many of the world’s top benchrest, long-range, and F-Class shooters prefer to seat their bullets using arbor-type presses with inline dies. This allows smooth, repeatable bullet-seating with very low run-out. One of the very best arbor-type seating presses ever created is the 21st Century Hydro Press. This offers plenty of leverage driving a precision ram. The Hydro Press also features a hydraulic line to drive a precision seating force gauge. Along with the Hydro Press, John tests 21st Century’s standard arbor press.
Cartridge Case Separation — Tell-Tale Warning Signs
If you reload and haven’t experienced a case separation yet then you are fortunate. It’s a fact of life in the shooting world. A bad case separation can have very unfortunate consequences. Therefore you need to watch for warning signs on your cartridge brass, so you stay safe. The video above shows what to look for — and how to recognize signs of incipient separation. One important factor leading to case head separation is improper head-spacing causing growth. To learn more about case head separation watch F-Class John’s follow-up video Case Head Separation Causes, identification and prevention.
Accuracy One Concentricity Gauge — Product review
Every person who makes precision hand-loads should have a quality concentricity gauge to measure run-out of case-necks and loaded rounds. Here John tests one of the best such tools on the market, the Accuracy One Concentricity Gauge. This measures the internal and external neck runout of cartridge cases as well as seated bullet runout. It can also measure the runout of the ogive, bearing surface, and boat-tail of individual bullets and can even measure primer pocket runout. John notes: “I think most precision shooters should have one of these to make sure their ammo is within their specs they’re happy with.”
How to Use a Barrel Tuner to Improve Accuracy and Repeatability
In this video, John works with a barrel tuner created by Erik Cortina, a member of Team Lapua/Brux/Borden. A tuner can be useful in modulating barrel vibrations and that can translate to smaller groups on target. Sometimes the positive effects are quite noticeable. Tuners have been popular with short-range benchresters for many years and now they are becoming more common on top F-Class and Long Range rifles.
John says: “I’ve been using Erik’s E.C. Tuner for a while now and I really like what it’s done to help as my final step in load development. Just remember, a tuner is a tool, not a magician. You still need good load development practices, good brass prep, and solid skills but the tuner does help make great loads even better.”
Teslong Rigid 26″ Borescope with 4.5″ Monitor — Product Review
There are a variety of affordable Teslong digital borescopes for inspecting your barrels and diagnosing issues. All Teslongs deliver impressively sharp images/video. Some units plug into a laptop or tablet, while others work via a dongle to communicate wirelessly. Here John tests a 26″ rigid model borescope that comes complete with its own 4.5″ viewing screen. Priced at $129.99 on Amazon, this system is completely self-contained — you don’t need a laptop or smartphone. You don’t have to worry about connections and there are no Apps to install or configure. John says: “Teslong now offers a 26″ rigid rod model with a 4.5″ monitor. This allows you to use the unit without the need for any mobile device or computer.”
Dillon 550 vs. Dillon 750 for Precision Reloading — Pros and Cons
Progressive presses are not just for bulk reloading these days. Many top shooters, including 5-time National Long Range Champion John Whidden, use Dillon progressive presses to complete many cartridge loading operations more efficiently. Even in the F-Class world, Top Guns such as Erik Cortina have found ways to use Dillon progressives for bullet pointing, case prep and other repetitious tasks, even if a precision arbor press is used for final bullet seating. In this video, F-Class John compares two Dillon options: “If you’re deciding between a Dillon 550 or 750/650 reloading press for precision reloading, here are some pros and cons of each. Both are capable of producing high quality ammunition but each has their own quirks so knowing your capabilities and loading style is important when choosing one over the other.
AutoTrickler V3 — General Set-Up and Operational Advice
In this video, John offers some general advice for setting-up the AutoTrickler system. He notes that you want to set the initial drop weight (from the powder measure) in an optimal range: “When you set the original drop you need it to be about 1 to 1.5 grains below. Some people set it too close to the final weight they want and it actually doesn’t let the trickler unit work as efficiently, consistently and accurately as it will if you start 1 to 1.5 grains low.” John also explains how to hook up the cords and how to position the trickler unit. John places his AutoTrickler on a 30-lb piece of granite, with a thin polymer “anti-static” pad on top. John also uses a line conditioner and grounding wire to provide the best electrical flow to the scale and trickler. John also shows how the angle of the trickler unit can be adjusted. If you own an AutoTrickler or plan to purchase one, we definitely recommend you watch this entire video.
ShotMarker Power-User Tip — How to Test Unit without Shooting
The ShotMarker is an advanced system that plots shot location using electronic sensors mounted on a frame. ShotMarker arrays are now used in many competitions because they are reliable, precise, and much more affordable than competing systems. Invented by Canadian Adam MacDonald, the ShotMarker plots bullet entry on target using sensors activated by the bullet’s soundwaves. Using 8 high precision MEMS microphones placed in the corners of your frame, ShotMarker precisely measures the point of impact and down-range velocity of each shot, so that you can analyze your groups and shoot for score in competition. In this video, John shows how you can quickly and easily test your ShotMarker before deploying it at the range: “Here’s a quick and simple way to ensure your system is working 100% before taking a shot on it.”
Every firearms owner should have some basic first-aid/trauma training. Sadly, bad things CAN happen at the range, even if that’s just a blown primer, or a richochet off a metal target that sends shards back at the shooter. That’s why all shooters should always wear ear and ear protection, and be PREPARED for situations requiring emergency first aid.
Thankfully, there is a way shooters can get emergency trauma training for FREE. The folks at Mountain Man Medical offer a FREE Emergency Trauma Course. This 100% FREE online course, entitled “Emergency Trauma Response” (ETR), consists of a 13-module training program conducted via a series of web-hosted videos. It can benefit anyone who wishes to be better prepared for traumatic medical emergencies.
Online Course Description — Module Subjects
“Emergency Trauma Response” (ETR) is a comprehensive training program for to help person become better prepared to deal with massive trauma. Building off the popular “Stop The Bleed” program, the online ETR course goes above and beyond to ensure the student has the practical knowledge to use emergency products and gear when dealing with a wide variety trauma emergencies. Of course, in any serious emergency, professional medical assistance (EMTs and First Responders) should be summoned immediately whenever that is feasible.
The Mountain Man Medical ETR Course Features 13 Modules:
1. Trauma Medicine and Combat Mindset
2. The Gear Of A Medic
3. Vital Signs and Anatomy
4. Intro to MARCH
5. Massive Hemorrhage
6. Airway
7. Respirations
8. Circulation
9. Hypothermia and Head Trauma
10. Reassessment
11. Other Injury Types
12. Practical Tourniquet Exercises/Solutions
13. Your Role As A Medic
As a side note, this Editor’s brother was a U.S. Army combat medic in Viet Nam. He received months of special training before being deployed. He told me this online ETR course provides valuable information, but one should always summon qualified medical professionals when presented with serious trauma. But when that is not possible, immediate on-the-spot correct assistance can save lives or prevent further injury.
Credit the Guns America Digest for finding this valuable online training resource.
Want to improve your understanding of Ballistics, Bullet Design, Bullet Pointing, and other shooting-related tech topics? Well here’s a treasure trove of gun expertise. Applied Ballistics offers dozens of FREE tech articles on its website. Curious about Coriolis? — You’ll find answers. Want to understand the difference between G1 and G7 BC? — There’s an article about that.
“Doc” Beech, technical support specialist at Applied Ballistics says these articles can help shooters working with ballistics programs: “One of the biggest issues I have seen is the misunderstanding… about a bullet’s ballistic coefficient (BC) and what it really means. Several papers on ballistic coefficient are available for shooters to review on the website.”
Credit Shooting Sports USA Editor John Parker for finding this great resource. John writes: “Our friends at Applied Ballistics have a real gold mine of articles on the science of accurate shooting on their website. This is a fantastic source for precision shooting information[.] Topics presented are wide-ranging — from ballistic coefficients to bullet analysis.”
Here are six (6) of our favorite Applied Ballistics articles, available for FREE to read online. There are dozens more, all available on the Applied Ballistics Education Webpage. After Clicking link, select Plus (+) Symbol for “White Papers”, then find the article(s) you want in the list. For each selection, then click “Download” in the right column. This will send a PDF version to your device.
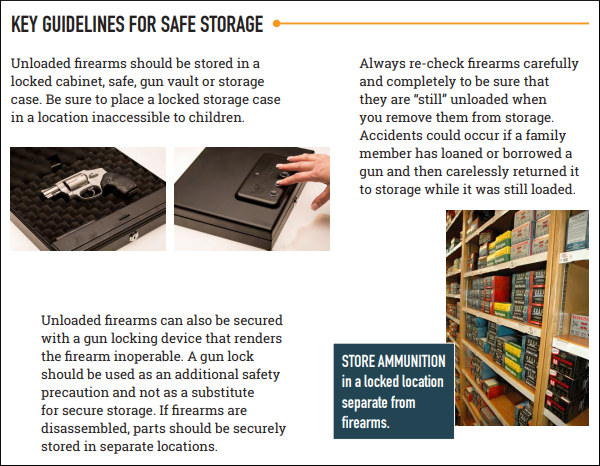
The NSSF, as part of its ChildSafe Program, has just released a 26-page PDF document covering all aspects of firearms safety and safe storage. We recommend that new gun owners review this Safety Brochure. In addition, NSSF and Project ChildSafe offer a variety of other educational materials and resources:
Message from the NSSF:
“With the holiday season upon us, the National Shooting Sports Foundation reminds Americans to practice responsible safety measures at home, including safe and responsible firearm handling and storage. “It’s important to remember that the holidays can be a challenging time of year for many, and that may be especially true this year — particularly for those who are unable to see loved ones due to the pandemic, or who may be feeling isolated or alone for other reasons,” said Joe Bartozzi, NSSF President and CEO. “We want to ensure families are practicing safe firearm storage habits to reduce the chance of a firearm accident this holiday season.”
SAFETY QUIZ — NSSF has created Firearm Storage and Safety Assessment Quiz. This walks gun owners through questions related to safe handling and storage of firearms. Click Link below to take the Quiz.
Nielsen-Kellerman, Inc. (NK) is acquiring the assets of MagnetoSpeed, LLC, leading manufacturer of barrel-mounted electromagnetic chronographs and other shooting accessories. MagnetoSpeed will join Kestrel Ballistics in NK’s Ballistics Division. With Kestrel and now MagnetoSpeed, NK has two very important product lines for precision shooters and competitors. And yes, NK anticipates that, in the near future, new software engineering will allow MagnetoSpeed chronos to communicate with Kestrels to provide faster ballistic solutions. NK CEO Alix James stated: “…We see exciting opportunities to improve the function of the chronograph line by connecting the chronographs directly to Kestrel Ballistics Weather Meters with Kestrel LiNK. The MagnetoSpeed founders are brilliant engineers and we are grateful for the opportunity to build upon their design innovations.”
NK CEO James added: “The MagnetoSpeed acquisition is a win for our companies, our customers, and the shooting community as a whole. The MagnetoSpeed brand is known for accuracy, durability, and innovation. This aligns with our commitment to producing extremely accurate, rugged, purpose-built ballistics tools for improving long-range precision and shooting performance. The move…supports NK’s commitment to expanding its offerings to the shooting, hunting, and outdoor users.”
NOTE: NK Ballistics Division will host a combined Kestrel/MagnetoSpeed Virtual Class training session on 12/23/2020. CLICK HERE to Register.
Nielsen-Kellerman Announces Acquisition of MagnetoSpeed LLC
The founders of MagnetoSpeed are proud their company is teaming with NK and Kestrel: “Ten years ago, three young engineers from Texas began work on a new kind of chronograph. It began with a crude prototype, but with the support of the shooting community, we were able to bootstrap those humble beginnings into a successful company[.] We see a great opportunity with Kestrel’s Ballistic division to take our products to the next level and to develop amazing new ones.”
MagnetoSpeed Product Line OverView
MagnetoSpeed has been manufacturing rugged chronographs, target hit indicators, and barrel coolers since 2013. The company’s signature V3 and Sporter barrel-mounted ballistic chronographs use patented electromagnetic sensors to measure bullet velocity with extreme precision and reliability. Other MagnetoSpeed products include the T1000 Hit Indicator, and the Riflekühl chamber flag + barrel cooler.
With a MagnetoSpeed barrel-mounted chrono you can quickly and easily record muzzle velocity (MV) without having to set up tripods or walk down-range. The compact MagnetoSpeed chronos are easy to set up and transport. With the full-featured V3 model, everything you need comes in a small fitted case. In the top photo are the components used with the MagnetoSpeed V3 Kit:
1. V3 Bayonet sensor
2. Display and control unit
3. Bayonet spacers (plastic and rubber)
4. Cords and mounting hardware (left), suppressor heat shield (right)
5. Alignment rod (square cross-section)
6. Rail adapter (sold separately)
If you are on a tighter budget, the MagnetoSpeed Sporter is a great option. This unit works on most rifles and offers the same reliable speed-measuring technology as the V3 model, but with fewer options and different display. Available for just $179.00 on Amazon, the MagnetoSpeed Sporter is perhaps the best value in chronographs on the market today.
There are many reasons you might want to make a chamber cast. You may have acquired an older rifle and need to verify the chamber dimensions. Or, if you have a new reamer, you may want to check the exact “cut” dimensions against the blueprint specs. A chamber casting is also valuable if you run across a firearm that you believe has a custom barrel on it and you want to find out the dimensions of the chamber. Lastly, you may want to prepare a chamber casting to be used in the making of custom dies. (Most reloading die makers know how to work from Cerrosafe chamber casts.)
Cerrosafe is a metal alloy that has some unique properties which make it ideal for chamber casting. First, it has a relatively low melting point of 158 to 190° Fahrenheit. This makes it easy for the handloader to melt the Cerrosafe in his home shop. Second, it shrinks slightly during cooling which allows it to be extracted from the chamber easily. It then re-expands to the chamber’s original size after about one hour at room temperature. After cooling for about 200 hours, the chamber cast will expand to about .0025″ larger than the actual chamber size.
One of our Forum members has done many Cerrosafe castings and he offers this smart advice:
1. Remove the barrel from the action to make the pour much easier. If you don’t remove the barrel, it can be hard to pour through the action (even with a funnel) and can make a mess if you’re not careful.
2. Pre-heat the barrel for 5-10 minutes in the oven on the very lowest setting (170° F in my oven). (DON’T overdo it!). Allow to cool for a couple minutes so you can pick it up and it is under 120° F. Pre-heating the barrel helps the Cerrosafe stay liquid as you pour the casting. This helps ensure a good, complete fit to the chamber.
How to Use Cerrosafe for Chamber Casting
The basic ingredient of Cerrosafe is bismuth. Bismuth is a heavy, coarse, crystalline metal which expands when it solidifies, up to 3.3% of its volume. When bismuth is alloyed with other metals, such as lead, tin, cadmium and indium, this expansion is modified according to the relative percentages of bismuth and other components present. As a general rule, bismuth alloys of approximately 50% bismuth exhibit little change of volume during solidification. Alloys containing more than this tend to expand during solidification and those containing less tend to shrink during solidification.
What all this means for the gunsmith is that you can make chamber castings using only Cerrosafe and a few, simple hand tools. To make a chamber casting, first clean and degrease the chamber. Use a tight-fitting, cotton patch that’s wrapped around a bore mop or brush to plug the bore just ahead of the throat. I usually leave the cleaning rod attached to the plug until it’s time to remove the plug. Melt the entire bar of Cerrosafe in a heatproof container that you can easily pour the hot Cerrosafe out of. You can use a propane torch or heat over a hot plate or the burner of a stove. Cerrosafe melts easily at 158°-195° F. While the casting metal is still liquid, stir very well, skim off the dross, and pour your chamber. The real trick with Cerrosafe is not to overheat it. If you heat the solid slowly, and keep it within the required temperature range, you shouldn’t get any dross.
Note the time the casting was poured. The casting will take only a very short time to solidify, usually within a minute. Wait 30 minutes and then remove the plug from the bore. Turn the muzzle upward and the casting will fall from the chamber. At 30 minutes after initial solidification, Cerrosafe shrinks slightly, so removal is very easy. Allow the new casting to cool thoroughly then measure the casting exactly one hour from the time it was cast. The casting will give you an exact measurement of the chamber. Cerrosafe casting metal can be used over and over. Remelt the entire amount back together and pour the Cerrosafe into a small mold of the appropriate size. Always melt the entire Cerrosafe ingot to make a chamber casting. For best results, never cut off, or use, just a part of the ingot.
If you will be flying with firearms this winter, you should read this article. You need to familiarize yourself with current Federal Regulations on gun transport before you get anywhere near an airport. Thankfully, the Transportation Security Administration (TSA) has a web page that states the important requirements for airline passengers traveling with firearms and/or ammunition.
You’ll want to visit the TSA Firearms and Ammunition webpage, and read it start to finish. In addition, before your trip, you should check the regulations of the airline(s) with which you will fly. Some airlines have special requirements, such as weight restrictions.
Here are the TSA’s key guidelines for travel with firearms:
TSA FIREARM Guidelines
1. When traveling, comply with the laws concerning possession of firearms as they vary by local, state and international governments.
2. If you are traveling internationally with a firearm in checked baggage, please check the U.S. Customs and Border Protection website for information and requirements prior to travel.
3. Declare each firearm each time you present it for transport as checked baggage. Ask your airline about limitations or fees that may apply.
4. Firearms must be unloaded and locked in a hard-sided container and transported as checked baggage only. As defined by 49 CFR 1540.5, a loaded firearm has a live round of ammunition, or any component thereof, in the chamber or cylinder or in a magazine inserted in the firearm. Only the passenger should retain the key or combination to the lock unless TSA personnel request the key to open the firearm container to ensure compliance with TSA regulations. You may use any brand or type of lock to secure your firearm case, including TSA-recognized locks.
5. Bringing an unloaded firearm with accessible ammunition to the security checkpoint carries the same civil penalty/fine as bringing a loaded firearm to the checkpoint. You may find information on civil penalties at the Civil Enforcement page.
6. Firearm parts, including magazines, clips, bolts and firing pins, are prohibited in carry-on baggage, but may be transported in checked baggage.
7. Replica firearms, including firearm replicas that are toys, may be transported in checked baggage only.
8. Rifle scopes are permitted in carry-on and checked baggage.
TSA Ammunition Guidelines
1. Ammunition is prohibited in carry-on baggage, but may be transported in checked baggage.
2. Firearm magazines and ammunition clips, whether loaded or empty, must be securely boxed or included within a hard-sided case containing an unloaded firearm. Read the requirements governing the transport of ammunition in checked baggage as defined by 49 CFR 175.10 (a)(8).
3. Small arms ammunition (up to .75 caliber and shotgun shells of any gauge) must be packaged in a fiber (such as cardboard), wood, plastic, or metal box specifically designed to carry ammunition and declared to your airline.
4. Ammunition may be transported in the same hard-sided, locked case as a firearm if it has been packed as described above. You cannot use firearm magazines or clips for packing ammunition unless they completely enclose the ammunition. Firearm magazines and ammunition clips, whether loaded or empty, must be boxed or included within a hard-sided, locked case.
5. Please check with your airline for quantity limits for ammunition.
More Airline Travel Tips from Tom McHale
Tom McHale has written an excellent article for the Beretta Blog, Ten Things You Need to Know about Flying with Guns. We suggest you visit the Beretta Blog to read this informative story. Here are two of Tom McHale’s Travel Tips:
Weigh your gun case and ammunition
Most airlines will allow up to 11 pounds of ammunition. And, like any luggage, you will be charged more for any baggage weighing more than 50 pounds. This sounds like a lot, but when traveling to the Crimson Trace Midnight 3 Gun competition last year, my case with shotgun, rifle, pistol and ammunition tipped the scale past the 50 pound mark.
Pack ammo in the same locking case
This is another area that’s misunderstood and full of internet myth. Your ammo just needs to be stored in some type of safe container and not loose. Technically, you can keep ammunition in magazines, but I wouldn’t recommend it. It meets the letter of the law storage requirement, but too many airline and TSA agents will give you grief. Use a plastic ammo box or original cardboard packaging and you’ll be fine carrying that in the same lockable case as your gun.
*Please see, United States Code, Title 18, Part 1, Chapter 44 for information about firearm definitions.


 The best procedure for checked the true value of your scope click values is to use a tall target that can dial in at least 25 MOA of “up”, and check where your cross-hairs air compared to exact pre-measured reference lins. B2B developed an advanced target just for that task. The 30″ tall by 23.5″ wide Rex Grid Target (shown below) provides a highly precise grid for testing elevation and windage clicks. The unique grid design has small tics denoting 1/4 MOA, 1/2 MOA, and 3/4 MOA. 1 MOA is marked with a “+” and the 5, 10, 15, 20, & 25 MOA elevation lines are bolded for better visibility. There are aiming points at 5 MOA intervals over the full grid.


 Darrell is a hydro-forming wizard who has perfected the process over the last couple of years. He has learned a few special techniques along the way to ensure uniform case-forming.

 One of the easiest ways to build a portable target stand is to use PVC pipe and connectors. Utah .308 Shooter “Cheese” has created a simple yet sturdy target frame, and he’s shared his design so you can build a similar frame easily and at low cost. The components are wood furring strips, 2″-diameter PVC pipes (and connections), and a 2’x3′ sheet of cardboard. The PVC base can be glued together, or, for easier transport and storage, you can leave some or all of the connections free. “Cheese” tells us: “I didn’t glue any of it together so I could disassemble it, shove it in a bag and take it anywhere.”


 Cerrosafe is a metal alloy that has some unique properties which make it ideal for chamber casting. First, it has a relatively low melting point of 158 to 190° Fahrenheit. This makes it easy for the handloader to melt the Cerrosafe in his home shop. Second, it shrinks slightly during cooling which allows it to be extracted from the chamber easily. It then re-expands to the chamber’s original size after about one hour at room temperature. After cooling for about 200 hours, the chamber cast will expand to about .0025″ larger than the actual chamber size.


