Sinclair International has created a series of helpful articles on rifle cartridge reloading. Today’s feature lists ten basic steps for precision hand-loading, with links to longer, detailed Sinclair Int’l technical articles providing more complete information. There’s a lot of helpful info here guys, if you click all the links to access the ten “long form” articles.
Tying It All Together: 10 Steps To Precision Handloads
Feature based on article by Roy Hill, Brownells/Sinclair Copywriter
Sinclair Int’l offers a series of detailed articles on hand-loading precision rifle ammunition. The articles are included in Sinclair’s GunTech Articles Archive, but sorting through the index to find each article takes time. To help you access all these articles quickly, here’s a handy summary of ten key topics, with links to longer articles covering each subject in detail.
Part 1: The first step in making high-quality handloads is to carefully choose the best brass for your application. You need to know how to identify the different types of brass and how to choose the best kind for the ammo you want to load. CLICK HERE for Part 1.
Part 2: Even high-quality brass can have burrs around the flash hole that can interfere with the primer flame and cause inconsistent ignition – which can lead to shot groups opening up. Flash hole deburring is a critical step in making sure primers ignite powder consistently. CLICK HERE for Part 2.
Part 3: The next step is to make sure the primer pockets are square and uniform. Like flash hole deburring, primer pocket uniforming may reduce variations in primer ignition by ensuring more consistent primer seating. CLICK HERE for Part 3.
Part 4: Making sure all your cases are precisely the same length is crucial, especially when you use cases that have been fired before. Case trimming is the way to get there. CLICK HERE for Part 4.
Part 5: After trimming, cases still have to be resized. In order for them to work through the resizing die, they have to be lubricated. The case lube method you choose is crucial to making precision handloads. CLICK HERE for Part 5.
Part 6: Now it’s time to choose the dies that will resize your cases. There are several important options to consider in selecting the right sizing dies. CLICK HERE for Part 6.
Part 7: Wait! You’re not quite ready to start sizing yet. There’s yet more to consider before you start cranking cases through the press. Learn more about setting up and adjusting your sizing dies. CLICK HERE for Part 7.
Part 8: Once the cases are completely prepped, it’s time to start putting fresh components back into them. We start off by seating primers. CLICK HERE for Part 8.
Part 9: After the primers are seated, it’s time to drop in the powder. There are several tools that will help you handle powder for precision handloads. CLICK HERE for Part 9.
Part 10: The final step in the process is carefully seating the bullet to just the right depth. And then… you’re ready to try your loads at the range. CLICK HERE for Part 10.
Some years ago our friend Danny Reever acquired the PMA Action Cleaning tool. He’s used it for many seasons and it’s still working great. If you shoot a precision rifle, it deserves to have a clean action and lug recess area. This handy tool speeds up the cleaning process, letting you do a better job in less time.
PMA Action Cleaning Tool Kit Review by Danny Reever
I’ve been using the PMA Action Cleaning Tool Kit for quite some time. Previously, I used one of the old style (round knob) Sinclair action-cleaning tools with cylindrical cotton rolls. With the Sinclair tool, I was pretty satisfied that I was getting my actions reasonably clean. But, as I explain below, I think the PMA Action Cleaning Tool Kit is easier to use, and possibly achieves better results.
PMA Tool Kit Extensively Tested with Many Action Types
PMA tried a variety of options before finalizing the PMA Action Cleaning Tool Kit. PMA explains that several shooters did a lot of testing “with various sizes of die-cut foam, patches, felts and cotton rolls with various bolt action types (BAT two- and three-Lug, Kelblys, Halls, Remingtons, Winchesters and Savages). [Testers all agreed] that the foam disc is far superior to felts and cotton rolls [and] we decided to include two different sizes of foam discs.”
The PMA Action-Cleaning Tool uses round foam discs in two included sizes: 1″ diameter and 1.25″ diameter. Both size discs can be used alone, or with a 3″ patch wrapped around them. The handles of the tools are CNC-machined blue-anodized aluminum with a silicone sleeve for grip. The PMA tool handles are a bit longer than those of my old Sinclair action-cleaning tool. I like the added handle length, and I find the design of the handle easier to use compared to the old-style round knobs.
The PMA tools are quality items. They are an improvement over my older Sinclair action-cleaning set-up. But do the PMA tools they actually clean the action better or easier than the old style cotton rolls? Well, based on my experience, the answer is a definite “maybe”.
Comparison Testing — Cotton Rolls vs. PMA Foam Discs (with and without patches)
Starting with the old-style cotton roll system, I cleaned my actions to a level I considered “clean” in the past. I then tried the included PMA foam discs. I found that, for my Remington-style actions, the larger 1.25″-diameter disc seemed to work better than the smaller 1″-diameter disc. Wrapping the larger disc with a 3″ patch definitely brought out more crud from my previously cleaned actions than the old style cotton rolls. Well, you might ask, what if you wrap the old-style cotton roll with a patch? Yes that will remove more crud too, but perhaps not as much as the PMA system. Moreover you would have to buy both cotton rolls AND 3″ patches. Not many places sell the cotton rolls.
Is it worth plunking down the $55.95 for the complete PMA system? Well, if you want to upgrade to a quality-made tool with better handles the answer is yes. Is getting that last bit of crud out of your action every time you clean it that important to you? You have to decide that for yourself. From my own perspective, I was due for an upgrade so the answer was easy. I like the PMA system, especially the new improved handles. Also, with the PMA system I don’t have to fool around with a tiny Allen screw to secure the cotton rolls — that was annoying. So my final take on the PMA Action Cleaning Tool Kit is that it is a good product with some real advantages over other action-cleaning systems.
PMA Tool charges $55.95 for the complete Action Cleaning Tool Kit that includes a chamber cleaning tool and Lug Recess cleaning tool. PMA offers the Lug Recess Cleaning Tool by itself with four foam cleaning discs and five 3″ patches. The Chamber Swab Tool is sold separately for $20.95. Cleaning discs are also available separately in your choice of 1″- and 1.25″-diameter in a five pack.
Many shooters are familiar with ballistics tables, weather programs, and even wind meters for smart devices, but few may know about a very handy Leveling Tool that comes factory-installed on Apple iPhones. The leveling function is a little-known option in Apple’s Compass App. It works well for a multitude of tasks.
There are a numerous reasons that a leveling tool should be in every rifleman’s range bag. From leveling optics during mounting to figuring out how much extra compensation is going to be required for a tricky angled shot, knowing just how far off things are from plumb can go a long way towards realizing success in the field.
This writer has used the leveling app on his iPhone to level a rifle on a rest while at the range. It definitely worked for “field expedient” leveling duties. That’s especially important for long-range applications. Just one degree of cant (tilt) can move your point of impact 7 inches at 1000 yards.
Of course, the iPhone level doesn’t use an actual bubble to find angles. Rather, it relies on the device’s sophisticated accelerometer to do so, and with a great degree of accuracy. Navigating to the level is done by first selecting the Compass App (Utilities folder), at which point the device will need to be calibrated by rotating it a full 360 degrees. Once the compass is fully calibrated, simply make swipe LEFT gesture to bring up the level — it will start operating immediately. Swipe right to return to compass. NOTE: On some newer iPhones the Level feature is part of the Measure App, so to access it you go to Utilities > Measure, and it’s listed at the bottom.
From there, use is intuitive and easy, like most iPhone Apps. Switching from horizontal plane to vertical is done by simply changing the physical axis of the phone. How do you know when you’ve got things just right — well the entire lower half of the screen turns green when everything is perfectly level. You’ll also see a zero° read-out, like this:
Bottom Line: If you already own an iPhone, you should definitely give this App a try. The price is right (free), and for a wide variety of tasks the iPhone Level App is actually pretty handy.
For Android Phone Users — FREE Leveling Apps
Don’t have an iPhone? No worries — there are a multitude of Bubble Level Apps available for Android OS phones. We found over 40 leveling Apps. Most are free, others cost a few dollars. Most of these Apps work in multiple orientations. Choose the App that offers the display views you find most convenient or pleasing to the eye. You may want to try two or three before you settle on a favorite.
Bryan Blake, a very clever machinist and gunsmith, has created an ultra-precise and speedy neck-turning machine. Bryan, who runs Blake Machine, Blake Barrel, and F-Class Products has created a system that uses twin precision cutter tips to turn case necks inside and out quickly and efficiently, with superior precision. This advanced IDOD Neck Turning Machine holds cases securely in a precision-machined spindle attached to an electric motor. Twin blades move precisely during the cutting process, milling the necks inside and out. The turned necks come out perfect every time, with the shoulders trimmed exactly (with doughnut removed) as well. If you turn hundreds of cases during a shooting season, you may want to consider getting an IDOD from F-Class Products. Bryan was able to turn 30 cases in just 6 minutes. And there is an even more advanced version, called the AUTODOD, shown in the last video below.
Our friend Erik Cortina recently visited Bryan Blake in Phoenix. Erik saw the IDOD in action and was impressed. Erik notes: “For a very long time, we have been turning brass the exact same way. Use a mandrel as a pilot and have a cutter with a specified gap go around the perimeter and turn the necks to specified thickness. The IDOD uses a technique called ‘pinch turning’ to turn the ID and the OD (IDOD) at the same time.” You can watch how it works in Erik’s video below (action starts at 7:55 time-mark):
The secret to the efficiency of the Blake IDOD is a vibration-free motor, high-mass case-holder, precision OD/ID-adjustable cutter, along with an advanced tracking system that moves the cutter heads towards the case neck (and back again) with absolute, 100% repeatable precision. Watch the video from 8:30 to 10:10 to see Bryan explain how to adjust the system for a perfect result.
This shows how to set up the IDOD Neck-turning machine for a particular cartridge type:
This video shows a close-up of a neck being with perfect neck-wall consistency:
This latest video from Blake Machine shows the new AUTODOD machine with power controls. This speeds up and simplifies neck-turning process.
If you have a SIG Sauer Cross rifle — do NOT shoot it. There is a serious potential safety issue that could result in an accidental discharge. Accordingly, yesterday, 11/25/2020, SIG Sauer issued this Safety Recall Notice for ALL Cross rifles that have been produced:
Safety Recall Notice: SIG SAUER Cross Bolt-Action Rifles
NEWINGTON, N.H.: (November 25, 2020) – Today Sig Sauer, Inc. is announcing a safety recall for the CROSS Bolt-Action Rifle, and consumers should immediately discontinue use of the rifle. This recall applies to all CROSS Bolt-Action rifles currently manufactured.
Sig Sauer has viewed an online video that presents a single CROSS Bolt-Action Rifle with a potential safety concern. This gun has been returned to Sig Sauer and upon evaluation it has been confirmed that the rifle exhibited a delayed discharge after the trigger was pulled. Sig Sauer has decided to issue a safety recall in order to implement a modification to the firing action to address this potential safety concern.
Q: WHAT SHOULD YOU DO IF YOU OWN A CROSS BOLT-ACTION RIFLE?
A: Stop using and unload your CROSS Rifle immediately.
To register for the recall process please visit sigsauer.com/crossrecall or call Sig Sauer Customer Service at 603-610-3000, option 1. Following registration Sig Sauer will further communicate with you to arrange for the return of your rifle to Sig Sauer for the safety improvement. All shipment and replacement costs will be covered by Sig Sauer.
Sig Sauer is committed to providing the highest quality, industry-leading firearms in the marketplace and is requesting that consumers take immediate action and follow the recall process as described.
Trigger Problem Revealed in Field Test Video
In this video a SIG Cross rifle is being tested in the field. The shooter started to encounter problems with delayed ignition at 26:05 time-mark. Basically the gun did NOT fire when the trigger was engaged normally. In another instance (28:10-28:30) the gun did not fire as the trigger was pulled back but then the gun fired when the trigger was released forward. Not good.
The Cartridge Comparison Guide is a remarkably comprehensive 340-page, spiral-bound book. Covering over 250 cartridges, the Second Edition of the Cartridge Comparison Guide is the product of many years of labor by Andrew Chamberlain, a Utah-based hunter. Andrew says his Guide “compares every factory available cartridge from the 17 calibers up to the 50 caliber cartridges”. (Sorry, most wildcat cartridges are not covered.) Chamberlain’s Guide also compiles cartridge data from major ammunition manufacturers such as Barnes, Federal, Hornady, Norma, Nosler, Remington, Sierra, Swift, Weatherby, and Winchester. It shows the optimal velocity achieved for each bullet weight and calculates bullet energy, recoil, and powder efficiency. Large color photos illustrate handgun and rifle cartridges.
The Cartridge Comparison Guide provides data for thousands of cartridge/bullet/velocity combos. Quick reference sheets and ballistics charts cover Trajectory, Velocity, and Energy out to 500 yards. The Cartridge Comparison Guide also offers a firearms lexicon, plus Appendices covering Cartridge Selection for Game Animals, Bullet Selection/Design, Bullet Expansion, and Wound Channel Characteristics.
New Content in Second Edition of Cartridge Comparison Guide
The Cartridge Comparison Guide (Second Edition) costs $29.99 plus shipping and tax. CLICK HERE to visit the Online Store where you can order the 340-page book. Here’s what’s new in the Second Edition:
Addition of Shotgun Ammunition (Both Slug and Shot loads).
Momentum Calculation for all Rifle, Shotgun and Handgun loads.
Integration of Shotgun Slug Ammunition with Center Fire Rifle Data Tables.
Factory Load Summary Added (Shows manufacturers and loads produced).
One factory load and one hand load for every bullet weight available in each cartridge.
Over 90 pages of additional ballistics content (roughly 35% more than in First Edition).
Great Resource for Hunters
One of Chamberlain’s main goals in creating the Cartridge Comparison Guide was to help hunters select the right cartridge for the job: “This started as a personal project to gather information on the more popular cartridges commonly used for hunting. I wanted to find the best all-around performing cartridge and rifle that a guy on a budget could shoot. I began comparing cartridge performance, versatility, bullet selection, powder efficiency, recoil generation vs. energy produced, standing ballistic data for different environments….”
Black Rifle Cartridge Comparison Guide
The Black Rifle Cartridge Comparison Guide (CCG) was created for semi-auto AR-platform and Modern Sporting Rifle users. The Black Rifle CCG covers virtually all popular rifle, shotgun, and handgun cartridge types used with magazine-fed, semi-automatic black rifles or AR “pistols”. There is information for 50 unique rifle cartridges plus shotgun and handgun cartridges. The book provides ballistics data for all these cartridges via easy-to-use data tables. The tables cover factory ammunition and handloaded cartridges, included the newer .224 Valkyrie.
The data tables compare standardized rifle and handgun cartridges from .17 caliber to up to .50 caliber. The book also provides data for 20-, 16-, and 12-gauge Shotgun cartridges. A handy summary table identifies each rifle cartridge presented and notes if it can be fired from a factory available MSR platform, a semi-custom platform/upper, as well as a semi-custom barrel. This 275-page, spiral-bound book is on sale now for $21.99.
Giant Cartridge Poster for Computer Wallpaper (1665×1080 pixels)
Here’s a great illustration of hundreds of cartridges and shotshell types. For dedicated reloaders, this would work great as desktop “wallpaper” for your computer. CLICK HERE for full-size image.
The Sporting Arms and Ammunition Manufacturers’ Institute, Inc., (SAAMI), has announced the acceptance of three (3) new cartridges for SAAMI standardization: 1) 277 SIG FURY; 2) 6.5 Weatherby Rebated Precision Magnum (WBY RPM); 3) 6.8 Western. While the 277 SIG FURY was developed originally for the U.S. Military, it should serve well for hunters, as will the new 6.5 Weatherby RPM and 6.8 Western. SAAMI has standardized the dimensions, max pressures, and load specs for all these three new cartridges.
277 SIG FURY from SIG Sauer
Developed by SIG SAUER for the U.S. Military, the 277 SIG FURY boasts a SAAMI maximum average pressure of 80,000 psi, driving a 135-grain bullet to 3,000+ fps. That 80K PSI pressure is WAY higher than almost all other cartridge types. To achieve these high pressures, the 277 FURY uses a hybrid case with a brass body and harder alloy metal case head. This design allows the cartridge to run very high pressures. Dan Horner of SIG Sauer told us: “When the handloaders get hold of this brass, it will be a game-changer for sure”. We envision this cartridge could be necked down to 6.5 mm and it would dramatically out-perform the 6.5 Creedmoor. And yes the official name of the cartridge is all caps “277 SIG FURY”.
Developed by Weatherby, the 6.5 Weatherby Rebated Precision Magnum (WBY RPM) was introduced with a maximum average pressure of 65,000 psi, with a 140-grain bullet traveling at a velocity of 3,075 fps. The 6.5 WBY RPM offers signficantly higher velocities that most other 6.5mm cartridges, including the 6.5-284 and .265 Win Mag. SEE 6.5 Cartridge Comparison Table
Developed by Olin Winchester, the 6.8 Western was introduced with a maximum average pressure of 65,000 psi, with a .277-caliber 175-grain bullet traveling at a velocity of 2,840 fps. A shorter variant of the Winchester Short Magnum (WSM) family, the new cartridge appears to be about .090″ shorter than the .270 WSM. It has the same 35-degree shoulder angle as the .270 WSM.
Top to bottom – Remington firing pin assembly with ISS, Tubb SpeedLock alloy-composite system without ISS (current versions have dual, opposite-wound springs), and Remington short action firing pin assembly without ISS.
The U.S. Army Marksmanship Unit regularly publishes technical articles on the USAMU Facebook page. One informative USAMU article covered mechanical issues and related ignition irregularities that can cause vertical fliers even with good ammunition in an otherwise excellent rifle. We highly recommend you read this article, which offers some important tech tips.
Vertical Dispersion: Mechanical/Ignition Issues?
Poor or inconsistent ignition has long been known to be one of the “usual suspects” when one encounters vertical fliers that just shouldn’t be there. By having a sense of some of the basic principles involved, and a few basic areas to check, the shooter may avoid colsiderable frustration, not to mention time, expensive loading components and barrel wear.
Is your well-built rifle of high-quality components plagued with vertical fliers across more than 1-3 handload combinations? Consider the bedding, crown and scope/sight mounts. Are they correct? If so, then you might check for ignition issues before boldly undertaking an extensive, expensive, and quite possibly fruitless quest for the “magic handload”.
SEEING IS BELIEVING: While the author had been aware for many years that poor ignition should be considered and ruled out when dealing with vertical fliers in an otherwise-excellent rifle, actually seeing the problem and its almost instantaneous cure really drove the lesson home.
He was working with a “dot” rifle – a .22 LR match rifle that really stacked bullets into little piles at 50 yards and beyond. With one lot of ELEY Tenex, it produced consistent “bughole” groups at 50, but with another, selected lot of Tenex, similar groups were regularly ruined by single, vertical fliers that did not appear in other rifles. Rather than spending days burning up expensive, select ammunition looking for “magic lots”, he contacted a well-respected rimfire gunsmith and explained the situation.
Without so much as batting an eye, the highly-experienced ‘smith tore into the rifle’s action, and quickly found the cause(s) of the problem. He discovered a demonstrably weak firing pin spring, plus a chip out of the face of the firing pin where it contacted the cartridge rim.
After replacing and tuning the offending parts, the rifle immediately began shooting tiny, bughole groups with the previously “unacceptable” lot of Tenex. Centerfire rifles can also benefit from ensuring positive, consistent ignition. A wise riflesmith is literally worth his weight in gold!
So, what are some issues we as shooters can inspect in our rifles to help determine if ignition woes could be part of our problem? At the club level, ask yourself if that “experienced” Remington, Winchester 70, or even Springfield-based match bolt gun you’re using is still running its’ original 40-80 year-old factory striker spring? If so, a new replacement is cheap insurance against current or future problems. (And BTW, it might be best to stick to the normal, factory-spec spring weight. A super-powerful spring can cause vertical, just as a weak one one can.) Along with that, a routine check for proper firing-pin protrusion is a quick preventive measure that can rule out potential issues.
Other areas to consider are the centering and consistency of the firing pin’s operation in the bolt. Admittedly, with the increasing use of precision-machined custom actions, this is becoming less an issue every day. Below is the firing pin assembly from a custom BAT action:
However, particularly with factory actions, a very quick and easy check is to remove the bolt, let the firing pin go forward, and look at the firing pin tip through the firing pin hole. Is the tip off-center in the hole, and possibly striking it as it moves forward? Is the hole out-of-round or burred from being struck repeatedly? If so, a trip to the riflesmith is likely in order.
Similarly, machining issues in the bolt/firing pin system can lead to rough and erratic firing pin movement, in which the firing pin drags against an internal surface of the bolt. In high-quality rifles these issues are relatively rare, but not unheard-of, and it takes mere minutes to rule them out. It may be worthwhile to remove the cocking piece/firing pin/spring assembly and look for any unusual gouges, dings, peening, burrs or signs of abnormal wear.
This task is especially easy with Winchester 70s, Springfields, and the similar Mauser 98s, involving little more than the push of a button and unscrewing the cocking piece assembly. This is just one of the many reasons these tried-and-true actions have earned such a loyal following in the field, among hunters who must maintain their rifles away from a shop.
Particularly with older rifles, watch for and remove excess grease (or even Cosmoline!) from both the firing pin assembly and inside the bolt. This can help improve firing pin speed and consistency. Other bolt-action designs may need a take-down tool or other measures.
As part of this inspection, AFTER ENSURING THE RIFLE IS UNLOADED, slowly cock the rifle, dry-fire, and repeat several times. Listen carefully near the action for inconsistency in the sounds it generates. Does the striker falling make the same sound each time? Do you hear or feel grinding upon operation? If so, where?
Be sure to check the operation of the cocking piece (bolt shroud), firing pin within the bolt shroud, the cocking piece cam and the rear of the bolt body where the cocking piece cam operates. As with our examination for abnormal wear marks discussed above, look for marks indicating roughness or a possible need for light polishing. Then, clean and lightly grease the bearing surfaces while you’re at it.
Remington 700 bolt shroud and cocking cam
These are relatively easy checks that shooters can undertake to perform a preliminary inspection on their own. Other mechanical issues can also cause ignition issues, chiefly centered around the action of the trigger, sear and sear spring. If these are suspected, a trip to an experienced, qualified riflesmith for diagnosis is recommended. We hope you find this information helpful! Join us again next week, and in the meantime, enjoy the shooting sports safely!
Whether you should from the bench, or from prone, it’s great to have your cartridges in a convenient, easy-to-reach position. This article explains how you can build your own height-adjustable ammo caddy for under ten bucks. Credit Martin Tardif for this great Do-It-Yourself (DIY) project. Martin’s flex-arm caddy design works great for F-Open competitors as well as anyone who shoots with a pedestal front rest, either on the ground or from a bench. The ammo caddy attaches, via a flexible arm, to your front rest. The flexy arm allows you to position your ammunition close to your rifle’s feeding port. That makes it easy to grab cartridges and load them into the chamber without shifting your shooting position.
Kudos to Martin Tardif for his clever use of inexpensive materials. The total cost of the whole project, according to Martin, was just $8.00!
Martin Explains How to Build the Ammo Caddy
Here are some pics of my DIY P.L.A.B. (Port Level Ammo Block). I cannibalized the goose neck from a Craftsman bendy-style utility light and bought a 3.5″x 1″ Acetal disk on eBay. I then drilled out the disk to accept twenty .284 Winchester rounds and screwed the disk to the bendy arm. The arm, by itself, wasn’t sturdy enough to support my fully loaded ammo block, so I inserted a 1/8″-diameter steel rod cut to length into the arm before I screwed it to the disk. On this Bald Eagle rest, I wasn’t using the windage adjustment cable. That allowed me to secure the bottom end of the arm to the unused 5/16″ x 18 bolt hole for the cable. [Editor’s Note: For other pedestal rest types/brands you may need to drill a hole for the base of the flexy arm.]
Rifleshooter.com built this tactical rifle (top image) with a Howa 1500 action, Shilen barrel, and MDT chassis. Below is a factory Howa 1500 Multi-Cam rifle.
Many of our readers are thinking of purchasing a Howa rifle or barreled action. These feature smooth-running actions with a good two-stage HACT trigger. But some folks have heard that it may be difficult to find stocks, or to fit an after-market barrel. That’s not true. There are many stock options available, and in this article, Bill of RifleShooter.com shows that it is easy to remove the factory-installed barrel with the right tools. We think a Howa makes a fine basis for a varmint rig or field rifle. Or you can build a tactical rifle as Bill did. You can start with the factory barrel and when you want/need more accuracy, then have a gunsmith install a custom barrel from Krieger, Shilen, or other quality brand.
What You Need to Know About Howa 1500-series Rifles
Tech Feature by RifleShooter.com
Consider this article the “Howa 1500 Overview”. AccurateShooter.com’s editor mentioned there’s been a lot of interest in Howa rifles and barreled actions imported by Legacy Sports International. In addition to being able to buy a complete rifle from a dealer, Brownells sells barreled actions in a wide variety of calibers and configurations. In this post we are going to take a look at the Howa 1500 series.
Howa Rifles — General Background
Howa is a Japanese heavy machinery company. One of its product lines are firearms, which, are imported into the United States of America by two different companies, Legacy Sports International and Weatherby. Legacy sells the 1500 under the manufacturers name while Weatherby re-brands the guns as the Weatherby Vanguard. In general, the finishes on the Weatherby rifles are more refined than the LSI-imported 1500s.
General Evaluation of Howa 1500 Rifles
I’ve found Howa 1500s to be solid, entry-level rifles that are capable of sub-MOA accuracy out of the box. I’ve actually purchased two Howa rifles I’ve tested because I like them so much. The gun below, a Howa Mini-Action in 7.62×39 Russian, is one of my favorite factory guns to shoot. I’m running a Tract Optics Toric on it, these are solid little rifle scopes that offer great performance for the money.
Check out this three-shot group I drilled at 100 yards with the rifle above and 125-grain Sierras. It took a lot of work and load development to get there, but when it did, it worked well.
Howa 1500 HACT 2-Stage Trigger
Howa 1500s feature the very nice Howa HACT trigger. This is an adjustable, two-stage trigger, set for about 3 pounds (combined stages). Crisp and repeatable, this is an excellent trigger for a factory gun. There is no annoying Glock-style safety lever in the middle of the trigger blade. The 2-stage design and pull weight range works well for a hunting rifle or a rig for PRS competition. Rifleshooter.com says the Howa trigger is “one of the best factory triggers, along with Tikka. I’ve found the Howa trigger superior to a Remington 700 — the Howas doesn’t need to be replaced.”
Writing for the Western Outdoor News, WONews.com, Steve Comus has field-tested the new HACT Trigger. Steve writes: “I always liked two-stage triggers, because of the way I could take-up the slack and then actually know when the rifle was going to go off. The take-up on the [HACT] trigger was fast and easy. The crisp, positive release when pressure was put on during the second stage [reminded me] of some of the target rifles I shot through the years.”
Howa Actions — Three Options
Howa offers three action lengths: Mini, Short, and Long. You can see the bolts for the three action lengths in the image below. The Mini-Action has similar external dimensions to the Remington Model Seven, however, the Mini-Action’s bolt does not travel as far to the rear. This is a mixed bag. The upside is you have a quicker action (shorter bolt throw). The downside is you are limited to shorter rounds such as the .223 Remington, 7.62×39mm Russian, and 6.5 Grendel. But if you need a bigger cartridge, just choose the standard or long action Howa variant.
Howa 1500 vs. Remington 700 — Important Differences
Is the Howa 1500 a Remington 700 clone, or some kind of improved Remington 700? No, not really. While the top radius of the Howa 1500 does match the Model 700, and they can both use the same two-piece scope bases, there are a number of differences.
If you look at the Howa 1500 alongside the Remington 700 you’ll note the M700 is a round action, while the Howa is a flat-bottom action. In many ways the Howa’s bottom half reminds me of a push-feed Winchester. This means the chassis and stocks that support a Howa 1500 are not V-block based like you’ll find on a 700, instead they have a flat bottom. While the bolt of the Howa is similar in external appearance to the Model 700, it does offer some improvements, notably an M16-style extractor and a firing pin assembly that can be easily removed without tools.
Howa 1500 action screws are metric and are in a different location from the 700. The Howa 1500 has an integral recoil lug that accepts the front action screw, this means you have more of the front action screw engaging the action. WARNING: If you install it into a poorly-fitted stock or action you may bind it.
Can a Howa Action Be Used for a Custom Rifle Project?
Absolutely! You can either buy a barreled action from Brownells and throw it in a chassis system/stock of your choice or you can use a stripped action to build a custom rifle. If you are in the chassis market, MDT offers a wide variety of chassis in different price ranges. All have worked well for me.
How to Remove Howa Factory Barrel from Action
You may have heard internet grumblings about removing Howa barrels. Some keyboard commandos say they are extremely difficult to remove without a relief cut. Well Bill at Rifleshooter.com demonstrates that Howa barrels can be removed without trouble, provided you have the right tools. Watch this video:
Watch Howa Barrel Removal Video — Quick and Easy (Click Speaker Icon for Audio)
Q: Is it difficult to remove a barrel from a Howa 1500?
A: Not very. I’ve heard from some smiths that worked on Howas (years ago) that the factory barrels are difficult to remove. However of the half dozen or so Howa barrels that I’ve pulled, they’ve been very easy. I use a Brownells action wrench with the top piece for a Rem Model 700 and the flat bottom resting against the flat on the wrench.
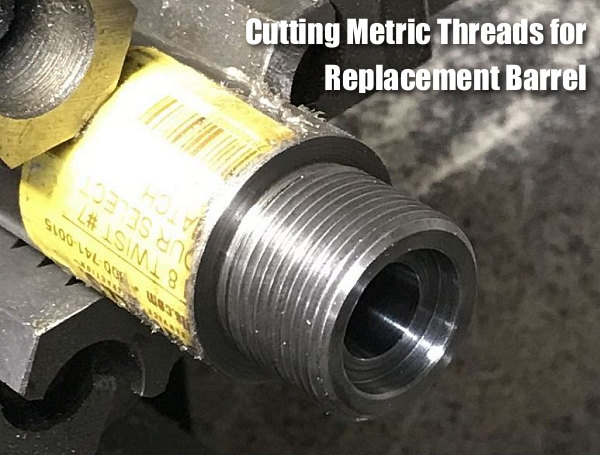
Howa Actions Require Metric Barrel Threads
It’s easy to thread a barrel for a Howa Action. You just have to cut metric threads — most lathes out there can cut them. I cut the threads below on a manual lathe using change gears. [Editor: John Whidden cuts metric tenon threads with a CNC lathe. “It’s easy,” John tells us, “No issue whatsoever.”]


 Many shooters are familiar with ballistics tables, weather programs, and even


 The
The 


 Is your well-built rifle of high-quality components plagued with vertical fliers across more than 1-3 handload combinations? Consider the bedding, crown and scope/sight mounts. Are they correct? If so, then you might check for ignition issues before boldly undertaking an extensive, expensive, and quite possibly fruitless quest for the “magic handload”.


 Howa 1500 HACT 2-Stage Trigger