Airport photo by Politikaner under Creative Commons License.
With hundreds of readers traveling to Raton, New Mexico next month for the 2020 F-Class Nationals (October 25 – November 1, 2020), and with many others planning hunting trips out of state, we thought we’d repeat an article providing important information about air travel with firearms. If you will be flying with firearms this fall, you should read this article. You need to familiarize yourself with current Federal Regulations on gun transport before you get anywhere near an airport. Thankfully, the Transportation Security Administration (TSA) has a web page that states the important requirements for airline passengers traveling with firearms* and/or ammunition.
You’ll want to visit the TSA Firearms and Ammunition webpage, and read it carefully. In addition, before your trip, check the regulations of the airline(s) with which you will fly. Some airlines have special requirements, such as weight restrictions.
Here are the TSA’s key guidelines for travel with firearms:
More Airline Travel Tips from Tom McHale
Tom McHale has written an excellent article for the Beretta Blog, Ten Things You Need to Know about Flying with Guns. We suggest you visit the Beretta Blog to read this informative story. Here are two of Tom McHale’s Travel Tips:
Weigh your gun case and ammunition
Most airlines will allow up to 11 pounds of ammunition. And, like any luggage, you will be charged more for any baggage weighing more than 50 pounds. This sounds like a lot, but when traveling to the Crimson Trace Midnight 3 Gun competition last year, my case with shotgun, rifle, pistol and ammunition tipped the scale past the 50 pound mark.
Pack ammo in the same locking case
This is another area that’s misunderstood and full of internet myth. Your ammo just needs to be stored in some type of safe container and not loose. Technically, you can keep ammunition in magazines, but I wouldn’t recommend it. It meets the letter of the law storage requirement, but too many airline and TSA agents will give you grief. Use a plastic ammo box or original cardboard packaging and you’ll be fine carrying that in the same lockable case as your gun.
*SEE United States Code, Title 18, Part 1, Chapter 44. A “firearm” is defined as: any weapon (including a starter gun) which will, or is designed to, or may readily be converted to expel a projectile by the action of an explosive; the frame or receiver of any such weapon; any firearm muffler or firearm silencer; and any destructive device. As defined by 49 CFR 1540.5 a loaded firearm has a live round of ammunition, or any component thereof, in the chamber or cylinder or in a magazine inserted in the firearm.
Hunting Season has already started in some states, and is right around the corner in other locations. For readers who plan to hunt game this fall, we recommend you brush up on hunter safety and learn the laws in your jurisdiction. Here are some helpful resources for hunters: Safety Tips, Hunter Education, License Requirements, and Where-to-Hunt interactive map. Top photo courtesy Horn Fork Guides, Ltd., in Colorado.
Visit WhereToHunt.org
There’s a great online resource for hunters that will help you find game locations in your state and ensure you have all the proper permits and game tags. WheretoHunt.org features an interactive map of the country. For all 50 states, the NSSF has compiled information about hunting license and permits, where to hunt, hunter education classes, laws and regulations and more. For each state you’ll also find a link for required applications and license forms.
Click Map to Get State-by-State Hunting INFO
Hunter Safety Tips NRAFamily.org has a good article listing six salient safety tips for hunters. Anyone preparing for a fall hunt should read this article before heading into the field. Here are three key bits of advice:
1. Be Positive of Your Target before Shooting
This might sound overly simplistic, but the fact remains that, every year during whitetail season, farmers everywhere are forced to spray-paint their cattle or risk having them “harvested” by hunters who don’t bother confirming the species of the large ungulate in their sights. Why does this happen? The most likely explanation is “buck fever,” meaning that the hunter wants so badly to see a nice big buck that sometimes his eyes deceive him into thinking that there’s one there. When in doubt, don’t shoot.
2. Scopes Are Not Binoculars
Never use a riflescope as a substitute for binoculars. The temptation to do so is real, but when one does this, one is by definition pointing the muzzle of the gun at unknown targets.
3. Know When to Unload
When finished hunting, unload your firearm before returning to camp. You should also unload your gun before attempting to climb a steep bank or travel across slippery ground.
Hunting Affiliation Groups
There are many good organizations dedicated to promoting hunting and preserving our hunting habitats. These groups all offer valuable information for hunters:
Brownells is a well-known retailer of guns, gun parts, tools, accessories, ammo, and pretty much everything gun related. Brownells has a very active video production department that releases new “how-to” and product information videos every week. These videos offer helpful advice on gun cleaning/maintenance, reloading, as well as selecting/assembling components for various kinds of rifles. There now over 1000 videos on the Brownells YouTube Channel, this really is a remarkable resource.
One of our favorite regular Brownells video features are the Quick Tip Cartridge Comparisons. Brownells tech staffers look at a pair of cartridge types and reveal the noteworthy differences. Here are three recent Cartridge Comparison videos from Brownells.
1. 6.5 Creedmoor vs. .260 Remington
Brownells Gun Tech Caleb Savant compares and contrasts the 6.5 Creedmoor rifle cartridge with the older .260 Remington. Both cartridges are often loaded to nearly the same overall length (OAL), but with more of the bullet inside the neck for the .260 Rem. The .260 Remington is basically a .308 Winchester necked down to 6.5mm (.264″). The 6.5 Creedmoor has a shorter case, with a more modern 30-degree shoulder angle. With the same cartridge OAL, that can make it possible to load longer-ogive, higher-BC bullets. However, with a long-freebore chamber, the .260 Rem can certainly run any high-BC 6.5mm bullet made.
The .260 Remington can, theoretically, generate a bit more velocity at the muzzle because its longer case holds a bit more powder. However, with high-quality Lapua brass, in the real world, the 6.5 Creedmoor comes pretty darn close to .260 Rem performance with any given bullet weight. Moreover, the 6.5 Creedmoor is available with small primer pocket brass from Lapua. This brass may give a higher number of reloading cycles before case-head expansion becomes a problem. For the hunter, both choices are good, but the older .260 Rem may feed a bit better from a magazine, given the .260’s case taper and longer body. Overall, we favor the 6.5 Creedmoor for its versatility and efficiency, but the .260 Rem is a good cartridge too.
2. 6.8 SPC vs. 6.5 Grendel
Brownells Gun Tech Caleb Savant compares two medium-caliber cartridges that can work in AR15-platform rifles: the 6.5 Grendel and the 6.8 SPC (aka 6.8mm Remington “Special Purpose Cartridge”). The 6.5 Grendel is typically loaded with a high-BC .264″ bullet, while the 6.8 SPC has a larger-diameter .277″ bullet. Both have the same 2.26″ OAL as the AR-15’s standard .223 Remington / 5.56 NATO round. The big difference is the 6.5 Grendel’s faster velocity and flatter trajectory. With the same bullet weight, Brownells says the 6.5 Grendel will be about 100 fps faster than the 6.8 SPC. Given a 100-yard zero, the 6.5 Grendel will drop about 8.5″ at 300 yards, while the 6.8 SPC will drop 10.5″ at the same range. The 6.5 Grendel is probably a better choice for long-range targets, at least when loaded with a higher-BC bullet. A big difference is brass. You can get superb Lapua brass for the 6.5 Grendel. Not so for the 6.8 SPC, which really has never developed into a widely popular accuracy round.
3. 7.62×51 NATO vs. .308 Winchester (Subtle differences)
Brownells Technician Caleb Savant talks about the .308 Winchester and 7.62x51mm NATO. Most shooters know that both rounds have the same external dimensions. In fact, the military 7.62×51 was developed from the civilian .308 Winchester. So… can they be used interchangeably? The 7.62×51 cartridge normally can be fired from any rifle chambered in .308 Winchester because the 7.62 is spec’d for a lower pressure than SAAMI max in the .308 Win. However, we have encountered some British and Austrian 7.62×51 NATO milsurp ammo that was VERY hot — more than a typical commercial .308 Win Load. Accordingly you should always be careful when shooting new 7.62×51 ammo in your rifles. Likewise you should be careful about shooting higher-pressure .308 Win in some 7.62 NATO rifles. The 7.62×51 NATO chamber is slightly longer, and the cartridge’s case is typically a bit thicker, so it will “flow” and expand into the extra space. NOTE: Some newer rifles with 7.62×51 NATO chambers ARE made to handle .308 Win ammo. Check the owner’s manual or contact your rifle’s manufacturer to find out for sure.
“Science tells us that exposure to continuous noise of 85 dB for eight hours is enough to cause permanent hearing loss, and worse, spikes of 130 dB and more can result in permanent hearing damage instantly.” Source: NRA Blog.
The Risk of Hearing Loss
Hearing loss can be progressive and irreversible. If you are a shooter, this is serious business. As the NRA Blog cautions: “You may not even realize you’re harming your hearing. Hearing loss occurs gradually, and can go effectively unnoticed until symptoms become severe. By then, the damage is done.”Effective hearing protection is a must whenever you are shooting firearms or when you are in the vicinity of gun-shots. For ultimate protection, we recommend a good set of tapered foam earplugs, topped by ear-muffs. However, there are situations when you may prefer lighter-weight hearing protection that can be quickly removed. For example, if you are standing well behind the firing line as an observer, or if you are working as a rangemaster or waddie some distance away from the shooters.
Sound Levels for Common Noises:
9mm Luger pistol: 160 dB
Jet aircraft engine (near): 140 dB
.22 LR pistol: 134 dB
Normal human pain threshold: 120 dB
Noisy Nightclub: 110 db
Riding Motorcycle at 65 mph: 103 db
Power Lawnmower: 95 dB
Hearing damage possible: 85 dB (sustained for 8+ hours)
Hearing bands are inexpensive, lightweight, and are handy for special situations, such using hedgetrimmers and noisy power tools, when you may need to frequently remove the protection. These banded products are a also a very good form of hearing protection for hunters. You can keep them handy around the neck while spotting game, and then insert the plugs before shooting. We have tried two types of banded hearing protection, the Howard Leight Quiet Band (shown above) (25 dB NRR), and the Radians Rad-Band (23 dB NRR). The Leight Quiet Band is quite durable and the plugs can be replaced.
Radians Rad-bad is very light-weight, with Jelli™ Plugs that are comfortable, washable, and reusable. Peltor also offers Sport Banded Earplugs but we think those are a bit flimsy and the NRR seems exaggerated.
2. Ear Muffs — Max Protection and Compact Options
The highest current USA Noise Reduction Rating is 34 dB NRR. To get that kind of protection, you need pretty big muffs, but thankfully, you don’t have to spend big bucks. For under $15.00 you can buy quality ANSI-approved muffs with a 34dB Noise Reduction Rating. Chose the G&F Pro Muffs at $13.08 (Amazon’s Choice), or the dark green Walker EXT Range Muffs for $14.99. Both products have padded head-bands which retract.
Many hunters and competitive shooters prefer low-profile ear muffs. As these typically have a lower Noise Reduction Rating, perhaps NRR 22-24, we recommend running earplugs under muffs, particularly when you are at a busy range or shooting a match. If you use low-profile electronic muffs, such as Howard Leight Impact Sport Muffs, you should still be able to hear range commands even with plugs underneath.
3. Earplugs — Small, Inexpensive, but Essential
20 Pairs
50 Pairs
These Howard Leight NRR33 Max plugs are your Editor’s favorite foam earplugs. Between shooting, motorcycling and mowing lawns, I probably have Max plugs in my ears 3-4 days a week. These Leight Max plugs are very effective, easy to insert/remove (with the flared ends), and they seem to be less abrasive in the ear canal than some other brands. Right now you can get 50 pairs of these NRR33 Leight Max plugs for just $8.40 (with free shipping).
Note, if you prefer thin, light-weight earmuffs, we recommend running earplugs underneath for double protection while shooting firearms (or when you’re on the firing line). Sound experts tell us that running plugs and muffs together can effectively improve your effective noise reduction by 4-7 db NRR.
One of our Forum members complained that he wasn’t able to set his primers flush to the rim. He tried a variety of primer tools, yet no matter what he used, the primers still didn’t seat deep enough. He measured his primers, and they were the right thickness, but it seemed like his primer pockets just weren’t deep enough. He was mystified as to the cause of the problem.
Well, our friend Boyd Allen diagnosed the problem. It was the decapping rod. If the rod is adjusted too low (screwed in too far), the base of the full-diameter rod shaft (just above the pin) will contact the inside of the case. That shaft is steel whereas your case is brass, a softer, weaker metal. So, when you run the case up into the die, the shaft can actually stretch the base of the primer pocket outward. Most presses have enough leverage to do this. If you bell the base of the primer pocket outwards, you’ve essentially ruined your case, and there is no way a primer can seat correctly.
The fix is simple. Just make sure to adjust the decapping rod so that the base of the rod shaft does NOT bottom out on the inside of the case. The pin only needs to extend through the flash hole far enough to knock the primer out. The photo shows a Lyman Universal decapping die. But the same thing can happen with any die that has a decapping rod, such as bushing neck-sizing dies, and full-length sizing dies.
Whenever you use a die with a decapping pin for the first time, OR when you move the die to a different press, make sure to check the decapping rod length. And it’s a good idea, with full-length sizing dies, to always re-check the height setting when changing presses.
There are a variety of decapping dies currently on the market, with models available from Lee, Lyman, Hornady, RCBS, Redding, and Sinclair Int’l.
Lee Universal Decapping Die on SALE for $10.96
Speaking of decapping tools, Midsouth Shooters Supply sells the Lee Universal Decapping Die for just $10.96 (item 006-90292), a very good deal. There are many situations when you may want to remove primers from fired brass as a separate operation (prior to case sizing). For example, if your rifle brass is dirty, you may want to de-cap before sizing. Or, if you load on a progressive press, things will run much more smoothly if you decap you brass first, in a separate operation.
Decapping Dies for Cases with Smaller Flashholes
TAKE NOTE: Some Euro Small Flash Holes are spec’d at 1.5mm or 0.059″, and max out at about .062″, so these need a smaller die pin.
The low-cost Lee Universal Decapping Die will work with cartridges from 17 Fireball all the way up to big Magnums. However, NOTE that the decapping pin supplied with this Lee die is TOO LARGE for LAPUA 220 Russian, 6mmBR, 6.5×47, 6.5 Creedmoor, .308 Win (Palma) and Norma 6 PPC flash holes. Because the pin diameter is too large for these brass types, you must either turn down the pin, or decap with a different tool for cases with .059-.062″ flash-holes.
Sinclair Int’l offers a Stainless Decapping Die that comes with both .080 and .060 Pins. The $34.99 die ships with three decap pins for standard .080″ flash holes, and two pins for .060″ flash holes
Redding makes a Universal Decapping Die with an optional smaller-diameter decapping rod for the smaller .059-.062″ flash holes found on the BR and PPC cases. The use of this die is explained in the video below:
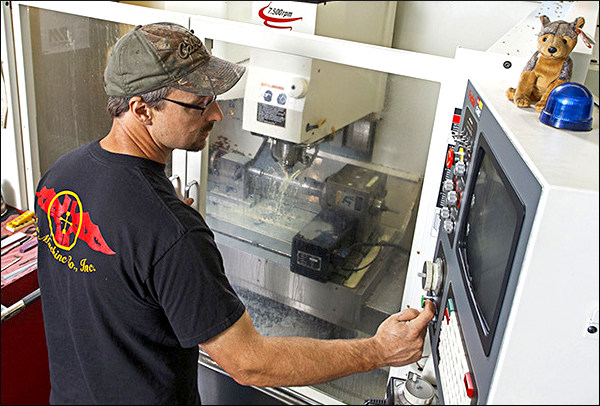
If you have ANY interest in custom rifle actions, you MUST watch this video from UltimateReloader.com. Folks, definitely watch the video — it is VERY informative! To produce this video, Ultimate Reloader’s Gavin Gear visited the BAT Machine facility in Post Falls, Idaho, and interviewed BAT owner Bruce Thom.
In the video Bruce Thom demonstrates how BAT Machine actions are created from start to finish. Bruce shows every stage of the process, employing multiple high-tech machines. It’s impressive — Forum members say that this is a “must-watch” video. Gunsmith Jackie Schmidt noted: “Great Video. Even though I have been in the machine shop business for 50 years, I still marvel at the new innovations in precision machining. Bruce has a very down-to-earth, common sense approach to explaining what to many seems like machining wizardry.” And Mark T. posted: “Watched it last night. Excellent video and excellent machining practices — precision from beginning to end.”
Click Arrow to Watch Video
For further explanation of the action production processes, with step-by-step listing of how receivers and bolt assemblies are created, read Gavin Gear’s full BAT Machine Article on UltimateReloader.com.
BAT Machine Company Was Started 29 Years Ago
Back in 1991, Bruce Thom started BAT Machine Company, which was incorporated later in 1996. Bruce’s shop stared with manual machines, quickly moving to CNC machines later in the 1990s. BAT Machine quickly achieved a following among benchrest shooters for crafting superb actions that exhibited flawless function and superb machining. Those qualities, benchrest competitors realized, helped produce tiny groups, win matches, and set benchrest records. BAT Machine now makes rifle actions for a wide variety of disciplines: F-Class, PRS, ELR, hunting, and of course short- and long-range benchrest.
BAT Action Body Machining Stages
As shown in the video, here are the major stages for the fabrication of a BAT Machine receiver body:
1. Start: raw 17-4 stainless round bar (higher toughness than typical barrel/receiver steel)
2. Heat treat
3. Bore central hole (for EDM wire), face ends
4. EDM machining (cut bore and raceways)
5. True OD, cut receiver threads and lug seats
6. Cut tang and related features
7. Finish machining including body OD, integral lug (if equipped)
Final Production Stages — Polishing and Deburring
After the receiver body and bolt are machined, they go through a deburring and polishing process.
In the image above you can see the stages. At left is a receiver body straight from machining. Some hand work is typically performed to break interior edges that are sharp from machining. In the center, the receiver shows can see the initial polish stage. During this stage, machining marks are removed by coarse polishing. Additionally for receivers that will be nitrided, that will be done next. But for actions that are NOT nitrided, a final polish brings the parts up to a high luster, as show on the right.
After polish (and nitriding if that applies) the bolts and receivers get a finish assembly, and testing for proper smooth functioning. The receivers are then registered with the ATF and shipped to the customer.
Here’s something all shooters need — a smartphone App that calculates bullet-hole group sizes from your own photos. The Ballistic-X App is simple to use. Take a photo of your target, set some values (such as bullet diameter and distance to target), then use the touchscreen to place circles around each hole. The App will calculate group size (in MOA or Mils), distance to point of aim, and provide all the info in an overlay. Then click “save” to record your group for posterity!
This App works well, is relatively easy to set-up, and costs just $7.99. It is available for both Android devices and iOS (Apple) devices. There are other ways to measure group sizes from target images, such as the excellent On-Target program, which we have used for years. However On-Target requires a software installation on a Windows platform desktop or laptop. Ballistic-X is a simple, easy-to-install App with versions for both Android and iOS (Apple) Mobile devices.
The Ballistic-X App has a relatively easy-to-use interface. Of course you can choose either MOA or Milrad group values, and Inch or Metric dimensions. There are various labeling options that provide useful info for Load Development. There is even an ATZ (Adjustment To Zero) feature for adjusting your turrets.
How to Use Ballistic-X App
1. Select Photo Source — Choose Camera to take new photo or get image from Photo Library.
2. Set Reference Values — Select Bullet Diameter and enter Distance to Target.
3. Establish Scale on Image — Mark two points on target photo to set scale. For example, if the target has a 1″-square grid lines, mark two points on grid for 1″ distance.
4. Mark Point Of Aim — Put the central X on the aim point.
5. Designate Shot Locations — Place the green circles around each shot.
6. Finalize Data Display — Position Overlay, select size/color options, and export file.
Android Options — Range Buddy FREE App
Along with Ballistic-X, there is another Mobile App, Range Buddy, that also measures shot groups. Range Buddy is currently offered for Android devices only. It is FREE, but has adverts. Range Buddy isn’t bad, but users complained about the program crashing, and there are compatibility issues with newer phones. We recommend you pay $7.99 and stick with Ballistic-X.
When your cases become hard to extract, or you feel a stiff bolt lift when removing a cartridge, it’s probably time to full-length size your cases, and “bump” the shoulder back. Short-range benchrest shooters, running high pressures, typically full-length size every load cycle, bumping the shoulder .001-.002″. The vast majority of mid-range and long-range F-Class shooters also full-length size every time. High Power shooters with gas guns should definitely full-length size every time, and may need to bump the shoulders .003″ or more to ensure reliable feeding and extraction.
Use Shims for Precise Control of Shoulder Bump
Some shooters like to set the “default” position for their full-length die to have an “ample” .003″ or .004″ shoulder bump. When they need less bump, a simple way to reduce the amount of shoulder movement is to use precision shims in .001″ (one-thousandth) increments. Sinclair Int’l offers a set of seven (7) shims for your standard 7/8-14 FL sizing dies for $14.99.
Sinclair explains: “Each shim is notched for easy size identification. Just set your die using one of the middle thickness shims. Adjustments can be made easily by changing shims to increase or decrease die depth without changing the stem setting. This is a great upgrade for non-micrometer adjustable dies.”
Here are reports from Forum members who use the shims:
“Great product. I have my die lock ring(s) adjusted for the shortest headspace length on my multiple chambers 6BRs and 6PPCs. When needing a longer headspace, I just refer to my notes and add the appropriate shim under the lock ring. Keep it simple.” — F.D. Shuster
Mats Johansson writes: “I’ve been using [shims] since Skip Otto (of BR fame) came out with them. I set up my dies with the .006″ shim, giving me the option of bumping the shoulder a bit more when the brass gets old and hardens while still having room to adjust up for zero headspace, should I have missed the original setup by a thou or two. Hunting rounds can easily be bumped an extra .002-.003″ for positive, no-crush feeding. Being a safety-oriented cheapskate, I couldn’t live without them — they let me reload my cases a gazillion times without dangerous web-stretching. Shims are a must-have, as simple as that.” — Mats Johansson
Brownells offers the seven-piece set of Sizing Die Shims that let you adjust the height of your die (and thereby the amount of bump and sizing) in precise .001″ increments. Sinclair explains: “Some handloaders will set their die up to achieve maximum sizing and then progressively use Sinclair Die Shims between the lock ring and the press head to move the die away from the shellholder. Doing this allows you to leave the lock ring in the same position. These shims are usually available in increments of .001″ and work very well.”
Seven Shims from .003″ to .010″
For use with 7/8-14 threaded dies, Sinclair’s $14.99 Die Shim Kit (Sinclair item 22400 or Brownells Code 749-001-325WB) includes seven shims in thicknesses of .003, .004, .005, .006, .007, .008, and .010. For ease of use, shim thickness is indicated by the number of notches cut in the outer edge of each shim. Even without looking you can “count” the notches by feel.
NOTE: These shim sets can also be use to adjust bullet seating depth for dies that lack micrometer adjustment. Use the same 7/8-14 shims with your non-micrometer seating dies.
Shims for Arbor Dies
Do you seat with an Arbor Press? No problem…
Brownells offers a $14.99 10-shim Arbor Die set for use with L.E. Wilson seating dies employed with arbor presses. Frankly we prefer micrometer-top Wilson dies, but if you have the standard Arbor dies, these shims come in handy. Order either Brownells Code 749-001-370WB (.22 to .243 caliber) or Brownells Code 749-001-326WB (.25 to .30 caliber).
SUMMARY: Powder can have a very long shelf life. You need to watch for changes in smell and color. A reddish tinge, almost like rust on the powder, is a bad sign, as is a foul odor, not to be confused with a normal chemical smell. Either of these signs indicate it is time to dispose of your powder by means other than shooting.
Ever wondered about the stability of the propellants in your reloading room? There are some important things you should know about powder storage, to ensure consistent powder performance and safety. On its website, Western Powders (vendors of Accurate, Norma, and Ramshot powders) published an informative Q & A series entitled Dear Labby: Questions for our Ballistics Lab. Here are some excerpts that pertain to powder storage and shelf life. Worried that your powder may be too old? Western’s experts explain how to check your propellants for warning signs.
Proper Powder Storage
Q: I live in southern Arizona where it is very hot. I am told powders will become unstable if stored in an area not air-conditioned. My wife says no powder or primers in the house. Can powder be stored in a refrigerator? What about using a fireproof safe? I would appreciate your ideas. — M.C.
Lab Answer: SAAMI guidelines are pretty clear on issues of storage. They recommend storing smokeless powder in containers that will not allow pressure to build if the powder is ignited — ruling out gun safes and refrigerators.
In their original containers smokeless powder’s lifespan is quite long, even in your hot, arid climate, typically longer than the average handloader would need to store them. Stored safely in a garage or outbuilding, your powder should last years. If you see the powder developing a reddish tint, or giving off a foul odor, it is time to discard it.
Clumps in Powder Container
Q: I ordered some of your Accurate 1680 powder back about in December. I just now opened it … and it is full of clumps. My knowledge tells me that means moisture. Am I wrong? I just now broke the seal and it has been stored in a ammo can with desiccant packs around it and a dehumidifier running 14-16 hours a day. I can’t imagine this being my fault, if this does indicate moisture. I don’t know if the pink part on the label is suppose to be red or not, but it is definitely pink, so if it was red I am wondering if I was shipped an old container? I hope that this isn’t bad and I am stuck with it…
Lab Answer: All powder contains a certain amount of moisture. When the powder is stored or during shipping, it can go through temperature cycles. During the cycling, the moisture can be pulled to the surface and cause clumping. Clumping can also be caused by static electricity if too dry or the powder has limited graphite content. You can break up the clumps before metering and they shouldn’t be a problem. This will not affect the powder performance, so your product is fine. Accurate 1680 labels are designed in Pink. As a side note, specification for testing powder is at 70° F and 60% humidity.
Shelf Life and Packaging Dates
Q: Does powder ever get to old to use and what identifying marks does your company put on the canister for when it is made, You have helped me out a while ago when I asked about keeping my cowboy shooting under 950 fps and it works great less stress on the hand and the recoil is very minimum. — R.B.
Lab Answer: On one pound bottles, the number is on the corner in a silver box. If the powder was poured today, it would read 012815 followed by a lot number. The whole number would look something like 012815749. Eight pound bottles have a sticker on the bottom with an obvious date code. The lot number appears above the date.
Running out of space in your gun safe? Here’s a clever product that will allow you to store more long guns in your current vault. The plastic Rifle Rods from Gun Storage Solutions slip in long-gun barrels and then grip the shelf above using Velcro pads. This allows you to nestle your rifles and shotguns much closer together than with the conventional racks provided with most gunsafes.
The handy Rifle Rods are offered in bright orange or basic black. We prefer the orange rods (shown above with the Velcro “receiver” shelf liner provided with the Rod Kit).
Rifles with narrow furniture (such as lever guns) can be placed very close together, saving lots of space. For benchrest or varmint rifles with wider fore-ends, you won’t benefit as much. Note that, in the photo above, all of the guns are fairly slim — none have wide fore-ends. Still we think these Rifle Rods could open up 12″ or more horizontal clearance in a medium-sized safe — that could easily allow you to store six (6) more guns in two rows, as shown.
Rifle Rod Kits Starting at $24.95
A kit with 5 Rifle Rods and loop fabric shelf liner costs $24.95 on Amazon.com, while the 10-Rod Kit with liner costs around $34.95. That’s a lot cheaper than buying a new safe. A six-pack of additional Rifle Rods costs $17.95 on Amazon. You can also purchases rods and fabric directly from Gun Storage Solutions.
WARNING: Always REMOVE Rod from barrel before taking gun to the range. Never place live ammunition in a gun with storage Rod in the barrel!
Product tip from EdLongrange. We welcome reader submissions.


 The Risk of Hearing Loss


 Shims for Arbor Dies


