Brownells is a well-known retailer of guns, gun parts, tools, accessories, ammo, and pretty much everything gun related. What you may not know is that Brownells has a very active video production department that releases new “how-to” and product information videos every week. These videos offer helpful advice on gun cleaning/maintenance, reloading, as well as selecting/assembling components for various kinds of rifles. And every week Brownells serves up a new products video. There now over 1000 videos on the Brownells YouTube Channel, this really is a remarkable resource.
Here are six of our favorite recent videos from Brownells. AR owners will find some good advice on spare parts, new reloaders can learn how to use the OAL tool, and all gun owners should watch the video on ammunition storage.
Introduction to PRS Competition
In this video, Tom Beckstrand, former Special Forces Sniper Team Leader and Guns & Ammo magazine staffer, looks at the Precision Rifle Series (PRS). Tom covers the types of stages in a typical PRS match using unconventional, real-world shooting rests. He also discusses the equipment you’ll need including bag supports, bipods, tripods, and optics. As most ranges aren’t set up for PRS, Tom offers tips on how to train at your local range.
How to Use Hornady OAL Tool and Hornady Bullet Comparator
Gun Tech Steve Ostrem explains how to properly use Hornady’s Overall Length Gauge to determine length-to-land precisely. The OAL Gauge uses a “Modified Case” that theads onto the tool and holds a bullet. Push on the back of the gauge until you feel the bullet just touch the rifling. (We do this gently at first, tapping the rod a couple time to ensure the bullet is aligned correctly). Once you’ve got the length, then use the tool with a comparator on your calipers to get the lenght-to-lands. NOTE: We recommend taking the measurement 3-4 times in a row to get a reliable number. With a little practice your should be able to get repeatable measurements within .0015″.
New Bog Pod Tripod and Caldwell Electronic Muffs
Brownells staffer Paul Levy showcases the impressive new DeathGrip Tripod from Bog Gear. The DeathGrip’s adjustable jaws clamp firmly to the rifle’s forearm. This is a useful device for both PRS shooters and hunters. The head assembly has 25-deg front/rear tilt and 360-deg swivel. And the jaws’ non-slip, rubberized padding won’t scratch that stock. The legs snap open to three pre-set hard stops, and there’s plenty of length extension. Easily switch between rubber feet and steel spikes without removing a single part from the trippod. This video also features Caldwell’s E-Max™ Pro noise-cancelling electronic muffs. These affordable 23 dB NRR units boast dual microphones and digital volume controls, and two sizes are offered — Youth and Adult.
How to Store Ammunition Safely and Securely
Notably, this is the single most popular Brownells video this year, with 494,000 views since March 2020. Here’s the deal — ammunition WILL keep for a long time if you store it properaly. DO store ammunition in a cool, dry place that doesn’t have wide temperature swings. Temperature cycling will also degrade primers and powder. Put it in airtight ammo cans to keep out the moisture. Tupperware containers will work too. Brownells also recommends putting moisture-absorbing silica packs in your ammo containers. DON’T just keep ammo in factory cardboard factory boxes stacked in the basement, attic, or garage — especially not on the floor! The ammunition boxes will absorb moisture which will degrade primers and powder and corrode the brass cases. Yes, sealed military ammo will usually handle this kind of storage for quite a while, but it’s still not wise.
Must-Have Spare Parts for AR-Platform Rifles
This is one of Brownells most popular recent videos, with 154,000 views in just four months. Two gun technicians answer the question: “What spare parts should I keep on hand for my AR-15?” On the list are: Gas Rings, Buffer Spring, Extractor Spring and Pin. NOTE: You may want to try the one-piece spiral gas ring rather than the standard rings which require alignment. The cotter pin and cam pin can also easily get lost when the Bolt Carrier Group is disassembled for cleaning. On the lower receiver you’ll want spare springs and detents for the pivot/takedown pins. If you’re using lighter-power springs, keep standard-power spares on hand. If your rifle stops working, swap in the factory-spec springs to find out if the problem is the gun or your ammo. Also, if you have upgraded your trigger, always keep the original trigger as a backup.
Cleaning Advice for .22 LR Rimfire Rifles
Gun Techs Steve Ostrem and Caleb Savant debunk some myths about cleaning .22 LR barrels. One myth is that cleaning will harm the accuracy of a .22 LR barrel. Caleb thinks this myth is the result of people cleaning a barrel from the muzzle and damaging the muzzle crown, which CAN diminish accuracy. If it’s done right, cleaning won’t damage the bore. However, you certainly do NOT have to clean your 22 LR’s bore every time you go to the range. But DO clean the action every time you shoot the rifle, especially on a semi-auto. What about shooting a lot of lead bullets? Won’t that lead up the bore? The guys give us the straight skinny on lead fouling, too. When you see your .22 LR rifle’s groups opening up, you may want to consider cleaning.
Do you shoot long, pointy Hybrid Ogive bullets? If so, you may need to modify the Hornady L-N-L Bullet Comparator tool commonly used to measure the distance from bullet base to bullet ogive.
With modern, high-BC match bullets, so much of the bullet may extend forward of the ogive that the bullet tip actually contacts the inside of the red comparator body BEFORE the bullet’s ogive contacts the gray caliber-specific insert ring attached to the red body. When this happens you will NOT get an accurate Base-to-Ogive (BTO) measure. And likewise you will not get a proper Cartridge-Base-to-Ogive (CBTO) measurement with loaded rounds.
Watch this video — it shows exactly how this measurement “fail” can happen with a .338-caliber Berger Elite hunter bullet. The tester was getting a false bullet Base-to-Ogive reading of 1.175 (0:25 timemark) before modifying his tool. The true BTO measurement, with the bullet actually contacting the gray comparator ring, is 1.121 (1:25 timemark):
How to Fix the Problem
What’s the fix? With a drill, you must relieve the back “wall” inside the red comparator holder bore. This will provide more clearance for the bullet tip. With more clearance the bullet ogive will seat properly on the gray, caliber-specific insert. The tip will no longer bottom out on the red clamping half of the tool.
The maker of this helpful video, EuLRH explains: “As we all know the CBTO (Cartridge Base to Ogive) measurement is [more useful than] COAL (Cartridge Overall Length). There are lots of products that can do this. One of them is Hornady L-N-L bullet comparator. Attention! With modern long range bullets it is possible that the bullet tip is touching the comparator body instead of the bullet ogive touching the gauge.” In this example, EuLRH worked with the 300gr Berger elite hunter bullet in .338 Caliber.
Why You Need to Check with Your Own Loads
If your bullets have this “tip touching” issue, when you measure your loaded rounds you will be seeing COAL instead of the Cartridge Base to Ogive (CBTO) length. Take a moment, test with your own bullets and your comparator to determine if you have this measurement problem. If you do, try the drilling solution shown in the video.
Have you ever expanded a .22 or 6mm cartridge all the way up to .30-caliber? If so, you know this can be a difficult procedure that stresses the case necks and neck-shoulder junction. A significant neck-size expansion done in one big jump can increase run-out, cause doughnuts, or worse yet, even split the brass. Therefore you want to proceed in increments, increasing the neck diameter in stages. One smart way to do that is to use a Progressive Press. This article explains how…
The most successful short-range benchrest-for-score cartridge is the 30 BR. That cartridge, as well as 30 BR variants such as the 30 BRX, all start with the 6mmBR Norma parent cartridge, typically with Lapua 6mmBR brass. To get a nice 30 BR case you want to expand in stages, increasing the inside neck diameter incrementally from .243 to .308.
Darrell Jones of DJ’s Brass Service creates thousands of 30 BR cases each year. He has found a clever way to speed up the process — Darrell uses a Progressive Press. He runs his 6BR brass through four (4) separate Hornady neck-sizing dies with expander mandrels. First there is a .257 die, followed by .264 (6.5mm), .284 (7mm), and then .308. Then a fifth and final K&M die provides one last, slight expansion so the newly-fashioned 30 BR cases perfectly fit the arbor of Darrell’s neck-turning tool.
So to repeat, the case starts as .243 (6mm), then moves in up stages .257, .264, .284, and .308, with a final “finishing” step prior to neck-turning. You can see the expansion in this video, which starts with 6mmBR brass that was first hydro-formed to 6 BRX:
Watch 6mm Cases Expanded to 30-Caliber (6BRX to 30 BRX)
For this demo video, Darrell expands just one case at a time. However, he can also put multiple cases in the progressive — one per station. This takes a little more effort, Darrell says, but the results are still excellent. Darrell tells us: “I do put multiple cases in the progressive to save time. The results are the same — I just wanted to show a single-step process and how it reduces run-out by not stressing the shoulder with one big expansion from 6mm straight to 30 caliber. Doing the operation in multiple stages avoids binds and helps keep the shoulders concentric.”
This same multi-stage procedure can be use to expand other cartridge types. For example you could take .221 Fireball brass in stages up to .308 to create 300 Blackout brass.
Darrell uses caliber-specific, Hornady neck-sizing-only dies with elliptical expanders. Darrell tells us: “The Hornady elliptical expander has a reduced bearing surface that puts less strain on the brass when expanding the necks to the next size.” The fitting at the bottom of the die is the Lock-N-Load die bushing that allows fast die changes.
These particular cases used in the video were first hydro-formed to 6BRX then expanded to 30 BRX before neck turning. DJ’s Brass offers hydro-forming for many popular wildcat cartridges such as 6 PPC, 6mm Dasher, and .284 Shehane.
What is Parallax?
Parallax is the apparent movement of the scope’s reticle (cross-hairs) in relation to the target as the shooter moves his eye across the exit pupil of the riflescope. This is caused by the target and the reticle being located in different focal planes.
Why is it Important?
The greater the distance to the target and magnification of the optic, the greater the parallax error becomes. Especially at longer distances, significant sighting error can result if parallax is not removed.
How to Remove Parallax
This Nightforce Tech Tip video quickly shows how to remove parallax on your riflescope.
While keeping the rifle still and looking through the riflescope, a slight nod of the head up and down will quickly determine if parallax is present. To remove parallax, start with the adjustment mechanism on infinity and rotate until the reticle remains stationary in relation to the target regardless of head movement. If parallax has been eliminated, the reticle will remain stationary in relation to the target regardless of eye placement behind the optic.
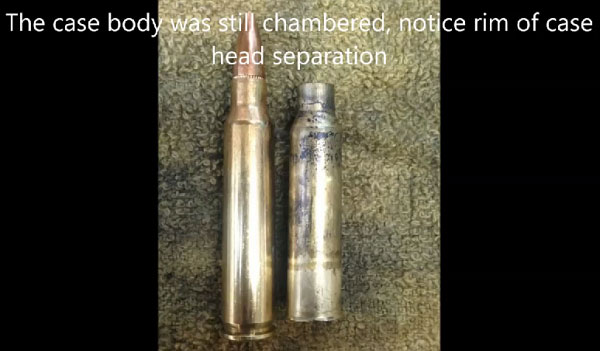
Above is a 26-year-old hand-loaded .300 Winchester Magnum case that failed to fire. After the misfire, the shooter used an inertial (impact) bullet puller to pull the bullet. In the process the case-neck sheared off.
Here’s a cautionary tale from the Tactical Rifle Shooters Facebook group. This real-world example explains why you should be cautious of old ammunition. Here serious internal corrosion was discovered.
Old Ammunition — Why You Should Be Careful
Commentary byTactical Rifle Shooters
The subject often comes up as to whether it is safe to shoot old ammunition. Historically my answer has always been yes, since over the years I have shot military surplus ammo dating back to World War II (1939-1945) and never had a problem. With over 40 years in competitive shooting, I’ve also had boxes of factory ammo that were 30+ years old and all worked flawlessly.
But I had an interesting experience this week shooting some .300 Winchester Magnum (WinMag) that I had loaded for competition with Reloder 22 back in 1993. I was breaking in a new barrel so just shooting any old ammo that I had. Of the 20 rounds, 15 shot perfectly, three had a fraction of a second hang-fire, and two didn’t shoot at all.
SMART TIP: If you have old ammunition, pull one bullet to see what’s going on inside.
So I pulled the bullets using a hammer-type impact (inertial) bullet puller. What I found was verdigris-like corrosion inside the necks, with one neck completely separating. One reason for this could be that dissimilar metals (copper and brass) can set up a reaction resulting in corrosion. Like I said, this is the first time I’ve seen this, but will definitely be more aware when shooting old hand-loads in the future.
Above is one of the 26-year-old reloaded .300 WinMag cartridges which had failed to fire. To check the internal condition, the bullet was removed using an impact (inertial) bullet puller. Note the verdigris-like corrosion and crack in neck.
Here’s a close-up of the same .300 Winchester Magnum hand-load from 1993 showing serious corrosion inside the neck. (This was a fail-to-fire.) The powder was Alliant Reloder 22. If you have old ammo, it wouldn’t hurt to pull one bullet to see what’s going on inside.
What happens when a round goes off unsafely in an AR? Watch this video and see. At about the 00:40 time-mark the shooter has a malfunction (click no bang), with a round. He then removes the magazine, and clears the chamber (we think). On the next round, at 00:53 you hear a “Bang” and see a big puff of smoke coming out of the upper receiver (see photo at right). This has been called a “detonation” by the video-maker, but we’re not 100% sure what happened. What do you guys think? Watch the video carefully, and state your conclusions in the comment section if you wish.
What Caused this Malfunction? Watch Video…
In any event, the shooter is fortunate his upper did not completely fracture, launching shrapnel into his face or other body parts. This could have turned out much worse. Here are screen-shots from the video, showing details of the gun after the accident, along with the recovered brass case, which separated near the case-head.
Have a good look at the photos below — this may be one of the most noteworthy target strings we’ve ever published. What you can see is the effect of barrel tuner position on point of impact (POI). You can clearly see that the tuner position alters the up/down POI location in a predictable fashion.
This remarkable 15-shot sequence was shot by French benchrester Pascal Fischbach using his 6 PPC fitted with a CG (Carlito Gonzales) action and a Bukys barrel tuner.
Pascal reports: “After [bullet] seating and load validation, I put the Bukys tuner on, screwing it out 10 turns. According to Carlito, the CG’s super stiff action-to-barrel fit gives a faster vibration modulus that is detrimental below 10 turns [position of the tuner].” Pascal’s procedure was to screw out the tuner 1/4 turn progressively from one shot to the next. He shot one bullet at each tuner position, with a total of 15 shots.
Left Half of Target Strip (shots with 1/4 rotation change of tuner in sequence)
Right Half of Target Strip (shots with 1/4 rotation change of tuner in sequence)
Pascal observed: “Note the point of impact displacement [from shot to shot] tracks clearly along a sinusoide (sine wave curve).” This is indeed notable and significant! This shows how the tuner’s ability to change barrel harmonics can alter the position of the muzzle as each bullet exits, resulting in a higher or lower POI. Pascal sent his results to Carlito Gonzales in Argentina for analysis.
Pascal poses this question to readers: “Guess which three positions Carlito recommends to try?”
Editor’s Note: While this target sequence clearly shows how tuner position can alter bullet point of impact, this, by itself, does not tell us which tuner position(s) are best for accuracy. That will require further multi-shot group testing, involving careful experimentation with tuner position (and powder charge weights). But for those folks who doubt that a tuner can make a difference on a short, fat barrel, just take another look at the photos. The up/down changes are undeniable, and noteworthy in the wave pattern they follow.
Shooting Set-up and Test Conditions:
Pascal did this test at an outdoor range under very good conditions: “This was shot at my home range, outdoors, with four Smiley flags. The range is a narrow cut in high woods. Wind was consistent with readable flags. I started testing the tuner from 10 turns out and on to 15. I recently… found a sweet spot very close to the rearmost position of the tuner, so the rigidity provided by this super long tenon (just short of 70mm) was not a reason to overlook the recommended Bukys tuning procedure.”
Despite the COVID-19 Pandemic, we know that many readers will be traveling by air this summer to attend major matches. If you plan to fly commercially in the weeks ahead, you need to be careful when transporting firearms through airports both in the USA and in other countries. It is important that you comply with all Homeland Security, TSA, and Airline policies when transporting guns and ammunition. Following the rules will help ensure you (and your gear) make it to your destination without hassles, delays or (God forbid), confiscations.
You’ll want to visit the TSA Firearms and Ammunition webpage, and read it start to finish. In addition, before your trip, you should check the regulations of the airline(s) with which you will fly. Some airlines have special requirements, such as weight restrictions.
TSA Guidelines for Travel with Firearms
Firearms Guidelines
• When traveling, comply with the laws concerning possession of firearms as they vary by local, state and international governments.
• If you are traveling internationally with a firearm in checked baggage, please check the U.S. Customs and Border Protection website for information and requirements prior to travel.
• Declare each firearm each time you present it for transport as checked baggage. Ask your airline about limitations or fees that may apply.
• Firearms must be unloaded and locked in a hard-sided container and transported as checked baggage only. As defined by 49 CFR 1540.5 a loaded firearm has a live round of ammunition, or any component thereof, in the chamber or cylinder or in a magazine inserted in the firearm. Only the passenger should retain the key or combination to the lock unless TSA personnel request the key to open the firearm container to ensure compliance with TSA regulations. You may use any brand or type of lock to secure your firearm case, including TSA-recognized locks.
• Firearm parts, including magazines, clips, bolts and firing pins, are prohibited in carry-on baggage, but may be transported in checked baggage.
• Replica firearms, including firearm replicas that are toys, may be transported in checked baggage only.
• Rifle scopes are permitted in carry-on and checked baggage.
Ammunition Guidelines
• Ammunition is prohibited in carry-on baggage, but may be transported in checked baggage.
• Firearm magazines and ammunition clips, whether loaded or empty, must be securely boxed or included within a hard-sided case containing an unloaded firearm. Read the requirements governing the transport of ammunition in checked baggage as defined by 49 CFR 175.10 (a)(8).
• Small arms ammunition (up to .75 caliber and shotgun shells of any gauge) must be packaged in a fiber (such as cardboard), wood, plastic, or metal box specifically designed to carry ammunition and declared to your airline.
• Ammunition may be transported in the same hard-sided, locked case as a firearm if it has been packed as described above. You cannot use firearm magazines or clips for packing ammunition unless they completely enclose the ammunition.
• Firearm magazines and ammunition clips, whether loaded or empty, must be boxed or included within a hard-sided, locked case.
• Please check with your airline for quantity limits for ammunition.
To help our readers comply with rules and regulations for air travel, we offer these guidelines, courtesy “Ron D.”, a member of our Shooters’ Forum. Before he retired, Ron D. served as a Police Officer assigned to Chicago’s O’Hare airport. Here Ron offers some very important advice for shooters traveling with firearms and expensive optics.
First, Ron explains that airport thieves can spot bags containing firearms no matter how they are packaged: “Don’t think you’re safe if your guns are placed in cases designed for golf clubs or trade show items. Baggage is X-Rayed now and cases are tagged with a special bar code if they contain firearms. It doesn’t take long for bad guys to figure out the bar coding for firearms.”
Carry-On Your Scopes and Expensive Items
Ron advises travelers to avoid placing very expensive items in checked baggage: “When traveling by air, carry on your rangefinder, spotting scope, rifle scope, medications, camera, etc. You would be surprised at the amount of people that carry-on jeans and shirts, but put expensive items in checked baggage. Better to loose three pairs of jeans than some expensive glass.”
Mark Bags to Avoid Confusion
Ron notes that carry-on bags are often lost because so many carry-on cases look the same. Ron reports: “People do accidentally remove the wrong bag repeatedly. I frequently heard the comment, ‘But it looks just like my bag.’ When de-planing, keep an eye on what comes out of the overhead that your bag is in. It’s easy to get distracted by someone that has been sitting next to you the whole flight. I tie two streamers of red surveyors’ tape on my carry-on bag.” You can also use paint or decals to make your carry-on bag more distinctive.
General Advice for Air Travelers
Ron cautions: “Keep your hands on your items before boarding. One of the most often heard comments from theft victims was, ‘I just put my computer down for a minute while I was on the phone.’ Also, get to the baggage claim area quickly. If your family/friends can meet you there, so can the opportunists. Things do get lost in the claim area. Don’t be a Victim. Forewarned is forearmed.”
Choosing a Rifle Transport Case
Ron advises: “Buy the best [rifle case] that you can afford. Don’t cry when your $3,000+ Benchrest rifle has a cracked stock or broken scope. Think about what it would be like to travel across the country (e.g. to Montana or the Cactus Classic) and arrive with a damaged rifle. Remember the Samsonite commercial. (For you younger shooters, it shows a monkey throwing the suitcase around in his cage at the zoo.) Baggage handling is NOT a fine art. There is no guarantee that your rifle case will be on top of all the other baggage. Then there is shifting of baggage in the belly of the plane. Ponder that for a while. Rifle and pistol cases must be locked. It doesn’t take a Rocket Scientist to figure out that a simple pry tool will open most case locks. There is not much that you can do to disguise a rifle case. It is what it is, and opportunists know this. Among thieves, it doesn’t take long for the word to get around about a NEW type of case.”
Plano Two-Gun Tactical Case
This Plano AW2 two-gun Case offers the functionality and durability of an SKB-type hard case for HALF the money. This is now just $116.67, while the equivalent SKB is around $300.00.
This Plano AW2 two-gun case is Amazon’s #1 Best Seller in wheeled, heavy-duty firearms cases. This is offered in three sizes: 36″, 42″, and 52″. We like the biggest 52″ version, as it is long enough inside to fit most scoped match rifles. Alternatively, if you have a really long F-Class, ELR, or Palma rig, you can detach the barreled action from the stock, and run the two sections in the shorter 42″ case. This case is strong enough for airline travel, meeting FAA requirements for checked baggage. This Plano case offers a good balance between strength and weight, all for a reasonable cost — $116.67 on Amazon.
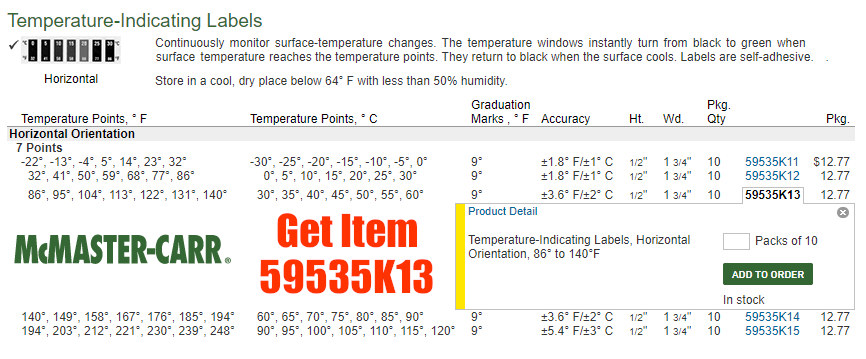
You never want your barrels to get too hot, which can happen more quickly in summertime. Accuracy suffers when barrels over-heat, and excessive heat is not good for barrel life. So how do you monitor your barrel’s temperature? You can check if the barrel is “warm to the touch” — but that method is not particularly precise. There is a better way — using temperature-sensitive strips. McMaster.com (an industrial supply house) offers stick-on temp strips with values from 86° F to 140° F. A pack of ten (10) of these strips (item 59535K13) costs $12.77. That’s a mere $1.28 per barrel for strips — cheap insurance for your precious barrels. For best barrel life, try to stay under 120 degrees F.
NOTE: On the McMaster.com website, you’ll need to scroll down to the multi-use “Temperature Indicating Labels”. Then click on the horizontal label and select item 59535K13, as shown below.
Click image for large view.
Forum member Nomad47 says: “I have temperature strips (bought at McMaster-Carr) on all my barrels. I try not to shoot when the barrel gets to 122 degrees or higher[.]” Here are photos of the McMaster-Carr temp strips on Nomad47’s customized Savage.
Bad things can happen if your barrel gets too hot. First, with some barrels, the point of impact (POI) will shift or “walk” as the barrel heats up excessively. Second, even if the POI doesn’t change, the groups can open up dramatically when the barrel gets too hot. Third, if the barrel is very hot, the chamber will transfer heat to your loaded cartridge, which can lead to pressure issues. Finally, there’s considerable evidence that hot barrels wear out faster. This is a very real concern, particularly for varmint shooters who may shoot hundreds of rounds in a day. For this reason, many varminters switch among various guns, never letting a particular barrel get too hot.
Neconos.com offers Bar-L Temp Strips that visually display heat readings from 86 to 140 degrees. Think of these strips as compact, unbreakable thermometers. With adhesive backing, they can also be used to monitor barrel heating.
Put a strip on the side of the barrel and the barrel’s temp will be indicated by a stripe that changes from black to green. There is also a “general purpose” strip that reads to 196 degrees (see bottom row). The Benchrest strip (86°F to 140°F) is in the middle. These Bar-L temp strips cost $9.00 each, or $25.00 for a 3-pack.
Want to learn more about Long Range Shooting? Check out the “Elements of Long Range Shooting” videos from the National Shooting Sport Foundation (NSSF). In this multi-part series, Bryan Litz of Applied Ballistics covers a variety of topics of interest to precision shooters. Today we feature three of these videos. There are five other videos in this series. Watch the entire 8-video “Elements of Long Range Shooting” series on the NSSF YouTube Channel.
Atmospherics and Density Altitude
Bryan Litz explains: “An important element in calculating an accurate firing solution for long-range shooting is understanding the effects of atmospherics on a projectile.” Atmospherics include air pressure, air temperature, and humidity. Bryan notes: “Temperature, pressure, and humidity all affect the air density… that the bullet is flying through. You can combine all those factors into one variable called ‘Density Altitude’.” Density Altitude is used by the ballistic solver to account for air density variables that affect bullet flight.
Bullet Ballistic Coefficients
A bullet’s ballistic coefficient (BC) basically expresses how well the bullet flies through the air. Higher BC bullets have less aerodynamic drag than lower BC projectiles. You will see BCs listed as either G1 and G7 numbers. These correspond to different bullet shape models. Generally speaking, the G7 model works better for the long, boat-tail bullets used for long-range shooting. Notably, a bullet’s drag is NOT constant in flight. The true BC can vary over the course of the trajectory as the bullet velocity degrades. In other words, “BC is dynamic”. That said, you can make very accurate drop charts using the BCs provided by major bullet-makers, as plugged into solvers. However, long-range competitors may want to record “real world” drop numbers at various distances. For example, we’ve seen trajectories be higher than predicted at 500 yards, yet lower than predicted at 1000.
Ballistics Solvers — Many Options
Bryan Litz observes: “When we talk about the elements of long range shooting, obviously a very important element is a getting a fire solution, using a ballistic solver. There are a lot of ballistic solvers out there… Applied Ballistics has smartphone Apps. Applied Ballistics has integrated the ballistic solver directly into a Kestral, and the same solver runs (manually) on the Accuracy Solutions Wiz-Wheel. The point is, if it is an Applied Ballistics device it is running the same solutions across the board.”
About Bryan Litz
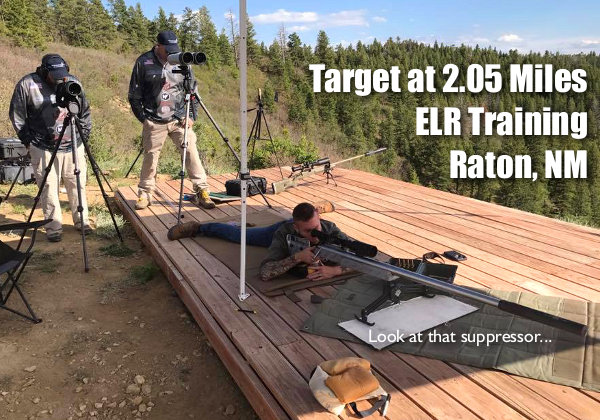
Bryan began his career as a rocket scientist, quite literally. He then started Applied Ballistics, the leading company focusing on ballistics science for rifle shooting. A past F-TR Long-Range National Champion and Chief Ballistician for Berger Bullets, knows his stuff. His Applied Ballistics squad was the winning team at the 2017 King of 2 Miles event, and Applied Ballistics recently received a major U.S. defense contract to to execute Phase 1 of the Extreme Sniper Strike Operations (ESSO) project.


 Do you shoot long, pointy Hybrid Ogive bullets? If so, you may need to modify the Hornady L-N-L Bullet Comparator tool commonly used to measure the distance from bullet base to bullet ogive.


 Have a good look at the photos below — this may be one of the most noteworthy target strings we’ve ever published. What you can see is the effect of barrel tuner position on point of impact (POI). You can clearly see that the tuner position alters the up/down POI location in a predictable fashion.


 First, Ron explains that airport thieves can spot bags containing firearms no matter how they are packaged: “Don’t think you’re safe if your guns are placed in cases designed for golf clubs or trade show items. Baggage is X-Rayed now and cases are tagged with a special bar code if they contain firearms. It doesn’t take long for bad guys to figure out the bar coding for firearms.”