Many of our Forum members have expressed interest in a recoil-reduction system for prone F-Open competition rifles shooting heavy bullets from powerful cartridges. A .300 WSM shooing 200+ grain bullets can definitely take its toll over the course of a match. One system that has been used with considerable success is the hydraulic “Bump Buster” recoil system. This definitely reduces the pounding your shoulder gets during a long match. To illustrate this system, we’ve reprised an article on Bret Soloman’s F-Open rifle from a couple years back. Watch the Videos to see the Bump Buster in action.
On his Facebook page, Hall-of-Fame shooter and ace gunsmith Thomas “Speedy” Gonzalez unveiled an impressive new F-Open rifle built for Bret Solomon. The rifle features Speedy’s new low-profile F-Class stock.
Bret’s gun is chambered for his 300 Solomon wildcat, shooting heavy 210gr bullets, so it can can be a real shoulder-buster, without some kind of buffer. The stock is fitted with a Ken Rucker’s Bump Buster hydraulic recoil reduction system to tame the recoil. The Bump Buster was originally designed for shotguns and hard-hitting, big game rifles. It is interesting to see this hydraulic buffer adapted to an F-Open rig.
Here you can see Bret shooting the gun, coached by Nancy Tompkins and Michele Gallagher:
Bret’s gun features a stainless Viper (Stiller) action, barrel tuner, and an innovative Speedy-crafted wood stock. Speedy says this stock design is all-new: “It is a true, low Center-of-Gravity F-Class stock, not a morphed Palma stock merely cut out on the bottom”. See all the details in this short video:
Stock Features: Glue-in or Bolt-In and Optional Carbon Pillars and Cooling Ports
Speedy explained the features of the new stock design: “Terry Leonard and I started working on an F-Class version of his stocks last year during the F-Class Nationals and came up with what he and I consider the first true low-CG stock in the sport. As you can see by the videos, there is very little torquing of the stock during recoil. I add the carbon fiber tunnel underneath the forearms to save Terry some time. This bonds very well to his carbon fiber skeleton within the stock adding addition stiffness to the forearm to support the heavy barrels found on the F-Class rigs.
We are playing with both glue-ins like we benchresters use and bolt-ins as well. The rifles on the videos are glue-ins. Bret just took delivery today of his first bolt-in employing carbon fiber pillars and the first Leonard stock ever to have cooling ports.”
Need for Recoil Reduction Follows F-Class Trend to Bigger Calibers and Heavier Bullets
In recent years we have seen F-Open competitors move to bigger calibers and heavier bullets in pursuit of higher BC. There is no free lunch however. Shooting a 210gr .30-caliber bullet is going to produce much more recoil than a 140gr 6.5mm projectile (when they are shot at similar velocities). Does this mean that more F-Open shooters will add hydraulic buffers to their rigs? Will a recoil-reduction system become “de rigueur” on F-Open rifles shooting heavy bullets?
Our friend Boyd Allen observes: “You may imagine that shooting a short magnum, or even a .284 Win with heavy bullets, involves a fair amount of recoil, and in the prone position this can be more than a little wearing. It can in fact beat you up over the course of a match. Some time back, Lou Murdica told me about having a hydraulic recoil absorbing device installed on one of his F-Class rifles, chambered in .300 WSM. Lou is shooting heavy (210-215gr) bullets so the recoil is stout. According to Lou, the hydraulic recoil-reduction system made all the difference.”
Story tip from Boyd Allen. We welcome reader submissions.
The prone position demonstrated by two talented Service Rifle shooters. At top is SFC Brandon Green, multi-time High Power National Champion. Below is Tony Chow, a gifted match shooter. NOTE: Current Service Rifle rules allow the use of optics up to 4.5X.
Jay Christopherson, 2020 Berger SW Nationals F-Open Champion, is one of the nation’s best F-Class shooters. When shooting F-Class, Jay uses a Seb Mini front rest and a large rear sandbag to support his big 22-lb F-Open rifle. Though he loves F-Class, Jay is also interested in Service Rifle competition where no external supports are allowed. You hold the rifle with your arms and a sling. Some Service Rifle competitions involve three position (Standing, kneeling/sitting, and prone), while others are prone only. Even in the prone position, the sling is a vital accessory.
Jay dramatically improved his Service Rifle “hard-holding” technique by enlisting the help of Emil Praslick III, former USAMU rifle coach. Emil’s guidance and advice resulted in an immediate increase in Jay’s scores on target, as recorded by his ShotMarker electronic target system. Jay noted: “These targets show the difference between hacking it on your own, and spending an hour with someone who knows what they are doing and can tell you that you are doing it wrong.” These targets show Jay’s “before and after” Service Rifle results shooting slung up prone at 600 yards:
Service Rifle, Prone with Sling at 600 Yards
Here is Jay’s target BEFORE training with Emil Praslick — a 194-3X with lots of vertical.
And here is Jay’s improved target AFTER putting Praslick’s advice to work — impressive 199-8X with significantly less vertical.
You can see on this second target much improved vertical. All 20 shots were in a vertical range much smaller than the vertical height of the 10-Ring. Had shot 16 not gone wide left, this would have been a 200. Shot 16 was OUT of the 10-Ring to the left, but note that vertically it has almost perfect elevation.
Jay stated: “I was pretty amazed at not only the difference on the target, but how much difference the changes Emil suggested made to how my hold felt. The entire feel was different and a ton less stress in my neck and arms compared to what I was feeling before. I was actually feeling pretty good about that 194 yesterday, because I hadn’t slung up in two years and that was my highest score (by one point) after doing some load fixing. But having someone explain what you are doing wrong and why makes a world of difference.
Do you own an M1 Garand? Or perhaps you’re thinking of ordering a Garand, now that the CMP recently received 99,000 of these classic battle rifles — returns from Turkey and the Philippines. An M1 Garand is a great addition to anyone’s personal firearms collection. It is a piece of living history — plus it can be used in Vintage Military rifle matchers. Here are some resources for M1 Garand owners. There are marksmanship tips, plus helpful advice on maintaining your M1 Garand.
Rifle Marksmanship with the M1 Garand Rifle
The film was made in 1942/43 for the War Department. It shows shooting positions and holding techniques for the M1 Garand. This informative video will help both novice Garand shooters as well as experts seeking a “refresher course”. The film focuses on the M1 Garand but the techniques can be applied to any rifle. The narration sounds a bit “corny” by today’s standards, but focus on the techniques shown and you’ll learn plenty.
M1 Service and Maintenance
Shooting Sports USA has published an excellent article on Service and Maintenance of M1 Garand Rifles. This covers basic cleaning and servicing and also explains how to upgrade the performance of your Garands. READ Article HERE.
Recommended M1 Garand Manual
Among the many M1 Garand manuals available, we recommend the CMP’s U.S. Rifle, Caliber .30, M1: ‘Read This First’ Manual. This booklet covers take-down, reassembly, cleaning, lubrication, and operation. The manual comes with CMP rifles or can be purchased for $3.25 from the CMP eStore. The author of Garand Tips & Tricks says: “It’s one of the best firearms manuals I’ve seen and I highly recommend it.” The CMP also offers many other M1 Garand print resources including:
Berger Ballistics Experts in 10-Part Podcast Series
Berger Bullets is presenting a 10-part Podcast series on bullet design and ballistics. Bryan Litz and Emil Praslick III are the featured guests for a 10-part Sniper’s Hide Podcast series about Ballistics. These 10 Podcasts aredelivered through The Everyday Sniper podcast platform. The series will help listeners learn more about Ballistic Coefficients (BCs), why BC consistency is important, and how BC effects both accuracy and precision.
In this 10-part series, Bryan Litz of Applied Ballistics and Wind Wizard Emil Praslick talk with Sniper’s Hide head honcho Frank Galli. Along with Ballistics, the 10 podcasts will cover a variety of shooting-related topics including: long range shooting, precision rifle builds, training, wind effects, industry updates, and more. The key features of the podcasts are also explain in print articles by Bryan Litz found at BergerBullets.com/NoBSBC.
How and Why Bullet BC Varies with Velocity
Podcast Episode 2 focuses on how Ballistics Coefficients Vary with Velocity and why that matters. Listen to Berger Chief Ballistician Bryan Litz and Mil/LE Tactical Expert, Emil Praslick, talk shop about bullet design, modern BC measurement techniques, and the importance of BC consistency for long-range precision and minimal vertical dispersion. READ Bryan Litz BC Variation Analysis HERE.
The 10-part podcast series kicked off May 1, 2020. Each podcast is an in-depth discussion of Berger’s bi-weekly “No-BS BCs” ballistics articles, authored by Bryan Litz, Berger’s Chief Ballistician. In Episode One, linked below, Litz defined BC and its purpose. As the series continues, the experts explain why BC consistency is the most important factor in long-range bullet performance. Learn more about “The Everyday Sniper” BC podcast series at NoBSBC.com.
“This is a great opportunity to open up our platform to Berger with Bryan and Emil. Giving people this kind of access through the partnership is a Masterclass opportunity for anyone interested in long range shooting”, stated Frank Galli.
Podcast Schedule and Topics
To learn more about Berger’s No-BS BCs and to read Bryan Litz’s bi-weekly articles, visit NoBSBC.com and Bergerbullets.com.
Can you form a wildcat cartridge such as the 6 Dasher without expending primer, powders, and bullets? Absolutely. Using the hydro-forming method you can form improved cases in your workshop with no firing whatsoever, so there is no wear on your precious barrel. Watch this video to see how it’s done:
6 Dasher Case Hydro-Forming Demonstration:
Forum member Wes J. (aka P1ZombieKiller) has produced a helpful video showing how to form Dasher cases use the Hornady Hydraulic forming die kit. This includes a two-part die (body and piston), and a special shell holder. To form the case, you insert a primer in your virgin brass, top the case off with with a fluid (water or alcohol), then run the case up into the Hydro-forming die. A few stout whacks with a hammer and your case is 95% formed.
Hydro-Forming Procedure Step-by-Step:
1. Insert spent primer in new 6mmBR brass case.
2. Fill with water or alcohol (Wes prefers alcohol).
3. Wipe excess fluid off case.
4. Place case in special Hornady shell-holder (no primer hole).
5. Run case up into Hydraulic forming die.
6. Smack top piston of forming die 3-4 times with rubber mallet or dead-blow hammer.
7. Inspect case, re-fill and repeat if necessary.
8. Drain alcohol (or water) into container.
9. Remove primer (and save for re-use).
10. Blow-dry formed case. Inspect and measure formed case.
Wes achieves very uniform cartridge OALs with this method. He measured ten (10) hydro-formed 6 Dasher cases and got these results: two @ 1.536″; 2 @ 1.537″; and 6 @ 1.538″.
Three or Four Whacks Produces a 95%-Formed Case
With a Hornady hydro-forming die, hydraulic pressure does the job of blowing out the shoulders of your improved case. The process is relatively simple. Place a spent primer in the bottom of a new piece of brass. Fill the case with water, and then slip it into a special Hornady shell-holder with no hole in the middle. Then you run the case up into the forming die. Now comes the fun part. You gently insert a plunger (hydraulic ram) from the top, and give it three or four stiff whacks with a mallet (or better yet, a dead-blow hammer). Remove the plunger and you have a 95% formed case, ready to load.
Special Shell-Holder
Hornady supplies a shell holder made specifically for the hydro die; there’s no hole in the bottom of it. Just insert a spent primer into the primer pocket and you’re ready to go. The spent primer, combined with the solid shell holder, keeps the water from seeping out of the primer pocket. The primer pushes out a little bit during this process, but it’s impossible for it to come out because of the way the shell holder is designed. The shell holder has a grove which allows the case to slide out of the shell holder even when the primer protrudes a bit.
Story tip from Body Allen. We welcome reader submissions.
All shooters, even rimfire enthusiasts, should always wear ear protection when at the range. A typical rifle gunshot is very loud — in the region of 140 to 170 decibels (the pain threshold is 130-140 db). Without ear protection, you can permanently damage your hearing during a single shooting session. We all know older shooters who are partially deaf, or who suffer from Tinnitus, because they didn’t use earplugs or muffs when they were younger.
How Humans Hear Sounds — Amazing Video Reveals All
The human sense of hearing involves multiple delicate internal membranes, bones, organs, and nerves. Shooters understand the importance of protecting their hearing, but they may not understand the bio-mechanics of human hearing. We hear sounds through Auditory Transduction. Sound waves vibrate the ear drum (tympanic membrane), but that is only the beginning. These vibrations are passed along via tiny rocker-arm-like bones to be “processed” in a spiral chamber, the cochlea.
This remarkable VIDEO explains how humans hear sounds. We strongly recommend you take the time to watch and learn. The hearing you save may be your own!
Click Speaker Icon to turn on the video’s soundtrack.
Vibrations moving through the cochlea are separated into frequencies and then sent as neural messages to the brain. It is an astonishingly complex process, one that truly seems miraculous when you examine the bio-engineering involved. In the Video above, the process of human Auditory Transduction is explained and illustrated with 3D animation. You really should watch this amazing video. By the end you will have a new-found appreciation for your ability to hear.
Every shooter should own a pair of Electronic muffs, even if you prefer shooting with earplugs and/or standard muffs. Electronic muffs are great when you are spotting for other shooters or are working near the firing line. They let you hear ordinary conversations while still providing vital hearing protection. You can also wear ear-plugs under muffs for extra sound attenuation.
Plugs PLUS Ear-Muffs — The Benefits of “Doubling-Up” Your Hearing Protection
According to OHS Online: “The combined attenuation of an ear plug and an ear muff is not simply the algebraic sum of the performance of each individual protector. This is due to an acoustic and vibratory interaction between the ear muff and the ear plug that causes them to behave together as a system rather than as independent hearing protectors.
Generally speaking, when you combine two hearing protectors, ear muffs over ear plugs, you can expect an increase [in noise reduction] of between 3 and 10 dB over the higher-performing hearing protector. OSHA [now advises] 5 dB as the [typical] benefit offered by combining hearing protectors.” Source: OHSonline.com
You have to admire someone with serious do-it-yourself skills. Not just hammer and nail skills, but formidable design and fabrication skills. Well Forum Member Dave D. (aka “AKShooter”) has a DIY skill set that might put some trained machinists to shame. You see, “DIY Dave” crafted his own pedestal front rest from scratch, using his own design and about $100.00 in materials (not counting the Edgewood front bag). Dave estimates he put 20 hours of labor into the project, but the end result was worth it: “This Do-It-Yourself rest drives like a dream. I’ve played with the Caldwell and a Sinclair, they have nothing on this one.”
Dave tells us: “Here is my Do-It-Yourself front rest. I wanted to show other folks who are handy that a solid front rest is doable with a bit of time — and you don’t need to spend $1000.00. (You could say this is a design for shooters with more time than money.) This is for F-Class. I was originally overwhelmed by the equipment needed, so I decided to make my own rest. I didn’t have the money for a SEB or Farley Coaxial. This is what I’ll run this season (my second as an F-Class competitor).”
We asked Dave what equipment was used to make the rest. He explained: “My brother has a CNC cutter. But most water-jet outfits would do the work for $100 or less. All the plates are tapped and screwed. I found small machine screws on eBay.” Dave says there are other ways to build a front rest: “You could do the same with a welder and plate stock for base. It’s easier to do the top out of aluminum though, with all the tapping.”
Dave enjoys fabricating his own gear, but he admits the process can be time-consuming: “I’m a DIY guy. Sometimes I wrap up a project and wonder why the heck I just spent X amount of time on it.” Dave has other projects in the works: “Another option we are making for a friend is taking a cheap front rest and bolting to a 3/4″ thick, wide MDF base and adding additional adjustment screws. The hardware store is your friend!”
On the competition front, Dave is tuning up a 6mm Dasher: “My rifle last year was a .260 Rem Savage repeater. I was about middle of the pack in my group of shooters. Just went with unsorted Bergers and Lapua brass, and had a ton of fun. Now I’m in — hook, line, and sinker. I have an unfired 6 Dasher barreled action from the folks at Kelbly’s to break in. I’m cheap, so I ended up with a Do-It-Yourself stock for the Dasher.” Hopefully Dave will send us a photo of his DIY-stocked Dasher when the gun is dialed-in and “ready to rumble”.
Important Information for Gunbroker Users
The Gunbroker Mobile Apps for Android and iOS users are no longer fully functional. You can see listings but you cannot bid or buy. The reason is that “big tech” — Google and Apple — are no longer supporting the Apps. So, you can still look at auctions, but in order to bid on an item (or purchase it), you need to go to Gunbroker.com using your internet browser on your smartphone or tablet. You want to stop using Gunbroker’s mobile Apps and you should probably remove them from your mobile device.
Gunbroker Tech Support NOTICE Last Updated 4/27/2020
Mobile App Users: Bidding and Buying is no longer available in the apps.
Bid and Buy functionality for the mobile app has been disabled. All bids and purchases must be done on the responsive website. If you try to bid or buy you will see this message: “You do not have permission to use this operation.” This permission has been taken away from everyone and cannot be restored.
Due to policy changes within their companies, Apple and Google have chosen to not support our apps at this time. Unfortunately, that also means we cannot provide needed updates and fixes or new access to the app. We hope you will continue to use our site via your mobile browser, which we are making more responsive to phone users.
To better serve our users who are increasingly using mobile devices and tablets, we are working daily to make our site responsive and mobile-friendly. Our enhanced site is designed to work effectively on mobile devices including phones and tablets. We recommend you add the GunBroker.com web site to your phone’s home screen. If you require assistance in creating this shortcut, please CLICK HERE for instructions[.]
Here is the explanation of Google’s action removing the Gunbroker App from the Google Play Store:
Why Google Removed Gunbroker Android App
Gunbroker notes that: “Unfortunately, Google has removed our app from the Google Play store. They state our app violates their guidelines. Here is what they told us:”
After review, GunBroker.com, com.gunbroker.android has been suspended and removed from Google Play due to a policy violation.
Issue: Violation of Dangerous Products policy
We don’t allow apps that facilitate the sale of explosives, firearms, ammunition or certain firearms accessories. We also don’t allow apps that provide instructions for the manufacture of explosives, firearms, ammunition, restricted firearm accessories, or other weapons.
Why Apple Removed Gunbroker iOS App
Apple has modified its “Objectionable Content” policy. New Item 1.3 now specifically targets gun sales:
1.1 Objectionable Content:
Apps should not include content that is offensive, insensitive, upsetting, intended to disgust, or in exceptionally poor taste. Examples of such content include:
1.3 Depictions that encourage illegal or reckless use of weapons and dangerous objects, or facilitate the purchase of firearms.
The Firearms Guide is a comprehensive guns and ammo reference guide, available online or on a flash drive. Published since 2009, this Guide offers gun prices, gun schematics, blueprints, and manuals. Guns are cross-referenced with the ammunition database. Guns and ammo are presented with prices, tech specifications, features, ballistic information and high-resolution color pictures. The Firearms Guide also includes a wide selection of printable targets.
The 11th Edition of the Firearms Guide has just been released. If you’d like to have instant access to 15,000+ gun schematics and descriptions of 77,000 types of guns and ammo from 1,300 manufacturers, then check this out. The basic annual subscription is on sale right now for just $29.95. If you only need the info for a month or two, get a monthly membership at $7.95 per month, and cancel any time.
You can also get a Flash Drive add-on that lets you access the database even without a web connection. The 1-year Online Edition PLUS Firearms Guide 11th Ed. Flash Drive for Mac & Windows is $59.95. CLICK HERE. This lets you directly access the data from laptops and most tablets with a USB port — no WiFi connection needed.
You may be familiar with the Firearms Guide when it was distributed as a DVD. Now the 11th Edition is a fully interactive, subscription-based online database of firearms and ammo, which is also the most complete guide to global gun values on the web. The amount of imagery is amazing — there are tens of thousands of photos and over 8000 schematics, which help you work on a firearm or identify key components/parts. The Firearms Guide permits detailed searches of antique and modern guns and side by side comparisons. Guns are cross-referenced with the ammunition database.
Database Includes Printable Targets: This resource even includes printable targets. You’ll find practice targets, sight-in targets, silhouette targets, special shapes and, yes, even Zombie targets.
Guns and ammo are presented with prices, specifications, features, ballistics, and up to 12 high-rez color pictures. NOTE: The Ammo information includes bullet BCs and velocities. GUN VALUES are provided for dealers and gun collectors. You can access thousands of printable and zoom-able GUN SCHEMATICS (diagrams or exploded views) with parts lists and blueprints for professional gunsmiths. Here’s an example of the schematics:
The online database’s comprehensive search capability lets you search by gun caliber, manufacturer, and key features (e.g. “.223 Rem, Colt, folding stock”). There are 14 different search criteria — allowing you to find the exact gun you want in seconds. Shown below are typical profiles of listed products:
If you are a gun collector, or just an information junkie, you’ll find the Firearms Guide to be an invaluable resource. The scope is truly worldwide, with coverage of gun makers in Western Europe, Eastern Europe, South America, South Africa, and Asia as well as North America.
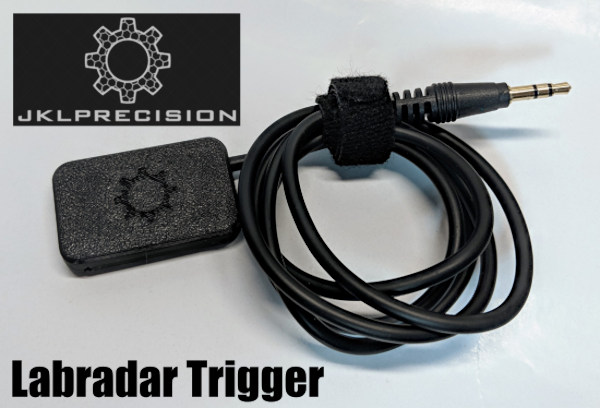
SUMMARY: This article reviews a device that “triggers” the LabRadar chronograph to register bullet speed. Rather than activate by sound or Doppler reading, this $35 JKL Inertial Trigger works from the rifle’s instantaneous recoil pulse when a shot is fired. After some frustration with his LabRadar when shooting at a range with reflective surfaces, our tester is now reporting that 100% of his actual shots are being captured correctly by his LabRadar chrono equipped with the JKL Inertial Trigger. He won’t use his LabRadar without it now. Other users have become instant fans of this inertial LabRadar trigger as well. It is very affordable and it works great. VIEW LARGE PHOTO.
JKL Inertial Trigger for LabRadar Chronograph
Product Review by F Class John
The LabRadar chronograph has been one of the most revolutionary tools in the shooting world because of how it collects velocity data, how it reports (and stores) that data, and, ultimately, the ease with which it can be positioned and operated. However, it’s not a perfect system. A majority of the complaints come from users whose LabRadar’s sometimes fail to record all the shots fired in a string. For the average plinker, this may not be an issue. But for serious shooters trying to do ladder tests or load development requiring all shots to be reported, it can be frustrating when a shot is missed.
Traditionally, LabRadar has recommended trying different settings that compensate for the gap between the unit and muzzle as well as well as having different options for how the unit recognizes a shot fired. While these options work to some degree, they aren’t a guaranteed fix especially when shooting at ranges with concrete baffles or with roofs, walls, and dividers that can alter sound waves. While nobody can precisely explain why shots are lost under certain circumstances, the fact remains it DOES happen. In addition, the default system can sometimes pick up stray shots from nearby rifles.
Not willing to give up on this sophisticated chronograph, many shooters have looked for a foolproof way to prevent such failures from happening. In fact, for this shooter, the frustration was so high that I actually sold my first LabRadar and went back to another chronograph before ultimately buying another LabRadar almost a year later. But I made that repeat purchase only after vowing to finding a way to make the LabRadar work — EVERY time, for EVERY shot.
See How JKL Inertial Trigger Works in this Video
JKL Inertial Trigger — Outstanding Product That Works Great
Enter the JKL Trigger for the LabRadar. This is an easy-to-use, inertial-driven trigger that activates simply from the recoil of your gun. The unit consists of a small rectangular pad attached to a long audio cable. All you do is plug in the audio cable, attach the pad to your gun with the provided hook and loop (Velcro) material. Then (important), you must change the LabRadar trigger settings from “Doppler” to “Trigger”. The unit works great and is easy to set up. In my experience, the unit will activate no matter where you place it on a stock. However the recoil of every gun is slightly different, so you will need to make sure you find a location that doesn’t interfere with your shooting setup.
An unexpected benefit of using the JKL trigger is that it gives you a larger area in which to place your Labradar unit, making it more convenient to setup on benches or range stations. I found this a welcome relief since the LabRadar originally seemed somewhat fussy about where I placed it. Now I can place the LabRadar in more convenient locations — as long as it’s still near my gun and pointed at the target correctly, I get consistent bullet speed data.
Are There Issues with “False Positives”?
If there is any downside to using the JKL Inertial Trigger, it’s that a very hard bump or aggressive working of the action can trigger a false reading. However these are easy to identify in your data, because the speed value is way lower than true fired shot values. Simply remove that low entry or otherwise ignore it in your calculations. To be fair, this “bump activation” really doesn’t happen very often once you get used to using the inertial trigger.
SUMMARY — Outstanding Accessory for LabRadar Users
Bottom line — if you own a LabRadar, then definitely get a JKL Inertial Trigger. Priced at just $35.00 this device is not expensive, yet it’s one of the most effective accessories you can buy for the LabRadar. I’ve recommended these inertial triggers to dozens of shooters. Every one of those guys who did buy a JKL trigger says they can’t imagine using a LabRadar without one. If you love what the LabRadar can do, but have been frustrated with shots not getting recorded 100% of the time, then definitely get yourself a JKL Inertial Trigger. It turns a good system into an amazing system. JKL Industries states that its inertial trigger “will work on anything from a .22 LR to a suppressed system or with standard rifle and brake.”


 On his Facebook page, Hall-of-Fame shooter and ace gunsmith Thomas “Speedy” Gonzalez unveiled an impressive new F-Open rifle built for Bret Solomon. The rifle features Speedy’s new low-profile F-Class stock.


 Hydro-Forming Procedure Step-by-Step:
 Special Shell-Holder
 All shooters, even rimfire enthusiasts, should always wear ear protection when at the range. A typical rifle gunshot is very loud — in the region of 140 to 170 decibels (the pain threshold is 130-140 db). Without ear protection, you can permanently damage your hearing during a single shooting session. We all know older shooters who are partially deaf, or who suffer from
 Plugs PLUS Ear-Muffs — The Benefits of “Doubling-Up” Your Hearing Protection
 You have to admire someone with serious do-it-yourself skills. Not just hammer and nail skills, but formidable design and fabrication skills. Well Forum Member Dave D. (aka “AKShooter”) has a DIY skill set that might put some trained machinists to shame. You see, “DIY Dave” crafted his own pedestal front rest from scratch, using his own design and about $100.00 in materials (not counting the Edgewood front bag). Dave estimates he put 20 hours of labor into the project, but the end result was worth it: “This Do-It-Yourself rest drives like a dream. I’ve played with the Caldwell and a Sinclair, they have nothing on this one.”
 Gunbroker Tech Support NOTICE