|
|
February 13th, 2020

by James Calhoon
(First Printed in Varmint Hunter Magazine, October, 1995)

In the course of talking to many shooters, it has become clear to me that the manufacturers of primers have done a less than adequate job of educating reloaders on the application of their primers. Everybody seems to realize that some primers are “hotter” than others and some seem to shoot better for them than others, but few reloaders know that primers have different pressure tolerances.
Primer Pressure Tolerance
When loading a .223 to the maximum, I was getting primer piercing before I reached case overloading. I don’t know what prompted me to try CCI 450s instead of the 400s which I had been using, but I did. Presto! No more piercing! Interesting!? A primer that has a hotter ignition and yet withstands more pressure! Thats when I decided that it was time to do a dissection of all primers concerned. The chart below shows my results.
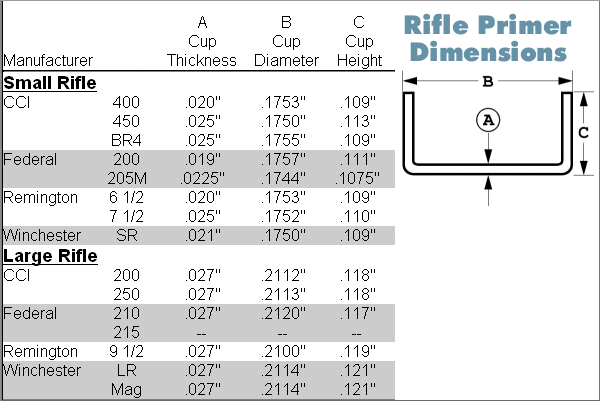
NOTE: These primer dimensions were measured many years ago. There may be some differences in current production specifications.
By studying the numbers (Cup “A” thickness), one can see which primers in the small rifle sections should be more resistant to primer cratering and/or piercing. Primer cup diameters are all similar and appear to follow a specification, but check out the cup thickness in the small rifle primers (Dimension “A”). Some cups are quite a bit thicker than others: .025″ for CCI 450 vs. .0019″ for Fed 200. Large rifle primers all appear to have the same cup thickness, no matter what the type. (As a note of interest, small pistol primers are .017″ thick and large pistol primers are .020″ thick.)
If you are shooting a 22 Cooper, Hornet, or a Bee, the .020″ cup will perform admirably. But try using the .020″ cup in a 17 Remington and you will pierce primers, even with moderate loads.
Considering that cup thickness varies in the small rifle primers, it is obvious that primer “flatness” cannot solely be used as a pressure indicator.
Another factor which determines the strength of a primer cup is the work-hardened state of the metal used to make the primer cup. Most primers are made with cartridge brass (70% copper, 30% zinc), which can vary from 46,000 psi, soft, to 76,000 psi tensile strength when fully hardened. Note that manufacturers specify the hardness of metal desired, so some cups are definitely “harder” that others.
What does all this mean to the reloader?
- Cases that utilize small rifle primers and operate at moderate pressures (40,000 psi) can use CCI 400, Federal 200, Rem 6 1/2, or Win SR. Such cases include 22 CCM, 22 Hornet and the 218 Bee. Other cases that use the small rifle primer can use the above primers only if moderate loads are used. Keep to the lower end of reloading recommendations.
– Cases that utilize small rifle primers and operate at higher pressures (55,000 psi) should use CCI 450, CCI BR4, Fed 205 and Rem 7 1/2.
– All the large rifle primers measured have the same thickness. Therefore choose based on other factors, such as accuracy, low ES/SD, cost, cup hardness, and uniformity.
Hope this clears up some primer confusion. If you want more information about primers, priming compounds, or even how to make primers, the NRA sells an excellent book called “Ammunition Making” by George Frost. This book tells it like it is in the ammo making industry.

February 12th, 2020

Every summer weekend, there are probably 400 or more club “fun matches” conducted around the country. One of the good things about these club shoots is that you don’t have to spend a fortune on equipment to have fun. But we’ve seen that many club shooters handicap themselves with a few common equipment oversights or lack of attention to detail while reloading. Here are SIX TIPS that can help you avoid these common mistakes, and build more accurate ammo for your club matches.
 1. Align Front Rest and Rear Bags. We see many shooters whose rear bag is angled left or right relative to the bore axis. This can happen when you rush your set-up. But even if you set the gun up carefully, the rear bag can twist due to recoil or the way your arm contacts the bag. After every shot, make sure your rear bag is aligned properly (this is especially important for bag squeezers who may actually pull the bag out of alignment as they squeeze). 1. Align Front Rest and Rear Bags. We see many shooters whose rear bag is angled left or right relative to the bore axis. This can happen when you rush your set-up. But even if you set the gun up carefully, the rear bag can twist due to recoil or the way your arm contacts the bag. After every shot, make sure your rear bag is aligned properly (this is especially important for bag squeezers who may actually pull the bag out of alignment as they squeeze).
Forum member ArtB adds: “To align my front rest and rear bag with the target, I use an old golf club shaft. I run it from my front rest stop through a line that crosses over my speed screw and into the slot between the two ears. I stand behind that set-up and make sure I see a straight line pointing at the target. I also tape a spot on the golf shaft that indicates how far the back end of the rear bag should be placed from the front rest stop. If you don’t have a golf shaft, use a wood dowel.
2. Avoid Contact Interference. We see three common kinds of contact or mechanical interference that can really hurt accuracy. First, if your stock has front and/or rear sling swivels make sure these do NOT contact the front or rear bags at any point of the gun’s travel. When a sling swivel digs into the front bag that can cause a shot to pop high or low. To avoid this, reposition the rifle so the swivels don’t contact the bags or simply remove the swivels before your match. Second, watch out for the rear of the stock grip area. Make sure this is not resting on the bag as you fire and that it can’t come back to contact the bag during recoil. That lip or edge at the bottom of the grip can cause problems when it contacts the rear bag. Third, watch out for the stud or arm on the front rest that limits forward stock travel. With some rests this is high enough that it can actually contact the barrel. We encountered one shooter recently who was complaining about “vertical flyers” during his match. It turns out his barrel was actually hitting the front stop! With most front rests you can either lower the stop or twist the arm to the left or right so it won’t contact the barrel.
 3. Weigh Your Charges — Every One. This may sound obvious, but many folks still rely on a powder measure. Yes we know that most short-range BR shooters throw their charges without weighing, but if you’re going to pre-load for a club match there is no reason NOT to weigh your charges. You may be surprised at how inconsistent your powder measure actually is. One of our testers was recently throwing H4198 charges from a Harrell’s measure for his 30BR. Each charge was then weighed twice with a Denver Instrument lab scale. Our tester found that thrown charges varied by up to 0.7 grains! And that’s with a premium measure. 3. Weigh Your Charges — Every One. This may sound obvious, but many folks still rely on a powder measure. Yes we know that most short-range BR shooters throw their charges without weighing, but if you’re going to pre-load for a club match there is no reason NOT to weigh your charges. You may be surprised at how inconsistent your powder measure actually is. One of our testers was recently throwing H4198 charges from a Harrell’s measure for his 30BR. Each charge was then weighed twice with a Denver Instrument lab scale. Our tester found that thrown charges varied by up to 0.7 grains! And that’s with a premium measure.
4. Measure Your Loaded Ammo — After Bullet Seating. Even if you’ve checked your brass and bullets prior to assembling your ammo, we recommend that you weigh your loaded rounds and measure them from base of case to bullet ogive using a comparator. If you find a round that is “way off” in weight or more than .005″ off your intended base to ogive length, set it aside and use that round for a fouler. (Note: if the weight is off by more than 6 or 7 grains you may want to disassemble the round and check your powder charge.) With premium, pre-sorted bullets, we’ve found that we can keep 95% of loaded rounds within a range of .002″, measuring from base (of case) to ogive. Now, with some lots of bullets, you just can’t keep things within .002″, but you should still measure each loaded match round to ensure you don’t have some cases that are way too short or way too long.
 5. Check Your Fasteners. Before a match you need to double-check your scope rings or iron sight mounts to ensure everything is tight. Likewise, you should check the tension on the screws/bolts that hold the action in place. Even on a low-recoiling rimfire rifle, action screws or scope rings can come loose during normal firing. 5. Check Your Fasteners. Before a match you need to double-check your scope rings or iron sight mounts to ensure everything is tight. Likewise, you should check the tension on the screws/bolts that hold the action in place. Even on a low-recoiling rimfire rifle, action screws or scope rings can come loose during normal firing.
6. Make a Checklist and Pack the Night Before. Ever drive 50 miles to a match then discover you have the wrong ammo or that you forgot your bolt? Well, mistakes like that happen to the best of us. You can avoid these oversights (and reduce stress at matches) by making a checklist of all the stuff you need. Organize your firearms, range kit, ammo box, and shooting accessories the night before the match. And, like a good Boy Scout, “be prepared”. Bring a jacket and hat if it might be cold. If you have windflags, bring them (even if you’re not sure the rules allow them). Bring spare batteries, and it’s wise to bring a spare rifle and ammo for it. If you have just one gun, a simple mechanical breakdown (such as a broken firing pin) can ruin your whole weekend.
February 6th, 2020

Readers — if you reload with Accurate-brand 2495, 4064, or 4350 powders, check your containers now! Accurate Powder is recalling certain lots of these powders in both 1-lb and 8-lb containers. This is serious. The manufacturer says: “The use or storage of this product may result in combustion, fire damage, and/or possible serious injury or property damage.” The problematic powders being recalled were manufactured for Western Powders Inc. prior to 10/1/2016, but they may have been sold anytime after that.
Check the Lot Number on the back or bottom of the containers. The lot number is the last digit or last two digits (right-most digits). Here are the recalled lots:
Accurate 2495 Lots 2-17 | Accurate 4064 Lots 2-16 | Accurate 4350 Lots 2-22
If you have any of the affected powder you should fill the container immediately with WATER. Then contact Western Powders at 406-234-0422 or customerservice@westernpowders.com .
Accurate Powders Recall Notice for 2495, 4064, 4360 Powders

Recall tip from EdLongrange. We welcome reader submissions.
You Should Inspect Your Powder Supplies Now
This Powder Recall was first announced in November 2019, but we are repeating it now for our readers who may still be unaware of the issue. Some of our Forum members have observed some powder degradation with affected lots. But they also report that the refunds were handled promptly and fairly.
Member Snert noted: “I went through my inventory and found an 8-pounder and a 1-pounder, 2495 and 4350 respectively. The 4350 was going….changing color and stunk, red mist. The 2495 hadn’t obviously gone, but was part of the recall.
I called and the process is easy. Read the tags and tell em what you have. Write down the info they give you. Take a photo of the product and tag, send your contact info and a claim number. I found that they are sending me back more money than I paid. Very fair refund. I was happy with the customer service. Stand-up guys who were helpful. I’d buy from them again.” READ FORUM Recall thread.
February 6th, 2020
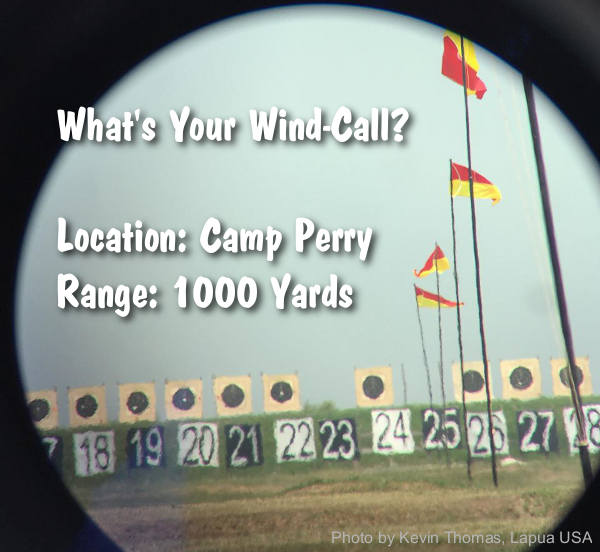
 Readers often ask for a good, authoritative resource on doping the wind and reading mirage. Many of our Forum members recommended M.Sgt. Jim Owens’ Wind-Reading Book. With 22 sets of wind charts, this 166-page resource is offered for $14.95 in print format or $12.95 in CD format. Readers often ask for a good, authoritative resource on doping the wind and reading mirage. Many of our Forum members recommended M.Sgt. Jim Owens’ Wind-Reading Book. With 22 sets of wind charts, this 166-page resource is offered for $14.95 in print format or $12.95 in CD format.
Owens’ Reading the Wind and Coaching Techniques clearly explains how to gauge wind speeds and angles. Owens, a well-known High Power coach and creator of Jarheadtop.com, offers a simple system for ascertaining wind value based on speed and angle. The CD also explains how to read mirage — a vital skill for long-range shooters. In many situations, reading the mirage may be just as important as watching the wind flags. Owens’ $12.95 CD provides wind-reading strategies that can be applied by coaches as well as individual shooters.
 As a separate product, Owens offers a Reading the Wind DVD for $29.95. As a separate product, Owens offers a Reading the Wind DVD for $29.95.
NOTE: The Wind DVD product is completely different than Owens’ $12.95 CD. The DVD is like an interactive class, while the CD is basically an eBook.
Played straight through, the DVD offers about 75 minutes of instruction. M.Sgt. Owens says “You will learn more in an hour and fifteen minutes than the host learned in fifteen years in the Marine Corps shooting program. This is a wind class you can attend again and again. [It provides] a simple system for judging the speed, direction and value of the wind.” The DVD also covers mirage reading, wind strategies, bullet BC and more.
February 4th, 2020

The 2020 Berger Southwest Nationals kicks off 2/5/2020 at the Ben Avery Range outside Phoenix, AZ. The big event starts with a 600-yard Mid-Range Match. Many of the nation’s most talented F-Class and sling shooters will be there. But no matter what your skill level, it is still possible to make major mistakes that can spoil the day and/or put you out of the running for the entire match. This article aims to help competitors avoid the big errors/oversights/failures, aka “train wrecks”, that can ruin a match.

Photo by Sherri Jo Gallagher.

In any shooting competition, you must try to avoid major screw-ups that can ruin your day (or your match). In this article, past F-TR National Mid-Range and Long Range Champion Bryan Litz talks about “Train Wrecks”, i.e. those big disasters (such as equipment failures) that can ruin a whole match. Bryan illustrates the types of “train wrecks” that commonly befall competitors, and he explains how to avoid these “unmitigated disasters”.
Urban Dictionary “Train Wreck” Definition: “A total @#$&! disaster … the kind that makes you want to shake your head.”
 Train Wrecks (and How to Avoid Them) Train Wrecks (and How to Avoid Them)
by Bryan Litz of Applied Ballistics LLC
Success in long range competition depends on many things. Those who aspire to be competitive are usually detail-oriented, and focused on all the small things that might give them an edge. Unfortunately it’s common for shooters lose sight of the big picture — missing the forest for the trees, so to speak.
Consistency is one of the universal principles of successful shooting. The tournament champion is the shooter with the highest average performance over several days, often times not winning a single match. While you can win tournaments without an isolated stellar performance, you cannot win tournaments if you have a single train wreck performance. And this is why it’s important for the detail-oriented shooter to keep an eye out for potential “big picture” problems that can derail the train of success!
Train wrecks can be defined differently by shooters of various skill levels and categories. Anything from problems causing a miss, to problems causing a 3/4-MOA shift in wind zero can manifest as a train wreck, depending on the kind of shooting you’re doing.

Below is a list of common Shooting Match Train Wrecks, and suggestions for avoiding them.
1. Cross-Firing. The fastest and most common way to destroy your score (and any hopes of winning a tournament) is to cross-fire. The cure is obviously basic awareness of your target number on each shot, but you can stack the odds in your favor if you’re smart. For sling shooters, establish your Natural Point of Aim (NPA) and monitor that it doesn’t shift during your course of fire. If you’re doing this right, you’ll always come back on your target naturally, without deliberately checking each time. You should be doing this anyway, but avoiding cross-fires is another incentive for monitoring this important fundamental. In F-Class shooting, pay attention to how the rifle recoils, and where the crosshairs settle. If the crosshairs always settle to the right, either make an adjustment to your bipod, hold, or simply make sure to move back each shot. Also consider your scope. Running super high magnification can leave the number board out of the scope’s field view. That can really increase the risk of cross-firing.
2. Equipment Failure. There are a wide variety of equipment failures you may encounter at a match, from loose sight fasteners, to broken bipods, to high-round-count barrels that that suddenly “go south” (just to mention a few possibilities). Mechanical components can and do fail. The best policy is to put some thought into what the critical failure points are, monitor wear of these parts, and have spares ready. This is where an ounce of prevention can prevent a ton of train wreck. On this note, if you like running hot loads, consider whether that extra 20 fps is worth blowing up a bullet (10 points), sticking a bolt (DNF), or worse yet, causing injury to yourself or someone nearby.

3. Scoring/Pit Malfunction. Although not related to your shooting technique, doing things to insure you get at least fair treatment from your scorer and pit puller is a good idea. Try to meet the others on your target so they can associate a face with the shooter for whom they’re pulling. If you learn your scorer is a Democrat, it’s probably best not to tell Obama jokes before you go for record. If your pit puller is elderly, it may be unwise to shoot very rapidly and risk a shot being missed (by the pit worker), or having to call for a mark. Slowing down a second or two between shots might prevent a 5-minute delay and possibly an undeserved miss.

Photo by Sherri Jo Gallagher.
 4. Wind Issues. Tricky winds derail many trains. A lot can be written about wind strategies, but here’s a simple tip about how to take the edge off a worse case scenario. You don’t have to start blazing away on the command of “Commence fire”. If the wind is blowing like a bastard when your time starts, just wait! You’re allotted 30 minutes to fire your string in long range slow fire. With average pit service, it might take you 10 minutes if you hustle, less in F-Class. Point being, you have about three times longer than you need. So let everyone else shoot through the storm and look for a window (or windows) of time which are not so adverse. Of course this is a risk, conditions might get worse if you wait. This is where judgment comes in. Just know you have options for managing time and keep an eye on the clock. Saving rounds in a slow fire match is a costly and embarrassing train wreck. 4. Wind Issues. Tricky winds derail many trains. A lot can be written about wind strategies, but here’s a simple tip about how to take the edge off a worse case scenario. You don’t have to start blazing away on the command of “Commence fire”. If the wind is blowing like a bastard when your time starts, just wait! You’re allotted 30 minutes to fire your string in long range slow fire. With average pit service, it might take you 10 minutes if you hustle, less in F-Class. Point being, you have about three times longer than you need. So let everyone else shoot through the storm and look for a window (or windows) of time which are not so adverse. Of course this is a risk, conditions might get worse if you wait. This is where judgment comes in. Just know you have options for managing time and keep an eye on the clock. Saving rounds in a slow fire match is a costly and embarrassing train wreck.
5. Mind Your Physical Health. While traveling for shooting matches, most shooters break their normal patterns of diet, sleep, alcohol consumption, etc. These disruptions to the norm can have detrimental effects on your body and your ability to shoot and even think clearly. If you’re used to an indoor job and eating salads in air-conditioned break rooms and you travel to a week-long rifle match which keeps you on your feet all day in 90-degree heat and high humidity, while eating greasy restaurant food, drinking beer and getting little sleep, then you might as well plan on daily train wrecks. If the match is four hours away, rather than leaving at 3:00 am and drinking five cups of coffee on the morning drive, arrive the night before and get a good night’s sleep.”
Keep focused on the important stuff. You never want to lose sight of the big picture. Keep the important, common sense things in mind as well as the minutia of meplat trimming, weighing powder to the kernel, and cleaning your barrel ’til it’s squeaky clean. Remember, all the little enhancements can’t make up for one big train wreck!
February 3rd, 2020

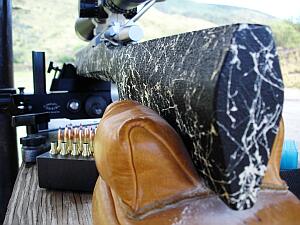
With the Berger Southwest Nationals (SWN) taking place this week in Phoenix, we are reprising this discussing of rear bag designs and fill levels. By “tuning” your rear bag you can reduce hop on shot-firing and help your rifle track better. All that can translate to better scores, particularly with large-caliber rifles.
Tuning Your Rear Sand Bags
Over the years, noted gunsmith and a Benchrest Hall-of-Fame inductee Thomas ‘Speedy’ Gonzalez has learned a few things about “tuning” rear sandbags for best performance. On his Facebook page, Speedy recently discussed how sand bag fill levels (hard vs. soft) can affect accuracy. Speedy says you don’t want to have both your front and rear sandbags filled up ultra-hard. One or the other bag needs to have some “give” to provide a shock-absorbing function (and prevent stock jump). And you want to tune your fill arrangements to match your shooting style. Free recoil shooters may need a different fill levels than bag squeezers (who a softer bag but harder ears).
SAND BAGS & HOW TO FILL THEM by Speedy Gonzalez
I was asked several times by competitors at the S.O.A. Matches and F-Class Nationals as to how I fill my sand bags for benchrest competition. Here is a copy of a reply I gave several years ago:
 Back in the old days, Pat McMillan told me: “You can not have two bags filled so hard that you gun bounces on them in the process of firing round at your target, especially if you have a rig with a very flexible stock. The bags must be set up in a manner for them to absorb the initial shock of the firing pin moving forward and igniting the primer. Back in the old days, Pat McMillan told me: “You can not have two bags filled so hard that you gun bounces on them in the process of firing round at your target, especially if you have a rig with a very flexible stock. The bags must be set up in a manner for them to absorb the initial shock of the firing pin moving forward and igniting the primer.
Then [they must] maintain their shape and absorb the second shock wave as well the rearward thrust and torque of the rifle. What happens to the rifle when this is not done? Well let me tell you. The rifles have a very bad tendency to jump and roll in the bags. This causes many of those wild, lost shots that one can’t explain.”
Here’s some Good General Advice for Bag Set-up:
1. You should not have TWO hard bags [i.e. both front AND rear] in your set-up.
2. Heavy sand magnifies these phenomena.
3. If you are a bag squeezer, pack ears hard and leave bag pliable enough to squeeze for the movement required. You may pack front bag as hard as rules permit.
4. Free recoil shooters pack both bags firm, but not so hard as to allow stock jump. Especially if you have a stock with a very flexible forearm.
5. We use play-ground sand, also know as silica sand. I sift mine to get any large impurities out then mix it with 25% to 50% with Harts parakeet gravel to the desired hardness that I am looking for. The bird gravel keeps the sand from packing itself into that solid as a brick state.
Speaking of bricks — another thing that happens when shooters employ that heavy zircon sand is the ears form a low spot under them from recoil and then tend to rock back and forth with the rifle causing many low shots to crop up. Edgewood makes an Edgewood/Speedy rear bag specially reinforced under the ears to eliminate this scenario.
General Thoughts about Bag Construction and Ear Materials
I do not like the solid double-stitched leather bottoms. While this seems like a good idea, I see more shooters have problems because of them. They tend to slide around the bench and or slide with the rifle on recoil. The standard Protektor with Cordura rabbit ears and an Otto ring bag with a Cordura front would be what I would suggest to the new shooter or one of the Edgewood / Speedy rear bags, these mimic the “Donut” and feature a ring of leather around the bottom circumference that keep the bottom from rocking on the bench or ground[.]
One last note –If you use the Cordura bags, keep them sprayed with a good silicon spray or “Rain-Ex”. This keeps them from getting sticky. — Speedy
February 2nd, 2020

This Technical Report Comes from the Vihtavuori website.
Powder Moisture Content — Did You Know?
Variations in moisture content change the burning rate of a powder and thereby chamber pressures and muzzle velocity. The moisture content of the Vihtavuori N100 and N300 series powders is usually around 1%, while the N500-series’ normal moisture content is 0.6% because of the added nitroglycerine.
So what difference does moisture content make? Here’s an example. In a test, a [Vihtavuori] powder sample was dried by heating it, losing about 0.5 % of its weight. Cartridges were then loaded with the dried powder and fired using a pressure gun. Chamber pressures and muzzle velocities produced by these special cartridges were compared to those produced by cartridges loaded with untreated powder. (The powder charge and bullet were of course the same in both sets of cartridges.)
After Powder Drying:
Pressure Increased 11% from 320 MPa to 355 MPa
Velocity Increased 2.6% from 2526 to 2592 FPS
Comparing results showed chamber pressures increased from 320 MPa to 355 MPa with the dried powder, and the muzzle velocity increased accordingly from 770 m/s to 790 m/s (2526 to 2592 FPS). And note, this is only one example, of one caliber and loading. The difference might be much higher depending on the cartridge and loading combinations.
Recommendation: Store powder below 68°F in 55-65% humidity.
What does this tell us? Well, it seems we need to forget the old saying “Keep your powder dry”! Instead, focus on proper powder storage, at a temperature below 20°C/68°F and humidity between 55 and 65%. Safe reloading everybody!
 Tech Tip sourced by EdLongrange. We welcome reader submissions.
February 2nd, 2020

Erik Dahlberg illustration courtesy FireArmsID.com.
 Sometimes you’ll get a barrel that doesn’t stabilize bullets the way you’d anticipate, based on the stated (or presumed) twist rate. A barrel might have 1:10″ stamped on the side but it is, in truth, a 1:10.5″ twist or even a 1:9.5″. Cut-rifled barrels, such as Kriegers and Bartleins, normally hold very true to the specified twist rate. With buttoned barrels, due to the nature of the rifling process, there’s a greater chance of a small variation in twist rate. And yes, factory barrels can be slightly out of spec as well. Sometimes you’ll get a barrel that doesn’t stabilize bullets the way you’d anticipate, based on the stated (or presumed) twist rate. A barrel might have 1:10″ stamped on the side but it is, in truth, a 1:10.5″ twist or even a 1:9.5″. Cut-rifled barrels, such as Kriegers and Bartleins, normally hold very true to the specified twist rate. With buttoned barrels, due to the nature of the rifling process, there’s a greater chance of a small variation in twist rate. And yes, factory barrels can be slightly out of spec as well.
After buying a new barrel, you should determine the true twist rate BEFORE you start load development. You don’t want to invest in a large supply of expensive bullets only to find that that won’t stabilize because your “8 twist” barrel is really a 1:8.5″. Sinclair International provides a simple procedure for determining the actual twist rate of your barrel.
Sinclair’s Simple Twist Rate Measurement Method
If are unsure of the twist rate of the barrel, you can measure it yourself in a couple of minutes. You need a good cleaning rod with a rotating handle and a jag with a fairly tight fitting patch. Utilize a rod guide if you are accessing the barrel through the breech or a muzzle guide if you are going to come in from the muzzle end. Make sure the rod rotates freely in the handle under load. Start the patch into the barrel for a few inches and then stop. Put a piece of tape at the back of the rod by the handle (like a flag) or mark the rod in some way. Measure how much of the rod is still protruding from the rod guide. You can either measure from the rod guide or muzzle guide back to the flag or to a spot on the handle. Next, continue to push the rod in until the mark or tape flag has made one complete revolution. Re-measure the amount of rod that is left sticking out of the barrel. Use the same reference marks as you did on the first measurement. Next, subtract this measurement from the first measurement. This number is the twist rate. For example, if the rod has 24 inches remaining at the start and 16 inches remain after making one revolution, you have 8 inches of travel, thus a 1:8 twist barrel.
Determining Barrel Twist Rate Empirically
Twist rate is defined as the distance in inches of barrel that the rifling takes to make one complete revolution. An example would be a 1:10″ twist rate. A 1:10″ barrel has rifling that makes one complete revolution in 10 inches of barrel length. Rifle manufacturers usually publish twist rates for their standard rifle offerings and custom barrels are always ordered by caliber, contour, and twist rate. If you are having a custom barrel chambered you can ask the gunsmith to mark the barrel with the twist rate.
January 30th, 2020

Berger SWN Photo by Sherri Jo Gallagher
The Berger Southwest Nationals (SWN), 2020’s biggest centerfire rifle match west of the Mississippi, is coming up next week. We know that many of our regular readers will be flying to Phoenix to attend the SWN. Here are some travel tips from experts in the industry.
If you’ll be traveling by air in the days ahead, be careful when transporting firearms through airports. It is important that you comply with all Homeland Security, TSA, and Airline policies when transporting guns and ammunition. Following the rules will help ensure you (and your gear) make it to your destination without hassles, delays or (God forbid), confiscations.

Good Advice from an Airport Police Officer
To help our readers comply with rules and regulations for air travel, we offer these guidelines, courtesy “Ron D.”, a member of our Shooters’ Forum. Before he retired, Ron D. served as a Police Officer assigned to Chicago’s O’Hare airport. Here Ron offers some very important advice for shooters traveling with firearms and expensive optics.
 First, Ron explains that airport thieves can spot bags containing firearms no matter how they are packaged: “Don’t think you’re safe if your guns are placed in cases designed for golf clubs or trade show items. Baggage is X-Rayed now and cases are tagged with a special bar code if they contain firearms. It doesn’t take long for bad guys to figure out the bar coding for firearms.” First, Ron explains that airport thieves can spot bags containing firearms no matter how they are packaged: “Don’t think you’re safe if your guns are placed in cases designed for golf clubs or trade show items. Baggage is X-Rayed now and cases are tagged with a special bar code if they contain firearms. It doesn’t take long for bad guys to figure out the bar coding for firearms.”
Carry-On Your Scopes and Expensive Items
Ron advises travelers to avoid placing very expensive items in checked baggage: “When traveling by air, carry on your rangefinder, spotting scope, rifle scope, medications, camera, etc. You would be surprised at the amount of people that carry-on jeans and shirts, but put expensive items in checked baggage. Better to loose three pairs of jeans than some expensive glass.”
Mark Bags to Avoid Confusion
Ron notes that carry-on bags are often lost because so many carry-on cases look the same. Ron reports: “People do accidentally remove the wrong bag repeatedly. I frequently heard the comment, ‘But it looks just like my bag’. When de-planing, keep an eye on what comes out of the overhead that your bag is in. It’s easy to get distracted by someone that has been sitting next to you the whole flight. I tie two streamers of red surveyors’ tape on my carry-on bag.” You can also use paint or decals to make your carry-on bag more distinctive.
General Advice for Air Travelers
Ron cautions: “Keep your hands on your items before boarding. One of the most often heard comments from theft victims was, ‘I just put my computer down for a minute while I was on the phone.’ Also, get to the baggage claim area quickly. If your family/friends can meet you there, so can the opportunists. Things do get lost in the claim area. Don’t be a Victim. Forewarned is forearmed.”
Choosing a Rifle Transport Case
Forum member David C., who will compete at the 2020 Berger SWN, offers this advice: “If you plan to fly with your rifle, a 55″-long case such as the Pelican 1770 may be too big and heavy. The 1770 is 36 pounds on its own and is quite unwieldly to move around. I would recommend going with a smaller case such as the Pelican 1720 with 42″-long interior. It weighs 19 pounds and if you separate your stock from the barreled action, everything fits just fine, as you can see below.” Editor: Note that you can also store a full-size spotting scope in the case along with your rifle:

Retired Airport Police Officer Ron D. advises: “Buy the best [rifle case] that you can afford. Don’t cry when your $3,000+ Benchrest rifle has a cracked stock or broken scope. Think about what it would be like to travel across the country and arrive with a damaged rifle. Baggage handling is NOT a fine art. There is no guarantee that your rifle case will be on top of all the other baggage. Then there is shifting of baggage in the belly of the plane. Ponder that for a while. Rifle and pistol cases must be locked. It doesn’t take a Rocket Scientist to figure out that a simple pry tool will open most case locks. There is not much that you can do to disguise a rifle case. It is what it is, and opportunists know this. Among thieves, it doesn’t take long for the word to get around about a NEW type of case.”
Great Deals on Plano All-Weather Cases at Amazon

Match season has begun, and that means hauling gear either in cars or on planes. Either way you need good cases for your firearms. We found the Plano All Weather Gun Cases at bargain prices. These are well-built and designed to protect whatever you put in them for a third the cost of some other brands. No Plano cases are not as refined as Pelican or SKB cases, but if you’re on a tight budget, the Planos can do the job. Read this article for more information on Plano cases.
January 30th, 2020

Barrel-maker Dan Lilja’s website has an excellent FAQ page that contains a wealth of useful information. On the Lilja FAQ Page as you’ll find informed answers to many commonly-asked questions. For example, Dan’s FAQ addresses the question of barrel life. Dan looks at factors that affect barrel longevity, and provides some predictions for barrel life, based on caliber, chambering, and intended use.
NOTE: This article was very well-received when it was first published last year. We are reprising it for the benefit of readers who missed it the first time.
Dan cautions that “Predicting barrel life is a complicated, highly variable subject — there is not a simple answer. Signs of accurate barrel life on the wane are increased copper fouling, lengthened throat depth, and decreased accuracy.” Dan also notes that barrels can wear prematurely from heat: “Any fast varmint-type cartridge can burn out a barrel in just a few hundred rounds if those rounds are shot one after another without letting the barrel cool between groups.”
Q. What Barrel Life, in number of rounds fired, can I expect from my new barrel?
A: That is a good question, asked often by our customers. But again there is not a simple answer. In my opinion there are two distinct types of barrel life. Accurate barrel life is probably the type most of us are referencing when we ask the question. But there is also absolute barrel life too. That is the point where a barrel will no longer stabilize a bullet and accuracy is wild. The benchrest shooter and to a lesser extent other target shooters are looking at accurate barrel life only when asking this question. To a benchrest shooter firing in matches where group size is the only measure of precision, accuracy is everything. But to a score shooter firing at a target, or bull, that is larger than the potential group size of the rifle, it is less important. And to the varmint hunter shooting prairie dog-size animals, the difference between a .25 MOA rifle or one that has dropped in accuracy to .5 MOA may not be noticeable in the field.
The big enemy to barrel life is heat. A barrel looses most of its accuracy due to erosion of the throat area of the barrel. Although wear on the crown from cleaning can cause problems too. The throat erosion is accelerated by heat. Any fast varmint-type cartridge can burn out a barrel in just a few hundred rounds if those rounds are shot one after another without letting the barrel cool between groups. A cartridge burning less powder will last longer or increasing the bore size for a given powder volume helps too. For example a .243 Winchester and a .308 Winchester both are based on the same case but the .308 will last longer because it has a larger bore.
And stainless steel barrels will last longer than chrome-moly barrels. This is due to the ability of stainless steel to resist heat erosion better than the chrome-moly steel.
Barrel Life Guidelines by Caliber and Cartridge Type
As a very rough rule of thumb I would say that with cartridges of .222 Remington size you could expect an accurate barrel life of 3000-4000 rounds. And varmint-type accuracy should be quite a bit longer than this.
For medium-size cartridges, such as the .308 Winchester, 7×57 and even the 25-06, 2000-3000 rounds of accurate life is reasonable.
Hot .224 caliber-type cartridges will not do as well, and 1000-2500 rounds is to be expected.
Bigger magnum hunting-type rounds will shoot from 1500-3000 accurate rounds. But the bigger 30-378 Weatherby types won’t do as well, being closer to the 1500-round figure.
These numbers are based on the use of stainless steel barrels. For chrome-moly barrels I would reduce these by roughly 20%.
The .17 and .50 calibers are rules unto themselves and I’m pressed to predict a figure.
The best life can be expected from the 22 long rifle (.22 LR) barrels with 5000-10,000 accurate rounds to be expected. We have in our shop one our drop-in Anschutz barrels that has 200,000 rounds through it and the shooter, a competitive small-bore shooter reported that it had just quit shooting.
Remember that predicting barrel life is a complicated, highly variable subject. You are the best judge of this with your particular barrel. Signs of accurate barrel life on the wane are increased copper fouling, lengthened throat depth, and decreased accuracy.

Benchrest Barrel Life — You May Be Surprised
I thought it might be interesting to point out a few exceptional Aggregates that I’ve fired with 6PPC benchrest rifles with barrels that had thousands of rounds through them. I know benchrest shooters that would never fire barrels with over 1500 shots fired in them in registered benchrest matches.
I fired my smallest 100-yard 5-shot Aggregate ever in 1992 at a registered benchrest match in Lewiston, Idaho. It was a .1558″ aggregate fired in the Heavy Varmint class. And that barrel had about 2100 rounds through it at the time.

Another good aggregate was fired at the 1997 NBRSA Nationals in Phoenix, Arizona during the 200-yard Light Varmint event. I placed second at this yardage with a 6PPC barrel that had over 2700 rounds through it at the time. I retired this barrel after that match because it had started to copper-foul quite a bit. But accuracy was still good.

|


