This shocking Revolver Kaboom resulted from “user error”. Our friends at Midsouth Shooters provided this cautionary tale, noting that you must ALWAYS be careful when hand-loading any ammo. Check your loads and don’t have multiple powder containers in your reloading area.
“Ever wonder what happens when you don’t pay attention to detail? A word of advice from the reloader who brought this in — always double-check the load data.
Thankfully, the shooter was unharmed in the explosion. A live round we recovered from the remaining portions of the cylinder contained 12.8 grains of powder. The shooter had multiple powders on his bench and was unable to recall which one had been used while loading.” — Midsouth Shooters
How to Avoid Kabooms
1. Never have more than one powder container open on your reloading bench at the same time — when you are finished with a powder, seal the bottle and put it away.
2. If there is already powder sitting in your dispenser, and you’re not 100% sure what it is — throw it out. We suggest, whenever you fill a powder hopper, put a piece of paper in the powder hopper with the name of the powder and the date.
3. When loading a new cartridge or when using a new powder, get load data from more than one source. Always load conservatively to start!
4. Always double-check your Load Data before starting the loading process.
5. In short handgun cases, bullet seating depth can make a BIG difference in pressure levels. Be sure to check your Cartridge OAL.
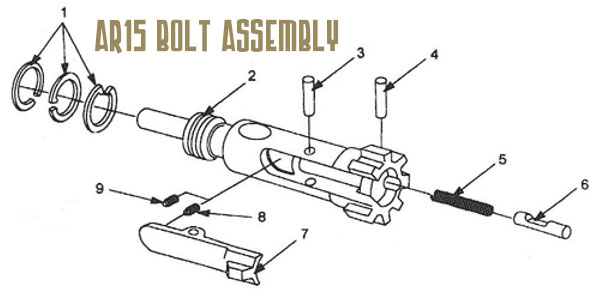
AR-platform rifles can be maintenance-intensive beasts. But some AR owners make the situation worse by not regularly cleaning important small parts, or by using too much oily/greasy lubricants in the wrong places. A properly maintained and lubricated AR15 can shoot hundreds of rounds (between cleanings) without a problem. If you learn where (and where not) to apply lubricant, you’ll find that your AR will run more reliably and the task of cleaning the bolt and bolt carrier will be less of a burden.
Here is a good video that explains AR-15 Cleaning and Maintenance. In this 30-minute NSSF video, Gunsite Academy instructor and gunsmith Cory Trapp discusses the proper way to clean and maintain the AR-15 carbine. Very knowledgeable, Trapp provides rock-solid advice for AR owners. Along with cleaning procedures, this video explains how to inspect key components and how to function-test your AR before each shooting session.
If you want to keep your black rifle running smoothly and reliably, you must clean it regularly and follow the correct maintenance procedures. Here’s another good video that explains how to properly disassemble and clean AR-platform rifles.
Take-Down and Full Cleaning of AR15 by Jerry Miculek
Here ace shooter Jerry Miculek takes down and cleans an AR-platform rifle belonging to his daughter Lena. This is a good video because Lena’s rifle was “run hard and packed up dirty” so you can see where carbon and grease build up. This 35-minute video is very thorough. Jerry is one of the nation’s top action carbine shooters, so listen carefully to his advice on cleaning and lubrication.
Photo 1: Three Near-Equal-Weight 7mm Bullets with Different Shapes
TECH TIP: Bullets of the same weight (and caliber) can generate very different pressure levels due to variances in Bearing Surface Length (BSL).
This article, from the USAMU Facebook Page, concerns reloading safety. In the relentless quest for more speed and flatter ballistics, some hand-loaders load way too hot, running charges that exceed safe pressure levels. Hint: If you need a mallet to open your bolt, chances are your load is too hot. Stay within safe margins — your equipment will last longer, and you won’t risk an injury caused by over-pressure. In this article, the USAMU explains that you need to account for bullet shape, diameter, and bearing surface when working up a load. Don’t assume that a load which is safe for one bullet will be safe for another even if both bullets are exactly the same weight.
How Bullet Profile and Bearing Surface Affect Pressure Levels
Today, we continue our handloading safety theme, focusing on not inadvertently exceeding the boundaries of known, safe data. Bullet manufacturers’ loading manuals often display three, four, or more similar-weight bullets grouped together with one set of load recipes. The manufacturer has tested these bullets and developed safe data for that group. However, seeing data in this format can tempt loaders — especially new ones — to think that ALL bullets of a given weight and caliber can interchangeably use the same load data. Actually, not so much.
The researchers ensure their data is safe with the bullet yielding the highest pressure. Thus, all others in that group should produce equal or less pressure, and they are safe using this data.
However, bullet designs include many variables such as different bearing surface lengths, hardness, and even slight variations in diameter. In fact, diameters can occasionally range up to 0.001″ by design. Thus, choosing untested bullets of the same weight and caliber, and using them with data not developed for them can yield excess pressures.
This is only one of the countless reasons not to begin at or very near the highest pressure loads during load development. Always begin at the starting load and look for pressure signs as one increases powder charges.
Bullet Bearing Surface and Pressure
Bullet bearing surface length (BSL) is often overlooked when considering maximum safe powder charges and pressures. In Photo 1, note the differences in the bullets’ appearance. All three are 7 mm, and their maximum weight difference is just five grains. Yet, the traditional round nose, flat base design on the left appears to have much more BSL than the sleeker match bullets. All things being equal, based on appearance, the RN/FB bullet seems likely to reach maximum pressure with significantly less powder than the other two designs.
TECH TIP: Bullets of the same weight (and caliber) can generate very different pressure levels due to variances in Bearing Surface Length (BSL).
Bullet 1 (L-R), the RN/FB, has a very slight taper and only reaches its full diameter (0.284 inch) very near the cannelure. This taper is often seen on similar bullets; it helps reduce pressures with good accuracy. The calculated BSL of Bullet 1 was ~0.324″. The BSL of Bullet 2, in the center, was ~0.430″, and Bullet 3’s was ~ 0.463″. Obviously, bullets can be visually deceiving as to BSL!
Some might be tempted to use a bullet ogive comparator (or two) to measure bullets’ true BSL for comparison’s sake. Unfortunately, comparators don’t typically measure maximum bullet diameter and this approach can be deluding.
Note: Due to time constraints, the writer used an approximate, direct measurement approach to assess the bullets’ different BSLs. While fairly repeatable, the results were far from ballistics engineer-grade. Still, they are adequate for this example.
Photo 2: The Perils of Measuring Bearing Surface Length with Comparators
In Photo 2, two 7mm comparators have been installed on a dial caliper in an attempt to measure BSL. Using this approach, the BSLs differed sharply from the original [measurements]. The comparator-measured Bullet 1 BSL was 0.694” vs. 0.324” (original), Bullet 2 was 0.601” (comparator) vs. 0.430” (original), and Bullet 3 (shown in Photo 2) was 0.602” (comparator) vs. 0.463” (original). [Editor’s comment — Note the very large difference for Bullet 1, masking the fact that the true full diameter on this bullet starts very far back. You can use comparators on calipers, but be aware that this method may give you deceptive reading — we’ve seen variances just by reversing the comparators on the calipers, because the comparators, typically, are not perfectly round, nor are they machined to precision tolerances.]
Thanks to the U.S. Army Marksmanship Unit for allowing the reprint of this article.
Q: What’s more important — wind speed, or direction?
A: Obviously they both matter, but they do trade dominance based on direction. For example, a 10 mph wind between 2:30 and 3:30 is only changing its value from 9.7 to 10 to 9.7 mph (bracket of 0.3 mph). However a 10 mph wind between 11:30 and 12:30 is changing its cross wind component value from 2.6 mph left to zero to 2.6 mph right (bracket of 5.2 mph). There is the same 30° change in direction, but this results in a massively different bracket.
Point being, in this case, a direction change is far more critical if it’s near 6 or 12 o’clock. A small direction change when it’s close to 3 or 9 o’clock is negligible.
On the contrary, a change in wind SPEED when it’s near 3 or 9 affects your crosswind component directly. But for a near head or tail wind, a fluctuation in wind speed only causes a small fraction of a change to the crosswind component.
SUMMARY: If you’re in a near full-value wind, pay more attention to wind SPEED. If you’re closer to a head- or tail-wind, nailing the exact DIRECTION will be more important.
Get More Tips on Bryan Litz Ballistics Facebook Page
This post is from the new Bryan Litz Ballistics Facebook Page. FB users should check that page regularly for more tips from Bryan, American’s leading ballistics expert and founder of Applied Ballistics LLC.
Shiny brass — it may not shoot more accurately, but it does make you feel better about your hand-loaded ammo. While it’s not necessary to get brass “bright and shiny” after every firing, it is a good idea to clean powder residue, grime, and grit off your brass before you run cases into sizing dies. There are many ways to clean cartridge cases. A quick wipe with solvent on a patch may suffice for recently-shot cases. Older brass with baked-on carbon may require lengthy tumbling. Ultrasonic cleaning is another popular option that gets your brass clean inside and out.
Sinclair International has a series of helpful videos on brass cleaning. These short “how-to” videos, hosted by Bill Gravatt, Sinclair’s past President and current Creedmoor Sports President, cover the various processes you can use — tumbling, ultrasonic cleaning, chemical cleaning, and cleaning by hand.
Video ONE — Cleaning Brass in Vibratory or Rotary Tumbler
TIP: Brass that has recently been shot will clean more easily than brass that has been sitting many days or weeks. If your tumbling media is fresh the job should be done in an hour or less. It’s your choice whether to tumble with primers removed or with primers still in the cases. If you choose to tumble with primers out, we suggest you deprime with a depriming die, rather that put dirty brass into your sizing die. Some people like to add a teaspoon of liquid polish to the media. This does work, cutting tumble time, and making your brass more shiny. However, if you add liquid polish, do that BEFORE you add the brass and let the tumbler run for a 15 minutes to get the polish completely mixed into the media. Otherwise you can else up with gooey gunk inside your cases — a very bad thing.
Video TWO — Ultrasonic Case Cleaning
TIP: There are many different types of solutions you can use. Soapy water suffices for some folks, particularly if you add a little Lemi-Shine. The Hornady One-Shot Sonic Clean and Lyman Turbo Sonic solutions both work well, and can be used multiple times, provided you strain the solution to remove dirt and grit after cleaning sessions. Many ultrasonic cleaning machines have timers. Experiment with dwell time to see how long you need to immerse your brass. A very small amount of Ballistol in the solution will help lubricate your necks on the inside. This can make bullet seating go more smoothly, with more consistent neck tension.
Video THREE — Chemical Cleaners (Soaking without Ultrasound)
TIP: After using chemical cleaners, such as the Iosso solution, you need to water-rinse your brass thoroughly. A kitchen strainer helps with this (see video at 0:20). Also, don’t forget your brass in the chemical solution — follow the manufacturers recommendations and don’t exceed the recommended dwell time. Chemical cleaners work surprisingly well to remove grease and grime, and the solution can be re-used multiple times. However, if you want your cases to look bright and shiny (like new brass), you will probably have to tumble. [Editor: A very effective new chemical cleaner is the Brass Monkey product from the makers of Wipe-Out and Carb-Out. Add a teaspoon to a gallon of water then soak your brass for 20-30 minutes. It really works — the cases clean up dramatically].
Video FOUR — Manual Cleaning (By Hand)
TIP: Keep some oversize patches in your range kit. At the end of your shooting sessions, wipe off your fired brass with a patch dampened with a mild, non-corrosive solvent (once again Ballistol works well). Before the carbon sets up on your brass it is very easy to remove. For tougher jobs, you can use 0000 Steel Wool (as Bill recommends in the video). You may find that timely hand-cleaning lets you avoid tumbling altogether — or you may choose to tumble (or ultra-sound) your brass only after a half-dozen or so firings.
We first ran this story a few years back. We’re republishing it today as a reminder to our readers that safety should be their paramount concern at the range. Avoid distractions and always check your barrel for obstructions before you chamber a round or pull the trigger. A moment of inattention can result in a catastrophic kaboom.
Discharging a .338 Lapua Magnum round with a cleaning rod in the barrel — that’s a recipe for disaster. What happens when a fired .338 caliber bullet and a cleaning rod try to occupy the same place at the same time? Well you get a catastrophic kaboom, with metal pieces flying all over the place, and a shooter very lucky to escape without serious injury. This incident occurred recently in Manatee, Florida, as reported by Sniper’s Hide member Queequeg. We thank SnipersHide.com for granting permission to publish these revealing images in the Daily Bulletin. CLICK HERE for more Kaboom info from the ‘Hide.
This story should serve as a chilling reminder to follow proper safety practices whenever you are at the range. Always check to make sure there is no obstruction in the bore BEFORE loading a live round.
.338 Lapua Magnum + Cleaning Rod + Inattention = Kaboom!
Kaboom at Manatee!
Sniper’s Hide member Queequeg recently published shocking photos of a catastrophic kaboom involving a .338 Lapua Magnum (Savage action). The action was blown off the rifle, shrapnel went through the roof, and the barrel split at the tenon before taking an excursion downrange. The action did crack in the front but the lugs remained engaged so the bolt did not slam to the rear (luckily for the shooter).
Here’s the report: “This happened [January 20, 2014] at the Manatee Gun and Archery Club. Al, Ren and myself were there with a couple other folks. Ren was at bench 12, I was at 13. The fellow at 11 was running a Savage .338 Lapua. He had a very bad day! He damn sure could have killed himself and quite likely Ren as well.”
Queeqeg added: “After the boom, I heard Ren ask ‘Are you alright’ and then turned to look in time to see the fellow reacting in total shock — literally stunned. Ren and I went over to him and could not see any major injuries. Ren was uninjured as well but had a lot of fiberglass splinters on him. The barrel nut is what I presume punched the two holes in the roof. The shooter is a regular there[.] He had been having a problem with sticky cases though he said he was certain the loads were mild. That’s why he was content to knock the sticky ones out with the rod. He simply forgot to remove the rod after knocking out the last stuck case. You can see what happened next.”
To learn more about this incident, go to the original Snipers Hide Forum Thread. There you’ll find more details and four pages of related discussions.
The Important Lesson Here
What did the .338 LM shooter do wrong here? You will say — “Well that’s obvious, he left a cleaning rod in the barrel and then shot a round.” Yes, that was a potentially fatal error. But that was his second mistake — one that occurred only because he made a more fundamental judgment error first.
The FIRST mistake was not acknowledging the problem with his ammo. Had he heeded the warning signs, he would still have a rifle (and an unsoiled pair of trousers). When he first observed that he was having problems with extracting cases, a warning light should have gone off in his head. Presuming his extractor was not broken (and that the chamber was cut properly) he should have been able to extract his brass if he was running safe loads. The lesson here we all need to learn is that if you observe a serious ammo-related issue, it is time to stop shooting. Don’t try to invent work-arounds just to extend your range session, when there are clear signs that something is wrong, very wrong.
Are you curious about bullet stabilization? Do you understand why bullets can tumble or become unstable if the velocity gets too low or if the twist rate is inadequate. Here is an excellent video from Gunwerks that explains Bullet Stabilization.
This animated video starts by showing the design/shape differences between an older-style rifle bullet and a newer VLD-style bullet with higher BCs (Ballistic Coefficients). Generally speaking, the longer a bullet gets relative to diameter, the more RPM is required for stability. And to achieve that higher RPM you need more barrel twist and/or more RPM. The video illustrates where the Center of Gravity and the Center of Pressure are located. These are farther apart (in relative terms) for a VLD or Hybrid-style, long-nose bullet.
When the bullet is in flight there is an angle of attack. This is exaggerated in the animation for illustration purposes, but it is important to understand the the attack angle affect stability. The rotation rate (Revolutions Per Minute) is a function of bullet velocity as it leaves the muzzle and the twist rate of the barrel. Since long VLD-style bullets need more stability, the barrel twist rate needs to be higher than with shorter, fatter bullets. This is pretty much try for all calibers.
The importance of adequate barrel twist rates for bullet stabilization is further discussed in this next video featuring Bryan Litz of Applied Ballistics:
Bullet Stability and Twist Rates
In this video, Bryan Litz talks about bullet in-flight stability and how to calculate barrel twist-rate requirements for long-range bullets. Bryan explains that bullet stability (for conventional projectiles) is basically provided by the spinning of the bullet. But this spin rate is a function of BOTH the nominal twist rate of the barrel AND the velocity of the projectile. Thus, when shooting the same bullet, a very high-speed cartridge may work with a slower barrel twist rate than is required for a lower-speed (less powerful) cartridge. For match bullets, shot at ranges to 1000 yards and beyond, Bryan recommends a twist rate that offers good stability.
The official first day of spring (the Vernal equinox) is just six days away. That means the spring shooting season will commence soon in most parts of the country. Before you head to the range for the first time, we recommend you do some basic tasks with your firearms. Here’s some good advice on readying your rifles for the 2025 shooting season.
by Ron Dague, Sinclair International I give my rifles a pre-season check before the shooting season starts. This starts with a general inspection starting with the butt-plate or recoil pad and making sure that all the screws and adjustable parts (on an adjustable butt-plate) move freely up or down and side to side. If you got caught in rain some of these screws and adjustable parts may not move when needed. I disassemble parts as needed and put rust preventative or a light oil and/or grease on threads and sliding parts. On rifles with recoil pads and fixed butt-plates, make sure the screws are tight and that holes in the stock aren’t stripped out. Make sure there are no cracks in the stock and around the butt-plate. If the recoil pad is glued-on, just make sure it hasn’t come loose.
Next I take the action out of the stock and check for cracks and wear marks. I look at the bedding to make sure that oils and cleaning solvents have not damaged the bedding. While the action is out of the stock, I look for any surface rust or dirt/dust in the recoil lug area and magazine well. Clean as needed and repair or re-bed if needed.
Trigger Assembly and Action With the barreled action out of the stock, it is a good time to spray out the trigger with cleaner. I use Ronson oil or lighter fluid. [Editor’s Note: Some trigger-makers advise against using any kind of lubricant, grease or oil — so plain lighter fluid is preferred.] After the trigger is cleaned you may want to check the trigger pull weight. If you don’t feel comfortable doing this, take it to a gun smith and have it checked. It is worth every penny to not have a trigger issue and/or a safety malfunction. I also take the bolt apart and clean the firing pin spring and bolt housing with Gun Scrubber or automotive brake cleaner. Then lube the firing pin-spring and firing pin with light oil. I use Kel Lube and/or Butch’s gun oil. Put a small dab of gun grease on the [bolt locking lugs] and cocking ramp.
I will also spray the outside of the action and barrel and give that a light coating of oil for rust prevention. I clean the action with Sinclair’s action cleaning tool. Don’t forget to clean the bore. Even though you didn’t fire the rifle, this makes sure nothing obstructs your barrel.
Checking Metal Fixtures and Fasteners Next I look at the trigger guard and hinged floor plate and make sure it works as designed. Make sure there are no cracks in the trigger guard from an accidental drop. Check guard screws and /or action screws for tightness and tighten to proper spec. There are torque specs for this, but on wood stocks the wood can crush and this should be checked throughout the year as weather change can affect this. My entire collection of rifles are bedded and I just tighten them just snug with screw driver or Allen wrench. The rimfire rifles have a spec of 55 to 74 inch/lbs and I think would carry over to center fire as well. I would caution you about torque wrenches as you need a good quality wrench, and read the directions on how to use it. You can over torque if not careful. Check the swivel studs and bipod to make sure there tight as well. You may want to take scope off and check the base screws and check the rings.
Test Fire the Rifle After Maintenance
After all cleaning and is done and everything is reassembled, take a few rounds out to the range and test fire to make sure everything works as it should. Don’t forget to run 3-5 rounds through the magazine at least two times for function. I look at this as preventive maintenance on the rifle. If you give it a look over you shouldn’t have any trouble during the rifle matches or hunting trip.
Ron Dague
Certified Reloading Instructor
Certified Range Safety Officer
This Article Originally Appeared in Sinclair International’s The Reloading Press.
Can you guess what your next barrel will weigh? In many competition disciplines, “making weight” is a serious concern when putting together a new match rifle. A Light Varmint short-range Benchrest rifle cannot exceed 10.5 pounds including scope. An F-TR rifle is limited to 18 pounds, 2 oz. (8.25 kg) with bipod.
One of the heaviest items on most rifles is the barrel. If your barrel comes in much heavier than expected, it can boost the overall weight of the gun significantly. Then you may have to resort to cutting the barrel, or worse yet, re-barreling, to make weight for your class. In some cases, you can remove material from the stock to save weight, but if that’s not practical, the barrel will need to go on a diet. (As a last resort, you can try fitting a lighter scope.)
Is there a reliable way to predict, in advance, how much a finished barrel will weigh? The answer is “yes”. PAC-NOR Barreling of Brookings, Oregon has created a handy, web-based Barrel Weight Calculator. Just log on to Pac-Nor’s website and the calculator is free to use. Pac-Nor’s Barrel Weight Calculator is pretty sophisticated, with separate data fields for Shank Diameter, Barrel Length, Bore Diameter — even length and number of flutes. Punch in your numbers, and the Barrel Weight Calculator then automatically generates the weight for 16 different “standard” contours.
Calculator Handles Custom Contours
What about custom contours? Well the Pac-Nor Barrel Weight Calculator can handle those as well. The program allows input of eight different dimensional measurements taken along the barrel’s finished length, from breech to muzzle. You can use this “custom contour” feature when calculating the weight of another manufacturer’s barrel that doesn’t match any of Pac-Nor’s “standard” contours.
Caution: Same-Name Contours from Different Makers May Not be Exactly the Same
One key thing to remember when using the Barrel Weight Calculator is that not all “standard” contours are exactly the same, as sold by different barrel-makers. A Medium Palma contour from Pac-Nor may be slightly different dimensionally from a Krieger Medium Palma barrel. When using the Pac-Nor Barrel Weight Calculator to find the weight of a barrel from a different manufacturer, we recommend you get the exact dimensions from your barrel-maker. If these are different that Pac-Nor’s default dimensions, use the “custom contour” calculator fields to enter the true dimensions for your brand of barrel.
Smart Advice — Give Yourself Some Leeway
While Pac-Nor’s Barrel Weight Calculator is very precise (because barrel steel is quite uniform by volume), you will see some small variances in finished weight based on the final chambering process. The length of the threaded section (tenon) will vary from one action type to another. In addition, the size and shape of the chamber can make a difference in barrel weight, even with two barrels of the same nominal caliber. Even the type of crown can make a slight difference in overall weight. This means that the barrel your smith puts on your gun may end up slightly heavier or lighter than the Pac-Nor calculation. That’s not a fault of the program — it’s simply because the program isn’t set up to account for chamber volume or tenon length.
What does this mean? In practical terms — you should give yourself some “wiggle room” in your planned rifle build. Unless you’re able to shave weight from your stock, do NOT spec your gun at one or two ounces under max based on the Pac-Nor calculator output. That said, the Pac-Nor Barrel Weight Calculator is still a very helpful, important tool. When laying out the specs for a rifle in any weight-restricted class, you should always “run the numbers” through a weight calculator such as the one provided by Pac-Nor. This can avoid costly and frustrating problems down the road.
Here’s a smart tip from Bryan Litz, explaining how damage to a bullet jacket can harm the projectile’s Ballistic Coefficient (BC). This tip is posted on Bryan’s new Bryan Litz Ballistics Facebook page. We recommend you subscribe to that page to access Bryan’s latest informative posts.
Bryan notes: “If the case mouth scratches the bullet when you seat it, the damage can cause the BC to be inconsistent, which shows up as vertical dispersion at long range.”
We see this sometimes when running Doppler Radar for competitors at Applied Ballistics Mobile Lab events. If someone is shooting a bullet that typically has a very consistent BC (1% or less) but they’re seeing a higher BC variation, it can be due to the bullets being damaged in the loading process.”
The lead photo above shows the badly-scratched jacket of a bullet seated in a rough-mouthed case. To prevent such jacket damage, one should chamfer, deburr, and smooth case mouths after trimming.
Below is a recorded Doppler radar result showing excessive BC variation. Such variation can increase vertical dispersion at long range. This can result in larger group sizes and lower scores.


 Bullet 1 (L-R), the RN/FB, has a very slight taper and only reaches its full diameter (0.284 inch) very near the cannelure. This taper is often seen on similar bullets; it helps reduce pressures with good accuracy. The calculated BSL of Bullet 1 was ~0.324″. The BSL of Bullet 2, in the center, was ~0.430″, and Bullet 3’s was ~ 0.463″. Obviously, bullets can be visually deceiving as to BSL!


 Shiny brass — it may not shoot more accurately, but it does make you feel better about your hand-loaded ammo. While it’s not necessary to get brass “bright and shiny” after every firing, it is a good idea to clean powder residue, grime, and grit off your brass before you run cases into sizing dies. There are many ways to clean cartridge cases. A quick wipe with solvent on a patch may suffice for recently-shot cases. Older brass with baked-on carbon may require lengthy tumbling. Ultrasonic cleaning is another popular option that gets your brass clean inside and out.
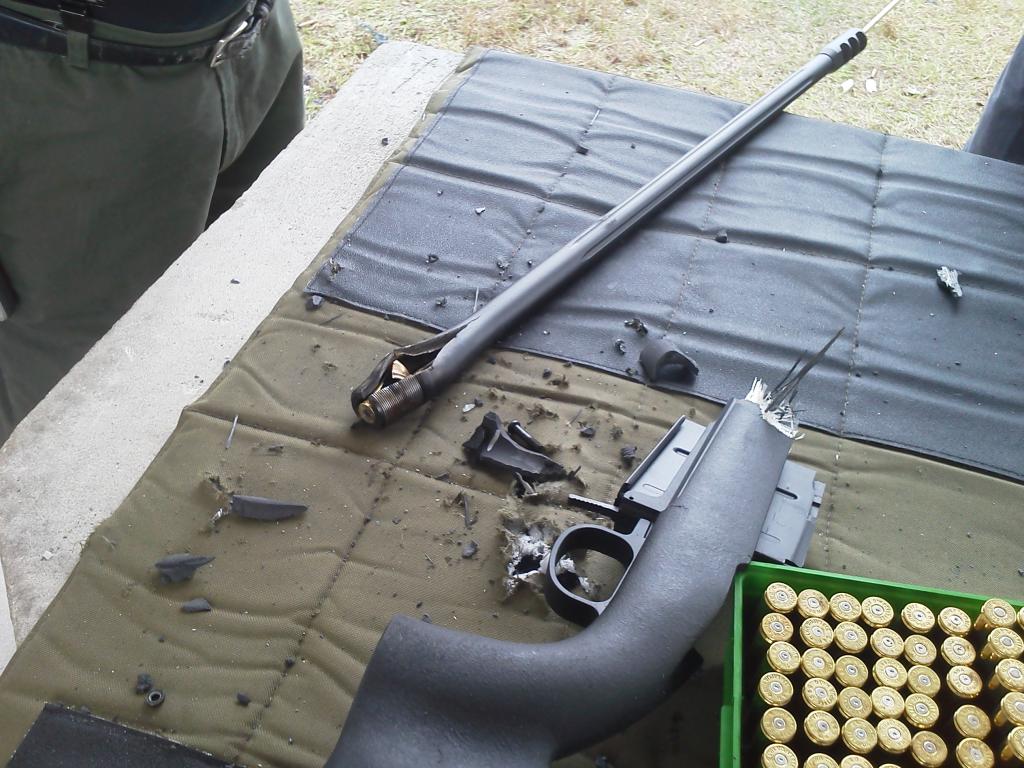


 I give my rifles a pre-season check before the shooting season starts. This starts with a general inspection starting with the butt-plate or recoil pad and making sure that all the screws and adjustable parts (on an adjustable butt-plate) move freely up or down and side to side. If you got caught in rain some of these screws and adjustable parts may not move when needed. I disassemble parts as needed and put rust preventative or a light oil and/or grease on threads and sliding parts. On rifles with recoil pads and fixed butt-plates, make sure the screws are tight and that holes in the stock aren’t stripped out. Make sure there are no cracks in the stock and around the butt-plate. If the recoil pad is glued-on, just make sure it hasn’t come loose.
 With the barreled action out of the stock, it is a good time to spray out the trigger with cleaner. I use Ronson oil or lighter fluid. [Editor’s Note: Some trigger-makers advise against using any kind of lubricant, grease or oil — so plain lighter fluid is preferred.] After the trigger is cleaned you may want to check the trigger pull weight. If you don’t feel comfortable doing this, take it to a gun smith and have it checked. It is worth every penny to not have a trigger issue and/or a safety malfunction. I also take the bolt apart and clean the firing pin spring and bolt housing with Gun Scrubber or automotive brake cleaner. Then lube the firing pin-spring and firing pin with light oil. I use Kel Lube and/or Butch’s gun oil. Put a small dab of gun grease on the [bolt locking lugs] and cocking ramp.
 Next I look at the trigger guard and hinged floor plate and make sure it works as designed. Make sure there are no cracks in the trigger guard from an accidental drop. Check guard screws and /or action screws for tightness and tighten to proper spec. There are torque specs for this, but on wood stocks the wood can crush and this should be checked throughout the year as weather change can affect this. My entire collection of rifles are bedded and I just tighten them just snug with screw driver or Allen wrench. The rimfire rifles have a spec of 55 to 74 inch/lbs and I think would carry over to center fire as well. I would caution you about torque wrenches as you need a good quality wrench, and read the directions on how to use it. You can over torque if not careful. Check the swivel studs and bipod to make sure there tight as well. You may want to take scope off and check the base screws and check the rings.

 Can you guess what your next barrel will weigh? In many competition disciplines, “making weight” is a serious concern when putting together a new match rifle. A Light Varmint short-range Benchrest rifle cannot exceed 10.5 pounds including scope. An F-TR rifle is limited to 18 pounds, 2 oz. (8.25 kg) with bipod.


