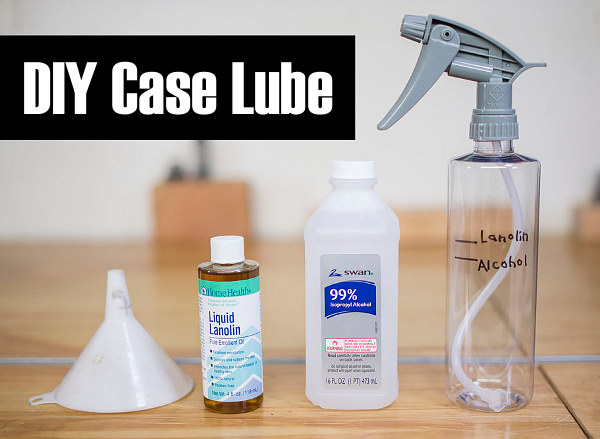
Tired of spending $15-$25 for a can of spray lube that doesn’t last that long? For about the same price as a single 10 oz. can you can make your own effective spray lube that should last for multiple seasons and lube thousands of cases quickly and easily.
In the YouTube video embedded below, our friend Gavin Gear of UltimateReloader.com shows how to make your own case lube using simple, inexpensive ingredients. As recommended by the 6.5 Guys, this Liquid Lanolin + Isopropyl Alchohol mix works well and is very cost-effective. You can make a pint of this home-brew Lanolin case lube that will lube thousands of cases — many more than a typical commercial aerosol spray can (that’s mostly compressed air).
Gavin describes the exact mixing process on his Ultimate Reloader website. Gavin says this lube mix is a good complement to the Hornady One-Shot (pistol) and Dillon DCL (rifle) lubes he has used for pistol and rifle reloading sessions. CLICK HERE to read more.
In our Shooters’ Forum, there was an discussion about a range that was threatened with closure because rifle over-shoots were hitting a farm building over two miles from the firing line. One reader was skeptical of this, asking “how’s that possible — were these guys aiming at the stars?” Actually, you may be surprised. It doesn’t take much up-angle on a rifle to have a bullet land miles down-range. That’s why it’s so important that hunters and target shooters always orient their barrels in a safe direction (and angle). Shooters may not realize how much a small tilt of the barrel (above horizontal) can alter a bullet’s trajectory.
How many degrees of muzzle elevation do you think it would take to hit a barn at 3000 yards? Ten Degrees? Twenty Degrees? Actually the answer is much less — for a typical hunting cartridge, five to seven degrees of up-angle on the rifle is enough to create a trajectory that will have your bullet impacting at 3000 yards — that’s 1.7 miles away!
Five degrees isn’t much at all. Look at the diagram above. The angle actually displayed for the up-tilted rifle is a true 5.07 degrees (above horizontal). Using JBM Ballistics, we calculated 5.07° as the angle that would produce a 3000-yard impact with a 185gr .30-caliber bullet launched at 2850 fps MV. That would be a moderate “book load” for a .300 Win Mag deer rifle.
Here’s how we derived the angle value. Using Litz-derived BCs for a 185gr Berger Hunting VLD launched at 2850 fps, the drop at 3000 yards is 304.1 MOA (Minutes of Angle), assuming a 100-yard zero. This was calculated using a G7 BC with the JBM Ballistics Program. There are 60 MOA for each 1 degree of Angle. Thus, 304.1 MOA equals 5.068 degrees. So, that means that if you tilt up your muzzle just slightly over five degrees, your 185gr bullet (2850 fps MV) will impact 3000 yards down-range.
Figuring Trajectories with Different Bullets and MVs
If the bullet travels slower, or if you shoot a bullet with a lower BC, the angle elevation required for a 3000-yard impact goes up, but the principle is the same. Let’s say you have a 168gr HPBT MatchKing launched at 2750 fps MV from a .308 Winchester. (That’s a typical tactical load.) With a 100-yard zero, the total drop is 440.1 MOA, or 7.335 degrees. That’s more up-tilt than our example above, but seven degrees is still not that much, when you consider how a rifle might be handled during a negligent discharge.
Think about a hunter getting into position for a prone shot. If careless, he could easily touch off the trigger with a muzzle up-angle of 10 degrees or more. Even when shooting from the bench, there is the possibility of discharging a rifle before the gun is leveled, sending the shot over the berm and, potentially, thousands of yards down-range.
Hopefully this article has shown folks that a very small amount of barrel elevation can make a huge difference in your bullet’s trajectory, and where it eventually lands. Nobody wants to put holes in a distant neighbor’s house, or worse yet, have the shot cause injury.
Let’s go back to our original example of a 185gr bullet with a MV of 2850 fps. According to JBM, this projectile will still be traveling 687 fps at 3000 yards, with 193.7 ft/lbs of retained energy at that distance. That’s more than enough energy to be deadly.
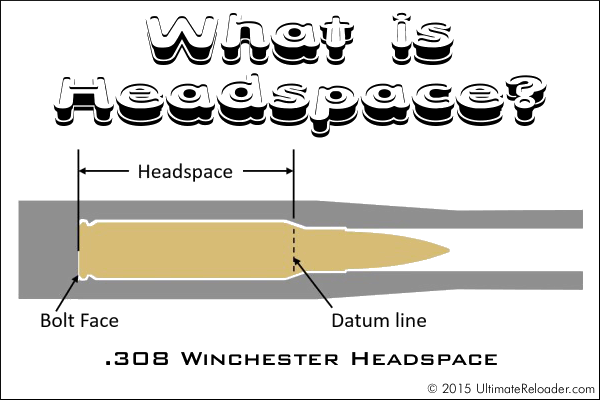
This illustration shows headspace measurement for the popular .308 Winchester cartridge, which headspaces on the shoulder. Image copyright 2015 Ultimate Reloader.
In this Brownells Tech Tip Video, Brownells gun tech Steve Ostrem explains what headspace is and why it’s one of the most critical measurements for nearly all firearms. Even if you’re an experienced rifle shooter, it’s worth watching this video to refresh your understanding of headspace measurements, and the correct use of “GO” and “NO-GO” gauges.
Headspace Definition
In firearms, headspace is the distance measured from the part of the chamber that stops forward motion of the cartridge (the datum reference) to the face of the bolt. Different cartridges have their datum lines in different positions in relation to the cartridge. For example, 5.56x45mm NATO ammunition headspaces off the shoulder of the cartridge, whereas .303 British headspaces off the forward rim of the cartridge. If the headspace is too short, ammunition that is in specification may not chamber correctly. If headspace is too large, the ammunition may not fit as intended or designed and the cartridge case may rupture, possibly damaging the firearm and injuring the shooter. (Source: Wikipedia)
Problems Caused by Too Much Headspace
Excessive headspace issues can include: light primer strikes, failure to fire, bulged/blown cases, case separations, split shoulders, or unseated primers after firing. Case ruptures caused by excessive headspace can lead to catastrophic failures causing serious injury. That is why headspace is such an important measurement.
Problems Cause by Too Little Headspace
Insufficent (or excessively tight) headspace can prevent the firearm from going into battery, resulting in failure to fire or deformation of the cartridge case. Various feeding and functioning problems can be caused by cases with too little headspace, even if a round can be chambered (with effort).
Headspace Gauges
Headspace is measured with a set of two headspace gauges: a “Go” gauge, and a “No-Go” gauge. Headspace gauges resemble the cartridges for the chambers they are designed to headspace, and are typically made of heat-treated tool steel. Both a “Go” and a “No-Go” gauge are required for a gunsmith to headspace a firearm properly. A third gauge, the “Field” gauge, is used (as the name implies) in the field to indicate the absolute maximum safe headspace. This gauge is used because, over time, the bolt and receiver will wear, the bolt and lugs compress, and the receiver may stretch, all causing the headspace to gradually increase from the “factory specs” measured by the “Go” and “No-Go” gauges. A bolt that closes on “No-Go” but not on “Field” is close to being unsafe to fire, and may malfunction on cartridges that are slightly out of spec. (Source: Wikipedia)
You need to understand Headspace Gauges and how to use them. There are “Go”, “No-Go”, and “Field” gauges. The “Field” is actually the longest. Brownells explains: “The GO gauge corresponds to the SAAMI minimum chamber length, while the FIELD gauge usually matches the maximum chamber depth, or slightly less. NO-GO gauges are an intermediate length between minimum and maximum, that, technically, is a voluntary dimension. A firearm that closes on a NO-GO gauge and does not close on a FIELD gauge may not give good accuracy and may have very short cartridge case life [.]”
Want to improve your understanding of Ballistics, Bullet Design, Bullet Pointing, and other shooting-related tech topics? Well here’s a treasure trove of gun expertise. Applied Ballistics offers dozens of FREE tech articles on its website. Curious about Coriolis? — You’ll find answers. Want to understand the difference between G1 and G7 BC? — There’s an article about that.
“Doc” Beech, technical support specialist at Applied Ballistics says these articles can help shooters working with ballistics programs: “One of the biggest issues I have seen is the misunderstanding… about a bullet’s ballistic coefficient (BC) and what it really means. Several papers on ballistic coefficient are available for shooters to review on the website.”
Credit Shooting Sports USA Editor John Parker for finding this great resource. John writes: “Our friends at Applied Ballistics have a real gold mine of articles on the science of accurate shooting on their website. This is a fantastic source for precision shooting information[.] Topics presented are wide-ranging — from ballistic coefficients to bullet analysis.”
Here are six (6) of our favorite Applied Ballistics articles, available for FREE to read online. There are dozens more, all available on the Applied Ballistics Education Webpage. After Clicking link, select Plus (+) Symbol for “White Papers”, then find the article(s) you want in the list. For each selection, then click “Download” in the right column. This will send a PDF version to your device.
Posting on the 6.5 Creedmoor Group Facebook Page, Russel T. complained that his AR magazine doesn’t like to feed that last few rounds. Russell asked: “Full magazine, no problem cycling. But with five (5) or less in the magazine… this happens. What can cause this?”
It sure looks like he could use a new magazine spring, but there may be buffer-related problems as well. Or maybe a gas system issue. What’s your call? Here are some responses posted by Facebook folks:
“Weak mag spring.” — Josh N.
“Weak mag spring or too heavy of a buffer spring.” — Justin G.
“Try a different mag, if it still jams it’s probably a gas problem, if not chuck the bad mag.” — Otto G.
“Weak mag spring or literally anything that would cause the Bolt Carrier Group to short cycle.” — Reggie W.
“I’ve had the same issue with my 300 BLK when my buffer tube came apart. It would still cycle cheap rounds fine but [not] the Hornadys. Took it apart and found the buffer tube was in pieces.” — Hunter R.
“Could be a weak mag spring or buffer spring, both at the same time.” — John S.
“As mentioned it could be a list of things. However, bolt velocity is too fast/hard and the usual (but not always) culprit is over-gassing.” — Bill F.
“Short cycle — clean and LUBRICATE the weapon.” — Mark H.
“Look to see where the brass is ejecting. That will tell if it’s an over or under gas issue. If that’s ok then look at the mag spring. See Diagram” — Teddy G.
“Weak magazine spring, I tossed four brand new ‘bargain mags’ [due to] that very problem.” — John V.E.
“May not be a weak spring or bad mag. Check out a Tubb Precision flatware spring. I swapped mine in a new rifle and solved the problem of short stroking and double feeds.” — Anthony T.
“It might be the follower as well, some designs will dip in the front/rear as rounds are expended. It’s the reason why we didn’t use some service mags with the green followers.” — Chris J.
“Weak spring… time for a new magazine…or add a 5-round block and make it a 25-round magazine. But I’m positive it’s a weak spring, which means it’s just a matter of time for failure.” — Steve M.
“Without the weapon in hand I would hate to guess….
Start with the simple stuff and go from there. Trying to diagnose a problem from a photo is just like when your wife or girlfriend tells you the car won’t start. LOL.” — Mark T.
Coalinga Range in California. At dawn we could clearly see 7mm and .30 Cal bullet holes at 1000 yards.
While attending the CA Long Range Championship a few seasons back, we had the opportunity to test the performance of a high-magnification (63X) spotting scope in near-ideal conditions (maybe the best I’ve ever witnessed). On the event’s last day we arrived at 5:45 am, literally as the sun was cresting the horizon. I quickly deployed our Pentax PF-100ED spotting scope, fitted with a Pentax SMC-XW 10mm fixed-power eyepiece. When used with the 100mm Pentax scope, this 10mm eyepiece yields 63X magnification. Befitting its $299.00 price, this eyepiece is extremely clear and sharp.
At the crack of dawn, viewing conditions were ideal. No mist, no mirage, no wind. The first thing this Editor noticed was that I could see metal nail heads on the target boards. That was astonishing. As soon as the first practice targets went up, to my surprise, I could see 6.5mm, 7mm, and 30-caliber bullet holes in the white at 1000 yards. No lie…
That’s right, I could see bullet holes at 1000. I know many of you folks may not believe that, but there was no mistaking when I saw a 7mm bullet cut the white line separating the Nine Ring and Eight Ring on the target in view. (I was watching that target as the shot was fired and saw the shot-hole form). And when I looked at the 30-cal targets, the bullet holes in the white were quite visible. In these perfect conditions I could also make out 3/8″ bolt heads on the target frames.
The Human Factor — Good Vision Required
When viewing the bullet holes, I was using my left naked eye (no safety glasses or magnification). I also had a contact lens in my right eye (needed for distance vision). To my surprise, while I could see the bullet holes without much difficulty with my left eye, things were fuzzier and slightly more blurry with the right eye, even when I re-focused the scope. That contact lens was degrading the fine resolution.
Then I invited 3 or 4 shooters to look through the scope. One younger guy, with good eyes, said immediately: “Yeah, I can see the holes — right there at 4 o’clock and seven o’clock. Wow.” Some older guys, who were wearing glasses, could not see the holes at all, no matter what we did to the scope’s main focus and diopter adjustment.
The lesson here — if you have to wear glasses or corrective contact lenses, just that extra bit of optical interference may make a difference in what you can see through the scope. Basically anything that goes between the scope eyepiece and your eyeball can degrade the image somewhat. So… you may be better off removing your glasses if you can still obtain good focus sharpness using the diopter adjustment and focus ring. I did the left vs. right eye test a half dozen times, and I could definitely see small features at 1000 yards with my naked eye that I could not see with my right eye fitted with a contact lens. (I did have to re-focus the scope for each eye, since one had a corrective lens while the other did not.)
Mirage Degrades Image Sharpness and Resolution
The “magic light” prevailed for only an hour or so, and then we started to get some mirage. As soon as the mirage appeared I was no longer able to see raw bullet holes, though I could still easily see black pasters on the black bulls. When the mirage started, the sharpness of the visible image degraded a huge amount. Where I could see bullet holes at dawn, by mid-morning I could barely read the numbers on the scoring rings. Lesson: If you want to test the ultimate resolution of your optics, you need perfect conditions.
Chromatic Aberration Revealed
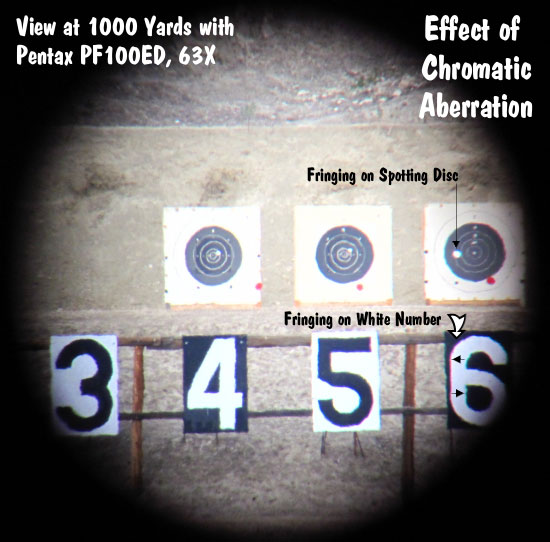
As the light got brighter and the mirage increased I started to see blue and red fringing at the edges of the spotting disk and the large numerals. This was quite noticeable. On one side of the bright, white spotting disc you could see a dark red edge, while on the other side there was a blue edge (harder to see but still present).
The photo below was taken through the Pentax spotter lens using a point and shoot camera held up to the eyepiece. The sharpness of the Pentax was actually much better than this photo shows, but the through-the-lens image does clearly reveal the red and blue fringing. This fringing is caused by chromatic aberration — the failure of a lens to focus all colors to the same point. Chromatic aberration, most visible at high magnification, causes different wavelengths of light to have differing focal lengths (see diagram). Chromatic aberration manifests itself as “fringes” of color along boundaries that separate dark and bright parts of the image, because each color in the optical spectrum cannot be focused at a single common point on the optical axis. Keep in mind that the Pentax does have “ED” or low-dispersion glass, so the effect would be even more dramatic with a cheaper spotting scope.
If you wonder why top-of-the-line spotting scopes (such as the $3558.00 Swarovski ATS-80 ) cost so much, the answer is that they will deliver even LESS chromatic aberration at long range and high magnification. With their exotic apochromatic (APO), ultra-low-dispersion glass, a few ultra-high-end spotting scopes can deliver an image without the color edging you see in the photo above.
The Pentax PF-100ED is a heck of a spotting scope. Any scope that can resolve bullet holes at 1000 yards is impressive. But if you want the ultimate in optical performance, with minimal chromatic aberration, you may need to step up to something like the 88mm Kowa Prominar TSN-88A with Flourite Crystal lenses ($3999.00 with eyepiece), or the 82mm Leica APO-Televid ($3649.95 with 25-50X eyepiece).
EDITOR’s NOTE: The purpose of this report is to show what is possible… in IDEAL conditions. With this Pentax 100mm, as well as a Swarovski 80mm, we can often resolve 6mm bullet holes at 600 yards. But again, that performance requires really good viewing conditions. By 10:00 am at my range, even with the 100mm Pentax at 75 power, seeing 6mm bullet holes is “iffy” at best. So don’t go out and mortgage the house to buy a $4000 optic with the hope that you’ll be able to spot your shots at 1000 yards. If conditions are anything less than perfect, you’ll be lucky to see bullet holes at 500 yards.
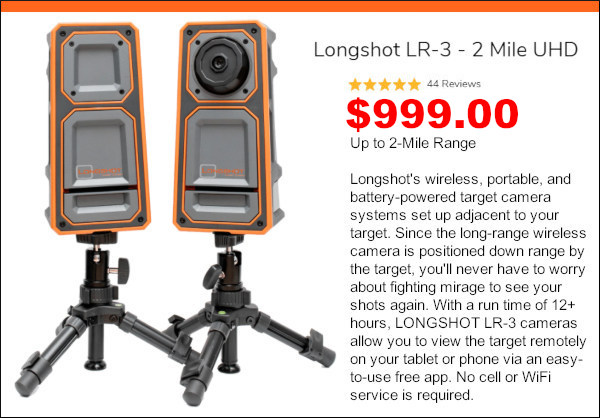
The real solution for very long-range spotting is to set up a remote target cam that broadcasts a video picture to a screen at your shooting station. Among the target cams on the market, we recommend the LongShot LR-3 2-mile UHD. This modern target cam system boasts excellent resolution and incredible range. The LongShot LR-3 target cam is used in major ELR competitions. The Longshot LR-3 currently sells for $999.00 on Amazon.
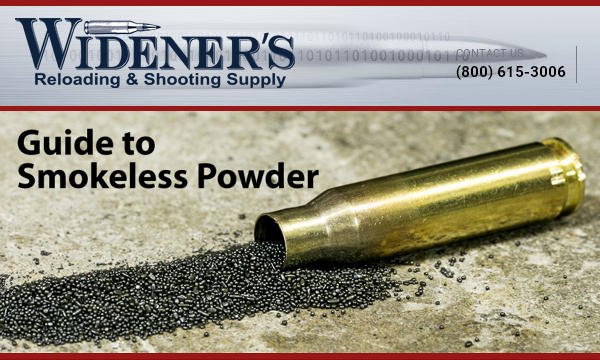
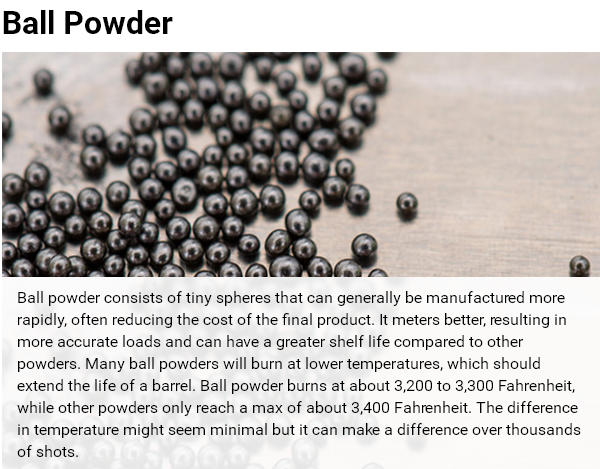
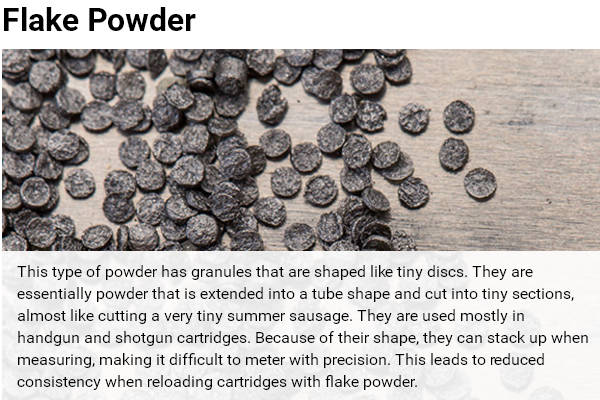
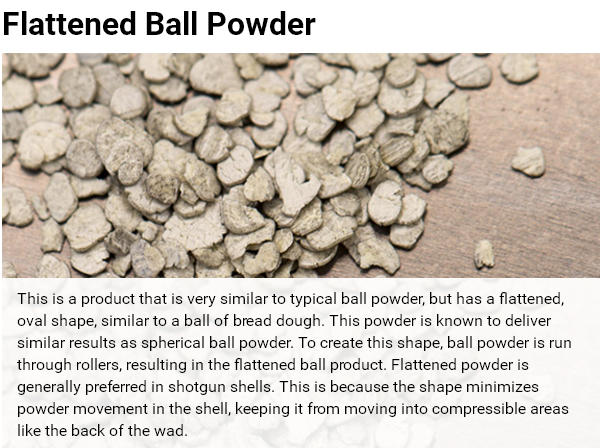
Widener’s Reloading & Shooting Supply has published a helpful introduction to reloading powders. Widener’s online Guide to Smokeless Powders shows the various types of powders, and explains how the differences in powder kernel/flake size and shape, and burn rate affect performance. We recommend you visit Widener’s website and read the Powder Guide in full.
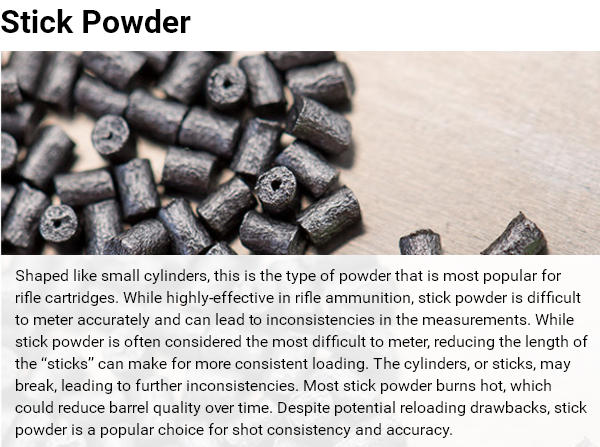
Take a close look at these illustrations which show the key differences between the four main powder types: extruded (stick) powder, ball (spherical) powder, flattened ball powder, and flake powder.
Burn Rate Basics
Widener’s Guide to Smokeless Powders also has a useful discussion of Burn Rate (a confusing topic for many hand-loaders). Wideners explains: “While a gun powder explosion in the cartridge seems instantaneous, if you slow it down you will actually find that each powder has a different ‘burn rate’, or speed at which it ignites.” This video shows powders with two very different burn rates. Watch closely.
Different burn rates suit different cartridge types notes Widener’s: “In general a fast-burning powder is used for light bullets and low-speed pistols and shotguns. Medium-rate powders are used for magnum pistols, while high-velocity, large bore rifle cartridges will need slow powders[.]
It should be noted that burn rate does not have a standardized unit of measurement. In fact, burn rate is really only discussed in comparison to other powders; there is no universal yardstick. Specifics will change by cartridge and bullet types[.]”
The 2025 NRA F-Class Nationals take place at the Winnequah Gun Club in Lodi, Wisconsin, August 2-9, 2025. So we know many of our readers will be flying with their rifles in the days ahead. Here is a helpful article from Team Savage Shooter Stan Pate. This covers how to ship your rifle safely, and then re-establish zero properly when the gun is reassembled after transport. This is one of a series of Shooting Tips articles in the Savage Blog.
Traveling with Firearms — Important Advice
Traveling with firearms can be stressful. You must comply with multiple regulations and then trust your expensive guns to airline baggage handlers. And after arrival you’ll need to put your rifles back together and confirm the zeros. This article offers helpful travel advice from Team Savage shooter Stan Pate. Pate has traveled the globe competing with match rifles. Here he shares his tips for making trips easier on you and your firearms.
Easier Air Travel With Firearms
TSA isn’t nearly as careful with your rifles as you are. Proper storage before sending your firearm up a conveyer belt and into the belly of a plane is critical. Stan Pate spends lots of time each year traveling the skies and has devised a system for keeping his rifle safe when going to and from.
“Never travel with your firearm completely assembled,” Pate cautions. “A fully assembled firearm is much heavier [as a total unit] than one that has been broken-down and stored [in separate sections]. More weight creates more in-the-case movement, which can result in damage. I learned this the hard way years ago. My rifle was actually broken in half when traveling to an international competition. Record your torque settings, use those settings during reassembly and your return to zero should be no problem.”
“Be sure to check on current TSA rules and regulations before travel to be aware of any changes that may effect how you pack your rifles,” says Pate.
Rifle Reassembly and Resetting Zero
The quicker you can reestablish your zero, the quicker you can relax and stop worrying about if your rounds are going to hit their mark during competition. Pate, over the years, has developed a system for rifle reassembly and getting back to zero as quickly as possible. While his torque settings may not be the same as yours, the process can still be used.
“The barreled-action goes back on the stock, and then I tighten all three receiver screws finger tight,” says Pate. “Next, I tighten the front two receiver screws down to 35-inch pounds. The rear receiver screws on this particular rifle likes 15-inch pounds. [Note: Proper torque settings will vary with your action and stock type. Most actions have TWO screws, not three.] Scope attachment comes next, and I follow manufacturer settings when tightening it down. All that’s left to do now is go zero your rifle.”
This video explains an efficient method to Re-Zero your rifles
There is a good article on gun safes in SHOT Business, a publication for the NSSF SHOT Show audience. Written by Christopher Cogley, this Safe Spaces Article offers some very important things to consider when purchasing a gun safe. Here are key points from that article:
Safe Security — The security of a gun safe comes down to two main factors: the thickness of the steel and the construction of the safe. When it comes to construction, look for a safe that has continuous welded construction instead of bolts or spot-welding, which are easier for trained gun thieves to cut through with torches or high-power saws.
Lock Options — Traditional combination locks are arguably the simplest choice. The downside, though, is they don’t provide quick access to firearms in an emergency. Electronic and biometric keypads provide quicker access — but be sure to replace the batteries every year.
Fireproof Rating — Aside from theft, the biggest threat to your firearms is fire. Unfortunately, the fireproof rating on gun safes can be confusing because there is no single, “standard” fireproof rating. As a general rule, the fireproof rating states how long a safe can be exposed to a fire of a particular temperature and maintain a temperature inside the safe of no more than 350 degrees F. To put this in context, the average house fire creates temperatures between 800 and 1,200 degrees F.
Where to Place a Gun Safe in Your Home
The Safe Spaces article includes advice from Stephen Hall, CEO of Lock It Up Safes. Hall addressed the question: “Where should I put my safe?”
Hall states: “Ease of installation should NOT be the foremost consideration when making this decision. Putting a safe in the garage has both pros and cons. We see some retailers recommend the garage solely because they don’t have the right team on board to install safes in other locations, and wheeling one into the garage is the easy way out.
Putting a safe in the garage is fine if that is the only place you an put it, but most want the safe in the home, where they can get to it quickly. Temperature and humidity are important considerations as well, and both are more easily controlled in a house rather than in the garage.
One advantage to garage installation is the concrete floor provides a solid base for safe installation. Houses built on concrete slabs also offer a solid anchor on the first level. If the safe needs to go to an upper floor, the weight of the safe and its contents need to be factored in.”
Place Safe Against Outside Wall
Hall recommends placing your gun safe against an outside wall: “In case of fire, the safe will typically last longer as there is not a lot that can burn on one side of the safe, thus keeping it cooler.”
Don’t Make the Mistake of Buying an Undersized Safe
The most common mistake people make when buying a gun safe is getting a safe that’s too small. This video explains why you should probably invest in a bigger safe. First, the rated gun capacity is exaggerated — rifles with mounted optics, long barrels, wide forearms and/or pistol grips take up considerably more space than a small rimfire rifle or a lever gun with iron sights. Second, your gun collection will likely grow in years to come. Third, you may want to store other valuables in the safe — such as vital documents, jewelry, watches, and pricey electronics. In this video the host notes: “Get a much larger safe than you think you’ll need at first. This will guarantee that you will have enough room for future purchases and all the guns and equipment you currently have.”
Recommended Safe Features for Long-Gun Storage
Editor’s Recommendation:
Budget $1200-1500 for a safe from a major maker, with external hinges, and an interior at least 58″ high. That gives you room for 30″-barreled rifles with a top shelf for handguns and other valuables. A rotary rack and slide-out drawers are great additions.
Keypad or Dial? We favor rotary dial locks. With minimal maintenance they will function flawlessly for decades. But the digital locks offer quick-access and convenience. If you go digital, get a commercial-grade unit.
Fire-lining is worth getting, but a thin layer of sheet-rock doesn’t make a safe truly “fire-proof”.
Interior at least 58″ High and 30″ wide Overall Weight 750+ Pounds 8 Gauge or Heavier Wall Thickness Double-Wall, Composite Door with Relockers Minimum UL RSC Rated. TL-15 or TL-30 Rating is Desirable External Hinges
Mechanical UL Group II (or better) Lock with Standard Dial Or UL Type 1 Commercial-Grade Electronic Lock
Custom Interior Suitable for Scoped Guns with Long Barrels On-Door Storage System for Non-scoped Long Guns OR Rotary Gun Rack for Scoped Rifles and ARs
Internal (sandwiched) Insulator, Reinforced if Sheet-rock Palusol? Heat-Activated Expanding Door Seals
Slide-out Drawers for Handguns Fire-lined Inner Safe for Paper and Media
Low Gloss, Rust-resistant External Finish Pre-Drilled holes for Lag Bolts and in Rear for Electric Cord Overhead Fluorescent Lamp and/or LED Mini-lights on Strings
Montana-based PROOF Research has released a revealing video showcasing carbon fiber firearms technology and the company’s barrel-making process. Viewers will find the 8-minute film an intriguing introduction to composite barrel-making, which employs aerospace carbon fiber wrapped around a steel barrel core. The video showcases the high-tech machines used at PROOF’s production facilities.
This video shows how PROOF Research employs aerospace-grade, high-temperature composite materials to build match-grade carbon fiber-wrapped barrels.
Dr. David Curliss, General Manager of PROOF Research’s Advanced Composite Division, and former head of the U.S. Air Force High Temperature Composites Laboratory, explains how aerospace expertise helps in the development of PROOF’s firearms-related products: “We are able to provide premier materials for PROOF Research for firearms barrels applications as well as the aerospace market. We’re probably the only firearms technology company that has composite materials in orbit around the earth.”



 In our Shooters’ Forum, there was an discussion about a range that was threatened with closure because rifle over-shoots were hitting a farm building over two miles from the firing line. One reader was skeptical of this, asking “how’s that possible — were these guys aiming at the stars?” Actually, you may be surprised. It doesn’t take much up-angle on a rifle to have a bullet land miles down-range. That’s why it’s so important that hunters and target shooters always orient their barrels in a safe direction (and angle). Shooters may not realize how much a small tilt of the barrel (above horizontal) can alter a bullet’s trajectory.

 Headspace Gauges


 While attending the CA Long Range Championship a few seasons back, we had the opportunity to test the performance of a high-magnification (63X) spotting scope in near-ideal conditions (maybe the best I’ve ever witnessed). On the event’s last day we arrived at 5:45 am, literally as the sun was cresting the horizon. I quickly deployed our
  Then I invited 3 or 4 shooters to look through the scope. One younger guy, with good eyes, said immediately: “Yeah, I can see the holes — right there at 4 o’clock and seven o’clock. Wow.” Some older guys, who were wearing glasses, could not see the holes at all, no matter what we did to the scope’s main focus and diopter adjustment.
 Chromatic Aberration Revealed