There is a good article on gun safes in SHOT Business, a publication for the NSSF SHOT Show audience. Written by Christopher Cogley, this Safe Spaces Article offers some very important things to consider when purchasing a gun safe. Here are key points from that article:
Safe Security — The security of a gun safe comes down to two main factors: the thickness of the steel and the construction of the safe. When it comes to construction, look for a safe that has continuous welded construction instead of bolts or spot-welding, which are easier for trained gun thieves to cut through with torches or high-power saws.
Lock Options — Traditional combination locks are arguably the simplest choice. The downside, though, is they don’t provide quick access to firearms in an emergency. Electronic and biometric keypads provide quicker access — but be sure to replace the batteries every year.
Fireproof Rating — Aside from theft, the biggest threat to your firearms is fire. Unfortunately, the fireproof rating on gun safes can be confusing because there is no single, “standard” fireproof rating. As a general rule, the fireproof rating states how long a safe can be exposed to a fire of a particular temperature and maintain a temperature inside the safe of no more than 350 degrees F. To put this in context, the average house fire creates temperatures between 800 and 1,200 degrees F.
Where to Place a Gun Safe in Your Home
The Safe Spaces article includes advice from Stephen Hall, CEO of Lock It Up Safes. Hall addressed the question: “Where should I put my safe?”
Hall states: “Ease of installation should NOT be the foremost consideration when making this decision. Putting a safe in the garage has both pros and cons. We see some retailers recommend the garage solely because they don’t have the right team on board to install safes in other locations, and wheeling one into the garage is the easy way out.
Putting a safe in the garage is fine if that is the only place you an put it, but most want the safe in the home, where they can get to it quickly. Temperature and humidity are important considerations as well, and both are more easily controlled in a house rather than in the garage.
One advantage to garage installation is the concrete floor provides a solid base for safe installation. Houses built on concrete slabs also offer a solid anchor on the first level. If the safe needs to go to an upper floor, the weight of the safe and its contents need to be factored in.”
Place Safe Against Outside Wall
Hall recommends placing your gun safe against an outside wall: “In case of fire, the safe will typically last longer as there is not a lot that can burn on one side of the safe, thus keeping it cooler.”
Don’t Make the Mistake of Buying an Undersized Safe
The most common mistake people make when buying a gun safe is getting a safe that’s too small. This video explains why you should probably invest in a bigger safe. First, the rated gun capacity is exaggerated — rifles with mounted optics, long barrels, wide forearms and/or pistol grips take up considerably more space than a small rimfire rifle or a lever gun with iron sights. Second, your gun collection will likely grow in years to come. Third, you may want to store other valuables in the safe — such as vital documents, jewelry, watches, and pricey electronics. In this video the host notes: “Get a much larger safe than you think you’ll need at first. This will guarantee that you will have enough room for future purchases and all the guns and equipment you currently have.”
Recommended Safe Features for Long-Gun Storage
Editor’s Recommendation:
Budget $1200-1500 for a safe from a major maker, with external hinges, and an interior at least 58″ high. That gives you room for 30″-barreled rifles with a top shelf for handguns and other valuables. A rotary rack and slide-out drawers are great additions.
Keypad or Dial? We favor rotary dial locks. With minimal maintenance they will function flawlessly for decades. But the digital locks offer quick-access and convenience. If you go digital, get a commercial-grade unit.
Fire-lining is worth getting, but a thin layer of sheet-rock doesn’t make a safe truly “fire-proof”.
Interior at least 58″ High and 30″ wide Overall Weight 750+ Pounds 8 Gauge or Heavier Wall Thickness Double-Wall, Composite Door with Relockers Minimum UL RSC Rated. TL-15 or TL-30 Rating is Desirable External Hinges
Mechanical UL Group II (or better) Lock with Standard Dial Or UL Type 1 Commercial-Grade Electronic Lock
Custom Interior Suitable for Scoped Guns with Long Barrels On-Door Storage System for Non-scoped Long Guns OR Rotary Gun Rack for Scoped Rifles and ARs
Internal (sandwiched) Insulator, Reinforced if Sheet-rock Palusol? Heat-Activated Expanding Door Seals
Slide-out Drawers for Handguns Fire-lined Inner Safe for Paper and Media
Low Gloss, Rust-resistant External Finish Pre-Drilled holes for Lag Bolts and in Rear for Electric Cord Overhead Fluorescent Lamp and/or LED Mini-lights on Strings
Montana-based PROOF Research has released a revealing video showcasing carbon fiber firearms technology and the company’s barrel-making process. Viewers will find the 8-minute film an intriguing introduction to composite barrel-making, which employs aerospace carbon fiber wrapped around a steel barrel core. The video showcases the high-tech machines used at PROOF’s production facilities.
This video shows how PROOF Research employs aerospace-grade, high-temperature composite materials to build match-grade carbon fiber-wrapped barrels.
Dr. David Curliss, General Manager of PROOF Research’s Advanced Composite Division, and former head of the U.S. Air Force High Temperature Composites Laboratory, explains how aerospace expertise helps in the development of PROOF’s firearms-related products: “We are able to provide premier materials for PROOF Research for firearms barrels applications as well as the aerospace market. We’re probably the only firearms technology company that has composite materials in orbit around the earth.”
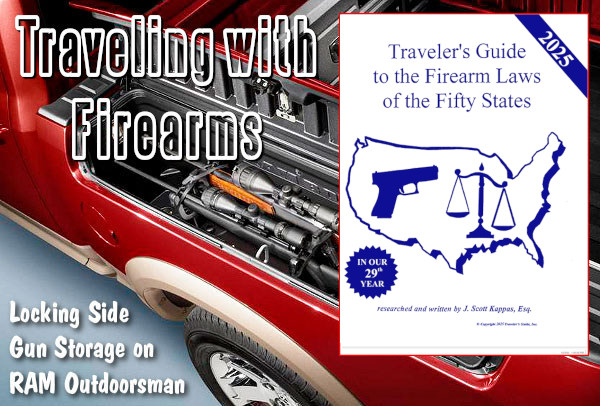
The 2025 NRA F-Class Nationals take place at the Winnequah Gun Club in Lodi, Wisconsin, August 2-9, 2025. And this is peak summer vacation time. So we know many of our readers will be driving to other states in the days and weeks ahead. If you plan to travel across state lines with your guns, this book can really help. With over 100 changes from last year, the 2025 edition of Traveler’s Guide to the Firearm Laws of the Fifty States is a must-read for anyone planning to travel around the country with firearms. In addition, the book also covers the firearms travel laws for Canada and Mexico.
For $16.95 you can purchase a state-by-state Traveler’s Guide to firearms laws. This book can help ensure you comply with all state laws during your trip. Highways Magazine states: “If you carry a weapon in your rig, you need this book.” This 68-page guide covers all firearms types and all 50 states. It even has info for Canada and Mexico. The Traveler’s Guide to the Firearm Laws of the Fifty States has sold more than 2,000,000 copies since it was first released in 1996.
This 28th edition of the Traveler’s Guide covers important topics such as carry of firearms in a motor vehicle, concealed carry reciprocity, which states preempt local gun regulation, tips on handling a traffic stop, concealed carry in state and National Parks, vehicle carry and possession on college campuses and much more. Best of all, the text is in plain, easy-to-read English.
Written and researched by J. Scott Kappas, an attorney and Class III Firearms Dealer, the 2025 Traveler’s Guide has a preface that defines many key terms important for anyone traveling with a firearm across state lines. The latest edition also has new formatting for easier reading.
The Traveler’s Guide is especially useful for shooters traveling in RVs and motorhomes. The American Rifleman Magazine declared: “This book is a must-have for truck drivers, motor home enthusiasts, campers and other travelers…easy to read and understand, well-organized and concise….” One reader from Texas adds: “I used to think that my RV was the same as my home when it came to gun carry….the Traveler’s Guide set me straight. Now I know my motorhome is subject to the same laws as any vehicle when it comes to guns.”
Berger Twist-Rate Stability Calculator On the Berger Bullets website you’ll find a handy Twist-Rate Stability Calculator that predicts your gyroscopic stability factor (SG) based on mulitiple variables: velocity, bullet length, bullet weight, barrel twist rate, ambient temperature, and altitude. This cool tool tells you if your chosen bullet will really stabilize in your barrel.
How to Use Berger’s Twist Rate Calculator
Using the Twist Rate Calculator is simple. Just enter the bullet DIAMETER (e.g. .264), bullet WEIGHT (in grains), and bullet overall LENGTH (in inches). On its website, Berger conveniently provides this info for all its bullet types. For other brands, we suggest you weigh three examples of your chosen bullet, and also measure the length on three samples. Then use the average weight and length of the three. To calculate bullet stability, simply enter your bullet data (along with observed Muzzle Velocity, outside Temperature, and Altitude) and click “Calculate SG”. Try different twist rate numbers (and recalculate) until you get an SG value of 1.4 (or higher).
Gyroscopic Stability (SG) and Twist Rate
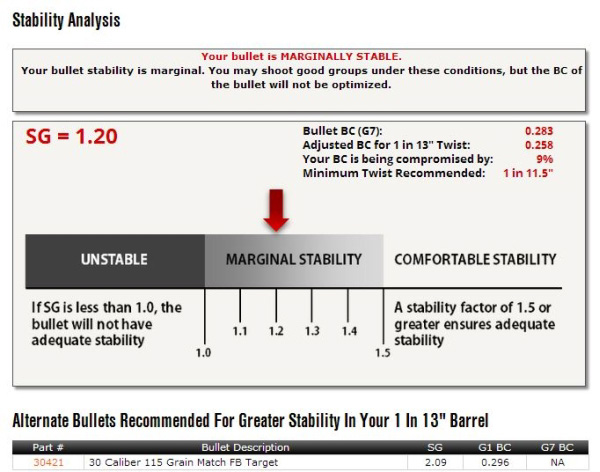
Berger’s Twist Rate Calculator provides a predicted stability value called “SG” (for “Gyroscopic Stability”). This indicates the Gyroscopic Stability applied to the bullet by spin. This number is derived from the basic equation: SG = (rigidity of the spinning mass)/(overturning aerodynamic torque).
If you have an SG under 1.0, your bullet is predicted not to stabilize. If you have between 1.0 and 1.1 SG, your bullet may or may not stabilize. If you have an SG greater than 1.1, your bullet should stabilize under optimal conditions, but stabilization might not be adequate when temperature, altitude, or other variables are less-than-optimal. That’s why Berger normally recommends at least 1.5 SG to get out of the “Marginal Stability” zone.
In his book Applied Ballistics For Long-Range Shooting (3rd Ed.), Bryan Litz (Berger Ballistician) recommends at least a 1.4 SG rating when selecting a barrel twist for a particular bullet. This gives you a safety margin for shooting under various conditions, such as higher or lower altitudes or temperatures.
Story idea from EdLongrange. We welcome reader submissions.
Want to see a bullet hit a target in ultra-slow motion? Watch this video to witness some amazing things — such as a bullet jacket peeling back like a banana-skin (at time-mark 7:30). A while back, Germany’s Werner Mehl produced this remarkable 10-minute video for the NSSF SHOT Show. This video has has been watched over 15.6 million times, making it one of the most popular shooting-related videos in history. Employing cameras recording at up to 1,000,000 (one million) frames per second, Mehl’s bullet flight video has been called “astounding” and “mesmerizing”. If you haven’t seen it yet, sit back and enjoy!
Watch This Video! It’s Really Something Special…
This remarkable 1 million Frame Per Second video by Werner has over 15,600,000 YouTube Views with 77,000+ likes. It is one of the best high-speed bullet impact videos ever created.
Guest Article By Michelle Gallagher, Berger Bullets
Let’s face it. In the world of firearms, there is something for everyone. Do you like to compete? Are you a hunter? Are you more of a shotgun shooter or rifle shooter? Do you enjoy running around between stages of a timed course, or does the thought of shooting one-hole groups appeal to you more? Even though many of us shoot several different firearms and disciplines, chances are very good that we all have a favorite. Are we spreading ourselves too thin by shooting different disciplines, or is it actually beneficial? I have found that participating in multiple disciplines can actually improve your performance. Every style of shooting is different; therefore, they each develop different skills that benefit each other.
How can cross-training in other disciplines help you? For example, I am most familiar with long-range prone shooting, so let’s start there. To be a successful long-range shooter, you must have a stable position, accurate ammunition, and good wind-reading skills. You can improve all of these areas through time and effort, but there are other ways to improve more efficiently. Spend some time practicing smallbore. Smallbore rifles and targets are much less forgiving when it comes to position and shot execution. Long-range targets are very large, so you can get away with accepting less than perfect shots. Shooting smallbore will make you focus more on shooting perfectly center shots every time. Another way to do this with your High Power rifle is to shoot on reduced targets at long ranges. This will also force you to accept nothing less than perfect. Shoot at an F-Class target with your iron sights. At 1000 yards, the X-Ring on a long range target is 10 inches; it is 5 inches on an F-Class target. Because of this, you will have to focus harder on sight alignment to hit a center shot. When you go back to the conventional target, you will be amazed at how large the ten ring looks.
Also, most prone rifles can be fitted with a bipod. Put a bipod and scope on your rifle, and shoot F-TR. Shooting with a scope and bipod eliminates position and eyesight factors, and will allow you to concentrate on learning how to more accurately read the wind. The smaller target will force you to be more aggressive on your wind calls. It will also help encourage you to use better loading techniques. Nothing is more frustrating than making a correct wind call on that tiny target, only to lose the point out the top or bottom due to inferior ammunition. If you put in the effort to shoot good scores on the F-Class target, you will be amazed how much easier the long-range target looks when you return to your sling and iron sights. By the same token, F-Class shooters sometimes prefer to shoot fast and chase the spotter. Shooting prone can help teach patience in choosing a wind condition to shoot in, and waiting for that condition to return if it changes.
Benchrest shooters are arguably among the most knowledgeable about reloading. If you want to learn better techniques about loading ammunition, you might want to spend some time at benchrest matches. You might not be in contention to win, but you will certainly learn a lot about reloading and gun handling. Shooting F-Open can also teach you these skills, as it is closely related to benchrest. Benchrest shooters may learn new wind-reading techniques by shooting mid- or long-range F-Class matches.
Position shooters can also improve their skills by shooting different disciplines. High Power Across-the-Course shooters benefit from shooting smallbore and air rifle. Again, these targets are very small, which will encourage competitors to be more critical of their shot placement. Hunters may benefit from shooting silhouette matches, which will give them practice when shooting standing with a scoped rifle. Tactical matches may also be good, as tactical matches involve improvising shots from various positions and distances. [Editor: Many tactical matches also involve hiking or moving from position to position — this can motivate a shooter to maintain a good level of general fitness.]
These are just a few ways that you can benefit from branching out into other shooting disciplines. Talk to the other shooters. There is a wealth of knowledge in every discipline, and the other shooters will be more than happy to share what they have learned. Try something new. You may be surprised what you get out of it. You will certainly learn new skills and improve the ones you already have. You might develop a deeper appreciation for the discipline you started off with, or you may just discover a new passion.
This article originally appeared in the Berger Blog. The Berger Blog contains the latest info on Berger products, along with informative articles on target shooting and hunting.
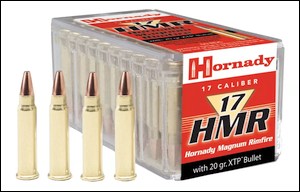
The .17 Hornady Magnum Rimfire (HMR) was introduced in 2002 by Hornady as a high-velocity, rimfire cartridge derived from the .22 Magnum case necked down to .17-caliber. Designed for precision and flat trajectory, the .17 HMR gained popularity among varmint hunters and target shooters for its good accuracy and hitting power out to 200 yards or more. Standard .17 HMR ammo typically fires a 17-grain V-MAX or TNT hollow point bullet at speeds around 2550 FPS, offering explosive impact on small game while maintaining low recoil.
Compared to other rimfire cartridges like the .22 LR or .22 WMR, the .17 HMR offers superior ballistic performance, including flatter trajectories and higher energy at extended distances. It’s good for shooting prairie dogs, ground squirrels, rabbits, and even coyotes under the right conditions. While not as powerful as some centerfire varmint rounds, its blend of affordability, velocity, and accuracy makes the .17 HMR an outstanding choice for precision-minded rimfire shooters. Popular manufacturers like CCI, Hornady, Winchester, and Federal produce a wide variety of loadings, from polymer-tipped hunting rounds to jacketed hollow points, making it easy to tailor your ammo choice to your specific shooting needs.
.17 HMR Ammo DEALS — CCI, Hornady, Remington, Winchester
Things to Know about .17 HMR Ammunition
Bullet Type & Weight: The standard bullet weight for .17 HMR is 17 grains, with options up to 20 grains for improved wind resistance and penetration. Polymer-tipped bullets expand rapidly on impact, while jacketed hollow points (JHP) offer deeper penetration.
Which is more powerful, .22 Mag or .17 HMR? While the .22 WMR (Magnum) may offer slightly more raw energy, .17 HMR delivers superior velocity and flatter trajectory, giving it better accuracy at long distances. For precision shooting, .17 HMR generally has the edge.
How does .17 HMR ammo compare to other rimfire cartridges? Compared to .22 LR or .22 WMR, .17 HMR shoots flatter, faster (typically 2500+ fps), and with greater accuracy at extended distances. It’s a top choice for rimfire shooters who demand high performance beyond 100 yards.
What is the effective range of .17 HMR? Good .17 HMR ammo is highly accurate up to 150–200 yards for small game and varmints. Some experienced shooters can push it beyond 200 yards with the right optics and wind conditions.
What is the best barrel length for .17 HMR rifles? A barrel length between 20–22 inches is optimal for .17 HMR, balancing velocity, maneuverability, and accuracy. Shorter barrels are lighter but may lose some velocity, while longer barrels offer slightly better ballistics at the cost of weight.
Is the .17 HMR good for beginners? Yes .17 HMR has low recoil, flat trajectory, and simple handling for new shooters. It’s an easy-shooting round that offers good performance with low recoil.
Today’s Saturday Video Showcase features informative videos about loading at the range. AccurateShooter.com contributor F-Class John shows efficient procedures for load development at the range, testing both powder charge and seating depth. And Ultimate Reloader’s Gavin Gear shows how to load in the field with a mechanical powder dispenser, small scale, and a high-tech hand press. We also include a video from a benchrest competitor in France loading his 6PPC, plus tips for loading at the range by Glen Zediker, author of the Handloading for Competition book.
Reloading at the Range with F-Class John
This excellent 25-minute video covers all aspects of loading at the range — case sizing, powder measuring/dispensing, priming, bullet seating and more. In the video, F-Class John also talks about transport of tools and how to develop loads at the range, as you test different powder charges and seating depths. Viewers have praised this video as one of F-Class John’s best ever. John employs a compact RCBS Summit press and an RCBS ChargeMaster. Highlights by time: 6:14 powder test with grain increments; 14:30 setting depth test; 16:18 test fire seating depth; 18:31 refine seating depth; 20:52 refined seating depth firing; 22:32 “take away” commentary.
Design and Function of Open Front RCBS Summit Press
Unlike other presses, the open front RCBS Summit moves the die up and down while the cartridge case remains stationary. The ambidextrous open-front design allows great access to your cases, and you can quickly change dies very quickly. The Summit has an all-steel linkage and cast iron frame. The Summit also offers compound leverage, a massive 2-inch diameter ram, full access through the front, a press adapter bushing, spent primer catcher, and wide 4.5-inch operating window for convenient access.
Ultimate Reloader Video of Loading at the Range
Sometimes the ONLY practical solution for load development is loading ammunition at the range. In this video Ultimate Reloader’s Gavin Gear demonstrates the loading process from start to finish, and covers what gear is required to “load where you shoot”. This applies to both loading at a covered range and loading in the field. In the video Gavin employs a bench-attached powder thrower and the impressive ($300) Buchanan Precision Machine (BPM) hand press.
Loading Between Matches — Precision Loading at a Pace
In this video, French benchrest competitor Carlos Pacheco loads ammo efficiently between relays at a Benchrest for Group match. He has a single-stage press clamped to a bench, and has a separate arbor press for bullet seating. 6PPC group-shooting competitors commonly tune their loads during the course of the competition, adjusting powder volumes to keep their rifles in optimal tune. Some competitors may also change bullet seating depth, but “tuning” is most commonly done with powder charge. Some benchrest-for-group competitors also believe that best accuracy is achieve with freshly-made ammo loaded before the brass necks take a set.
Loading at the Range — Then and Now
In benchrest shooting for Group, loading at the range has been de rigueur for decades. In the Score discipline, preloading is usually the custom. The main reason is that, in Score competition, only one Aggregate (warm-up match and five record targets) per day is usually shot. That would be less than 50 shots, assuming a few sighter shots. Also, the 30BR, the dominant Benchrest-for-Score cartridge, is very amenable to pre-loading.
By contrast, the Group discipline includes 21 targets (two warm-ups and twenty record targets) over a weekend, usually shot with 6PPC-chambered rifles. Many times, the 6PPC shooters may tweak their loads through the day given changing atmospheric conditions or simply trying to find the correct tune to “dot up”. This term, “Dot up”, means the shots are essentially going through the same hole, or closely so.
Loading at the range was a bit different when benchrest competition was in its infancy. The 1951 book, Modern Accuracy by Bob Wallack, is the best of the early benchrest books. Copies can be found, from time to time, on eBay or Alibris. It is a fascinating survey of benchrest as it existed more than six decades ago. In it, there is a photo of Wallack using the rear bumper of a car at the bench to clamp his reloading tools. Things have come a long way compared to the range loading set-ups of modern shooters. Here you can see Bob Wallack way back in 1950:
Good Article on Reloading at the Range by Glen Zediker
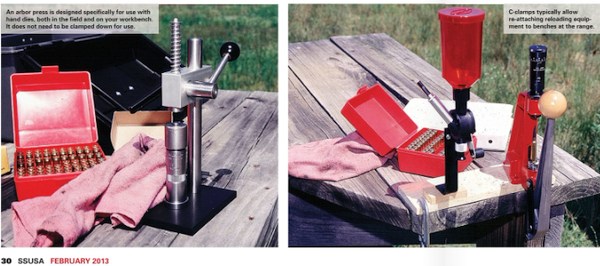
The February 2013 edition of Shooting Sports USA magazine has an interesting feature by Glen Zediker, who sadly passed away in October 2020. In this Transporting Success, Part I article, Zediker explains the advantages of loading at the range when you are developing new loads or tuning existing loads. Glen, the author of the popular Handloading for Competition book, discusses the gear you’ll need to bring and he explains his load development procedure. In discussing reloading at the range, Glen focuses on throwing powder and seating bullets, because he normally brings enough sized-and-primed brass to the range with him, so he doesn’t need to de-prime, re-size, and then re-prime his cases.
Zediker writes: “Testing at the range provides the opportunity to be thorough and flexible. You also have the opportunity to do more testing under more similar conditions and, therefore, get results that are more telling. Once you are there, you can stay there until you get the results you want. No more waiting until next time.”
Zediker starts with three-shot groups: “I usually load and fire three samples [with] a new combination. I’ll then increase propellant charge… based on the results of those three rounds, and try three more. I know that three rounds is hardly a test, but if it looks bad on that few, it’s not going to get any better.”
Glen reminds readers to record their data: “Probably the most important piece of equipment is your notebook! No kidding. Write it down. Write it all down.”
There’s More to the Story…
Editor’s Note: In Zediker’s discussion of loading at the range, he only talks about throwing powder and seating bullets. In fact, Glen opines that: “there is little or no need for sizing.” Well, maybe. Presumably, for each subsequent load series, Zediker uses fresh brass that he has previously sized and primed. Thus he doesn’t need to de-prime or resize anything.
That’s one way to develop loads, but it may be more efficient to de-prime, re-size, and load the same cases. That way you don’t need to bring 50, 80, or even 100 primed-and-sized cases to the range. If you plan to reload your fired cases, you’ll need a system for de-priming (and re-priming) the brass, and either neck-sizing or full-length sizing (as you prefer). An arbor press can handle neck-sizing. But if you plan to do full-length sizing, you’ll need to bring a press that can handle case-sizing chores. Such a press need not be large or heavy. Many benchresters use the small but sturdy RCBS Partner Press, an “O-Design” that costs about $119.99 on Amazon. You may even get by with the more basic Lee Precision Compact Reloading Press, shown in Zediker’s article. This little Lee press, Lee product #90045, retails for under $50.00.
Wind Box Shelters Scales When Reloading at Outdoor Ranges
Beat the Breezes with a Wind Box for your Scale
Forum member Boyd Allen has come up with a smart solution for reloaders who use scales outdoors — a windproof scale enclosure, aka “Wind Box”. Boyd explains: “Many guys have good set-ups for loading at the range, with clamping mounts for powder measure and press. But they lack a good enclosure for a scale. This is vitally important with beam scales because they have a lot of surface area to catch the wind. With much wind at all, the beam can oscillate to the point that is not really very usable. While a low-profile electronic scale may be less wind-sensitive, breezes DO affect weight read-outs on digital scales. And of course you always have the issue of blowing powder particles.”
Boyd Allen has used his Wind Box successfully for many seasons. He explains: “The essence of the idea is to have a scale set up in a box with a clear cover that can be opened and closed. On one side the trickler handle/control emerges through a ‘just big enough’ hole. You raise the cover, add a sub-target-weight thrown charge to the pan, and then close the cover. With the cover secure, the set-up is protected from the wind, and you can now trickle up to your desired charge. It works very well. The scale in the photo is an old Ohaus that I picked up. You can adapt this Wind Box design to any beam scale, or portable electronic scale. Simply adjust the dimensions to fit your particular scale and trickler.”
Saturday Movies range loading story concept and video links by Boyd Allen
Jerry Miculek is the best action revolver shooter who has ever lived. Miculek is also a true master with rifle and shotgun. This guy shoots hundreds of thousands of rounds every year in all types of firearms. Through that process, he has discovered common mistakes many shooters make. Those mistakes can harm the guns, or threaten the safety of the operator. Here Jerry offers some vital gun handling and safety advice in his “Never Do This” video series.
Jerry Miculek has won multiple revolvers championships, and has set amazing records for revolver speed shooting (with reloads). Yes Jerry, “Mr. Revolver”, knows a thing or two about wheelguns. In this video, Jerry explains how you can damage your revolver by using the wrong methods to open and close the cylinder and extract ammo. Jerry shows what NOT to do, and then he very carefully explains the proper procedure to release the cylinder, and swing it out of the frame. In addition, Jerry shows how best to swing a loaded cyclinder back into place. If you own a revolver, ANY revolver, you should definitely watch this video.
In this second video, Jerry explains common mistakes people make when handling and shooting three classic, semi-auto firearm types — the M1 Garand, the SKS carbine, and the M1911 pistol. Jerry shows handling faults that can cause out-of-battery detonation or early primer strikes, or cause jams in the Garand and SKS. Then Jerry explains why you should never release the slide on a M1911 pistol with a round already in the chamber. This is a must-watch video for Garand owners.
Here Jerry demonstrates of the most common jams that can happen with AR-platform rifles. Miculek reveals the cause of the issue and then shows how to prevent it. Jerry notes: “This is one of those malfunctions that you won’t see coming! I’ve seen it … on the range and it can be devastating to your time in a match. All ammo used in the video were dummy rounds and intentionally loaded for training without powder or primers.”
With schools closed for the summer and kids spending more time at home, firearms safety is more important than ever. Given that fact, the NSSF reminds gun owners to keep their guns locked up so they cannot be accessed by children. The National Shooting Sports Foundation (NSSF) and its partners urge gun owners to keep firearm safety a top priority and are making safety resources widely available as gun and ammunition sales increase, especially among first-time firearm purchasers.
For anyone considering buying a gun, Project ChildSafe’s Road To Responsible Firearm OwnershipMany Paths to Firearm Safety video series helps gun owners determine the best safe storage device for their home/lifestyle. You also view the Safe Storage Options chart.
NSSF encourages gun owners and non-gun owners to use the firearm safety resources available on its Project ChildSafe website. These include the McGruff Gun Safety videos for young children and this educational video explaining how to discuss gun safety with children:
“More parents are assuming the role of educators in their homes, so it’s a good to time have a talk with your kids about gun safety, even if you don’t own a gun”, states Joe Bartozzi, NSSF President and CEO. “If you do own a firearm, be sure your family understands the safety rules regarding firearms in your home, and always store guns responsibly when not in use.”


 Written and researched by J. Scott Kappas, an attorney and Class III Firearms Dealer, the 2025 Traveler’s Guide has a preface that defines many key terms important for anyone traveling with a firearm across state lines. The latest edition also has new formatting for easier reading.




 Position shooters can also improve their skills by shooting different disciplines. High Power Across-the-Course shooters benefit from shooting smallbore and air rifle. Again, these targets are very small, which will encourage competitors to be more critical of their shot placement. Hunters may benefit from shooting silhouette matches, which will give them practice when shooting standing with a scoped rifle. Tactical matches may also be good, as tactical matches involve improvising shots from various positions and distances. [Editor: Many tactical matches also involve hiking or moving from position to position — this can motivate a shooter to maintain a good level of general fitness.]
 The .17 Hornady Magnum Rimfire (HMR) was introduced in 2002 by Hornady as a high-velocity, rimfire cartridge derived from the .22 Magnum case necked down to .17-caliber. Designed for precision and flat trajectory, the .17 HMR gained popularity among varmint hunters and target shooters for its good accuracy and hitting power out to 200 yards or more. Standard .17 HMR ammo typically fires a 17-grain V-MAX or TNT hollow point bullet at speeds around 2550 FPS, offering explosive impact on small game while maintaining low recoil.



 There’s More to the Story…