The United States Postal Service allows shipment of long-barreled rifles and shotguns via the U.S. Mail. However, regular citizens who do not possess an FFL are NOT allowed to mail handguns at all.* For handguns (all pistols and revolvers), you must use UPS or FedEX and ship FROM an FFL business in most situations.
432.1 General
Mailers must comply with the Gun Control Act of 1968, all of the provisions of postal law in 18 U.S.C. 1715, and all other all federal and state regulations and local ordinances affecting the movement of firearms. The following also applies:
a. The Postal Service may require the mailer to open parcels containing firearms or air guns or give written certification that the weapon is unloaded and not concealable (see note 1).
b. Short-barreled rifles or shotguns that can be concealed on the person are non-mailable.
c. No markings of any kind that indicate the nature of the contents may be placed on the outside wrapper or container of any mailpiece containing firearms.
d. Mailable matter must be properly and securely packaged within the general packaging requirements in DMM 601.1-7.
e. Except for shipments between licensed dealers, manufacturers, or importers, all regulated firearms must be mailed using a USPS product or Extra Service that provides tracking and signature capture at delivery (see note 2).
432.3 Rifles and Shotguns
Except under 431.2, unloaded rifles and shotguns are mailable. Mailers must comply with the rules and regulations under 27 CFR, Part 478, as well as state and local laws. The mailer may be required by the USPS to establish, by opening the parcel or by written certification, that the rifle or shotgun is unloaded and not ineligible for mailing (see note 1). The following conditions also apply:
a. Subject to state, territory, or district regulations, rifles and shotguns may be mailed without restriction when intended for delivery within the same state of mailing. These items must:
1. Bear a “Return Service Requested” endorsement.
2. Be mailed using a class of mail, product, or Extra Service that provides tracking and signature capture at delivery.
b. A rifle or shotgun owned by a non-FFL may be mailed outside the owner’s state of residence by the owner to himself or herself, in care of another person in the other state where he or she intends to hunt or engage in any other lawful activity. These mailpieces must:
1. Be addressed to the owner.
2. Include the “in the care of” endorsement immediately preceding the name of the applicable temporary custodian.
3. Be opened by the rifle or shotgun owner only.
4. Be mailed using a class of mail, product, or Extra Service that provides tracking and signature capture at delivery.
d. Mailing of rifles and shotguns between licensed FFL dealers, manufacturers, or importers are not restricted. The Postal Service recommends that these items be mailed using a class of mail, product, or Extra Service that provides tracking and signature capture at delivery.
e. Except as described in 432.3a, licensed curio and relic collectors may mail firearms meeting the definition of curios or relics under 27 CFR 478.11 domestically to licensed FFL curio and relic collectors in any state. These items must be mailed using a class of mail, product, or Extra Service that provides tracking and signature capture at delivery.
Today’s video showcase covers bore-sighting methods and technology. Bore-sighting the old-fashioned way — by looking down the bore of a rifle at a target — is not difficult. With a conventional bolt-action rifle, visual bore-sighting can be done quickly and easily. Rest your gun securely on bags, remove your bolt and set up a 50-yard target with a large bright orange or black center circle. Look through the back of the action and you should be able to sight down the bore with your own eyes just fine. There’s no need for expensive hardware. In fact it may be easier to bore-sight the “old-fashioned way” rather than try to see a laser in bright sunlight at 50 yards (or even 25).
However, with lever guns and semi-auto rifles, including the popular AR15, M1 Garand, and M1A, the design of the receiver may make it virtually impossible to sight down the bore with the naked eye. That’s where a modern laser bore-sighting device comes in handy. For those situations where a bore-sighting tool is needed, we recommend a laser bore-sighter that fits inside your chamber. An in-chamber laser device, as shown below, is handy and has less safety risk than a tool which fits in the end of the barrel.
How to Bore-Sight Your Rifle in Five Minutes
This video from Australia shows the basics of the bore-sighting process. First set up a target 50 yards (or closer) from your shooting station. Make sure the rifle is well-supported and stable. When the target is ideally centered in the BORE of the barrel, then adjust the reticle on your scope to center the crosshairs on the middle of the target. Then, after checking down-range, take a few test shots. Finally, move the target out to 100 yards and confirm your zero, as explained at the close of today’s article.
Vortex Shows How to Bore-Sight Rifles
This well-made, informative video from Vortex covers the basics of bore-sighting. Bore sighting your rifle is a simple way to establish an initial zero to get you on target faster and save you ammo at the range. Thankfully, it doesn’t take a ton of gear or ammunition to bore-sight a rifle effectively. Video host Jimmy from Vortex provides a handy, step-by-step guide in this 10-minute video.
Bore-Sighting Using a Barrel-Mounted Laser Bore-Sighter
If you wondered why a barrel-mounted laser bore-sighter was off-center? Or if you want to learn how to use one properly, this video shows how to safely and properly zero a scope using a barrel-mounted laser bore sight device. Another option is a small cartridge-sized laser that fits inside the chamber. These sell for under $25.00 and are convenient. There are safety advantages to in-chamber lasers.
Initial Bore-Sighting at Home (Before You Head to the Range)
This useful video shows how to bore-sight a rifle at home. This can save time (and money for ammo) when you do get to the range to confirm your scope’s zero. This home procedure works best if the target is well-illuminated while the rifle is in a shadowed area, creating the best contrast. Also make sure the rifle is on a steady support — such as a portable gun vise or sandbags front and rear.
Bore-Sighting with a Red Dot (Reflex) Sight
As with conventional scopes, if you have a red dot sight or reflex optic, you’ll need to bore-sight your rifle, then zero the optic. [Reflex sights use a reflex lens to project a dot or reticle onto the target, whereas red dot sights use a flat, reflective surface to display a red dot reticle.] In this video, retired Navy SEAL Mark Cochiolo demonstrates how to bore-sight then adjust a red dot. Bore sighting allows you to zero your red dot so that your shots hit near your intended point of impact.
Learn More about Bore-Sighting with Tools
To learn more about bore-sighting, you can view a detailed article on the Warne Scope Mounts website. This features through-the-barrel images and discussion of tools that fit in the chamber or barrel to project a laser beam down-range. Shown below are cartridge-sized projecting lasers that fit in a rifle’s chamber. These are available for a wide variety of cartridge/chamber sizes.
WARNING: If you use an in-barrel laser be sure to remove it BEFORE chambering a round. ANY obstruction in the barrel can cause serious injury or even death if you fire a round.
Bore Sight Grid Tool with Arbors
The Bushnell Bore Sight with Arbors is a bore-sighting tool that many gun stores and gunsmiths use. This device uses arbors but does not transmit a laser.
You attach the tool to the end of the barrel and align it with your scope. A grid is visible inside the bore-sighter. Look at that grid and then and align your scope’s reticle with the grid. This Bushnell unit ships with three expandable arbors in 22-270 caliber, 7mm-35 caliber, and 35-45 caliber.
How to Zero a Hunting Rifle Efficiently
Once you have bore-sighted your rifle to get “on target” successfully, then you want to zero your optic so that the shot falls exactly where you want it at your target distance, typically 100 yards. This Vortex video shows you how to quickly and efficiently sight-in and zero a hunting rifle before heading out into the field. This video explains a simple procedure that lets you get a solid zero in just three shots. Of course you probably want to fire a few more rounds to confirm your zero before you head off to your hunting grounds, but this will let you get on-target with a minimum amount of time and ammo expended. This helpful video now has 3.2 million views on YouTube!
Fouling Shots and Cold Bore Condition
If you recently cleaned your rifle, you may want to fire two or three fouling shots before you start this procedure. But keep in mind that you want to duplicate the typical cold bore conditions that you’ll experience during the hunt. If you set your zero after three fouling shots, then make sure the bore is in a similar condition when you actually go out hunting.
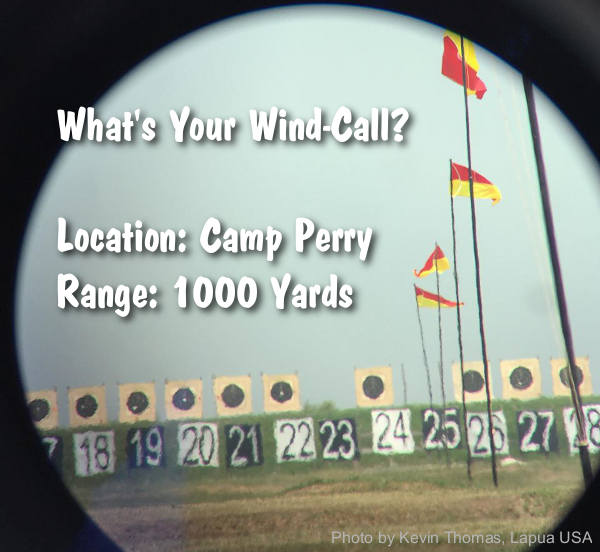
“The pessimist complains about the wind; the optimist expects it to change; the realist adjusts the sails.” — William Arthur Ward
Readers often ask us: “Is there a decent, easy-to-comprehend book that can help my wind-reading?” Many of our Forum members have recommended The Wind Book for Rifle Shooters by Linda Miller and Keith Cunningham.
New Edition — Hardback and eBook
The latest, updated edition of The Wind Book for Rifle Shooters was released in May 2020. This 144-page book, first published in 2007, is a great resource. But you don’t have to take our word for it. If you click this link, you can read book excerpts and decide for yourself. When the Amazon page opens, look below the book cover photo, and click the bar labeled “Read Sample”. This lets you preview chapters from the Wind Book, and view some illustrations. Along with the hardback edition ($22.99), Amazon offers a Kindle (eBook) edition for $14.99.
Other books cover wind reading in a broader discussion of ballistics or long-range shooting, such as Applied Ballistics for Long-Range Shooting by Bryan Litz. But the Miller & Cunningham book is ALL about wind reading from cover to cover, and that is its strength. The book focuses on real world skills that can help you accurately gauge wind angle, wind velocity, and wind cycles.
All other factors being equal, it is your ability to read the wind that will make the most difference in your shooting accuracy. The better you understand the behavior of the wind, the better you will understand the behavior of your bullet. — The Wind Book for Rifle Shooters
The Wind Book for Rifle Shooters covers techniques and tactics used by expert wind-readers. There are numerous charts and illustrations. The authors show you how to put together a simple wind-reading “toolbox” for calculating wind speed, direction, deflection and drift. Then they explain how to use these tools to read flags and mirage, record and interpret your observations, and time your shots to compensate for wind.
I believe this is a must-have book if you are a long-range sport shooter. I compete in F-Class Open and when I first purchased this book and read it from cover to cover, it helped me understand wind reading and making accurate scope corrections. Buy this book, read it, put into practice what it tells you, you will not be disappointed. — P. Janzso
If you have one book for wind reading, this should be it. Whether you’re a novice or experienced wind shooter this book has something for you. It covers how to get wind speed and direction from flags, mirage, and natural phenomenon. In my opinion this is the best book for learning to read wind speed and direction. — Muddler
Redding Reloading offers handy Handloader’s Data Sheets in printable PDF format. This FREE form allows hand-loaders to document their tool settings, bushing size, powder charge, load specs (COAL etc.), and case prep status. In addition, the form allows you to enter your load testing information, complete with chronograph data, group size, zero range, and wind/temp conditions. With this single, handy form you can document all the vital information for your particular cartridges and loads. We suggest you print these out, 3-hole-punch ‘em, and then keep them in a three-ring binder.
We’ve seen various reloading log templates, but this Redding form (shown below) is better than most because it combines both reloading data AND range-test data in one place. You can see all key details of the reloading process (tool settings etc.) plus the end results — how the load actually performed over the chronograph and on paper. This form allows the user to capture a large amount of information for later use, while accurately track load development. CLICK HERE to DOWNLOAD.
FREE Ammunition Box Label Template Redding also provides a FREE printable template for your ammo boxes (see photo at top of article). This lets you put all vital load info on your ammo boxes. There are fields for: Date, Cartridge, Powder, Grains, Bullet, Weight, Primer, Case type. Designed for Avery 5260 (or similar) label sheets, this template allows you to print 30 labels at one time. You can purchase the Avery 5260 peel-off printable label sheets at any office supply store.
We are re-publishing this article at the request of Forum members who found the information very valuable. If you haven’t read this Safety Tip before, take a moment to learn how you can inspect your fired brass to determine if there may be a potential for case separation. A case separation can be dangerous, potentially causing serious injury.
On the highly-respected Riflemans’ Journal blog, created by our late, dear friend German Salazar*, there was an excellent article about Cartridge Case-Head Separation. In this important article, Salazar (aka GS Arizona) examined the causes of this serious problem and explained the ways you can inspect your brass to minimize the risk of a case-head separation. As cases get fired multiple times and then resized during reloading, the cases can stretch. Typically, there is a point in the lower section of the case where the case-walls thin out. This is your “danger zone” and you need to watch for tell-tale signs of weakening.
The photo below shows a case sectioned so that you can see where the case wall becomes thinner near the web. You can see a little arrow into the soot inside the case pointing to the thinned area. This case hadn’t split yet, but it most likely would do so after one or two more firings.
Paper Clip Hack for Detecting Problems
The article provided a great, easy tip for detecting potential problems. You can use a bent paper clip to detect potential case wall problems. Slide the paper clip inside your case to check for thin spots. GS Arizona explains: “This simple little tool (bent paper clip) will let you check the inside of cases before you reload them. The thin spot will be immediately apparent as you run the clip up the inside of the case. If you’re seeing a shiny line on the outside and the clip is really hitting a thin spot inside, it’s time to retire the case. If you do this every time you reload, on at least 15% of your cases, you’ll develop a good feel for what the thin spot feels like and how it gets worse as the case is reloaded more times. And if you’re loading the night before a match and feel pressured for time — don’t skip this step!”
* Sadly, German Salazar passed away unexpectedly on June 21, 2022 at age 62. German was a great inspiration to this site who helped guide the creation of the AccurateShooter Forum. A brilliant man, expert attorney, and top-tier marksman, German will be sorely missed in the shooting sports world.
At long range, small bullet holes are much easier to see “in the white” than in the black center of the normal High Power target. When you’re practicing at long range using a scoped rifle, one way to enhance your ability to see your bullet holes is to print a “negative” version of the regulation bullseye target so that your black center is now white.
How do you create a “negative” of a target image? Many image programs, including the FREE Irfanview software, have a “Negative” function in the pull-down menu. If you don’t see a “Negative” menu option in your program, look for a “substitute colors” option. Many printers also have a “reverse colors” function. If you can’t find a solution with your computer or printer, just take a normal bullseye target to a copy shop, and the staff can easily print you a set of targets with white centers in black fields.
Forum member Watercam has a Pentax PF-80ED spotting scope that allows him to see 6mm bullet holes in the white at 600 yards. However, 6mm holes in the black are only visible out to 400 yards or so. Accordingly, Watercam uses a modified “reversed” black-to-white target for 600-yard practice. Watercam explains: “[Using the Pentax] With my 6mm and limited mirage I see defined, 6mm holes in the white out to 600. In the black, however, I can see bullets holes at about 400. I now use reverse-color targets for training without a pit partner at the 600-yard line.”
The Hi-Viz Solution — Day-Glo Pasters
If you’re not concerned with official scoring rings, you can use an all-white target with a bright, fluorescent target dot in the middle. A 2″- or 3″-diameter stick-on target dot is highly visible at 600 yards. Birchwood Casey Target Spots® assortment #33928-TSA offers neon orange target dots in 1″, 2″, and 3″ diameters.
TARGET TIP — Use Chart Paper
For practice backers for the Day-GLo pasters at long distance, use Flip Chart Paper (aka Easel Pads) marked with graph lines at 1″ intervals. Available either regular or self-stick, one sheet can hold 4-8 pasters and the white paper allows for easy spotting of the holes and quick estimation of group size. Get Flip Chart Paper at Amazon.com, Staples, or Office Depot.
Brits Use White-Field Target for F-Class
In the UK, some ranges are now using a “reverse-style” target with a mostly white area. Laurie Holland says this allows shooters to see shots much more easily. Laurie reports: “Here’s a photo of the 500/600 yard F-Class match target we use in PSSA comps at Diggle Ranges with club members Chris Hull (L) and Terry Mann (R). We now use this target form at all ranges up to 1K for F-Class, and, yes you can often see your hits at 600 yards on the target before the markers pull it. Regards from England — Laurie”.
Have you recently purchased a new scope? Then you should verify the actual click value of the turrets before you use the optic in competition (or on a long-range hunt). While a scope may have listed click values of 1/4-MOA, 1/8-MOA or 0.1 Mils, the reality may be slightly different. Many scopes have actual click values that are slightly higher or lower than the value claimed by the manufacturer. The small variance adds up when you click through a wide range of elevation.
In this video, Bryan Litz of Applied Ballistics shows how to verify your true click values using a “Tall Target Test”. The idea is to start at the bottom end of a vertical line, and then click up 30 MOA or so. Multiply the number of clicked MOA by 1.047 to get the claimed value in inches. For example, at 100 yards, 30 MOA is exactly 31.41 inches. Then measure the difference in your actual point of impact. If, for example, your point of impact is 33 inches, then you are getting more than the stated MOA with each click (assuming the target is positioned at exactly 100 yards).
How to Perform the Tall Target Test
The objective of the tall target test is to insure that your scope is giving you the proper amount of adjustment. For example, when you dial 30 MOA, are you really getting 30 MOA, or are you getting 28.5 or 31.2 MOA? The only way to be sure is to verify, don’t take it for granted! Knowing your scopes true click values insures that you can accurately apply a ballistic solution. In fact, many perceived inaccuracies of long range ballistics solutions are actually caused by the scopes not applying the intended adjustment. In order to verify your scope’s true movement and calculate a correction factor, follow the steps in the Tall Target Worksheet. This worksheet takes you thru the ‘calibration process’ including measuring true range to target and actual POI shift for a given scope adjustment. The goal is to calculate a correction factor that you can apply to a ballistic solution which accounts for the tracking error of your scope. For example, if you find your scope moves 7% more than it should, then you have to apply 7% less than the ballistic solution calls for to hit your target.
NOTE: When doing this test, don’t go for the maximum possible elevation. You don’t want to max out the elevation knob, running it to the top stop. Bryan Litz explains: “It’s good to avoid the extremes of adjustment when doing the tall target test.I don’t know how much different the clicks would be at the edges, but they’re not the same.”
Should You Perform a WIDE Target Test Too?
What about testing your windage clicks the same way, with a WIDE target test? Bryan Litz says that’s not really necessary: “The wide target test isn’t as important for a couple reasons. First, you typically don’t dial nearly as much wind as you do elevation. Second, your dialed windage is a guess to begin with; a moving average that’s different for every shot. Whereas you stand to gain a lot by nailing vertical down to the click, the same is not true of windage. If there’s a 5% error in your scope’s windage tracking, you’d never know it.”
Verifying Scope Level With Tall Target Test
Bryan says: “While setting up your Tall Target Test, you should also verify that your scope level is mounted and aligned properly. This is critical to insuring that you’ll have a long range horizontal zero when you dial on a bunch of elevation for long range shots. This is a requirement for all kinds of long range shooting. Without a properly-mounted scope level (verified on a Tall Target), you really can’t guarantee your horizontal zero at long range.”
NOTE: For ‘known-distance’ competition, this is the only mandatory part of the tall target test, since slight variations in elevation click-values are not that important once you’re centered “on target” at a known distance.
A Virginia Congressman has introduced legislation which will take suppressors (aka “silencers”) off the NFA list and make them much easier to purchase. That’s a good idea because a quality suppressor can reduce firearm sound levels by 30 decibels (dB) or more. U.S. Rep. Ben Cline’s Hearing Protection Act (H.R. 404) would remove firearm suppressors from the list of restricted items under the 1934 National Firearms Act (NFA). That would reduce costly licensing ($200 per suppressor) and burdensome background checks. Instead, suppressors would be regulated under the 1968 Gun Control Act (GCA) with the same type of background check done with retail firearm purchases. The legislation would also amend statutory suppressor definitions.
Under current law, an individual purchasing a suppressor must locate a regulated NFA Class III retailer, complete a Bureau of Alcohol, Tobacco, Firearms and Explosives (ATF) Form 4 with the model and serial number of the suppressor, and obtain two passport photos and fingerprint cards from a local police department. The local chief law enforcement official must receive a completed copy of the application. Then the form, photographs, and fingerprints must be sent to ATF along with a check to pay the $200 tax. The customer can obtain the suppressor from the NFA Class III retailer upon an additional background check through FBI’s National Instant Criminal Background Check System (NICS).
Congressman Cline’s legislation would eliminate those requirements and make suppressors available with the same type of paperwork and background check required for a firearm. H.R. 404 would also clarify the definition of suppressors, ensuring that components like mounts, baffles and end caps are not erroneously classified as standalone suppressors or “silencers”.
“Congressman Cline’s Hearing Protection Act will have the federal government recognize firearm suppressors for what they are. These are accessories to a firearm that make recreational shooting and hunting a safer experience”, said Lawrence G. Keane, NSSF Senior V.P. and General Counsel. “These safety devices reduce the report of a firearm to a level that won’t cause instant and permanent hearing damage.” There are currently 2.6 million legally owned suppressors in the United States.
See Through Suppressor in Super Slow Motion (110,000 fps) — Click Arrow to Watch:
Suppressors, On Average, Reduce Noise Levels about 30 Decibels
In an article for Ammoland, gunwriter Sam Hoober says that you can expect about 30 decibels (dB) of noise reduction from the average suppressor: “Looking at a few different products, SilencerCo attests their suppressors reduce the sound pressure of a 9mm gunshot to anywhere from 125.7 dB to 131.5 dB, depending on the model. Advanced Armament Co, another popular supplier, attests a 23 dB to 33 dB reduction or down to 127 dB. Liberty Suppressors, another manufacturer, attests a reduction of 24 dB to 38 dB, depending on model and other factors. In short, we can presume something on the order of 30 dB of attenuation as an average.”
Using that 30 dB number you can quickly discern that you’ll still need hearing protection — good hearing protection — when shooting any suppressed firearm (even a .22 LR). “Spikes of 130 dB and more can result in permanent hearing damage instantly”. Source: NRA Blog.
Firearm suppressors (aka “silencers”) reduce the report of a firearm from a level roughly equal to that of a jet taking off which causes instant and permanent hearing loss to one that is safe, but still equal to a jackhammer. That decibel level will not permanently damage hearing. Suppressors work similar to a car’s muffler, redirecting exhaust gases.
Our friend Dennis Santiago was doing some dry firing practice recently, using a SCATT sensing device. This electro-optical unit shows a trace of barrel/muzzle movement on a computer screen, allowing a shooter to improve his hold and aiming. With practice, you get steadier, and learn to break the shot more perfectly. Top position shooters worldwide use this system. Dennis tells us: “This is my dry fire practice set up. I’m working on my approaches to the target today. You need the SCATT’s traces to see the feedback of what’s going on.” Here is one trace from Santiago’s morning training session:
Dennis trains indoors at his house: “The set-up is in a room with the target about 15 feet away mounted on a scope stand at eye height and aligned. This morning, it’s focus and trigger control. My offhand form is gonna get there bit by bit. There are many details to turn into instincts.”
SCATT MX-02 Training System
The SCATT MX-02 is an electronic shooter training system that is capable of operating outdoors with live, centerfire ammunition, at distances from 25 yards to 600 yards. Tony Chow tested this product for AccurateShooter.com. As fitted to his AR-15 Service Rifle, Tony concludes this is a very useful tool that can help High Power competitors refine their technique and shoot higher scores. FULL REVIEW HERE.
How the SCATT MX-02 Works
The SCATT sensor mounted on the end of the barrel has a digital camera that recognizes the black bullseye in the target, even in broad daylight outdoors. Using the bullseye as a reference, the SCATT software tracks the movement of the muzzle relative to the center of the target. The unit can plot these movements as a continuous trace, which appears on a monitor as a squiggly, colored line. By sensing the exact moment of shot release, the SCATT can also interpolate relative shot placement (for a single shot or series of shots) — but this is not the same as an electronic target which actually records the exact shot impact location on the target.
Pro shooter Kirsten Joy Weiss demonstrates the SCATT MX-02 electronic training system:
The system traces and records valuable information such as hold pattern, shot hold duration, follow-through, recoil pattern, and much more. The latest SCATT MX-02 systems can be used both indoors and outdoors up to 300 meters (and possibly more). READ FULL SCATT MX-02 TEST HERE.
SCATT traces reveal muzzle movements during the aiming process.
This barrel’s shoulder was 0.025″ off the action because Red Locktite had been used on the threads.
Gunsmith Thomas ‘Speedy’ Gonzales offered this interesting report about how NOT to headspace a barrel. Hopefully you never discover something like this…
“A good friend and customer sent this rig in for repair after FedEx damaged the rifle during inbound transport from another smith. After repairing the stock and rebedding it, I decided to re-polish the barrel to make the repair perfect. Well this just added insult to injury as the barrel did not want to come off. After a few choice words, the barrel finally broke free only to reveal something very disturbing. It seems the barrel had been ‘headspaced’ by using RED Loctite to hold it in place.” [Editor: That’s definitely NOT how barrels should be fitted.]
Speedy was not happy: “I hope the smith that did this sees the photos and realized what jeopardy he put my customer in or anyone who shot the rifle for that matter. When cleaned up, the shoulder on the barrel was over 0.0250″ (25 thousandths) away from the face of the receiver.” [Editor: That’s a lot in this business]. Check out the images below to see how much the barrel rotated further inward when cleaned up. The barrel spun in nearly another eighth-turn or more. Not good.


 Redding also provides a FREE

 On the highly-respected Riflemans’ Journal blog, created by our late, dear friend German Salazar*, there was an excellent article about Cartridge Case-Head Separation. In this important article, Salazar (aka GS Arizona) examined the causes of this serious problem and explained the ways you can inspect your brass to minimize the risk of a case-head separation. As cases get fired multiple times and then resized during reloading, the cases can stretch. Typically, there is a point in the lower section of the case where the case-walls thin out. This is your “danger zone” and you need to watch for tell-tale signs of weakening.

 Forum member Watercam has a Pentax PF-80ED spotting scope that allows him to see 6mm bullet holes in the white at 600 yards. However, 6mm holes in the black are only visible out to 400 yards or so. Accordingly, Watercam uses a modified “reversed” black-to-white target for 600-yard practice. Watercam explains: “[Using the Pentax] With my 6mm and limited mirage I see defined, 6mm holes in the white out to 600. In the black, however, I can see bullets holes at about 400. I now use reverse-color targets for training without a pit partner at the 600-yard line.”


 Verifying Scope Level With Tall Target Test


