Protect Your Hearing — Wear Protection Whenever You Shoot
Noise-induced hearing loss and tinnitus are two of the most common afflictions for recreational shooters and hunters. Everyone knows that gunfire is loud, but very few people understand the repercussions that shooting can have on their hearing until it’s too late.
The better quality suppressors can reduce the noise of a gunshot by 20 to 35 decibels (dB). Good muffs or plugs will reduce sound by 23 to 33 dB. By decreasing the overall sound signature, suppressors help to preserve the hearing of recreational shooters and hunters. Even the most effective suppressors, on the smallest and quietest calibers (.22 LR) reduce the peak sound level of a gunshot to between 110 to 120 dB. To put that in perspective, according to the National Institute for Occupational Safety and Health (NIOSH), that is as loud as a jackhammer (110 dB) or an ambulance siren (120 dB). For normal caliber handguns and rifles, suppressed sound levels routinely exceed 130 dB, just shy of OSHA’s “hearing safe” threshold of 140 dB.
According to Dr. William W. Clark, the current Director of the Washington Univ. School of Medicine’s Audiology/Communication Sciences Program, a “serious threat to hearing comes from recreational hunting or target shooting”. This is in large part due to the fact that many people choose not to use traditional hearing protection devices like earplugs and earmuffs because they want to be able to hear their surroundings. Multiple studies have found that between 70 to 80% of hunters never wear earplugs or earmuffs, and nearly half of all target shooters don’t consistently wear traditional hearing protection. Thus, it should come as no surprise that for every five years of hunting, hunters become seven percent more likely to experience high frequency hearing loss.
This article is based on information from the American Suppressor Association (ASA). Since the ASA’s formation in 2011, three additional states have legalized suppressor ownership and 18 states have legalized suppressor hunting. For more information, visit www.AmericanSuppressorAssociation.com.
On our main AccurateShooter.com site, you’ll find a good article by GS Arizona on the Basics of Neck Turning. If you’re new to the neck-turning game, or are just looking for good tips on improving your neck-turning procedures, you should read that article. Below we offer some highlights and photos from the article, but you’ll need to read the whole story to view all the illustrations and follow all the procedures step by step.
Why Should You Consider Neck Turning?
Let’s assume that your rifle doesn’t have a tight neck chamber that requires neck turning; if you have a tight neck chamber, of course, the answer to the question is “because you have to”. For the rest of us, and that includes the vast majority of Highpower shooters, neck turning isn’t a requirement, but it can be a useful way to bring your ammunition a small but meaningful step closer to that pot of gold at the end of the rainbow: perfection. I’m not talking about a theoretical improvement, but a real one, an improvement that lies in equalizing and optimizing the neck tension of your loaded rounds. Inconsistent neck tension is a real contributor to increased muzzle velocity variance which itself is a significant factor in increased elevation dispersion at long range. So there’s our basic reason for neck turning: to equalize and optimize neck tension in order to reduce elevation dispersion.
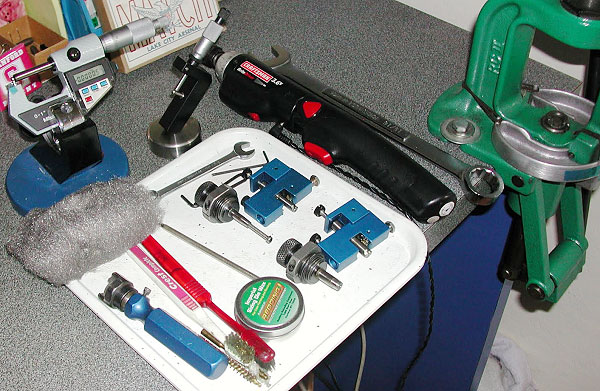
The Tools of the Trade
Here you see everything I use and a bit more. The press, a cordless screwdriver (always plugged in, turning is tough on the old battery), a couple of K&M neck turners (one set up for 6mm, the other for .30 caliber) an expander for each size, some Imperial lube, an old toothbrush or two to keep the cutter clean, a handle with a caseholder (for those emergencies when the screwdriver dies and there’s just one more case to go!), steel wool and a tubing micrometer finish the list of tools. Hey, I left the dial calipers out of the picture! They’re always handy, keep them around, but they are useless for measuring neck thickness, so don’t try. I usually use an Optivisor magnifier while I turn necks, very handy for a clear view of what’s happening on the neck.
Expanding the Neck
Put some lube on the inside of the case neck and run it into the expander. Really, this isn’t hard. I prefer to expand each case immediately before turning it as opposed to expanding all the cases and then turning them. Brass is somewhat springy and will tend to go back toward its original size; therefore, by expanding and turning immediately, you are more likely to have all cases fit the mandrel with the same degree of tightness and to get a more consistent depth of cut.
Cutter Adjustment for Cut Depth and Length
All the tools I’ve seen have pretty good adjustment instructions. The only thing they don’t tell you is that you should have five to ten spare cases to get it right initially. Anything of the right diameter will do while you learn, for instance, just use that cheap surplus .308 brass to do initial setup and save the precious .30-06 for when you know what you’re doing. Be patient and make your adjustments slowly; you’ll need to set the cutter for thickness as well as length of cut (just into the shoulder). The depth of cut (brass thickness) takes a bit of fiddling, the length of the cut is generally easy to set.
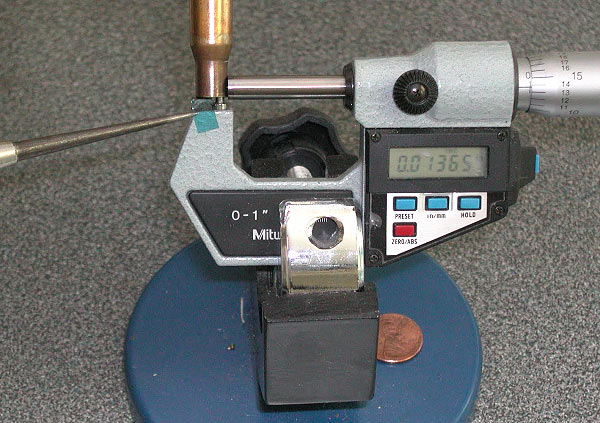
The Finished Product — A Perfectly Uniform Neck
If you read the whole article, and follow the procedures using quality tools, you should get very good results — with a little practice. To demonstrate, here’s an example of my finished, neck-turned brass. You’ll see there is a perfect, 0.0125″ thick neck. It’s very uniform around the circumference, usually I only see 1 or 2 ten-thousandths variance. Now, with the necks uniformed like this, we can select the bushing size that will give us our preferred neck tension and experiment with various levels of tension, secure in the knowledge that all of the cases will actually have the desired neck tension.
About the author — “GS Arizona” was the writing handle for German Salazar, a top-tier rifleman and gun writer. Sadly, German passed from a medical condition in 2022. German was instrumental in helping this website and our Forum get started, and we remember him as a very dear, valued friend.
German was a great individual, and a great asset to the sport. An attorney by trade, with an engineering background, German was one of the very best gun writers, who had high master shooting skills to match his writing abilities.
Burris Signature Rings with polymer inserts are an excellent product. The inserts allow you to clamp your scope securely without ring marks. Moreover, using the matched offset inserts you can “pre-load” your scope to add additional elevation. This helps keep the scope centered in its elevation range while shooting at long range. Additionally, with a -20 insert set in the front and a +20 insert set in the rear, you may be able to zero at very long ranges without using an angled scope base — and that can save money. (To move your point of impact upwards, you lower the front of the scope relative to the bore axis, while raising the rear of the scope.)
Insert Elevation Values and Ring Spacing
People are sometimes confused when they employ the Burris inserts. The inset numbers (-10, +10, -20, +20 etc.) refer to hundredths of inch shim values, rather than to MOA. And you need the correct, matched top/bottom pair of inserts to give you the marked thousandth value. Importantly, the actual amount of elevation you get with Burris inserts will depend BOTH on the insert value AND the spacing between ring centers.
Forum member Gunamonth has explained this in our Shooters’ Forum:
Working with Burris Signature Rings
Burris inserts are [marked] in thousandths of an inch, not MOA. To know how many MOA you gain you also need to know the ring spacing. For example, with a -20 thou insert set in the front and a +20 thou insert set in the rear, if the ring spacing is 6″, the elevation change will be approximately +24 MOA upwards.
Here’s how we calculate that. If you have a 2 X 0.020″ “lift” over a distance of 6 inches (i.e. 0.040″ total offset at 0.5 feet) that’s equivalent to 0.080″ “lift” over 12 inches (one foot). There are 300 feet in 100 yards so we multiply 0.080″ X 300 and get 24″ for the total elevation increase at 100 yard. (Note: One inch at 100 yards isn’t exactly a MOA but it’s fairly close.)
Here’s a formula, with all units in inches:
Total Ring Offset
——————– X 3600 = Change @ 100 yards
Ring Spacing
(.020 + .020)
—————– X 3600 = 24 inches at 100 yards
Ring Spacing: 6 inches
NOTE: Using the above formula, the only time the marked insert offset will equal the actual MOA shift is when the center to center ring spacing is 3.60″. Of course, you are not required to use 3.60″ spacing, but if you have a different spacing your elevation “lift” will be more or less than the values on the inserts.
Do you use bushings to size your case-necks? Are you assuming that your bushings are actually round on the inside, with a hole that’s centered-up properly? Well you may be in for an unpleasant surprise, based on what our friend Jim de Kort recently discovered. Jim was concerned about the run-out on his brass. His cases went into his bushing-equipped FL die pretty straight, but came out of the die with up to .004″ run-out. “What gives?”, Jim wondered. “Could the problem be the bushings themselves?”
To answer that question, Jim decided to examine his bushings. Using an Accuracy One Wheel-drive concentricity gauge, Jim checked out some of his neck bushings. What he discovered may surprise you…
Neck Bushing Flaws Revealed
Trust no one… — Jim de Kort
Jim writes: “I measured the concentricity of my 6BR rounds today. I noticed they went into the neck-bushing equipped full-length sizing die with less than .001″ deviation but came out with .003-.004″. The culprit, it appears, was the bushing itself. Without it the cases stayed within .0005″ to .001″ deviation, so something was happening with the bushing.
One bushing had .00025″ deviation on the outside, yet almost .003″ on the inside, so it is crooked. But even when using a bushing that is within .001″ I still get .003″ runout after sizing. I repeated the same procedure for my 6×47 and got the same results. When using the bushing, concentricity suffers a lot.”
Before we bash the bushing-makers, we must acknowledge that many different things can contribute to excessive run-out and/or mis-alignment of case-necks. We don’t have all the answers here, and Jim would be the first to say that some mysteries remain. Still, these are interesting results that give all precision hand-loaders something to think about.
Jim Borden of Borden Accuracy also offers this tip: “Check the trueness of the face of the die cap. That has more to do with trueness than the bushing. Also check perpendicularity of hole in bushing to top surface. When I was making dies, the cap was made by threading and facing the threaded tenon in same setup.”
Editor’s Comment: Many people have great results with neck-bushing dies, but Jim isn’t the only fellow who has seen some very odd results. I personally employ honed, non-bushing dies for many of my chamberings. These non-bushing dies (with the necks honed for .002-.003″ neck tension) produce extremely straight ammo, with run-out consistently under .0015″.
Wind effects are complex. In trying to access wind speeds and angles, you’ll want to watch multiple indicators — mirage, dust, wind-flags, grass movement, and more. You’ll also need to be concerned about wind cycles. In the video below, Bryan Litz talks about variable wind speed along a bullet’s flight path. A respected ballistics guru, Bryan is the founder of Applied Ballistics and a designer of Berger’s Hybrid Match projectiles. He is also a past F-TR National Champion and a High Master Palma ace.
In this video, Bryan discusses how wind effects can vary in intensity at different points along the bullet’s flight path to the target. Sometimes the firing line is sheltered, and the strongest winds come into effect in the middle of the trajectory. Bryan concludes: “Wind matters everywhere … but the best thing you can do is try to get a handle on the wind [velocity and angle] where you are. That may or may not represent the wind down-range — that’s when you have to look downrange and make a judgment[.]”
Litz Competition Tip: Select your wind shooting strategy carefully. For beginners and veterans, most points are typically lost to wind. Successful shooters put a lot of thought into their approach to wind shooting. Sometimes it’s best to shoot fast and minimize the changes you’ll have to navigate. Other times it’s best to wait out a condition which may take several minutes. Develop a comfortable rest position so you have an easier time waiting when you should be waiting.
More Wind Tips from Wind Wizard Emil Praslick
In these two short videos, Emil Praslick III, former coach of the USAMU and USA National long range teams, explains how to find the wind direction and how to confirm your no-wind zero. Praslick is widely considered to be one of the best wind coaches in the USA.
When Winds Are EXTREME — Near Gale Force at Ben Avery
This video shows INSANE winds at NBRSA 100/200 Benchrest Nationals. This was filmed at the Ben Avery Range in Phoenix, AZ during the recent NBRSA 100/200 yard National Championships. Extreme to say the least. Based on what we’re seeing here, there are 20-25 mph crosswinds, with gusts to 35 mph — near Gale Force. Video by Hall-of-Fame Benchrest competitor Gene Bukys, whom we sadly lost to COVID last year. RIP Gene.
Texas gunsmith Mike Bryant reports: “This video shows the Unlimited Class 200 at the Nationals in Phoenix. I had three 10-shot groups in the low 2″ range with a 2.228″ being my big group and was glad they weren’t bigger. Thursday and Friday were the worst of the windy days. Unfortunately those were the days for the UL 200 and it was about as windy through most all of the Sporter 200.”
Excellent Wind Reading Resource
The Wind Book for Rifle Shooters covers techniques and tactics used by expert wind-readers. The authors provide a wind-reading “toolbox” for calculating wind speed, direction, deflection and drift. They explain how to read flags and mirage, record and interpret your observations, and time your shots to compensate for wind. Here are two reviews:
This is a must-have book if you are a long-range sport shooter. I compete in F-Class Open and when read it from cover to cover, it helped me understand wind reading and making accurate scope corrections. Buy this book, read it, put into practice what it tells you, you will not be disappointed. — P. Janzso
If you have one book for wind reading, this should be it. It covers how to get wind speed/direction from flags, mirage, and natural phenomenon. This is the best book for learning to read wind speed and direction. — Muddler
Have a good look at the photos below — this may be one of the most noteworthy target strings we’ve ever published. What you can see is the effect of barrel tuner position on point of impact (POI). You can clearly see that the tuner position alters the up/down POI location in a predictable fashion.
This remarkable 15-shot sequence was shot by French benchrester Pascal Fischbach using his 6 PPC fitted with a CG (Carlito Gonzales) action and a Bukys barrel tuner.
Pascal reports: “After [bullet] seating and load validation, I put the Bukys tuner on, screwing it out 10 turns. According to Carlito, the CG’s super stiff action-to-barrel fit gives a faster vibration modulus that is detrimental below 10 turns [position of the tuner].” Pascal’s procedure was to screw out the tuner 1/4 turn progressively from one shot to the next. He shot one bullet at each tuner position, with a total of 15 shots.
Left Half of Target Strip (shots with 1/4 rotation change of tuner in sequence)
Right Half of Target Strip (shots with 1/4 rotation change of tuner in sequence)
Pascal observed: “Note the point of impact displacement [from shot to shot] tracks clearly along a sinusoide (sine wave curve).” This is indeed notable and significant! This shows how the tuner’s ability to change barrel harmonics can alter the position of the muzzle as each bullet exits, resulting in a higher or lower POI. Pascal sent his results to Carlito Gonzales in Argentina for analysis.
Pascal poses this question to readers: “Guess which three positions Carlito recommends to try?”
Editor’s Note: While this target sequence clearly shows how tuner position can alter bullet point of impact, this, by itself, does not tell us which tuner position(s) are best for accuracy. That will require further multi-shot group testing, involving careful experimentation with tuner position (and powder charge weights). But for those folks who doubt that a tuner can make a difference on a short, fat barrel, just take another look at the photos. The up/down changes are undeniable, and noteworthy in the wave pattern they follow.
Shooting Set-up and Test Conditions:
Pascal did this test at an outdoor range under very good conditions: “This was shot at my home range, outdoors, with four Smiley flag. The range is a narrow cut in high woods. Wind was consistent with readable flags. I started testing the tuner from 10 turns out and on to 15. I recently… found a sweet spot very close to the rearmost position of the tuner, so the rigidity provided by this super long tenon (just short of 70mm) was not a reason to overlook the recommended Bukys tuning procedure.”
NRA publication Shooting Sports USA (SSUSA) has thousands of articles online, all free for the reading. Many of these stories have been written by top competitors, including National and Olympic Champions. You will find SSUSA articles spotlighted every week on the NRA Competitive Shooting Facebook page. We recommend you bookmark that page as a valuable resource. Here are four notable SSUSA articles that have been featured on Facebook this month. Go to SSUSA.org to see even more current articles, with new content every day.
Here is an insightful, fairly lengthy 1850-word article about the phenomenon we call mirage. The article explains how and why mirage appears, how it can best be monitored, and how mirage can indicate both wind velocity and direction. Top competitors follow the adage “Mirage is your friend”, because mirage can often be the most important indicator of wind variables — sometimes even more important than wind flags. “The mirage is more sensitive than the flags since it has less inertia and momentum”, wrote Desmond T. Burke, in his book, Canadian Bisley Shooting, an Art and a Science.
Well worth reading, this SSUSA article talks about the properties of mirage. Here is a sample:
“Mirage — can make all the difference between a shot landing squarely in the X-ring or being victimized by an undetected downrange breeze. The true power of mirage is found in its ability to betray the subtlest of breezes downrange. Its fluid movement… can not only provide wind direction, but speed as well.
Typically, the ability to detect mirage is maximized on warm, sunny and sultry days. Expect mirage to be most pronounced in mid-morning or early afternoon, although it ignores these rules with regularity[.]
Mirage is extremely powerful at identifying winds of less than 12 mph, particularly those gentle breezes subtle enough to not even bother moving the flags.
When there is no wind, or a gentle head or tail wind, mirage will appear to be ‘bubbling’ directly up from the ground. Many call this ‘boiling’, and it is probably the easiest of all to detect.
As a general rule of thumb, when wind speed increases, overall height of the waves produced by the mirage is reduced. Large peaks and valleys in the waves mean that particular mirage is being driven by a very slight breeze. Conversely, crest size is reduced with wind speed, making it harder and harder to detect, until the mirage disappears entirely at somewhere around 12 miles per hour. In other words, the taller mirage’s waves appear, the slower the breeze.”
Authored by the late Glen Zediker, this article covers barrel break-in procedures. It is particularly useful for dealing with factory barrels. We CAUTION readers — with outstanding, hand-lapped custom barrels from top barrel-makers, you may want to do very little break-in — clean sparingly and keep barrel heat low. Do NOT use abrasives aggressively. On our Krieger and Brux barrels, we simply wet-patched every 2-3 rounds for 20 rounds and the barrels shot superbly from the start with minimal fouling. But for factory barrels, a moderate break-in process may prove beneficial.
Zediker explains: “Lesser, lower-cost barrels are going to have more pronounced … imperfections within the bore[.] These imperfections are largely tool marks resulting from the drilling and rifling processes. And if it’s a semi-automatic, like an AR-15, there might be a burr where the gas port was drilled. The goal of break-in is to knock down these imperfections, thereby smoothing the interior surface.”
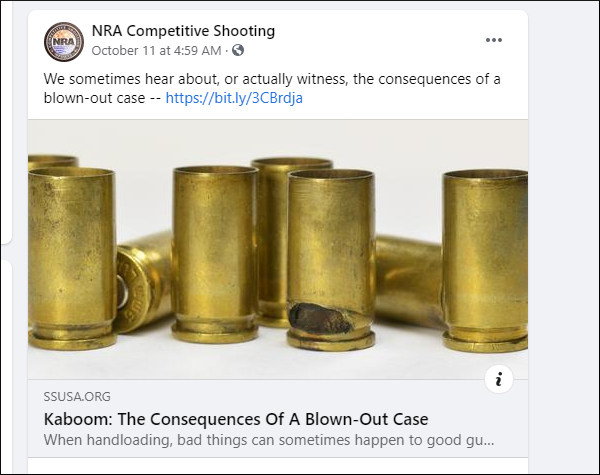
As one who has experienced a cartridge case-head blow-out with a 9mm pistol, this Editor is very conscious of the risks involved and the damage a blow-out can do to the pistol, to the magazine, and (worst of all) to the shooter. Even with new brass, the possibility of a case failure is always present. And even if the case remains intact, we’ve seen primer failures that create a dangerous jet back towards the pistol shooter. That’s why shooters should always employ protective eyewear whenever they shoot.
We love our wheelguns, but there’s no doubt that forcing cone damage can occur, particularly with hot loads and if your cylinder-to-barrel gap is excessive. This article explains how to inspect your revolvers, and how to mitigate the likelihood of forcing cone damage. The article also explains how to clean your revolvers properly. This is very important to avoid build-up of lead and powder residues.
What would you do if you had a LIVE Round stuck in a chamber? Well, don’t hammer a wood dowel in the barrel, that’s for sure. Here is a tale of stupidity that could have injured the rifle owner. This account appeared on the Facebook Page of Brock & Norris Custom Rifles, a gunsmith shop in the United Kingdom.
Live, Loaded Round Stuck in Chamber — What NOT to Do!
Commentary by gunsmith Mike Norris
Here is a cautionary tale. A client came into the workshop with a problem which could have had very serious [even deadly] consequences. And it is not the first time we have seen this. Firing neck-sized-only ammunition, the client attempted to load a round which then jammed solid in the chamber. The bolt would not close and the round was unable to be extracted.
The problem was compounded by various attempts to push the loaded round from the chamber with cleaning rods and the assistance of a hammer (I kid you not!). All of which damaged the bore and the crown, culminating in a wooden dowel being hammered into the barrel which subsequently broke off in the bore. The end result was a barrel that was totally wrecked.
One Facebook friend posted: “Fortunate avoidance of a ‘Darwin Award’. I can hear it: ‘Go on hammer the bolt, she’ll go!’. We’re missing a ‘face palm’ emoji here.”
The Problem Started with a Neck-Sized Case
The moral of this story is DO NOT NECK SIZE cases. Mike advises: “Full-length size cases correctly. You only move the shoulder back 1 to 1.5 thousandths and the case will feed and extract EVERY TIME. Yes you will have to trim cases occasionally but it is one hell of a site cheaper and safer than jamming a live round in the barrel and wrecking the barrel trying to remove it. Not to mention the risk to life and limb!”
What Should Have Been Done in this Situation?
Mike was asked the best method for removing a stuck round. He stated: “The Grease Gun Method on a threaded barrel works*. However, in this case, this was not remotely possible due to 20 inches of wooden dowel being broken off in the bore as well. The live round (yes it was live!) was attempted to be removed by hammering on a brass cleaning rod (an actual hammer was used) to try to dislodge it. That brass rod broke, so then a wooden dowel was employed, and THAT broke as well.”
Mike cautions that, when a live, loaded round is involved you must be very careful: “Do not be taking chances with your own safety or others around you. When it is safe to do so, get the rifle to a professional. By the way he WILL [chide you] for being daft in the first place and then bringing the problem into his premises. Expect to be charged for the expertise to remove said obstruction, In the past I even had a client send me a loading die with a live .338 Lapua round in it through the Post no less!”
* This YouTube Video shows the successful removal of a jammed FIRED (not live) case from an AR15 barrel. You can see the fired case eject at 15:35 time-mark, after the primer pops out first. But note, this was NOT a live, loaded round. Extreme caution must be excercised with live rounds.
The Legal Brief is a feature of TheGuncollective.com that focuses on firearms rules and regulations. In this Legal Brief video, Attorney Adam Kraut explains key State and Federal regulations governing firearms, and explains how to ensure compliance with all applicable laws.
This five-minute video explains barrel length rules for rifles and shotguns, and also explains the best (and most fool-proof) methods to measure your barrel. In addition, the video explains how to measure firearm overall length. A rifle or shotgun which is less than 26 inches overall can also be classified as a “Short-barreled” rifle/shotgun subject to the NFA. NOTE: Under federal law “If the rifle or shotgun has a collapsible stock, the overall length is measured with the stock EXTENDED”.
Highlights of LEGAL BRIEF Discussion of Barrel Length and Firearm Overall Length
The ATF procedure to measure the length of a barrel is to measure from the closed bolt or breech face to the furthest end of the barrel or permanently attached muzzle device. ATF considers a muzzle device that has been permanently attached to be part of the barrel and therefore counts towards the length.
How to Measure Barrel Length: Drop [a] dowel or rod into the barrel until it touches the bolt or breech face, which has to be closed. Mark the outside of the rod at the end of the muzzle crown (if you don’t have a permanently attached muzzle device) or at the end of the muzzle device if it is permanently attached. Remove the rod and measure from the mark to the end of the rod. That is your barrel length[.]
Remember, if the barrel length is less than 16 inches, it is possible that the firearm could be a short barrel rifle (if you are building a rifle or it is already on a rifle) and if the barrel length is less than 18 inches, it is possible the firearm could be a short barrel shotgun (again if you are building a shotgun or it is already a shotgun). Both of these firearms would be subject to the purview of the National Firearms Act and would require the firearm to be registered accordingly.
How to Measure Overall Length:The overall length of your rifle or shotgun may also classify it as a Short Barrel Rifle or Short Barrel Shotgun. The overall length of a firearm is the distance between the muzzle of the barrel and the rearmost portion of the weapon measured on a line parallel to the axis of the bore. … If the rifle has a permanently attached muzzle device, that is part of the overall length. … If the rifle or shotgun has a collapsible stock, the overall length is measured with the stock extended.
There is an excellent article about primers on the Shooting Times website. We strongly recommend you read Mysteries And Misconceptions Of The All-Important Primer, written by Allan Jones. Mr. Jones is a bona fide expert — he served as the manager of technical publications for CCI Ammunition and Speer Bullets and Jones authored three editions of the Speer Reloading Manual.
This authoritative Shooting Times article explains the fine points of primer design and construction. Jones also reveals some little-known facts about primers and he corrects common misconceptions. Here are some highlights from the article:
Size Matters
Useful Trivia — even though Small Rifle and Small Pistol primer pockets share the same depth specification, Large Rifle and Large Pistol primers do not. The standard pocket for a Large Pistol primer is somewhat shallower than its Large Rifle counterpart, specifically, 0.008 to 0.009 inch less.
Magnum Primers
There are two ways to make a Magnum primer — either use more of the standard chemical mix to provide a longer-burning flame or change the mix to one with more aggressive burn characteristics. Prior to 1989, CCI used the first option in Magnum Rifle primers. After that, we switched to a mix optimized for spherical propellants that produced a 24% increase in flame temperature and a 16% boost in gas volume.
Foiled Again
Most component primers have a little disk of paper between the anvil and the priming mix. It is called “foil paper” not because it’s made of foil but because it replaces the true metal foil used to seal early percussion caps. The reason this little disk exists is strictly a manufacturing convenience. Wet primer pellets are smaller than the inside diameter of the cup when inserted and must be compacted to achieve their proper diameter and height. Without the foil paper, the wet mix would stick to the compaction pins and jam up the assembly process.
Primer Functionality and Primer Types Compared
This video looks at a variety of primer types from multiple manufacturers, foreign and domestic. The video explains the basics of how primers function, and then explains the key characteristics of standard primers, magnum primers, and mil-spec primers (designed for semi-auto rifles).


 Noise-induced hearing loss and tinnitus are two of the most common afflictions for recreational shooters and hunters. Everyone knows that gunfire is loud, but very few people understand the repercussions that shooting can have on their hearing until it’s too late.


 Have a good look at the photos below — this may be one of the most noteworthy target strings we’ve ever published. What you can see is the effect of barrel tuner position on point of impact (POI). You can clearly see that the tuner position alters the up/down POI location in a predictable fashion.