Ever wondered what the air around a moving supersonic bullet really looks like? Check out this video from the Bryan Litz Ballistics Facebook page. This is a Schlieren video* of a 6mm 109gr Berger LRHT bullet at about 2800 fps as fired from Francis Colon’s PRS rifle at the Applied Ballistics Lab.
Bryan Litz notes: “You can clearly see the compression (shock) wave at the front of the bullet. A compression wave is formed when the air has to move faster than the speed of sound to get out of the way, which is certainly the case for this bullet which is moving about 2.5 times the speed of sound (Mach 2.5).
That shock wave is the ‘snap’ you hear when bullets fly past you if/when you’re downrange. Also, compressing the air into a shockwave takes energy, and that energy comes directly out of the forward velocity of your bullet and gets converted into heat and noise as the shock wave forms and dissipates.
The turbulent wake at the base of the bullet shows where/how base drag applies. The third and smallest component of drag for a supersonic bullet is skin friction drag, which is a viscous boundary layer effect, and is the least visible in this image. So as you head to the range or the hunting stand, think about the absolute violence your bullets are committing in the atmosphere, before they even reach the target!”
Are sound suppressors useful in competition shooting? In some disciplines, and in venues where sound “moderators” are permitted, the answer is “yes”. In a past edition of Shooting Sports USA eZine, you’ll find an interesting article about the use of sound suppressors (aka “cans”). The article explores the use of suppressors in Europe and in tactical matches in North America. You’ll also find an explanation of the rules and regulations governing suppressor ownership and use in the United States.
Shooting Sports Editor Chip Lohman tests three rifles from the bench and found that sound suppressors did not harm accuracy. In fact, all three test rifles (one each in .223 Rem, .308 Win, and .338 Lapua Magnum), shot slightly better 5-shot groups at 200 yards when a suppressor was fitted to the barrel. However, the suppressors did alter point of impact. Interestingly, velocity standard deviation (SD) values were lower with suppressors in place for all three test rifles. This observation calls for further study.*
So the use of suppressors in competition could be a good thing. However, in the United States, current NRA rules prohibit the use of sound suppressors. NRA Rule 3.16.1 subsection (a) states: “Sound Suppressors are not authorized for use in High Power competition.” In addition, there are some practical problems with suppressors — the heat rising off of a naked suppressor can create mirage problems (that’s why some shooters wrap their cans with a cover).
Despite such issues, now commonly see suppressors on rifles used in tactical matches and PRS/NRL events. For example, many competitors in the Steel Safari field challenge match use suppressors. The photo below shows our friend Zak Smith competing in the Steel Safari with his suppressed Accuracy International rifle.
Commentary — What Can We Conclude?
Obviously, this three-rifle SSUSA test was not definitive. One well might observe different results with different types of suppressors, fitted to different kinds of rifles. Mounting a suppressor to any barrel will certainly affect harmonics and “tune”. But this SSUSA study does suggest that tactical shooters, who are allowed to use suppressors in competition, may find that the benefits of suppressors (significantly reduced recoil and less noise) outweigh any meaningful accuracy loss, at least in PRS-type matches.
NOTE: The article cautions that one should not extrapolate too much from the SD numbers, given the low number of test shots. Chronograph-maker Ken Oehler, when asked to comment on the SD values stated: “[You should] report the observed SDs, but draw no conclusions until… you can do more testing with larger sample sizes.”
Qualifications to Obtain a Suppressor
To legally obtain a suppressor, you must fill out Federal Forms and pay a $200 fee to the ATF. You must also pass BATFE background checks and otherwise comply with Federal and state laws. States can regulate suppressor ownership or use, so be sure to check the laws in your area. On the federal level, the process to acquire a suppressor is regulated under the National Firearms Act of 1934.
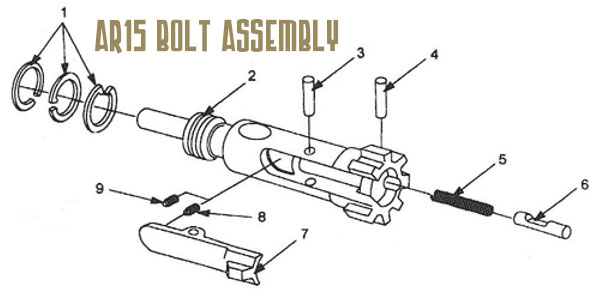
AR-platform rifles can be maintenance-intensive beasts. But some AR owners make the situation worse by not regularly cleaning important small parts, or by using too much oily/greasy lubricants in the wrong places. A properly maintained and lubricated AR15 can shoot hundreds of rounds (between cleanings) without a problem. If you learn where (and where not) to apply lubricant, you’ll find that your AR will run more reliably and the task of cleaning the bolt and bolt carrier will be less of a burden.
Here is a good video that explains AR-15 Cleaning and Maintenance. In this 30-minute NSSF video, Gunsite Academy instructor and gunsmith Cory Trapp discusses the proper way to clean and maintain the AR-15 carbine. Very knowledgeable, Trapp provides rock-solid advice for AR owners. Along with cleaning procedures, this video explains how to inspect key components and how to function-test your AR before each shooting session.
If you want to keep your black rifle running smoothly and reliably, you must clean it regularly and follow the correct maintenance procedures. Here’s another good video that explains how to properly disassemble and clean AR-platform rifles.
Take-Down and Full Cleaning of AR15 by Jerry Miculek
Here ace shooter Jerry Miculek takes down and cleans an AR-platform rifle belonging to his daughter Lena. This is a good video because Lena’s rifle was “run hard and packed up dirty” so you can see where carbon and grease build up. This 35-minute video is very thorough. Jerry is one of the nation’s top action carbine shooters, so listen carefully to his advice on cleaning and lubrication.
When shooting targets, the closer to the center the better the result. But this is not necessarily true when it comes to using jags and patches. There are some good reasons to try spiking your patches away from the center. This Creedmoor Sports Tech Tip explains why you may want to spike (puncture) your patch away from the center. CLICK HERE to order patches and Swab-Its cleaning bore tips from Creedmoor Sports.
You begin to push your first patch down the barrel and you notice it is extremely tight and then it jams! How can this be? A commonly overlooked solution to remedy the frustrating occurrences of overly tight or jammed patches is what we like to call “Side-Spiking”. Side-Spiking is super simple and works!
“Side-Spiking”, as the words suggest, refers to moving your patch spiking position from the center of the patch towards the corner of a square patch or the edge of a round patch.
Moving From Center-Spiking To Side-Spiking
The closer toward the edge of the patch you spike your jag, the looser the patch will be when pushed down the bore.
Important: Be careful to not go to the very edge of the patch. Leave enough patch material to fully cover the first set of rings on your jag as this insures your jag is properly centered in the bore and that no contact with the rifling will occur.
Proper Side-Spiking Location Creedmoor Sports recommends side spiking all wet patches. This allows for a looser patch in the bore which removes gross powder fouling and leaves more cleaning solution behind to start working on the remaining fouling.
When a tighter patch is needed, simply move your spike closer toward the center of the patch. The closer to the center of the patch you get, the tighter the patch will become in the bore. The objective is to have a snug-fitting patch that allows you to smoothly push your rod down the bore. Remember you do not need to end up in the center of the patch!
Bore-Tech Patch Size Selection Chart Recommends Patch Sizes by Caliber:
Whether you should from the bench, or from prone, it’s great to have your cartridges in a convenient, easy-to-reach position. This article explains how you can build your own height-adjustable ammo caddy for under ten bucks. Credit Martin Tardif for this great Do-It-Yourself (DIY) project. Martin’s flex-arm caddy design works great for F-Open competitors as well as anyone who shoots with a pedestal front rest, either on the ground or from a bench. The ammo caddy attaches, via a flexible arm, to your front rest. The flexy arm allows you to position your ammunition close to your rifle’s feeding port. That makes it easy to grab cartridges and load them into the chamber without shifting your shooting position.
Kudos to Martin Tardif for his clever use of inexpensive materials. The total cost of the whole project, according to Martin, was just $8.00! (With Bidenflation, materials could run a bit more these days, but the project would still be very inexpensive.)
Martin Explains How to Build the Ammo Caddy
Here are some pics of my DIY P.L.A.B. (Port Level Ammo Block). I cannibalized the goose neck from a Craftsman bendy-style utility light and bought a 3.5″x 1″ Acetal disk on eBay. I then drilled out the disk to accept twenty .284 Winchester rounds and screwed the disk to the bendy arm. The arm, by itself, wasn’t sturdy enough to support my fully loaded ammo block, so I inserted a 1/8″-diameter steel rod cut to length into the arm before I screwed it to the disk. On this Bald Eagle rest, I wasn’t using the windage adjustment cable. That allowed me to secure the bottom end of the arm to the unused 5/16″ x 18 bolt hole for the cable. [Editor’s Note: For other pedestal rest types/brands you may need to drill a hole for the base of the flexy arm.]
Here’s a cool product that makes it easier to stow and/or transport your precious cleaning rods. Sure you can tuck a single rod in a gun case, but what if you want to carry a variety of rods to the range? This affordable MTM Gun Cleaning Rod Case (CRC) holds up to four (4) rods securely, and keeps solvent residues off your fine firearms. Click Here for Product Specs from MTM Case-Gard website.
MTM’s bright red Cleaning Rod Case (CRC) will hold four rifle or shotgun cleaning rods up to 47″ long. Each rod is held in an individual slot and there are foam inserts on either end, making transportation secure and rattle-free. You don’t have to worry about the rods banging into each other. We like the fact that MTM has cleverly included multi-sized “corrals” to hold patches from large to small. Plus there is plenty of room to hold jags and brushes.
We’ve used this cleaning rod case, now just $21.99 at Midsouth, and can recommend it. Forum member TIMO agrees: “Just received one, 100% worth the investment. Got it from Midsouth Shooters Supply.”
MTM explains the benefits: “Long gun enthusiasts no longer have to fumble and search for miscellaneous cleaning equipment since it will all be in an easy to access container.”
MTM V.P. explains Gun Cleaning Rod Case Features:
MTM Cleaning Rod Case Features:
— Holds four rifle or shotgun cleaning rods up to 47.5″ long
— Padding holds rods in their own individual slots (Max handle diam. 1.4″)
— Compartments for storing patches, jags, and brushes
— Made of rugged polypropylene plastic
— Has hanging hole for wall storage
— Room for bore guides
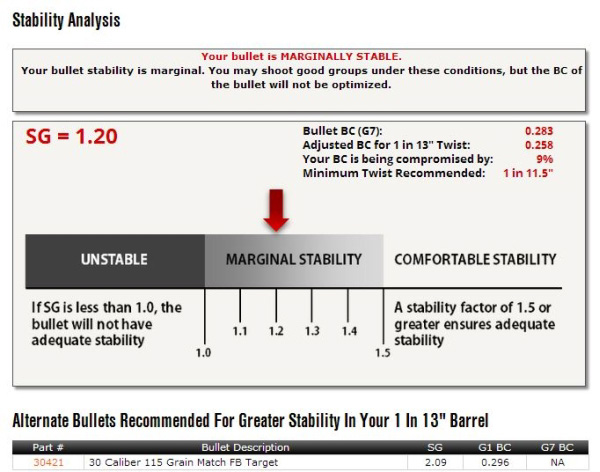
Berger Twist-Rate Stability Calculator On the Berger Bullets website you’ll find a handy Twist-Rate Stability Calculator that predicts your gyroscopic stability factor (SG) based on mulitiple variables: velocity, bullet length, bullet weight, barrel twist rate, ambient temperature, and altitude. This cool tool tells you if your chosen bullet will really stabilize in your barrel.
How to Use Berger’s Twist Rate Calculator
Using the Twist Rate Calculator is simple. Just enter the bullet DIAMETER (e.g. .264), bullet WEIGHT (in grains), and bullet overall LENGTH (in inches). On its website, Berger conveniently provides this info for all its bullet types. For other brands, we suggest you weigh three examples of your chosen bullet, and also measure the length on three samples. Then use the average weight and length of the three. To calculate bullet stability, simply enter your bullet data (along with observed Muzzle Velocity, outside Temperature, and Altitude) and click “Calculate SG”. Try different twist rate numbers (and recalculate) until you get an SG value of 1.4 (or higher).
Gyroscopic Stability (SG) and Twist Rate
Berger’s Twist Rate Calculator provides a predicted stability value called “SG” (for “Gyroscopic Stability”). This indicates the Gyroscopic Stability applied to the bullet by spin. This number is derived from the basic equation: SG = (rigidity of the spinning mass)/(overturning aerodynamic torque).
If you have an SG under 1.0, your bullet is predicted not to stabilize. If you have between 1.0 and 1.1 SG, your bullet may or may not stabilize. If you have an SG greater than 1.1, your bullet should stabilize under optimal conditions, but stabilization might not be adequate when temperature, altitude, or other variables are less-than-optimal. That’s why Berger normally recommends at least 1.5 SG to get out of the “Marginal Stability” zone.
In his book Applied Ballistics For Long-Range Shooting (3rd Ed.), Bryan Litz (Berger Ballistician) recommends at least a 1.4 SG rating when selecting a barrel twist for a particular bullet. This gives you a safety margin for shooting under various conditions, such as higher or lower altitudes or temperatures.
Story idea from EdLongrange. We welcome reader submissions.
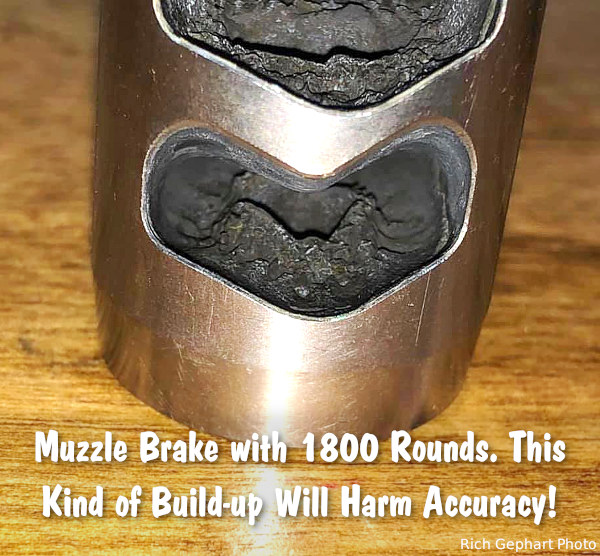
Many hunters and precision rifle competitors use muzzle brakes because these ported devices reduce felt recoil significantly. That makes a real difference getting back on target for quick follow-up shots. While many rifle owners appreciate the benefits of muzzle brakes, they may also neglect their brakes, allowing hard carbon and powder residue to build up. Not good. You should regularly clean your muzzle brake to remove fouling and carbon build-up.
As Mark Edgreen posted: “Carbon build up on the crown and in the brake is a recipe for poor accuracy.” And another gunsmith reported that customers complained about guns that “shot out way too early” but they only needed to have the brakes cleaned.
Gunsmith and PRS/NRL competitor Jim See recently reminded his Facebook Fans about the importance of cleaning muzzle brakes: “How many times do I have to say it? You need to maintain your rifles. Clean your muzzle brakes people!”. Jim, who runs Elite Accuracy LLC, notes that hard carbon build-up in brakes can definitely harm accuracy. Look at this example:
Muzzle Brake Cleaning Methods
There are various methods for cleaning a brake, we list a variety of techniques, but we would start with NON-corrosive ultrasound. You’ll want to remove the muzzle device before doing these tasks.
1. Use Ultrasonic Cleaning Machine with cleaning solution. This may be the most efficient method: “I place my brake in the ultrasonic cleaner. Shiney as new.” (Jim Moseley).
2. Spray with commercial Carb Cleaner and brush. Then apply anti-corrosion coating.
3. Soak in half hydrogen peroxide and half vinegar. Suggestion: “Let sit over night and carbon melts off. Brush remaining carbon off, rinse and put the brake back on.” Apply anti-corrosive before mounting.
4. Soak in 50/50 solution of water and white vinegar and brush. (Be sure to apply anti-corrosion coating, such as Eezox, after soaking).
5. Tumble in liquid solution with stainless pins. Comment: “Comes out slightly faded, but perfectly clean on stainless, non-painted brakes though.” Warning — do NOT do this with threaded brakes — tumbling could affect threads of screw-on brakes. Also, tumbling can harm painted or Cerakote finishes.
Gunsmithing Tip: By fitting the muzzle brake so that the barrel crown is slightly forward, it is easier to wipe carbon fouling off the end of the barrel. See photo:
Our friend Gavin Gear has just released an excellent video showing how to make a threaded Modified Case for use with the Hornady Lock-N-Load Overall Length Gauge. You can watch Gavin make a Modified Case start to finish in the video below:
Video Shows How to Drill and Tap Modified Case
Gavin has some clever tricks. First he uses a sizing die to hold the cartridge case during the threading process. Second he uses two drill bits in sequence — a smaller bit to ream out the primer pocket, and then a larger “M” bit to increase the hole diameter before threading the brass. Finally he leaves the threading tap IN the brass, locks the tailstock, and then “gently pulls on the quill” to remove the brass from the die held in his lathe (See 5:46 timemark).
Get the Correct 5/16″-36 RH Tap
Unfortunately, Hornady has selected an uncommon thread type for OAL Gauges. You probably won’t be able to buy the correct 5/16″ – 36 RH HSS Tap at your local hardware store. However you CAN order this special tap from Amazon for $9.99.
Modified Case Q & A — TECH TIPS
Why do I need a Modified Case?
Every serious reloader should have a Modified Case for each cartridge type they shoot. The reason is that this allows you to get very precise measurements of the length-to-lands in your chamber. When used with the Hornady OAL Gauge, with some practice, you should be able to get repeatable length-to-lands measurements within about 0.0015″. We generally do 4-5 measurements with the OAL Gauge and usually 3 or 4 will be “on the money”. NOTE: We recommend a gentle, easy pressure on the plastic pusher rod. Don’t push too hard or you will jam the bullet hard into the lands, which produces inconsistent results.
Can’t I Just Buy a Modified Case?
Hornady makes a variety of Modified Cases sold on Amazon and through retailers such as Midsouth. While Hornady makes modified cases for many standard cartridges, if you shoot a wildcat such as the 6mm Dasher or .284 Shehane, you’ll need to create a custom modified case. And even if you shoot a standard cartridge such as the .308 Win, you can get more consistent measurements with a custom Modified Case.
If you do decide to make your own modified case, you’ll want to start with a case that’s been fired in your rifle. That way you get the best fit to YOUR chamber. Also, you won’t need to expand the neck to provide bullet clearance. Then you need to drill out the primer pocket and tap the base of the case to match the threads on the Hornady OAL Gauge tool. Make at least two modified cases, as you’ll probably misplace one at some point.
MORE INFORMATION: Want to learn more? We published a much longer story in which Erik Cortina explains in greater detail how to made the Modified Case. That article illustrates the 5/16″ – 36 RH HSS Tap required and shows how to set up the lathe to drill and tap your case. If you are serious about making your own Modified Cases, you should Read the Full Article.
Ever wondered what caused a particular bulge or marking on a case? And more importantly, does the issue make the case unsafe for further use? Sierra Bullets Ballistic Technician Duane Siercks offers some insight into various issues and their causes in two Case Diagnostic articles from the Sierra Blog.
Incipient Case-Head Separation
This is a Winchester .308 Win case that has a real issue. This case has a very obvious incipient case head separation in the process of becoming a complete failure.
This is most commonly caused by over-sizing the case causing there to be excess headspace on the case. After a few firings and subsequent re-sizing, this case is just about ready to come completely apart. Proper die adjustment is certainly a requirement here. Of course this case is not safe to reuse.
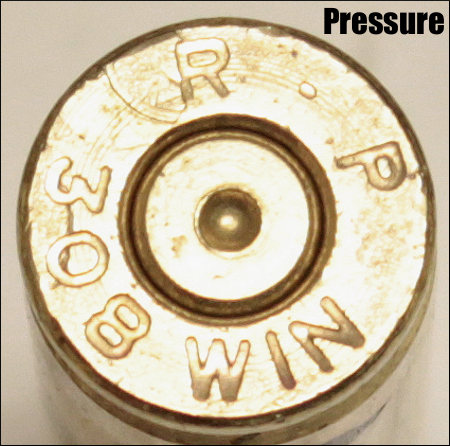
Excessive Pressure (Load Too Hot)
If you will notice in the picture of the case rim, there are two pressure signs to notice. First, look at the primer. It is basically flattened to about the max of what could be considered safe. If this was the only pressure sign noted, I would probably be fine with this load, but would constantly keep an eye on it especially if I was going to use this load in warmer temperatures. This load could easily cross into the “excess pressure” realm very quickly.
There is another sign of pressure that we cannot ignore. If you’ll notice, there is an ejector mark apparent that is located over the “R” of the R-P headstamp. This absolutely tells us that this load would not have been in the safe pressure range. If there were any of these rounds loaded, they should not be fired and should be dis-assembled. This case should not be reloaded.
Split Case-Neck
Here we have an R-P .22-250 case that has died the death. Everything looks fine with this case except the neck is split. This case must be tossed.
A split neck is a normal occurrence that you must watch for. It is caused by work-hardening of the brass. Brass cases get harder with age and use. Brand new cases that are stored for a period of time can become hard enough that they will split like this case within one to two firings. I have had new factory loads do the same thing. Then as we resize and fire these cases repeatedly, they tend to get harder and harder. Eventually they will split. The life of the case can be extended by careful annealing practices. This is an issue that would need to be addressed in an article by itself. Of course this case is no longer usable.
In the classes that I teach, I try to use examples like this to let the students see what they should be looking for. As always, if we can assist you, whether you are new to reloading or very experienced, contact us here at Sierra Bullets by phone at 1-800-223-8799 or by email at sierra@sierrabullets.com.
Dented Case Body
Here we have a Lake City 7.62×51 (.308 Win.) case with two heavy marks/dents in the case body.
This one may be a bit of a mystery. It appears as if this case may have been caught in the action of a semi-auto rifle when the firearm jammed or the case failed to clear during the cycling process. I probably would not reload this case just to prevent any feeding problems. This also appeared to be a factory loaded round and I don’t really see any pressure issues or damage to the case.
Multiple Problems — Lake City 5.56×45 unknown year.
This case has suffered multiple failures and cannot be re-used. First its has have a very rounded shoulder that is split. Upon first look it was obvious that this round had been a victim of excess pressure. The firearm (perhaps an AR?) was apparently not in full battery, or there was possibly a headspace issue also. While taking a closer look, the primer was very flat and the outside radius of the primer cup had been lost. High pressure! Then I also noticed that there was an ejector mark on the case rim. This is most certainly an incident of excessive pressure. This case is ruined and should be discarded.
It is very important to observe and inspect your cases before each reloading. After awhile it becomes second nature to notice the little things. Never get complacent as you become more familiar with the reloading process. If ever in doubt, call Sierra’s Techs at 1-800-223-8799.


 “Side-Spiking”, as the words suggest, refers to moving your patch spiking position from the center of the patch towards the corner of a square patch or the edge of a round patch.