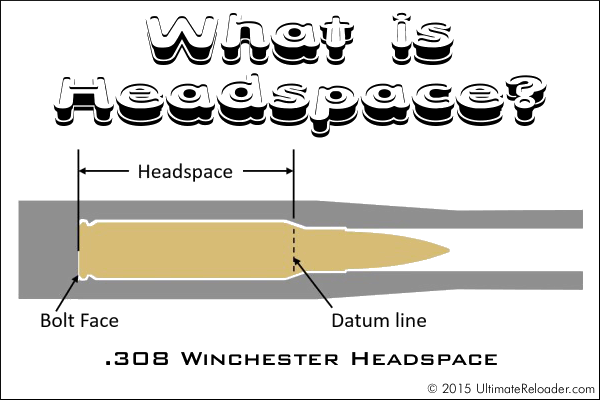
This illustration shows headspace measurement for the popular .308 Winchester cartridge, which headspaces on the shoulder. Image copyright 2015 Ultimate Reloader.
In this Brownells Tech Tip Video, Brownells gun tech Steve Ostrem explains what headspace is and why it’s one of the most critical measurements for nearly all firearms. Even if you’re an experienced rifle shooter, it’s worth watching this video to refresh your understanding of headspace measurements, and the correct use of “GO” and “NO-GO” gauges.
Headspace Definition
In firearms, headspace is the distance measured from the part of the chamber that stops forward motion of the cartridge (the datum reference) to the face of the bolt. Different cartridges have their datum lines in different positions in relation to the cartridge. For example, 5.56x45mm NATO ammunition headspaces off the shoulder of the cartridge, whereas .303 British headspaces off the forward rim of the cartridge. If the headspace is too short, ammunition that is in specification may not chamber correctly. If headspace is too large, the ammunition may not fit as intended or designed and the cartridge case may rupture, possibly damaging the firearm and injuring the shooter. (Source: Wikipedia)
Problems Caused by Too Much Headspace
Excessive headspace issues can include: light primer strikes, failure to fire, bulged/blown cases, case separations, split shoulders, or unseated primers after firing. Case ruptures caused by excessive headspace can lead to catastrophic failures causing serious injury. That is why headspace is such an important measurement.
Problems Cause by Too Little Headspace
Insufficent (or excessively tight) headspace can prevent the firearm from going into battery, resulting in failure to fire or deformation of the cartridge case. Various feeding and functioning problems can be caused by cases with too little headspace, even if a round can be chambered (with effort).
Headspace Gauges
Headspace is measured with a set of two headspace gauges: a “Go” gauge, and a “No-Go” gauge. Headspace gauges resemble the cartridges for the chambers they are designed to headspace, and are typically made of heat-treated tool steel. Both a “Go” and a “No-Go” gauge are required for a gunsmith to headspace a firearm properly. A third gauge, the “Field” gauge, is used (as the name implies) in the field to indicate the absolute maximum safe headspace. This gauge is used because, over time, the bolt and receiver will wear, the bolt and lugs compress, and the receiver may stretch, all causing the headspace to gradually increase from the “factory specs” measured by the “Go” and “No-Go” gauges. A bolt that closes on “No-Go” but not on “Field” is close to being unsafe to fire, and may malfunction on cartridges that are slightly out of spec. (Source: Wikipedia)
You need to understand Headspace Gauges and how to use them. There are “Go”, “No-Go”, and “Field” gauges. The “Field” is actually the longest. Brownells explains: “The GO gauge corresponds to the SAAMI minimum chamber length, while the FIELD gauge usually matches the maximum chamber depth, or slightly less. NO-GO gauges are an intermediate length between minimum and maximum, that, technically, is a voluntary dimension. A firearm that closes on a NO-GO gauge and does not close on a FIELD gauge may not give good accuracy and may have very short cartridge case life [.]”
Ever wondered how factory ammunition is produced, from start to finish? How are brass cases made, how are bullets created, and how are finished cartridges produced on automated assembly lines? Today’s video showcase features six major factories that, collectively, produce bullets, powder, and finished ammo. We start with the Berger Bullet plant, follow by Vihtavuori powder production in Europe. Then we show the Remington (now Vista Outdoor) ammo plant in Utah, along with a Federal plant that produces rimfire ammunition. Last but not least, there’s an excellent, very informative video from the Norma ammo factory, plus a Hornady ammo plant video.
Bullets being seating at Hornady ammo factory.
Berger Bullets Factory Tour — Made in USA
In this video, Recoil TV takes a behind-the-scenes look at Berger Bullets, and how the outstanding, match-winning Berger bullets are created. The video covers the entire process — from raw materials, to the placement of bullet cores inside jackets, to the final ultra-consistent and uniform projectiles. To see the complete line of Berger Bullets, with full Ballistic data, visit BergerBullets.com
Vihtavuori Powder Production in Europe
Vihtavuori produces some of the most consistent, high-quality powder on the planet. Vihtavuori powders have been used to set world records and win countless championships in multiple disciplines. This excellent video goes inside Vihtavuori’s European production centers. It is really fascinating — you see how extruded powder starts with long spaghetti-like strings, before being finalized into the tiny sticks that we load.
Along with the powder production process, this video includes the entire VV production line, so you see how powder bottles are filled with powder and the tops of the bottles are secured by automated machines.
Remington Ammo Factory (Now Operated by Vista Outdoor)
This SHWATteam video visits the Remington ammunition plant in Arkansas. Vista Outdoor, the company that produces Federal, Speer and CCI ammo, purchased Remington’s ammunition business in Lonoke, Arkansas. Including the new high-tech plant in the back, this facility has the equivalent of 13+ football fields (1200 acres) under roof at its ammo plant, with over 1100 employees. Production capacity is impressive. When running at maximum output, this Remington ammo plant can crank out a staggering 7,000,000+ rounds every day. To produce that volume of ammunition, the facility needs a huge amount of resources: one million pounds of copper per month and 124,000 pounds of lead per day. Remington started manufacturing ammunition at this Lonoke facility in 1970, but some of the machines have been churning out ammo since long before.
Norma Factory Tour
Guys — honestly, if you do anything today on this site, watch this video. You won’t be disappointed. Guaranteed. This is a very informative (and surprisingly entertaining) video. Every serious hand-loader should watch this video to see how cartridge cases are made. The camera work and editing are excellent — there are many close-ups revealing key processes such as annealing and head-stamping.
VERY Informative Video Show Cartridge Brass and Ammunition Production:
Norma has released a fascinating video showing how bullets, brass, and ammunition are produced at the Norma Precision AB factory which opened in 1902. You can see how cartridges are made starting with brass disks, then formed into shape through a series of processes, including “hitting [the cup] with a 30-ton hammer”. After annealing (shown at 0:08″), samples from every batch of brass are analyzed to check metal grain structure and hardness. Before packing, each case is visually inspected by a human being (3:27″ time-mark).
Federal Rimfire Ammunition Production
Field & Stream Tours Federal Ammo Plant in Minnesota
A reporter for Field & Stream recently got a chance to tour the Federal ammunition production facility in Anoka, Minnesota. This large plant produces both rimfire and centerfire ammunition. While touring the plant, the reporter was allowed to capture video showing the creation of .22 LR rounds from start to finish. This is a fascinating video, well worth watching. Watch and learn how rimfire ammo is made.
Note to Viewers — After Starting Video, Click Speaker Icon to HEAR audio!
This revealing video shows all phases of .22 LR ammo production including cupping, drawing, annealing, washing, drying, head-stamping, priming, powder charging, bullet seating, crimping, waxing, inspection, and final packaging. We recommend you watch the video from start to finish. You’ll definitely learn some new things about rimfire ammo.
Hornady Ammunition Factory
If you wonder how ammo is made, starting with raw metal, check out this video from Hornady. It shows how bullet jackets are formed from copper, followed by insertion of a lead core. The jacket is then closed up over the core with the bullet taking its final shape in a die (a cannelure is applied on some bullet types). Next the video shows how cartridge brass is formed, starting with small cups of brass. The last part of the video shows how cases are primed and filled with powder, and how bullets are seated into the cases, using an automated process on a giant assembly-line.
On some internet shooting forums, self-declared “experts” advise new rifle shooters to stick to low-end factory rifles. These “experts” (many of whom don’t own a single really accurate rifle), claim that it will take years for a new shooter to learn how to shoot a rifle accurately. So, the argument goes, the accuracy offered by a precision-chambered rifle, with a custom barrel, is “wasted” on a new shooter.
We disagree with that viewpoint, at least when it comes to rifles shot from a rest. We’ve seen relatively new shooters, with help from a skilled mentor, do remarkably well with precision rifles right from the start. With a good bench gun, many new shooters can shoot well under 1 MOA on the first day. Certainly it takes time for a complete novice to learn how to handle the gun and to work the trigger smoothly. However, this editor has personally seen some inexperienced shooters try their hand at benchrest shooting, and within few month they are doing very well indeed at club shoots.
Accurate Rifles Reward Progress As Novices Build Skills
For bench shooting, we think a highly accurate rifle is a much better training device for a new shooter than a typical, cheap factory sporter. With a gun capable of 1.5-2.0 MOA at best, you can never really determine if a “flyer” is you or the gun. Conversely, when a novice shoots a gun that can put 5 shots through one ragged hole, if a shot goes way high or low, the shooter knows his aim, trigger control, or gun-handling is to blame. He (or she) can then correct the problem. And when the shooter does everything right, he or she will see a nice tight group on the target. The accurate rifle provides more meaningful feedback and it rewards progress. That helps the novice become a better shooter in a shorter period of time.
A while back, Forum Member Preacher and his “bunny hugger” niece from California proved this point. The young lady, with almost no shooting experience, took Preacher’s 6-6.5×47 and shot a sub-quarter-MOA, 3-shot group at 350 yards. Don’t tell her she needs to stick to a cheap factory rifle. Preacher reports: “My niece flew in from the west coast and came up to visit. When she saw a few of my full-blown varmint rifles, she wanted to shoot one. She did a super job even if she IS a ‘bunny hugger’. She pulled the 1.5 ounce Jewell on a few fired cases to check out the trigger pull and then got in behind the gun and put three shots into a 350-yard target with a one-inch circle.” We measured her group at 0.822″ (0.224 MOA). Don’t tell Preacher that accuracy is “wasted” on novices. He joked: “I sure don’t want her shooting at me ….”
Rifle Features BAT Action, Krieger Barrel, and Russo Laminated Stock:
For those who are interested, Preacher’s rifle features a BAT 3-lug action, 30″ Krieger 7.5-twist heavy contour barrel, and Russo stock (with clear coat by Preacher). Chambered in 6-6.5×47 Lapua, this gun “shoots the 108gr Bergers very well” according to Preacher. Yep, we agree with that — even when a novice “bunny-hugger” does the trigger-pulling.
“A bullet launched at a higher altitude is able to fly slightly farther (in the thinner air) for every increment of downward movement. Effectively, the bullet behaves as if it has a higher ballistic coefficient.”
A few seasons back a good friend ventured to the high country of Colorado to pursue elk. He recently zeroed his rifle in California, at a range just a few hundred feet Above Mean Sea Level (AMSL). He wondered if the higher altitude in Colorado could alter his ballistics. The answer is a definite yes. However the good news is that free ballistics calculators can help you plot reliable drop charts for various shooting locations, high or low.
The question has been posed: “What effect does altitude have on the flight of a bullet?” The simplistic answer is that, at higher altitudes, the air is thinner (lower density), so there is less drag on the bullet. This means that the amount of bullet drop is less at any given flight distance from the muzzle. Since the force of gravity is essentially constant on the earth’s surface (for practical purposes), the bullet’s downward acceleration doesn’t change, but a bullet launched at a higher altitude is able to fly slightly farther (in the thinner air) for every increment of downward movement. Effectively, at higher altitudes, the bullet behaves as if it has a higher ballistic coefficient.
Forum member Milanuk explains that the key factor is not altitude, but rather air pressure. Milanuk writes:
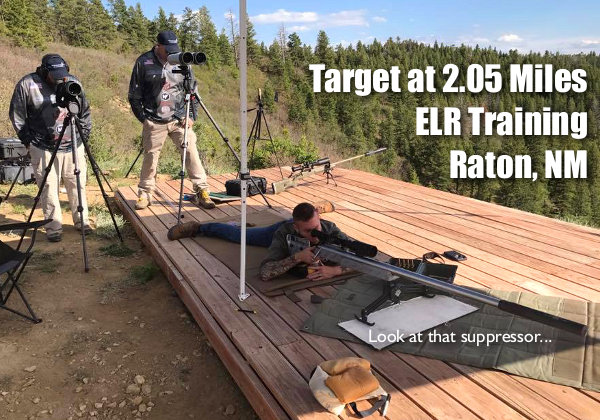
“In basic terms, as your altitude increases, the density of the air the bullet must travel through decreases, thereby reducing the drag on the bullet. Generally, the higher the altitude, the less the bullet will drop. For example, I shoot at a couple ranges here in the Pacific Northwest. Both are at 1000′ AMSL (Above Mean Sea Level) or less. I’ll need about 29-30 MOA to get from 100 yards to 1000 yards with a Berger 155gr VLD at 2960 fps. By contrast, in Raton, NM, located at 6600′ AMSL, I’ll only need about 24-25 MOA to do the same. That’s a significant difference.
Note that it is the barometric pressure that really matters, not simply the nominal altitude. The barometric pressure will indicate the reduced pressure from a higher altitude, but it will also show you the pressure changes as a front moves in, etc. which can play havoc w/ your calculated come-ups. Most altimeters are simply barometers that read in feet instead of inches of mercury.”
As Milanuk states, it is NOT altitude per se, but the LOCAL barometric pressure (sometimes called “station pressure”) that is key. The two atmospheric conditions that most effect bullet flight are air temperature, and barometric pressure. Normally, humidity has a negligible effect. It’s important to remember that the barometric pressure reported on the radio (or internet) may be stated as a sea level equivalency. So in Denver (at 6,000 feet AMSL), if the local pressure is 24″, the radio will report the barometric pressure to be 30″. If you do high altitude shooting at long range, bring along a Kestrel, or remember to mentally correct the radio station’s pressure, by 1″ per 1,000 feet.
Trajectory of Bullet fired at Sea Level
Trajectory of Bullet fired at 20,000 feet
You can do your own experimental calculations using JBM Online Ballistics (free to use). Here is an extreme example, with two printouts (generated with Point Blank software), one showing bullet trajectory at sea level (0′ altitude) and one at 20,000 feet. For demonstration sake, we assigned a low 0.2 BC to the bullet, with a velocity of 3000 fps.
To learn more about all aspects of Exterior Ballistics, Hornady has a useful discussion of External Ballistics including the effects of altitude and temperature. To dig deeper, Sierra Bullets has a comprehensive Exterior Ballistics Resource Page with multiple sections from the Sierra Manual (4th and 5th Editions), including:
Example from Section 3.0: “When a bullet flies through the air, two types of forces act on the bullet to determine its path (trajectory) through the air. The first is gravitational force; the other is aerodynamics. Several kinds of aerodynamic forces act on a bullet: drag, lift, side forces, Magnus force, spin damping force, pitch damping force, and Magnus cross force. The most important of these aerodynamic forces is drag. All the others are very small in comparison when the bullet is spin-stabilized.”
Shown is the Redding Model 15-P Competition Piloted Inside Chamfering Tool with pilot rod that centers in the case flash hole. Also shown is a Forster 45° Rocket Tool.
There are a wide variety of reloading tools designed to cut a slight chamfer in case necks and deburr the edge of the case mouth. You don’t need to spend a lot of money for an effective tool. A basic “rocket-style” 45° chamfering tool, such as the Forster, actually does a pretty good job taking the sharp edge off case mouths, particularly if you use a little scotch-pad (or steel wool) to smooth the edge of the cut. The Forster chamfer tool, shown below, is a nicely-made product, with sharper cutting blades than you’ll find on most other 45° chamferers. It costs $26.99 at Brownells.com.
Redding sells a handy piloted chamfering tool with a 15° inside cutting angle and removable accessory handle. This Redding Model 15-P chamferer works really well, so long as you have consistent case OALs. The pilot rod (which indexes in the flash hole) is adjustable for different cartridge types (from very short to very long). This ensures the concentricity of the inside neck chamfer to the case mouth. This quality tool works with cases from .22 to .45 Caliber, and retails for $37.19 at MidwayUSA.
Sinclair International offers a 28° carbide chamferer with many handy features (and sharp blades). The $28.99 Sinclair Carbide VLD Case Mouth Chamfering Tool will chamfer cases from .14 through .45 caliber. This tool features a removable 28° carbide cutter mounted in the green plastic Sinclair handle. NOTE: A hex-shaft cutter head power adapter can be purchased separately for $19.99 (Sinclair item 749002690). This can be chucked in a power screwdriver or used with dedicated power drives when doing large volumes of cases.
Many folks feel they can get smoother bullet seating by using a tool that cuts at a steeper angle. We like the 22° cutter sold by Lyman. It has a comfortable handle, and costs $17.49 on Amazon. The Lyman tool is an excellent value, though we’ve seen examples that needed sharpening even when new. Blade-sharpening is easily done, however.
K&M makes a depth-adjustable, inside-neck chamferer (“Controlled Depth Tapered Reaper”) with ultra-sharp cutting flutes. The latest version, which costs $62.95 at KMShooting.com, features a central pin that indexes via the flash hole to keep the cutter centered. In addition, the tool has a newly-designed handle, improved depth-stop fingers, plus a new set-screw adjustment for precise cutter depth control. We caution, even with all the depth-control features, if you are not careful, it is easy to over-cut, slicing away too much brass and basically ruining your neck. We think that most reloaders will get better results using a more conventional chamfer tool, such as the Forster or Redding 15-P.
One last thing to note — tools like the K&M and the Sinclair chamferer are often described as VLD chamferers. That is really a misnomer, as bullets with long boat-tails actually seat easily with very minimal chamfering. In reality, these high-angle chamferers may be most valuable when preparing brass for flat-base bullets and bullets with pressure rings. Using a 22° or 28° chamferer can reduce the risk of cutting a jacket when using VLD bullets though — so long as you make a smooth cut.
Need a top-notch Ballistics App for your iPhone, iPad, or iPod? Start with Ballistic: Advanced Edition (AE), the number 1 (i.e. most installed) App for iOS systems (iPhones and iPads). Ballistics AE (Advanced Edition) is the most popular iOS ballistics program for many good reasons. It offers a full feature set with Ballistic Solver, Ballistic Comparison (with up to 8 projectiles), Target Log (records group sizes), Advanced WindKit, and more. The Ballistic: Advanced Edition software is easy to use, with nice controls. Underneath it all is the proven JBM Ballistics calculator. And here’s the kicker — this excellent mobile App software is now FREE to download and install on iPhones and iPads!
This Video Explains How to Set Up and Use Ballistic: Advanced Edition
Full-featured and easy to use, Ballistics AE has been refined over many years, and it supplies rock-solid solutions derived from JBM Ballistics solver (created by James B. Millard). Unlike some other Apps, Ballistics AE is STABLE on iPhones (with various OS levels). What’s cool is that Ballistics AE is now available for FREE for both iPhones and iPads. This software is now provided by Federal Premium Ammunition, with in-App purchase functionality.
We’ve used the Ballistic: Advanced Edition program on an iPhone 5S, iPhone 6, and iPad, and it performed well. Here are some of the features we liked:
1. Mirrors output from online version of JBM Ballistics we often use for initial calculations.
2. Controls are simple to use and (mostly) intuitive.
3. Handy comparison feature lets you compare ballistics for different projectiles side by side.
4. Advanced Wind Kit allows you to account for complex wind situations.
5. Projectile and BC Databases are very comprehensive.
6. Software is regularly updated to match Apple OS changes.
This article is Copyright 2023 AccurateShooter.com. No republication is authorized. Any appearance of this story on another site obliges that site to pay liquidated damages and/or licensing fees.
Watch this video to see how a sound suppressor (aka “silencer”, “moderator”, or “can”) is constructed, start to finish. It’s more complicated than you might expect — there are quite a few stages in the process. The video below shows the fabrication of a SilencerCo Octane 45 suppressor:
SilencerCo writes: “What, exactly, goes into making a silencer? It may be more than you’d expect. From cutting metal to chemical baths, to extensive quality control every step of the way, our streamlined process is more than just a few steps. Watch our newest video, HOW IT’S MADE: Octane 45, to catch a glimpse behind SilencerCo’s doors.”
How Loud Are Unsuppressed Rifles?
Firearms Are Loud — 140 dB to 175 dB. ASHA explains: “Almost all firearms create noise that is over the 140-dB level. Exposure to noise greater than 140 dB can permanently damage hearing. A small .22-caliber rifle can produce noise around 140 dB, while big-bore rifles and pistols can produce sound over 175 dB. Firing guns in a place where sounds can reverberate, or bounce off walls and other structures, can make noises louder and increase the risk of hearing loss. Also, adding muzzle brakes or other modifications can make the firearm louder. People who do not wear hearing protection while shooting can suffer a severe hearing loss with as little as one shot[.]” Source: ASHA, Recreational Firearm Noise Exposure.
How Much Does a Good Suppressor Really Reduce Firearm Sound Levels?
That depends on the rifle, the cartridge, and the effectiveness of the suppressor. American Hunter explains: “Suppressors retard the speed of propellant gases from the cartridge that rapidly expand and rush out of the barrel. It’s these gases that produce the loud boom that’s heard for miles. A suppressor’s series of internal baffles slows these gases so they are not all released at once, thereby muffling the sound.” Many good commercial suppressors can achieve 30-35 dB sound suppression. However, Zak Smith of Thunder Beast Arms says: “There are a bunch of manufacturers who publish values that are not reproducible, or use an ad-hoc test instead of a mil-spec test. In many cases we’ve tested the exact same suppressors they’ve advertised with 30-40 dB reductions and found they are actually in the high 20s instead.”
Again, for this reason, we recommend that hunters use ear protection, such as electronic muffs, even when shooting suppressed.
Here’a useful article by Sierra Bullets Media Relations Manager Carroll Pilant. This story, which originally appeared in the Sierra Bullets Blog, covers some of the more common ammo problems that afflict hand-loaders. Some of those issues are: excessive OAL, high primers, and improperly-sized cases. Here Mr. Pilant explains how to avoid these common problems that lead to “headaches at the range.
I had some gentlemen at my house last fall getting rifle zeros for an upcoming elk hunt. One was using one of the .300 short mags and every 3rd or 4th round would not chamber. Examination of the case showed a bulge right at the body/shoulder junction. These were new cases he had loaded for this trip. The seating die had been screwed down until it just touched the shoulder and then backed up just slightly. Some of the cases were apparently slightly longer from the base to the datum line and the shoulder was hitting inside the seating die and putting the bulge on the shoulder. I got to thinking about all the gun malfunctions that I see each week at matches and the biggest percentage stem from improper handloading techniques.
One: Check Your Cases with a Chamber Gage
Since I shoot a lot of 3-gun matches, I see a lot of AR problems which result in the shooter banging the butt stock on the ground or nearest solid object while pulling on the charging handle at the same time. I like my rifles too well to treat them that way (I cringe every time I see someone doing that). When I ask them if they ran the ammo through a chamber gage, I usually get the answer, “No, but I need to get one” or “I didn’t have time to do it” or other excuses. The few minutes it takes to check your ammo can mean the difference between a nightmare and a smooth running firearm.
A Chamber Gauge Quickly Reveals Long or Short Cases
Size Your Cases Properly
Another problem is caused sizing the case itself. If you will lube the inside of the neck, the expander ball will come out a lot easier. If you hear a squeak as the expander ball comes out of a case neck, that expander ball is trying to pull the case neck/shoulder up (sometimes several thousandths). That is enough that if you don’t put a bulge on the shoulder when seating the bullet … it can still jam into the chamber like a big cork. If the rifle is set up correctly, the gun will not go into battery and won’t fire but the round is jammed into the chamber where it won’t extract and they are back to banging it on the ground again (with a loaded round stuck in the chamber). A chamber gage would have caught this also.
Oversizing cases also causes problems because the firing pin doesn’t have the length to reach the primer solid enough to ignite it 100% of the time. When you have one that is oversized, you usually have a bunch, since you usually do several cases at a time on that die setting. If the die isn’t readjusted, the problem will continue on the next batch of cases also. They will either not fire at all or you will have a lot of misfires. In a bolt action, a lot of time the extractor will hold the case against the face of the breech enough that it will fire. The case gets driven forward and the thinner part of the brass expands, holding to the chamber wall and the thicker part of the case doesn’t expand as much and stretches back to the bolt face. If it doesn’t separate that time, it will the next time. When it does separate, it leaves the front portion of the case in the chamber and pulls the case head off. Then when it tries to chamber the next round, you have a nasty jam. Quite often range brass is the culprit of this because you never know how many times it has been fired/sized and in what firearm. Back to beating it on the ground again till you figure out that you have to get the forward part of the case out.
Just a quick tip — To extract the partial case, an oversized brush on a cleaning rod [inserted] and then pulled backward will often remove the case. The bristles when pushed forward and then pulled back act like barbs inside the case. If you have a bunch of oversized case that have been fired, I would dispose of them to keep from having future problems. There are a few tricks you can use to salvage them if they haven’t been fired though. Once again, a case gage would have helped.
Two: Double Check Your Primers
Another thing I see fairly often is a high primer, backwards primer, or no primer at all. The high primers are bad because you can have either a slam fire or a misfire from the firing pin seating the primer but using up its energy doing so. So, as a precaution to make sure my rifle ammo will work 100% of the time, I check it in a case gage, then put it in an ammo box with the primer up and when the box is full, I run my finger across all the primers to make sure they are all seated to the correct depth and you can visually check to make sure none are in backwards or missing.
Three: Check Your Overall Cartridge Length
Trying to load the ammo as long as possible can cause problems also. Be sure to leave yourself enough clearance between the tip of the bullet and the front of the magazine where the rounds will feed up 100%. Several times over the years, I have heard of hunters getting their rifle ready for a hunt. When they would go to the range to sight in, they loaded each round single shot without putting any ammo in the magazine. On getting to elk or deer camp, they find out the ammo is to long to fit in the magazine. At least they have a single shot, it could be worse. I have had hunters that their buddies loaded the ammo for them and then met them in hunting camp only to find out the ammo wouldn’t chamber from either the bullet seated to long or the case sized improperly, then they just have a club.
Four: Confirm All Cases Contain Powder
No powder in the case doesn’t seem to happen as much in rifle cartridges as in handgun cartridges. This is probably due to more handgun ammo being loaded on progressive presses and usually in larger quantities. There are probably more rifle cartridges that don’t have powder in them than you realize though. Since the pistol case is so much smaller internal capacity, when you try to fire it without powder, it usually dislodges the bullet just enough to stick in the barrel. On a rifle, you have more internal capacity and usually a better grip on the bullet, since it is smaller diameter and longer bearing surface. Like on a .223, often a case without powder won’t dislodge the bullet out of the case and just gets ejected from the rifle, thinking it was a bad primer or some little quirk.
For rifle cases loaded on a single stage press, I put them in a reloading block and always dump my powder in a certain order. Then I do a visual inspection and any case that the powder doesn’t look the same level as the rest, I pull it and the one I charged before and the one I charged after it. I inspect the one case to see if there is anything visual inside. Then I recharge all 3 cases. That way if a case had powder hang up and dump in the next case, you have corrected the problem.
On progressive presses, I try to use a powder that fills the case up to about the base of the bullet. That way you can usually see the powder as the shell rotates and if you might have dumped a partial or double charge, you will notice as you start to seat the bullet if not before. On a progressive, if I don’t load a cartridge in one smooth stroke (say a bullet tipped over sideways and I raised the ram slightly to reset it) Some presses actually back the charge back adding more powder if it has already dumped some so you have a full charge plus a partial charge. When I don’t complete the procedure with one stroke, I pull the case that just had powder dumped into it and check the powder charge or just dump the powder back into the measure and run the case through later.
Want to learn more about Long Range Shooting? Check out the NSFF “Elements of Long Range Shooting” videos hosted by ballistics guru Bryan Litz of Applied Ballistics. In this multi-part series, Bryan covers a variety of topics of interest to precision shooters. For today’s Saturday at the Movies special, we feature seven of Bryan’s videos. Watch other informative Long Range Shooting and Ballistics videos with Bryan Litz on the NSSF YouTube Channel.
Atmospherics and Density Altitude
Bryan Litz explains: “An important element in calculating an accurate firing solution for long-range shooting is understanding the effects of atmospherics on a projectile.” Atmospherics include air pressure, air temperature, and humidity. Bryan notes: “Temperature, pressure, and humidity all affect the air density… that the bullet is flying through. You can combine all those factors into one variable called ‘Density Altitude’.” Density Altitude is used by the ballistic solver to account for variables that affect bullet flight.
Bullet Ballistic Coefficients
A bullet’s ballistic coefficient (BC) basically expresses how well the bullet flies through the air. Higher BC bullets have less aerodynamic drag than lower BC projectiles. You will see BCs listed as either G1 and G7 numbers. These correspond to different bullet shape models. Generally speaking, the G7 model works better for the long, boat-tail bullets used for long-range shooting. Notably, a bullet’s drag is NOT constant in flight. The true BC can vary over the course of the trajectory as the bullet velocity degrades. In other words, “BC is dynamic”. That said, you can make very accurate drop charts using the BCs provided by major bullet-makers, as plugged into solvers. However, long-range competitors may want to record “real world” drop numbers at various distances. For example, we’ve seen trajectories be higher than predicted at 500 yards, yet lower than predicted at 1000.
Transonic Range
When considering your rifle’s long-range performance, you need to understand the limit of your bullet’s supersonic range. As the bullet slows below the speed of sound, it enters the transonic zone. This can be accompanied by variations in stability as well as BC changes. Bryan explains “once your bullet slows done below supersonic and you get into transonic effects, there are a lot more considerations that come into play. The drag of the bullet becomes less certain, the stability of the bullet can be challenged, and things related to long times of flight, such as Coriolis and Spin Drift, come into play. So whenever you are shooting long range you need to where your bullet slows down to about 1340 fps.”
Ballistics Solvers — Many Options
Bryan Litz observes: “When we talk about the elements of long range shooting, obviously a very important element is a getting a fire solution, using a ballistic solver. There are a lot of ballistic solvers out there… Applied Ballistics has smartphone Apps. Applied Ballistics has integrated the ballistic solver directly into a Kestral, and the same solver runs (manually) on the Accuracy Solutions Wiz-Wheel. The point is, if it is an Applied Ballistics device it is running the same solutions across the board.”
Bullet Stability and Twist Rates
In this video, Bryan Litz talks about bullet in-flight stability and how to calculate barrel twist-rate requirements for long-range bullets. Bryan explains that bullet stability (for conventional projectiles) is basically provided by the spinning of the bullet. But this spin rate is a function of BOTH the nominal twist rate of the barrel AND the velocity of the projectile. Thus, when shooting the same bullet, a very high-speed cartridge may work with a slower barrel twist rate than is required for a lower-speed (less powerful) cartridge. For match bullets, shot at ranges to 1000 yards and beyond, Bryan recommends a twist rate that offers good stability.
Scope Tracking — Tall Target Test
Have you recently purchased a new scope? Then you should verify the actual click value of the turrets before you use the optic in competition. While a scope may have listed click values of 1/4-MOA, 1/8-MOA or 0.1 Mils, the reality may be slightly different. Many scopes have actual click values that are slightly higher or lower than the value claimed by the manufacturer. The small variance adds up when you click through a wide range of elevation. In this video, Bryan Litz shows how to verify your true click values using a “Tall Target Test”. The idea is to start at the bottom end of a vertical line, and then click up 30 MOA or so. Multiply the number of clicked MOA by 1.047 to get the claimed value in inches. For example, at 100 yards, 30 MOA is exactly 31.41 inches. Then measure the difference in your actual point of impact.
Coriolis Effect
The Coriolis Effect comes into play with extreme long-range shots. The rotation of the earth actually moves the target a small distance (in space) during the long duration of the bullet’s flight. Bryan Litz notes that, in most common shooting situations inside 1K, Coriolis is not significant. At 1000 yards, the Effect represents less than one click (for most cartridge types). Even well past 1000 yards, in windy conditions, the Coriolis Effect may well be “lost in the noise”. But in very calm conditions, when shooting at extreme ranges, Bryan says you can benefit from adjusting your ballistics solution for Coriolis: “The Coriolis Effect… has to do with the spin of the earth. The consequence of that is that, if the flight time of the bullet gets significantly long, the bullet can have an apparent drift from its intended target. The amount [of apparent drift] is very small — it depends on your latitude and azimuth of fire on the planet.”
About Bryan Litz
Bryan began his career as a rocket scientist, quite literally. He then started Applied Ballistics, the leading company focusing on ballistics science for rifle shooting. A past F-TR Long-Range National Champion and Chief Ballistician for Berger Bullets, knows his stuff. His Applied Ballistics squad was the winning team at the 2017 King of 2 Miles event, and Applied Ballistics has earned major U.S. defense contracts.
Today’s Saturday Showcase covers gun safes. Every firearms owner should have a secure, quality gun safe with ample capacity. There are numerous choices in gun safes — but we have one key bit of advice — buy BIGGER than you think you need, because your gun collection will likely grow over time. Also you should consider the fire rating of your safe. There are other key factors to consider, such as wall thickness, lock type, shelf and storage layout, and humidity control. We recommend that all Bulletin readers read our detailed, Gun Safe Buyers Guide. This in-depth 9400-word article covers ALL these topics:
Anti-Corrosion
Budget Safes
Bolt Layout
Door Seals
Fire Proofing
Handgun Storage
Hinges
Humidity Control
Installation Tips
Interior Layout
Interior Lighting
Locks–Dial vs. Digital
Modular Safes
Rotary Racks
Size and Weight
Temperature Control
Wall Thickness
Water Proofing
Technical Features of Gun Safes — What You Need to Know
This is a very sensible, informative video that examines the technical features of gun safes. You’ll learn about the steel “gauge” or thickness, the different types of hinges, lock controls, and fire-proofing options. We think anyone contemplating purchase of a large home safe should watch this video, prepared by a respected safe retailer in Las Vegas.
Assembly of SnapSafe Titan XXL Double Door Modular Safe
In this video Gavin Gear of UltimateReloader.com shows the unpacking and assembly of a large, twin-door SnapSafe modular safe. This video shows how individual panels are assembled one by one, and how the twin doors are attached. Gavin also shows the process of installing the interior insulation panels which provide basic fire protection. Remarkably, this entire XXL modular safe can be put together with simple tools in less than an hour. SEE Full Article HERE.
Features of a Quality Safe under $1000
Even if you already have a safe, this video is well worth watching. The host shows a variety of accessories and upgrades that all gun safe owners should consider. The host explains why you should have a dehumidifier or Golden Rod. He also shows how to install handy interior lights that activate automatically when the door is opened.
The Gun Vault — The Next Step Beyond a Jumbo Gun Safe
If you have a very large gun collection and are building a new custom home, you may want to consider a Gun Vault. This is essentially a large, secure room, with a very heavy door and thick walls. In this interesting video, Atlas builds a large walk-in gun vault using the Gallow Tech Shelving System and a Fort Knox Gun Vault door.
After the Fire — What Actually Happens in a Burned Safe
In this video, the hosts open a “fireproof” gun safe that went through an actual house fire. See what happens when a gun safe that is supposed to be fireproof actually is exposed to a major fire. The results are surprising to say the least. This video shows that you need to do your homework before buying a “fireproof” safe. Understand how the fire rating systems work, and learn how the interior materials and construction make a big different in real world fire protection.
Mechanical Locks vs. Electronic Locks — What You Need to Know
One important decision when buying a gun safe is the choice of locking mechanism. Should you go with a mechanical lock or an electronic lock? There are pros and cons to both dial locks and e-locks, and as long as you get a quality lock, neither is a bad choice. To help you make your decision, This video explains the differences between the two, and reasons why you might choose one over the other.
How to Assemble a Modular Safe with Simple Tools
For gun owners who move frequently, or who may live in an upstairs apartment or condo, a modular safe makes sense. Steelhead Outdoors, based in Minnesota, offers three different safes: Nomad 26, 32, and Nomad 38. The video below shows how to assemble a Steelhead Outdoors Nomad series safe. If you have basic skills, these safes can be assembled easily in 60-90 minutes. Steelhead recommends having two people to do the job. The entire safe ships in four (4) boxes. Wrenches are included with the safe.
This time-lapse video shows the entire process of assembling the safe, start to finish.
Guide to Quick Access Handgun Safes
A quick access safe can keep your pistol secure, but also readily accessible. But not all of these devices are created equal. This video explains the features you need in a small pistol safe. The video also examines the pros and cons of seven different handgun safes. We recommend that you do NOT keep your handgun safe in plain view, such as on a bedside table. There are other locations where you still have quick access, without tempting home intruders.
Wireless Hygrometer Reports Temperature and Humidity Inside Safes
The Hornady Security® Wireless Hygrometer monitors temperature and humidity in real-time, all without opening the gun safe. The wireless hygrometer employs a remote sensor inside your safe, which measures temperature and humidity data. This data is then sent to an external base display. Wireless technology eliminates the need to open the safe and check the storage environment, preventing temperature and humidity spikes from the outside air.
The display features a large touchscreen that shows current high/low data from both the base and remote units in Fahrenheit or Celsius. The hygrometer pairs with Hornady Security’s in-safe dehumidifiers to combat oxidation-causing moisture.
Gun Safe Installation Recommendations
Every safe, when possible, should be anchored in place with heavy-duty fasteners. Ideally, use multiple bolts in the bottom of the safe, anchored to concrete or solid foundation. Choose the appropriate lag bolts or anchors for the material below your safe. If you can’t mount to the floor, bolt the safe to wall studs. You can locate the position of the studs with an inexpensive electronic “Stud Sensor” available at home supply stores.
Check the thickness of your safe floor. If the steel on the bottom of your safe is fairly thin, place a steel backing strip between the bolt heads and the safe bottom. (Large washers will work, but a backing strip is better.) Without such reinforcement, the bolt heads may pull right through thin-gauge steel if the safe is rocked, or levered from the bottom with a pry-bar.
Locate your safe in the corner of a room or in a recess that blocks access to one or more sides of the safe. On many gun safes, the steel on the top, sides, and rear is thinner than on the door. Blocking access to the sides makes it much more difficult to use power tools on the sides, where the safe is most vulnerable. It’s also wise to place the safe in a relatively tight space with limited room to maneuver. Anything that makes the safe harder to move helps deter would-be thieves.
Many people place their safe in a garage or basement. That’s not necessarily a bad idea, but people also tend to store their tools in the same locations. Don’t store your power tools next to the safe. One safe-maker told us how a customer’s safe was defeated using the owners’ own cutting torch which was stored right next to the safe!
Inspect the area around the safe. Avoid locations where there are a lot of wood beams, paint cans, or other combustible material nearby. In the event of a serious house-fire, these items will fuel the flames, increasing the likelihood that items inside your safe will be heat-damaged. Chris Luchini, co-author of Rec.Gun’s Guide to Gun Safes, offers some practical advice: “Get an alarm system. If the burglars hear an alarm go off, they are less likely to stick round to finish the job. Alarms on both the house and the safe area are a good idea.”


 Headspace Gauges


 Norma has released a fascinating video showing how bullets, brass, and ammunition are produced at the
  If you wonder how ammo is made, starting with raw metal, check out this video from


 The question has been posed: “What effect does altitude have on the flight of a bullet?” The simplistic answer is that, at higher altitudes, the air is thinner (lower density), so there is less drag on the bullet. This means that the amount of bullet drop is less at any given flight distance from the muzzle. Since the force of gravity is essentially constant on the earth’s surface (for practical purposes), the bullet’s downward acceleration doesn’t change, but a bullet launched at a higher altitude is able to fly slightly farther (in the thinner air) for every increment of downward movement. Effectively, at higher altitudes, the bullet behaves as if it has a higher ballistic coefficient.
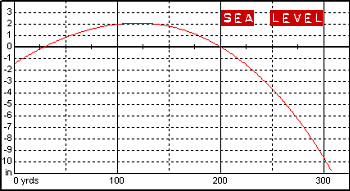


 Oversizing cases also causes problems because the firing pin doesn’t have the length to reach the primer solid enough to ignite it 100% of the time. When you have one that is oversized, you usually have a bunch, since you usually do several cases at a time on that die setting. If the die isn’t readjusted, the problem will continue on the next batch of cases also. They will either not fire at all or you will have a lot of misfires. In a bolt action, a lot of time the extractor will hold the case against the face of the breech enough that it will fire. The case gets driven forward and the thinner part of the brass expands, holding to the chamber wall and the thicker part of the case doesn’t expand as much and stretches back to the bolt face. If it doesn’t separate that time, it will the next time. When it does separate, it leaves the front portion of the case in the chamber and pulls the case head off. Then when it tries to chamber the next round, you have a nasty jam. Quite often range brass is the culprit of this because you never know how many times it has been fired/sized and in what firearm. Back to beating it on the ground again till you figure out that you have to get the forward part of the case out.


 Every safe, when possible, should be anchored in place with heavy-duty fasteners. Ideally, use multiple bolts in the bottom of the safe, anchored to concrete or solid foundation. Choose the appropriate lag bolts or anchors for the material below your safe. If you can’t mount to the floor, bolt the safe to wall studs. You can locate the position of the studs with an inexpensive electronic “Stud Sensor” available at home supply stores.
 Locate your safe in the corner of a room or in a recess that blocks access to one or more sides of the safe. On many gun safes, the steel on the top, sides, and rear is thinner than on the door. Blocking access to the sides makes it much more difficult to use power tools on the sides, where the safe is most vulnerable. It’s also wise to place the safe in a relatively tight space with limited room to maneuver. Anything that makes the safe harder to move helps deter would-be thieves.


