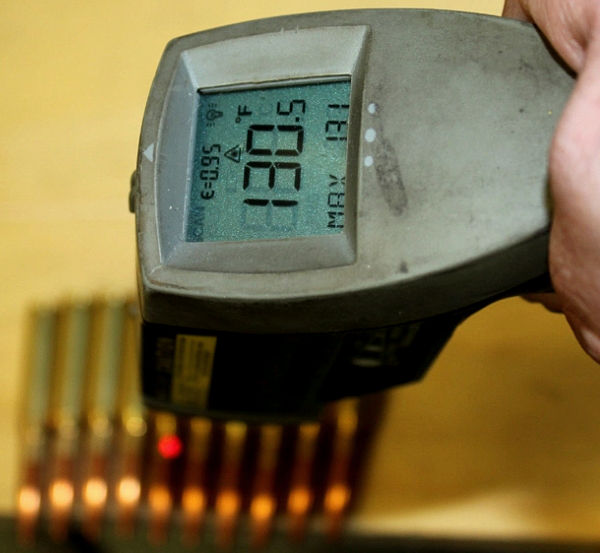
In this .308 Win test, 70° F ammo shot 96 FPS slower than ammo heated to 130.5° F. And the 130.5° ammunition was 145 fps faster than ammo taken right out of the freezer (at 25.5° F). That’s a huge difference…
Summer Solstice is just two weeks away, so most parts of the country will soon be encountering peak summer heat. Some ranges in the Western states have already recorded temperatures well over 100 degrees F during matches. When dealing with extreme summer heat, you should make a serious effort to keep your ammo at reasonable temperatures. When possible, keep ammo in a cooler in the shade.
Never leave boxes of ammo out in the hot sun. Even with powders advertised as “temp stable” you can see significant velocity increases when ambient temps reach 90 degrees and above. This article explains how temperature extremes (both hot and cold) can alter bullet velocities. The velocity differences between very cold ammo and very hot ammo can be very large, as this article explains.
EDITOR’s NOTE: The Sierra tester does not reveal the brand of powder tested here. Some powders are much more temp sensitive than others. Accordingly, you cannot extrapolate test results from one propellant to another. Nonetheless, it is interesting to see the actual recorded velocity shift with ammo temperature variations in a .308 Win.
Written by Sierra Chief Ballistician Tommy Todd This story originally appeared in theSierra Bullets Blog
A few weeks ago I was attending the Missouri State F-Class Match. This was a two-day event during the summer and temperatures were hot one day and hotter the next. I shot next to a gentleman who was relatively new to the sport. He was shooting a basically factory rifle and was enjoying himself with the exception that his scores were not as good as he hoped they would be and he was experiencing pressure issues with his ammunition. I noticed that he was having to force the bolt open on a couple of rounds. During a break, I visited with him and offered a couple of suggestions which helped his situation somewhat and he was able to finish the match without major issues.
He was shooting factory ammunition, which is normally loaded to upper levels of allowable pressures. While this ammunition showed no problems during “normal” testing, it was definitely showing issues during a 20-round string of fire in the temperatures we were competing in. My first suggestion was that he keep his ammunition out of the direct sun and shade it as much as possible. My second suggestion was to not close the bolt on a cartridge until he was ready to fire. He had his ammo in the direct sunlight and was chambering a round while waiting on the target to be pulled and scored which can take from a few seconds to almost a minute sometimes.
This time frame allowed the bullet and powder to absorb chamber [heat] and build pressure/velocity above normal conditions. Making my recommended changes lowered the pressures enough for the rifle and cartridge to function normally.
Testing Effects of Ammunition Temperature on Velocity and POI
After thinking about this situation, I decided to perform a test in the Sierra Bullets underground range to see what temperature changes will do to a rifle/cartridge combination. I acquired thirty consecutive .30 caliber 175 grain MatchKing bullets #2275 right off one of our bullet assembly presses and loaded them into .308 Winchester ammunition. I utilized an unnamed powder manufacturer’s product that is appropriate for the .308 Winchester cartridge. This load is not at the maximum for this cartridge, but it gives consistent velocities and accuracy for testing.
I took ten of the cartridges and placed them in a freezer to condition.
I set ten of them on my loading bench, and since it was cool and cloudy the day I performed this test I utilized a floodlight and stand to simulate ammunition being heated in the sun.
I kept track of the temperatures of the three ammunition samples with a non-contact laser thermometer.
The rifle was fired at room temperature (70 degrees) with all three sets of ammunition. I fired this test at 200 yards out of a return-to-battery machine rest. The aiming point was a leveled line drawn on a sheet of paper. I fired one group with the scope aimed at the line and then moved the aiming point across the paper from left to right for the subsequent groups.
NOTE that the velocity increased as the temperature of the ammunition did.
The ammunition from the freezer shot at 2451 fps.
The room temperature ammunition shot at 2500 fps.
The heated ammunition shot at 2596 fps.
The tune window of the particular rifle is fairly wide as is shown by the accuracy of the three pressure/velocity levels and good accuracy was achieved across the board. However, notice the point of impact shift with the third group? There is enough shift at 200 yards to cause a miss if you were shooting a target or animal at longer ranges. While the pressure and velocities changed this load was far enough from maximum that perceived over pressure issues such as flattened primer, ejector marks on the case head, or sticky extraction did not appear. If you load to maximum and then subject your ammunition to this test your results will probably be magnified in comparison.
This test showed that pressures, velocities, and point-of-impact can be affected by temperatures of your ammunition at the time of firing. It’s really not a bad idea to test in the conditions that you plan on utilizing the ammo/firearm in if at all possible. It wouldn’t be a bad idea to also test to see what condition changes do to your particular gun and ammunition combination so that you can make allowances as needed. Any personal testing along these lines should be done with caution as some powder and cartridge combination could become unsafe with relatively small changes in conditions.
Mirage shields are useful for all shooters, not just hard-core competitors. A mirage shield helps you see your target better, without distortion caused by heat waves coming off your barrel. This isn’t rocket science — it’s a simple, inexpensive way to see better and shooter more accurately. We’ve advocated that varmint shooters give mirage bands a try on those hot summer groundhog and prairie dog expeditions. And we observed that practically every shooter at the 2013 World F-Class Championship was using a mirage shield of some kind.
Forum member Fabian from Germany, whose Sako 6mmBR Rifle was featured many years ago as a Gun of the Week, has devised a clever and inexpensive mirage band option. Fabian is a radiologist by trade. He notes that many X-ray machines require a daily test film for calibration. These are normally just discarded in the trash, so you can get them for free.
Fabian explains: “I’m a radiologist, so I handle medical x-ray films every day. Modern X-ray machines use laser-based printers and they need to print a test-film every day. One x-ray film is about 43×35 cm (16.9″ x 13.7″). Made from polyester, the films are very stable and only 0.007″ inches thick. They are light-weight, semi-transparent, and very stable. Using normal scissors, you can easily cut four mirage shields from a single sheet of film. Then glue on some velcro to attach to your barrel. Try it, you will not be disappointed.”
Carbon Fiber Mirage Shield from Rodzilla
If you’re not into making your own mirage shield, aka “mirage band”, Rodzilla, makers of the superb Raptor front rest and 5-Axis rest tops, offers an excellent 3″ x 24″ carbon fiber mirage shield. This 1/32″-thick band is really a top-tier, state-of-the-art shield. Order it for $30.00 from TheRodzilla.com web store.
Shooting Industry magazine has released its first-ever “Safety Issue” this month (June 2023), coinciding with National Safety Month. Among the many articles in the June issue are three major features which can benefit gun owners and range operators. These articles cover Firearms Safes (large and small), Eye and Ear Protection, and general range Health and Safety procedures.
Gun Safe Trends for Large Vaults and Portable Units
In this month’s featured Gun Safes article, SI writer Shannon Farlow spoke with Stephen Hall of Lock It Up Safe Company; Brice McCunn, of Iowa Safe Company; and Larry Hyatt, president of Hyatt Guns.
SI: Which types of gun safes are the most popular these days?
Hall: In our store, we tend to divide safes in a few categories such as pistol/travel, “home safes” (which usually means 44″ and shorter, small safes (think 1–20 rifles), big safes (20+ rifles) and extra-large safes, which can have capacities of close to 100. We seem to rotate through all of them pretty consistently, but if I had to pick one that’s a bit slow it would be the medium sizes such as 60″ tall and between 36″–42″ wide. Oftentimes, I think people want something much smaller or much larger.
McCunn: In Iowa, we’ve noticed a trend of larger safes being sold. For instance, 72″ tall safes are by far the most popular for our region, but we do sell a variety of sizes.
Hyatt: Small handgun safes remain our top sellers. We use these as add-on sales for every gun sold in our store and we offer a discount at point of purchase.
SI: How popular are portable gun safes?
Hyatt: These are our top sellers by a significant margin. They are an inexpensive way to allow gun owners to secure their firearms, while still allowing easy access to them, both in the home and on the go.
Hall: Securing a firearm in a car is probably the most popular thing small handgun-style safes are utilized for. Vaultek has done a phenomenal job of addressing this with their LifePod and Barikade line of travel safes. They come in a variety of sizes, colors and features. Vaultek has biometric options along with keypad options, creating an option for most shoppers.
Eye and Ear Protection
Eye and ear protection are vital for all gun owners. And visitors to shooting ranges should rent/borrow eye and ear protection if they don’t have their own gear.
Store owners interviewed by Shooting Industry noted that safety gear sells well: “Out of all the stuff in the shop, they’re probably the easiest things to sell, maybe other than ammo,” confirmed Tim Van Leiden, owner of The Gun Guys in Kansas. Indeed, this stuff is pretty much a mandatory part of every shooter’s kit, suggests John Stephenson, general manager of Metro Shooting Supplies in Missouri. Accordingly Metro Shooting promotes eye and ear protection for all customers.
There is a trend to shooters getting electronic muffs. These offer excellent protection against high-decibel sounds while still allowing shooters to hear range commands. Plugs alone can work well, but plugs under electronic muffs may be the best option. Plugs under muffs can provide maximum sound protection (with 6-8 dB NRR better than typical muffs alone), while allowing shooters to hear instructions and communicate with fellow shooters.
Shooting Range Safety and Health Programs
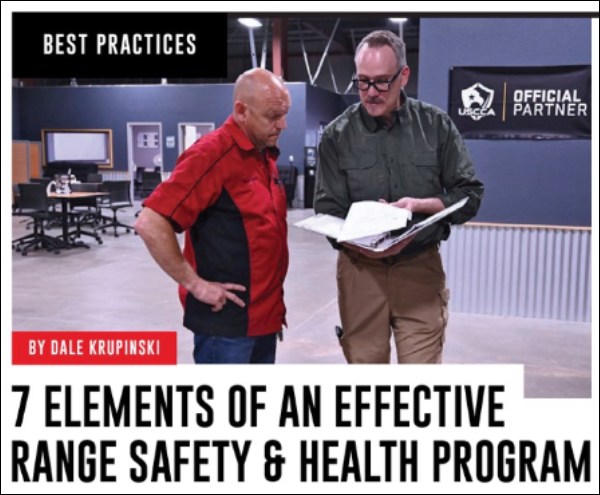
In a detailed “Best Practices” artile Dale Krupinski explains how to maintain effective range safety and health programs, and keep indoor ranges safe for workers and customers. Among the key points covered in the article are:
1. Frequently inspect the shooting range for safety hazards.
2. Conduct lead dust and noise exposure tests for range workers.
3. Provide safety and health training to range managers and employees.
4. Communicate safety and health protocols to contractors working at the range.
5. Regularly verify that the safety and health programs are working as intended.
Let’s face it, AR-platform rifles run dirty, at least compared to typical bolt-action rifles. The AR-15 works by piping gas from the barrel back into the bolt carrier, causing the bolt to unlock and the carrier to move the bolt backward. The “exhaust gas” from the barrel contains soot and carbon. The carbon will form hard deposits on the bolt. In addition, the carbon can combine with lube on the bolt carrier to make a nasty, paste-like sludge. This can be particularly problematic when the black paste pollutes the ejector and extractor recess.
This Editor has inspected dozens of ARs over the years. Other than mag-related malfunctions, the most common cause of AR cycling problems I found was oily gunk in the extractor and ejector areas. Many AR owners overlook these critical areas. Look at an AR that hasn’t been cleaned properly and you’ll probably find black gunk (and small brass shavings) in the ejector and extractor recesses.
If you want to keep your black rifle running smoothly and reliably, you must clean it regularly and follow the correct maintenance procedures. Here are three videos that explain how to properly disassemble and clean AR-platform rifles. And then they cover the essential lubrication ARs need to run reliably.
Take-Down and Full Cleaning of AR15 by Jerry Miculek
Here ace shooter Jerry Miculek takes down and cleans an AR-platform rifle belonging to his daughter Lena. This is a good video because Lena’s rifle was “run hard and packed up dirty” so you can see where carbon and grease build up. This 35-minute video is very thorough. Jerry is one of the nation’s top action carbine shooters, so listen carefully to his advice on cleaning and lubrication.
General AR-15 Maintenance and Lubrication
There are various schools of thought on AR lubrication. Some guys like to run “wet” with lots of CLP, while others choose to focus lubrication on the key spots that receive the most friction and wear, such as the contact point for the bolt carrier. We do advice check the ejector recess and extractor spring recess frequently as gunk can get in there, causing malfunctions. Here is a good video from Pew Pew Tactical — a 7-minute guide to cleaning and lubricating AR-platform rifles. This shows important details for both the upper and the lower.
How to Clean Your AR-15 Bolt Carrier Assembly
This video offers very specific advice on the bolt carrier group, which receives the dirty gas directly from the barrel. Be sure to check the extractor and ejector recesses. That’s where old lube, brass shavings, and carbon accumulate. Follow the directions in this video for lubrication, and don’t over-lubricate the bolt carrier — that will only capture more carbon.
Dennis DeMille shows a young competitor at the CMP Western Games how to adjust his leather sling.
If you want to learn more about setting up your sling properly for position shooting, here are some tips from Dennis DeMille, a past Service Rifle Champion. Dennis explains how to choose a sling, and how to adjust it to fit properly.
The Benefits of Dry-Fire Training
Once you know how to set up your sling properly, you’ll want to practice. Dennis DeMille stresses the importance of dry-fire practice with sling and shooting coat. Dry-Fire training is essential to the sling disciplines. Dennis DeMille, a national Service Rifle Champion, told us that, for every minute he spent in actual competition, he would spend hours practicing without ammunition. While in the USMC, Dennis would practice in the barracks, working on his hold and dry-firing:
“The most important thing is to spend time off the range practicing. Most of what I learned as a High Power shooter I learned without ammunition — just spending time dry firing and doing holding exercises. Holding exercises will really identify the weak parts of your position. The primary purpose of dry firing is to get you used to shooting an empty rifle. If you can shoot a loaded rifle the same way you shoot an empty rifle then eventually you will become a High Master.”
SFC Brandon Green, 2018 Nat’l High Power Champion. Brandon, one of the nation’s best “hard-holders”, demonstrates proper use of sling in prone position.
Setting-Up a Leather Service Rifle Sling for Competition
So you made the mistake of disassembling your leather service rifle sling, or are intimidated about how to use one? In this Creedmoor Sports InfoZone video, former Creedmoor G.M. Dennis DeMille explains how to set up and use a sling. The covers the basics — Dennis starts with a totally disassembled leather service rifle sling and shows you how to set it up properly.
Tip: “Many shooters shy away from using a leather sling because they have never been taught how to use one. That’s unfortunate. In my opinion a leather sling offers more support than a web sling, which is important when competiting with the heavier than normal rifles.”
Configuring the Sling for the Standing (Offhand) Position
In this second in a series of Creedmoor InfoZone videos on the setup and use of the leather service rifle sling, Dennis DeMille details how to configure and best utilize the leather service rifle sling while shooting from the standing position.
Tip: “Putting the Frogs in different hole will change the amount of added elevation a sling provides.”
Looking at Sling Types — Comparing the Features
In this video Dennis showcases a large variety of shooting slings. He explains the strong points of each type so you can choose the sling best suited to your discipline and shooting style.
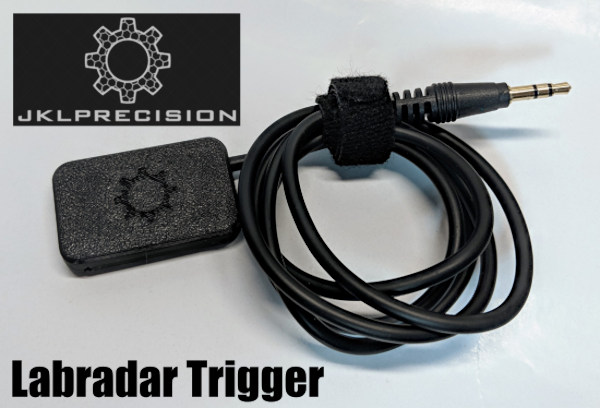
SUMMARY: This article reviews a device that “triggers” the LabRadar chronograph to register bullet speed. Rather than activate by sound or Doppler reading, this $35 JKL Inertial Trigger works from the rifle’s instantaneous recoil pulse when a shot is fired. After some frustration with his LabRadar when shooting at a range with reflective surfaces, our tester is now reporting that 100% of his actual shots are being captured correctly by his LabRadar chrono equipped with the JKL Inertial Trigger. He won’t use his LabRadar without it now. Other users have become instant fans of this inertial LabRadar trigger as well. It is very affordable and it works great. VIEW LARGE PHOTO.
JKL Inertial Trigger for LabRadar Chronograph
Product Review by F Class John
The LabRadar chronograph has been one of the most revolutionary tools in the shooting world because of how it collects velocity data, how it reports (and stores) that data, and, ultimately, the ease with which it can be positioned and operated. However, it’s not a perfect system. A majority of the complaints come from users whose LabRadars sometimes fail to record all the shots fired in a string. For the average plinker, this may not be an issue. But for serious shooters trying to do ladder tests or load development requiring all shots to be reported, it can be frustrating when a shot is missed.
Traditionally, LabRadar has recommended trying different settings that compensate for the gap between the unit and muzzle as well as well as having different options for how the unit recognizes a shot fired. While these options work to some degree, they aren’t a guaranteed fix especially when shooting at ranges with concrete baffles or with roofs, walls, and dividers that can alter sound waves. While nobody can precisely explain why shots are lost under certain circumstances, the fact remains it DOES happen. In addition, the default system can sometimes pick up stray shots from nearby rifles.
Not willing to give up on this sophisticated chronograph, many shooters have looked for a foolproof way to prevent such failures from happening. In fact, for this shooter, the frustration was so high that I actually sold my first LabRadar and went back to another chronograph before ultimately buying another LabRadar almost a year later. But I made that repeat purchase only after vowing to finding a way to make the LabRadar work — EVERY time, for EVERY shot.
See How JKL Inertial Trigger Works in this Video
JKL Inertial Trigger — Outstanding Product That Works Great
Enter the JKL Gen 2 Trigger for the LabRadar. This is an easy-to-use, inertial-driven trigger that activates simply from the recoil of your gun. The unit consists of a small rectangular pad attached to a long audio cable. All you do is plug in the audio cable, attach the pad to your gun with the provided hook and loop (Velcro) material. Then (important), you must change the LabRadar trigger settings from “Doppler” to “Trigger”. The unit works great and is easy to set up. In my experience, the unit will activate no matter where you place it on a stock. However the recoil of every gun is slightly different, so you will need to make sure you find a location that doesn’t interfere with your shooting setup.
An unexpected benefit of using the JKL trigger is that it gives you a larger area in which to place your Labradar unit, making it more convenient to setup on benches or range stations. I found this a welcome relief since the LabRadar originally seemed somewhat fussy about where I placed it. Now I can place the LabRadar in more convenient locations — as long as it’s still near my gun and pointed at the target correctly, I get consistent bullet speed data.
Are There Issues with “False Positives”?
If there is any downside to using the JKL Inertial Trigger, it’s that a very hard bump or aggressive working of the action can trigger a false reading. However these are easy to identify in your data, because the speed value is way lower than true fired shot values. Simply remove that low entry or otherwise ignore it in your calculations. To be fair, this “bump activation” really doesn’t happen very often once you get used to using the inertial trigger.
SUMMARY — Outstanding Accessory for LabRadar Users
Bottom line — if you own a LabRadar, then definitely get a JKL Inertial Trigger. Priced at just $35.00 this device is not expensive, yet it’s one of the most effective accessories you can buy for the LabRadar. I’ve recommended these inertial triggers to dozens of shooters. Every one of those guys who did buy a JKL trigger says they can’t imagine using a LabRadar without one. If you love what the LabRadar can do, but have been frustrated with shots not getting recorded 100% of the time, then definitely get yourself a JKL Inertial Trigger. It turns a good system into an amazing system. JKL Industries states that its inertial trigger “will work on anything from a .22 LR to a suppressed system or with standard rifle and brake.”
Emil Praslick III is widely recognized as one of the greatest wind wizards on the planet — a master at identifying wind value and direction, and predicting wind cycles. As coach of the USAMU and top civilian teams, Emil has helped win many high-level championships. In the three videos we feature today, Emil, who works with Capstone Precision Group (Berger, Lapua, SK, Vihtavuori) and Team Applied Ballistics, explains how to determine wind direction and velocity using a variety of indicators. Praslick, now retired from the U.S. Army, was an 18-time National and 2-time World Champion coach with the USAMU.
Video ONE: Wind Theory Basics — Understanding “Wind Values”
In this video from UltimateReloader.com, Emil explains the basics of modern wind theory. To properly understand the effect of the wind you need to know both the velocity of the wind and its angle. The combination of those variables translates to the wind value. Emil also explains that the wind value may not be constant — it can cycle both in speed and velocity. Emil also explains some of the environmental conditions such as mirage that can reveal wind conditions.
Video TWO: Determining the Direction of the Wind
Key Point in Video — Find the Boil
Emil explains how to determine wind direction using optic. The method is to use spotting scope, riflescope, or binoculars to look for the “Boil” — the condition in mirage when the light waves rising straight up. The wind will generate that straight-up, vertical boil in your optics when it is blowing directly at you, or directly from your rear. To identify this, traverse your scope or optics until you see the boil running straight up. When you see that vertical boil, the direction your optic is pointing is aligned with the wind flow (either blowing towards you or from directly behind you).
Video THREE: The No Wind Zero Setting
In this second video, Emil defines the “No-Wind Zero”, and explains why competitive shooters must understand the no-wind zero and have their sights or optics set for a no-wind zero starting point before heading to a match. In order to hit your target, after determining wind speed and direction, says Emil, “you have to have your scope setting dialed to ‘no wind zero’ first.”
Coach of Champions — Emil Praslick III
SFC Emil Praslick III, (U.S. Army, retired) works with Berger Bullets and Applied Ballistics. Emil served as the Head Coach of the U.S. National Long Range Rifle Team and Head Coach of the USAMU for several years. Teams coached by Emil have won 33 Inter-Service Rifle Championships. On top of that, teams he coached set 18 National records and 2 World Records. Overall, in the role of coach, Praslick can be credited with the most team wins of any coach in U.S. Military history.
He who dies with the most toys wins — right? Well Sinclair has another interesting gadget you can add to your reloading bench. The Sinclair Case Neck Sorting Tool lets you quickly sort brass by neck-wall thickness. For those who shoot “no-turn” brass, this can improve neck-tension consistency. Large variances in neck-wall thickness can cause inconsistent neck “grip” on the bullet. Generally, we’ve found that more consistent neck tension will lower ES and (usually) improve accuracy. We know some guys who shoot no-turn 6mmBR brass in competition with considerable success — but their secret is pre-sorting their brass by neck-wall thickness. Cases that are out-of-spec are set aside for sighters (or are later skim-turned).
Watch Case Neck Sorting Tool Operation in Video
How the Case Neck Sorting Tool Works
Here’s how the Sinclair tool works. Cases are rotated under an indicator tip while they are supported on a case-neck pilot and a support pin through the flash hole. The unit has a nice, wide base and low profile so it is stable in use. The tool works for .22 through .45 caliber cases and can be used on .17- and .20-caliber cases with the optional carbide alignment rod. The MIC-4 pin fits both .060 (PPC size) and .080 (standard size) flash holes. Sinclair’s Case Neck Sorting Tool can be ordered with or without a dial indicator. The basic unit without dial indicator (item item 749006612) is priced at $59.99. You can also buy the tool complete with dial indicator (item 749007129) for $89.99. IMPORTANT: This sorting tool requires caliber-specific Case Neck Pilots which must be ordered separately.
Editor’s Comment: The purpose of this Sinclair tool is rapid, high-quantity sorting of cartridge brass to ascertain significant case-neck-wall thickness variations. Consider this a rapid culling/sorting tool. If you are turning your necks, you will still need a quality ball micrometer tool to measure neck-wall thickness (to .0005) before and after neck-turning operations.
Are you a do-it-yourself kind of guy with a creative eye? Then you’ll love the FREE Target Generator from the folks at ShooterShed.com. This FREE, interactive webpage allows you to design a variety of fun targets, including grids, benchrest-type Score/Group Shooting targets, sight-in targets, and even playing card targets. Choose the paper size and orientation (vertical or horizontal), then select the number of target elements on the page. For example, you could have four (4) bulls or a dozen playing cards. Then click the Style TAB to choose your target style. Use the OPTIONS TAB to overlay a grid on the target, choose squares or diamonds, or include load information blocks. For bullseye targets, you can control the number, color, and spacing (diameter) of the rings. LINK to TARGET GENERATOR.
QWIK TIP: For Super-Quick Target Creation, click the “Target Style” tab, then select a design from the list on the left. Then go to OPTIONS.
Click the TARGET STYLE TAB to select one of many target styles, including NBRSA Benchrest targets and 20+ types of NRA bullseye targets, scaled to distance:
Benchrest
Bullseye
Shapes
NRA High Power
NRA Pistol
NRA Rimfire
Images
Playing Cards
Load Test Blocks
Creating new targets is fast and easy. No computer graphics skills required! We created this green diamonds grid target in just five minutes using the ShooterShed Target Generator:
And here is a handy target with short-range range Benchrest competition-style box/circle aiming points, along with fields for entry of gun/load data:
The program provides a preview of each target you generate. There are controls to choose border and fill colors. If you like a particular design, save the file, and then print as many targets as you want. Check it out, this program is fun and handy to use. Here are four (4) targets your Editor created just for this article. With a bit of practice, you can be generating your own custom targets in minutes.
About the Creator of the Target Generator
The Target Generator program was created by Rod Brown of Sheridan, Wyoming. Rod tells us: “I build custom rifles and coach shooters. I’ve got a 100-yard range out my back door. I shoot short- and long-range benchrest competitively around the country. I’m a full-time software development consultant and an FFL holder. When I’m not developing custom software for my clients, I’m usually fiddling in the shop, building a custom benchrest rifle, traveling to a match, chambering a barrel, or reloading some ammunition.
Story tip from Boyd Allen. We welcome reader submissions.
Want to improve your understanding of Ballistics, Bullet Design, Bullet Pointing, and other shooting-related tech topics? Well here’s a treasure trove of gun expertise. Applied Ballistics offers dozens of FREE tech articles on its website. Curious about Coriolis? — You’ll find answers. Want to understand the difference between G1 and G7 BC? — There’s an article about that.
“Doc” Beech, technical support specialist at Applied Ballistics says these articles can help shooters working with ballistics programs: “One of the biggest issues I have seen is the misunderstanding… about a bullet’s ballistic coefficient (BC) and what it really means. Several papers on ballistic coefficient are available for shooters to review on the website.”
Credit Shooting Sports USA Editor John Parker for finding this great resource. John writes: “Our friends at Applied Ballistics have a real gold mine of articles on the science of accurate shooting on their website. This is a fantastic source for precision shooting information[.] Topics presented are wide-ranging — from ballistic coefficients to bullet analysis.”
Here are six (6) of our favorite Applied Ballistics articles, available for FREE to read online. There are dozens more, all available on the Applied Ballistics Education Webpage. After Clicking link, select Plus (+) Symbol for “White Papers”, then find the article(s) you want in the list. For each selection, then click “Download” in the right column. This will send a PDF version to your device.


 Summer Solstice is just two weeks away, so most parts of the country will soon be encountering peak summer heat. Some ranges in the Western states have already recorded temperatures well over 100 degrees F during matches. When dealing with extreme summer heat, you should make a serious effort to keep your ammo at reasonable temperatures. When possible, keep ammo in a cooler in the shade.


 The Benefits of Dry-Fire Training


 He who dies with the most toys wins — right? Well Sinclair has another interesting gadget you can add to your reloading bench. The Sinclair


