CCI and Federal Premium are both brands of Vista Outdoor. Most CCI rimfire is produced in Idaho, while other Federal-branded rimfire ammo is produced in Federal’s Anoka, Minnesota facilities. Here we feature videos from both CCI and Federal ammo plants. Watch and learn how rimfire ammo is made.
Field & Stream Tours Federal Ammo Plant in Minnesota
A reporter for Field & Stream recently got a chance to tour the Federal ammunition production facility in Anoka, Minnesota. This large plant produces both rimfire and centerfire ammunition. While touring the plant, the reporter was allowed to capture video showing the creation of .22 LR rounds from start to finish. This is a fascinating video, well worth watching.
Note to Viewers — After Starting Video, Click Speaker Icon to HEAR audio!
This revealing video shows all phases of .22 LR ammo production including cupping, drawing, annealing, washing, drying, head-stamping, priming, powder charging, bullet seating, crimping, waxing, inspection, and final packaging. We recommend you watch the video from start to finish. You’ll definitely learn some new things about rimfire ammo.
.22 LR Ammo Production at CCI Ammo Plant in Idaho
Back in 2016, YouTuber 22Plinkster was able to tour the CCI Ammo plant in Lewiston, Idado. Here is the rimfire production video he produced.
The Manufacturing Process for .22 LR Rimfire Ammunition Shooting Sports USA explains: “Rimfire cartridge cases are the oldest self-contained cartridge in existence, having been in continuous production since the mid-1850s. Rimfire cases are drawn from a thin piece of brass and formed with a hollow rim. A priming compound is then forced into the case using centrifugal force, where it is charged with powder and a bullet is seated in the mouth of the case. The case is then crimped around the bullet to ensure sufficient push and pull when the round is fired. When the firing pin strikes the thin brass rim of the case, the hollow rim is crushed and the primer is ignited.” Source: SSUSA.org 9/2/2017.
Will you be traveling (with firearms) to other states this fall? Are you concerned about the laws that might apply when you are transporting guns across state lines? Or are you puzzled about the requirements for obtaining a carry permit in your own state? If you have any of these questions, you should definitely get expert guidance on State statutes and regulations controlling firearms. To do that, you can purchase Attorney Scott Kappas’s Traveler’s Guide to the Firearms Laws of the 50 States for just $10.00 on Amazon (or $19.95 from publisher). The latest 2023 edition includes 100+ updates since last year. In addition, there are multiple new and expanded sections for 2024.
If you don’t want to spend the money on the book, there is a FREE alternative. There’s a very helpful set of State Law Summaries on the web, presented by PewPewTactical.com. Despite the silly name, the PewPewTactical website has an abundance of information that is particularly beneficial for pistol shooters and CCW holders.
One of the best features of PewPewTactical.com is the Gun Laws by State online reference guide. We looked through four of these State Law Summaries and were impressed by the depth of the coverage. But we caution — if you have specific legal questions, particularly with recently-enacted statutes, you should consult a licensed attorney for your state (or the state to which you will travel). In addition, many of the State Law Summaries have not been updated for 3-5 YEARS! But they are still a good place to start. Below are links to state law articles from PewPewTactical.com. To access any State summary, simply click the State name below:
How and Why to Create a Dummy Round
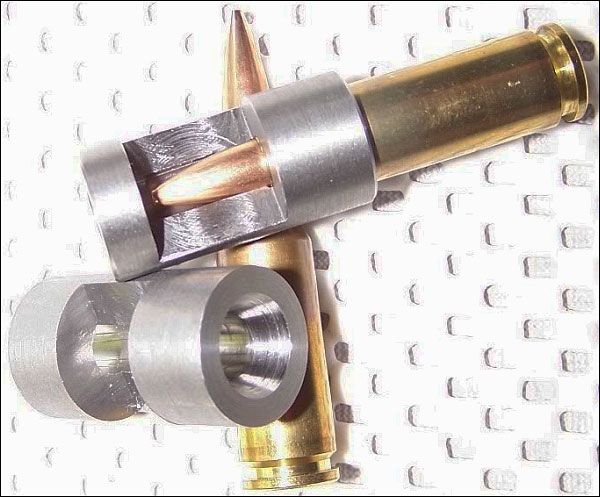
When you have a new custom rifle built, or a new barrel fitted to an existing rifle, it makes sense to create a dummy round. This should have your preferred brass and bullet types, with the bullet positioned at optimal seating depth. A proper dummy round helps the gunsmith set the freebore correctly for your cartridge, and also ensure the proper chamber dimensions.
Respected machinist, tool-maker, and gunsmith Greg Tannel of Gre-Tan Rifles explains: “I use the dummy round as a gauge to finish cut the neck diameter and throat length and diameter so you have [optimal] clearance on the loaded neck and the ogive of the bullet just touches the rifling.” He recommends setting bullet so the full diameter is just forward of the case’s neck-shoulder junction. “From there”, Greg says, “I can build you the chamber you want… with all the proper clearances”.
Greg Tannel has created a very helpful video showing how to create a dummy round. Greg explains how to measure and assemble the dummy and how it will be used during the barrel chambering process. Greg notes — the dummy round should have NO Primer and No powder. We strongly recommend that every rifle shooter watch this video. Even if you won’t need a new barrel any time soon, you can learn important things about freebore, leade, and chamber geometry.
Must Watch Video — This has been viewed over 790,000 times on YouTube:
This has been a very popular video, with 782,000 views! Here are actual YouTube comments:
That is the best explanation I’ve ever seen. Thank you sir. — P. Pablo
Nice video. You do a very good job of making this easy for new reloaders to understand. I sure wish things like this were available when I started reloading and having custom rifles built. Once again, great job, and your work speaks for itself. — Brandon K.
Beautiful job explaining chambering clearances. — D. Giorgi
Another Cool Tool — The Stub Gauge
When you have your gunsmith chamber your barrel, you can also have him create a Stub Gauge, i.e. a cast-off barrel section chambered like your actual barrel. The stub gauge lets you measure the original length to lands and freebore when your barrel was new. This gives you a baseline to accurately assess how far your throat erodes with use. Of course, as the throat wears, to get true length-to-lands dimension, you need take your measurement using your actual barrel. The barrel stub gauge helps you set the initial bullet seating depth. Seating depth is then adjusted accordingly, based on observed throat erosion, or your preferred seating depth.
We first ran this article in 2012, and it was very well received. Since then, many Forum members have requested an explanation of MILS and mildots, so we decided to run this feature again…
1 Milliradian (Milrad or ‘Mil’) = 1/1000th of a radian | 1 Milliradian = 0.0573 degrees.
In this NSSF Video, Ryan Cleckner, a former Sniper Instructor for the 1st Ranger Battalion, defines the term “MilliRadian” (Milrad) and explains how you can use a mildot-type scope to range the distance to your target. It’s pretty simple, once you understand the angular subtension for the reticle stadia dots/lines. Cleckner also explains how you can use the milrad-based reticle markings in your scope for elevation hold-overs and windage hold-offs.
Even if you normally shoot at known distances, the hold-off capability of milrad-reticle scopes can help you shoot more accurately in rapidly-changing wind conditions. And, when you must engage multiple targets quickly, you can use the reticle’s mil markings to move quickly from one target distance to another without having to spin your elevation turrets up and down.
WEB RESOURCES: If you want to learn more about using Milliradians and Mildot scopes, we suggest the excellent Mil-dot Explained article from targettamers.com Guide. This covers the basics you need to know, with clear illustrations.
Also informative is The Truth about Mil Dots by Michael Haugen. Mr. Haugen begins with basic definitions: 360 degrees = 2 x Pi (symbol π) Radians. That means 1 Radian is about 57.3 degrees. 1 Milliradian (Milrad or ‘Mil’) = 1/1000th of a radian. Thus 1 Milliradian = .0573 degrees.
AR-platform rifles can be maintenance-intensive beasts. But some AR owners make the situation worse by not regularly cleaning important small parts, or by using too much oily/greasy lubricants in the wrong places. A properly maintained and lubricated AR15 can shoot hundreds of rounds (between cleanings) without a problem. If you learn where (and where not) to apply lubricant, you’ll find that your AR will run more reliably and the task of cleaning the bolt and bolt carrier will be less of a burden.
Here is a good video that explains AR-15 Cleaning and Maintenance. In this 30-minute NSSF video, Gunsite Academy instructor and gunsmith Cory Trapp discusses the proper way to clean and maintain the AR-15 carbine. Very knowledgeable, Trapp provides rock-solid advice for AR owners. Along with cleaning procedures, this video explains how to inspect key components and how to function-test your AR before each shooting session.
If you want to keep your black rifle running smoothly and reliably, you must clean it regularly and follow the correct maintenance procedures. Here’s another good video that explains how to properly disassemble and clean AR-platform rifles.
Take-Down and Full Cleaning of AR15 by Jerry Miculek
Here ace shooter Jerry Miculek takes down and cleans an AR-platform rifle belonging to his daughter Lena. This is a good video because Lena’s rifle was “run hard and packed up dirty” so you can see where carbon and grease build up. This 35-minute video is very thorough. Jerry is one of the nation’s top action carbine shooters, so listen carefully to his advice on cleaning and lubrication.
A good riflescope is essential for many types of competition, and the vast majority of hunters have scoped rifles. Some F-Class and benchrest competitors are now using optics with up to 60X magnification. Over the past 30 years, scopes have continued to evolve with improved glass, more reticle types, vastly increased elevation travel, bigger main tubes, FFP and SFP options, and even built-in electronics.
When shopping for a riflescope, it’s useful to understand how scopes work — how the internal mechanisms control windage and elevation, how parallax controls work, and how magnification levels are controlled.
Basics of How Riflescopes Work
This Burris video (above) covers the key aspects of scope function: zoom magnification, windage control, elevation control, parallax control (front or side mount), and ocular lens focus. There are some tips on getting a new scope running smoothly — it’s wise to rotate the power control a few times as well as both windage and elevation knobs. The video below also explains how to set ocular focus controls optimally.
Scope Break-In Methods and Diagnosing Issues — Great Video
We recommend that all serious shooters watch this video start to finish. A very knowledgeable scope engineer, Leupold’s Mike Baccellieri, explains the fine details of scope operation — with very useful recommendations on how to ready a new scope for use (See 36:50 time-mark). With a new optic he advises to run the controls multiple times to full travel. Also, take your time to get the diopter control just right (See 26:40 time-mark).
The video also explains why, with a new scope or one that hasn’t been used much, it is sometimes effective to rotate the elevation PAST the desired setting then come back a click (See 35:40 time-mark). In addition, near the end of the video, the expert explains how you can use a mirror to determine if the scope mount (base and/or rings) is NOT aligned with the bore axis, forcing excess travel to get on target (See 42:00 time-mark). We have seen this caused by scope rails attached slightly off axis.
Large diameter turrets make windage and elevation markings easier to see, and the click “feel” may be more noticeable given the greater diametrical travel between clicks.
First Focal Plane (FFP) vs. Second Focal Plane (SFP)
The main visual difference between First Focal Plane (FFP) and Second Focal Plane (SFP) scopes is the appearance of the reticle (and its hash marks) at different magnification levels. With a FFP scope, the reticle increases in visible size (and line thickness) with increased magnification. This is so the angular hash marks remain constant (in Mils or MOA angular span) at all magnification levels. So, on a 10-30X FFP scope, a 0.1 Mil hash mark represents the SAME angular measurement at 10X, 20X, or 30X (or any magnification). The downside of the FFP system is that the reticle lines can appear very thick at high magnification. But for a PRS/NRL match, with targets at multiple distances, it is important that the hash marks represent the same angular measurement at all power settings.
On a Second Focal Plane (SFP) scope, by contrast, the reticle lines (and hash marks) appear visually (in thickness) the same at all magnification levels. This means the hash mark divisions will only be precise at one magnification level, as designed by the manufacturer. For example, you could have exact 1 MOA Hash marks at 10X. But zoom the scope to 20X and the same reticle hash mark would then cover 2 MOA. SFP scopes are popular with competition shooters who shoot at specific known distances. Not having thick reticle lines at 25X to 50X is an advantage when aiming at precise benchrest and F-Class targets.
ZEISS now makes excellent FFP Scopes with both MOA and Milrad options
Minute of Angle (MOA) vs. Milliradian (MILRAD or MIL)
This video also explains MOA vs. MRAD (Milliradian) controls. A Minute of Angle (MOA) is an angular measurement that represents 1.047″ at 100 yards. Modern MOA scopes are typically configured with 1/4 MOA or 1/8 MOA clicks. A Milliradian (MRAD) is another angular measurement defined as one-thousandth of a radian. Milrad scopes are commonly configured with 0.1 Milrad clicks. How much is a 0.1 mil at 100 yards? One mil equals 3.6 inches at 100 yards; therefore, 1/10th of that, 0.1 Mil, equals 0.36” – roughly a third of an inch – at 100 yards. That’s pretty close to the common quarter-inch (1/4 MOA) increment found on MOA riflescopes.
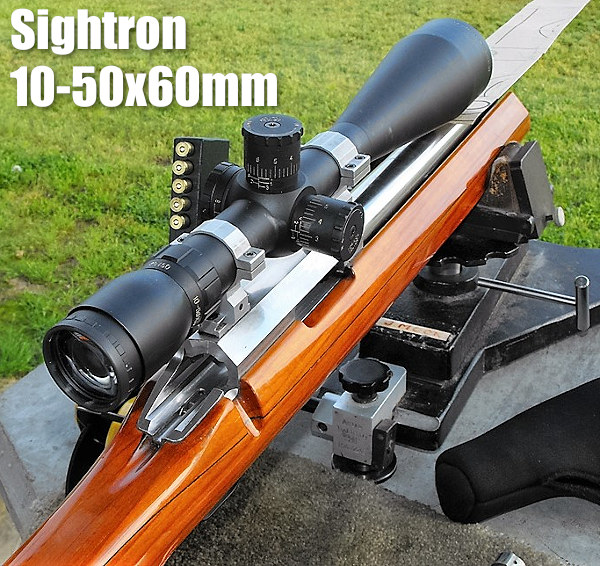
Sightron makes excellent high-magnification SFP zoom scopes favored by many competitors. These have proven quite reliable and offer very good performance for the price.
Scope Mounting Method and Alignment
When mounting a scope, you want to make sure the scope is aligned properly, so that vertical travel is precisely up and down, not offset. Begin by supporting the rifle with a good front and rear rest. Use a portable level to ensure the rifle is not tilting slightly left or right around the barrel bore axis. Then you want to align your scope’s vertical axis. For this, we recommend setting up a plumb bob — a weighted line that hangs straight down. This can be set up indoors or outdoors. Align your reticle’s vertical axis precisely with the plumb bob line, making sure not to move the rifle.
One caution — we have seen some riflescopes that are internally off-axis by up to 4 degrees. In this case, you can align the reticle’s vertical axis with the plumb bob line but then find that your turrets are slightly titled. That is a scope manufacturing fault that will result in some error when you input a large click value (e.g. 10+ MOA up or down).
When mounting your scope, another key factor to consider is the eye relief — the distance of the rear “ocular” lens to your eye. When mounting the scope, put your head in the position at which you normally shoot. NOTE: As your optimal head position may be quite a bit different when shooting prone vs. shooting from a bench, you may want to adjust the scope placement for different shooting positions. This Editor had to move his comp rifle scope about an inch rearward when local club matches changed from prone to bench.
Sherri Jo Gallagher, the second woman in history to win the NRA High Power National Championship, sports Eye Protection at Camp Perry. The first lady High Power Champion was Sherri’s mother, Nancy Tompkins.
In response to a Bulletin article about Protective Eyewear, one of our Canadian readers posted a personal story. His account demonstrates the importance of wearing eye protection whenever you shoot — no matter what type of firearm you are using — even air rifles. We hope all our readers take this to heart. All too often at rifle matches we see shooters, even some top competitors, risking their vision by failing to wear eye protection.
Eye and Hearing Protection are now MANDATORY for Highpower Rifle competitors and Pistol shooters in all CMP-affiliated matches. The 2020 CMP Highpower Rifle, Pistol, and CMP Games Rulebooks all contain the following rule: “All competitors and competition officials are required to wear appropriate eye and hearing protection when on shooting range firing lines during highpower rifle or pistol firing. All competitors must comply with this requirement before they can participate in a CMP sponsored or sanctioned competition. Competitors are responsible for selecting their eyewear and hearing protection.”
Eye Protection — Lesson Learned by Nicholas from Canada
As a boy on a mixed farm on the plains the first shooting stick I owned was a Red Ryder BB gun. My Dad bought it for me as I showed a keen interest in the shooting and hunting sports. I was about 9 years old at the time.
We had literally thousands of sparrows in our large farm yard and they liked to roost on the steel railings in the barn loft. I took to slowly thinning out their ranks by flashlight at night as these little winged pests settled in the farm buildings.
One evening as I slayed sparrow after sparrow in the barn loft — with about a dozen farm cats following me to consume these easy meals, I fired at another bird centered in my flashlight beam.
However, my aim was a bit low — and the copper pellet hit the steel beam square on. Instantly I felt a sharp pain as the BB bounced back and hit me squarely between the eyes on the bridge of my nose – drawing blood from the partial penetration into the skin. A half inch either way and I’d have lost an eye!
Never, never, never shoot at any target with a steel background with any firearm, even a BB gun – is the hard lesson I learned, and wear the best shooting glasses that money can buy!
PLEASE REMEMBER THAT!!
Editor’s Comment: Among competitive pistol shooters, the use of safety eyewear is universal. You’ll never see Rob Leatham, Julie Golob, or Jerry Miculek competing without eye protection — for good reason. The handgun sports’ governing bodies effectively enforce mandatory eye protection policies. We wish the same could be said for competitive rifle shooting. We often see benchrest, High Power, and F-Class competitors shooting without eye protection. We’ve heard all the excuses, yet none of them trump the safety considerations involved.
We recommend that all shooters and hunters employ eye protection whenever they use firearms or are at a location where live fire is taking place. You only have two eyes. A tiny bullet fragment or ricochet is all it takes to cause permanent blindness in one or both eyes. As rifle shooters, we place our eyes a couple inches away from a combustion chamber operating at pressures up to 70,000 psi. I know quite a few guys who will religiously put on safety glasses when running a lathe or a drill press, yet the same guys won’t use eye protection when shooting their rifles — simply because it is “inconvenient”. That’s nuts. It doesn’t matter is you are a cub scout or a multi-time National Champion — you should wear eye protection.
I will give you a personal example. A year ago I was shooting a 9mm pistol. One of the cartridges had a primer burst outward blowing small particles, some brass, and a piece of the pistol’s extractor right back into my eyes. Thankfully I was wearing good wrap-around safety glasses. No injuries at all. But without those safety glasses, this could have been very serious. I always wear safety glasses with ALL firearms. Shown below is the same kind of primer blow-out I experienced, but with a .270 Win rifle cartridge.
Be wise — protect your eyes. To learn more about eyewear safety standards, and to learn about the latest options in ANSI Z87-certified protective eyewear, read our article on Eye Protection for Shooters.
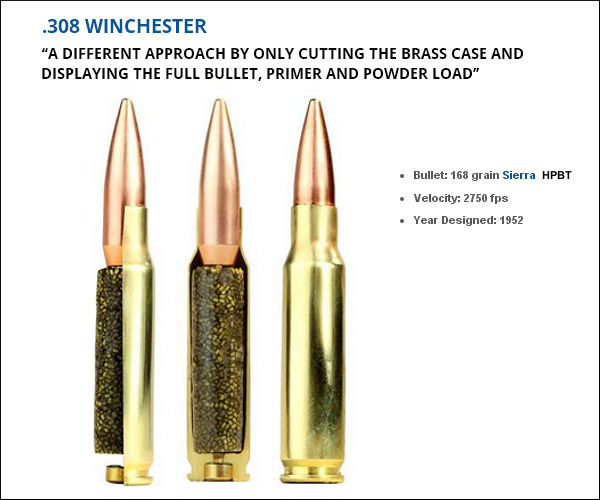
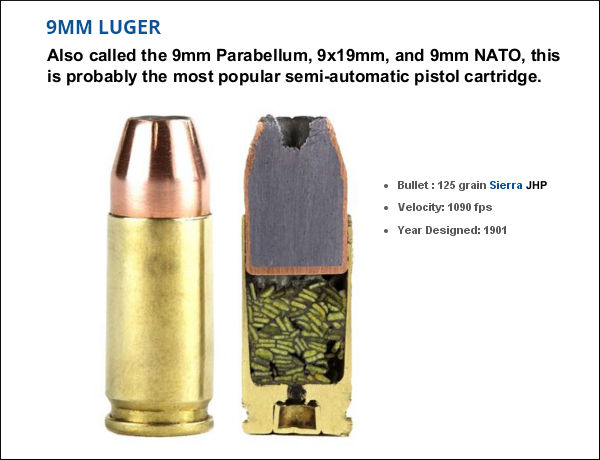
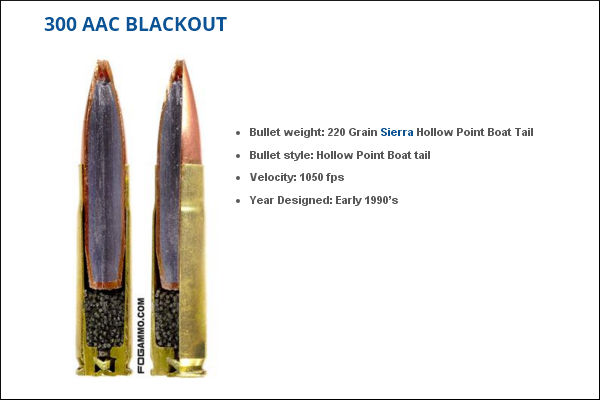
Here’s something you don’t see every day — the inside of loaded cartridges, sliced halfway through. This lets you see how bullet core, jacket, cartridge case, powder, and primer all fit together. Give credit to the folks at FOG Ammunition for creating this interesting series of cut-through ammo images. We show four cartridges here: the .308 Winchester, 9mm Luger, 300 BLK, and .50 BMG. You’ll find two more (the .223 Remington and .45 ACP) at www.FogAmmo.com.
This .308 Winchester model took on a different approach by only cutting the brass case and displaying the full bullet, primer and powder load. A spec amount of powder was used to create the model powder form. An estimated 10% volume was added during the forming process, along with an undetermined amount of air pockets.
This bisection is a 9mm Luger Jacketed Hollow Point round with flake powder held together with super glue. After this self-defense round was cut by a trained professional the round was polished by hand. This might look like stick powder, but those are in fact flakes stacked up in cross-section. Designed in 1901 by Georg Luger, this popular cartridge is used by civilians, military, and law enforcement.
For this model of the .300 AAC Blackout (aka 300 BLK), a Dremel tool was used to create a pie cut within the bullet and brass case. A measured amount of power, roughly 65% of spec charge, was placed inside the case with super glue. This cartridge was originally optimized for subsonic use with a suppressor, so the amount of powder used is small relative to the nominal case capacity. That leaves more room for the relatively large .30-caliber bullet.
Last but definitely not least is the .50 Caliber BMG round (aka .50 Browning Machine Gun). Famed for its wartime use in the M2 Machine gun, the .50 BMG round is also used in civilian Long Range competitions. A typical .50 BMG cartridge holds over 225 grains of powder. That’s almost ten times the amount in a 5.56×45 NATO Round! To demonstrate the size of the .50 BMG, check out that .223 Rem for comparison.
This stunning Westley Richards & Co. shotgun was made for the 1981 nuptials of Lady Diana Spencer and HRH Prince Charles. It is rare, has a unique history of ownership, and is also elaborately decorated.
Jim Supica, Director of the NRA Firearms Museum, has written a trio of articles about gun collecting. If you are thinking of starting your own collection of firearms, you should read Supica’s informative articles. The first talks about the basics of gun collecting, the second explains the five key factors that govern gun values, and the third article explains where to find rare and valuable arms. Today we want to highlight the five factors that contribute most to a gun’s value, according to Supica:
Make and Model, Condition, Rarity, History, Art — These are the five factors that … appeal to collectors and help determine the value of collectible guns.
Make and model tends to be the starting point for evaluating collectible guns for most collectors and will be a basic threshold requirement for those with specialized collections.
Factors here include the quality of a particular manufacturer’s products, the historical usage of the guns in question, and the brand’s aura of romance. As an example of that last (and most intangible) factor, consider that Colt Single Action Army revolvers were for several decades the most prevalent focus for collectors interested in full-size revolvers from the post-Civil War to turn of the 20th Century-era, and there is no question that Colts were widely used during that time. In recent years, there has been a refreshing trend in gun collecting to look at a broader range of guns than the traditional blue chip Colts, Winchesters, and Lugers.
Colt Single Action Army Revolvers remain among the most prized (and collectible) firearm.
2. Condition (and Originality)
Obviously, condition plays a major role in the value of a collectible firearm. The classic advice to new collectors in this regard has always been to hold out for guns in the best condition and pay the extra premium they demand. This condition-emphasis seems to have developed in the 1970s and 1980s. In the early post-WWII years of gun collecting there was more interest in rare variations and history, and fewer collectors to whom a few percentage point difference in remaining original finish was of much concern.
Although the highest-condition guns continue to bring record prices, it seems that the pendulum is beginning to swing back the other way, a trend met with my hearty approval. The appeal of “mint” guns has been largely lost on me, and seems to be more appropriate to coin or stamp collecting than a field in which the possible historic usage of the artifact holds so much interest and significance. There is a definite segment of the collector market that is not overly concerned with perfect condition, so long as the gun is original and has not been messed with in a more recent (and, in my opinion, usually misguided) attempt to enhance its desirability.
3. Rarity
In terms of rarity, the well-worn saying that “just because a gun is rare doesn’t mean it’s valuable” remains true to a certain extent. There may only be five known examples of a particular gun, but if only three people care about it, the market is saturated. However, there does seem to be more interest in cornering the rare variations within established collecting fields. There is a bit of a resurgence of the collecting philosophy of completing a punchlist of models and variations within a specialization, and this lead to vigorous competition for the rarest examples in these fields. In emerging collecting fields, when new research is published revealing the rarity of certain variations there can develop a brisk interest in those guns.
4. History
Individual guns with a known history of ownership by a specific individual or usage in a specific historical event have always captured the fascination of collectors, as well as historians and the general public. This seems to reflect a basic human interest and shows no sign of abatement. A positive trend here seems to be an increase in general understanding of the type of documentation which must accompany a historically attributed firearm to give it the credibility to justify a premium price, and the importance of creating and preserving such documentation.
This Beretta has extra value because it was owned by pilot Chuck Yeager. Photo NRA Museum.
5. Art (Decorative Embellishment)
Fine engraved guns are collected more for their artistic value than for their worth as firearms. Here the market for classic works by the great engravers of the 19th and early 20th Centuries remains strong, as well as for factory-engraved pieces from more recent years. Interest in recent non-factory engraving seems to have diminished, as has… the trend of adding modern engraving to older firearms.
Here is a matching set of three three beautifully engraved pistols by the late Indiana engraving wizard Ben Shostle — a Luger, a Mauser, and a Colt. Photo courtesy Amoskeag Auction Company.
Factory-custom engraving should not be confused with mass-produced, factory-made commemorative firearms, which flooded the market in the 1960s and 1970s. A couple of major manufacturers worked this genre to death, and prices on commemoratives have been stagnant for many years now, although the market for these shows some signs of renewal.
CAUTIONARY WORDS about RESTORATION
With prices for high-condition original finish guns running away from the budgets of many collectors, period-of-use refinished guns and older factory-refinished guns are finding more enthusiastic buyers than they did a few years ago.
The availability of excellent-quality restoration services is another factor that I anticipate may impact collector preferences in the future. The top restoration artists are reworking guns to “as new” condition with such skill that it has become increasingly difficult for even knowledgeable collectors to distinguish mint original finish guns from the best restorations.
When such restoration is disclosed to a prospective buyer (as it ethically should be), the prices the gun will bring are significantly below a similar gun with original finish, and may be less than the original cost of the pre-restoration gun plus the cost of the rework. This creates a mighty incentive for deception by a motivated seller, either by active misrepresentation (a.k.a. “fraud”) or passively by simple failure to mention the modification.
We like air rifles both for fun shooting and for competition. However, so many options are now available that is easy to get overwhelmed with the choices. Thankfully, there is a good book that helps air rifle shooters make informed decisions about air guns and accessories. Steve Markwith’s comprehensive resource, Air Rifles: A Buyer’s and Shooter’s Guide offers a wealth of useful information. This 154-page book is now available for $14.48 (paperback) or $9.95 (Kindle)..
“This is a very informative book explaining the ins and outs of air rifles, their capabilities and limitations. I highly recommend this book to anyone considering purchasing an air rifle for marksmanship practice or small game hunting.” – L. Stanek, Verified Amazon Reviewer
Read Free Sample Chapters Online
If you go to Amazon.com and look right below the book cover photo, you’ll see a “READ SAMPLE” button. Click that to view a FREE preview with extensive samples from many chapters. The book covers all the most important types of air rifle systems, both pre-charged pneumatics and other self-charging guns. Markwith reviews the wide variety of pellets available, offering suggestions for particular applications. You’ll also find a useful discussion of Airgun Power, Range, and Accuracy. This will help you pick the right air rifle.
Markwith explains the many attractions of airguns. They are not considered firearms (in most jurisdictions) so they can be purchased at local shops or mail-order outlets without FFL fees or background checks. You’ll find a huge online selection of airguns at PyramydAir.com that can ship direct to you — no FFL required. Air rifles are also quiet and very inexpensive to shoot. While .177 and .22 caliber air rifles are most common, there are also larger-caliber airguns offered for hunting or special applications.
Pyramyd Air has dozens of helpful videos about air rifles and air pistols.



 In this NSSF Video, Ryan Cleckner, a former Sniper Instructor for the 1st Ranger Battalion, defines the term “MilliRadian” (Milrad) and explains how you can use a mildot-type scope to range the distance to your target. It’s pretty simple, once you understand the angular subtension for the reticle stadia dots/lines. Cleckner also explains how you can use the milrad-based reticle markings in your scope for elevation hold-overs and windage hold-offs.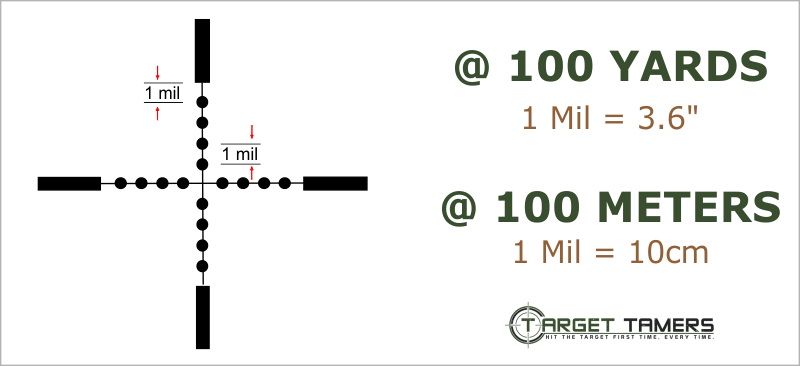





 In response to a Bulletin article about
 Eye Protection — Lesson Learned
 Editor’s Comment: Among competitive pistol shooters, the use of safety eyewear is universal. You’ll never see Rob Leatham, Julie Golob, or Jerry Miculek competing without eye protection — for good reason. The handgun sports’ governing bodies effectively enforce mandatory eye protection policies. We wish the same could be said for competitive rifle shooting. We often see benchrest, High Power, and F-Class competitors shooting without eye protection. We’ve heard all the excuses, yet none of them trump the safety considerations involved.