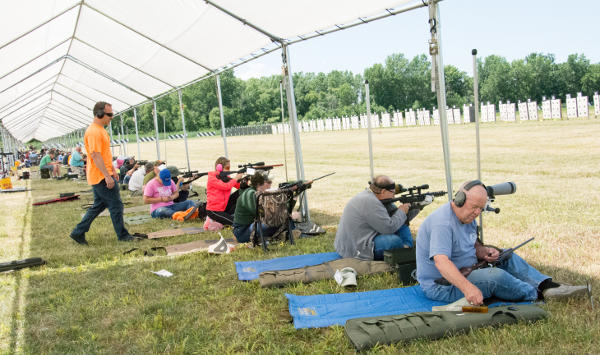
“A bullet launched at a higher altitude is able to fly slightly farther (in the thinner air) for every increment of downward movement. Effectively, the bullet behaves as if it has a higher ballistic coefficient.”
It’s hunting season, and we have a friend who wants to go the high country of Colorado to pursue elk. He recently zeroed his rifle in California, at a range just a few hundred feet Above Mean Sea Level (AMSL). He wondered if the higher altitude in Colorado could alter his ballistics. The answer is a definite yes. However the good news is that free ballistics calculators can help you plot reliable drop charts for various shooting locations, high or low.
The question has been posed: “What effect does altitude have on the flight of a bullet?” The simplistic answer is that, at higher altitudes, the air is thinner (lower density), so there is less drag on the bullet. This means that the amount of bullet drop is less at any given flight distance from the muzzle. Since the force of gravity is essentially constant on the earth’s surface (for practical purposes), the bullet’s downward acceleration doesn’t change, but a bullet launched at a higher altitude is able to fly slightly farther (in the thinner air) for every increment of downward movement. Effectively, at higher altitudes, the bullet behaves as if it has a higher ballistic coefficient.
Forum member Milanuk explains that the key factor is not altitude, but rather air pressure. Milanuk writes:
“In basic terms, as your altitude increases, the density of the air the bullet must travel through decreases, thereby reducing the drag on the bullet. Generally, the higher the altitude, the less the bullet will drop. For example, I shoot at a couple ranges here in the Pacific Northwest. Both are at 1000′ AMSL (Above Mean Sea Level) or less. I’ll need about 29-30 MOA to get from 100 yards to 1000 yards with a Berger 155gr VLD at 2960 fps. By contrast, in Raton, NM, located at 6600′ AMSL, I’ll only need about 24-25 MOA to do the same. That’s a significant difference.
Note that it is the barometric pressure that really matters, not simply the nominal altitude. The barometric pressure will indicate the reduced pressure from a higher altitude, but it will also show you the pressure changes as a front moves in, etc. which can play havoc w/ your calculated come-ups. Most altimeters are simply barometers that read in feet instead of inches of mercury.”
As Milanuk states, it is NOT altitude per se, but the LOCAL barometric pressure (sometimes called “station pressure”) that is key. The two atmospheric conditions that most effect bullet flight are air temperature, and barometric pressure. Normally, humidity has a negligible effect. It’s important to remember that the barometric pressure reported on the radio (or internet) may be stated as a sea level equivalency. So in Denver (at 6,000 feet AMSL), if the local pressure is 24″, the radio will report the barometric pressure to be 30″. If you do high altitude shooting at long range, bring along a Kestrel, or remember to mentally correct the radio station’s pressure, by 1″ per 1,000 feet.
Trajectory of Bullet fired at Sea Level
Trajectory of Bullet fired at 20,000 feet
You can do your own experimental calculations using JBM Online Ballistics (free to use). Here is an extreme example, with two printouts (generated with Point Blank software), one showing bullet trajectory at sea level (0′ altitude) and one at 20,000 feet. For demonstration sake, we assigned a low 0.2 BC to the bullet, with a velocity of 3000 fps.
To learn more about all aspects of Exterior Ballistics, Hornady has a useful discussion of External Ballistics including the effects of altitude and temperature. To dig deeper, Sierra Bullets has a comprehensive Exterior Ballistics Resource Page with multiple sections from the Sierra Manual (4th and 5th Editions), including:
Example from Section 3.0: “When a bullet flies through the air, two types of forces act on the bullet to determine its path (trajectory) through the air. The first is gravitational force; the other is aerodynamics. Several kinds of aerodynamic forces act on a bullet: drag, lift, side forces, Magnus force, spin damping force, pitch damping force, and Magnus cross force. The most important of these aerodynamic forces is drag. All the others are very small in comparison when the bullet is spin-stabilized.”
Over 22 million carry permits have been issued in the United States according to a recent study. Overall 8.5% of American adults now have carry permits. Along with CCW permit holders, millions of other gun owners may carry defensive pistols in “open carry” states. Carrying a defensive pistol is a big responsibility. That’s why all those who carry handguns for self-protection should definitely practice regularly. For many, pistol practice is an indoor experience. Indoor ranges are most convenient for those who live near urban centers, where the biggest threats to public safety currently exist. This article covers indoor firearms training and the proper procedures you should follow at indoor ranges.
This Video Covers Basic Gun Range Safety Rules and Etiquette
FIVE IMPORTANT SAFETY PROCEDURES for Indoor Ranges
1. Follow the Three Fundamental Rules for Safe Gun Handling
ALWAYS keep the gun pointed in a safe direction. ALWAYS keep your finger off the trigger until ready to shoot. ALWAYS keep the gun unloaded until ready to use.
2. Follow ALL Range Officer Instructions
ROs are the first and final authority on any range and their decisions are generally final. Arguing with a Range Officer may just get you thrown out.
3. Don’t Bother Others or Touch Their Guns
Respect other shooters’ privacy unless a safety issue arises. Do NOT engage other shooters to correct a perceived safety violation unless absolutely necessary – inform the RO instead. NEVER handle or touch another shooter’s firearm without their permission!
4. Know Your Range’s Rules
Review and understand any and all range rules and requirements/expectations. For example, what is the range’s maximum rate of fire? Are you allowed to collect your brass?
5. Know What To Do During a Cease Fire
IMMEDIATELY set down your firearm, pointed downrange, and STEP AWAY from the shooting booth (or bench). Range Officers do not want shooters trying to “secure/unload” their firearms in a cease fire situation — they want the shooters separated from their guns instantly.
Double-Up on Hearing Protection When Shooting Indoors
Howard Leight states that Impact Pro muffs are “designed for handgun and pistol shooters looking for high NRR … for indoor ranges, covered ranges or other extremely loud shooting environments.”
When shooting indoors we recommend quality muffs with earplugs underneath, offering double protection. When inside an enclosed range, with other shooters blasting away right next to you, you really need effective hearing protection. But you also need to hear range commands and be able to communicate. That’s why we recommend electronic muffs with quality plugs underneath. We recommend the NRR 33 Howard Leight Max-1 Plugs. These tapered plugs are comfortable, easy to insert, and have a flared end for better sound seal.
On top of those plugs, run high-quality muffs. For indoor ranges where sound levels can be extremely high, we recommend Howard Leight Impact Pro Muffs. These offer an impressive 30 dB Noise Reduction Rating (NRR) and the effective noise reduction can be improved by 4 decibels or more by running plugs as well.* These muffs are pretty comfortable and offer Headphone Functionality so you can connect to your smartphone, MP3 player, or other audio device. These muffs are a good value, an Amazon’s Choice for $64.97.
* Four decibels may not sound like much, but remember the decibel measurement system is logarithmic, so four decibels is VERY significant. We have discussed the merits of “doubling up” hearing protection with Ph.D. sound engineers. They told us that a combination of muffs and plugs could reduce effective noise levels by up to five decibels compared to plugs alone. In addition, good muffs will block bone conduction sound energy better than plugs alone.
The Magnetospeed V3 chronograph is affordable, easy to transport, and easy to set up. With a MagnetoSpeed barrel-mounted chrono you can quickly and easily record muzzle velocity (MV) without having to set up tripods or walk down-range. The compact MagnetoSpeed chronos are easy to operate and transport. With the full-featured V3 model, everything you need comes in a small fitted case. In the top photo are the components used with the MagnetoSpeed V3 Kit:
1. V3 Bayonet sensor
2. Display and control unit
3. Bayonet spacers (plastic and rubber)
4. Cords and mounting hardware (left), suppressor heat shield (right)
5. Alignment rod (square cross-section)
6. Rail adapter (sold separately)
Our friend Gavin Gear of UltimateReloader.com reviewed the MagnetoSpeed V3 and came away impressed. Gavin explains that a good chrono is essential: “If you want to load and shoot precision ammunition, you need the tools that will produce and validate the precision of your loads. A good chronograph is one of those tools! In this post I’m going to introduce you to the MagnetoSpeed V3 chonograph, the high-end electromagnetic chronograph which fills out the top slot in MagnetoSpeed’s equipment portfolio.”
In this 11-minute video Gavin reviews MagnetoSpeed’s top-of-the-line V3 Chronograph. He shows what ships with the unit, how to set it up for both rifles and pistols, and then he puts it through its paces showing how it captures velocity data. Gavin says he will follow-up with future videos showing how to link the MagnetoSpeed V3 to your mobile phone and how to log velocity data for future reference. To learn more about this high-tech chrono, visit UltimateReloader.com.
Given its compact size, reasonable price, and easy of set-up, we believe all serious shooters should have a MagnetoSpeed in their gear collection even if their primary chronograph is a LabRadar. The MagnetoSpeed V3 complete system is available now for $399.99 from Sportsman’s Warehouse (MSRP is $449.00). A Labadar Chrono by itself is $625.00 but they are currently out-of-stock.
Many short-range Benchresters have thought about converting their 6 PPC to shoot a 30BR for score matches, or a Dasher for mid-range (or even 1000-yard) games. That way you have a rifle that does double duty, giving you the most bang for your buck. Though an action with a PPC bolt won’t normally work with 30BR/6BR/Dasher cases with their larger .308-class rim (0.4728″ diameter), there is a pretty easy solution that allows you to cycle these bigger cartridges with a 6PPC-style bolt (designed to fit .220 Russian rims).
“Rebating case rims … lets you shoot a 30BR in score matches using your PPC action. All you need is a new barrel. This saves buying another bolt, receiver, or rifle.” — Butch Lambert
Butch Lambert of ShadeTree Engineering provided this tip. Butch notes that many 6 PPC benchrest group shooters also enjoy shooting in score matches. But to be really competitive in the BR for score game, that means shooting a 30BR, which has a wider, .308-class rim (0.4728″ diameter). Likewise, if you want to compete in 600-yard registered BR events or in varmint matches, you probably want to run a bigger case, such as the 6BR, 6mm Dasher, or 6-6.5×47. Those cartridges also have the larger 0.4728″ rims.
Rebate Your 30 BR Rims
To convert a PPC-boltface action to shoot bigger cases you can spend a ton of money to buy a new bolt. That can cost hundreds of dollars. The simpler solution is to turn down the diameter of the larger cases on a lathe. Butch explains: “We’ve seen plenty of interest in rebating case rims. This lets you shoot a 30BR in score matches using your PPC action. All you need is a new barrel. This saves buying another bolt, receiver, or rifle if you have a PPC boltface. Anyone who has access to a lathe can do this job pretty easily. Yesterday I turned 150 case in about an hour.”
At right is the lathe form tool Butch uses to rebate the case rims.
We like Lyman’s Electronic Digital Trigger Pull Gauge, which is faster and more precise than the previous model. The latest Lyman Pull Gauge measures trigger pull weights from 1 ounce to 12 pounds with resolution of 0.1 ounces (2.8 grams). It features an adjustable, 4-position rod which retracts into the gauge body. We think that anyone running match triggers below 2.5 pounds pull weight should have a gauge like this. Among the pull gauges on the market, we think the Lyman unit offers great performance for the price. This gauge has a $69.95 MSRP, but it’s now $54.99 at Midsouth and $56.06 on Amazon.
Features: More Precise Strain Gauge | Improved Grip Shape | Adjustable Rod Lengths
Lyman’s Electronic Digital Trigger Pull Gauge is designed to be the fastest and most accurate trigger pull gauge available. State-of-the-art strain gauge technology allows for repeatable accuracy of 1/10 ounce (2.8 grams). The gauge features a large, easy-to-read LCD display and you can switch from ounces to grams with the push of a button. The gauge can also deliver a pull weight average of the last 10 readings. That’s very helpful, particularly when working with factory triggers that may not be very consistent.
The Lyman Trigger Pull Gauge features a solid, collapsible rod with four locking positions. Being able to adjust length makes it easier to use the gauge with a wide variety of firearms — pistols, rifles, and shotguns. The locking feature prevents the rod from flexing when applying pressure to the trigger. When not in use, the rod conveniently collapses into the gauge body, making the whole unit more compact. The new Trigger Pull Gauge comes in an internally-padded plastic case that can be easily stored in a drawer or on your work bench.
Ever wondered how factory ammunition is produced, from start to finish? How are brass cases made, how are bullets created, and how are finished cartridges produced on automated assembly lines? Today’s video showcase features six major factories that, collectively, produce bullets, powder, and finished ammo. We start with the Berger Bullet plant, follow by Vihtavuori powder production in Europe. Then we show the Remington (now Vista Outdoor) ammo plant in Utah, along with a Federal plant that produces rimfire ammunition. Last but not least, there’s an excellent, very informative video from the Norma ammo factory, plus a Hornady ammo plant video.
Bullets being seating at Hornady ammo factory.
Berger Bullets Factory Tour — Made in USA
In this video, Recoil TV takes a behind-the-scenes look at Berger Bullets, and how the outstanding, match-winning Berger bullets are created. The video covers the entire process — from raw materials, to the placement of bullet cores inside jackets, to the final ultra-consistent and uniform projectiles. To see the complete line of Berger Bullets, with full Ballistic data, visit BergerBullets.com
Vihtavuori Powder Production in Europe
Vihtavuori produces some of the most consistent, high-quality powder on the planet. Vihtavuori powders have been used to set world records and win countless championships in multiple disciplines. This excellent video goes inside Vihtavuori’s European production centers. It is really fascinating — you see how extruded powder starts with long spaghetti-like strings, before being finalized into the tiny sticks that we load.
Along with the powder production process, this video includes the entire VV production line, so you see how powder bottles are filled with powder and the tops of the bottles are secured by automated machines.
Remington Ammo Factory (Now Operated by Vista Outdoor)
This SHWATteam video visits the Remington ammunition plant in Arkansas. Vista Outdoor, the company that produces Federal, Speer and CCI ammo, purchased Remington’s ammunition business in Lonoke, Arkansas. Including the new high-tech plant in the back, this facility has the equivalent of 13+ football fields (1200 acres) under roof at its ammo plant, with over 1100 employees. Production capacity is impressive. When running at maximum output, this Remington ammo plant can crank out a staggering 7,000,000+ rounds every day. To produce that volume of ammunition, the facility needs a huge amount of resources: one million pounds of copper per month and 124,000 pounds of lead per day. Remington started manufacturing ammunition at this Lonoke facility in 1970, but some of the machines have been churning out ammo since long before.
Norma Factory Tour
Guys — honestly, if you do anything today on this site, watch this video. You won’t be disappointed. Guaranteed. This is a very informative (and surprisingly entertaining) video. Every serious hand-loader should watch this video to see how cartridge cases are made. The camera work and editing are excellent — there are many close-ups revealing key processes such as annealing and head-stamping.
VERY Informative Video Show Cartridge Brass and Ammunition Production:
Norma has released a fascinating video showing how bullets, brass, and ammunition are produced at the Norma Precision AB factory which opened in 1902. You can see how cartridges are made starting with brass disks, then formed into shape through a series of processes, including “hitting [the cup] with a 30-ton hammer”. After annealing (shown at 0:08″), samples from every batch of brass are analyzed to check metal grain structure and hardness. Before packing, each case is visually inspected by a human being (3:27″ time-mark).
Federal Rimfire Ammunition Production
Field & Stream Tours Federal Ammo Plant in Minnesota
A reporter for Field & Stream recently got a chance to tour the Federal ammunition production facility in Anoka, Minnesota. This large plant produces both rimfire and centerfire ammunition. While touring the plant, the reporter was allowed to capture video showing the creation of .22 LR rounds from start to finish. This is a fascinating video, well worth watching. Watch and learn how rimfire ammo is made.
Note to Viewers — After Starting Video, Click Speaker Icon to HEAR audio!
This revealing video shows all phases of .22 LR ammo production including cupping, drawing, annealing, washing, drying, head-stamping, priming, powder charging, bullet seating, crimping, waxing, inspection, and final packaging. We recommend you watch the video from start to finish. You’ll definitely learn some new things about rimfire ammo.
Hornady Ammunition Factory
If you wonder how ammo is made, starting with raw metal, check out this video from Hornady. It shows how bullet jackets are formed from copper, followed by insertion of a lead core. The jacket is then closed up over the core with the bullet taking its final shape in a die (a cannelure is applied on some bullet types). Next the video shows how cartridge brass is formed, starting with small cups of brass. The last part of the video shows how cases are primed and filled with powder, and how bullets are seated into the cases, using an automated process on a giant assembly-line.
Larry Medler has come up with a smart little invention — a simple, inexpensive Empty Chamber Indicator for rimfire rifles. It is made from a section of plastic “weed-wacker” line and a wooden ball from a hobby shop. Larry says he was inspired by Juniors who used something similar for their 17-Caliber Air Rifles.
How to Make the Empty Chamber Indicator
Construction Method: First, drill a 7/64″ diameter hole all the way through the 1″-diameter wooden ball. Then enlarge half of that 1″-long hole using a 13/64” diameter drill. Next insert an 8″ piece of heavy duty (0.095″ diameter) weed wacker line through the ball, leaving about 2″ on the side with the bigger-diameter hole. Then, with the short end of the line, fold over the last half-inch so the line is doubled-over on itself. Then slide the line into the ball, stuffing the doubled-over section through the 13/64″ (large) hole. Finally, pull the longer end of the line until the doubled-over section is flush with the outside of the ball. This gives you a sturdy line attachment without messy adhesives. When the assembly’s complete, hold the ECI by the tail and dip the ball in yellow paint. If you’re making more than one ECI, you can drill horizontal holes in a spare block of wood and use that as a drying rack.
At a Rimfire Sporter match like this, all shooters must have an Empty Chamber Indicator.
The Empty Chamber Indicator for Smallbore Rifles
Larry explains: “At all Highpower rifle matches, silhouette matches, and other shooting events I have attended, Open Bore Indicators (OBI), or what are now called Empty Chamber Indicators (ECI) have been mandatory. The NRA’s yellow ECI for Highpower rifles is easy to use and has been well-received by the shooters. However, I had not seen a truly workable ECI for 22 rimfire rifles — until I visited Michigan’s Washtenaw Sportsman’s Club where I saw juniors using ECIs for their 17 Caliber Air Rifles. Someone at the club made the empty chamber indicators by attaching an 8″ piece of weed wacker line to a 1″-diameter wooden ball, painted bright yellow. I now make similar ECIs for the 22 rimfire silhouette matches I run.”
Need a top-notch Ballistics App for your iPhone, iPad, or iPod? Start with Ballistic: Advanced Edition (AE), the number 1 (i.e. most installed) App for iOS systems (iPhones and iPads). Ballistics AE (Advanced Edition) is the most popular iOS ballistics program for many good reasons. It offers a full feature set with Ballistic Solver, Ballistic Comparison (with up to 8 projectiles), Target Log (records group sizes), Advanced WindKit, and more. The Ballistic: Advanced Edition software is easy to use, with nice controls. Underneath it all is the proven JBM Ballistics calculator. And here’s the kicker — this excellent mobile App software is now FREE to download and install on iPhones and iPads!
This Video Explains How to Set Up and Use Ballistic: Advanced Edition
Full-featured and easy to use, Ballistics AE has been refined over many years, and it supplies rock-solid solutions derived from JBM Ballistics solver (created by James B. Millard). Unlike some other Apps, Ballistics AE is STABLE on iPhones (with various OS levels). What’s cool is that Ballistics AE is now available for FREE for both iPhones and iPads. This software is now provided by Federal Premium Ammunition, with in-App purchase functionality.
We’ve used the Ballistic: Advanced Edition program on an iPhone 5S, iPhone 6, and iPad, and it performed well. Here are some of the features we liked:
1. Mirrors output from online version of JBM Ballistics we often use for initial calculations.
2. Controls are simple to use and (mostly) intuitive.
3. Handy comparison feature lets you compare ballistics for different projectiles side by side.
4. Advanced Wind Kit allows you to account for complex wind situations.
5. Projectile and BC Databases are very comprehensive.
6. Software is regularly updated to match Apple OS changes.
This article is Copyright 2023 AccurateShooter.com. No republication is authorized. Any appearance of this story on another site obliges that site to pay liquidated damages and/or licensing fees.
Close-up view of a sectioned case. This one here was “fixin’ to pop”, observed Glen Zediker.
Here are highlights from an article Glen Zediker wrote for the Midsouth Blog. In that article Glen, who sadly passed away in 2020, focused on cartridge brass. Glen identified the most common failures that appear with brass that has been shot multiple times, or which has been fired at excessive pressures. Glen explained some simple ways to check your cartridge brass to detect “early warning signs” of case failure, particularly case head separation, which can be very dangerous.
How Cases Degrade with Multiple Firings By Glen Zediker
This article explains when, and then how, to check after the progress of changes commencing with the firing on a new case. It’s the “progress of degeneration,” in a way of looking at it because the concern is getting a handle on when enough change in the brass has come about to require attention. Or abandonment. As said then, for me that’s 4 firings. That, as said last time, is when I might see changes that need attention. Also as said, that figure didn’t come out of a hat, but from my own notes in running my competition NRA High Power Rifle loads. [Editor’s Note: With Lapua brass, using moderate loads, in bolt-action rifles, we typically get about 10 good (match-worthy) firings. But if you anneal your Lapua brass, and run modest pressures, Lapua brass can perform well for 20 or more load cycles.]
The areas most affected are the case neck and case head area. Case neck walls get thicker [but] the case head area body walls get thinner. Primer pockets get shallower and larger diameter.
This case shows a cracked neck AND a crack (separation) above the case head. Zediker says it is “rare to see one case with both of the most common failures. [This case] was attacked by an M14.”
Case Head — Causes of Separation and Cracking
When a case is under pressure during firing, the brass, like water, flows where it can, where it’s more free to move. Of course, the chamber steel limits the amount it can expand. The case shoulder blows fully forward and the case base is slammed back against the bolt face. There is, therefore and in effect, a tug on both ends — it gets stretched. The shoulder area is relatively free to expand to conform to the chamber, but the other end, the case head area, is not. Since that’s the area of the case with the thickest walls, it doesn’t expand “out” much at all. What it does is stretch. The “case head area,” as I refer to it here, is the portion of the case above the web, which is just above the taper that leads in to the extractor groove. The “area” extends approximately an eighth-inch up the case body.
Here’s a “pressure ring.” You’ll see this after firing, if you see it. And, if you see it, that case is done. The bright ring indicates excessive stretching, which indicates excessive thinning. If you see a ring circling the case, noticeable because it’s lighter color than the case body, and it’s in this area, I’d say that case is done. And that’s right where a “head separation” occurs. It can crack and also blow slap in two, and that’s the “separation” part of case head separation.
Photo courtesy GS Arizona.
This is a spot to keep close watch on as cases age. It is also the area that is more “protected” by sizing with less case shoulder set-back. That is, pretty much, where the freedom for the stretching movement in this area comes from (the case shoulder creates a gap). If you’re seeing a sign that a head separation [might happen with relatively few firings], chances are the shoulder set-back is excessive, and also… the load pressure level.
Bent Paper Clip Case-Wall Gauge
Editor: You can use a bent paper clip to detect potential case wall problems. Slide the paper clip inside your case to check for thin spots. GS Arizona explains: “This simple little tool (bent paper clip) will let you check the inside of cases before you reload them. The thin spot will be immediately apparent as you run the clip up the inside of the case. If you’re seeing a shiny line on the outside and the clip is really hitting a thin spot inside, it’s time to retire the case.” Photo by GS Arizona.
Monitor Primer Pocket Dimensional Changes
Another case-head-area and pressure-related check is the primer pocket. As said, the primer pocket will get larger in diameter and shallower in depth each firing. As with many such things, the questions are “when” and “how much,” and the main thing, “how much?”
If the pocket gets excessively shallow, and that’s judged by a primer that seats fully but isn’t at least a tick below flush with the case base, there could be function issues. There’s a risk of a “slam-fire” with a semi-auto that uses a floating firing pin, and, if there is actual protrusion, that has the same effect as insufficient headspace. A primer pocket uniformer can reset the depth of a shallowed primer pocket to what it should be, but the real test for me is how easily the next primer seats into it. If it’s significantly less resistance, I’ll say that case is done. Shallower can be refurbished. That’s a primary function of a primer pocket uniformer. Larger diameter, though, can’t be fixed. I’ve mentioned in another article or two that, any more at least, my main gauge of load pressure has become how much primer pocket expansion there’s been.
AR owners know that their black rifles require regular cleaning and maintenance. And this modular platform allows many options for stocks, fore-arms, and optics mounting. That ability to customize is one of the AR’s major attractions, but customization requires solid understanding of the AR’s design and components.
To help AR owners optimize their rifles and maintain their rifles properly, Gun Digest Media offers an excellent 320-page illustrated book: AR-15 Setup, Maintenance and Repair. Authored by Patrick Sweeney, this book is a “one-stop guide to repairing, maintaining and modifying America’s favorite rifle.” The MSRP for the paperbook resource is $33.99 from Gun Digest, but it is available on Amazon starting at $25.13 with $3.99 shipping. Digital editions are offered by GunDigest for $31.99.
If you need to disassemble and maintain your AR rifle, swap barrels or handguards, add optics, or customize the stock, Gun Digest’s AR-15 Setup, Maintenance and Repair book tells you what you need to know. From field-stripping to barrel mounting and trigger installations, the book covers a wide range of topics. The book provides step-by-step instructions for set-up and maintenance, with hundreds of detailed photos. The book also includes AR gunsmithing chapters with reviews of recommended tools.
Author Patrick Sweeney is a certified master gunsmith and armorer instructor for police departments. Sweeney has also authored the notable 4-volume Gunsmithing the AR-15 series (Vol. 1, Vol. 2, Vol. 3, and Vol. 4) and 20+ other titles for Gun Digest Books.
Whether you want to learn about disassembling your AR for regular maintenance, field-stripping, swapping out parts, adding optics or customizing a stock, AR-15 Setup, Maintenance and Repair guides you through everything you need to know to keep your AR-platform rifle running well. There are also tips on how to improve accuracy, and maintain your bolt carrier group properly.
Authored by Patrick Sweeney
Published by Gun Digest Books
ISBN-13: 978-1951115470
320 pages, softcover, 8 ¼ x 10 7/8 inches
Editor’s NOTE: The key to keeping an AR running reliably is proper lubrication (in the RIGHT places), and regular cleaning of the bolt carrier and bolt, including ejector recess and extractor recess. The majority of non-functioning ARs we’ve seen had gunk, lube, carbon, and brass shavings in those recesses.
Other AR Books by Patrick Sweeney
Bonus Video — AR15 Maintenance with Jerry Miculek
In this helpful video, legendary shooting Jerry Miculek explains how he cleans and maintains his AR-platform rifles. Miculek shoots ARs in three-gun competitions.
This article is Copyright 2023 AccurateShooter.com. No republication is allowed without advance permisson and fees.


 The question has been posed: “What effect does altitude have on the flight of a bullet?” The simplistic answer is that, at higher altitudes, the air is thinner (lower density), so there is less drag on the bullet. This means that the amount of bullet drop is less at any given flight distance from the muzzle. Since the force of gravity is essentially constant on the earth’s surface (for practical purposes), the bullet’s downward acceleration doesn’t change, but a bullet launched at a higher altitude is able to fly slightly farther (in the thinner air) for every increment of downward movement. Effectively, at higher altitudes, the bullet behaves as if it has a higher ballistic coefficient.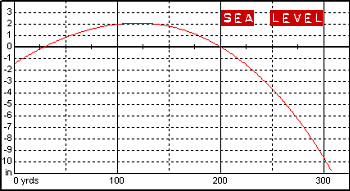


 Norma has released a fascinating video showing how bullets, brass, and ammunition are produced at the
  If you wonder how ammo is made, starting with raw metal, check out this video from