Product innovation is all about “building a better mousetrap”, or in this case, building a better bore-cleaning patch. A real smart guy, Shane Smith, has invented a triangular patch that earned a patent. The U.S. Patent Office has awarded a utility patent for BoreSmith’s Triangle Patch™. This unique cleaning patch was designed by Shane Smith, a mathematician/physicist who employed his scientific and firearms knowledge to create innovative bore-cleaning products.
BoreSmith’s clever Triangle Patch™ (aka Pyramid Patch) presents more cleaning surface area to the bore wall than does a conventional square or round patch (of equivalent size). At the same time, the unique geometry makes Triangle Patches much less likely to jam in the barrel. This is because the notches in the sides of the triangle allow the patch to sit more uniformly on the jag (without bunching up). In addition, the Pyramid patch is must less likely to jam due to pleating. One reason conventional patches get stuck is unwanted 5-layer pleating. The special notches in the Pyramid patch remove all or most 5-layer pleating. As a result the patch does not bunch up and this also reduces rod bowing. SEE Triangle Patches HERE.
Triangle Patch Function and Geometry Explained (See 1:18 time-mark):
NOTE: Despite what you may see in this video, you should ALWAYS insert brushes and patches from the chamber end first, using a fitted cleaning rod bore guide. With bolt-action rifles, NEVER insert a cleaning rod (with brush or jag) in through the muzzle. This may damage the delicate crown of your barrel.
The Triangle Patches work great with Boresmith’s patented dual-diameter bore brushes:
NOTE: There are ten (10) shots in the group, but for simplicity we are only displaying five (5) shot circles. Adding more circles won’t change the measurement because the two most distant shots, which determine group size, ARE included.
What kind of 200-yard accuracy can you get in an enclosed, underground test range? Would you believe 0.162 MOA at 200 yards with a .338? Have a look at these test targets from Sierra Bullets. Like most bullet manufacturers, Sierra does live-fire bullet testing to ensure that Sierra projectiles perform as promised, with repeatable accuracy. Sierra tests bullets in its own underground test complex. Sierra’s 300-meter test range is the longest, privately-owned underground bullet test facility in the Western Hemisphere.*
Day in and day out, various bullet types are tested using a big collection of barreled actions. These barreled actions are clamped in stout, return-to-battery test fixtures. These big, heavy test fixtures provide near-perfect repeatability (with no human-induced holding or aiming errors).
Sierra Bullets 10-Shot Groups at 200 yards
Check out these 10-shot test groups shot at the Sierra Test Range at 200 yards. Note that the numbers listed on each sample are actual measurements in inches. To convert to MOA, cut those numbers in half (to be more precise, divide by 2.094, which is 1 MOA at 200 yards). For example, the 0.340″ middle group works out to 0.162 MOA at 200 yards.
Scan-Verified 0.162 MOA Accuracy at 200 Yards
To verify the accuracy of Sierra’s measurements, we measured the middle (.338 caliber) 10-shot group with our On-Target Group Measurement software. We registered a group size reading of 0.339″ — within one-thousandth of the Sierra measurement. The calculated group size in MOA (Minute of Angle) is 0.162.
That’s amazingly good for ten rounds of big .338 caliber bullets. A FIVE-shot 0.162 MOA group at 200 would be considered excellent at any benchrest match. But remember this target has TEN shots. The current, one-target IBS world record for ten shots at 200 yards is 0.245″, set by Ed Watson in 1999.
Bevy of Barreled Actions for Bullet Testing
Sierra Bullets uses dozens of barreled actions for testing bullets in its enclosed, 200-yard test range. Each barrel has its own logbook to track the barrel’s usage.
Click Photo to Zoom
*Even Longer Test Tunnels Exist in Europe: At Stadeln in Germany, RWS (now part of RUAG) owns a 500 meter tunnel (above ground level) which has existed for decades. In Thun, Switzerland, RUAG has a fully-instrumented 500 meter underground tunnel. Near Ulm, Germany, there is a 5-lane 300 meter underground shooting range that is open to the public.
Hunting season continues in many areas of the nation, so many game hunters have questions about terminal performance and particular caliber/cartridge combinations. Bryan Litz of Applied Ballistics says there are really a number of questions that need to be answered:
1) What’s the max range that the shooter/rifle is capable of hitting the intended target?
2) What’s the max range that a bullet can kill the intended game?
3) How do bullets kill?
4) Effects of Muzzle Velocity on Lethality.
(Your MV may be lower in winter with temp-sensitive powders).
5) Long Range Lethality and the Ballistic Coefficient.
You’ll find answers to these and other questions in Bryan’s book, Applied Ballistics for Long-Range Shooting. These topics are covered in Chapter 15: Lethality of Long Range Hunting Bullets. Bryan says: “For responsible hunting, knowing your limits and your rifle’s limits, is important.”
Bryan’s book also includes Bullet Lethality Charts for a variety of calibers and cartridge types. These charts feature categories for 600-lb, 300-lb, and 150-lb Game animals so you can match performance to the size of your prey. Bryan explains: “If I wanted to know how a Medium Capacity Cartridge shooting the 6mm Berger 115 VLD will perform on 300-pound game, I can reference the bullet-specific chart.”
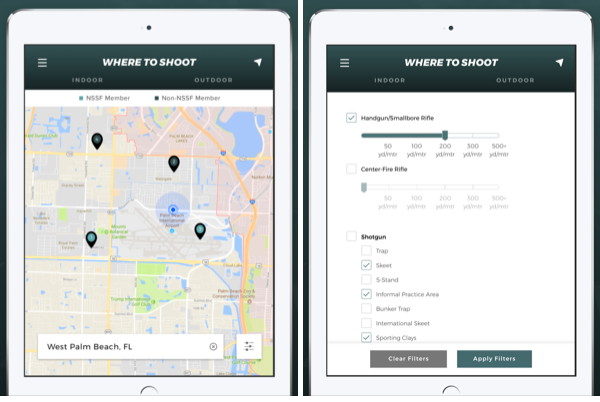
The Where To Shoot Mobile App quickly locates shooting ranges near you, drawing on North America’s most comprehensive directory of shooting ranges. Users can search by current location, state, or zip code. Once you locate a range, you can view activities offered along with a summary of range facilities. You can even get driving directions.
The app is modeled after NSSF’s popular WhereToShoot.org® website and is updated frequently with range information for every U.S. state and Canadian province. Once you’ve located a place to shoot, the App can provide directions to the range. The App also includes video tips for shooters, news, and firearm-safety information.
Top to bottom – Remington firing pin assembly with ISS, Tubb SpeedLock alloy-composite system without ISS (current versions have dual, opposite-wound springs), and Remington short action firing pin assembly without ISS.
The U.S. Army Marksmanship Unit regularly publishes technical articles on the USAMU Facebook page. One informative USAMU article covered mechanical issues and related ignition irregularities that can cause vertical fliers even with good ammunition in an otherwise excellent rifle. We highly recommend you read this article, which offers some important tech tips.
Vertical Dispersion: Mechanical/Ignition Issues?
Poor or inconsistent ignition has long been known to be one of the “usual suspects” when one encounters vertical fliers that just shouldn’t be there. By having a sense of some of the basic principles involved, and a few basic areas to check, the shooter may avoid colsiderable frustration, not to mention time, expensive loading components and barrel wear.
Is your well-built rifle of high-quality components plagued with vertical fliers across more than 1-3 handload combinations? Consider the bedding, crown and scope/sight mounts. Are they correct? If so, then you might check for ignition issues before boldly undertaking an extensive, expensive, and quite possibly fruitless quest for the “magic handload”.
SEEING IS BELIEVING: While the author had been aware for many years that poor ignition should be considered and ruled out when dealing with vertical fliers in an otherwise-excellent rifle, actually seeing the problem and its almost instantaneous cure really drove the lesson home.
He was working with a “dot” rifle – a .22 LR match rifle that really stacked bullets into little piles at 50 yards and beyond. With one lot of ELEY Tenex, it produced consistent “bughole” groups at 50, but with another, selected lot of Tenex, similar groups were regularly ruined by single, vertical fliers that did not appear in other rifles. Rather than spending days burning up expensive, select ammunition looking for “magic lots”, he contacted a well-respected rimfire gunsmith and explained the situation.
Without so much as batting an eye, the highly-experienced ‘smith tore into the rifle’s action, and quickly found the cause(s) of the problem. He discovered a demonstrably weak firing pin spring, plus a chip out of the face of the firing pin where it contacted the cartridge rim.
After replacing and tuning the offending parts, the rifle immediately began shooting tiny, bughole groups with the previously “unacceptable” lot of Tenex. Centerfire rifles can also benefit from ensuring positive, consistent ignition. A wise riflesmith is literally worth his weight in gold!
So, what are some issues we as shooters can inspect in our rifles to help determine if ignition woes could be part of our problem? At the club level, ask yourself if that “experienced” Remington, Winchester 70, or even Springfield-based match bolt gun you’re using is still running its’ original 40-80 year-old factory striker spring? If so, a new replacement is cheap insurance against current or future problems. (And BTW, it might be best to stick to the normal, factory-spec spring weight. A super-powerful spring can cause vertical, just as a weak one one can.) Along with that, a routine check for proper firing-pin protrusion is a quick preventive measure that can rule out potential issues.
Other areas to consider are the centering and consistency of the firing pin’s operation in the bolt. Admittedly, with the increasing use of precision-machined custom actions, this is becoming less an issue every day. Below is the firing pin assembly from a custom BAT action:
However, particularly with factory actions, a very quick and easy check is to remove the bolt, let the firing pin go forward, and look at the firing pin tip through the firing pin hole. Is the tip off-center in the hole, and possibly striking it as it moves forward? Is the hole out-of-round or burred from being struck repeatedly? If so, a trip to the riflesmith is likely in order.
Similarly, machining issues in the bolt/firing pin system can lead to rough and erratic firing pin movement, in which the firing pin drags against an internal surface of the bolt. In high-quality rifles these issues are relatively rare, but not unheard-of, and it takes mere minutes to rule them out. It may be worthwhile to remove the cocking piece/firing pin/spring assembly and look for any unusual gouges, dings, peening, burrs or signs of abnormal wear.
This task is especially easy with Winchester 70s, Springfields, and the similar Mauser 98s, involving little more than the push of a button and unscrewing the cocking piece assembly. This is just one of the many reasons these tried-and-true actions have earned such a loyal following in the field, among hunters who must maintain their rifles away from a shop.
Particularly with older rifles, watch for and remove excess grease (or even Cosmoline!) from both the firing pin assembly and inside the bolt. This can help improve firing pin speed and consistency. Other bolt-action designs may need a take-down tool or other measures.
As part of this inspection, AFTER ENSURING THE RIFLE IS UNLOADED, slowly cock the rifle, dry-fire, and repeat several times. Listen carefully near the action for inconsistency in the sounds it generates. Does the striker falling make the same sound each time? Do you hear or feel grinding upon operation? If so, where?
Be sure to check the operation of the cocking piece (bolt shroud), firing pin within the bolt shroud, the cocking piece cam and the rear of the bolt body where the cocking piece cam operates. As with our examination for abnormal wear marks discussed above, look for marks indicating roughness or a possible need for light polishing. Then, clean and lightly grease the bearing surfaces while you’re at it.
Remington 700 bolt shroud and cocking cam
These are relatively easy checks that shooters can undertake to perform a preliminary inspection on their own. Other mechanical issues can also cause ignition issues, chiefly centered around the action of the trigger, sear and sear spring. If these are suspected, a trip to an experienced, qualified riflesmith for diagnosis is recommended. We hope you find this information helpful! Join us again next week, and in the meantime, enjoy the shooting sports safely!
Forest of Windflags at World Benchrest Championships in France in 2011
There’s a simple, inexpensive “miracle device” that can cut your groups in half. If you’re not using this device, you’re giving away accuracy. The “miracle device” to which we refer is a simple wind indicator aka “windflag”. Using windflags may actually improve your accuracy on target much more than weighing charges to the kernel, or spending your life savings on the “latest and greatest” hardware.
Remarkably, many shooters who spend $3000.00 or more on a precision rifle never bother to set up windflags, or even simple wood stakes with some ribbon to show the wind. Whether you’re a competitive shooter, a varminter, or someone who just likes to punch small groups, you should always take a set of windflags (or some kind of wind indicators) when you head to the range or the prairie dog fields. And yes, if you pay attention to your windflags, you can easily cut your group sizes in half. Here’s proof…
Miss a 5 mph Shift and You Could DOUBLE Your Group Size
The table below records the effect of a 5 mph crosswind at 100, 200, and 300 yards. You may be thinking, “well, I’d never miss a 5 mph let-off.” Consider this — if a gentle 2.5 mph breeze switches from 3 o’clock (R to L) to 9 o’clock (L to R), you’ve just missed a 5 mph net change. What will that do to your group? Look at the table to find out.
Values from Point Blank Ballistics software for 500′ elevation and 70° temperature.
Imagine you have a 6mm rifle that shoots half-MOA consistently in no-wind conditions. What happens if you miss a 5 mph shift (the equivalent of a full reversal of a 2.5 mph crosswind)? Well, if you’re shooting a 68gr flatbase bullet, your shot is going to move about 0.49″ at 100 yards, nearly doubling your group size. With a 105gr VLD, the bullet moves 0.28″ … not as much to be sure, but still enough to ruin a nice small group. What about an AR15, shooting 55-grainers at 3300 fps? Well, if you miss that same 5 mph shift, your low-BC bullet moves 0.68″. That pushes a half-inch group well past an inch. If you had a half-MOA capable AR, now it’s shooting worse than 1 MOA. And, as you might expect, the wind effects at 200 and 300 yards are even more dramatic. If you miss a 5 mph, full-value wind change, your 300-yard group could easily expand by 2.5″ or more.
If you’ve already invested in an accurate rifle with a good barrel, you are “throwing away” accuracy if you shoot without wind flags. You can spend a ton of money on fancy shooting accessories (such as expensive front rests and spotting scopes) but, dollar for dollar, nothing will potentially improve your shooting as much as a good set of windflags, used religiously.
Windflags Sources and Options
Which Windflag to buy? There are many vendors selling windflags of various types, some with daisy wheels others without. You may want to go to a match and see what types works best for you. CLICK HERE for the Benchrest Central Classifieds with multiple windflag types and accessories for sale. Here is a sample:
Peterson Cartridge Company (“Peterson”) has released a lengthy, authoritative guide to the 22 Creedmoor cartridge, a popular wildcat based on the 6.5 Creedmoor or 6mm Creedmoor necked down to .224 caliber. We think the .22 Creedmoor would be a great long-range varmint cartridge, similar to the .22-250 Rem, but with a more modern, efficient cartridge design. In addition, some PRS/NRL competitors may turn to the .22 Creedmoor because it has less recoil and is flatter-shooting than the 6mm Creedmoor. In addition, .224-caliber match bullets are typically less expensive than heavier 6mm and 6.5mm projectiles. Less recoil, and less cost — what’s not to like?*
Along with load data, this article has specific sections dedicated to: Primers, Rifling Twist Rates, and Reloading Supplies. If you are considering building a .22 Creedmoor, we recommend you download the full Peterson .22 Creedmoor article, which is available in PDF format.
Peterson states, “Since its inception in 2007… the 6.5 Creedmoor has seen some pretty meteoric growth in popularity. That growth continues as of this writing, as the cartridge has now gone mainstream with hunters and shooters alike. As the popularity of the 6.5 Creedmoor has increased, so has the number of wildcat cartridges based off of it. Some of those popular wildcat cartridges are the 6mm Creedmoor, the .25 Creedmoor, and now the .22 Creedmoor. This data sheet will cover the .22 Creedmoor.
To help our customers, and anyone else who shoots .22 Creedmoor, we decided to create this Data Sheet and distribute it. [In this LOAD DATA Document] you will find four (4) common bullets, and four (4) common rifle powders used when handloading the .22 Creedmoor cartridge. We then took the different bullet and powder combinations and loaded them up to the SAAMI Maximum Average Pressure (MAP) for the 6.5 Creedmoor and 6mm Creedmoor cartridges, which is 62,000 PSI. [O]ur goal was to provide a wide spectrum of bullet weights and the powders used with them.
All of the following data was gathered by our ballistician in our indoor ballistics lab located in our factory in Pennsylvania. Although we were able to gather pressure and velocity data in our lab, we have NOT tested these loads for accuracy. Again, these loads are just designed to give shooters information regarding what velocity, a given bullet and powder charge combination, will produce the SAAMI Maximum Average Pressure (MAP) of 62,000 psi.”
Sample 22 Creedmoor LOAD DATA
IMPORTANT — Pressures can vary significantly with different Cartridge Overall Lengths (COAL). In addition, ANY change to ANY load components — primers, bullets, brass, powder — can affect pressure. Always load conservatively. In addition, because of variances in bore dimensions, some barrels may show higher pressures than others. Again, always start with conservative loads, well below MAX pressures.
*Actually there IS a potential downside — reduced barrel life. We expect that a .22 Creedmoor running hot varmint loads would experience shorter useful barrel life compared to a 6.5 Creedmoor. This is based on what we’ve observed with .22-250 and .22-250 Ackley barrels compared to our 6.5 CM barrels.
Do you need to find an FFL for a firearms transfer in your local area? Or perhaps you are selling a gun and need it shipped to an FFL in another city or state. Thankfully, there are two good online resource that can, in a matter of seconds, provide a list of Federal Firearms License holders in the area you need. These web resources will even locate those FFLs on a map AND list the fees they typically charge for transfers.
Sportsman’s Guide FFL Finder
The first resource is the Sportsman’s Guide FFL LOOKUP Page. This online search tool is fast and easy to use. Simply enter a Zip Code and then select a radius (in miles) within which to find FFLs. Here is an example for Billings, Montana with Zip Code 59103. Note that the transfer fees are listed for the first three “In-Network” FFLs. Click on each FFL business name to get more details.
Gunbroker FFL Finder
A good second resource is offered by GunBroker, the online gun trading/auction site. Gunbroker offers a handy online FFL Finder. This resource allows you to quickly find an FFL by zip code or state. Along with the FFL business name, this also lists fees. Click the “Map It” button to see a local map.
Gunbroker states: “Use our FFL Finder to locate FFL dealers in your area. You can search for FFL dealers by your zip code or by state. Use our FFL finder to get in touch with a local FFL dealer in order to complete your firearms purchase, or sign up to be part of our FFL Dealer Network.”
Shown below are the FFL Finder results for Billings, Montana and Zip Code 59103:
Many novice hand-loaders believe that neck bushing Inside Diameter (ID) size is the only important factor in neck tension. In fact, many different things will influence the grip on your bullet and its ability to release from the case neck. To learn more about neck tension and “case grip”, take the time to read this article carefully. We bet you’ll gain knowledge that will let you load more accurate ammo, with better ES/SD.
Editor: Guys, this is a VERY important article. You really should read it over carefully, twice. Variations in the force required to release a bullet can significantly affect accuracy and ES/SD. You really need to know how the grip on bullet can be altered by many different factors.
Neck Tension (i.e. Grip on Bullets) Is a Complex Phenomenon
While we certainly have considerable control over neck tension by using tighter or looser bushings (with smaller or bigger Inside Diameters), bushing size is only one factor at work. It’s important to understand the multiple factors that can increase or decrease the resistance to bullet release. Think in terms of overall brass-on-bullet “grip” instead of just bushing size (or the internal neck diameter in non-bushing full-length sizing dies).
Bullet grip is affected by many things, such as:
1. Neck-wall thickness.
2. Amount of bullet bearing surface (shank) in the neck.
3. Surface condition inside of neck (residual carbon can act as a lubricant; ultrasonic cleaning makes necks “grabby”).
4. Length of neck (e.g. 6mmBR neck vs. 6mm Dasher).
5. Whether or not the bullets have an anti-friction coating.
6.The springiness of the brass (which is related to degree of work-hardening; number of firings etc.)
7. The bullet jacket material.
8. The outside diameter of the bullet and whether it has a pressure ridge.
9. Time duration between bullet seating and firing (necks can stiffen with time).
10. How often the brass is annealed.
11. Amount (length) of neck sized (e.g. you can size only half the neck).
12. Interior diameter of bushing, or neck section of non-bushing die.
– and there are others…
One needs to understand that bushing size isn’t the beginning and end of neck tension questions, because, even if bushing size is held constant, the amount of bullet “grip” can change dramatically as the condition of your brass changes. Bullet “grip” can also change if you alter your seating depth, and it can even change if you ultrasonically clean your cases.
5-time U.S. National Long-Range Champion John Whidden adds: “Our tests show us that the condition of the necks in regards to lubed or not, carbon inside or not, squeaky clean or not, etc., matter even more than the size of the bushing used. An ultrasonically cleaned or brand new dry case neck make for some quite high seating force.”
In our Shooters’ Forum a reader recently asked: “How much neck tension should I use?” This prompted a Forum discussion in which other Forum members recommended a specific number based on their experience, such as .001″, .002″, or .003″. These numbers, as commonly used, correspond to the difference between case-neck OD after sizing and the neck OD of a loaded round, with bullet in place. In other words, the numbers refer to the nominal amount of interference fit (after sizing).
While these commonly-used “tension numbers” (of .001″, .002″ etc.) can be useful as starting points, neck tension is actually a fairly complex subject. The actual amount of “grip” on the bullet is a function of many factors, of which neck-OD reduction during sizing is just one. Understanding these many factors will help you maintain consistent neck tension as your brass “evolves” over the course of multiple reloadings.
Seating Depth Changes Can Increase or Decrease Grip on Bullet
You can do this simple experiment. Seat a boat-tail bullet in your sized neck with .150″ of bearing surface (shank) in the neck. Now remove the bullet with an impact hammer. Next, take another identical bullet and seat it with .300″ of bearing surface in another sized case (same bushing size/same nominal tension). You’ll find the deeper-seated bullet is gripped much harder.
Neck-Wall Thickness is Important Too
I have also found that thinner necks, particularly the very thin necks used by many PPC shooters, require more sizing to give equivalent “grip”. Again, do your own experiment. Seat a bullet in a case turned to .008″ neckwall thickness and sized down .003″. Now compare that to a case with .014″ neckwall thickness and sized down .0015″. You may find that the bullet in the thin necks actually pulls out easier, though it supposedly has more “neck tension”, if one were to consider bushing size alone.
In practical terms, because thick necks are less elastic than very thin necks, when you turn necks you may need to run tighter bushings to maintain the same amount of actual grip on the bullets (as compared to no-turn brass). Consequently, I suspect the guys using .0015″ “tension” on no-turn brass may be a lot closer to the guys using .003″ “tension” on turned necks than either group may realize.
Toward a Better Definition of Neck Tension
As a convenient short-cut, we tend to describe neck tension by bushing size alone. When a guy says, “I run .002 neck tension”, that normally means he is using a die/bushing that sizes the necks .002″ smaller than a loaded round. Well we know something about his post-sizing neck OD, but do we really have a reliable idea about how much force is required to release his bullets? Maybe not… This use of the term “neck tension” when we are really only describing the amount of neck diameter reduction with a die/bushing is really kind of incomplete.
My point here is that it is overly simplistic to ask, “should I load with .001 tension or .003?” In reality, an .001″ reduction (after springback) on a thick neck might provide MORE “grip” on a deep-seated bullet than an .003″ reduction on a very thin-walled neck holding a bullet with minimal bearing surface in the neck. Bushing ID is something we can easily measure and verify. We use bushing size as a descriptor of neck tension because it is convenient and because the other important factors are hard to quantify. But those factors shouldn’t be ignored if you want to maintain consistent neck tension for optimal accuracy.
Consistency and accuracy — that’s really what this all about isn’t it? We want to find the best neck tension for accuracy, and then maintain that amount of grip-on-bullet over time. To do that you need to look not only at your bushing size, but also at how your brass has changed (work-hardened) with time, and whether other variables (such as the amount of carbon in the neck) have changed. Ultimately, optimal neck tension must be ascertained experimentally. You have to go out and test empirically to see what works, in YOUR rifle, with YOUR bullets and YOUR brass. And you may have to change the nominal tension setting (i.e. bushing size) as your brass work-hardens or IF YOU CHANGE SEATING DEPTHS.
Remember that bushing size alone does not tell us all we need to know about the neck’s true “holding power” on a bullet, or the energy required for bullet release. True bullet grip is a more complicated phenomenon, one that is affected by numerous factors, some of which are very hard to quantify.
Today is Halloween (originally “All Hallows Eve”). With the slow return to post-Pandemic normalcy, there will be trick-or-treating in many locales across the country. U.S. LawShield has provided Halloween safety tips for homeowners and families with kids. These tips are designed to keep kids safe/secure and to help adults supervise the young ones and avoid potential liabilities as homeowners. READ Full Article HERE.
Halloween Safety Tips for Adults (Parents and Homeowners) Drive Carefully – Drive slowly and watch for people crossing the street. Avoid distractions like phones or food so you can be ready to stop quickly. (But it’s best to just avoid driving after dark on Halloween[.]) Clear the Way – Clear your front steps, driveway, and lawn of any potential safety hazards. If any injuries happen on your property, you could be held liable! Leave a Light On – If you leave the house, keep a few visible lights on inside to discourage criminals. However, leave your porch light off to let trick-or-treaters know you aren’t giving out candy! Verify Insurance – Are you turning your home into a neighborhood haunted house? Are you charging admission? Make sure to check your local laws and verify your homeowners insurance coverage! Something like this could be considered a business activity, and accidents or injuries typically are not covered. (You should also verify your self-defense insurance coverage!) Go Flameless – Use electric lights in your jack-o-lanterns and other décor. House fires are one of the more common accidents reported by homeowners on Halloween.
Halloween Safety Tips for Kids Adult Supervision – All children aged 13 and under should be accompanied by an adult when trick-or-treating. Older kids without an adult should be in groups of three or more. Create a Route – Only trick-or-treat in familiar neighborhoods and at houses with porch lights on. Be aware of and avoid the addresses of local sex offenders. Street Smart – Walk only on sidewalks, and cross streets only at crosswalks or corners. Make eye contact with drivers before crossing to help prevent accidents. Take extra caution with costume masks, as they greatly reduce a child’s ability to see their surroundings. High Visibility – Carry glow sticks or flashlights when out after dark, and avoid wearing costumes that are dark-colored or aren’t reflective. Treat Smart – Check your kids’ candy! The CDC Halloween Safety Guide highly recommends throwing away any unwrapped or unsealed pieces.
U.S. LawShield also strongly recommends not having toy guns — even Nerf guns or squirt guns — as part of costumes. At night toy guns can cause confusion, with potential bad reactions.
About U.S. LawShield
Founded in 2009, U.S. LawShield now has 700,000+ members and 6,000+ industry partners. The goals are to help members handle critical, life-threatening situations and prevent potential injustices in the legal system after acts of self-defense. For more information on U.S. LawShield visit USLawshield.com.


 Scan-Verified 0.162 MOA Accuracy at 200 Yards

 You’ll find answers to these and other questions in Bryan’s book,


 Is your well-built rifle of high-quality components plagued with vertical fliers across more than 1-3 handload combinations? Consider the bedding, crown and scope/sight mounts. Are they correct? If so, then you might check for ignition issues before boldly undertaking an extensive, expensive, and quite possibly fruitless quest for the “magic handload”.


 There’s a simple, inexpensive “miracle device” that can cut your groups in half. If you’re not using this device, you’re giving away accuracy. The “miracle device” to which we refer is a simple wind indicator aka “windflag”. Using windflags may actually improve your accuracy on target much more than weighing charges to the kernel, or spending your life savings on the “latest and greatest” hardware.


 In our
  Neck-Wall Thickness is Important Too


