IMPORTANT: FedEx policies now prohibit regular persons from shipping ANY firearms through FedEx. The shipping company now limits firearms shipping privileges to FFL-holders and certain government agencies. NOTE: This is not a new change for 2022. The restrictions went into effect in Q3 2021. However, the great majority of gun owners may not be aware of this restrictive policy, because it does represent a major change from the past. SEE FedEx Firearms Shipping Rules.
This represents a significant FedEx rule change that severely restricts the gun shipping options available to normal Americans who do not have Federal Firearms Licenses. FedEx policies state: “Nonlicensee shippers — Nonlicensees are prohibited from shipping firearms with FedEx.”
In years past, a regular gun owner (without an FFL) could ship both long guns and handguns from primary FedEx locations, provided you disclosed the contents. That was important for returning guns to manufacturers for warranty work, or shipping guns to a gunsmith. Now the options are limited. Long guns (rifles, shotguns) can still be shipped via the U.S. Postal Service and via UPS. However, the USPS prohibits shipping handguns. So the only viable alternative for private individuals to ship handguns (pistols and revolvers), is through UPS. And even with UPS, some affiliate locations will not handle firearms.
In this 54-minute video interview, Ken Clemens, co-owner of Brux Barrels, is interviewed by F-Class ace Erik Cortina for the Cortina Precision YouTube Channel. A lot of ground is covered, with many fascinating insights into barrel-making revealed. Watch and learn:
Interview with Ken Clemens, Co-owner of Brux Barrels
If you are involved in competitive shooting, and especially if you compete in F-Class or long-range benchrest, we recommend you take the time to watch this interview, perhaps in a couple of sessions because it runs for a lengthy 54 minutes. Ken Clemens explains the important procedures that go into making match-grade, cut-rifled barrels. Ken also explains some factors to consider when choosing a barrel-maker and specifying length, contour, land/groove configuration, and twist rates.
About BRUX Barrel-Making Methods
Brux starts with 4150 chrome-moly or 416R stainless steel double-stress-relieved bar stock — the best available. Barrels are bored with the Barnes gun drill, and reamed with an industry-standard Pratt & Whitney reamer. Brux uses solid carbide cutter hooks and employs special methods to achieve best results.
After the bore-cutting process is complete, each barrel is hand-lapped to high-precision standards. Multi-point inspections and meticulous hand processes (not possible in mass production) ensure extremely high quality. The Brux website says: “If there is the slightest deviation in surface finish or tolerance, the barrel is discarded.”
BRUX Specializes in Cut-Rifled Gun Barrels
Brux produces custom cut-rifled barrels, precision-crafted by professionals with extensive experience in both machine tools and competitive shooting. While Brux earned its reputation building great barrels for F-Class, benchrest, and long range competition, Brux also crafts hunting barrels. Brux states: “Hunters, big game and varmint, can benefit from the accuracy and dependability of a custom barrel made to your specifications.”
BRUX Barrels’ Owners Are Competitive Shooters
Brux owners and machinists are shooters themselves. So they understand how important a truly top-quality barrel can be. Everything else about a rifle can be great, but you need a superb barrel to win at the highest level. Owners Ken Clemens (pictured above) and Norm Brux are both seasoned shooters with years of experience using their own products.
Made in the USA — About the Home of Brux Barrels
The Wisconsin River Valley near Lodi has a storied history of hunting and shooting. The glacier spared many granite escarpments, leaving secluded glens and a topography rich in soil and wildlife habitat, which attracted families with old-world values and skills. Many of their descendants turned raw steel and iron into the tools necessary for farming – and some evolved to precision tooling and making gun barrels.
Wisconsin River Valley near Ferry Bluff State Natural Area.
“22 Plinkster” is an avid shooter who has produced a number of entertaining videos for his YouTube Channel. In the video below, he tackles the question “Why Do Misfires Occur in .22 LR Rimfire Ammunition?” This is the most common question posed to 22 Plinkster by his many viewers. He identifies four main issues that can cause .22 LR misfires or faulty ignition:
1. Damaged Firing Pin — The dry firing process can actually blunt or shorten the firing pin, particularly with older rimfire firearms. Use of snap caps is recommended.
2. Poor Ammunition — Some cheap brands have poor quality control. 22 Plinkster recommends using ammo from a manufacturer with high quality control standards, such as CCI and Federal.
3. Age of Ammunition — Rimfire ammo can function well for a decade or more. However the “shelf life” of rimfire ammunition is not infinite. You ammo’s “lifespan” will be shortened by heat, moisture, and humidity. You should store your rimfire ammo in a cool, dry place.
4. Mishandling of Ammunition — Tossing around ammunition can cause problems. Rough handling can cause the priming compound to be dislodged from the rim. This causes misfires.
Preventing misfires is essential if you want to succeed in NRL22 competition and other rimfire competition disciplines run “on the clock”.
For today’s Sunday GunDay story, we look at the legendary Remington 700, perhaps the most popular American bolt-action rifle of all time. After covering the history of the Rem 700 rifle, we provide an inside look at the Rem 700 through a series of cutaway animations. Then we explain how gunsmiths can enhance a Remington 700 action through “blueprinting” procedures.
Remington 700 Origins and History
After World War II, Remington Arms engineer Mike Walker began designing lower-cost alternatives to the Model 30, which resulted in the Model 721. These used a cylindrical receiver produced from cylindrical bar stock that could be turned on a lathe, rather than machined in a series of milling operations, which significantly reduced the cost of production. Further developments of the basic 721 action under the direction of Walker produced the Model 722 and Model 725, and ultimately in 1962, the Model 700.
Walker sought to increase the accuracy of the rifles, by utilizing tight tolerances in the chamber and bore, a short leade, and a very fast lock time. Like the earlier 721, the Remington 700 action was designed for mass production. Remington initially produced two variants of the Model 700, the ADL and BDL, in both long- and short-action versions. In 1969, Remington introduced upgrades for the rifle, including a longer rear bolt shroud, a jeweled bolt, and improved stock finishing. Four years later, production of left-handed Rem 700s began, to compete with the Savage Model 110, at that time the only major American-made left-bolt rifle.
Other Rem 700 versions include the titanium receiver 700ti, the 700 SPS (which replaced the ADL in 2005), and the CDL model. In addition to its development as a hunting rifle, the Model 700 also provided the basis for military and police sniper rifles, starting with the M40 rifle in 1966, which was initially ordered by the U.S. Marine Corps. The U.S. Army adopted the M24 Sniper Weapon System in 1986.
The Remington 700 is sold in both short action and long action variants. This photo is from the Big ED YouTube video comparing the two action lengths.
The Remington 700 is a manually-operated bolt action with two forward dual-opposed lugs. The bolt face is recessed, fully enclosing the base of the cartridge, The extractor is a C-clip sitting within the bolt face. The ejector is a plunger on the bolt face actuated by a coil spring. The bolt is of 3-piece construction, brazed together (head, body and bolt handle). The receiver is milled from round cross-section steel.
Chassis Systems for Remington 700s
With the popularity of the Remington 700 series rifles, and the availability of Rem 700 barreled actions by themselves, many companies have created after-market chassis systems. This Brownells Video reviews modern Accuracy Int’l chassis systems configured for Remington 700 barreled actions. Modular chassis systems have become particularly popular with PRS/NRL competitors.
Rem 700 Cutaway Video Shows Components + Operation
Ever wish you could look inside your rifle, to see how the trigger and fire-control system work? Well now that is possible with the magic of 3D computer graphics. Modern software allows detailed “cutaway” side-views (see below), as well as 3D views with 360° rotation. The software can also provide X-Ray-type views into the gun’s internals — as you can see above. And computer animation can show the complete firing process from trigger pull to chambering of the next round.
READERS — Do take the time to watch the video! This Rem 700 animation is really outstanding! EVERY bolt-action shooter should watch this video all the way through.
The Model 700 series of bolt-action rifles have been manufactured by Remington Arms since 1962. All are based on basically the same centerfire bolt action. They are typically sold with an internal magazine depending on caliber, some of which have a floor-plate for quick-unloading, and some of which are “blind” (no floor-plate). The Model 700 is a development of the Remington 721 and 722 series of rifles, which were introduced in 1948.
The Remington 700 is a manually-operated bolt action with forward, dual opposed lugs. It features “Cock On Opening”, meaning the upward rotation of the bolt when the rifle is opened cocks the firing pin. A cam mechanism pushes the firing pin’s cocking piece backward. The bolt face is recessed, fully enclosing the base of the cartridge. The extractor is a C-clip sitting within the bolt face. The ejector is a plunger on the bolt face actuated by a coil spring. The bolt is of 3-piece construction, brazed together (head, body. and bolt handle). The receiver is milled from round cross-section steel.
Blueprinting Rem 700 Action — Making a Good Action Better
You may have heard the phrase “blueprinting an action”, but do you know what that really means? Do you know what operations are done to an action during the blueprinting process? To help you understand, gunsmith Bill Marr of RifleShooter.com has created a helpful article showing a Rem 700 blueprinting job start to finish. This article spotlights how the procedures can be done with manual tools. Bill, who runs 782 Custom Gunworks Ltd., can also perform many of these operations with modern automated machinery. In fact, Bill has written a follow-up article on Truing a Rem 700 receiver with a Lathe.
Bill explains: “Blue-printing, or truing a rifle action, ensures the receiver face, threads, lugs, bolt lugs, and bolt face are square to the center line of the receiver.” In Bill’s informative article, Bill shows how he blueprints a Remington 700 short action receiver with .308 Win bolt face. He covers the following procedures step by step:
Action Disassembly
Ream Minor Diameter of Receiver Threads
Square the Receiver Lugs
Square the Face of the Receiver
Lap the Bolt Lugs
Square the Bolt Face
Using the receiver facing tool, the front of the receiver is trued. The tool is placed over the tap and turned by hand. We used Do Drill to lubricate it.
2. Lapping the Lugs
The bolt lapping tool screws into the front of the action and applies rearward pressure on the bolt face. A little bit of lapping compound is placed on the front of the receiver lugs. The bolt handle is then raised and lowered repeatedly. Note — it is critical that we do not get any lapping compound on any other surfaces.
3. Truing the Bolt Face
On this bolt, the central part of the bolt face was low. After the truing operation, this Rem 700 bolt face is now completely square to the action.
IMPORTANT: Rifleshooter.com states: “This article highlights our project and is presented for information purposes only. This provides an overview of the process and should not be attempted without the guidance and supervision of an experienced gunsmith“.
If you like the idea of a Blueprinted action, but do not have a good gunsmith nearby (or don’t want to wait many weeks), you can order high-grade blueprinted Remington 700 actions from Pacific Tool & Gauge starting at $637.99 (see above).
Most shooters realize that significant changes in temperature will alter how powders perform. That’s why you want to keep your loaded ammo out of the hot sun, and keep rounds out of a hot chamber until you’re ready to fire. But there are other factors to be considered — HUMIDITY for one. This article explains why and how humidity can affect powder burn rates and performance.
We’ve all heard the old adage: “Keep your powder dry”. Well, tests by Norma have demonstrated that even normal environmental differences in humidity can affect the way powders burn, at least over the long term. In the Norma Reloading Manual, Sven-Eric Johansson, head of ballistics at Nexplo/Bofors, presents a very important discussion of water vapor absorption by powder. Johansson demonstrates that the same powder will burn at different rates depending on water content.
Powders Leave the Factory with 0.5 to 1.0% Water Content
Johansson explains that, as manufactured, most powders contain 0.5 to 1% of water by weight. (The relative humidity is “equilibrated” at 40-50% during the manufacturing process to maintain this 0.5-1% moisture content). Importantly, Johansson notes that powder exposed to moist air for a long time will absorb water, causing it to burn at a slower rate. On the other hand, long-term storage in a very dry environment reduces powder moisture content, so the powder burns at a faster rate. In addition, Johansson found that single-base powders are MORE sensitive to relative humidity than are double-base powders (which contain nitroglycerine).
Tests Show Burn Rates Vary with Water Content
In his review of the Norma Manual, Fred Barker notes: “Johansson gives twelve (eye-opening) plots of the velocities and pressures obtained on firing several popular cartridges with dehydrated, normal and hydrated Norma powders (from #200 to MRP). He also gives results on loaded .30-06 and .38 Special cartridges stored for 663 to 683 days in relative humidities of 20% and 86%. So Johansson’s advice is to keep powders tightly capped in their factory containers, and to minimize their exposure to dry or humid air.”
Confirming Johansson’s findings that storage conditions can alter burn rates, Barker observes: “I have about 10 pounds of WWII 4831 powder that has been stored in dry (about 20% RH) Colorado air for more than 60 years. It now burns about like IMR 3031.”
What does this teach us? First, all powders start out with a small, but chemically important, amount of water content. Second, a powder’s water content can change over time, depending on where and how the powder is stored. Third, the water content of your powder DOES make a difference in how it burns, particularly for single-base powders. For example, over a period of time, a powder used (and then recapped) in the hot, dry Southwest will probably behave differently than the same powder used in the humid Southeast.
Reloaders are advised to keep these things in mind. If you want to maintain your powders’ “as manufactured” burn rate, it is wise to head Johannson’s recommendation to keep your powders tightly capped when you’re not actually dispensing charges and avoid exposing your powder to very dry or very humid conditions. The Norma Reloading Manual is available from MidwayUSA for $24.99.
Real-World Example — “Dry” H4831sc Runs Hotter
Robert Whitley agrees that the burn rate of the powder varies with the humidity it absorbs. Robert writes: “I had an 8-lb. jug of H4831SC I kept in my detached garage (it can be humid there). 43.5-44.0 gr of this was superbly accurate with the 115 Bergers out of my 6mm Super X. I got tired of bringing it in and out of the garage to my house for reloading so I brought and kept the jug in my reloading room (a dehumidified room in my house) and after a few weeks I loaded up 43.5 gr, went to a match and it shot awful. I could not figure out what was going on until I put that load back over the chronograph and figured out it was going a good bit faster than before and the load was out of the “sweet spot” (42.5 – 43.0 gr was the max I could load and keep it accurate when it was stored in less humid air). I put the jug back in the garage for a few weeks and I now am back to loading 43.5 – 44.0 gr and it shoots great again. I have seen this with other powders too.”
If you have two jugs of the same powder, one kept in a room in your house and one somewhere else where it is drier or more humid, don’t expect the two jugs of the same lot of powder to chrono the same with the same charge weights unless and until they are both stored long enough in the same place to equalize again.
This new mobile App helps shooters make the right wind hold and/or dial the correct amount of windage.
High Power Wind Lab Mobile App Product Review by F-Class John
When it comes to long range shooting, there are few things that make a bigger difference in hitting your target than being able to accurately adjust for wind angle/velocity changes. While it’s one thing to learn how to read the speed and direction of wind by looking at flags, mirage, or surface conditions, it’s another to know what to do with that information (how much to hold off/correct). Knowing how to process changing wind cycles and determine the right hold-off/correction often takes years or decades of practice to master.
Enter the High Power Wind Lab App which stands out as the only dedicated WSYWIG hold-off calculator on the market. Enter a few simple numbers from your favorite ballistic calculator and you’re ready to make adjustments to the wind direction and power dials, leaving the App to do the rest by telling you what your hold should be and if any additional windage should be added to your scope or sights. So after you input the data, then the App suggests the proper correction(s). Download the Wind Lab App for iPhones/iPads via the Apple App Store. NOTE: Android availability via Google Play is pending.
F-Class John Review of High Power Wind Lab App:
Starting up the App you’ll see a simple menu to start a session. The first field is for naming the session. This is helpful for those who save their strings and want to refer to them later but it’s not a required field. The next field is for choosing your target. The App offers the choice of High Power or F-Class targets at mid-range (600 yards) or long range (800-1000 yards). After picking the appropriate target, input the actual distance at which you’ll be shooting. After that, you’ll have to enter your load data. The next two fields will auto-populate for the date and then the shot list once you are done saving shots. The lower section allows you to change what’s visible on the screen (selecting the features you want to view). You can also choose MOA or MILS (milliradians) click values. For wind velocity values, you can select MPH, kilometers per hour, or meters per second.
High Power Wind Lab iPhone App in horizontal mode.
Once you’re done with the setting page, simply tap “start” to bring up the target display. The App can be used in portrait or landscape mode but for the best user experience I’d recommend using it in landscape. On the target page you’ll see four distinct sections. Along the bottom you’ll see the windage dial where you can add or subtract windage simply by moving it left or right. Above the windage dial, you’ll see wind flags that represent the power and above that the direction dial. On the right is the actual target where you see the bracket of where you should hold for the shot based on the information you put in along with color coded brackets to show you the margin of error. The target section also features a great shot calling feature that allows you to tap where you held, then tap where your actual impact was. These shots can be saved for future reference and the ability to do this really helps while you’re training.
Once you get used to how the wind direction and power inputs work the real power of this App comes to life as you can sit and practice what your calls should be from the comfort of your home. There are countless nights where I’ll sit in bed and spend ten minutes moving the power or direction through strange changes just so I can guess or track what happens and the more you practice with it, the more you’ll feel confident when you see those conditions occur at the range.
App Available Now for Apple and Android Mobile Devices
The High Power Wind Labs App is available now for iOS (Apple) mobile devices and Android devices. At $12.99 this App costs less than twenty 7mm match bullets. You could easily save that much in sighters in a couple range sessions. With its ability to calculate nearly every condition you’d encounter at a match you owe it to yourself to download it and start practicing. This interactive application is an invaluable tool for shooters that want to better understand the affects of wind on bullets over long distances.
High Power Wind Lab Description by Accuracy Software Ltd.
High Power Wind Lab is a visualization tool that helps shooters determine wind value based on observed conditions. The App efficiently calculates the sight correction necessary to hit the center of a target. Use High Power Wind Lab on and off the range to explore scenarios and better understand how wind affects the trajectory of a bullet. By interactively changing the wind velocity and wind angle, the display dynamically updates to show the calculated correction and a visualizes a range of possible outcomes if the shooter misreads the wind conditions. By changing the wind velocity and wind angle, the High Power Wind Lab shows the calculated correction as well as possible outcomes if the wind angle and velocity are misread. This interactive tool is invaluable for exploring the interplay of wind direction and velocity and the tradeoffs you need to make when deciding when to shoot and what correction to put on your gun.
The High Power Wind Lab is also a shot plotting and wind plotting tool that shows how wind conditions have developed over time and what the predominant conditions have been throughout a string of fire. That can be a very powerful “hindsight” tool when analyzing your results in a shooting session.
High Power Wind Lab Key Features Include:
Shot Plotting
Score Calculation
Record Keeping
Tablet Support
True MOA Corrections
Support for Custom Ammunition
Library of commonly-used Midrange and Long Range F-Class and High Power Rifle Targets
Hold-Over Function in High Power Wind Lab
This video, from the creator of the High Power Wind Lab, explains how the Hold-Over feature works. Holding over is commonplace in long range target shooting among those who use scoped rifles. This video demonstrates how to use High Power Wind Lab’s hold-over feature to accurately calculate the needed hold-over when engaging long range targets.
NOTE: If this Hold-Over video is not displaying on your browser, try another browser and/or use this YouTube link: https://youtu.be/WhpyymG15HE
If you read our lengthy article on Ultrasonic Cleaning by Jason Baney, you’ve seen the remarkable results that can be achieved with this method, as shown by the photo above. Ultrasonic cleaning has many advantages over traditional tumbling methods of case cleaning. There is no dust or media residue to remove from the brass, and when done right, the cases come out clean and shiny, inside and out, even the primer pockets.
In its Benchtalk Archives, Brownell’s has an excellent article discussing Ultrasonic Case Cleaning. Brownell’s staff compares results, with measured dwell times from 5 to 75 minutes, using both Mpro-7 and HCS 200 cleaning solutions. Tests are performed with once-fired and 5X-fired Tactical 20 (Tac20) cases, as well as once-fired .260 Rem Cases. The article also compares the results from ultrasonic cleaning vs. tumbling in walnut media. Below are Brownell’s results for Tac20 cases with the HCS 200 (non-acidic solution). Go to Brownell’s article for MPro7 results and Rem 260 results.
HCS 200 Cleaning Solution Test
Procedure — Solution was de-gassed for 15 minutes, then 63 Tac20 cases were placed in a single layer, in stainless steel mesh basket. The temperature of the starting solution was 102° F. When the cases were removed the temperature was 110° F.
Once-Fired Tactical Twenty Cases (HCS 200) — Observations 5 minutes: The exterior of the cases are not significantly brighter/cleaner. The primer pockets and case interiors are still dirty. 10 minutes: Exterior of the cases are brighter. 70% of the cases show some degree of cleaning of the primer pockets. Little difference seen inside the case, but case mouths are cleaner. 15 minutes: Case brightness is about the same. Still only 70% of the primer pockets are clean, but a larger portion of each is cleaner. A Q-tip swabbed inside the cases shows that carbon/powder residues are loosening up. 20 minutes: Case exteriors are brightening up. 80-85% of the primer pockets are about 90% clean. The insides of the cases and case mouths are cleaner. 25 minutes: Cases are brighter/cleaner than even new brass. 80-85% of the cases have almost completely clean primer pockets. The inside of the cases are 80-90% clean. 30 minutes: The insides of the cases and case mouths appear to be completely clean. 87% of the primer pockets are virtually 100% clean. 13% of the cases had stubborn primer pocket residue that could not be completely removed. 60 minutes: Eight cases (13%) were placed in the tank for another 30 minutes to try to remove the remaining residue in their primer pockets. Six out of the eight cases were completely clean.
Five-Times Fired Tac20 Cases — Observations 30 minutes: Based on the above observations, I didn’t begin to observe these 5-time fired cases until after 30 minutes: The exterior cases are bright/clean. Brighter than new cases. The primer pockets on 75% of the cases are 75% clean. The remaining cases had primer pockets that were only 25% clean. The inside of the cases appear to be clean. 65 minutes: 25% of the primer pockets were 95% clean, 25% of the primer pockets were 90% clean, 25% of the primer pockets were 85% clean; and 25% were 80% clean. 75 minutes: 75% of the primer pockets were 90% clean.
How Does Ultrasonic Cleaning Work? The Brownell’s article explains: “Ultrasonic cleaning uses high-frequency sound waves (generally between 20-80 kHz) to remove a variety of contaminants from objects immersed in a liquid. The result of these high-frequency sound waves is a process called cavitation. These high frequency bursts of ultrasonic energy produce a three-dimensional wave of alternating positive and negative pressure areas as the sound wave passes through the solution. During negative pressure, microscopic cavitation bubbles form and will continue to grown until they reach resonant size. As the positive sound wave passes, the pressure rises rapidly and implodes these tiny bubbles. Before these minuscule bubbles implode they store a tremendous amount of energy. These bubbles can be as hot as 10,000 degrees and have as much as 50,000 lbs per square inch of pressure. This sounds alarming, but you have to remember that these bubbles are microscopic in nature and pose no harm to anything, unless you are a carbon /powder residue deposit on a cartridge case!
When this cavitation bubble implodes near your brass case, it transforms the bubble into a jet about 1/10th of its size. This jet of energy can travel as fast as 400 km/hour. At 43 kHz, as is the frequency for our L & R HCS 200 ultrasonic cleaner, this is happening 43,000 times per second. This micro-burst of extreme energy is responsible for removing contaminants from the surface of your cartridge brass. Ultrasonic cleaning can reach into crevices and inaccessible areas and remove surface debris that can’t be cleaned by any other process.”
Hey guys, you’ll probably want to download this Powder Burn Rate Chart issued by Hodgdon/IMR. This table includes the latest IMR powders including the Enduron series (IMR 4166, 4451, 4955, 7977), shown in green below. Please note, the chart is not limited to Hodgdon and IMR propellants. This table also includes popular powders from Accurate, Alliant, Norma, Ramshot (Western), Vihtavuori, and Winchester. There are a total of 163 powders listed in the chart.
This chart provides useful information for all hand-loaders. When doing load development, and testing one powder versus another, it’s generally wise to choose propellants that share the same relative burn rate, as least for starters. While this chart contains “Nov. 2019″ in the title, this is the most recent chart available from Hodgdon/IMR. It is the chart currently linked on the Hodgdon.com Reference Data Center.
NOTE: Hodgdon powders are shown in blue, IMR standard powders are shown in yellow, IMR Enduron powders are shown in green, and Winchester powder are shown in red. DOWNLOAD Chart HERE.
Burn Rate Chart from LoadData.com with 197 Powders
The LoadData.com website has released its own burn rate chart, which is even more comprehensive than the official Hodgdon/IMR chart. We recommend starting with the Hodgdon/IMR listings, but if you can’t find a particular powder on the Hodgdon/IMR chart above, then consult the alternative from LoadData.com which lists 197 powders.
We also caution that, with any powder, start conservatively, at the low end of official load recommendations. Be aware that, even within the same burn range a ball powder can behave differently than an extruded powder. And some powders are much more temperature sensitive than others. Among the available powders on the market, some of best in terms of temp stability are the Alliant TS (temp stable) series, and the popular Hodgdon powders, such as H4350, made by ADI in Australia.
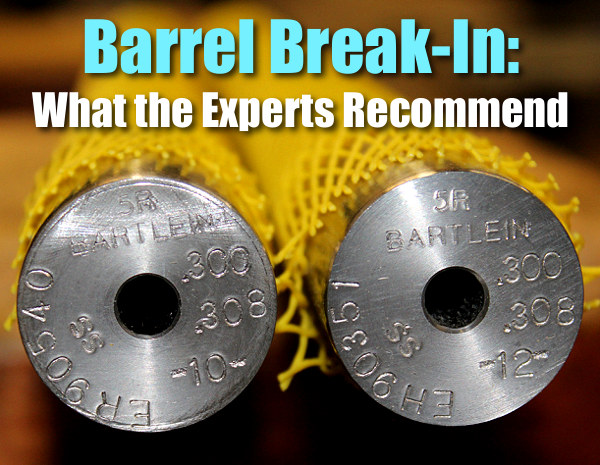
The question of barrel break-in is controversial. Some folks advocate an elaborate, lengthy cycle of shooting and brushing, repeated many times — one shot and clean, two shots and clean and so on. This, it is argued, helps barrels foul less and shoot more accurately. Others say minimal break-in, with patching and brushing after 10-15 rounds, is all you need. Still others contend that break-in procedures are a total waste of time and ammo — you should just load and shoot, and clean as you would normally.
We doubt if there will ever be real agreement among shooters concerning barrel break-in procedures. And one must remember that the appropriate break-in procedure might be quite different for a factory barrel vs. a custom hand-lapped barrel. This Editor has found that his very best custom barrels shot great right from the start, with no special break-in, other than wet patches at 5, 10, and 15 rounds. That said, I’ve seen some factory barrels that seemed to benefit from more elaborate break-in rituals.
What’s the best barrel break-in procedure? Well our friend Eric Mayer of Varminter.com decided to ask the experts. A while back Eric interviewed representatives of three leading barrel manufacturers: Krieger, Lothar-Walther, and Shilen. He recorded their responses on video. In order of appearance in the video, the three experts are:
Do I Need to Break-In a New Rifle Barrel?
Eric Mayer of Varminter.com says: “That is a simple question, [but it] does not necessarily have a simple answer. Instead of me repeating my own beliefs, and practices, on breaking-in a new rifle barrel, I decided to answer this one a bit differently. While we were at the 2016 SHOT Show, we tracked down three of the biggest, and most popular, custom barrel makers in the world, and asked them what they recommend to anyone buying their barrels, and why they recommend those procedures. We asked the question, and let the camera run!” Launch the video above to hear the answers — some of which may surprise you.
Long-Term Barrel Care — More Experts Offer Opinions
Apart from the debate about barrel break-in, there is the bigger question of how should you clean and maintain a barrel during its useful life. Some folks like aggressive brushing, other shooters have had success with less invasive methods, using bore foam and wet patches for the most part. Different strokes for different folks, as they say. In reality, there may not be one solution for every barrel. Different fouling problems demand different solutions. For example, solvents that work well for copper may not be the best for hard carbon (and vice-versa).
“Why worry about a little barrel fouling when the throat is subjected to a brutal 5,600° F volcano at 55,000 PSI? To investigate these and other questions about taking care of a match barrel, we spoke with a dozen experts and share their knowledge in this first of a series of articles.
After listening to folks who shoot, build barrels or manufacture cleaning solvents for a living, we concluded that even the experts each have their own unique recommendations on how to care for a match barrel. But they all agree on one thing — the gun will tell you what it likes best. Because the life expectancy of a match barrel is about 1,500 to 2,500 rounds, the objectives of cleaning one should include: preserve accuracy, slow the erosion, and remove fouling — all without damaging the gun. This article doesn’t claim that one cleaning method is better than the next. Rather, we set out to interject a little science into the discussion and to share some lessons learned from experts in the field.” — Chip Lohman
With the Whidden Click-Adjustable Sizer Dies, you can change shoulder bump by .001″ (one-thousandth) with a simple click. Fast. Easy. Precise.
As handloaders have become more aware of shoulder bump and proper adjustment of the sizer die in recent years, there has become a need for an easier way to adjust the sizer die properly. For most folks, with their conventional dies, it takes lengthy trial trial and error to get the shoulder setback correct. Anyone who has done this can attest that it can be a slow and annoying job.
Whidden Gunworks has solved the problem with the innovative Click Adjustable Sizer Die. Patent No: 10,393,488. This die and lock ring work together to give the user a clicking feel to the adjustment just like a high end rifle scope. Each click moves the shoulder bump exactly .001″ so you can easily find the exact shoulder bump that you desire.
The Click Adjustable option is available on Whidden Custom Sizer dies as well (7/8”-14 format dies only)! Included with the Click Adjustable Sizer Die is a Shoulder Bump Gauge. This gauge attaches to standard calipers and allows measurement from the case shoulder to the base. Using the Shoulder Bump Gauge with the Click Adjustable Sizer Die will make the proper sizer die setup easier than ever before.
Click-adjustable die sets are available with both bushing and non-bushing configurations. Along with these complete die sets, Whidden Gunworks offers a separate click-adjustable ring to use with existing dies. Priced at $54.95, the Whidden Click-Adjust Lock Ring represents a modest investment for a major gain in die ease-of-use and precision adjustability.
The Whidden Universal Click Adjustable Lock Ring you can instantly turn your sizer die into a Click Adjustable Die. This ring works with any 7/8 OD sizer of any brand with adjustable shoulder bump. Simple in design, the inner and outer ring can rotate independently of each other. Each click is metered in true 1 thousandths adjustment and has 0.100″ total available travel. These work great with nearly all sizing 7/8 OD sizing dies, and one verified purchaser noted: “Not only are they useful on reloading dies, but it’s the cat’s meow on the Giraud Power Trimmer Case Holders.”
Dillon Users Take Note: The Whidden Click Adjustable Sizing Die will not work with the Dillon 550 or 650 progressive reloading press systems. The Universal Click Adjustable Lock Ring is not compatible with the Dillon floating toolhead.


 Tests Show Burn Rates Vary with Water Content


 If you read our lengthy article on
 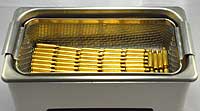 The Brownell’s article explains: “Ultrasonic cleaning uses high-frequency sound waves (generally between 20-80 kHz) to remove a variety of contaminants from objects immersed in a liquid. The result of these high-frequency sound waves is a process called cavitation. These high frequency bursts of ultrasonic energy produce a three-dimensional wave of alternating positive and negative pressure areas as the sound wave passes through the solution. During negative pressure, microscopic cavitation bubbles form and will continue to grown until they reach resonant size. As the positive sound wave passes, the pressure rises rapidly and implodes these tiny bubbles. Before these minuscule bubbles implode they store a tremendous amount of energy. These bubbles can be as hot as 10,000 degrees and have as much as 50,000 lbs per square inch of pressure. This sounds alarming, but you have to remember that these bubbles are microscopic in nature and pose no harm to anything, unless you are a carbon /powder residue deposit on a cartridge case!
 When this cavitation bubble implodes near your brass case, it transforms the bubble into a jet about 1/10th of its size. This jet of energy can travel as fast as 400 km/hour. At 43 kHz, as is the frequency for our L & R HCS 200 ultrasonic cleaner, this is happening 43,000 times per second. This micro-burst of extreme energy is responsible for removing contaminants from the surface of your cartridge brass. Ultrasonic cleaning can reach into crevices and inaccessible areas and remove surface debris that can’t be cleaned by any other process.”
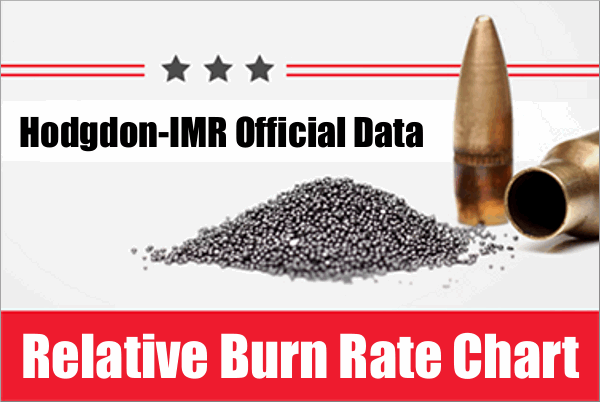


 Do I Need to Break-In a New Rifle Barrel?