By Ashley Brugnone, CMP Writer
At the 2018 National Matches at Camp Perry this past summer, the Civilian Marksmanship Program (CMP) introduced a new series of Long Range events. Three days of long range rifle matches, held at 800, 900 and 1,000 yards, were added to the summer 2018 schedule to allow long range marksmen the opportunity to fire on the Camp Perry grounds following the NRA’s decision to move the NRA High Power Long Range Championship (and HP Championship) to Camp Atterbury, Indiana. Long Range matches will be held again at Camp Perry next year, from August 6-9, 2019 — put those dates on your calendar.
Camp Perry Photo by Scott McKenna from past event.
Competitors at the 2018 Long Range Matches at Camp Perry fired in Service, Match, and Palma rifle classes. Six matches were fired during the Long Range series. Those who participated in the inaugural LR matches were pleased that Long Range was featured again at Camp Perry after a two-year absence:
“Camp Perry is one of the best ranges in the U.S. with a long and proud history. Thank you, CMP, for all of the work expended on the 2018 season.”
“The matches were well-organized and went smoothly.”
“I liked the fact that they were held at Camp Perry. That’s where the National Matches should be.”
“Good job! I enjoyed the matches. It was great being back at Perry for long range.”
“Overall a very positive and fun championship for me. I applaud your efforts in bringing long range back to Camp Perry….”
Winning the overall Aggregate was USAMU shooter SFC Shane Barnhart with 1244-71X. Teammate SGT Lane Ichord won the service rifle division with 1228-48X, while Robert Steketee topped the Palma rifle class with 1233-56X. As the “top gun” for the match, SFC Barnhart was the first recipient of the Coats Brown Memorial Trophy – donated to the CMP by the Military Marksmanship Association. Chief Warrant Officer 4 Coats Brown, was a repeat National Matches champion and became the head coach of the newly-formed Army Marksmanship Unit in 1956.
John Whidden cleaned the Viale Memorial event with the match rifle, with a score of 200-12X. Robert Gill, 59, of Visalia, CA, led the Palma rifle portion. The Bataan Memorial 4-person Team Match, which included 20 shots by each member at 1,000 yards, saw wins from the AMU in both the match and service rifle categories. Members of AMU Green (SFC Barnhart, SFC Brandon Green, SGT Ben Cleland, and SSG Amanda Elsenboss), each dropped only one point in the match rifle class to record an Aggregate score of 796-54x.
Major Sponsors for Camp Perry Long Range Matches
Geissele Automatics served as a generous sponsor for the new Long Range events, donating a prize to every winner in each category. Capstone Precision, the parent company of Berger, Lapua, SK and Vihtavuori, also donated prizes to several winners during the National Long Range Matches.
SAVE THE DATE in 2019: The CMP’s Long Range Matches will take place August 6-9 at Camp Perry, in Port Clinton, Ohio. Events include three days of Individual Long Range Matches, two days of Team Matches, the Camp Perry Palma Match, Shooter’s Reception and Long Range Awards Ceremony.
Hornady has opened a second production facility in Nebraska, 6 miles down the road from the main Hornady plant in Grand Island, NE. The new 150,000-square-foot production and shipping facility was christened with a ceremony featuring politicians and 1000 guests. Nebraska Governor Pete Ricketts commended Hornady during the facility’s grand opening, thanking the company for its significant investments in the state of Nebraska.
Hornady was founded by J.W. Hornady in 1949. The company started in a small shop on Fourth Street in Grand Island. Hornady opened its main plant just west of Grand Island in 1958. The new Hornady ‘West’ facility showcases the company’s growth over nearly 70 years. The Hornady West facility has already started shipping, with products heading out its doors in early October.
Hornady broke ground on the project in 2017 and finally unveiled Hornady West in late October. The 150,000 square-foot building will house Hornady ammunition production, packaging, and inspection, as well as the distribution center. Nestled on 320 acres on the former Cornhusker Army Ammunition Plant, Hornady intends to augment the facility over time, eventually introducing R&D capabilities as well as other support services for production operations.
Bullet and Brass Production Unchanged
The new plant will produce loaded ammo. Hornady bullets and cartridge brass will continue to be made at Hornady headquarters in Grand Island. According to Guns.com: “The company has no intention of abandoning any current manufacturing facilities, instead just moving services such as ammo, loading, packaging and its distribution center to Hornady West.”
Big Time Investments in the Nebraska Economy
“Over the last five years, Hornady has spent nearly a half a billion dollars in Nebraska through payroll and all the other investments they make here in our state. They’ve, over the last several years, contributed $1.7 million to state and local charities. Again, continuing to invest to make Nebraska a great place,” said Governor Ricketts.
“We are extremely excited for this new building, this new facility. It’s a great operation for our employees,” V.P. Jason Hornady told local news outlet KSNB. “It is going to make us a far more efficient company.”
Founded in 1949, Hornady® Manufacturing Company is a family-owned business headquartered in Grand Island, Nebraska, that manufactures reloading tools, ammunition, bullets, shooting accessories, and security products.
Here’s a simple solution for lumpy front sandbags. Cut a small block the width of your fore-end and place that in the front bag between matches. You can tap it down firmly with a rubber mallet. This will keep the front bag nice and square, without bunching up in the center. That will help your rifle track straight and true. Rick Beginski uses wood (see photo), while our friend John Southwick uses a small block of metal. The metal block might work a little better, but the wood version is easier to make with simple tools. John Loh of JJ Industries offers a slick Delrin block with a built-in bubble level. Loh’s block helps ensure that the actual top surface of your front bag is level, as distinct from the front rest assembly.
At the request of Forum members, we are reproducing this helpful article by gunsmith and Hall-of-Fame benchrest shooter Thomas “Speedy” Gonzalez
How to Reduce Vertical in Your Shot Groups
One of our Shooter’s Forum members recently built a new benchrest rifle. He was concerned because his groups were stringing vertically. This is a common problem that all precision shooters will face sooner or later. In addition to ammo inconsistencies, many other factors can cause vertical stringing. Accordingly, it’s important that you analyze your gun handling and bench set-up systematically.
Hall of Fame benchrest Shooter Speedy Gonzalez has written a helpful article that explains how to eliminate mechanical and gun-handling problems that cause vertical spread in your groups. Speedy’s article addresses both the human and the hardware factors that cause vertical. CLICK HERE to read the full article. Here are a few of Speedy’s tips:
• Front Bag Tension — Vertical can happen if the front sand bag grips the fore-arm too tightly. If…the fore-arm feels like it is stuck in the bag, then the front bag’s grip is too tight. Your rifle should move in evenly and smoothly in the sand bags, not jerk or chatter when you pull the gun back by hand.
• Sandbag Fill — A front sandbag that is too hard can induce vertical. Personally, I’ve have never had a rifle that will shoot consistently with a rock-hard front sandbag. It always causes vertical or other unexplained shots.
• Stock Recoil — Free-recoil-style shooters should be sure their rifle hits their shoulder squarely on recoil, not on the edge of their shoulder or the side of their arm. If you shoulder your gun, you need to be consistent. You can get vertical if your bench technique is not the same every shot. One common problem is putting your shoulder against the stock for one shot and not the next.
• Front Rest Wobble — You will get vertical if the top section of the front rest is loose. Unfortunately, a lot of rests have movement even when you tighten them as much as you can. This can cause unexplained shots.
• Stock Flex — Some stocks are very flexible. This can cause vertical. There are ways to stiffen stocks, but sometimes replacement is the best answer.
• Rifle Angle — If the gun is not level, but rather angles down at muzzle end, the rifle will recoil up at butt-end, causing vertical. You may need to try different rear bags to get the set-up right.
• Unbalanced Rifle — If the rifle is not balanced, it does not recoil straight, and it will jump in the bags. If the rifle is built properly this will not happen. Clay Spencer calls this “recoil balancing”, and he uses dual scales (front and rear) to ensure the rifle recoils properly.
• Firing Pin — A number of firing-pin issues can cause vertical. First, a firing pin spring that is either too weak or too strong will induce vertical problems. If you think this is the problem change springs and see what happens. Second, a firing pin that is not seated correctly in the bolt (in the cocked position) will cause poor ignition. Take the bolt out of rifle and look in the firing pin hole. If you cannot see the entire end of firing pin it has come out of the hole. Lastly, a firing pin dragging in bolt or shroud can cause vertical. Listen to the sound when you dry fire. If you don’t hear the same sound each shot, something is wrong.
• Be Consistent — You can get vertical if your bench technique is not the same every shot. One common problem is putting your shoulder against the stock for one shot and not the next.
• Head Position — Learn to keep your head down and follow-through after each shot. Stay relaxed and hold your position after breaking the shot.
• Last Shot Laziness — If the 5th shot is a regular problem, you may be guilty of what I call “wishing the last shot in”. This is a very common mistake. We just aim, pull the trigger, and do not worry about the wind flags. Note that in the photo below, the 5th shot was the highest in the group–probably because of fatigue or lack of concentration.
Q: What is the most popular gun book ever published?
A: That distinction goes to the Shooter’s Bible, which has sold over 7 MILLION copies since it was first published over 80 years ago.
Released last month (October 2018), the 110th Edition of this respected resource is bigger and better than ever. This latest Shooter’s Bible boasts 608 pages with 275 color photos and more than 1000 black-and-white photos. The new 110th Edition features many new firearms as well as new optics.
Published annually for more than eighty years, the Shooter’s Bible is perhaps the most comprehensive reference guide for firearms and their specifications. The publishers claim that “nearly every firearms manufacturer in the world” is included. The 110th Edition also contains new and/or enhanced sections on ammunition, optics, and accessories, along with updated handgun and rifle ballistic tables. There are also extensive charts of currently available hunting and match bullets for hand-loaders.
While many shooters are now using the internet to get reloading data and equipment specifications, the Shooter’s Bible remains a valuable resource with a great legacy. As one recent Shooter’s Bible purchaser explains: “While it’s true that much of the information contained in the Shooter’s Bible can be found on the Internet, there are many of us who would first rather relax in our easy chair and page through the book at our leisure. If you find an item that catches your fancy, you can then follow up by going to their Web site.”
Another buyer observed: “This latest edition is proof that, even with all the attacks on our 2nd Amendment right over the years, the industry has persevered and grown. I hope the day never comes when there will no longer be a reason to publish the Shooter’s Bible.”
The U.S. Army Marksmanship Unit (USAMU) regularly releases a reloading “how-to” article on the USAMU Facebook page. Here’s a helpful USAMU guide on removing military primer pocket crimps. If you ever use surplus military brass, you really should this article. It contains vital information “learned the hard way”. The writer has tried many different options for removing/swaging out crimps. He weighs the pros and cons of various methods and provides some advice that will save you time and headaches. This article was the second in a 3-part series. Visit the USAMU Facebook page regularly for other informative articles on reloading methods.
A common question, and important issue with US GI surplus 5.56 brass is “what to do with the primer crimp?” Our Handloading Shop does not prime/re-prime GI 5.56 brass, as we receive it in virgin state (primed) and don’t reload it. However, our staff has extensive private experience handloading GI brass in our own competitive shooting careers, and have several tips to offer.
Once the brass is full-length sized and decapped, the staked-in ring of displaced metal from the primer crimp remains, and hinders re-priming. Some swaging tools exist to swage out this ring, allowing free access to the primer pocket. Some are stand-alone products, and some are reloading-press mounted. Early in this writer’s High Power career, he used the common press-mounted kit several times, with less than stellar results.
Setting Up Swaging Tools
Surplus brass tends to come from mixed lots, and primer crimp varies from very mild to strong. Also, primer pocket dimensions vary. So, setting up this “one size fits most” tool involves trying to find a happy medium for a selection of different types of brass in your particular lot. Some are over-swaged, some under-swaged, and some are “Just Right.” Overall, it was a time-consuming and sub-optimal process, in this writer’s experience.
Cutting Out the Crimp Ring with a Chamfer Tool
[After trying swaging tools] this writer evolved to using the ubiquitous Wilson/RCBS/Other brands chamfer and deburring tool to cut out only the displaced crimp ring at the top of the primer pocket. One caution: DON’T OVER-DO IT! Just a little practice will let the handloader develop a “feel” for the right degree of chamfer that permits easy re-priming without removing so much metal that primer edges start to flow under pressure. For this writer, it was three half-turns of the tool in the primer pocket, with medium pressure.
Here, as with all bulk reloading operations, mechanization is our friend. A popular reloading supply house has developed an inexpensive adaptor that houses the chamfer/deburr tool (retained by an allen screw) and allows mounting in a hand drill or drill press. This speeds the operation significantly, as does use of one of the popular Case Preparation Stations that feature multiple powered operations. (Say good-bye to carpal tunnel syndrome and arthritis!)
One advantage of chamfering the primer pockets lightly to remove remnants of primer crimp, vs. swaging, is that primer pockets are not loosened in this process. US GI (usually LC) NATO 5.56 brass has a great reputation for longevity due to the superior hardness of the case head vs. some softer brands of commercial brass. This means the brass will stand up well to multiple full-pressure loads without loosening primer pockets, and the chamfering method helps support this benefit.
Powered Case Prep Centers — What to Look For
A word of advice (often learned the hard way) — think carefully before jumping on the “latest/greatest” case prep center. One with a proven, long-time track record of durability and excellent customer support has a lot going for it, vs. the flashy “new kid on the block.” Analyze the functions each case prep center can support simultaneously — i.e., can it chamfer, deburr and clean primer pockets all at the same time, without having to re-configure?
Do the tool-heads that come with it look truly functional and durable? If not, can they be easily replaced with proven or more-needed versions, such as a VLD chamfer tool, or a solid/textured primer pocket cleaner rather than a less-durable wire-brush type?
Tips for Priming with Progressive Presses
When re-priming, a couple of factors are worth noting. When re-priming using either single-stage presses, hand tools, or bench-mounted tools (such as the RCBS bench-mounted priming tool), precise alignment of the primer pocket entrance with the primer is easily achieved, and priming goes very smoothly. When using certain progressive presses, due to the tolerances involved in shell-heads, etc., one may occasionally encounter a primer that isn’t quite perfectly aligned with the primer pocket.
If resistance is felt when attempting to re-prime, DO NOT attempt to force the primer in — doing so can be dangerous! Rather, just exert SLIGHT upward pressure to keep the primer in contact with the case-head, and with the support hand, move the case back/forth a trifle. The primer will drop into alignment with the primer pocket, and then prime as usual. After priming, check each seated primer by feel. Ensure it is below flush with the case head (cleaning primer pockets helps here), and that there are no snags, burrs or deformed primers.
More Info on Primer Pocket Swaging
For more information about removing military crimps in primer pockets, we recommend you read Get the Crimp Out on the Squibloads Gun Thoughts Blog. This is a detailed, well-illustrated article that shows how to use various primer pocket reamers/cutters. It also has a very extensive discussion of swaging using CH4D, RCBS, and Dillon tools. The Squibloads author had much better luck with swaging tools than did the USAMU’s writer — so if you are considering swaging, definitely read the Squibloads article.
The illustration of primer pocket types is from the Squibloads Blog Article, Get the Crimp Out.
Today is October 31st, Halloween (originally “All Hallows Eve”). That means it’s pumpkin time. Just how much fun can you have with pumpkins? Watch these two videos and find out. In the first video, the RatedRR team sends a few orange gourds to pumpkin heaven using Det Cord, C4, and binary explosives. The sequence starting at the 2:00 minute mark in the first video is truly amazing. WARNING: DO NOT TRY THIS AT HOME!
Watch Pumpkin Blasting with Explosives
In the next video, a pumpkin carved as a Death Star serves as the target for a .50 caliber rifle (looks like a Barrett M82 .50 BMG). As you may guess, the pumpkin Death Star suffers the same fate as the Hollywood version in Star Wars. NOTE: At the 0:42 mark in the video, a graphic displays “30,000 FPS”. That’s the high-speed camera’s frame-per-second rate, NOT the projectile velocity in feet-per-second.
Watch .50 BMG Rifle vs. Death Star Pumpkin
Warning: These demonstrations were carried out on closed ranges by experienced professionals certified to use explosives. Possession of C4 and Det Cord may be a violation of various Federal, State, and local laws. Detonating cord and C4 are classified as high explosives and are regulated by the BATFE. Don’t even think about trying to repeat these stunts on your own.
Along with these popular cartridge types, DJ’s Brass can hydro-form 6 PPC, 30 PPC, 6 BRA, 30 BR, .260 AI, .284 Shehane and other wildcats.
Do you shoot a popular wildcat (such as the 6 BRA), but hate the hassle of fire-forming all your own cartridge brass? That takes time, costs money (in bullets and powder), and consumes precious barrel life. Well there IS a better solution — you can have your new brass hydro-formed to your exact specifications for a reasonable cost.
DJ’s Brass Service now offers custom case hydro-forming to your exact specs. Darrell Jones offers this service for a variety of popular cartridges: 6 PPC, 30 PPC, 30 BR, 6 BRA (BR Ackley), 6mm Grinch, 6 BRDX, 6 BRX, .260 Ackley, .284 Shehane and of course the very popular 6mm Dasher. After hydro-forming your brass, Darrell can also neck-up or neck-down the cases to meet your needs. For example, if you shoot a 22 Dasher, Darrell can hydro-form the cases to a 6 Dasher and then neck them down to .22 caliber. He can also turn the necks to your specs (for an additional charge).
Darrell is a hydro-forming wizard who has perfected the process over the last couple of years. He has learned a few special techniques along the way to ensure uniform case-forming.
Without revealing any trade secrets, we can say the Darrell has very special dies and Darrell doesn’t use a mallet or hammer — he has a system that is much more consistent. Darrell tells us: “Many of my customers take this brass and load it ‘as is’ and go straight to a match and shoot some very nice groups.”
Hydro-forming by Darrell costs $0.60 (sixty cents) per case with a minimum order of $60. Neck-turning is an additional $0.50 (fifty cents) per case plus actual return shipping. The turnaround is usually less than five days.
With Darrell’s hydro-forming service you don’t have to buy any special dies or other equipment. Darrell says: “Simply send me the brass you need or have it dropped-shipped to me along with a fired case that has not been sized. If you need formed brass for a new build (gun not yet fired), let me know and I will size the brass to fit within .001 of a PT&G GO gauge.”
For more information, visit DJsBrass.com, or call Darrell at (205) 461-4680. IMPORTANT: Contact Darrell for shipping instructions BEFORE sending brass for processing. In a hurry, don’t have time? Just call Darrell and he’ll make something work for you.
Hydro-Forming Customer Reports
Here are testimonials from recent customers.
“Recently had Darrell Jones of DJ’s Brass Service hydro-form 6 BRX brass for me. The turn around time was very fast and the brass was to the exact specification I ask for. I actually shot the hydro-formed brass in a match [without further fire-forming]. It shot a 3.597″ — pretty amazing. Let DJ do the work for you!” — Mike Wilson (3 Time IBS Record Holder; 2013 and 2014 1000-yard IBS Shooter of the Year.)
“Darrell Jones of DJ’s Brass Service went far beyond the call of duty, to assist me in preparation to shoot for my first time in an IBS match. I have had an interest in 1000-yard competition for many years and finally got the opportunity to try it. After researching the winning competitors, rifles, and rounds I ordered a Panda action with Krieger barrel in 6mm Dasher from Kelby’s. It was one week before the match and I had a rifle and no rounds. I contacted Darrell to hydraulically form 6mm dasher from Lapua 6mm BR brass. He formed the brass and had it in the mail the next day[.] Since I have only reloaded for hunting or magazine fed rifles I was not familiar with proper seating to allow land engagement of the bullets for 1000-yard accuracy. Darrell took the time to advised me every step of the way to allow me to shoot a 3.158″ (5) shot group to win my first round of my first competitive match ever.” — Mike Youngblood
Tomorrow is October 31st, Halloween (originally called “All Hallows’ Evening”). That means kids in costumes will be ringing doorbells as soon as it gets dark. No doubt some of you proscrastinators will wait ’til the last minute to set out your Halloween decorations and Jack-O-Lanterns. Don’t worry, in the video below, our friend, 3-Gun ace Taran Butler, shows how to carve a pumpkin in just about 5.5 seconds, give or take a tenth. Taran performed this feat of speed-carving with his trusty Infinity handgun, chambered in 9mm Major.
What Are the Origins of Halloween?
Halloween or Hallowe’en (a contraction of “All Hallows’ Evening”), also known as All Hallows’ Eve, is a yearly celebration observed on October 31, the eve of the Western Christian feast of All Hallows (or All Saints). According to many scholars, it was originally influenced by western European harvest festivals and festivals of the dead with possible pagan roots, particularly the Celtic Samhain. Others maintain that it originated independently of Samhain and has Christian roots.
“The blue plastic barrels that we have to shoot through are the idea of the local police — to ensure that we keep our rifles pointing at the targets!” — David Sharp
Here’s a great story from the other side of the pond — the United Kingdom. Shooting a .308 Win factory Savage rifle, a novice benchrest shooter set two new 1000-Yard UK Factory Sporter Class records with a group barely over three inches plus a 6.756″ four-group Aggregate. The Savage had been upgraded with an inexpensive aftermarket stock and Timney trigger, but was otherwise “as manufactured” — with factory barrel.
At Ingleston, competitors shoot for group size only — so there are no scoring-rings on the targets.
On October 14, 2018 David Sharp had a memorable performance at the Ingleston Range in Scotland. David Agg’d 6.756 inches for all four 5-shot groups, a new UK 1000-Yard record for the Factory Sporter Class. His smallest group measured 3.090 inches, which is also a new UK Factory Sporter record. Great Shooting David — congrats!
Sharp Sets Two New UK Factory Sporter Class 1000-Yard Records
Report by Vince Bottomley
In the UK, long-range benchrest is far more popular than short-range. The UKBRA (United Kingdom Benchrest Association) holds shoots at three venues: Diggle (100, 600 & 1000 yards), Bisley (100 yards only) and Ingleston in Dumfries, Scotland (1000 yards).
The Scottish venue is the UK’s latest 1000-yard facility. It was established just three years ago yet it is already holding well-attended monthly shoots. It is operated by the Galloway Small Arms Club and, as you may imagine, it is situated in the beautiful wild Scottish countryside.
The UKBRA operates under IBS/NBRSA rules for the Light and Heavy Gun Classes but, many of the Scottish members are also deer stalkers and came to the benches with their hunting rifles, so we also run a Factory Sporter Class. Factory Sporter rifles must be the original manufacturer’s barreled-action but a more benchrest-compatible stock may be used or ‘bag-rider’ attachments may be fitted to the butt and fore-end. The barreled-action must however be totally as it left the factory — no re-chambering or throating, though the crown may be re-cut. To discourage potentially dangerous trigger modifications, an after-market trigger may be fitted.
The Factory Sporter Class is very popular and Savage rifles, chambered for the 6mmBR, 6.5-284, and .308 Win are the favored factory-classers. These have produced some remarkable performances over the years, often out-performing custom rifles!
David Sharp is a True Sharp-Shooter
David Sharp is a relatively new benchrest shooter, though he has decades of firearms experience. David started his shooting days wild-fowling and rough shooting with a shotgun over 50 years ago. After retiring, he moved to Dumfriesshire and began shooting again — clay pigeon, wildfowling on the Solway, driven pheasant and deer stalking. As a stalker, David keeps his eye in by shooting targets on a local range using his .308 Mannlicher.
Eventually, the pains of old age began taking their toll and stomping up hills was becoming more difficult. Fortunately, David heard about the Ingleston 1000-yard range and joined the Galloway Small Arms Club in 2016. As a complete novice to benchrest shooting, David relied on the guidance and advice from his fellow Club members and eventually purchased a Savage Model 12 F-TR rifle in .308 Winchester to compete in the Factory Class.
Here’s the view looking downrange. What a beautiful place to shoot…
.308 Win Factory Savage with Choate Stock and Vortex Scope
David’s rifle has some upgrades, as permitted for Factory Sporter Class. The Savage trigger was replaced with a Timney. The Savage F-TR stock was replaced with a Choate Varmint stock fitted with a Sinclair front bag-rider. The Choate’s butt was home-modified to better ride the Edgewood bag. The rifle is fitted with a Vortex Golden Eagle 15-60 scope mounted on a 20 MOA Ken Farrell rail via Vortex rings. Dave shoots off a SEB Mini front rest. As the Mini is lighter to lug around than the SEB NEO (and less expensive), the Mini is becoming popular with UK shooters.
David reports: “My rounds are nothing special — I’m using Sierra 2155 155 grain bullets over Vihtavuori N140 powder and CCI 200 primers. I use Lapua brass (large primer) full-length sized in a Redding S bushing die to give 0.002″ neck-tension.”
Although the Ingleston Range is a beautiful place to shoot, as you can imagine conditions can vary dramatically and it is not known for mild days! However, at 9:00 am on the day of David’s record shoot, it was clear and quite still with the flags barely lifting. The temperature was already 15 deg C (59 deg F). What more could any benchrest shooter ask for?
In the photo of David above, you can just see the four 1000-yard targets in the extreme top right of the picture — up near the tree-line. Note, at Ingleston, competitors shoot for group size only. Hence there are no scoring-rings on the target. However, Vince Bottomley says score shooting may begin at some UK ranges: “This year we have purchased a set of electronic targets. The IBS target face can be inputted so we will now start to shoot for score as scores are registered instantly. Previously, it just took too long to score the targets as well as measure the groups.”


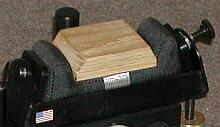 Here’s a simple solution for lumpy front sandbags. Cut a small block the width of your fore-end and place that in the front bag between matches. You can tap it down firmly with a rubber mallet. This will keep the front bag nice and square, without bunching up in the center. That will help your rifle track straight and true. Rick Beginski uses wood (see photo), while our friend John Southwick uses a small block of metal. The metal block might work a little better, but the wood version is easier to make with simple tools. John Loh of
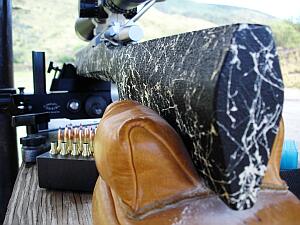 • Front Bag Tension — Vertical can happen if the front sand bag grips the fore-arm too tightly. If…the fore-arm feels like it is stuck in the bag, then the front bag’s grip is too tight. Your rifle should move in evenly and smoothly in the sand bags, not jerk or chatter when you pull the gun back by hand.


 Tips for Priming with Progressive Presses

 Darrell is a hydro-forming wizard who has perfected the process over the last couple of years. He has learned a few special techniques along the way to ensure uniform case-forming.

 Tomorrow is October 31st, Halloween (originally called “All Hallows’ Evening”). That means kids in costumes will be ringing doorbells as soon as it gets dark. No doubt some of you proscrastinators will wait ’til the last minute to set out your Halloween decorations and Jack-O-Lanterns. Don’t worry, in the video below, our friend, 3-Gun ace


