At the request of our readers, we provide select “Deals of the Week”. Every Sunday afternoon or Monday morning we offer our Best Bargain selections. Here are some of the best deals on firearms, hardware, reloading components, optics, and shooting accessories. Be aware that sale prices are subject to change, and once clearance inventory is sold, it’s gone for good. You snooze you lose.
NOTE: All listed products are for sale to persons 18 years of age or older. No products are intended for use by minors.
EuroOptic — Major Multi-Brand Optics Sale, up to 65% Off
⏺️ » Fantastic Deals on major brand optics
EuroOptic.com is running a major clearance sale this week on big name optics. You can save hundreds on quality scopes from Vortex, Leupold, Burris, Althon, Schmidt & Bender, and many other brands. This Limited Time Sale at EuroOptic offers huge savings up to 60% with specials and close-out deals. Click these links for sale listings by manufacturers: Vortex | Leupold | Burris | Swarovski | Athlon | Schmidt & Bender.
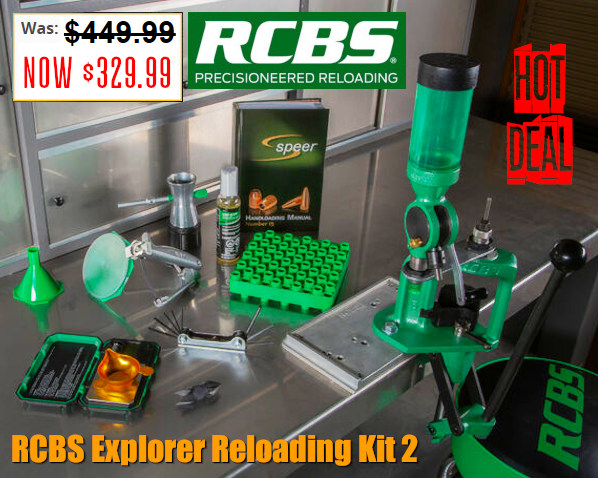
Midsouth — RCBS Explorer Reloading Kit 2, $329.99
⏺️ » Great price for everything you need — press, powder measure, scale etc.
For folks getting started with hand-loading, a great basic package is the RCBS Explorer Reloading Kit 2. On sale for $329.99 at Midsouth, this RCBS Package features pretty much all you need to load rifle and pistol ammo: Reloader Special 5 single-stage press, Uniflow-III Powder Measure, 1500gr digital scale, hand priming tool, powder funnel, powder trickler, hex key set, deburring tool, loading block, and Case Slick spray lube. You even get a Speer Reloading Manual.
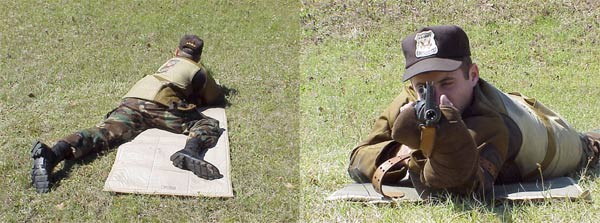
The First Shot, the CMP’s online magazine, features a well-written article on Prone Shooting Technique by SPC Matthew Sigrist of the U.S. Army Marksmanship Unit (USAMU). The article covers all the major points of gun hold and body position: hand position, elbow position, stock weld, buttstock placement, and sling position/tension.
Keep it Steady — The Elements of a Good Prone Position
Part 1 — Building the Position By SPC Matthew Sigrist
Imagine the following scenario: You are at the last stage of fire in the National Trophy Individual Match, firing at the 600 yard line in the prone position and every point matters. What should you reflect on as you prepare to shoot this final string? As your eyes cloud from sweat, you realize that all you have to rely on is your experience and knowledge of the fundamentals.
During the National Trophy Individual Match, you will fire 60 percent of your shots from the prone position. This article will address the fundamentals of a good prone position and help you learn the techniques required to be successful in both the slow and rapid-fire stages of National Match competition.
This article will be divided into two parts. In part one, we will discuss the elements of a good prone position. In part two, we will cover the techniques you will in the rapid-fire and slow-fire stages.
The Fundamentals
The fundamentals are the building blocks of a position. Much like the framework of a house, a correct application of the fundamentals ensures a solid and stable structure. Since each person’s position will depend on their particular body build and shape, there is no “perfect position” that applies to everyone. Experience, practice and knowledge of the correct fundamentals will dictate the best position for you.
There are six key elements of any position. The purpose for these six points is to achieve a solid platform that allows for consistent sight alignment using the least amount of muscle tension.
1. Placement of the Firing Hand (the hand that pulls the trigger)
The firing hand needs to be placed high on the pistol grip. This high hand position will give you better control of the rifle. Combined with a firm grip there will be a reduced amount of hand movement when pulling the trigger. Wrap your thumb over the three fingers on the pistol grip (excluding the trigger finger). This will help isolate the movement of the trigger finger.
2. Placement of the Non-firing Hand (the hand supporting the rifle).
The non-firing hand should grip the handguard or stock in the flat portion of the hand between the thumb and forefinger. The fingers should curl naturally around the stock, but they should not grip it tightly. The position of the hand on the stock will depend on the physical size of the shooter. Generally speaking, taller shooters with longer arms will grip the rifle further out, near the sling swivel, while shorter shooters will need to pull their hand rearward. This is sometimes referred to as “short-stocking” the rifle.
3. Stock Weld
Stock weld is the contact that the face makes with the stock. It is important because it directly effects your sight alignment. Consistent head placement will help you achieve consistent sight alignment. The human head weighs an average of 8 to 10 pounds. The full weight of the head must rest on the stock. In doing this you achieve two things, a relaxed neck and reduced recoil because of the pressure of the head.
4. Placement of the Rifle (the contact that is made in the firing shoulder)
The rifle butt placement needs to be consistent. If this changes between shots, it effects your sight alignment and the effect of recoil. In the prone position the rifle will sit lower in the shoulder compared to other shooting positions. This allows for a more forward head and a lower position as a whole.
5. Position of the Sling
The sling should be high on the arm, above the bicep. This way the sling will have less leverage on the arm so it doesn’t cut off the circulation.
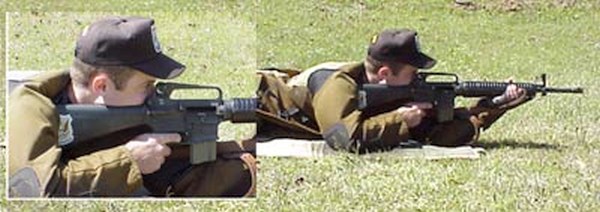
Demonstration of the placement of the firing elbow (left) and non-firing elbows (right).
6. Placement of both the firing, and non-firing elbows
A guideline for non-firing elbow placement is that there should be 1 ½’’ to 2’’ gap between your non-firing arm and the rifle’s magazine. (NOTE: this references the AR-15 service rifle) Your arm should be almost straight up and down; this will transfer the weight directly down the arm and not to the side (see picture above). Think of the firing arm as only a kind of kickstand, it doesn’t support weight it only holds the firing hand in position.
Variations of the Prone Position
There are two main variations of the prone position; open/spread legged, and bent-legged. The two types will be discussed below.
Open/Spread Leg Position
Demonstration of the Open/Spread Leg Position.
The first position is the open/spread legged position. This is when the shooter spreads their legs shoulder width or more apart. This allows for a more forward pressure on the sling and elbows. This position requires a tighter sling and solid elbow placement. The rifle should sit tight in the shoulder. With this position, your body will be farther behind the rifle compared to the bent leg position, allowing for minimum disturbance from recoil.
Bent Leg Position
Demonstration of the Bent Leg Position.
The bent leg position is when the shooter bends the firing side leg up towards the firing hand making the knee at a rough 90 degree angle to the body. The non-firing leg will remain straight and inline with the body. This will take pressure off the lungs and heart minimizing the pulse from the chest as well as easing the pressure on the lungs which will allow for easy breathing and control.
Summary
You now know the fundamentals of a good prone position, as well as the two types most commonly used. Extensive dry-firing will reveal which is the best position for you. If possible, have a friend take pictures of you in position. This will enable you to better diagnose and correct your errors. Remember, a position must be both fundamentally sound and comfortable. Practice frequently to learn your new position and to develop the conditioning required to endure long days on the range.
Here’s a simple solution for lumpy front sandbags. Cut a small block the width of your fore-end and place that in the front bag between matches. You can tap it down firmly with a rubber mallet.
The block will keep the front bag nice and square, without bunching up in the center. That will help your rifle track straight and true. Rick Beginski uses wood (see photo), while our friend John Southwick uses a small block of metal. The metal block might work a little better, but the wood version is easier to make with simple tools. Shown above is a slick Delrin block with a built-in bubble level used with a quality J.J. Loh front rest. Using a good block on your front bag helps ensure that the actual top surface of your front bag is level, as distinct from the front rest assembly.
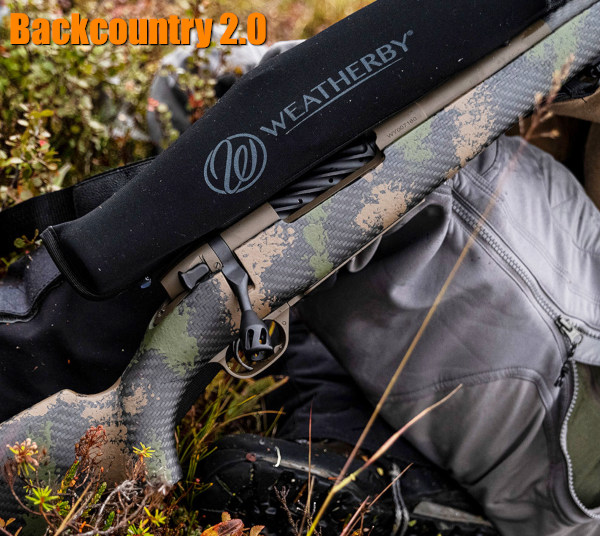
It’s the heart of hunting season in many parts of the country. Game hunters are heading out for their late fall deer hunts. For hunters making long treks in the back-country, reducing carry weight is a big deal. That’s why we’ve seen a trend among rifle-makers to introduce rifles that weigh significantly less. This is accomplished through use of carbon fiber stocks, carbon-wrapped or fluted barrels, and even titanium actions. The Weatherby rifles showcased here feature such lightweight components. For example, the Weatherby Mark V Backcountry 2.0 Ti (Titanium) model comes in at just 4.7 pounds before optics. That’s mighty light for a hunting rifle.
Weatherby Backcountry 2.0 Ti with titanium action, fluted barrel, and carbon-fiber stock, 4.7 pounds.
Light-Weight, Carbon-Stock Backcountry 2.0 from Weatherby
Here is good news for backcountry hunters. Weatherby’s Backcountry 2.0 carbon-stocked hunting rifles weigh well under 6 pounds before optics. There is even one titanium action model series that weighs just 4.7 pounds. The 2.0 series now offers both standard steel receivers or even lighter titanium receivers. And Backcountry 2.0 Carbon models are equipped with a new carbon fiber stock that is the lightest in the industry — weight is a mere 20 ounces for standard actions. For further weight savings, some models feature a tensioned carbon fiber-wrapped barrel. But all that high-tech doesn’t come cheap — MSRP for the Titanium action, carbon-wrapped barrel model is $3849.00!
Ultralight Carbon Stock — Weatherby’s new Blacktooth stock features a Carbon Link™ bedding system which engages the recoil lug and distributes recoil throughout the stock without the weight of a traditional aluminum bedding block. This makes the overall stock lighter and stiffer.
The Backcountry 2.0 Ti Carbon combines a tensioned carbon fiber barrel with the ultra-lightweight Titanium Weatherby Mark V action. This barrel system has shown excellent accuracy, making it a good choice for a long-range hunter. Registering a very low 5.3 lb starting weight, the Backcountry 2.0 Ti Carbon combines a titanium action with the Peak 44 Blacktooth stock — which Weatherby claims is the “lightest production carbon fiber stock on the market.”
Along with the new ultra-light elements, these Weatherbys have premium Mark V features: 54-degree bolt lift for fast cycling, fluted bolts, TriggerTech triggers, and Cerakote finish on metal parts. All the Backcountry 2.0 series rifles have a sub-MOA accuracy guarantee. CLICK HERE for Weatherby Backcountry 2.0 Field Test by Peterson’s Hunting.
Light is Right — Weatherby’s Backcountry 2.0 rifles weigh as little as 4.7 pounds (before optics).
Weights for Backcountry 2.0 Models range with chamberings:
Weight Saving Secrets — How Weatherby Achieved Such Light Weights GunsAmerica Digest reports: “A huge amount of the weight savings comes thanks to the updated carbon fiber Blacktooth stock by Peak 44. This stock uses what they call their Rock Solid Carbon Link bedding system which eliminates the need for a metallic bedding block. The Blacktooth stock weighs less than 20 ounces. The Backcountry 2.0 [series adds] both a carbon fiber stock and either fluted #1 MOD-profile or #2 MOD-profile carbon steel barrels or #4 MOD-profile BSF carbon fiber-tensioned barrel to achieve these light weights.” READ GunsAmerica Review.
To mitigate recoil Weatherby developed its new 3DHEX recoil pad — the gun industry’s first production 3D-printed pad. The 3DHEX’s three-dimensional honeycombed design extends the duration of the recoil pulse — taking away the sharp kick. Weatherby explains: “With the same amount of recoil spread out over a much greater time period, felt recoil is greatly reduced[.]” Backcountry 2.0 rifle recoil is also reduced by factory-fitted Accubrakes, contoured to match barrel profile.
Field Test of Titanium Action Weatherby Backcountry in 6.5-300 Whby Magnum
In this video, Hunter Todd Helms reviews Weatherby’s Backcountry T1 rifle in 6.5-300 Weatherby Magnum. This rifle is meant for fast and light travel in the backcountry. A fluted barrel, titanium action, and carbon fiber stock minimize weight. Todd says the 3DHEX recoil pad really does tame the magnum kick. This model also features a new streamlined muzzle brake.
Preparations Before The Hunt
1. Map Your Hunt and Notify Others — Before your hunt, make a plan and notify friends and family members about WHERE you are going and your intended return date and time. Print out a Google Satellite map and locate landmarks and trailheads. Mark where you plan to park your vehicle and give a copy of this map to friend and/or family members. A hunter may injure himself by falling off a rock, or tumbling in a creek-bed. After that kind of injury the hunter may be confused or unable to walk. If you get stranded in the wilderness, you want trusted persons to know where you are. So, before you leave on a trip, provide a map to a friend or family member. Show them where you will leave your vehicle, and where you expect to be every day of your hunting adventure.
2. Licenses and Permits — Make sure you have a valid hunting licenses and all the necessary tags. Begin this process with ample time before your intended hunt(s). The NSSF adds: “If you are crossing state or national borders, find out about any special considerations you must take care of. Border crossings can mean knowing about firearm transport laws or Chronic Wasting Disease-related regulations.”
3. Work on Your Fitness — On a multi-day hunt you may be trekking many miles. You need to be in good shape. If you are out of shape you may be putting yourself in a precarious situation, particularly if you underestimate the terrain difficulty. As the NSSF says: “Not being able to handle the conditions lessens your chances of success, can turn a great experience into an agonizing one and can endanger your health.”
4. Do Your Homework — Study the area you will be hunting. Talk to other hunters. Look at satellite photos. Get a real sense of the walking and terrain challenges. For a multi-day hunt, MAKE a PLAN. The NSSF states: “Eliminate surprises. Learn as much about where you will be staying, the area you will be hunting, what the weather might be like and what you need to bring[.]”
5. Rifle and Ammo — Make sure your rifle is sighted-in and your ammo is tested. Sight-in your rifle with the ammo you plan to use on your hunt. CLICK HERE for 4-Shot Sight-in Method. After sighting-in from the bench, confirm your zero by shooting from typical hunting positions (kneeling and with forearm supported on a rock or post).
6. Communications and GPS — Bring a GPS if you are in a wilderness area far from civilization. It’s a good idea to bring a cell phone, but you may not have coverage if you’re quite a distance from populated areas. A smart-phone also doubles as a digital camera to record your trophies. For navigation and safety, consider getting Garmin inReach Explorer+. This high-tech handheld unit features interactive SOS, connecting you to the GEOS 24/7 search-and-rescue monitoring center. They also allow you to send and receive text messages, no matter where you are, via advanced inReach satellite technology. Yes you can communicate even if you are miles from the nearest cell tower.
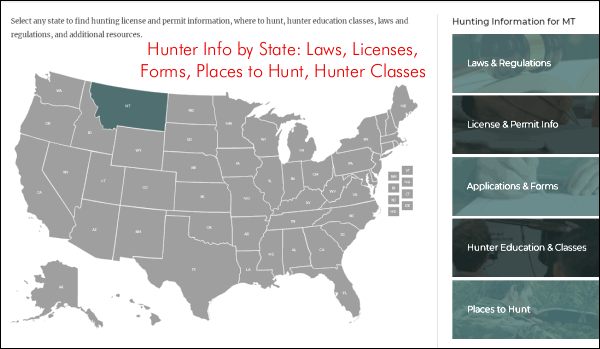
Visit WhereToHunt.org
There’s a great online resource for hunters that will help you find game locations in your state and ensure you have all the proper permits and game tags. WheretoHunt.org features an interactive map of the country. For all 50 states, the NSSF has compiled information about hunting license and permits, where to hunt, hunter education classes, laws and regulations and more. For each state you’ll also find a link for required applications and license forms.
How accurate can a .45 ACP pistol be, in the hands of an expert marksman? Take a look at that target. This was shot off-hand (no rest) with ONE HAND at FIFTY (50) Yards. That’s TEN shots at 50 yards all inside the 3.36″ 10-Ring with eight shots in the 1.695″ diameter X-Ring.* We bet most folks would have trouble matching that with a scoped rifle shot standing.
Amazing Handgun Accuracy at 50 yards
This remarkable feat of precision pistol shooting — a 100-8X group at 50 yards — was accomplished a few seasons back by PFC Jason Gregoire, a talented young USAMU pistol marksman. And yes, that was done by Jason shooting one-handed!
On its Facebook Page the USAMU posted: “Check out this impressive target by PFC Jason Gregoire of the USAMU Service Pistol Team! This was shot one-handed, with a .45 pistol, and at 50 yards during the Centerfire Match in Columbus, Ohio [on 7/1/2020]. The score was 100-8X. Now that is some marksmanship!”.
How to Improve Your Pistol Skills
Want to improve your bullseye pistol shooting skills? Then watch a series of videos hosted by Brian “Gunny” Zins, a 12-time National Pistol champion, and retired U.S.M.C. Gunnery Sergeant. Here is one the Fundamentals of Bullseye Pistol Shooting videos that Zins produced with the NRA and Shooting Sports USA.
12-time National Pistol Champion Brian Zins Explains Aiming and Trigger Control.
Pistol Competitors (.45 ACP) at 2019 NTT Match at Camp Perry, Ohio.
* This 10-shot group was shot on the NRA B-6 50-yard Pistol Target. Here are the ring dimensions as stated in the NRA Precision Pistol Rules (p. 15):
Here is a simple, low-cost way to get reliable readings of case headspace when you “bump” the shoulder back on your 6BR, .243 Win, or .308 Win brass. Credit Boyd Allen for this tip. First, you’ll need one .45 ACP case (.40 SW works too), with primer removed. Make sure the pistol case is trimmed square and that it is round. We recommend you first size it, trim it and chamfer. Next, take the .45 ACP (or .40 SW) case and slip it over the neck of a fired, unsized rifle case with the primer removed. Align the two cases between the jaws of your calipers and note the length from rim to rim (See photo below, with striped case).
OK, now you have the length for a fired rifle case BEFORE sizing. Next, take a full-length sized rifle case (without primer) and do the same thing, placing the pistol case over the neck of the FL-sized case (Bottom Photo). The difference between the two numbers is the amount of “bump” or set-back you are applying to the shoulder. Here the difference is .0015″. The amount of bump you need varies with your chamber and your load, but .0015-.002″ is a good initial setting. By using this simple tool, you can avoid bumping the shoulder too much. This will also help you set-up the depth of your full-length die to get the proper amount of bump each time.
Other Pistol Brass Types Work Too: Some folks have used this method but they prefer to work with 10mm or .40 SW brass rather than a .45 ACP, because slightly smaller-diameter pistol cases may conform to the shoulders of their sized rifle cases a bit better. That works fine — use whatever pistol brass case works best for your rifle brass. We got very repeatable results with .45 ACP brass but the method also works with 10mm or .40 SW brass. Just be sure the pistol brass has been sized, trimmed, chamfered, and de-burred.
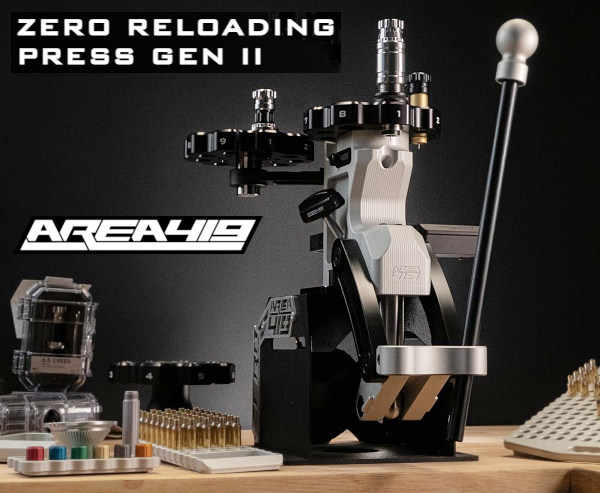
Every handloader can benefit from a turret press. This type of press features an upper rotating disk that has multiple threaded placements for dies or other tools (such as powder dispensers). There are a variety of turret presses on the market today with the remarkable Area 419 9-Station Zero Press at the top end, and the inexpensive Lee turret presses at the other end of the spectrum. In between are Lyman’s 8-station All-American turret, the Redding 7-station T-7 press, and the RCBS 6-station turret.
Today’s Saturday video showcase features notable turret presses from Area 419, Lyman, Redding, and RCBS. We lead off with a feature on the advanced Area 419 ZERO 9-station turret.
Area 419 ZERO 9-Station Turret Reloading Press — Without Peer
Area 419’s impressive ZERO reloading press is a 9-station turret press with some very unique features. This press was designed to be the most precise turret ever created. As tested by Gavin Gear of UltimateReloader.com, the ZERO turret press delivered very impressive shoulder-bump consistency and ultra-low seated bullet run-out (about +/- 0.0005″). The numbers were as good as you can get from a quality single-stage press, so Area 419 did some impressive engineering. We would expect that, as this represents a big investment — the current ZERO Gen 2 model $1400.00 at Area419.com. SEE FULL Gen 1 REVIEW on UltimateReloader.com.
The ZERO turret press lets you install up to nine (9) different reloading dies in the large top turret, which revolves around a central axis. But unlike most turret presses, the ZERO doesn’t have flex or wobble when you’re loading. This is because Area 419 includes a clever system for locking the turret in position after you’ve selected the die from your array.
Lyman Brass Smith All-American 8-Station Turret Press
The 8-station Lyman Brass-Smith All-American Turret Press is an impressive product. Since its introduction in 2018, Lyman’s All-American 8 has become popular with handloaders. With a $275.99 street price at MidwayUSA, the 8-station Lyman is $119 cheaper than the $394.99 7-station Redding T-7 (current Amazon price). No question, that’s a significant price advantage, which has helped Lyman grab turret press sales from Redding.
More Stations Provide More Reloading Options
Gavin liked having 8 stations, because this offers more flexibility. With eight stations, you can have four two-die sets, or three two-die sets plus a dedicated decapping die and a powder measure. Gavin notes: “I’ve owned many reloading presses, including 3-station, 4-station, 5-station, and 7-station variants, but I’ve never owned an 8-station press until the Brass-Smith All-American 8 came to the shop. I’ll have to say… you can’’t get too many stations, especially on a manually-indexed turret. I love the idea that you can leave dies on the press, and load multiple calibers/chamberings using the same turret setup.”
Quick Comparison Videos — Lyman, Lee, Redding
Below we’ve included a couple quick vertical-format video “shorts” which show the Lyman 8-station Turret Press and the Lee Classic 4-Hole Turret Press in action. If you are just loading one or two pistol cartridge types, the inexpensive ($184.99) Lee Class turret press may suffice.
Redding T-7 Turret Press Overview
The Redding T-7 has long been a leading turret press for precision handloaders. It offers one more station than the other “green” turret press offered by RCBS. It has a reliable optional priming system and plenty of leverage. We like the build quality of the Redding T-7, but at $394.99 on Amazon, it is now significantly more expensive than the Lyman turret, which has one more station. See a comparison of the Redding T-7 and Lyman 8-station turret press in a video below.
Redding T-7 with Creedmoor Sports Enhanced Turret Head
Creedmoor Sports offers an upgraded Enhanced Press Head for the Redding T-7. This $219.95 turret top allows greater precision in case sizing and bullet seating. This UltimateReloader video covers the advantages of the new precision turret head.
8 vs. 7 Stations — Lyman Turret and Redding T-7 Comparison
If you’re considering acquiring a turret press, it helps to compare products side by side. Here is an interesting comparison video showcasing the Redding T-7 and the Lyman 8-station turret press. This video offers a side-by-side comparison of the Redding turret and the Lyman turret, showing how each performs key functions.
RCBS Six-Station Turret Press
This Editor has used an RCBS Turret Press for over 20 years. It does not have the most stations or the most sophisticated features, but it has proven very reliable over the years. I use it primarily to load with pistol sizing and seating dies. Having six stations allows me to load multiple cartridge types: 9x19mm, .357 Magnum, and .45 ACP. READ FULL REVIEW on UltimateReloader.com. The RCBS Turret press is currently $389.99 on Amazon.
Creedmoor Enhanced Turret Heads for Redding and Lyman
Creedmoor Sports offers enhanced precision press heads for the Redding 7-station Turret Press and the Lyman 8-station Turret Press. The Creedmoor Enhanced Press Head is a direct drop-in upgrade to the factory OEM press head and can be installed in a matter of minutes. This press head is precision-crafted from stainless steel bar stock. Priced at $219.95, these enhanced heads are featured in the video below. (NOTE: There are also 1″ series turret heads for Lyman and Redding turrets priced at $154.95. These will only work with 1″ dies).
NOTE: Creedmoor Sports no longer lists an enhanced top for the 6-station RCBS Turret Press.
The $219.95 Creedmoor Sports turret top allows greater precision in case sizing and bullet seating. A recent UltimateReloader video covers the advantages of the new precision turret head for the Redding T-7. READ Full Report on UltimateReloader.com.
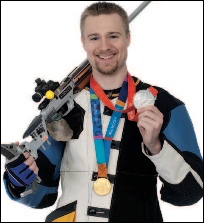
Rio 2016 World Cup Photo Courtesy ISSF and Team USA
Would you like to try smallbore position shooting? Here are some tips from one of the best 3P shooters on the planet, Olympian Matt Emmons.
Matt Emmons competed in the Three-Position Event at the Rio Olympics, his fourth Olympic appearance. Matt has competed on the U.S. National Team since 1997, medaling in three Olympic games: Gold in 2004 in Men’s 50m Prone; Silver in 2008 in Men’s 50m Prone; and Bronze in 2012 in Men’s 50m 3X40. Although his specialty is Men’s 3-Position rifle, Emmons’ World Championship and Olympic Gold are in Men’s 50m Prone. He usually shoots an Anschütz or Bleiker .22LR rifle, with Eley Tenex ammo.
Winning Gold with a Borrowed Rifle
There is a fascinating story behind Matt’s 2004 Gold Medal, won with a “loaner” rifle. In April 2004, just prior to the Olympic Team Trials, Emmons discovered his rifle had been severely sabotaged in the supposedly secure locker room at the United States Olympic Training Center. The precisely tuned barrel and action were heavily damaged. “I unpacked my gun and I noticed that something wasn’t right,” Emmons said. “Sure enough, somebody had done something to it. I shot it and I couldn’t get the shell out. Emmons said it could not have been an accident: “Oh no, no,” Emmons said. “Somebody took a screwdriver and went in.” Emmons went on to the 2004 Summer Olympics using a rifle belonging to using his former University of Alaska Fairbanks teammate, Amber Darland. With that borrowed rifle he won the Gold Medal in 50m prone. Emmons never found out who the saboteur was, but said “I’d like to know so I could shake their hand and say thanks.”
In this Olympic Channel Video, Matt explains 50m 3-Position Shooting.
Here are shooting tips from Matt, courtesy Anschütz. Click image below to launch a full-screen PDF file.
CLICK Photo to Load Large PDF File
Here Matt Shows the Kneeling Position. The other two positions are Standing and Prone.
Three Sets of Hardware for Three Positions
You may be surprised to find that Matt often totes three complete sets of rifle parts to important matches — three buttplates, three cheekpieces, and three Centra sights with adjustable irises. Matt told Shooting Sports USA that he travels with “three sets for three positions. Our final is so fast that I need three sets of everything to allow a fast change-over between positions.” Matt carries his gear in an an Anschütz sport bag: “It’s similar to the big Ogio duffels with wheels, but lighter. I’ve worked with AHG/Anschütz for many years and I like their bag because all of my junk fits in it.”
A while back, Shooting Times released an article entitled “Ten Most Common Reloading Mistakes”. Listed below are the Top Ten mistakes hand-loaders can make, at least according to Shooting Times. What do you think of this list — does it overlook some important items?
Top Ten Reloading Mistakes According to Shooting Times:
1. Cracked Cases — Reloaders need to inspect brass and cull cases with cracks.
2. Dented Cases — Dents or divets can be caused by excess case lube.
3. Excessive Powder Charge — Overcharges (even with the correct powder) can be very dangerous.
4. Primers Not Seated Deep Enough — “High” primers can cause functioning issues.
5. Crushed Primers — Some priming devices can deform primers when seating.
6. Excess Brass Length — Over time, cases stretch. Cases need to be trimmed and sized.
7. Bullets Seated Too Far Out — If the bullet is seated too long you may not even be able to chamber the round. Also, with hunting rounds, bullets should not engage the rifling.
8. Burrs on Case Mouths — Ragged edges on case mouths can actually shave bullet jackets.
9. Excess Crimp — This is a common problem with pistol rounds loaded on progressives. If case lengths are not uniform some cases will get too much crimp, others too little.
10. Inadequate Crimp — This can be an issue with magnum pistol cartridges in revolvers.
Do you agree with this list? We think some important things are missing, such as not adjusting full-length sizing dies properly. This can cause the shoulder to be pushed back too far (or not far enough). Another common mistake is using brass that is worn out, i.e. stretched in the case-head area from multiple cycles of hot loads. We also think the #1 error a reloader can make is using the wrong powder altogether. That can be a fatal mistake. See what happens when you load pistol powder in a rifle.
Jim Borden, the very knowledgeable owner of Borden Accuracy, provided an interesting historical insight about barrel fitting and the term “blueprinting”. Jim has posted on his Borden Accuracy Facebook page an explanation of the term “blueprinting” as it originally was used with respect to barrel/shoulder/lug fitting.
Barrel/Shoulder Fit and Blue-Printing
Jim told us: “Something often overlooked on barrel installation is the shoulder fit. Many are so overly obsessed with doing a crank-on fit of threads that the shoulder contact is overlooked. Full, solid barrel shoulder to recoil lug or action face is critical to optimum accuracy and precision.
Many years ago part of the ‘blueprinting’ of an action was the use of Prussian blue to ‘blueprint’ lug fit, thread fit, and barrel shoulder fit. It was a colloquial expression that had nothing to do referring to a blueprint or drawing of the action.” Bet you didn’t know that!
About the photo below, Jim noted: “the fuzzy look on the threads is a liberal coating of Never-Seez thread lubricant.”
Look carefully to see the Prussian Blue applied to the barrel shoulder, plus Never Seez on threads.


 Here’s a simple solution for lumpy front sandbags. Cut a small block the width of your fore-end and place that in the front bag between matches. You can tap it down firmly with a rubber mallet.


 Amazing Handgun Accuracy at 50 yards


 Matt Emmons competed in the Three-Position Event at the Rio Olympics, his fourth Olympic appearance. Matt has competed on the U.S. National Team since 1997, medaling in three Olympic games: Gold in 2004 in Men’s 50m Prone; Silver in 2008 in Men’s 50m Prone; and Bronze in 2012 in Men’s 50m 3X40. Although his specialty is Men’s 3-Position rifle, Emmons’ World Championship and Olympic Gold are in Men’s 50m Prone. He usually shoots an Anschütz or Bleiker .22LR rifle, with Eley Tenex ammo.
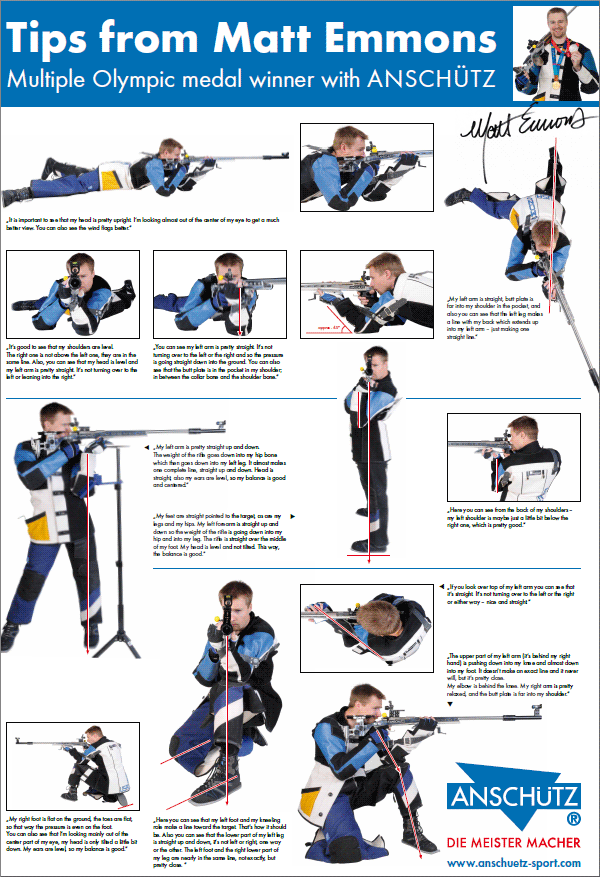

 Barrel/Shoulder Fit and Blue-Printing


