One recent trend in F-TR competition is the use of low-profile, benchrest-type stocks shot with a light hand-hold and little or no face contact. For this method of F-TR shooting to work, you need the right equipment, and practice a “minimalist” shooting technique. One of the pioneers in this style of F-TR shooting is action-maker John Pierce of Pierce Engineering. Above you can see John shooting one of his F-TR rifles at the 2015 Canadian F-Class Championships. Note the straight-line stock and see how the adjustable bipod is set quite low to the ground (in fact the bipod’s arms are almost straight out).
Members of the Michigan F-TR Team, including Bryan Litz, have used similar rigs with success. Bryan said it took a while to adapt his shooting technique to this kind of rig, but there is a pay-off. Armed with a Pierce-built F-TR rifle, Bryan won his first-ever F-TR Match. Bryan explains the technique he uses when shooting this kind of rifle:
“Coming over from sling shooting, I knew there would be unique challenges to F-TR which I wanted to learn prior to (not during) a major tournament. I learned a new shooting position which doesn’t involve drawing the right knee up. For F-TR I get more straight behind the gun rather than at an angle. I found that the rifle shoots best with very light cheek, shoulder and grip pressure, approaching free recoil. This is how Eric Stecker shot his similar rifle into second place in the SW Nationals [with high X-Count by a large margin]. I learned the rifle’s sensitivity to different bipod and rear bag supports, and found the best buttplate position to allow the rifle to track and stay on target after recoil. This set-up shot best with a mostly free-recoil approach, that means ‘hovering’ over the comb, rather than resting your head on the stock. This took some ‘getting used to’ in terms of neck and back muscle tone. These are the kind of details I think it’s important to focus on when entering a new discipline.”
Bryan’s Pierce-built F-TR rig is a tack-driver: “I can certainly vouch for this set-up! In last weekend’s mid-range State Championship in Midland, MI, I shot my Pierce rifle into first place with a 598-44X (20 shots at 300, 500 and 600). Once you get used to the positioning and way of shooting these rifles, they just pour shots through the center of the target.”
Pierce F-TR Rifles with Scoville Stocks
Shown below are three complete Pierce F-TR rifles, along with a barreled action for comparison. The carbon-fiber/composite stocks are built by Bob Scoville. These Scoville stocks are very light, yet very strong and very stiff.
Frank Galli, aka “Lowlight”, is the head honcho of Sniper’s Hide. In the video below, Galli offers a series of shooting tips he calls the “Long Range Shooting W.T.F”. No that’s not what you think it is — no cuss words are involved. “W.T.F.” stands for Wind, Trajectory, and Fundamentals of Marksmanship. To shoot well, Frank says, you first must gauge the wind correctly. Second, you must know the trajectory of your load in your rifle — i.e. know your ballistics. If you want to hit a target at long range, you must start with a rock-solid zero, determine an accurate muzzle velocity, and know the Ballistic Coefficient of the bullet. Plug all that into a good ballistic program (along with elevation, temp, and air pressure) and you should have your point of impact (within a click or two) out to 1000 yards.
Watch Video for Tips about Wind-Reading, Ballistics, and Shooting Fundamentals:
The third element of “W.T.F” is “F” for “Fundamentals of Marksmanship”. This actually involves multiple factors — body position (relative to the rifle), finding your natural point of aim, proper head alignment behind the scope, pre-loading the bipod, breathing modulation, trigger control, follow through, recoil management and more. Frank addresses all these “fundamentals” in the second half of the video, starting at the 3:40 time-mark.
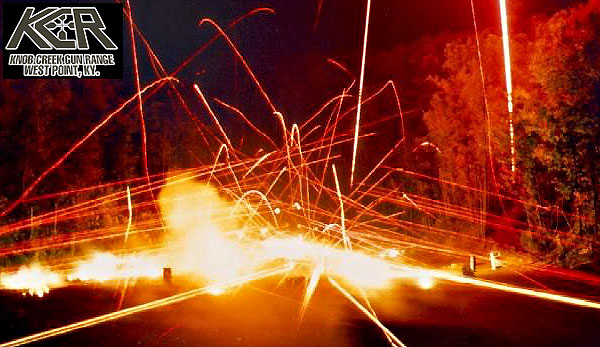
Twice a year, select-fire fans head to the Knob Creek Gun Range in West Point, Kentucky, for the nation’s largest Machine Gun Shoot. A bi-annual event, the Machine Gun Shoot is held in April and October. This year’s fall Machine Gun Shoot will take place October 9-11, 2015. The highlight of every Machine Gun Shoot is the Saturday Night event, where scores of guns send regular and tracer bullets down-range. An estimated 1.25 million rounds are fired each year during the October Night Shoot.
Click Triangle to Watch Knob Creek Machine Gun Shoot Video (Warning: Very Loud Audio)
This video was created by Top Shot Season 4 Champ Chris Cheng.
There’s a new two-stage trigger for Remington and Rem-clone actions from CADEX Defense of Canada. The new CADEX DX2 double-stage trigger adjusts from 1.5 to 5.0 lbs pull weight. Both stages can be adjusted separately through allen-head screws located on the front of the trigger body. The trigger shoe also adjusts fore and aft. The CADEX DX2 is offered in both a standard version (no safety or bolt release) and a version with integral safety and bolt release. The cost of the standard DX2 is 267.95 Canadian dollars, or $202.62 U.S. Dollars at current exchange rates. Add forty dollars (Canadian) for the version with safety and bolt release.
DX2 Dimensions: 7.21cm x 4.42cm x 1.22cm | With Safety/Bolt Release: 7.65cm x 5.23cm x 3.35cm
DX2 Weight: 37.5 grams | With Safety/Bolt Release: 52 grams
Frank Green Tries the CADEX Two-Stage
Frank Green of Bartlein Barrels recently acquired one of the CADEX two-stage triggers and he likes it. Here is his report:
“My CADEX two-stage trigger arrived[.] I installed it into my Badger M2008 action/rifle in 6 Creedmoor. Initial impression is that it’s very nice. You can adjust each stage for pull of weight. You can adjust the position of the trigger shoe and [adjust] for over-travel as well. I think the pricing on the trigger is going to be very competitive and it will be a nice option out there for another two-stage trigger.
I installed it and made no adjustments. Checked it for function and measured some pull weights while the barreled action was out of the stock. Reassembled the whole rifle and again made some pull weight measurements. I recorded the last five and they came in at 2.09, 2.15, 2.15, 2.1 and 2.12 pounds. The little variance I’m going to chalk it up to me and how I pulled on the trigger scale …but it broke clean.”
Installation Considerations
Frank Green said there may be some clearance issues with some trigger guards: “The CADEX trigger shoe assembly is a tad longer than a stock Remington. In my trigger guard it barely bottomed out/touched in the guard but functioned just fine but to give it a little room I milled .010″ off the bottom of the shoe. My trigger guard is a Defiance. I’d have to throw the trigger onto a Remington rifle/trigger guard assembly and a Badger bottom metal to see if it does the same thing but [this] is minor in my opinion.
You need a T6 Allen wrench to adjust the trigger shoe location. I had to move my shoe forward just a tad from how it came out of the package. When pulling the trigger it would just touch the back of the trigger guard.”
On our main AccurateShooter.com site, you’ll find a good article by G. Salazar on the Basics of Neck Turning. If you’re new to the neck-turning game, or are just looking for good tips on improving your neck-turning procedures, you should read German’s article. Below we offer some highlights and photos from the article, but you’ll need to read the whole story to view all the illustrations and follow all the procedures step by step.
Why Should You Consider Neck Turning?
Let’s assume that your rifle doesn’t have a tight neck chamber that requires neck turning; if you have a tight neck chamber, of course, the answer to the question is “because you have to”. For the rest of us, and that includes the vast majority of Highpower shooters, neck turning isn’t a requirement, but it can be a useful way to bring your ammunition a small but meaningful step closer to that pot of gold at the end of the rainbow: perfection. I’m not talking about a theoretical improvement, but a real one, an improvement that lies in equalizing and optimizing the neck tension of your loaded rounds. Inconsistent neck tension is a real contributor to increased muzzle velocity variance which itself is a significant factor in increased elevation dispersion at long range. So there’s our basic reason for neck turning: to equalize and optimize neck tension in order to reduce elevation dispersion.
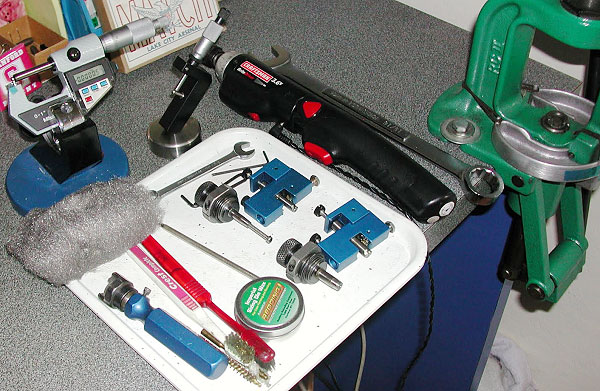
The Tools of the Trade
Here you see everything I use and a bit more. The press, a cordless screwdriver (always plugged in, turning is tough on the old battery), a couple of K&M neck turners (one set up for 6mm, the other for .30 caliber) an expander for each size, some Imperial lube, an old toothbrush or two to keep the cutter clean, a handle with a caseholder (for those emergencies when the screwdriver dies and there’s just one more case to go!), steel wool and a tubing micrometer finish the list of tools. Hey, I left the dial calipers out of the picture! They’re always handy, keep them around, but they are useless for measuring neck thickness, so don’t try. I usually use an Optivisor magnifier while I turn necks, very handy for a clear view of what’s happening on the neck.
Expanding the Neck
Put some lube on the inside of the case neck and run it into the expander. Really, this isn’t hard. I prefer to expand each case immediately before turning it as opposed to expanding all the cases and then turning them. Brass is somewhat springy and will tend to go back toward its original size; therefore, by expanding and turning immediately, you are more likely to have all cases fit the mandrel with the same degree of tightness and to get a more consistent depth of cut.
Cutter Adjustment for Cut Depth and Length
All the tools I’ve seen have pretty good adjustment instructions. The only thing they don’t tell you is that you should have five to ten spare cases to get it right initially. Anything of the right diameter will do while you learn, for instance, just use that cheap surplus .308 brass to do initial setup and save the precious .30-06 for when you know what you’re doing. Be patient and make your adjustments slowly; you’ll need to set the cutter for thickness as well as length of cut (just into the shoulder). The depth of cut (brass thickness) takes a bit of fiddling, the length of the cut is generally easy to set.
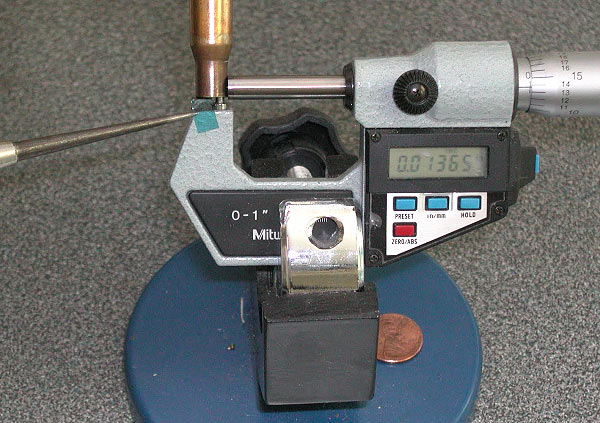
The Finished Product — A Perfectly Uniform Neck
If you read the whole article, and follow the procedures using quality tools, you should get very good results — with a little practice. To demonstrate, here’s an example of my finished, neck-turned brass. You’ll see there is a perfect, 0.0125″ thick neck. It’s very uniform around the circumference, usually I only see 1 or 2 ten-thousandths variance. Now, with the necks uniformed like this, we can select the bushing size that will give us our preferred neck tension and experiment with various levels of tension, secure in the knowledge that all of the cases will actually have the desired neck tension.
Report by Tom Whitaker, Captain of USA Veterans Team
Much has been said about the fantastic performance of the Great Britain Palma Rifle Team setting a new World Record for the Palma Team course of fire, as well as the strong second place showing of our USA Palma squad. However, little to nothing has been published about the only team World Championship that the United States won at the World Championships this year at Camp Perry.
Before all the pomp and circumstance of the World Individual Championship and the Palma Team Match got underway, a dedicated group of shooters made their way to the firing line. These were the members of the 2015 USA Veterans Rifle Team. To qualify for this team one of the requirements is to have reached your 60th birthday by the first day of the World Championships. This usually means you’ve “been there and done that” for many years and still love the sport. The team consists of a maximum of 17 people, a captain, adjutant, three coaches, 10 firing members, and two reserve members. Each team has two targets so the firing members are separated into two squads of five, each with a line coach. The third coach or main coach coordinates the two squads to optimize their performance. The course of fire is two convertible sighting shots and 10 shots for score per shooter at 300, 600, 900, and 1000 yards on the ICFRA 5V Targets.
When I was child my family raced horses. My father was once asked “how do you win a horse race?” His answer was “Break out of the starting gate in first place and keep improving your position.” That is exactly what the USA Veterans Team did, as the Americans won the 300-yard stage and each stage thereafter to beat the British Team by 12 points 1919-152V (USA) to 1907-172V (GB). Canada was third with 1896-131V, Australia fourth with 1878-140V. Of special note, Wayne Forshee (maker of the famous “Rightsight”) was high score on the entire line with 196-24V!
Message from Tom Whitaker:
As Captain I would like to congratulate my team again. No captain could be more proud of a team than I am of these “oldies”. They worked very hard to accomplish their quest for the Gold, a feat that hasn’t been done since 1999. Team members are:
Captain: Tom Whitaker; Adjutant: Leo Cebula; Coaches: Steve Hardin, Jim O’Connell, Gary Rasmussen; Shooters: David Crandall, Peter Church, Gerard DeCosta, Wayne Forshee, Charles Kemp, Randall Gregory, Marty Mayo, Noma Mayo, Steve McGee, Bob Steketee; Reserves: Michel Dunia, J.P. Young.
In the World Individual Championships there were three U.S. shooters who qualified for the final “top ten” shoot-off at 1000 yards, they, too, were all Veterans. I have heard it said that old eyes can’t be counted on to get the job done, but it looks like old age and treachery won out over youth and enthusiasm this time. Many thanks to all who supported our team. We could not have done this without your help, especially Sierra Bullets, Lapua, and The Bald Eagles Rifle Club.
In recent years, Forster Co-Ax® presses have been somewhat hard to find, as demand has out-stripped supply. However, right now Grafs.com has Co-Ax presses in stock, at just $299.99 — that’s six percent off the regular price. This sale price includes a set of jaws, and includes ground shipping (in the lower 48), after a single $7.95 (per order) handling fee. If you’ve been hankering for a Co-Ax press, now is definitely a good time to buy.
If you are not yet familiar with the many unique features of the Forster Co-Ax, we recommend you watch the video embedded below. This shows how the press operates and highlights the design elements which set the Co-Ax apart from every other reloading press on the market.
Forster Co-Ax Press Video Review
This is a very thorough review of the Forster Co-Ax done by Rex Roach. This 14-minute video shows the key Co-Ax features, explaining how the floating case-holder jaws work (3:30 time-mark), how the dies are held in place (4:40 time-mark), how spent primers are captured (6:10 time-mark), and how to set the primer seating depth (10:00 time-mark). We’ve used a Co-Ax for years and we still learned a few new things by watching this detailed video. If you are considering purchasing a Co-Ax, definitely watch this video start to finish.
The Co-Ax case-holder features spring-loaded, floating jaws. These jaws have two sets of openings, small and large. This allows the system to adapt to various rim diameters. The jaw plates can simply be reversed to switch from small jaw to large jaw. In the photo above, the Co-Ax is configured with the large jaw openings in the center.
“Once-fired, lot-number-traceable Lake City 7.62×51. This has been de-primed, pocket-swaged, small base body die’d, full-length sized, trimmed with a Gracey Trimmer, and tumbled. Now it’s shiny again. It’s like gourmet macaroni for shooters!” — Dennis Santiago
Our friend Dennis Santiago shoots a variety of disciplines, including Vintage Military Rifle. He burns through a lot of brass, some of it run through gas guns, so he often saves money by acquiring once-fired Lake City Arsenal brass. But that stuff is often pretty ugly when it arrives. For his “previously-owned” Lake City Brass, Dennis does a complete case prep operation and a thorough cleaning/tumbling operation. Special attention is paid to the primer pockets — they are swaged to remove the military crimp. The cases are trimmed and chamfered in one operation using a Gracey Powered Case Trimmer.
Dennis likes once-fired Lake City brass for some applications. The price is right, and with proper attention to detail during case prep, Lake City brass can shoot exceptionally well indeed. You may want to sort Lake City brass by weight. To remove the military crimp you have a variety of options — you can swage it out with a special tool like Dennis does, or you can ream out the crimp. For Wilson trimmer owners, Wilson makes a special Primer Pocket Reamer to remove military crimps. It works very well, as shown below:
Case Processing with the Gracey Trimmer
Designed by Doyle Gracey 30 years ago, the Gracey machine trims, deburs and chamfers in one operation, indexing off the case shoulder. The manufacturer claims the Gracey will process 20 cases per minute while holding .002″ tolerances on trim length. Two steel cutters are employed — one cutter trims the case to length and puts a chamfer on the inside of the case mouth. The second cutter removes the burr from the outside of the case-mouth. A 1/15 hp motor turns 1550 rpm. Interestingly, a clamped rubber hose serves as the “drive shaft” to turn the cutting head.
“This model may have a piece of wood for a base, no on-off swith and a piece of bent sheet metial to contain brass shavings — but it does trim, debur and chamfer with great speed and accuracy at a nice price. The [Gracey] two-bladed cutter requires a little more patience to adjust than the one-piece cutter on the Giraud, but it gets the job done superbly. [The Gracey] does the job for less money, if you’re willing to tinker with the cutter blade adjustment.” Gracey machines are still available new from MatchPrep.com for $335.00 (or $235.00 without motor).
They knocked it, tossed it, even hammered with it — but they couldn’t kill a Nightforce NXS. In this remarkable torture test video, past Nightforce Exec Kyle Brown (with help from NF employee Sean Murphy), absolutely brutalizes a Nightforce NXS 5.5-22x56mm scope. Brown bangs the NXS on a concrete bench-top, throws it 50 yards downrange, knocks it on a hardwood beam multiple times, and then heaves it back again. We kid you not. To our eternal surprise, the Nightforce scope survives all that abuse and shoots fine. What did Timex once say — “Takes a licking and keeps on ticking”?
Video is Continuous — No Tricks
You’ve got to watch this video — it was shot with five cameras and runs with no “time-outs”, cutaways, or video tricks. What you see is what you get. This is one tough NXS. Thank you Kyle Brown and crew for taking the time to prove the durability of Nightforce Optics products.
Could this be the most scenic rifle range in North America? We can’t say for sure, but it certainly is a strong candidate. This is the General Vokes Rifle Range in Chilliwack, British Columbia, Canada. Our friend Anette Wachter (30CalGal.com) was there for the annual BC Target Championship. All that greenery combined with the majestic snow-capped peaks in the distance makes for a stunning venue.
After seeing this photo, one of Anette’s Facebook friends from down-under was inspired to make a trip to Canada: “Maybe I can get a rebel Australian team to go there, even just for the scenery!”
Anette (at right) says the match has been going well: “Starting off a bit slow but there were tricky conditions today. I just need to step it up tomorrow… but they are predicting rain. [Editor’s comment: That’s why it looks so green. BC has rain, unlike drought-stricken California where I’m based.]
Anette reports there were fewer participants than in years past: “There has been a small turnout this year since they changed the dates.” She also noted that she is getting a good workout: “People wonder why I have such strong arms. Try carrying all this gear from line to line!” Good luck Anette.


 Installation Considerations


 After seeing this photo, one of Anette’s Facebook friends from down-under was inspired to make a trip to Canada: “Maybe I can get a rebel Australian team to go there, even just for the scenery!”


