Here is a simple technique that can potentially help you load straighter ammo, with less run-out (as measured on the bullet). This procedure costs nothing and adds only a few seconds to the time needed to load a cartridge. Next time you’re loading ammo with a threaded (screw-in) seating die, try seating the bullet in two stages. Run the cartridge up in the seating die just enough to seat the bullet half way. Then lower the cartridge and rotate it 180° in the shell-holder. Now raise the cartridge up into the die again and finish seating the bullet.
Steve, aka “Short Range”, one of our Forum members, recently inquired about run-out apparently caused by his bullet-seating process. Steve’s 30BR cases were coming out of his neck-sizer with good concentricity, but the run-out nearly doubled after he seated the bullets. At the suggestion of other Forum members, Steve tried the process of rotating his cartridge while seating his bullet. Steve then measured run-out on his loaded rounds. To his surprise there was a noticeable reduction in run-out on the cases which had been rotated during seating. Steve explains: “For the rounds that I loaded yesterday, I seated the bullet half-way, and turned the round 180 degrees, and finished seating the bullet. That reduced the bullet runout by almost half on most rounds compared to the measurements from the first test.”
Steve recorded run-out measurements on his 30 BR brass using both the conventional (one-pass) seating procedure, as well as the two-stage (with 180° rotation) method. Steve’s measurements are collected in the two charts above. As you can see, the run-out was less for the rounds which were rotated during seating. Note, the change is pretty small (less than .001″ on average), but every little bit helps in the accuracy game. If you use a threaded (screw-in) seating die, you might try this two-stage bullet-seating method. Rotating your case in the middle of the seating process won’t cost you a penny, and it just might produce straighter ammo (nothing is guaranteed). If you do NOT see any improvement on the target, you can always go back to seating your bullets in one pass. READ Forum Thread..
Many short-range Benchresters have thought about converting their 6 PPC to shoot a 30BR for score matches, or a Dasher for mid-range (or even 1000-yard) games. That way you have a rifle that does double duty, giving you the most bang for your buck. Though an action with a PPC bolt won’t normally work with 30BR/6BR/Dasher cases with their larger .308-class rim (0.4728″ diameter), there is a pretty easy solution that allows you to cycle these bigger cartridges with a 6PPC-style bolt (designed to fit .220 Russian rims).
“Rebating case rims … lets you shoot a 30BR in score matches using your PPC action. All you need is a new barrel. This saves buying another bolt, receiver, or rifle.” — Butch Lambert
Butch Lambert of ShadeTree Engineering provided this tip. Butch notes that many 6 PPC benchrest group shooters also enjoy shooting in score matches. But to be really competitive in the BR for score game, that means shooting a 30BR, which has a wider, .308-class rim (0.4728″ diameter). Likewise, if you want to compete in 600-yard registered BR events or in varmint matches, you probably want to run a bigger case, such as the 6BR, 6mm Dasher, or 6-6.5×47. Those cartridges also have the larger 0.4728″ rims.
Rebate Your 30 BR Rims
To convert a PPC-boltface action to shoot bigger cases you can spend a ton of money to buy a new bolt. That can cost hundreds of dollars. The simpler solution is to turn down the diameter of the larger cases on a lathe. Butch explains: “We’ve seen plenty of interest in rebating case rims. This lets you shoot a 30BR in score matches using your PPC action. All you need is a new barrel. This saves buying another bolt, receiver, or rifle if you have a PPC boltface. Anyone who has access to a lathe can do this job pretty easily. Yesterday I turned 150 case in about an hour.”
At right is the lathe form tool Butch uses to rebate the case rims.
Have you ever expanded a .22 or 6mm cartridge all the way up to .30-caliber? If so, you know this can be a difficult procedure that stresses the case necks and neck-shoulder junction. A significant neck-size expansion done in one big jump can increase run-out, cause doughnuts, or worse yet, even split the brass. Therefore you want to proceed in increments, increasing the neck diameter in stages. One smart way to do that is to use a Progressive Press. This article explains how…
The most successful short-range benchrest-for-score cartridge is the 30 BR. That cartridge, as well as 30 BR variants such as the 30 BRX, all start with the 6mmBR Norma parent cartridge, typically with Lapua 6mmBR brass. To get a nice 30 BR case you want to expand in stages, increasing the inside neck diameter incrementally from .243 to .308.
Darrell Jones of DJ’s Brass Service creates thousands of 30 BR cases each year. He has found a clever way to speed up the process — Darrell uses a Progressive Press. He runs his 6BR brass through four (4) separate Hornady neck-sizing dies with expander mandrels. First there is a .257 die, followed by .264 (6.5mm), .284 (7mm), and then .308. Then a fifth and final K&M die provides one last, slight expansion so the newly-fashioned 30 BR cases perfectly fit the arbor of Darrell’s neck-turning tool.
So to repeat, the case starts as .243 (6mm), then moves in up stages .257, .264, .284, and .308, with a final “finishing” step prior to neck-turning. You can see the expansion in this video, which starts with 6mmBR brass that was first hydro-formed to 6 BRX:
Watch 6mm Cases Expanded to 30-Caliber (6BRX to 30 BRX)
For this demo video, Darrell expands just one case at a time. However, he can also put multiple cases in the progressive — one per station. This takes a little more effort, Darrell says, but the results are still excellent. Darrell tells us: “I do put multiple cases in the progressive to save time. The results are the same — I just wanted to show a single-step process and how it reduces run-out by not stressing the shoulder with one big expansion from 6mm straight to 30 caliber. Doing the operation in multiple stages avoids binds and helps keep the shoulders concentric.”
This same multi-stage procedure can be use to expand other cartridge types. For example you could take .221 Fireball brass in stages up to .308 to create 300 Blackout brass.
Darrell uses caliber-specific, Hornady neck-sizing-only dies with elliptical expanders. Darrell tells us: “The Hornady elliptical expander has a reduced bearing surface that puts less strain on the brass when expanding the necks to the next size.” The fitting at the bottom of the die is the Lock-N-Load die bushing that allows fast die changes.
These particular cases used in the video were first hydro-formed to 6BRX then expanded to 30 BRX before neck turning. DJ’s Brass offers hydro-forming for many popular wildcat cartridges such as 6 PPC, 6mm Dasher, and .284 Shehane.
Editor’s NOTE: Shelley Davidson passed away in 2008 after a courageous battle with cancer. He was one of the great innovators in benchrest rifle design. This article, written before Shelley died, showcases Shelley’s creative talents at their best. His “Tinker Toy” design will always be a tribute to Shelley’s fabricating skills and imagination.
Shelley Davidson — a brilliant innovator. R.I.P. Shelley — you will not be forgotten.
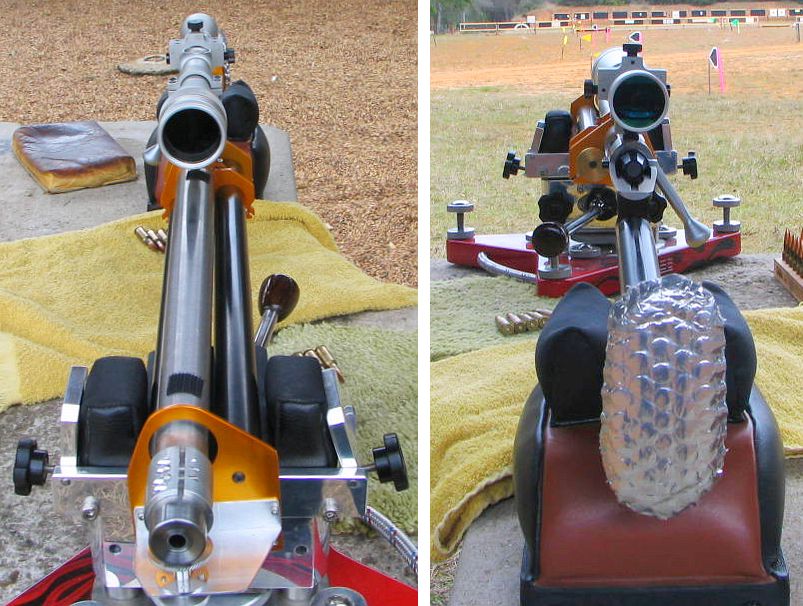
Shelley Davidson’s peers called his radical rifle the “Tinker Toy” gun. We call it revolutionary. Even now, 14 years after its creation, there’s nothing quite like it. This innovative, skeleton design threw conventional wisdom to the winds. Shelley readily concedes he “broke the rules” of benchrest rifle building. But this was inspired rule-breaking, because Davidson’s rifle shot like a house on fire. The Tinker Toy gun won its first matches, both for Score AND for Group. And this rifle also delivered many “zero groups” in Gene Begg’s Texas Tunnel. Hats off to Shelley for conceiving and building a truly radical rifle that was also wicked accurate and successful in competition.
Tinker Toy 30 BR — Radical As It Gets
Report by Shelley Davidson
Although I’m not big on naming rifles, my shooting buddies have christened the gun “Tinker Toy.” I can live with that as it does kind of look as if it was made with a Tinker Toy set.
Origins of the Project
This project began with some wild ideas I had in the fall of 2006 about using magnets to tune a barrel. My idea was to use one magnet on the barrel and another on the stock so they pushed against each other to counter gravity-induced barrel sag (and possibly) tame barrel vibration in a beneficial manner. The only way to test these ideas was to build the device and mount it on a gun. That meant I had to build a new rifle because there was no place to mount a magnet on the stock of a conventional benchrest rig. I had a Kelbly-stocked heavy varmint stock with a Michael Kavanaugh paint job on it. I didn’t think Kav would ever forgive me if I started drilling holes in one of his works of art. My light varmint was in a carbon fiber Scoville stock that costs about a grand. Drilling into the Scoville for an experiment just smacked of bad judgment. So, the magnet thing was my first motivation for designing a new stock. As long as I was building from scratch I decided to offset the barrel and action 0.75″ to the right to counteract the spin/torque from the bullet.
Although there’s nothing new here, my second motivation was to build a 30BR that could shoot in the 10.5 lb light varmint class in NBRSA. The magnetic tuner will automatically make this gun illegal in the IBS. The IBS has declared all barrel attachments un-safe and have outlawed them. I personally feel that the IBS really outlawed all barrel attachments to prevent experimentation and innovation. But at least we have NBRSA matches.
Designing the New Gun — Thinking “Outside the Box”
Once I’d decided to build a lightweight stock that could support experimental devices out near the muzzle, I started drawing up some rough plans. I also took a trip to Jerry Stiller’s shop in Wylie, Texas for a brainstorming session with Jerry, the maker of Viper and other Benchrest actions. Jerry is a school-trained mechanical engineer and thinks differently than I do. I came away from Stiller’s shop with my design roughed out and sketched on paper. The design violated several covenants of conventional wisdom for building competition BR rifles. For instance, two-piece stocks stress the action. Stress reduction is why most BR rifles are glued into the stock. Another myth is that metal stocks vibrate too much so wood or foam-filled fiberglass or carbon fiber are used.
Tinker Toy Rifle DESIGN FEATURES
Shelly Davidson’s Rifle was so innovative, that almost every feature, except the bare action, is very different than you’ll find on most Benchrest rigs. Accordingly we felt it would be useful to isolate and describe the key design features, from stem to stern. Click thumbnails to view FULL-SIZE PHOTOS.
Front Bracket with Magnetic Tuner
The tuner consists of one rare earth magnet attached to the stock and another attached to a barrel sleeve with the magnets oriented so as to make the magnetic force repel each other. The purpose is to counter “barrel droop” and, hopefully, dampen barrel vibration. The lower magnet is carried on a threaded shaft (with lock ring), allowing the magnet to be raised up and down to adjust the “up push” on the barrel.
Tubular Fore-Arm Supported by Brackets
Three brackets support two tubes, one on either side of the barrel. The rear-most bracket is sandwiched between the barrel and the action. Four inches forward (max distance allowed for barrel blocks) a second bracket grips the barrel. Near the muzzle a third bracket secures the ends of the tubes and holds the magnetic tuner. To allow barrel offset, the left tube is 1″ diameter tube while the right tube is 5/8″ diameter.
Offset Barrel The rifle rests on a 3″ wide plate attached to the underside of the two fore-end tubes. With the plate centered in the front sandbag, the barreled action is actually offset 0.75″ to the right (looking forward from the breech). The purpose of this offset is to keep more weight on the right side to counter the tendency of the rifle to torque counter-clockwise. Two different diameter tubes allow for the built-in offset.
Floating Action without Sub-Support or Bedding
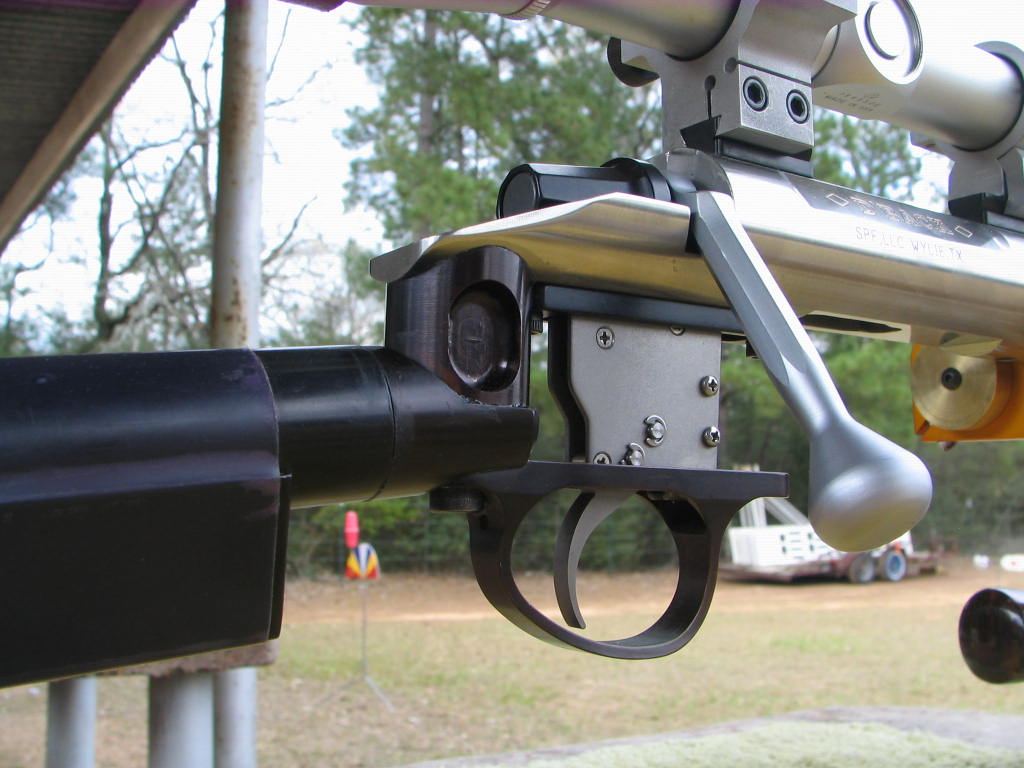
On the Tinker Toy gun, the action serves as a load-bearing assembly, holding the barrel in the front, and the skeleton buttstock (or “keel”) in the rear. Shelley was told that accuracy would suffer if you stressed a benchrest action in this manner but that proved untrue. It is a very simple solution to building a rifle, and it eliminates the need to bed the action. The forearm attaches to the action via a bracket installed like a recoil lug.
Skeleton Rear “Keel” Affixed Directly to Action
Davidson’s Tinker Toy does not have a conventional rear buttstock. Instead there is low-profile, v-shaped metal “keel”, as Davidson calls it, that rides the rear bag. The keel is supported by a tubular backbone that attaches at the rear of the Diamondback action. At the butt end is an aluminum plate covered with bubble wrap that serves as a butt pad. The skeletonized rear section helps the rifle maintain a very low center of gravity.
Locked Scope with External Windage and Elevation Adjustment
Shelley ran an older Leupold 36X Benchrest Scope with front-adjusting objective. To eliminate slop or loose tolerances in the erector mechanism that could cause changes in point of impact, the internals have been locked up by Jackie Schmidt. To move the cross-hairs relative to the bore axis, Shelley has a special Jewell/Foster rear ring that allows a limited amount of lateral and vertical movement of the entire scope body.
TINKER TOY SPECIFICATIONS
Action: Stiller SS Diamondback Drop-Port (1/2″ short), with .308 Bolt Face.
Barrel: Shilen .308 caliber, 17-twist, HV.
Chambering: 30BR, .330″ neck, Pacific Tool & Gauge Robinett Reamer.
Stock: Davidson Custom Tubular Stock with 0.75″ Offset Barreled Action.
Tube Construction: 6061 Aluminum, 1″ diameter (left), 5/8″ diameter (right).
Load: H4198 powder and 118gr Ronnie Cheek bullets. Loaded to 2980 fps.
Trigger: Jewell, 2 ounce BR.
Tuner: Custom, Adjustable with Opposing Magnets.
Optics: Leupold 36X (locked by J. Schmidt).
Rings: Jewell Foster External Adjusting Rings.
Stiller Diamondback Action and Shilen 17-Twist Barrel
I had wanted to use an aluminum Stiller Cobra drop port with a 6mmBR bolt face but Jerry had none in stock and he estimated it would be a year before one was available. Although I’ve waited for up to a year for an action in the past, I wanted to build this rifle during the fall of 2006 while the weather was pleasant enough to work in my unheated and un-air-conditioned garage shop. Jerry did have a 1/2″ short stainless steel Diamondback in stock so I purchased it even though it would add 3 ounces to the gun compared to the aluminum Cobra. Three ounces is a lot of weight when you’re working with a 10.5-lb limit. I had a heavy varmint contour Shilen 17-twist barrel that would work nicely and I had a Jewell trigger on a rifle that I wasn’t using at the time. I also decided to use my Leupold 36X (locked-up by Jackie Schmidt) with the Jewell/Foster adjustable rings.
Building the Tube Fore-Arm and Brackets
I took a wild guess as to tubing thickness and settled on .035″ for the 1″ left fore-arm tube and .058″ for the 5/8″ right fore-arm tube. All of the flat stock and tubes are 6061 Aluminum. I did the lathe work and the mill work and every evening I’d put the parts together and think about the proper way to proceed.
When the parts were mostly made, I started thinking that this was a truly ugly rifle. I thought about painting it but that wasn’t a good option as many of the parts are designed to slide over others and glue together. Anodizing was the best answer so while looking on the Internet for local anodizing shops I Googled “Home Anodizing”. Sure enough there were a few sites that told about how to anodize at home. I picked up some battery acid from NAPA Auto Supply, some Rit Clothes Dye from Wal-Mart, and a bunch of distilled water from the grocery store. Using an old battery charger as my dc power supply I started anodizing and dying the eighteen parts that went into the stock. Although I had to strip and re-anodize some of the parts, the work turned out acceptable.
Putting it All Together–Lug-Mounting the Fore-Arm and Lots of Epoxy
The barrel contour had to be modified to work with the stock which attaches by way of a rear plate which mounts like a recoil lug and a plate that ties the barrel and the stock tubes together 4″ forward of the bolt face. The four-inch maximum distance is a NBRSA rule concerning barrel blocks.
The recoil lug-style stock mount is probably the only truly innovative thing I did other than the opposing-magnet tuner. Basically, the rear bracket is sandwiched between the receiver face and the barrel shoulder–positioned where a conventional recoil lug would go. I also added a brass ring (visible in photo) between the anodized bracket and the barrel. This was done to distribute loads over a wider surface area. (I was concerned that the bracket material was fairly soft and I didn’t want to crush it as I torqued the barrel in place.) After fitting the barrel and plates I glued the entire gun together using epoxy and various LocTite adhesives. The rest of the parts were assembled but I did not Loctite the scope bases since I thought I’d be disassembling the rifle for re-work after the first trials. That came back to bite me during later testing when the gun started shooting erratically and I went down a couple of blind alleys before finding the loose bases.
Range Testing–Results Are Very Positive
The first range session was a real shocker. Even though the wind was up to 10mph and twitchy, the rifle showed promise from the very first shot. I really didn’t expect that kind of performance without, at least, some rework. After sighting in, I shot five, 5-shot groups that, when averaged together, measured .223″. That’s good enough to win some benchrest group matches. But I wasn’t finished with the gun yet–I still wanted to try out my magnetic tuner concept.
The Magnetic Tuner
Next, I built the magnetic tuner. The tuner consists of one rare earth magnet attached to the stock and another attached to a barrel sleeve with the magnets oriented so the magnetic forces repel each other. In order to test the magnets and to determine if the rifle really shot as well as it seemed to, I took it to Gene Beggs’s shooting tunnel in Odessa, Texas. I spent two days at the tunnel testing loads and then installed the magnetic tuner. The gun shoots well with the magnets and shoots well without them. I suppose I can’t make any claims as to how much, if any, improvement the magnets make. Gene said that my gun was the most accurate rifle to be tested at his one-year-old shooting facility: “Shelley Davidson brought one of the most unusual rifles I had ever seen; he called it his ‘Tube Gun.’ And boy, did it ever shoot! It still holds the record in the tunnel as the rifle that shot more zeros than any other to date.” I definitely recommend Gene’s facility for testing and refining shooting techniques and loads.
Competition — Tinker Toy Won Both Score and Group Matches
Finally the big day arrived when I’d shoot the first match with my new gun. The North Texas Shooters Association was holding its first club match of the 2007 season. At the Denton, Texas matches we shoot a Score Match in the morning and a Group Match in the afternoon. The March event was at 100 yards and the April match will be at 200 yards and so on alternating throughout the benchrest season.
Match One–Tinker Toy Wins Score with a 250 – 17X
Since the gun is chambered in 30BR and that chambering is almost immune to tuning woes, I preloaded 130 rounds with H4198 powder and 118gr Cheek bullets. I used my SEB front rest and rear bag which are made by Sebastian Lambang in Indonesia. Everything came together, and Tinker Toy demonstrated that the accuracy it showed in the tunnel was no fluke. The gun shot great and I won the morning match with a 250, 17X. The day was quite windy and the next best shooter scored a 250, 15X. So I’d chalked up my first win.
Match Two–Tinker Toy Wins Group with a .2282″ Agg Tinker Toy won the afternoon group match I entered with a five-group Aggregate of .2282″. (The second place score was .2568″.) My groups were .149″, .197″, .243″, .302″ (oops), and .250″. You know how some folks say a 30BR can’t be competitive with a PPC? Well that .2282″ Agg won’t break any records, but it is good enough to win some regional registered BR matches. So this rifle has demonstrated an ability to win in both Score and Group matches. Obviously I have a very good Shilen barrel, great Cheek bullets and the rest of the components are doing their jobs as well. But, the stock is also working well.
Score Shooting vs. Group Shooting–The Rules
In a score match, the shooter shoots one bullet at each of five record targets, which are clustered on one target sheet. The Aggregate score of five of these targets determines the winner. If the shooter touches the 10 ring on all of his 25 targets he can score a “clean” 250 score. Usually there will be more than one shooter who scores a 250 so the winner is determined by the X-count. The 1/2″ 10-point ring has a 1/16″ dot in its center. Touching the X dot adds to the shooters X count. In short-range group matches, the shooter must try to put five bullets through the same hole. At each distance (100 or 200), five, 5-shot matches are scored, the group sizes are added together (MOA equivalent at 200) and the total is divided by five to arrive at an Aggregate score.
This story, from our Gun of the Week Archives, offers a good intro to the 30 BR cartridge, which is still the leading chambering for short-range Score Benchrest.
What’s better than one custom-built 30 BR with gorgeous wood and top-shelf components? A matching pair of course. Just ask Australian shooter Greg Roche (“Caduceus” in our Forum). A decade ago, Greg spent two years living and working in the USA. While in America, he commissioned two matched custom rifles to bring back to Australia for Hunter Class BR matches. Though the look-alike rigs are both chambered in 30 BR, one is designed for the Australian “Traditional” centerfire Hunter Class (10-lb limit), while the other is purpose-built for the “Custom” centerfire Hunter Class (14-lb limit). The 10-lb Traditional rifle features a fully-functioning two-round magazine and a 6-power scope. In contrast the Custom Class rifle is a single-shot action, with a 45X Leupold scope. The Custom weighs 13.5 pounds so it can also be used in traditional Heavy Varmint Benchrest matches if desired.
Tale of Two Rifles Story and Photos by Greg Roche (“Caduceus”)
The USA boasts some of the finest precision rifle-builders and Benchrest parts suppliers in the world. Before returning to Australia after two years in the States, I decided to have two special BR rifles built using American components and skilled labor. I wanted a matched pair — twin guns that would be as handsome as they were accurate. The heavier gun of the pair, the 13.5-lb Custom Class rifle, features top-of-the-line (but well-proven) technologies and components. With the 10.5-lb Traditional Class rifle, we had to develop new solutions to allow the 30 BR cartridge to feed from a functional two-round magazine. Here is my saga of how my twin 30 BRs were conceived and built, and how they have performed in competition.
BACKGROUND — The 30 BR for Score Competition
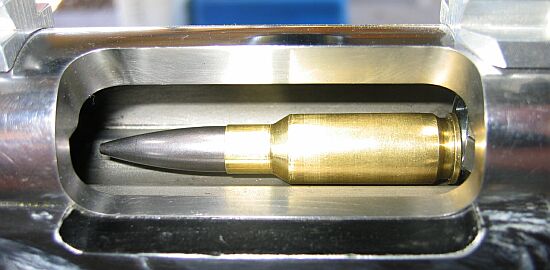
The 30 BR is a wildcat cartridge based on a necked-up version of the 6mmBR Norma case. It originated in U.S. Benchrest circles where it found its niche in Varmint For Score (VFS) matches. Unlike traditional Benchrest, where group size determines the winner, VFS matches are shot on a target with multiple, concentric-ringed bullseyes. Point total is based on “best edge” shot location (one shot per bull). In score competition, the 30 BR’s “supersized” .308-diameter hole offers an advantage over the 6mm hole created by a 6 PPC, the dominant group BR chambering.
The starting point for loading the 30 BR wildcat is Lapua 6mmBR brass. These are necked up as a single-step operation using a .30 caliber tapered expander ball (or dedicated expander mandrel). This will leave a bulge in the neck, so the expanded case neck is normally turned to bring the thickness down to the correct dimension for the chamber. I turned these necks down to .010″ wall thickness using a Stiller neck-turning tool. It features an eccentric mandrel similar to the Nielson “Pumpkin”. Loaded rounds measure .328″ neck diameter. This gives minimum clearance in my .330″ neck chamber, so very little neck resizing is needed after firing. Cases are trimmed to 1.500″ prior to turning to ensure consistency since the Stiller tool indexes the length of cut off the case mouth. Other than that, cases are just chamfered, loaded and made ready to shoot. No special fire-forming is required.
17-Twist Barrels for Both Rifles
Texan gunsmith Mike Bryant chambered both barrels. Mike also polished both barrels to a high-gloss to match the receivers. In this game, barrels are consumables, much like powder and primers, so most owners wouldn’t bother to polish their barrels. However a 30 BR barrel can provide up to 5000 rounds of accurate life (unlike a 6PPC barrel which might be tossed after 800-1000 rounds.) So, these barrels are likely to be on the rifles for many seasons. Given the high-gloss finish of the Grizzly actions and the beauty of the Red Cedar stocks, it would have been an injustice to leave a dull finish on the barrels.
The chambers were both cut with the same reamer supplied by Dave Kiff of Pacific Tool and Gauge. Randy Robinett, one of the originators of the 30 BR wildcat, specified the reamer dimensions. Randy’s 118gr, 10-ogive custom BIB bullets and the 30 BR cartridge enjoy a winning track record in the USA. The 30 BR Robinette reamer has zero free-bore and a .330″ neck, and is optimized for the BIB 118s. The bullets perform best when seated far enough out to jam firmly into the rifling as the bolt is closed. The long ogive means the bullet’s bearing surface is very short.
Slow Twists for Maximum Accuracy
You may note the unusually slow twist rate of both barrels. In most .30-caliber chamberings, the barrel twist rate is 1:11 or 1:12 to stabilize 150gr to 200gr bullets. The 30 BR is optimized for 115gr to 118gr flat-base bullets and 1:17 provides sufficient stability at muzzle velocities around 2900-3000 fps. In competitive Benchrest, where every thousandth of an inch counts, over-stabilization of projectiles can hurt accuracy, so “just stable enough” is the goal; hence the 1:17 twist.
Case Forming, Case Prep, and Reloading Methods
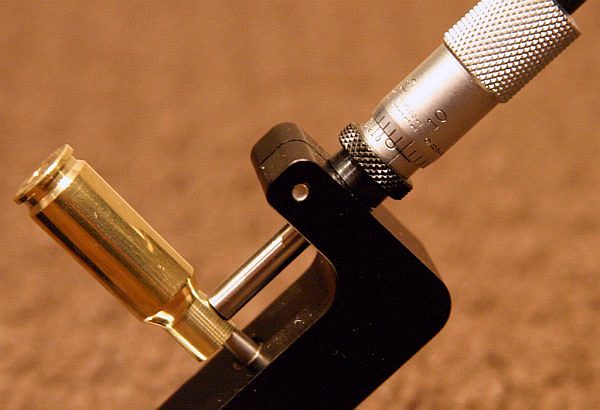
A Sinclair case neck micrometer indicates neck thickness of 0.010″ after neck turning.
30 BR dies are readily available from a number of manufacturers. I personally use Wilson neck and seating dies with a Sinclair Arbor press, but Redding and Forster both supply high-quality threaded dies for use in a conventional press. For under $100.00 US, custom full-length dies can be obtained from Hornady and CH Tool & Die by sending them reamer prints or a couple of fired cases. Harrell’s Precision offers “semi-custom” dies. Just send them some fired cases and they select a pre-made CNC-cut die that ideally fits your chamber. You can ask the Harrell brothers for a die that’s tighter at the shoulder or base, or otherwise customized to your preferences.
Load Development and Accuracy Testing
With cases formed and bullets selected, load development is simply a matter of choosing the right primer, powder and charge weight, and loading the most consistent ammunition possible. The Lapua BR cases use a small rifle primer. The choice here was Federal 205 Match primers vs. CCI BR4 Benchrest primers. Some shooters have also had success using CCI 450 Magnum primers but it is very unlikely the small case needs this much spark to light off regular extruded powders. In my case, I selected Federal primers because availability tends to be better in Australia.
The relatively large bore-to-capacity ratio of the 30 BR case means that fast burning powders are the order of the day. Once again, US experience suggests H4198 (the Hodgdon equivalent of ADI AR2207) is the choice of match winners. The fact that H4198/AR2207 is an Australian-made product is an added bonus. So, I loaded up test rounds with AR2207 from 32.5 grains to 35.0 grains in approximately 0.3 grain increments. All bullets were seated to jam +0.010″ into the lands. This places the bullet base about two-thirds of the way down the neck and well short of the neck-shoulder junction.
Action Choice — Stainless Grizzly II from Kelbly’s
The heart of any rifle is the action. Both my two 30BRs have RBLP Grizzly II actions from Kelbly’s. Kelbly’s is perhaps most famous for the Stolle Panda flat-bottomed aluminum actions but the Grizzly II also has a match-winning pedigree and precise tolerances. The Grizzly II is a round-profile, stainless steel, Remington-style action. I chose Right-Bolt, Left-Port configuration for ease of loading at the bench. The Traditional Class action has a magazine cut out in the floor and a plunger-style ejector (both required to meet the class rules). By contrast, the Custom Class action has a solid floor and no ejector. Other minor differences are the shape of the loading/ejection port and the profile of the bolt noses. The bolt from the single-shot action has a conical face, which theoretically gives maximum accuracy when mated to a similarly profiled barrel. However, the bolt from the repeater is made square for reliable pickup of the next round in the magazine without jumping over the top. Both bolt face diameters are 0.473″ for .308 case heads and feature sliding-plate style extractors.
Both receivers have pinned recoil lugs. These are not always required in Benchrest actions since a square tang can perform the same role when the stock is inletted accordingly. Since the actions are pillar-bedded into their timber stocks rather than glued, and because the 30BR recoils more stoutly than the 6mmPPC, I decided to fit recoil lugs on both rifles. Jewell triggers are standard fare–both set at 2 ounces. Bolt stops are integral to the action as with most benchrest actions.
Scope Options — 6X for Traditional, 45X for Custom
Both rifles are fitted with Leupold scopes in Kelbly aluminum rings and bases. The Traditional rifle’s scope is a 6x42mm to comply with class restrictions. It has a front-adjustable objective for parallax correction and a target dot reticle. I like the target dot when “holding off” for wind correction on the Hunter Class targets. The other rig wears a 45-power scope since magnification is unrestricted in Custom Class. It has a side-parallax adjustment and target dot reticle. The greater magnification really helps with precision aiming, and is probably the main reason why Custom Class scores are higher.
This 6 PPC features a Nesika Extended ‘C’ action, Krieger 1:13.5″-twist LV barrel, Kelbly stock, and stunning paint by Mike Lavalle of killerpaint.com. For an eye-catching R-Rated paint surprise, Click HERE.
One of the most popular items in our Shooters’ Forum is the ongoing “Pride and Joy” thread. Since 2009, Forum members have posted photos and descriptions of their most prized firearms. Here are some of the most recent “Pride and Joy” rifles showcased in our Forum. Do you have a gun you’d like to see featured there? Register for the Forum and you can add your favorite gun to the list.
Click image to view large, full-screen photo!
For this week’s Sunday GunDay we’ve selected five fan favorites from the Pride and Joy archives. First up is this custom 30 BR brought to you by ANSHUTER2013 and built by Dave Bruno. We were captivated by the clean lines and handsome looks of the Roy Hunter Curly Maple stock. Nestled in that stock is a BAT B action fronted by a 1:17″-twist James Lederer 24″ HV barrel. A Jewell trigger with fixed 42x44mm Nightforce scope round out this beauty.
This state-of-the-art 6 PPC boasts all top-tier components. And owner Wes R. shoots it with a superb rest/bag/pad set-up that inspires envy. This “Bughole 6 PPC” features a Bat DS action, Bix’N Andy trigger, with Bartlein 1:13.75″-twist barrel. The stock is a super-low-profile Scoville with carbon strengthening. The front rest is a SEB NEO, while in the rear is the new Lenzi sandbag. Folks tell us the Lenzi is super stable, which improves tracking from shot to shot. Note the timer attached to the front rest as well as the nice Edgewood leather bench “blanket” and arm-rest pad.
Forum Member Killick attached PickleForks to his handsome blue Eliseo R1 TubeGun now chambered in .284 Winchester, a top choice for the F-Open discipline. Killick explains: “Behold! An Eliseo R1 F-Classer. This started out as an R1 Long Range sling rifle (6XC) with a Borden TubeGun action. It is now rebarreled in .284 Win with Gary’s PickleFork fore-end adaptor. Props to Gary Eliseo at Competition Machine LLC.”
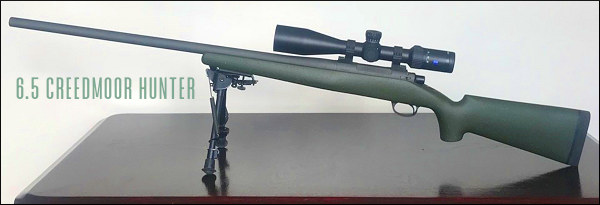
Sometimes clean and simple is the way to go — particularly with a hunting rifle. WEATHERBYFAN’s 6.5 Creedmoor is built around a Stiller Predator single-shot action in a texturd, green Wildcat Var-Tac stock. The 1:8″-twist Bartlein barrel is finished at 28″. That’s pretty long for a hunting rig, but it delivers added velocity. Finishing off this nice rigle is a Zeiss 6-24x50mm optic. Sometimes less is more and this is a perfect example of that.
Our final offering is from Forum member 300_WHISPER. Completed just months ago by gunsmith CALEB85, this .308 Win rifle features a Bighorn TL3 action with a Bartlein M40 26″ 1:10″-twist barrel, and Manners TA Elite stock. Other components include Trigger Tech Special, Area 419 self-timing muzzle brake, and a Weaver Tactical 3-15x50mm FFP mil/mil optic. When test-fired by Caleb with ammo using Berger 175gr OTM Tactical bullets, this nice .308 Win delivered a 1.6″ 5-shot group at 400 yards. The owner says “It’s my dream rifle. I couldn’t be happier”.
The 30 BR is an amazing little cartridge. However, 30 BR shooters do have to neck-up 6mmBR or 7mmBR brass and then deal with some issues that can arise from the expansion process. One of our Forum members was concerned about the donut that can form at the new (expanded) neck-shoulder junction. Respected bullet-maker Randy Robinett offers tips on how to deal with the “dreaded donut”.
The Forum member was concerned about thinning the brass if he turned his 30 BR necks after expansion: “Everything I have found on 30 BR case-forming says to simply turn off the bulge at the base of the neck caused by the old 6BR shoulder. I expanded my first case and measured the neck at 0.329″ except on the donut, where it measures 0.335″. Looking inside the case… reveals a groove inside the case under the donut. Now, it is a fact that when I turn that neck and remove the donut, the groove is still going to be there on the inside? That means there is now a thin-spot ring at the base of the neck that is .005 thinner than the rest of the neck. Has anyone experienced a neck cracking on this ring?”
Randy Robinett, who runs BIB Bullet Co., is one of the “founding fathers” of the 30 BR who help prove and popularize the 30 BR for benchrest score shooting. Randy offers this advice on 30 BR case-forming:
While the thinner neck-base was one of our original concerns, unless one cuts too deeply INTO the shoulder, it is not a problem. For my original 30BR chamber, thirty (30) cases were used to fire 6,400 rounds through the barrel. The cases were never annealed, yet there were ZERO case failures, neck separations, or splits. The case-necks were turned for a loaded-round neck diameter of .328″, and, from the beginning, sized with a .324″ neck-bushing.
The best method for avoiding the ‘bulge’ is to fire-form prior to neck-turning (several methods are successfully employed). Cutting too deeply into the shoulder can result in case-neck separations. I have witnessed this, but, with several barrels and thousands to shots fired, have not [personally] experienced it. The last registered BR event fired using that original barrel produced a 500-27x score and a second-place finish. [That’s] not bad for 6K plus shots, at something over 200 firings per case.
Check Out the 30 BR Cartridge Guide on AccurateShooter.com
You’ll find more information on 30 BR Case-forming in our 30 BR Cartridge Guide. Here’s a short excerpt from that page — some tips provided by benchrest for score and HBR shooter Al Nyhus:
30 BR Case-Forming Procedure by Al Nyhus
The 30 BR cartridge is formed by necking-up 6mmBR or 7mmBR brass. You can do this in multiple stages or in one pass. You can use either an expander mandrel (like Joe Entrekin does), or a tapered button in a regular dies. Personally, I use a Redding tapered expander button, part number 16307. This expands the necks from 6mm to .30 cal in one pass. It works well as long as you lube the mandrel and the inside of the necks. I’ve also used the Sinclair expander body with a succession of larger mandrels, but this is a lot more work and the necks stay straighter with the Redding tapered button. This button can be used in any Redding die that has a large enough inside diameter to accept the BR case without any case-to-die contact.
Don’t be concerned about how straight the necks are before firing them the first time. When you whap them with around 50,000 psi, they will straighten out just fine! I recommend not seating the bullets into the lands for the first firing, provided there is an adequate light crush-fit of the case in the chamber. The Lapua cases will shorten from approx. 1.550″ to around 1.520″ after being necked up to 30-caliber I trim to 1.500″ with the (suggested) 1.520 length chambers. I don’t deburr the flash holes or uniform the primer pockets until after the first firing. I use a Ron Hoehn flash hole deburring tool that indexes on the primer pocket, not through the case mouth. — Al Nyhus
Here is a simple technique that can potentially help you load straighter ammo, with less run-out (as measured on the bullet). This procedure costs nothing and adds only a few seconds to the time needed to load a cartridge. Next time you’re loading ammo with a threaded (screw-in) seating die, try seating the bullet in two stages. Run the cartridge up in the seating die just enough to seat the bullet half way. Then lower the cartridge and rotate it 180° in the shell-holder. Now raise the cartridge up into the die again and finish seating the bullet.
Steve, aka “Short Range”, one of our Forum members, recently inquired about run-out apparently caused by his bullet-seating process. Steve’s 30BR cases were coming out of his neck-sizer with good concentricity, but the run-out nearly doubled after he seated the bullets. At the suggestion of other Forum members, Steve tried the process of rotating his cartridge while seating his bullet. Steve then measured run-out on his loaded rounds. To his surprise there was a noticeable reduction in run-out on the cases which had been rotated during seating. Steve explains: “For the rounds that I loaded yesterday, I seated the bullet half-way, and turned the round 180 degrees, and finished seating the bullet. That reduced the bullet runout by almost half on most rounds compared to the measurements from the first test.”
Steve recorded run-out measurements on his 30 BR brass using both the conventional (one-pass) seating procedure, as well as the two-stage (with 180° rotation) method. Steve’s measurements are collected in the two charts above. As you can see, the run-out was less for the rounds which were rotated during seating. Note, the change is pretty small (less than .001″ on average), but every little bit helps in the accuracy game. If you use a threaded (screw-in) seating die, you might try this two-stage bullet-seating method. Rotating your case in the middle of the seating process won’t cost you a penny, and it just might produce straighter ammo (nothing is guaranteed). If you do NOT see any improvement on the target, you can always go back to seating your bullets in one pass. READ Forum Thread.
We first ran this story a few years back. But it’s still a very interesting subject for benchrest shooters. Shown above, the 30 BR (a 6mmBR necked up to .30 caliber) currently rules the benchrest-for-score game. However, a 30 BR Improved offers some potential advantages, particularly when the winds are strong or tricky. In this article Al Nyhus explains his 30 BRX wildcat. Running Hodgdon H4198, Al says he gets an easy 150 – 200 FPS more than the conventional 30 BR. That can translate to less drift in the wind. It also lets you pursue a higher speed node, which can lead to improved accuracy with some barrels.
Forum member Al Nyhus is a top-level score shooter who has competed successfully with the 30 BR cartridge in VFS (Varmint for Score) matches. Al has been working on an “improved” 30 BR cartridge that delivers extra velocity. Al’s 30 BRX cartridge is inspired by the 6mm BRX cartridge, popular in 600-yard benchrest and across-the-course competition. The 6mm BRX cartridge maintains the same sidewall profile and shoulder angle as the parent 6mmBR case. Likewise, the 30 BRX retains the 30° shoulder used on the popular 30 BR cartridge.
Al reports: “Thought you might like to see what I’ll be working with in my VFS gun this season. It’s a true 30 BRX — a 30 BR with the shoulder moved forward 0.100″ with the standard BR shoulder angle. Stan Ware of SGR Custom Rifles built one last season for Steve Grosvenor and I was really impressed by the performance of Steve’s gun. The 30 BR barrel on my VFS gun needed replacing, so the new 30 BRX got the nod.”
30 BRX Delivers 150-200 FPS More Velocity than 30 BR
Al says his 30 BRX gives a solid 150-200 fps speed gain over the 30 BR at the top, while needing just 2.5-3.0 more grains of Hodgdon H4198 to do so. A 30 BR case holds on average 40.8 grains of water, while the 30 BRX holds 42.3 grains (roughly 4% more). So the 30 BRX delivers a 7% increase in velocity with a mere 4% increase in H20 capacity. That’s pretty good efficiency. [Editor’s Note: Assuming 34 grains of H4198 is a typical 30 BR match load, Al’s increase of 2.5-3.0 grains for the 30 BRX represents roughly a 7.5-8.5% increase in actual powder burned. That explains the higher velocities.]
Why did Nyhus decide to try an “improved” 30 BR?
Al explains: “The 30 BRX was created to operate at a [higher] velocity level than can be achieved with the standard 30 BR case, while at the same time keeping the easy-tuning characteristics of the standard 30 BR case. We also wanted to use the same powders currently used with the 30 BR and maintain similar operating pressures.” Is the 30BRX harder to shoot because of the increased velocity? Al doesn’t think so: “In a 13.5-lb HV gun, the 30 BRX case is a pleasure to shoot with just a flea bite of recoil.”
Will the 30 BRX Become Popular in Score Competition?
The 30 BR is already an exceptionally accurate cartridge that dominates short-range Benchrest for Score competition. Will the 30 BRX make the standard 30 BR obsolete? Nyhus doesn’t think so. However, Al believes the 30 BRX offers a small but important edge in some situations: “On any given day, it’s the shooter that hits the flags best and makes the fewest mistakes that ends up on top. No amount of velocity will save you when you press the trigger at the wrong time. Missing a switch or angle change at 200 yards that results in 3/4″ of bullet displacement on the target can’t be compensated for with another 200 fps. That’s the hard fact of benchrest shooting. But on those days when, as Randy Robinett says, ‘our brains are working’, the BRX may offer enough of an advantage to turn a close-but-no-cigar 10 into an ‘X’ at 200 yards. Or turn a just-over-the-line 9 into a beggar 10.” Given the fierce competition in Score matches, an extra 10 or another X can make the difference between a podium finish and also-ran status.
Think you need a relatively long case-neck for good accuracy? Think again. Stan Ware broke all the rules with his radical Wolfpup cartridge, proving that a near-no-neck design can deliver match-winning accuracy. Read on to learn how the Wolfpup works…
Retired gunsmith Stan Ware is a talented shooter who’s not afraid to think “outside the box”. Stan competes in both Hunter Benchrest (HBR) and Varmint for Score (VFS) disciplines. In his quest to build the ultimate Hunter Benchrest cartridge, Stan created the radical “Wolfpup” wildcat, based on a 6mmBR parent case. Noting the dominance of 30 BRs in VFS matches, Stan wondered if a stretched 30 BR could work in HBR competition. The challenge was case capacity. Under HBR rules the cartridge must hold at least 45.0 grains of water, equal to the capacity of the classic 30/30 case.
To get the requisite HBR case capacity, Stan figured he needed to boost the volume of a 30 BR case significantly, so he would have to move the shoulder forward — a lot. He did this by running a 30 BR reamer deeper and deeper, test-firing brass along the way. After three reamer passes, he ended up with the capacity he needed (the Wolfpup holds 45.3 grains of water). But then he looked at the finished product — a case with almost no neck, and he wondered “how could this possibly work?”.
From Trashbin to Winner’s Circle
Ware’s prototype Wolfpup ended up so short-necked, so unlike any “normal” cartridge, that Stan figured it was “dead on arrival”. Stan told us: “I said ‘this ain’t going to work’ and I threw the brass in the trash can. Honest. But later I thought I better shoot it and see what it does.” There was one problem — Stan didn’t have a seating die. He noticed the short neck provided a bit of tension after fire-forming, so he literally seated some bullets, BIB 118s and 125s, with his fingers. For powder he used H4198 and started with 35 grains, one grain more than a 30 BR load. Stan then did a pressure work-up: “I actually went up to 41.0 grains and didn’t have a sticky bolt. I ended up at 37.9 grains of Hodgdon 4198 — that gave 3150 fps, where the sweet spot is.” (Later testing revealed a second accuracy node at about 3020 fps, using 36.4 grains of H4198).
Stan’s radical short-necked Wolfpup shot great from the get-go. Once he found the right velocity node, the gun shot in the ones and zeros with both 7-ogive and 10-ogive bullets, both 118s and 125s. The Wolfpup proved easy to tune — it’s not finicky at all. And it’s a winner. Stan began shooting the Wolfpup in 2006 in both VFS and HBR matches and the ‘Pup’ started winning matches right away. In 2007, Stan won the Wisconsin State VFS Championship shooting the Wolfpup. In June 2010 at a Webster City, Iowa VFS match, Stan won the Grand Agg and posted high X-Count for the match, while placing first at 100 yards and second at 200 yards. How’s that for a cartridge that almost ended up in the trash bin?
Does Stan deserve an award for “most innovative benchrest cartridge design”? Stan chuckles at that notion: “I’m not a hero, not a genius. I really didn’t do anything. The fun part is thinking outside the box — for me anyway. Shooting is an age-old process of experimentation. You never learn it all.”
Why Does It Work?
How can such a radical case design perform so well? “That’s a good question,” Stan admitted. He then explained: “The 30 BR is inherently accurate, so I figured something based on the 30 BR should be accurate too. My personal belief is that the short neck doesn’t hurt you. Plus if the throat in the barrel is straight, the bullet can self-align. If the chamber is good, the bullet will self-center in the throat. In a regular case there’s not much room to do that, so a bullet can start off-center, and you don’t get the same results every time. A bullet in a conventional case is stopped from self-centering by the stiffer neck, particularly in a tight-clearance BR gun.”
Reloading the .30 Wolfpup
Stan’s Wolfpup chamber has a neck dimension of 0.330″. He turns his necks for a 0.327″ loaded round. Bullets are jammed .020″ forward of first contact with the lands. When he closes the bolt it pushes the bullet back in the case — almost a soft seat. Stan notes: “To start with I normally bump the shoulder .0005-.001″ so they go in easy. Just by doing that I get a little neck tension. I also use a bushing. Right now I’m running a .322, but it’s not particularly sensitive. I’ve tried one-thousandths increments up to a .325 bushing and couldn’t tell a lot of difference.” For bullet seating, Stan uses a Wilson 30 BR seater die into which he ran the chamber reamer. This gives perfect case fit during seating operations.
About the Illustrated Gunstock
You’ll notice Stan’s stock contains scenes from Vietnam and a quotation. Here’s the story. A Vietnam combat veteran, Stan served “in-country” with the Army’s 509th Non-Divisional Combat Unit (out of Fort Riley) from 1965-1966. Shortly before he left Vietnam, Stan went to a shop to have a souvenir lighter engraved. He asked the vendor for an appropriate inscription. The shop’s metal-worker engraved: “War is a tragedy. It takes mans’ best to do mans’ worst.” That message, along with the combat scenes, were hand-painted on Stan’s rifle by his wife Susan, a talented artist. She spent more than 20 hours painting the rifle stock.


 The recoil lug-style stock mount is probably the only truly innovative thing I did other than the opposing-magnet tuner. Basically, the rear bracket is sandwiched between the receiver face and the barrel shoulder–positioned where a conventional recoil lug would go. I also added a brass ring (visible in photo) between the anodized bracket and the barrel. This was done to distribute loads over a wider surface area. (I was concerned that the bracket material was fairly soft and I didn’t want to crush it as I torqued the barrel in place.) After fitting the barrel and plates I glued the entire gun together using epoxy and various LocTite adhesives. The rest of the parts were assembled but I did not Loctite the scope bases since I thought I’d be disassembling the rifle for re-work after the first trials. That came back to bite me during later testing when the gun started shooting erratically and I went down a couple of blind alleys before finding the loose bases.

 Match One–Tinker Toy Wins Score with a 250 – 17X


 30 BR dies are readily available from a number of manufacturers. I personally use Wilson neck and seating dies with a Sinclair Arbor press, but Redding and Forster both supply high-quality threaded dies for use in a conventional press. For under $100.00 US, custom full-length dies can be obtained from


 The 30 BR is an amazing little cartridge. However, 30 BR shooters do have to neck-up 6mmBR or 7mmBR brass and then deal with some issues that can arise from the expansion process. One of our Forum members was concerned about the donut that can form at the new (expanded) neck-shoulder junction. Respected bullet-maker Randy Robinett offers tips on how to deal with the “dreaded donut”.
 Forum member Al Nyhus is a top-level score shooter who has competed successfully with the
 Retired gunsmith Stan Ware is a talented shooter who’s not afraid to think “outside the box”. Stan competes in both Hunter Benchrest (HBR) and Varmint for Score (VFS) disciplines. In his quest to build the ultimate Hunter Benchrest cartridge, Stan created the radical “Wolfpup” wildcat, based on a 6mmBR parent case. Noting the dominance of 30 BRs in VFS matches, Stan wondered if a stretched 30 BR could work in HBR competition. The challenge was case capacity. Under HBR rules the cartridge must hold at least 45.0 grains of water, equal to the capacity of the classic 30/30 case.
 From Trashbin to Winner’s Circle
 Why Does It Work?


