Here’s something of interest for benchrest competitors, particularly those who shoot at 100/200/300 yards. In those disciplines, high magnification is very important, and fixed-power options are popular. And in a game where the goal is to shoot in the ones and zeros, it is absolutely vital to have a scope that never experiences even the slightest shot-to-shot change (drift), and that allows very precise adjustments for windage and elevation. If you have a scope that moves internally, even the slightest amount, from one shot to the next, that can ruin a group.
Sightron offers a competition scope that should be a serious option for benchrest shooters. The Sightron SIII Competition 36x45mm ED riflescopes offer quality glass, precise adjustments, and reticles that hold steady — with no drift from shot to shot. This is a side-parallax scope with 1/10 MOA click values. Two Reticles are offered: Fine Crosshair (FCH), and FCH with 0.125 MOA Target Dot. This scope is in stock now at Creedmoor Sports for $1259.99, or direct from Sightron for the same $1259.99 price.
Sightron SIII Competition 36x45mm ED Specifications:
Sightron ExacTrack Windage and Elevation
When you’re trying to shoot one-hole groups, you need a scope that holds its values, and can also give precise, 100% repeatable adjustments when you need to dial a windage or elevation change. This SII ED’s ExacTrack windage and elevation adjustment system maintains proper alignment of the adjustments to the erector tube. That, Sightron says, ensures “precision and accuracy even when the most dramatic adjustments are applied.” NOTE: The adjustment values for both windage and elevation are 1/10th MOA. That is unusual. We usually see 1/8th MOA clicks in this type of scope. Here the click values are one-tenth Minute of Angle. (NOT 1/10 MIL). Sightron notes: “Precise target knobs with 1/10th MOA click value provide hair-splitting accuracy.”
ED (Extra Low-Dispersion) Glass in New 36x45mm Optic
The SIII Competition 36×45 ED features precision ED glass for crisp, razor-sharp views with minimal chromatic aberration — Sightron promises “crystal-clear target definition” with no color hazing. The SIII SS 36x45mm ED boasts Zact-7 Revcoat multi-coated precision ground lenses. Sightron claims “the highest quality light transmission in the industry”. A side parallax adjustment knob allows the riflescope to focus from 10 yards to infinity.
The type of targets you use can make a difference during load development and training — helping you align your crosshairs, estimate group size visually, and also record load data/gun type. Here we provide selection of FREE printable precision and training targets. This selection includes popular load development targets AccurateShooter created as well as other useful grid targets. You can download ALL these targets as PDF files and then print them out on 8.5×11″ heavy paper.
AccurateShooter.com offers a cool page with over 50 FREE downloadable targets. You’ll find all types or FREE targets — sight-in targets, varmint targets, rimfire targets, bullseye targets, tactical targets, load development targets and more. CLICK HERE for all our free targets, including our LOAD DEV target.
We created the above target a decade ago. Since then it has been used by tens of thousands of shooters. It has proven very popular as a load development target, since all your load data fits neatly in the boxes under each target. In fact this target is being employed by both rifle-makers and barrel-makers (including Criterion) to test their products. The target was designed for aiming efficiency. The diamonds have 1/2″ sides and you can align your cross-hairs on the horizontal and vertical lines. It is a clean design that is easy to see even at 200 yards with a 20X scope. When we test, we usually crank in a little elevation, setting the point-of-impact higher, so that our shots fall in the gray circles. That way you leave the squares intact for precise aiming.
Versatile Targets with Multiple Aiming Points
We use the two targets below for load development and precision practice. For the left target, use the corners of the diamonds to align your cross-hairs precisely. The circle dot target (on the right) can also be used for informal rimfire competition at 50 yards. Right-Click Each Target to Download Printable PDFs.
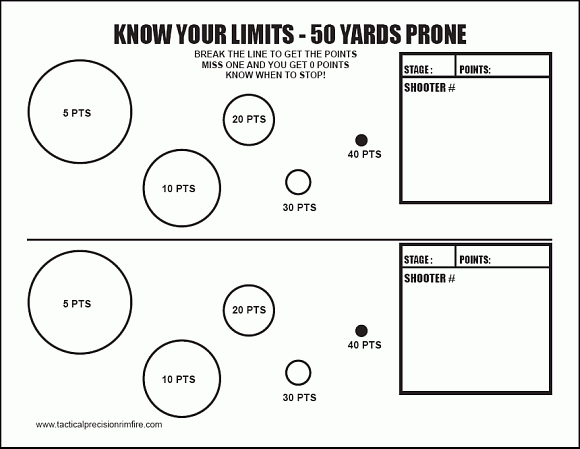
Know-Your-Limits Target for Rimfire Training & Fun Matches
Here’s a rimfire training target with “big to small” target circles. Start with the largest circles, then move to the smaller ones in sequence. This systematic drill provides increasing challenge shot-by-shot. Novices often are quite surprised to see their accuracy improve as they move from bigger to smaller aiming points. That provides positive feedback — always a good thing.
Right Click and “Save as” to download printable PDF versions of target.
Five Diamond Grid Targets
Here’s a popular grid target with multiple red diamond aiming points. The background includes a grid pattern with 1″ squares — that helps to quickly estimate group size through your scope. We recommend using a color printer for this target so the diamonds and grid lines are bright red.
Here’s a NRA-type target for pistol shooting. The bright red center helps when shooting indoors because well-placed bullet holes are much more visible. This target includes data entry boxes to record gun type, score, and load data. This is one of many good free targets available at Targets4free.com.
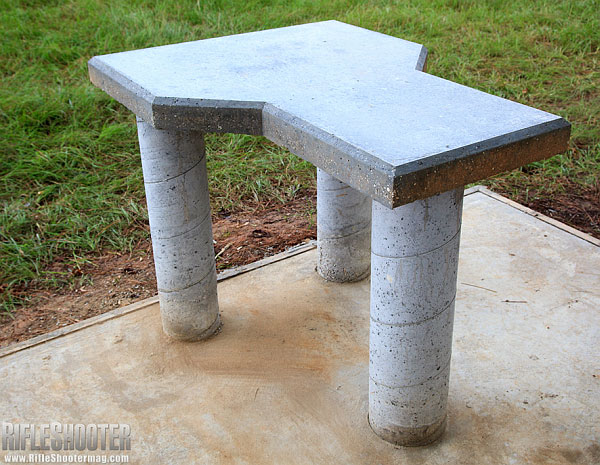
Who hasn’t dreamed of having a professional-quality, permanent shooting bench on their own property? Well here’s an article that can help you make that dream come true. This “how-to” feature from the archives of RifleShooter Magazine shows how to build a quality concrete shooting bench step-by-step.
All aspects of the construction process are illustrated and explained. The author, Keith Wood explains: “Construction happened in three phases — first creating the slab foundation, then the support pillars (legs), and finally the table.”
Click image below to load article with slide show.
Each step in the process is illustrated with a large photo and descriptive paragraph. Starting with framing the foundation (Step 1), the article illustrates and explains the 15 Steps that produce the finished, all-concrete bench (see top photo).
New .300 WSM F-Class rifle, with stock finished by Forum member Cigar Cop.
One of the most popular features of our Shooters’ Forum is the ongoing Pride and Joy Rifle thread. Since 2009, Forum members have posted photos and descriptions of their most prized firearms. Here are some of our favorite “Pride and Joy” rifles recently showcased in our Forum. Do you have a gun you’d like to see featured there? Register for the Forum and you can add your favorite gun to the list.
We hope these “Pride and Joy” rifles may provide inspiration for our readers, whetting their appetite for their next competition, varminting, or hunting rifle project.
Ultra-Low Profile 6 PPC for Short-Range Benchrest
This handsome rifle, which belongs to Forum member J.J.Coe, represents the state-of-the-art for 100/200-yard benchrest rifles. It is chambered (no surprise) for the 6 PPC cartridge, which dominates the short-range game. In features a super-low profile carbon composite stock. Note how the vertical centerline of the stock is very close to the barrel. This keeps the center of gravity low and helps the rifle recoil smoothly with less hop in the bags. Note also the tuner on the barrel.
22 BR Savage Varminter — Accuracy on a Budget
This 22 BR Savage, with upgrades from Sharpshooter Supply, is the “pride and joy” of Forum member Maynard. Note the heavy-contour custom barrel with brake. That 22 BR cartridge is a very effective choice for varmint work, as the ground hog in the photo proves. The 22 BR and 22 Dasher are capable of outstanding accuracy with a large variety of bullets and powders. A 22 Dasher can rival the ballistics of a 6mmBR out to 500+ yards, but with reduced recoil.
Eliseo Tubegun in 7mm SAUM with Pierce Action, Bartlein Barrel
Here is a striking camo-finished Elesio (Competition Machine) Tubegun chambered for 7mm SAUM. Note the block fitted to the tubular fore-end so the rifle rides smooth and steady on the Rodzilla T-Rex joystick front rest. The proud owner, Forum member Aeon, tells us: “This is a Gary Eliseo RTM chassis with pickle forks. It has a custom Ceracoat paint job to match my sling gun.” Key components are: Pierce Engineering long action tube receiver, Bartlein 1:8.5″-twist barrel, Jewell trigger set at 2 oz., and Vortex Golden Eagle scope in Vortex rings. Aeon adds: “The chamber was cut by Mark Chesesbro of Chesebro Rifles. Mark throated it very long so the the 180gr and 184gr Bergers would sit where they belong.”
Tuning the 7mm SAUM and Recoil Reduction
Owner Aeon tells us: “The 7 SAUM was as easy a gun as I have ever shot to find a good load for — H1000 gave great consistency and tuning was not hard. However, the challenge in shooting this rifle was recoil management. The 7 SAUM has a punch to it and I found myself having trouble finishing three relays without form problems in the last relay. I considered getting a RAD Pad but that would have required expensive machine work. I stumbled on a recoil pad that is uniquely effective, the Falcon Strike. Sent the pad to Gary Eliseo and he sent it back with the butt plate machined to fit. Complete game changer! The rifle is a dream to shoot now with a big reduction in felt recoil.”
This gray and blue beauty belongs to Forum member Farmer Dave. He posted: “Got this 6.5×47 Lapua back from my smith about six months ago. It’s the most accurate rifle I have ever owned.” This rifle features: AG Composites CF stock, Stiller TAC 30 action, Bartlein 5R barrel, TriggerTech Diamond trigger. On top is a Trijicon Accupower riflescope.
Henry .45-70 with Modern Buttstock and M-LOK Handguard
Here is member Quest45’s handsome lever-action Henry .45-70 Gov and Glock 40 10mm. About his two guns he posted: “All I need is a can of bear spray”. The rifle is fitted with a red dot sight, ammo caddies, Ranger Point M-LOK handguard, and a modernized modular buttstock. These upgrades make it a thoroughly-modern Henry lever gun for the 21st Century.
A .243 Winchester Hunting Rig that Nailed Scottish Roe Buck
Forum member John V. from Scotland showcased a successful hunt with his .243 Winchester rifle. This sports a suppressed, 26″ MTU 1:7.5″-twist barrel. He loaded Sierra 100gr Pro-Hunter bullets, and took this nice Roe Buck at 240 yards through a gap in the foliage.
Mauser M96 with Quilted Maple Stock — for the Wife
We like this handsome quilted Maple-stocked Mauser belonging to Forum member Steel Mover. He posted: “Some like synthetic and some like wood — I have both. Here is the wife’s quilted Maple 96 Mauser 6.5×55. I was working in the shop, wife walked through and said ‘You are building that for me aren’t you?’ Well ‘Yes, dear’ I said of course … so I Lost my rifle.”
Patriotic .284 Shehane F-Open Rig
Forum member 1shot is proud of this new F-Classer: “Just got my first F-Open rifle finished chambered in .284 Shehane. It features a Kelbly stock w/RAD system, Shilen 1:8″-twist ratchet-rifled barrel with EC Tuner, and X-treme 2-stage trigger — all mated up to a Kelbly Panda action. I think this dog will hunt!”
Bill Goad’s 6PPC Hunter “Ranch Rifle”
Forum member Grimstod tells us: “This is the personal rifle of Bill Goad. He has been experimenting with it on several levels. It is shooting great and has several matches on it now. Please enjoy these photos. More can be found on the website www.PremierAccuracy.com. We like the subtle barbed wire effect on the stock.
Do-it-Yourself Paint Job, Done in the Bathroom at Home
Many eye-catching rifles start with a great paint job. Forum member JHN did this job himself. He posted: “Went to local paint shops, some cost a two-month work income, some said guns were a ‘no-no’. So I did it myself — my first Candy Apple red. Base collar is gold metallic, followed by the red. I didn’t have a good paintwork place so I had to improvise. Our bathroom has nice concealing in the summer — a perfect paint booth. So I only have to apologize about some red flakes in our bathroom.”
Here’s a simple solution for lumpy front sandbags. Cut a small block the width of your fore-end and place that in the front bag between matches. You can tap it down firmly with a rubber mallet.
The block will keep the front bag nice and square, without bunching up in the center. That will help your rifle track straight and true. Rick Beginski uses wood (see photo), while our friend John Southwick uses a small block of metal. The metal block might work a little better, but the wood version is easier to make with simple tools. Shown above is a slick Delrin block with a built-in bubble level used with a quality J.J. Loh front rest. Using a good block on your front bag helps ensure that the actual top surface of your front bag is level, as distinct from the front rest assembly.
For today’s Sunday GunDay story we showcase seven interesting metal-chassis rifles. While we love the look and feel of wood and fiberglass, metal does have its advantages. It can be crafted very straight and true, and the designs can achieve a very low center-of-gravity without sacrificing rigidity. In addition, a precisioned machined metal chassis tends to track extremely well.
Massive IBS Heavy Gun Milled from Solid Aluminum Billet
This remarkable 70-lb IBS Heavy Gun, was machined from solid aluminum billet, by Bruce Baer. It rests on a G&G Alvey rest split in the middle to comply with rules. This “heavy metal” CNC-machined wonder is a work of art designed for the 1000-yard game in the Heavy Gun class. Wood stocks, and to a lesser extent fiberglass stocks, are more forgiving, offering greater damping and recoil absorption. However, metal stocks offer superior rigidity, and the CNC machining allows tracking surfaces to be perfectly parallel.
Williamsport limits Heavy Guns to 100 pounds. Under IBS and NBRSA rules weight is unlimited. You will see a few massive 200-lb behemoths at IBS matches, but most competitors find that something in the 60-90 pound range works best. Bruce Baer explains, “You can’t stop a gun from recoiling. If it doesn’t recoil it will jump. If it jumps you might as well go home because you won’t shoot a good group. So it is pointless to try to build a gun so heavy as to eliminate all recoil. The more you restrict the rifle’s recoil the more temperamental that rifle will be. The 200-pounders just don’t out-perform something in the 60- to 80-pound range, and I think the optimal weight is 60-70 pounds.”
Bruce Baer likes the 70-lb overall weight for a heavy gun: “Extreme mass is not necessarily an advantage. Watch a locomotive starting up from zero–it will vibrate from one end to another. If the gun is too heavy I think it will vibrate at the start of recoil and that will kill accuracy. I want the gun to start from recoil with very little effort so it will be smooth from start to stop.”
Water-Cooled World Record-Setting Wondergun
We like “outside of the box” thinking. And in the world of competitive shooting, it can’t get more unconventional than this. But this radical liquid-cooled benchrest rig wasn’t just a crazy experiment — it actually delivered the goods. This IBS Heavy Gun, built by Joel Pendergraft, produced a superb 10-shot, 3.044″ group that stood as an International Benchrest Shooters (IBS) 1000-Yard Heavy Gun record for seven years, not being broken until 2016.
Using this water-cooled wondergun, Joel shot the record-breaking group in April 2009 at Hawks Ridge, NC. This monster features a .30-Caliber 12-twist, 4-groove Krieger barrel inside a water-filled sleeve (like on a liquid-cooled machine gun). Joel shot BIB 187gr flat-based bullets in Norma brass, pushed by a “generous amount” of Alliant Reloder 25 and Federal 210M primers. The cartridge was a big custom wildcat Joel listed as “.300 Ackley Improved”.
Pendergraft’s 3.044″ 10-shot group was a great feat, breaking one of the longest-standing, 1000-yard IBS World Records. And Joel’s 3.044″ record stood for 7 years!
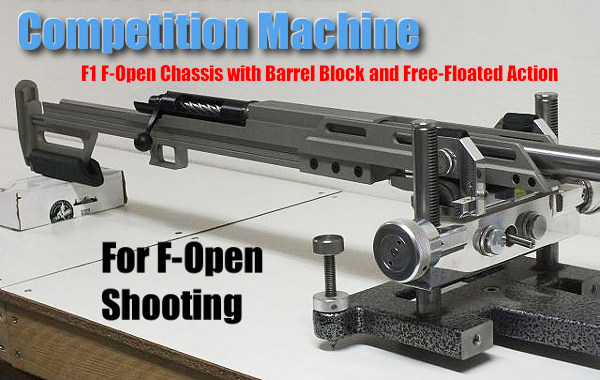
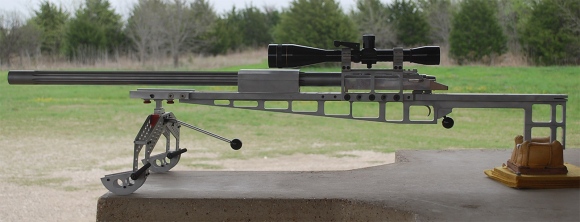
F1 F-Open Chassis from Competition Machine
Along with his famed tube-guns, Gary Eliseo of Competition Machine has designed a modern, low-profile chassis system for F-Open competition. Assembled with Cerakoted aluminum beams, these F1 F-Open chassis systems offer great tracking with an ultra-low center of gravity.
Here is the F1 Chassis with “Marine Corps Red” powder coat finish. Read Full Report.
This F1 aluminum alloy chassis stock features a super-low center of gravity, plus adjustable length of pull, cheek rest, and drop. The stock is available in a wide choice of Cerakote finishes. The current Model F1 chassis features a action block mounting system to fit most actions. There was also an earlier version that had a free-floated action with the barrel in a barrel block, secured with epoxy. Both F1 versions (action block and barrel block) shot great, with excellent performances in competition.
Gen 1 F1 F-Open Chassis System with Barrel Block
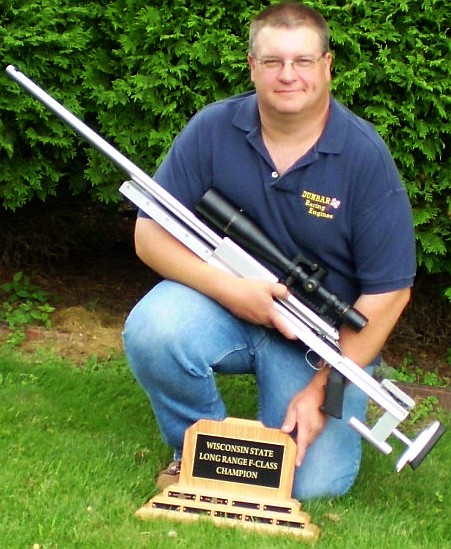
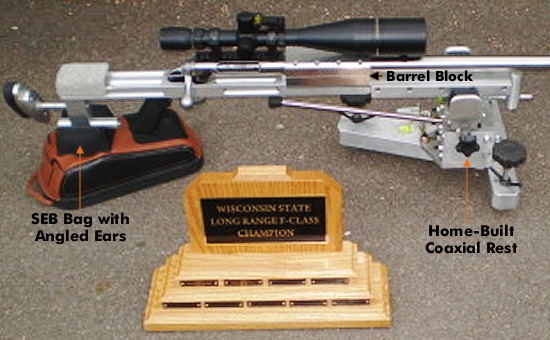
State Championship Win with Home-Built Aluminum Stock
While most of the stocks featured above were crafted by professionals, the properties of aluminum allow it to be used by persons with some basic mechanical skills and metal-working tools. Here’s proof. Back in 2009, Forum Member John Dunbar (aka JD12) crafted his own aluminum F-Open stock. And he used that impressive metal stock to win the Wisconsin State F-Class championship. READ Full Story.
The stock for John’s “home-built” .284 Winchester was mated with a Savage target action. John designed and fabricated the aluminum stock himself. It features a central barrel block clamping a 32″ Brux barrel. Get this — John completed the rifle only 5 days before the match: “I finished machining/assembly on Monday night, did load workup Wednesday and Thursday nights, loaded rounds Friday night, and headed to Lodi at 4:30 on Saturday morning.” John even made his own co-axial front rest (see below)
Richard King’s Radical .223 Rem F-TR Skeleton Rifle
Here’s something exotic from our Gun of the Week archives. We like this rig because it is so radical (we doubt that you have ever seen anything quite like it). Gun-builder Richard King calls this his “Texas-T”, noting that “this is my personal gun, built the way I wanted it. I know it’s radical and some may not care for it. But it works.” The rig was designed to shoot F-TR, but it can also be converted easily to shoot F-Open with a front rest.
Richard reports: “This is pretty much an all-aluminum rifle. The action is a Kelbly F-Class with a Shilen stainless steel competition trigger. The scope is a 1″-tube Leupold 36X with a Tucker Conversion set in Jewell spherical bearing rings. The .223 barrel is 30″ Pac-Nor 3-groove, 1:6.5″-twist mounted in a V-type barrel block. The bipod has vertical adjustment only via a dovetail slide activated by a stick handle. It works like a joy-stick, but for vertical only. I adjust for windage by moving the rear sandbag.”
Richard likes how the barrel block works: “With the barrel block forward, the vibrations should be at a low frequency. Instead of one long rod whipping, I now have two short rods (barrel halves) being dampened. This is my fourth barrel block gun. They work, but so does a good pillar-bedded action. [This rifle] is designed for my style of shooting. It is not meant to be a universal ‘fit all’ for the general public. However, I will say the design is adaptable. I can easily convert the system to run in F-Open Class. I would drop a big-bore barreled action into the V-block, slide on a heavier pre-zeroed scope and rings, add plates on the sides up front to bring the width to 3″, and maybe a recoil pad.”
When Fiberglass Fails, Aluminum Stock Saves the Day
Australian Mark Fairbairn performed a “Quick Fix” during the 2018 Berger SW Nationals. Mark’s F-Open rifle, in a conventional fiberglass stock, was giving him random vertical during one yardage: “I had a bit of a problem with elevation — the stock was hitting somewhere [causing vertical]. I was X-X-X then a shot popped up in the 9 ring with no good reason. So I figured I better put a new stock on it. I got my old aluminium stock I brought from Australia and quickly adjusted it to fit on the Stolle.”
Right on the firing line berm Mark swapped his barreled action into the metal stock of his own design. The clock was ticking… but the story had a happy ending. For the next yardage Mark shot a brilliant 150-7X, not dropping a point. So the “Quick Fix” did the trick. As they say Down Under — “Good on Ya, Mate!”
Home-Built Aluminum Chassis with Innovative A-Arm Bipod
Here is another home-built rig featuring an aluminum chassis mated to a Savage barreled action via a forward-mounted barrel block. This rig was crafted by Forum member Patrick Lundy, who followed the maxim: “If you can’t buy it, then build it.”
Patrick Lundy was so impressed with a fellow shooter’s barrel-block rifle, that he build a similar match gun himself, complete with barrel block and aluminum chassis. Patrick was inspired by a metal stock belonging to Peter Gagne. But he added his own custom touches, including an innovative “A-Arm”-design bipod for shooting in F-TR class. The gun has been very successful in competition. READ FULL Report
Pat told us: “This new stock was a milestone in my shooting career — it was my very first attempt to build a stock. I wasn’t much of a wood worker but I did have a talent for building with metal. The stock was fabricated from 6061 T6 aluminum. With this gun I was able to shoot from a rest or a bipod.”
Pat crafted the bipod from aluminum tubing: “The bipod was a very rigid A-frame design with welded aluminum tubing. I added slippery feet under the pod skis to facilitate smoother recoil. I realized that a wide-stance bipod had to recoil the same on both sides or the group would string horizontally.” Here is the innovative “A-Arm” bipod that Pat Lundy built for his rifle.
To get the best accuracy out of any benchrest rifle, you need to find the optimal position of front rest and rear bag. The important point to remember is that each rig is different. One gun may perform best with the front rest right at the tip of the forearm (Position ‘D’ in photo), while another gun will work best with the rest positioned much further back. This Editor’s own 6mmBR rifle has a laminated stock that is pretty flexy in the front. It shoots best with the front rest’s sandbag located a good 6″ back from the forearm tip (position ‘A’).
Here’s some benchrest advice that can help you reduce vertical and shoot tighter groups… without spending another penny. Many benchrest shooters spend a fortune on equipment and devote countless hours to meticulous handloading, but they never experiment with their rifle’s position/balance on the bags. This article explains why you should test your rifle in various positions. What you learn may surprise you (and improve your scores).
Next time you go to the range, experiment with the position of your rifle on the front rest, and try a couple different positions for the rear bag. You may find that the rifle handles much better after you’ve made a small change in the placement of your gun on the bags. Recoil can be tamed a bit, and tracking can improve significantly, if you optimize the front rest and rear bag positioning.
This competitor has the front rest positioned fairly far forward but not all the way out. Note the stop on the front rest — this limits forward stock travel.
A small change in the position of the forearm on the front rest, or in the placement of the rear bag, can make a big difference in how your gun performs.
Balance Your Gun BEFORE You Spend Hours Tuning Loads
In the pursuit of ultimate accuracy, shooters may spend countless hours on brass prep, bullet selection, and load tuning. Yet the same shooters may pay little attention to how their gun is set-up on the bags. When you have acquired a new rifle, you should do some basic experimentation to find the optimal position for the forearm on the front rest, and the best position for the rear bag. Small changes can make a big difference.
Joel Kendrick, past IBS 600-yard Shooter of the Year, has observed that by adjusting forearm position on the front rest, he can tune out vertical. He has one carbon-fiber-reinforced stock that is extremely rigid. When it was placed with the front rest right under the very tip of the forearm, the gun tended to hop, creating vertical. By sliding the whole gun forward (with more forearm overhang ahead of the front sandbag), he was able to get the whole rig to settle down. That resulted in less vertical dispersion, and the gun tracked much better.
Fore/aft stock position is important even with very wide fore-ends.
Likewise, the placement of the rear bag is very important. Many shooters, by default, will simply place the rear bag the same distance from the front rest with all their guns. In fact, different stocks and different calibers will NOT behave the same. By moving the rear bag forward and aft, you can adjust the rifle’s overall balance and this can improve the tracking significantly. One of our shooters had a Savage 6BR F-Class rifle. By default he had his rear bag set almost all the way at the end of the buttstock. When he slid the rear bag a couple inches forward the gun tracked much better. He immediately noticed that the gun returned to point of aim better (crosshairs would stay on target from shot to shot), AND the gun torqued (twisted) less. The difference was quite noticeable.
A small change in the position of the forearm on the front rest, or in the placement of the rear bag, can make a big difference in how your gun performs. You should experiment with the forearm placement, trying different positions on the front rest. Likewise, you can move the rear bag back and forth a few inches. Once you establish the optimal positions of front rest and rear bag, you should find that your gun tracks better and returns to battery more reliably. You may then discover that the gun shoots smaller groups, with less vertical dispersion. And all these benefits are possible without purchasing any expensive new gear.
Vertical stringing is a common problem that all precision shooters will face sooner or later. In addition to ammo inconsistencies, many other factors can cause vertical stringing. Accordingly, it’s important that you analyze your gun handling and bench set-up systematically.
EDITOR: Folks, READ THIS ARTICLE! You WILL benefit. There are some VERY important insights here. You’ll learn ways to set up your gun better, and check for various technical issues. That can save you time at the range and save you money spent on expensive bullets and powder.
In this article, Hall of Fame benchrest Shooter Speedy Gonzalez explains how to eliminate mechanical and gun-handling problems that cause vertical spread in your groups. Speedy’s article addresses the many human and the hardware factors that can cause vertical.
Speedy Gonzalez, noted shooter, gunsmith and member of the Benchrest Hall of Fame, offers these pearls of wisdom to help you eliminate vertical in your shot strings. Remember that vertical can result from myriad gear issues and gun-handling mistakes. Try to isolate one item at a time as you work to improve your groups.
BAGS and REST–VERY IMPORTANT
• Front Rest Wobble — You will get vertical if the top section of the front rest is loose. Unfortunately, a lot of rests have movement even when you tighten them as much as you can. This can cause unexplained shots.
• Rifle Angle — If the gun is not level, but rather angles down at muzzle end, the rifle will recoil up at butt-end, causing vertical. You may need to try different rear bags to get the set-up right.
• Front Bag Tension–Vertical can happen if the front sand bag grips the fore-arm too tightly. If, when you pull the rifle back by hand, the fore-arm feels like it is stuck in the bag, then the front bag’s grip is too tight. Your rifle should move in evenly and smoothly in the sand bags, not jerk or chatter when you pull the gun back by hand.
• Sandbag Fill — A front sandbag that is too hard can induce vertical. Personally, I’ve have never had a rifle that will shoot consistently with a rock-hard front sandbag. It always causes vertical or other unexplained shots.
• Bag Ears — If the channel between the Rear Bag’s ears is not in line with the barrel, but is twisted left or right, this can affect recoil and vertical consistency. And take note — if the bag is off-axis quite a bit, you can also get horizontal stringing.
• Reliability — ALL your bench equipment must work flawlessly. If it doesn’t, get it fixed or get rid of it. We need all our attention on wind flags.
GUN HANDLING and BENCH TECHNIQUE
• Be Consistent — You can get vertical if your bench technique is not the same every shot. One common problem is putting your shoulder against the stock for one shot and not the next.
• Free Recoil — Free recoil shooters should be sure their rifle hits their shoulder squarely on recoil, not on the edge of their shoulder or the side of their arm.
• Head Position — Learn to keep your head down and follow-through after each shot. Stay relaxed and hold your position after breaking the shot.
• Eyes — Learn to shoot with both eyes open so you can see more of the conditions.
• Last Shot Laziness — If the 5th shot is a regular problem, you may be guilty of what I call “wishing the last shot in”. This is a very common mistake. We just aim, pull the trigger, and do not worry about the wind flags. Note that in the photo above, the 5th shot was the highest in the group–probably because of fatigue or lack of concentration.
• Last Shot Low — I hear a lot of discussion about low shots in a group and apparently this occurs a lot on the 5th shot. If your 5th shot that goes out most of the time, you can bet you are doing something at the bench.
• Seating — When possible, bring your own stool so that you can sit comfortably, at a consistent height, every time you shoot.
LOAD TUNING
• Find the Sweet Spot — A load that is too light or too heavy can cause vertical problems. When you’ve tuned the load right, you should see a reduction in vertical. Even 0.1 grain may make a difference, as will small changes in seating depth.
• Primers — If you’re getting vertical, and everything else looks fine, try another brand of primers. And remove the carbon from the primer pockets so the primers seat uniformly every time.
• Case Prep — When you chamfer the inside of your case necks make sure they are smooth enough that they don’t peel jacket material off when you seat the bullet. Bullets with J4 Jackets (like Bergers) and Lapua Scenar bullets seem more prone to jacket scratching or tearing than Sierra bullets.
• Shell Holders — Keep shell holders clean, in both your press and priming tool. I have seen so much dirt/crud in shell holders that the cases end up get sized crooked because the rim is not square to the die.
• Water in Cases — I see people walking around with case necks turned up in the loading block. A lot of the time there is condensation dropping from the roof of your loading area. If one drop of water gets in a case you are in trouble. How many times have you had a bad low shot when it has been raining and you have been walking around with your cases turned up in your block?
MECHANICAL and HARDWARE ISSUES
• Barrel Weight — A lot of rifles are muzzle-heavy. Some rifles have too heavy a barrel and this causes vertical, especially when shooting free recoil. Basically the gun wants to tip forward. The remedy is to trim or flute the barrel, or add weight in the rear (if you can stay within weight limits).
• Unbalanced Rifle — If the rifle is not balanced, it does not recoil straight, and it will jump in the bags. If the rifle is built properly this will not happen. Clay Spencer calls this “recoil balancing”, and he uses dual scales (front and rear) to ensure the rifle recoils properly.
• Firing Pin — A number of firing-pin issues can cause vertical. First, a firing pin spring that is either too weak or too strong will induce vertical problems. If you think this is the problem change springs and see what happens. Second, a firing pin that is not seated correctly in the bolt (in the cocked position) will cause poor ignition. Take the bolt out of rifle and look in the firing pin hole. If you cannot see the entire end of firing pin it has come out of the hole. Lastly, a firing pin dragging in bolt or shroud can cause vertical. Listen to the sound when you dry fire. If you don’t hear the same sound each shot, something is wrong.
• Trigger — A trigger sear with excessive spring load can cause problems. To diagnose, with an UNLOADED gun, hold the trigger in firing position and push down on sear with your thumb. If it is hard to push down, this will cause vertical problems.
• Stock Flex — Some stocks are very flexible. This can cause vertical. There are ways to stiffen stocks, but sometimes replacement is the best answer.
SCOPE ISSUES
• Lock Rings — This year alone I have seen nine lock rings on scopes that are not tight. Guess what that does to your group? Make sure yours are tight.
• Big Tubes Need Tension — We’ve observed that some 30mm scope rings are not getting tight enough, and scopes are slipping in the rings under recoil. This will cause point of aim movement.
• Windage Bases — If you’re using a conventional-style single dovetail with rear windage adjustment, make sure both sides of the windage screws are tight. This can induce both windage AND vertical issues since the rear ring is held down by the windage tension.
AWARENESS of CONDITIONS and READING WIND
• Basic Wind-Reading Rule–If you do not know how to read wind flags or are very inexperienced, try to shoot your group with the flags all going in one direction.
• Rate of Fire — The longer you wait between shots when a condition is changing, the more the condition change will affect your shots.
• Look Far and Wide — Learn to look at the whole field of flags, not just the row in front of you. Many times a change quite a ways out will cause shot to go out of your group well before that change shows up in front of your bench.
• Don’t Fear the Wind — When you realize that the wind is your friend you will become a much better benchrest shooter. By this I mean that wind skills can separate you from other shooters who have equally good equipment. To learn how to read the wind, you must practice in challenging winds, not only in good conditions.
• Watch Wind Direction AND Velocity — Pay attention to angle changes on flags. Even though you see the same windspeed indicators, angle changes make a big difference in your groups.
• Watch While You Wait — Between courses of fire, whenever possible, watch conditions on the range. That way you will be aware of any changes in conditions since your last group and you will be mentally prepared for the new condition.
SPECIAL ADVICE for HUNTING RIFLES
• Clean That Barrel — Most hunting rifle barrels do not get cleaned enough. If you keep barrel clean it will shoot better for you. You should clean your barrel well after every 10 to 12 shots. If you’re lazy, just use Wipe-Out.
• First Shot Inconsistency — Most hunting rifles will not put the first shot (after cleaning) with the subsequent shots. So, after cleaning, if you have a rifle that tosses that first shot high or wide, then shoot one fouling shot before going hunting or before you shoot for group.
• Barrel Heat — Thin-contour “sporter” barrels WILL change point of impact as they heat up. When testing loads for your hunting rifle, take your time and don’t let the barrel get hot on you.
How to Fill Shooting Sandbags Most Effectively
For both front and rear Edgewood bags, start by looking for the black nylon/cordura flap. This flap will have white stiches running along both sides. Note that the flap is actually two pieces of nylon/cordura which are sewn together. These two pieces must be separated at the end where there are no stitches in order to insert a funnel or other filling device.
Hold the bag so that the flap is pointed straight up and fill half way. Using a blunted rod and alternating between filling and packing, begin packing the sand firmly into the bag until the shape is uniform and you are satisfied with the firmness. Slam the base of the bag firmly on the bench several times to compact and evenly seat the sand. Then, check to see if more sand needs to be added. Repeat this process for the ears if you are filling a rear bag. Note that as the sand continues to condense during use, the bag may occasionally require additional sand until it reaches maximum capacity. NOTE: This tip is from Creedmoor Sports, which carries Edgewood Shooting Bags.
Edgewood offers an innovative rear Twisted Gater bag with an unusual asymmetrical footprint. This provides arm/hand support for the shooter while still providing superb rear support for your bench rifles.
SANDBAG Fill Options — Yes Weight Matters
For most shooting applications, “heavy is good” when it comes to sandbags. The more your sandbag weighs, the better it will resist movement or mis-alignment that can throw off a shot. In order to increase the weight of their rear bags, serious shooters have turned to exotic sand formulations that offer greater density (hence higher weight by volume) than plain silica sand (aka “play sand”).
In this article, Jason Baney reviews three popular alternatives to play sand for rear sandbags. He tested each variety to determine its density, i.e. how much volume it would displace per pound. Then he calculated how much each type of sand would weigh in various sizes of rear sandbags: standard, large, and ultra-large (Bigfoot). Check our Rapid Reference Chart to see how much weight you can add to your sandbag by switching to heavy sand.
Is heavy sand worth the added expense? For serious shooters, the answer is yes. More mass equals more stability, and a more stable bag will help you shoot tighter groups. By switching from conventional sand to Zircon or Chromite, you can DOUBLE the weight of sand in your rear bag.
Shown above are the SEB Bigfoot Bags. Note that the bags sit perfectly flat — there is no bulge on the bottom even though the bags are “packed to the brim with sand”.
Heavy Sand — Weighing the Benefits by Jason Baney
Many serious Benchrest shooters fill their sand bags with “heavy sand”. This practice may seem “overkill” to most shooters, but its benefits are realized quickly when shooting from a bench. Heavy sand is more dense than normal silica “play sand” and therefore makes the sandbag heavier and more stable. How much heavier is the heaviest sand? Check the chart below and you’ll see that Zircon sand weighs essentially TWICE as much as ordinary play sand. More weight equals more inertia opposing bag movement, plus more gravity-induced “stiction” on the bottom of the bag. In other words, using heavy sand helps your rear bag stay planted on the bench during a string of fire. When you shoot a hard-recoiling gun, the difference between a bag filled with play sand vs. Zircon is very noticeable. The Zircon-filled bag stays put. The play sand-filled bag may not.
Rapid Reference Chart
Comparative Sand Weights by Sandbag Size
SandBag Type
Play Sand
Riverbed Sand
Chromite
Zircon
Standard 5″x6″
5.1 lbs.
7.9 lbs.
9.9 lbs.
10.1 lbs.
Large 6″x8″
6.8 lbs.
10.5 lbs.
13.2 lbs.
13.4 lbs.
BigFoot 6″x13″
10.2 lbs.
15.8 lbs.
19.7 lbs.
20.1 lbs.
Weight Increase Compared to Play Sand
Zincon +98%
Chromite +94%
Riverbed Sand +55%
The Benefits of Heavier Sand
Heavy Sand helps your sandbag resist the tendency to shift or change alignment (relative to the stock) during recoil. This ability to maintain sandbag alignment is vital when shooting competitive Benchrest, either short-range or long-range. Having to fight a “migrating” rear bag during a group at 1000 yards will not do anything to help your accuracy. In non-competitive use, heavy sand can still benefit shooters. Friction from the stock on the rear bag, or bumping the bag on recoil with either a body part or pistol grip can move a lighter bag out of place and necessitate realigning the bag to get on target.
Of course there are some shooting situations where you don’t need (or don’t want) maximum sandbag weight. During a “walk-around” varmint session you may prefer a lighter bag. Beanbags that I carry around the groundhog fields stay filled with plastic beads, making the bag handier to tote. But, any rear bag used on a bench will be as heavy as I can make it while still using “sand” as filler.
Heavy Sand, Lead Shot, and Competition Rules
Some will say, “Well if you want a heavier sandbag, why not just add lead shot?” That is a great idea, but as far as I know, it is also illegal in every form of Benchrest competition. The material in sandbags must actually be “sand”, and only sand. It’s tempting to filter in a mix of shot and sand to increase weight, but that would also violate the rules.
Heavy Sand — Available Types and Properties
Heavy sand comes in several different varieties. In this article we tested three types: Zircon, Chromite, and commercial Riverbed sand (Exo-Terra brand “Reptile Sand”). All these are heavier alternatives to normal silica “play sand.” There are other types of Heavy Sand not tested here, such as Garnet Sand, which is between Chromite and Zircon in weight.
Sources: ProtektorModel.com sells black “Heavy Sand”, basically chromite. Large quantities of Zircon and Chromite are available from IFS Industries, and other industrial suppliers.
Exo-Terra Riverbed sand (amber). Available at pet stores.
Silica “Play Sand” (tan or light gray). Available at Home/Garden stores.
Zircon — Heavy-Weight Champion
To my knowledge, “Dupont Zircon M” is the heaviest “sand” that a normal human can acquire. It is also the most expensive. Zircon is a very light tan/brown color and is very similar in appearance to normal sandbox “play sand”. Zircon is normally rated as having the greatest density among heavy sands and it has the smallest particle size, though some Chromite sand density values overlap the Zircon numbers.
1.00 pound of Zircon displaces 149cc vs. 295cc for Play Sand. So, that means Zircon is 98% heavier than an equal volume of Play Sand.
CONSUMER TIP: Real ZIRCON sand is TAN in color, not black or dark gray. Some “heavy sand” vendors promise Zircon but deliver a dark gray sand that is something else entirely!
Chromite — Almost as Heavy as Zircon, and 30% Cheaper
Chromite sand is nearly the same density as Zircon but it costs quite a bit less. Chromite typically sells for about 25-30% less than Zircon (comparing bulk prices of both types of sand). Chromite sand is black in color. So when you buy “heavy sand,” make sure you are getting what you pay for.
1.00 pound of Chromite displaces 152cc vs. 295cc for Play Sand. So, that means Chromite is 94% heavier than an equal volume of Play Sand.
Riverbed Sand — Weighs Less but Costs More than Chromite
Riverbed sand, is about 30% less dense than Zircon or Chromite, but is about 150% more dense than silica sand. Depending upon where you buy this sand, and the quantity, you will most likely pay more for this sand than you would Zircon or Chromite. Riverbed sand is a conglomerate of several different sizes and colors and appears red and black. Unless you are unable to get Zircon or Chromite, I would not bother with the riverbed sand.
1.00 pound of Riverbed Sand displaces 190cc vs. 295cc for Play Sand. So, that means Riverbed Sand is 55% heavier than an equal volume of Play Sand.
Density/Volume Testing and Weight Comparisons
All four sand varieties mentioned above were tested for volumetric density by weight. Each type of sand was weighed out to 1.00 lbs. on a commercial postal scale. Each 1.00 lb sample of sand was then poured loosely into a 600ml beaker and shaken minimally to level the top surface. This served to determine the volume that the sand occupied.
1.00 pound of sand displaced the following volumes:
Zircon: 149 cc
Chromite: 152 cc
Riverbed sand: 190 cc
Play Sand: 295 cc
How do the density-volume numbers translate to the real world? Here is an estimate of how much each sand would weigh in various sizes of rear bag:
Standard Bunny Ear Bag
5″ by 6″ footprint or about 1500cc
Zircon: 10.1 lbs.
Chromite: 9.9 lbs.
Riverbed Sand: 7.9 lbs.
Play Sand: 5.1 lbs.
Protektor Doctor Bag
6″ by 8″ footprint or about 2000cc
Zircon: 13.4 lbs.
Chromite: 13.2 lbs.
Riverbed Sand: 10.5 lbs.
Play Sand: 6.8 lbs.
Seb BigFoot Rear Loaf Bag
6″ by 13″ footprint or about 3000cc
Zircon: 20.1 lbs.
Chromite: 19.7 lbs.
Riverbed Sand: 15.8 lbs.
Play Sand: 10.2 lbs.
Conclusions and Recommendations
What’s the best choice? For most users, we recommend Chromite. Chromite delivers nearly the same bag weight as Zircon but is more economical to buy. But for those who demand the maximum weight in their sandbag (without consideration of cost), Zircon is the top choice because it is sold at a finer grade (higher density) than Chromite. However, Chromite will save you money, and deliver very nearly the same amount of weight by volume. When purchased in bulk, Chromite is typically 25-30% LESS expensive than Zircon.
I would not suggest using the Riverbed sand unless you really need to fill a sandbag immediately and can’t wait to locate a source for either Zircon or Chromite. Keep in mind that Sinclair Int’l and other major mail-order vendors do sell heavy sand (though Zircon and Chromite may be much less expensive when purchased in larger quantities from local industrial sources.) The price of the Riverbed sand will vary quite a bit depending on the pet store and quantity bought. The Riverbed sand I tested, Exo-Terra Reptile sand (photo right), was fairly expensive as purchased at a pet store.
Bottom Line: When it comes time to fill your new rear bag, you may want to save a few dollars and go with cheaper Chromite sand, but if you want to gain every bit of weight possible, step up to the heavier Zircon.
Lenzi Rear bags work very well and are popular with top competitors. This are sold through PMA Tool.
A while back our Aussie friend Stuart Elliot of BRT Shooters Supply filmed some interesting videos at the QTS range in Brisbane, Australia. Stuart told us: “I was shooting in an Air Gun Benchrest match here in Brisbane, Australia. I finished my target early and was awaiting the cease fire and took a short, slow-motion video of windflag behavior.” You may be surprised by the velocity changes and angle swings that occur, even over a relatively short distance (just 25 meters from bench to target).
Here are windflags in slow motion:
The flags show in the videos are “Aussie Wind Flags”, developed by Stuart Elliot. These are still produced in Australia, and are now available through BRTFlags.com.
Here is a video in real time:
Stuart says this video may surprise some shooters who don’t use windflags: “Many people say the wind doesn’t matter. Well it sure does — whether for an airgun at 25 meters or a long range centerfire at 1,000.” This video illustrates how much the wind can change direction and velocity even in a small area.


 Here’s a simple solution for lumpy front sandbags. Cut a small block the width of your fore-end and place that in the front bag between matches. You can tap it down firmly with a rubber mallet.


 In this article, Hall of Fame benchrest Shooter Speedy Gonzalez explains how to eliminate mechanical and gun-handling problems that cause vertical spread in your groups. Speedy’s article addresses the many human and the hardware factors that can cause vertical.
  • Front Bag Tension–Vertical can happen if the front sand bag grips the fore-arm too tightly. If, when you pull the rifle back by hand, the fore-arm feels like it is stuck in the bag, then the front bag’s grip is too tight. Your rifle should move in evenly and smoothly in the sand bags, not jerk or chatter when you pull the gun back by hand.


 How to Fill Shooting Sandbags Most Effectively
 For most shooting applications, “heavy is good” when it comes to sandbags. The more your sandbag weighs, the better it will resist movement or mis-alignment that can throw off a shot. In order to increase the weight of their rear bags, serious shooters have turned to exotic sand formulations that offer greater density (hence higher weight by volume) than plain silica sand (aka “play sand”).
 Many serious Benchrest shooters fill their sand bags with “heavy sand”. This practice may seem “overkill” to most shooters, but its benefits are realized quickly when shooting from a bench. Heavy sand is more dense than normal silica “play sand” and therefore makes the sandbag heavier and more stable. How much heavier is the heaviest sand? Check the chart below and you’ll see that Zircon sand weighs essentially TWICE as much as ordinary play sand. More weight equals more inertia opposing bag movement, plus more gravity-induced “stiction” on the bottom of the bag. In other words, using heavy sand helps your rear bag stay planted on the bench during a string of fire. When you shoot a hard-recoiling gun, the difference between a bag filled with play sand vs. Zircon is very noticeable. The Zircon-filled bag stays put. The play sand-filled bag may not.
 Dupont Zircon M (pale tan): 165-175 lb/cu.ft; avg. particle size 0.01″.
 Prince Minerals Chrome CAST 7850 (Chromite) (black): 172 lb/cu.ft; avg. particle size 0.02″.

 Zircon — Heavy-Weight Champion
 Chromite — Almost as Heavy as Zircon, and 30% Cheaper
 Riverbed Sand — Weighs Less but Costs More than Chromite


 I would not suggest using the Riverbed sand unless you really need to fill a sandbag immediately and can’t wait to locate a source for either Zircon or Chromite. Keep in mind that