Today’s video showcase covers bore-sighting methods and technology. Bore-sighting the old-fashioned way — by looking down the bore of a rifle at a target — is not difficult. With a conventional bolt-action rifle, visual bore-sighting can be done quickly and easily. Rest your gun securely on bags, remove your bolt and set up a 50-yard target with a large bright orange or black center circle. Look through the back of the action and you should be able to sight down the bore with your own eyes just fine. There’s no need for expensive hardware. In fact it may be easier to bore-sight the “old-fashioned way” rather than try to see a laser in bright sunlight at 50 yards (or even 25).
However, with lever guns and semi-auto rifles, including the popular AR15, M1 Garand, and M1A, the design of the receiver may make it virtually impossible to sight down the bore with the naked eye. That’s where a modern laser bore-sighting device comes in handy. For those situations where a bore-sighting tool is needed, we recommend a laser bore-sighter that fits inside your chamber. An in-chamber laser device, as shown below, is handy and has less safety risk than a tool which fits in the end of the barrel.
How to Bore-Sight Your Rifle in Five Minutes
This video from Australia shows the basics of the bore-sighting process. First set up a target 50 yards (or closer) from your shooting station. Make sure the rifle is well-supported and stable. When the target is ideally centered in the BORE of the barrel, then adjust the reticle on your scope to center the crosshairs on the middle of the target. Then, after checking down-range, take a few test shots. Finally, move the target out to 100 yards and confirm your zero, as explained at the close of today’s article.
Vortex Shows How to Bore-Sight Rifles
This well-made, informative video from Vortex covers the basics of bore-sighting. Bore sighting your rifle is a simple way to establish an initial zero to get you on target faster and save you ammo at the range. Thankfully, it doesn’t take a ton of gear or ammunition to bore-sight a rifle effectively. Video host Jimmy from Vortex provides a handy, step-by-step guide in this 10-minute video.
Bore-Sighting Using a Barrel-Mounted Laser Bore-Sighter
If you wondered why a barrel-mounted laser bore-sighter was off-center? Or if you want to learn how to use one properly, this video shows how to safely and properly zero a scope using a barrel-mounted laser bore sight device. Another option is a small cartridge-sized laser that fits inside the chamber. These sell for under $25.00 and are convenient. There are safety advantages to in-chamber lasers.
Initial Bore-Sighting at Home (Before You Head to the Range)
This useful video shows how to bore-sight a rifle at home. This can save time (and money for ammo) when you do get to the range to confirm your scope’s zero. This home procedure works best if the target is well-illuminated while the rifle is in a shadowed area, creating the best contrast. Also make sure the rifle is on a steady support — such as a portable gun vise or sandbags front and rear.
Bore-Sighting with a Red Dot (Reflex) Sight
As with conventional scopes, if you have a red dot sight or reflex optic, you’ll need to bore-sight your rifle, then zero the optic. [Reflex sights use a reflex lens to project a dot or reticle onto the target, whereas red dot sights use a flat, reflective surface to display a red dot reticle.] In this video, retired Navy SEAL Mark Cochiolo demonstrates how to bore-sight then adjust a red dot. Bore sighting allows you to zero your red dot so that your shots hit near your intended point of impact.
Learn More about Bore-Sighting with Tools
To learn more about bore-sighting, you can view a detailed article on the Warne Scope Mounts website. This features through-the-barrel images and discussion of tools that fit in the chamber or barrel to project a laser beam down-range. Shown below are cartridge-sized projecting lasers that fit in a rifle’s chamber. These are available for a wide variety of cartridge/chamber sizes.
WARNING: If you use an in-barrel laser be sure to remove it BEFORE chambering a round. ANY obstruction in the barrel can cause serious injury or even death if you fire a round.
Bore Sight Grid Tool with Arbors
The Bushnell Bore Sight with Arbors is a bore-sighting tool that many gun stores and gunsmiths use. This device uses arbors but does not transmit a laser.
You attach the tool to the end of the barrel and align it with your scope. A grid is visible inside the bore-sighter. Look at that grid and then and align your scope’s reticle with the grid. This Bushnell unit ships with three expandable arbors in 22-270 caliber, 7mm-35 caliber, and 35-45 caliber.
How to Zero a Hunting Rifle Efficiently
Once you have bore-sighted your rifle to get “on target” successfully, then you want to zero your optic so that the shot falls exactly where you want it at your target distance, typically 100 yards. This Vortex video shows you how to quickly and efficiently sight-in and zero a hunting rifle before heading out into the field. This video explains a simple procedure that lets you get a solid zero in just three shots. Of course you probably want to fire a few more rounds to confirm your zero before you head off to your hunting grounds, but this will let you get on-target with a minimum amount of time and ammo expended. This helpful video now has 3.2 million views on YouTube!
Fouling Shots and Cold Bore Condition
If you recently cleaned your rifle, you may want to fire two or three fouling shots before you start this procedure. But keep in mind that you want to duplicate the typical cold bore conditions that you’ll experience during the hunt. If you set your zero after three fouling shots, then make sure the bore is in a similar condition when you actually go out hunting.
Hunting season is right around the corner. We know many readers have acquired a new hunting rifles, or perhaps are using new ammo or a new optic. If you’ve got new gear, you’ll want to zero your hunting rig properly. Here’s how…
Here’s a simple procedure that lets you get a solid zero in just four shots. Of course you probably want to fire a few more rounds to confirm your zero before you head off to your hunting grounds, but this will let you get on-target with a minimum amount of time and ammo expended. (This assumes your scope is securely mounted, and the bases are not drastically out of alignment.)
QUICK-TIP: The Key to this procedure is Dialing to Shot One Point of Impact (POI). Re-aim at center of target after SHOT ONE. Then with the rifle motionless, use the turrets to put the middle of the cross-hair on the first shot location.
1. First, remove the bolt and boresight the rifle. Adjust the position of the rifle so that, looking through the bore, you can see the center of the target with your eyes. Secure the rifle in the rests to maintain its position as boresighted. Then, without moving the rifle, center the reticle. That should get you on paper. With the rifle solidly secured in front and rear rests or sandbags, aim at the center of a target placed at your zeroing distance (50 or 100 yards). Confirm there are no obstructions in the barrel! Then load and fire SHOT ONE. Then, return the gun to the exact position it was when you pulled the trigger, with the cross-hair centered on the target as before.
2. Locate, in the scope, where your first bullet landed on the target. Now, while you grip the rifle firmly so it doesn’t move, have a friend adjust the turrets on your scope. While you look through the scope, have your friend turn the windage and elevation turrets until the cross-hairs, as viewed through the scope, bisect the first bullet hole on the target. Use the turrets to move the center of the reticle to the actual position of shot number one. IMPORTANT: Dial the crosshairs to the hole — don’t move the rifle.
3. After you’ve adjusted the turrets, now re-aim the rifle so the cross-hairs are, once again, positioned on the target center. Keep the rifle firmly supported by your rest or sandbag. Take the SECOND SHOT. You should find that the bullet now strikes in the center of the target.
4. Take a THIRD SHOT with the cross-hairs aligned in the center of the target to confirm your zero. Make minor modifications to the windage and elevation as necessary.
5. Finally, shoot the rifle from a field rest (shooting sticks, bipod, or rucksack) as you would use when actually hunting. Confirm, with SHOT FOUR, that your zero is unchanged. You may need to make slight adjustments. Some rifles, particularly those with flexy fore-arms, exhibit a different POI (point of impact) when fired from a bipod or ruck vs. a sandbag rest.
This Video Shows the Process Described Above:
Fouling Shots and Cold Bore Condition
If you recently cleaned your rifle, you may want to fire two or three fouling shots before you start this procedure. But keep in mind that you want to duplicate the typical cold bore conditions that you’ll experience during the hunt. If you set your zero after three fouling shots, then make sure the bore is in a similar condition when you actually go out hunting.
Savage Arms has completed a major overhaul of the Savage website. Now the SavageArms.com site is more mobile-friendly and easier to navigate. Savage has expanded information on its rifle products, and also updated the Expert Advice area. This section of the website offers informative technical articles/videos, as well as numerous helpful tips for hunters.
You’ll find 30 informative topics in the Expert Advice section of the updated Savage Arms website. Below are FIVE of our favorites. Click each item to view the full text and linked VIDEOS. Even if you don’t own a Savage, these features are useful. And all new shooters should definitely check out the Advanced Optics selection. This features a good video covering mirage and light refraction.
1. Advanced Optics — Stan Pate
Light refraction can wreak havoc on your ability to connect with a target at extreme long range. Stan Pate offers some good advice concerning mirage and refraction.
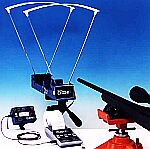
There is nothing more frustrating (or embarassing) than sending a live round into your expensive new chronograph. As the photo below demonstrates, with most types of chronographs (other than the barrel-hung Magnetospeed), you can fatally injure your expensive chrono if it is not positioned precisely.
When setting up a chrono, we always unload the rifle, remove the bolt and bore-sight to ensure that the path of the bullet is not too low. When bore-sighting visually, set up the rifle securely on the sandbags and look through the bore, breech to muzzle, lining up the barrel with your aim point on the target. Then (during an appropriate cease-fire), walk behind the chronograph. Looking straight back through the “V” formed by the sky-screens, you should be able to see light at the end of the barrel if the gun is positioned correctly. You can also use an in-chamber, laser bore-sighter to confirm the visual boresighting (see photo).
Adjust the height, angle and horizontal position of the chronograph so the bullet will pass through the middle of the “V” below the plastic diffusers, no less than 5″ above the light sensors. We put tape on the front sky-screen supports to make it easier to determine the right height over the light sensors.
Use a Test Backer to Confirm Your Bullet Trajectory
You can put tape on the support rods about 6″ up from the unit. This helps you judge the correct vertical height when setting up your rifle on the bags. Another trick is to hang a sheet of paper from the rear skyscreen and then use a laser boresighter to shine a dot on the paper (with the gun planted steady front and rear). This should give you a good idea (within an inch or so) of the bullet’s actual flight path through the “V” over the light sensors. Of course, when using a laser, never look directly at the laser! Instead shine the laser away from you and see where it appears on the paper.
Alignment of Chronograph Housing
Make sure the chrono housing is parallel to the path of the bullet. Don’t worry if the unit is not parallel to the ground surface. What you want is the bullet to pass over both front and rear sensors at the same height. Don’t try to set the chrono height in reference to the lens of your scope–as it sits 1″ to 2″ above your bore axis. To avoid muzzle blast interference, set your chronograph at least 10 feet from the end of the muzzle (or the distance recommended by the manufacturer).
Rifles with Elevated Iron Sights
All too often rookie AR15 shooters forget that AR sights are positioned roughly 2.4″ above the bore axis (at the top of the front sight blade). If you set your bullet pass-through point using your AR’s front sight, the bullet will actually be traveling 2.4″ lower as it goes through the chrono. That’s why we recommend bore-sighting and setting the bullet travel point about 5-8″ above the base of the sky-screen support shafts. (Or the vertical distance the chronograph maker otherwise recommends). NOTE: You can make the same mistake on a scoped rifle if the scope is set on very tall rings, so the center of the cross-hairs is much higher than the bore axis line.
TARGET AIM POINT: When doing chrono work, we suggest you shoot at a single aiming point no more than 2″ in diameter (on your target paper). Use that aiming point when aligning your chrono with your rifle’s bore. If you use a 2″ bright orange dot, you should be able to see that through the bore at 100 yards. Using a single 2″ target reduces the chance of a screen hit as you shift points of aim. If you shoot at multiple target dots, place them in a vertical line, and bore sight on the lowest dot. Always set your chron height to set safe clearance for the LOWEST target dot, and then work upwards only.
Other Chronograph Tips from Forum Members:
When using a chronograph, I put a strip of masking tape across the far end of the skyscreens about two-thirds of the way up. This gives me a good aiming or bore-sighting reference that’s well away from the pricey bits. I learned that one the hard way. — German Salazar
A very easy and simple tool to help you set up the chronograph is a simple piece of string! Set your gun (unloaded of course) on the rest and sight your target. Tie one end of the string to the rear scope ring or mount, then pull the string along the barrel to simulate the bullet path. With the string showing the bullet’s path, you can then easily set the chronograph’s placement left/right, and up/down. This will also let you set the chrono’s tilt angle and orientation so the sensors are correctly aligned with the bullet path. — Wayne Shaw
If shooting over a chrono from the prone position off a bipod or similar, beware of the muzzle sinking as recoil causes the front of the rifle to drop. I “killed” my first chronograph shooting off a gravel covered firing point where I’d not given enough clearance to start with and an inch or two drop in the muzzle caused a bullet to clip the housing. — Laurie Holland


 When setting up a chrono, we always unload the rifle, remove the bolt and bore-sight to ensure that the path of the bullet is not too low. When bore-sighting visually, set up the rifle securely on the sandbags and look through the bore, breech to muzzle, lining up the barrel with your aim point on the target. Then (during an appropriate cease-fire), walk behind the chronograph. Looking straight back through the “V” formed by the sky-screens, you should be able to see light at the end of the barrel if the gun is positioned correctly. You can also use an in-chamber, laser bore-sighter to confirm the visual boresighting (see photo).


