Product innovation is all about “building a better mousetrap”, or in this case, building a better bore-cleaning patch. A real smart guy, Shane Smith, has invented a triangular patch that earned a patent. The U.S. Patent Office has awarded a utility patent for BoreSmith’s triangular Pyramid Patch™. This unique cleaning patch was designed by Shane Smith, a mathematician/physicist who employed his scientific and firearms knowledge to create innovative bore-cleaning products.
BoreSmith’s clever Triangle Patch™ (aka Pyramid Patch) presents more cleaning surface area to the bore wall than does a conventional square or round patch (of equivalent size). At the same time, the unique geometry makes Triangle Patches much less likely to jam in the barrel. This is because the notches in the sides of the triangle allow the patch to sit more uniformly on the jag (without bunching up). In addition, the Pyramid patch is must less likely to jam due to pleating. One reason conventional patches get stuck is unwanted 5-layer pleating. The special notches in the Pyramid patch remove all or most 5-layer pleating. As a result the patch does not bunch up and this also reduces rod bowing.
Triangle Patch Function and Geometry Explained (See 1:18 time-mark):
NOTE: Despite what you may see in this video, you should ALWAYS insert brushes and patches from the chamber end first, using a fitted cleaning rod bore guide. With bolt-action rifles, NEVER insert a cleaning rod (with brush or jag) in through the muzzle. This may damage the delicate crown of your barrel.
One of our Forum readers complained that his 6mm jags fit very tight with patches, making it difficult to apply much solvent. The problem with a tight-fitting patch is that the solvent gets squeezed off in the first few inches. You can switch to a smaller jag, or a bore mop, but there is an even better way to get an ample amount of solvent in your bore — just spray it in with a “wash bottle”. This is an inexpensive plastic bottle with an L-shaped dispensing neck, tapered at the end. You can either just plug the breech and spray from the muzzle end (where most copper fouling is), or, alternately, put the wash bottle neck directly in the chamber and spray forward. When spraying from the chamber forward, you may need to use a rubber O-Ring to seal off the action… depending on the bore size and the particular wash bottle’s neck spout diameter.
Bottle Solvent Application Great for Smaller Bores
Using wet patches or wet brushes is an inefficient way to really saturate the tight bores of 17s, 20s, and 22s. Even with a cotton bore mop, most of the solvent will be squeezed out before it gets to the end of the bore, where most copper fouling occurs. For these smaller 17, 20, and 22-caliber bores, you can just take the “wash bottle” and stick the tapered nozzle right in the chamber. The tapered end will press fit in the throat, sealing off the chamber. With the barrel slightly nose-down, give the bottle a couple good squirts until the solvent mists out the muzzle. In just a few seconds, this will put more solvent in the bore than a half-dozen wet patches.
A solvent-filled wash bottle is also handy for wetting your brushes. It’s much easier to saturate a bore brush (without spilling solvent on your stock), by using the wash bottle. You can get wash bottles from USPlastic.com, Amazon.com, or lab supply stores.
Editor: This article appears on the Criterion Barrels website. It provides good, conservative advice about barrel cleaning. Understand that cleaning methods may need to be adapted to fit the amount and type of fouling (and the particular barrel). In general, we do try to minimize brushing, and we follow the procedures Criterion recommends respecting the crown/muzzle. We have also had very good success using wet patches followed by Wipe-Out bore foam. Along with the practices outlined by Criterion below, you may want to try Wipe-Out foam. Just be sure to use a fitted cleaning rod bore guide, to keep foam out of the action recesses and trigger assembly.
What is the Best Way to Clean a Rifle Barrel?
We are asked this question quite frequently alongside requests for recommended break-in procedures. Improper barrel cleaning methods can damage or destroy a barrel, leading to diminished accuracy or even cause a catastrophic failure. When it comes to barrel maintenance, there are a number of useful techniques that we have not listed. Some techniques may work better with different barrel types. This series of recommendations is designed to incorporate a number of methods that the Criterion Barrels staff has used successfully both in the shop and on their personal rifles. Please feel free to to list your own recommendations in the below comments section.
We recommend the use of the following components during rifle cleaning:
• Cloth patches (sized for the appropriate caliber)
• Brass jag sized properly for your bore
• One-piece coated cleaning rod
• General bore cleaner/solvent (Example: Hoppes #9)
• Copper solvent of your choosing (Example: Sweets/KG 12)
• Fitted cleaning rod bore guide
• Plastic AP brush or toothbrush
• Q-Tips
• Plastic dental picks
• CLP or rust preventative type cleaner
There are a number of schools of thought relating to the frequency in which a barrel should be cleaned. At minimum we recommend cleaning a barrel after each shooting session to remove condensation, copper, and carbon build-up. Condensation is the greatest immediate threat, as it can cause the barrel to rust while the rifle sits in storage. Copper and carbon build-up may negatively impact future barrel performance, increasing the possibility of a failure in feed or function. Fouling should be removed whenever possible.
The below tips will help limit the wear of different parts of your barrel during routine maintenance, helping extend the life of the barrel and improving its performance.
The Crown
The crown is the portion of the barrel where the bullet loses contact with the lands and grooves and proceeds to exit the firearm. The area most critical to accuracy potential is the angle where the bullet last touches the bore of the barrel.
Avoid damage to this area by using a plastic toothbrush and CLP type cleaner to scrub the crown from the exterior of the barrel. Even the most minimal variation in wear to the crown will negatively impact barrel performance, so be careful to avoid nicking or wearing away this part of the barrel.
Reducing Cleaning Rod Wear to the Crown
When running a patch through the barrel, place the muzzle about a ¼” from a hard surface that runs flat at a perpendicular angle to the cleaning rod’s direction of travel, like a wall or the edge of a work bench (pictured). When the jag impacts the hard surface, retract the cleaning rod and remove the patch.
By withdrawing the jag prior to its exit from the barrel, you are limiting the possibility of the brass dragging upon the crown if the rod is at all bent or misaligned. The soft cloth patch will continue to serve as the point of contact between the jag and the barrel, minimizing potential wear.
If possible, insert the rod through the chamber, pushing it forward toward the muzzle. Some rifles, such as the M1 Garand or M14, will require you to insert the cleaning rod through the muzzle. In these situations the use of a cleaning rod guide is recommended to limit the friction placed upon the crown.
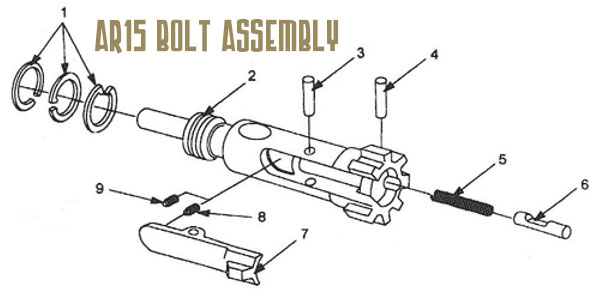
Avoid using cleaning rod segments for scraping carbon from the recessed muzzle of an AR-15 barrel. We used this trick in the Marine Corps to impress the armorers and NCO’s with the cleanliness of our muzzles, but it likely played a significant role in reducing the service life of the rifle barrel in question.
Use a Q-Tip soaked in solvent to remove any copper or carbon residue from the recessed muzzle of an AR-15 barrel. A little bit of remaining carbon on the face of the muzzle will not negatively affect bullet travel so long as the crown edge remains consistent around the circumference of the bore.
The Lands and Grooves
This portion of the barrel may experience reduced efficiency due to copper fouling and cleaning rod damage. If copper fouling takes place during the initial break-in of the rifle, make sure to check our barrel break-in article.
For regular maintenance we suggest using a single piece coated cleaning rod rather than the traditional segmented rod or bore snake. While segmented rods and bore snakes may be convenient for field use, the corners between the segments may bow out and catch on the lands, scraping along the length of the rifling. Residual grit and particles from expended cartridges may also get caught between segments, resulting in an abrasive surface working its way down the length of the barrel. Most bore snakes will remove significant amounts of carbon fouling, but may fall short in the removal residual carbon buildup and copper fouling during deep cleaning. Good rods can be sourced from multiple manufacturers, but we have found good results using both Pro-Shot and Dewey brand products.
General cleaning requires the use of patches rather than nylon or brass bore brushes. Brass brushes may be required when aggressive cleaning is required, but can lead to unnecessary wear on the barrel if used frequently. This is not due to the nature of the soft brushes themselves, but from the abrasive particles of grit that become embedded in the material that is being run repeatedly through the bore. We recommend the use of bore guides when cleaning from both the muzzle and breech. These bore guides will help serve to protect the crown and throat from cleaning rod damage.
If significant resistance develops while running the cleaning rod through the bore, no attempt should be made to force it in further. Back the rod out and inspect the barrel to determine the cause of the resistance. The jag may be pushing between a bore obstruction and the rifling, digging a divot into the barrel before pushing the obstruction back through the muzzle. One way to minimize the risk of a stuck rod is by utilizing a slightly smaller patch during the initial push.
The process of cleaning the length of the rifling is relatively straightforward:
1. Check to make sure the rifle is safely unloaded.
2. Carry out any necessary disassembly procedures prior to cleaning.
3. Remove bolt (if possible) and insert fitted cleaning rod bore guide in action.
4. Soak a patch in bore solvent (similar to Hoppes #9).
5. Center and affix the patch on the brass jag, inserting it into the chamber end of the barrel. A misaligned patch may cause the jag to damage the lands of the rifling, so make sure the patch is centered on the jag.
6. Run the patch the full length of the barrel, retracting it upon reaching the end of the muzzle.
7. Let the solvent sit for a minute.
8. Continue to run patches through the bore until carbon residue is minimized.
9. Run a dry patch through the bore to ensure carbon residue has been removed.
10. Soak a patch in copper solvent (Sweet’s or KG-12).
11. Run the patch through the bore, leaving it to sit for 3-5 minutes (do not let solvent sit for more than 15 minutes.*)
12. Repeat this process until no blue residue remains on the patches.
13. Run a patch of Hoppes #9 and a dry patch through the bore to neutralize the copper solvent.
14. Inspect the barrel prior to reassembling the rifle, verifying that no bore obstructions remain.
*Please note that some ammonia-based copper solvents may prove to be corrosive if left sitting in the barrel for an extended period of time. It is essential that these solvents be removed within 15 minutes to avoid ruining the bore.
The Chamber
Proper cleaning of the chamber is a critical component of a general cleaning procedure. Carbon rings can build up near the neck and throat of the chamber wall, leading to feeding malfunctions and pressure spikes inside the chamber.
The chamber can be the trickiest part of the barrel to effectively clean, due to its fluctuation in size and the awkward ergonomics often required to remove carbon residue. Numerous chamber specific devices have been created to address this problem, and while some should be avoided (steel chamber brushes), others can be used to great effect (cleaning stars and plastic dental picks). The simplest approach to cleaning a chamber is to apply solvent to a couple patches, and use the cleaning rod to spin the wadded up patches inside the confines of the chamber. This should aid in removing any excess carbon. A Q-Tip can be used to reach portions of the chamber unreached by patches.
The Barrel Exterior
While the condition of the crown, rifling, and chamber are essential to firearm performance, the finish of the exterior should also be cleaned after handling. Condensation, humidity, direct water contact, and salt residue from skin contact can cause rust or corrosion. An application of anti-corrosion products is recommended when placing a firearm into deep storage for an extended period of time. [Editor: AccurateShooter.com recommends Corrosion-X or Eezox, but other products work well too.]
Finding Cleaning Components
While most cleaning components can be found at your local gun shop, some specialty items may need to be sourced through online retailers such as Brownell’s. Criterion utilizes both Dewey and Pro-Shot brand cleaning components during our day-to-day operations.
Do you have any rifle cleaning tips or tricks not mentioned in the above article? We’d love to hear about them. You can post your comments below.
AR-platform rifles can be maintenance-intensive beasts. But some AR owners make the situation worse by not regularly cleaning important small parts, or by using too much oily/greasy lubricants in the wrong places. A properly maintained and lubricated AR15 can shoot hundreds of rounds (between cleanings) without a problem. If you learn where (and where not) to apply lubricant, you’ll find that your AR will run more reliably and the task of cleaning the bolt and bolt carrier will be less of a burden.
Here is a good video that explains AR-15 Cleaning and Maintenance. In this 30-minute NSSF video, Gunsite Academy instructor and gunsmith Cory Trapp discusses the proper way to clean and maintain the AR-15 carbine. Very knowledgeable, Trapp provides rock-solid advice for AR owners. Along with cleaning producedures, this video explains how to inspect key components and how to function-test your AR before each shooting session.
It’s December already. That means winter has definitely arrived — no doubt about it. If you plan to put away all or some of your firearms for the winter, here are TEN Tips for winterizing your firearms.
1. Bore Cleaning and Coating — Clean your barrels and neutralize any solvents you may have used. Then run a couple patches with a corrosion-fighter down the bore. We recommend Eezox or CorrosionX. Eezox leaves a glossy dry film shield with excellent rust resistance. CorrosionX is more like a conventional oil, but with special anti-rust additives. Other products may work well too. Just be wary of the “all in one” products that have a strong solvent, and don’t use any fluid that contains ammonia — this can actually promote corrosion. Here’s a test of various anti-corrosion products: Rust Block Comparison Test.
2. Crown Inspections — After cleaning the barrel, inspect the crown with a magnifying glass. If you see any unusual wear, abrasion, or “shark’s teeth” at the very outer edge of the rifling, make a note — it may be wise to recrown the barrel next spring. Before you place your rifle in the safe, we recommend putting a piece of electrical tape or blue masking tape loosely over the muzzle to protect the crown. This is just to protect the delicate crown during handling — you are NOT trying to seal off the bore.
3. Optics Storage — If your gunsafe is crowded, you may wish to remove the optics and rings from your rifles before winter storage. You can use a white crayon to mark the ring position (on the rail) for next season. We recommend that you store your optics inside a warm part of your house, where temperatures and humidity are relatively stable.
4. Trigger Group — Inspect your trigger assembly. Trigger housings accumulate dirt, grit, and oily gunk over the course of a season. If you have some basic mechanical skills, you may wish to remove the trigger from the hanger and clean it per the manufacturer’s recommendations. Don’t flood it with any kind of thick oil.
5. Bolt and Action — Clean the gunk off your bolt and raceway in your receiver. Put a thin coat of anti-corrosion product on the bolt, and re-grease the lugs and camming surfaces as recommended by the manufacturer. Don’t forget the fasteners and pins on the action and scope rail — these may not be stainless even if you have a stainless steel receiver.
6. Use Thin Gloves — When oiling firearms during the winterization process, we recommend you wear thin latex or nitrile gloves. This will prevent you from leaving skin oils and acids that can actually promote corrosion. This will also protect YOU from any chemicals in the corrosion-blockers you put on your guns.
7. Applying Surface Protectants — For blued firearms, put Eesox or other rust-fighter on a cloth and wipe the barrel and exposed metal. Eezox works best with a couple light coats. Don’t forget iron sights, bottom metal, trigger guards, bolt handles, and sling swivels — they can rust too if not protected. Use Q-Tips or small swabs to reach small, internal parts.
8. Use Gun Sacks — We put rifles and pistols in Bore-Store Gun sleeves. These thick, synthetic-fleece sacks cushion your guns, preventing nicks and scratches. The breathable fabric wicks away moisture, and the fibers are coated with corrosion inhibitors to help fight rust. Bore-Stores are offered in a wide range of sizes, so you can find something to fit everything from a Snub-nosed revolver to a 32″-barrelled 50 BMG. Rifle-size Bore Stores can be purchased for $9.00 – $22.00 from Brownells.com or Amazon.com. While we prefer Bore-Stores for regularly-used guns, if you have heirloom firearms that will be kept in storage for very long periods without seeing any use, you may want to grease them up and place them in the thin, but rugged three-layer storage bags sold by Brownells. Here’s one VITAL bit of advice for using these bags. Be absolutely sure, before you seal up the bags, that your guns are DRY and that all metal surfaces have been coated with an effective rust-blocker, such as BoeShield T9 or Eezox.
9. Take Your Guns OUT of Foam-lined Cases — These common foam-lined cases are Rust Magnets. This may be the most important Tip in this article. Just about the worst thing you can do in the winter (short of leaving your rifle outside in the rain) is to store firearms in tight, foam-padded cases. The foam in these cases actually collects and retains moisture from the air, acting as the perfect breeding ground for rust. Remember, those plastic-shelled cases with foam interiors are for transport, not for long-term storage.
10. Make Your Gun Safe Ready for Winter — If you don’t have a Goldenrod (or equivalent), buy one. Sold as a “dehumidifier”, the Goldenrod is a simple electrical element that can maintain temperature in your gun vault. This helps prevent moisture in the air from condensing on your guns. A small incandescent light-bulb can help as well (just make sure it cannot touch any flammable fabrics or objects). In addition, you may want to purchase Dessicant packs to put inside the safe to absorb moisture. If you have an electronic keypad for your safe, we recommend replacing the batteries at least once a year.
Ask 10 shooters about barrel cleaning and you’ll get 10 different opinions. This reflects that fact that different fouling problems demand different solutions. For example, solvents that work well for copper may not be the best for hard carbon (and vice-versa). To come up with the right solution, first you must understand the nature of the fouling in your barrel.
The debate about the proper care of a match barrel is a hot one, spiked with folklore and old wives’ tales, Lohman said. He and his staff set out to set the record straight: “We tried to interject some science into the discussion of cleaning a match barrel,” he explained. In his article, Lohman writes:
Why worry about a little barrel fouling when the throat is subjected to a brutal 5,600° F volcano at 55,000 PSI? To investigate these and other questions about taking care of a match barrel, we spoke with a dozen experts and share their knowledge in this first of a series of articles.
After listening to folks who shoot, build barrels or manufacture cleaning solvents for a living, we concluded that even the experts each have their own unique recommendations on how to care for a match barrel. But they all agree on one thing — the gun will tell you what it likes best. Because the life expectancy of a match barrel is about 1,500 to 2,500 rounds, the objectives of cleaning one should include: preserve accuracy, slow the erosion, and remove fouling — all without damaging the gun. This article doesn’t claim that one cleaning method is better than the next. Rather, we set out to interject a little science into the discussion and to share some lessons learned from experts in the field.
For more Shooting Sports USA articles, visit www.ssusa.org.
John Krieger Interview with AccurateShooter at SHOT Show:
The U.S. Patent Office has awarded BoreSmith utility patents for two unique gun cleaning products. Patents were issued for BoreSmith’s triangular Pyramid Patch™ as well as BoreSmith’s dual-diameter JagBrush™. Both products were designed by Shane Smith, a mathematician/physicist who used his scientific and firearms knowledge to create innovative bore-cleaning products that may well work better than conventional patches and brushes.
BoreSmith’s clever Triangle Patch™ (aka Pyramid Patch) presents more cleaning surface area to the bore wall than does a conventional square or round patch (of equivalent size). At the same time, the unique geometry makes Triangle Patches much less likely to jam in the barrel. This is because the notches in the sides of the triangle allow the patch to sit more uniformly on the jag (without bunching up). The Triangle patch can be used with a standard jag but works best when paired with BoreSmith’s patented dual-diameter JagBrush. Order Triangle Patches HERE.
Triangle Patch Function and Geometry Explained (See 1:18 time-mark):
NOTE: Despite what you may see in this video, you should insert brushes and patches from the chamber end first, using a well-fitting cleaning rod bore guide. With bolt-action rifles, NEVER insert a cleaning rod (with brush or jag) in through the muzzle. This may damage the delicate crown of your barrel.
Patent Awarded to Dual-Diameter JagBrush
The JagBrush is like a standard bore brush but has two different diameters on the bristle section. Bristles in the front are smaller, while the rear bristles are similar length to a standard bore brush. When a patch is pushed through the bore using a JagBrush, the smaller bristles will grab the patch, leaving the longer bristles exposed and creating a dual-action wiping + brushing system. JagBrushes are offered in a wide variety of calibers, in both bronze and nylon versions.
Shane Smith, CEO of BoreSmith, was pleased that his designs have been awarded two important patents: “I created these tools to allow the user to get their firearms cleaner, faster, and without causing unnecessary damage in the process. At BoreSmith, we strive to develop and produce superior cleaning tools that help firearm owners protect their investments.” For more info, visit BoreSmith at RigelProducts.com.
One of our Forum members asked us the question: “Does anybody make a good range box with cradles for cleaning at the bench?” The answer is yes — the MTM model RBMC Range Box offers slide-in plastic cradles that provide a reasonably sturdy platform for a quick clean when you’re done shooting. The RBMC box also offers plenty of storage for jags, brushes, solvents, ammo boxes and other miscellaneous gear you need for the range.
Among the many range boxes available, the MTM model RBMC Range Box leads the pack in terms of versatility. It is rugged, it has plenty of storage space, plus it doubles as a handy cleaning station. This Editor has used the MTM Range Box to clean rifles and as a “range expedient” rifle holder when adjusting scopes and tensioning action screws. It’s a good product that does the job and stands up to rough handling.
Fitted Cleaning Cradles
The key feature setting MTM’s RBMC apart from most range boxes is the rubber-coated cradle system. Wide enough to fit a 3″-wide fore-arm, the cradles slide into vertical slots on either end of the box. This allows your range box to serve as a stable maintenance station. The RBMC is really pretty stable in this role, and the cradles won’t mark your stock. The cradles even feature slots on each side to hold your cleaning rods when not in use. The MTM Range Box is secure enough to stay in place when you’re brushing the barrel. However, if you’re working on a carpeted bench top, you may want to keep one hand on the box when running a cleaning rod through the bore, just to ensure the box doesn’t slide.
Versatile Upper Tray with Dividers
The MTM Range Box has two major components — the box base (with cradles), and a large upper tray with hinged top and carry handle. This large upper tray clamps securely to the bottom unit for transport. The top tray has a long section that holds cleaning rod guides, long brushes, grease syringes and the like. There are two, clear-plastic fitted divider trays. These will hold your patches and jags, plus comparators, ring wrenches, and other small tools.
What Might Be Improved
Though we really like the MTM Range Box, it’s not perfect. First, we wish the box was a bit deeper, to have added carrying capacity. The dimensions of the MTM Range Box are: 25″ long x 11.5″ wide x 8.75″ high. We’d like to see it 12″ high/deep to allow larger solvent bottles to stand upright and to provide more space to carry tools and shooting muffs. However, it is deep enough to hold the large 100-round MTM cartridge boxes that are popular with many shooters (see photo at left).
The cradles are very nicely designed, and will hold your rifle securely without marking the stock. However, we’ve found that sometimes the rear cradle grips the gun so well that the cradle slides out as you lift the gun up. This is not a big deal, but it does demand a little extra attention when you’ve finished cleaning. We really like the twin clear plastic dividers that fit into the large removable top-tray, but we wish the dividers had individual hinged tops. This would keep patches and small parts more secure.
The MTM Range Box costs about $46.00 at most vendors. The MTM Shooting Range Box RBMC-11 (green version) is on sale now for $35.68 at Amazon.com, with FREE shipping. The red RBMC-30 version (shown below) costs slightly more, and may currently be hard to find.
If you’ve read our feature story on Ultrasonic Cleaning by Jason Baney, you’ve seen the remarkable results that can be achieved with this method. Ultrasonic cleaning has many advantages over traditional tumbling methods of case cleaning. There is no dust or media residue to remove from the brass, and when done right, the cases come out clean and shiney, inside and out, even the primer pockets.
In its Benchtalk Archives, Brownell’s has an excellent article discussing Ultrasonic Case Cleaning. Brownell’s staff compares results, with measured dwell times from 5 to 75 minutes, using both Mpro-7 and HCS 200 cleaning solutions. Tests are performed with once-fired and 5X-fired Tactical 20 (Tac20) cases, as well as once-fired .260 Rem Cases. The article also compares the results from ultrasonic cleaning vs. tumbling in walnut media. Below are Brownell’s results for Tac20 cases with the HCS 200 (non-acidic solution). Go to Brownell’s article for MPro7 results and Rem 260 results.
HCS 200 Cleaning Solution Test
Procedure — Solution was de-gassed for 15 minutes, then 63 Tac20 cases were placed in a single layer, in stainless steel mesh basket. The temperature of the starting solution was 102° F. When the cases were removed the temperature was 110° F.
Once-Fired Tactical Twenty Cases (HCS 200) — Observations 5 minutes: The exterior of the cases are not significantly brighter/cleaner. The primer pockets and case interiors are still dirty. 10 minutes: Exterior of the cases are brighter. 70% of the cases show some degree of cleaning of the primer pockets. Little difference seen inside the case, but case mouths are cleaner. 15 minutes: Case brightness is about the same. Still only 70% of the primer pockets are clean, but a larger portion of each is cleaner. A Q-tip swabbed inside the cases shows that carbon/powder residues are loosening up. 20 minutes: Case exteriors are brightening up. 80-85% of the primer pockets are about 90% clean. The insides of the cases and case mouths are cleaner. 25 minutes: Cases are brighter/cleaner than even new brass. 80-85% of the cases have almost completely clean primer pockets. The inside of the cases are 80-90% clean. 30 minutes: The insides of the cases and case mouths appear to be completely clean. 87% of the primer pockets are virtually 100% clean. 13% of the cases had stubborn primer pocket residue that could not be completely removed. 60 minutes: Eight cases (13%) were placed in the tank for another 30 minutes to try to remove the remaining residue in their primer pockets. Six out of the eight cases were completely clean.
Five-Times Fired Tac20 Cases — Observations 30 minutes: Based on the above observations, I didn’t begin to observe these 5-time fired cases until after 30 minutes: The exterior cases are bright/clean. Brighter than new cases. The primer pockets on 75% of the cases are 75% clean. The remaining cases had primer pockets that were only 25% clean. The inside of the cases appear to be clean. 65 minutes: 25% of the primer pockets were 95% clean, 25% of the primer pockets were 90% clean, 25% of the primer pockets were 85% clean; and 25% were 80% clean. 75 minutes: 75% of the primer pockets were 90% clean.
How Does Ultrasonic Cleaning Work? The Brownell’s article explains: “Ultrasonic cleaning uses high-frequency sound waves (generally between 20-80 kHz) to remove a variety of contaminants from objects immersed in a liquid. The result of these high-frequency sound waves is a process called cavitation. These high frequency bursts of ultrasonic energy produce a three-dimensional wave of alternating positive and negative pressure areas as the sound wave passes through the solution. During negative pressure, microscopic cavitation bubbles form and will continue to grown until they reach resonant size. As the positive sound wave passes, the pressure rises rapidly and implodes these tiny bubbles. Before these minuscule bubbles implode they store a tremendous amount of energy. These bubbles can be as hot as 10,000 degrees and have as much as 50,000 lbs per square inch of pressure. This sounds alarming, but you have to remember that these bubbles are microscopic in nature and pose no harm to anything, unless you are a carbon /powder residue deposit on a cartridge case!
When this cavitation bubble implodes near your brass case, it transforms the bubble into a jet about 1/10th of its size. This jet of energy can travel as fast as 400 km/hour. At 43 kHz, as is the frequency for our L & R HCS 200 ultrasonic cleaner, this is happening 43,000 times per second. This micro-burst of extreme energy is responsible for removing contaminants from the surface of your cartridge brass. Ultrasonic cleaning can reach into crevices and inaccessible areas and remove surface debris that can’t be cleaned by any other process.”
Hornady has announced new products for 2013. These include a number of new bullets, along with new loaded rifle, pistol, and shotgun ammunition. Perhaps most interesting for precision reloaders is Hornady’s new jumbo Ultrasonic Cleaning machine (MSRP $658.33). Featuring a 9-liter capacity, the new Hornady Hot Tub™ is long enough to accommodate and clean a 16-inch AR-15 upper. Along with its large capacity, the Hot Tub has many advanced features.
New Large-Size Ultra-Sonic Cleaning Machine — the Hot Tub™
For 2013, Hornady will be offering a new, jumbo-sized ultra-sonic cleaning machine that can handle big parts and accessories. In addition to having four (4) transducers, there is also a heating element that enhances cleaning action. Hornady says that “the microjet action of the Hornady® Hot Tub™ removes carbon residue and other debris from cartridge cases, gun parts and other metal equipment.” We know that ultra-sonic cleaning works well on cartridge cases, provided you have a good machine, a suitable solution, and run the machine for an appropriate time.
The new Hot Tub is well-equipped out of the box. One 1.7 quart inner tank comes with the unit and can be used in the main tank for cleaning multiple smaller batches or to use separate solutions at the same time. Additional inner tanks can be purchased separately. Hanging cords have been integrated into the design to allow large objects to take full advantage of the ultrasonic energy. Additionally, the Hot Tub® features integrated drain pans in the lids, a small parts basket, a degas function and five (5) temperature settings from 100-140°F.
Watch Video to See Hornady Hot Tub Ultra-Sonic Cleaning Machine in Action


 One of our Forum readers complained that his 6mm jags fit very tight with patches, making it difficult to apply much solvent. The problem with a tight-fitting patch is that the solvent gets squeezed off in the first few inches. You can switch to a smaller jag, or a bore mop, but there is an even better way to get an ample amount of solvent in your bore — just spray it in with a
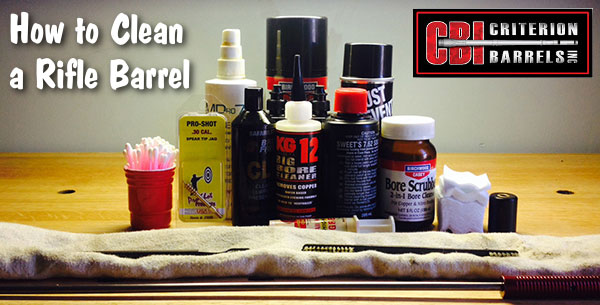


 1. Bore Cleaning and Coating — Clean your barrels and neutralize any solvents you may have used. Then run a couple patches with a corrosion-fighter down the bore. We recommend
  3. Optics Storage — If your gunsafe is crowded, you may wish to remove the optics and rings from your rifles before winter storage. You can use a white crayon to mark the ring position (on the rail) for next season. We recommend that you store your optics inside a warm part of your house, where temperatures and humidity are relatively stable.
 6. Use Thin Gloves — When oiling firearms during the winterization process, we recommend you wear thin latex or nitrile gloves. This will prevent you from leaving skin oils and acids that can actually promote corrosion. This will also protect YOU from any chemicals in the corrosion-blockers you put on your guns.
 9. Take Your Guns OUT of Foam-lined Cases — These common foam-lined cases are Rust Magnets. This may be the most important Tip in this article. Just about the worst thing you can do in the winter (short of leaving your rifle outside in the rain) is to store firearms in tight, foam-padded cases. The foam in these cases actually collects and retains moisture from the air, acting as the perfect breeding ground for rust. Remember, those plastic-shelled cases with foam interiors are for transport, not for long-term storage.


 What Might Be Improved
 If you’ve read our feature story on
 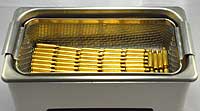 The Brownell’s article explains: “Ultrasonic cleaning uses high-frequency sound waves (generally between 20-80 kHz) to remove a variety of contaminants from objects immersed in a liquid. The result of these high-frequency sound waves is a process called cavitation. These high frequency bursts of ultrasonic energy produce a three-dimensional wave of alternating positive and negative pressure areas as the sound wave passes through the solution. During negative pressure, microscopic cavitation bubbles form and will continue to grown until they reach resonant size. As the positive sound wave passes, the pressure rises rapidly and implodes these tiny bubbles. Before these minuscule bubbles implode they store a tremendous amount of energy. These bubbles can be as hot as 10,000 degrees and have as much as 50,000 lbs per square inch of pressure. This sounds alarming, but you have to remember that these bubbles are microscopic in nature and pose no harm to anything, unless you are a carbon /powder residue deposit on a cartridge case!
 When this cavitation bubble implodes near your brass case, it transforms the bubble into a jet about 1/10th of its size. This jet of energy can travel as fast as 400 km/hour. At 43 kHz, as is the frequency for our L & R HCS 200 ultrasonic cleaner, this is happening 43,000 times per second. This micro-burst of extreme energy is responsible for removing contaminants from the surface of your cartridge brass. Ultrasonic cleaning can reach into crevices and inaccessible areas and remove surface debris that can’t be cleaned by any other process.”


