Product innovation is all about “building a better mousetrap”, or in this case, building a better bore-cleaning patch. A real smart guy, Shane Smith, has invented a triangular patch that earned a patent. The U.S. Patent Office has awarded a utility patent for BoreSmith’s triangular Pyramid Patch™. This unique cleaning patch was designed by Shane Smith, a mathematician/physicist who employed his scientific and firearms knowledge to create innovative bore-cleaning products.
BoreSmith’s clever Triangle Patch™ (aka Pyramid Patch) presents more cleaning surface area to the bore wall than does a conventional square or round patch (of equivalent size). At the same time, the unique geometry makes Triangle Patches much less likely to jam in the barrel. This is because the notches in the sides of the triangle allow the patch to sit more uniformly on the jag (without bunching up). In addition, the Pyramid patch is must less likely to jam due to pleating. One reason conventional patches get stuck is unwanted 5-layer pleating. The special notches in the Pyramid patch remove all or most 5-layer pleating. As a result the patch does not bunch up and this also reduces rod bowing.
Triangle Patch Function and Geometry Explained (See 1:18 time-mark):
NOTE: Despite what you may see in this video, you should ALWAYS insert brushes and patches from the chamber end first, using a fitted cleaning rod bore guide. With bolt-action rifles, NEVER insert a cleaning rod (with brush or jag) in through the muzzle. This may damage the delicate crown of your barrel.
The shooting season is now in full swing. When you head to the range you’ll want to be prepared. That means collecting all the gear you’ll need at the range. It’s easy to forget small, critical items, so we’ve provided a checklist of the small “extras” you should pack before you head out to the range. In addition to rifle, rests, ammo, targets, and cleaning gear, here are a dozen essentials you should include in your range bag.
• Shell-Holder — If you don’t have calipers, you can use a shell-holder to check for excessive case expansion from hot loads. If a fired case doesn’t slip into the shell-holder easily, your load is definitely TOO HOT.
• Extra Earplugs — Always use ear protection when shooting. We bring a 35mm film canister with extra sets of foam earplugs.
• Hex Wrench or Screwdriver for action screws — Action screws can work loose with time. Always bring the appropriate hex wrench or screwdriver whenever you go to the range.
• Small Wrench for Scope Rings — Check the tension of your scope base and ring fasteners before you go. Bring along a small Torx wrench for the ring screws (or other tool that fits your fasteners).
• Normal and Under-sized Jags — It is often wise to use one-caliber undersize jags when applying solvent with cotton patches. You should have a couple sizes in your range kit.
• Extra Batteries — Bring extra batteries for all your electronic gear — which can include chronograph, windmeter, digital camera, GPS etc.
• Small Notebook and Pen or Pencil — Use the notebook to record chron data, log group sizes, and make notes about wind and weather conditions.
• Adhesive dots — Bring a few sheets of adhesive dots (sold at office supply stores). Use small white or black dots as target pasters. Use larger red or orange dots as aiming points (target centers).
• Folding Chair or Camp Stool — This comes in handy if you’re spotting for another shooter, or if you reload away from the firing line.
• Water Bottle — You can’t shoot well if you’re dehydrated. Bring at least two quarts of water with you and keep a bottle at the bench.
• Surveyors’ Tape and Wood Stakes — You can make inexpensive wind indicators using surveyors’ tape attached to the top of wood stakes.
• Small Plastic Ruler — Use this to measure your group sizes. A transparent (see-through) ruler works best. Rulers are also useful for drawing lines on targets.
This list is not intended to be exclusive. There are many other items you may wish to include. Obviously bring safety glasses, and Sharpie-type pens are always handy to mark targets. We invite our readers to add other “essentials” to the list. The important thing is to plan ahead, packing your key items before you drive to the range.
Product innovation is all about “building a better mousetrap”, or in this case, building a better bore-cleaning patch. A real smart guy, Shane Smith, has invented a triangular patch that earned a patent. The U.S. Patent Office has awarded a utility patent for BoreSmith’s triangular Pyramid Patch™. This unique cleaning patch was designed by Shane Smith, a mathematician/physicist who employed his scientific and firearms knowledge to create innovative bore-cleaning products.
BoreSmith’s clever Triangle Patch™ (aka Pyramid Patch) presents more cleaning surface area to the bore wall than does a conventional square or round patch (of equivalent size). At the same time, the unique geometry makes Triangle Patches much less likely to jam in the barrel. This is because the notches in the sides of the triangle allow the patch to sit more uniformly on the jag (without bunching up). In addition, the Pyramid patch is must less likely to jam due to pleating. One reason conventional patches get stuck is unwanted 5-layer pleating. The special notches in the Pyramid patch remove all or most 5-layer pleating. As a result the patch does not bunch up and this also reduces rod bowing.
Triangle Patch Function and Geometry Explained (See 1:18 time-mark):
NOTE: Despite what you may see in this video, you should ALWAYS insert brushes and patches from the chamber end first, using a fitted cleaning rod bore guide. With bolt-action rifles, NEVER insert a cleaning rod (with brush or jag) in through the muzzle. This may damage the delicate crown of your barrel.
Here’s a record-setting rimfire benchrest rifle owned by our friend Joe Friedrich.
The experts at ELEY Limited, top rimfire ammo-maker, have posted a helpful guide to cleaning rimfire barrels. We reprint highlights of the article below, but we suggest you read the full article on the Eley website: How to Clean Your Rifle the ELEY Way.
Editor’s Comment: This is not the only way to clean a rimfire barrel. There are other procedures. This is the method recommended by ELEY based on decades of experience with the top smallbore shooters in the world, including many Olympic Gold Medalists. Some shooters have been very successful cleaning less frequently, or using different types of solvents. The ELEY method is a good starting point.
Rimfire Barrel Cleaning
1. Clean the extension tube with a 12 gauge brush and felt or tissue moistened with solvent.
2. Smoothly insert a cleaning rod guide into the receiver.
3. Apply a dry felt to the cleaning rod adapter and push it through the barrel to the muzzle in one slow steady movement. As the felt is dry it may feel stiff.
4. Remove the soiled felt and pull back the cleaning rod.
After purchasing a new set of dies from Forster, Hornady, Redding, or Whidden Gunworks, you’ll want to disassemble the dies, inspect then, and then remove the internal grease and/or waxy coatings placed on the dies by the manufacturer. Here are two video that show how to de-grease and clean dies as they come “out of the box” from the manufacturer. In the first video, from Creedmoor Sports, Bill Gravatt shows various methods for cleaning dies both when new and after they have accumulated carbon and lube after use. This video is definitely worth watching. In the second video, a Hornady technician shows the method for degreasing dies before first use. A convenient aerosol spray cleaner is used in the video. You an also use a liquid solvent with soft nylon brush, and cotton patches. NOTE: After cleaning you may want to apply a light grease to the external threads of your dies.
Creedmoor Sports Die Cleaning Video with Bill Gravatt
Hornady Video Showing Aerosol Cleaner
Clean Your Sizing Dies and Body Dies Regularly
These same techniques work for cleaning dies after they have been used for reloading. Many otherwise smart hand-loaders forget to clean the inside of their dies, allowing old case lube, gunk, carbon residue, and other contaminants to build up inside the die. You should clean your dies fairly often, particularly if you do not tumble or ultrasound your cases between loadings. It is most important to keep full-length sizing and body dies clean. These dies accumulate lube and carbon residue quickly.
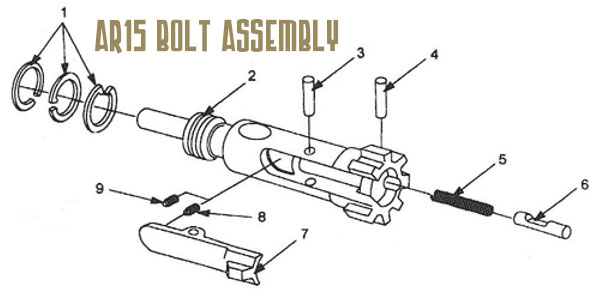
We call them “black rifles”, but that shouldn’t refer to all the carbon and gunk on the inside. AR-platform rifles can be maintenance-intensive beasts. But some AR owners make the situation worse by not regularly cleaning important small parts, or by using too much oily/greasy lubricants in the wrong places. A properly maintained and lubricated AR15 can shoot hundreds of rounds (between cleanings) without a problem. If you learn where (and where not) to apply lubricant, you’ll find that your AR will run more reliably and the task of cleaning the bolt and bolt carrier will be less of a burden.
Here is a good video that explains AR-15 Cleaning and Maintenance. In this 30-minute NSSF video, Gunsite Academy instructor and gunsmith Cory Trapp discusses the proper way to clean and maintain the AR-15 carbine. Very knowledgeable, Trapp provides rock-solid advice for AR owners. Along with cleaning producedures, this video explains how to inspect key components and how to function-test your AR before each shooting session.
The shooting season is now in full swing. When you head to the range you’ll want to be prepared. That means collecting all the gear you’ll need at the range. It’s easy to forget small, critical items, so we’ve provided a checklist of the small “extras” you should pack before you head out to the range. In addition to rifle, rests, ammo, targets, and cleaning gear, here are a dozen essentials you should include in your range bag.
• Shell-Holder — If you don’t have calipers, you can use a shell-holder to check for excessive case expansion from hot loads. If a fired case doesn’t slip into the shell-holder easily, your load is definitely TOO HOT.
• Extra Earplugs — Always use ear protection when shooting. We bring a 35mm film canister with extra sets of foam earplugs.
• Hex Wrench or Screwdriver for action screws — Action screws can work loose with time. Always bring the appropriate hex wrench or screwdriver whenever you go to the range.
• Small Wrench for Scope Rings — Check the tension of your scope base and ring fasteners before you go. Bring along a small Torx wrench for the ring screws (or other tool that fits your fasteners).
• Normal and Under-sized Jags — It is often wise to use one-caliber undersize jags when applying solvent with cotton patches. You should have a couple sizes in your range kit.
• Extra Batteries — Bring extra batteries for all your electronic gear — which can include chronograph, windmeter, digital camera, GPS etc.
• Small Notebook and Pen or Pencil — Use the notebook to record chron data, log group sizes, and make notes about wind and weather conditions.
• Adhesive dots — Bring a few sheets of adhesive dots (sold at office supply stores). Use small white or black dots as target pasters. Use larger red or orange dots as aiming points (target centers).
• Folding Chair or Camp Stool — This comes in handy if you’re spotting for another shooter, or if you reload away from the firing line.
• Water Bottle — You can’t shoot well if you’re dehydrated. Bring at least two quarts of water with you and keep a bottle at the bench.
• Surveyors’ Tape and Wood Stakes — You can make inexpensive wind indicators using surveyors’ tape attached to the top of wood stakes.
• Small Plastic Ruler — Use this to measure your group sizes. A transparent (see-through) ruler works best. Rulers are also useful for drawing lines on targets.
This list is not intended to be exclusive. There are many other items you may wish to include. Obviously bring safety glasses, and Sharpie-type pens are always handy to mark targets. We invite our readers to add other “essentials” to the list. The important thing is to plan ahead, packing your key items before you drive to the range.
Let’s face it, AR-platform rifles run dirty, at least compared to typical bolt-action rifles. The AR15 works by piping gas from the barrel back into the bolt carrier, causing the bolt to unlock and the carrier to move the bolt backward. The “exhaust gas” from the barrel contains soot and carbon. The carbon will form hard deposits on the bolt. In addition, the carbon can combine with lube on the bolt carrier to make a nasty, paste-like sludge. This can be particularly problematic when the black paste pollutes the ejector and extractor recess.
This Editor has inspected dozens of ARs over the years. Other than mag-related malfunctions, the most common cause of AR cycling problems I found was oily gunk in the extractor and ejector areas. Many AR owners overlook these critical areas. Look at an AR that hasn’t been cleaned properly and you’ll probably find black gunk (and small brass shavings) in the ejector and extractor recesses.
If you want to keep your black rifle running smoothly and reliably, you must clean it regularly and follow the correct maintenance procedures. Here are three videos that explain how to properly disassemble and clean AR-platform rifles.
Take-Down and Full Cleaning of AR15 by Jerry Miculek
Here ace shooter Jerry Miculek takes down and cleans an AR-platform rifle belonging to his daughter Lena. This is a good video because Lena’s rifle was “run hard and packed up dirty” so you can see where carbon and grease build up. This 35-minute video is very thorough. Jerry is one of the nation’s top action carbine shooters, so listen carefully to his advice on cleaning and lubrication.
How to Clean Your AR-Platform Rifle
This is a good basic video that shows the take-down and cleaning procedure for a typical AR15. It uses some fast-motion sequences to speed up the story. Check out this video if you don’t have the time to sit through the Miculek video above.
Cleaning and Lubricating AR15 Bolt Carrier Group
This video offers very specific advice on the bolt carrier group, which receives the dirty gas directly from the barrel. Be sure to check the extractor and ejector recesses. That’s where old lube, brass shavings, and carbon accumulate. Follow the directions in this video for lubrication, and don’t over-lubricate the bolt carrier — that will only capture more carbon.
Most competitive shooters are pretty good about bore cleaning (some may even clean their bores too aggressively). However, we’ve found that many shooters neglect the chamber area and the bolt lug recesses. It’s too easy to clean the bore, slip out the guide rod and say “I’m done.” Sinclair Int’l explains why it’s important to clean the action interior: “Shooters use a lot of grease and oil on their bolts to reduce friction and to prevent wear[.] Unfortunately, both of these compounds attract grit, powder and primer residues. Cleaning your receiver is especially critical [with] custom actions where the fit between the action and bolt is held to very tight tolerances. Routine cleaning of the action will prevent unnecessary wear on the bolt body, locking lugs, and the action raceways/guide rails. Frequent action cleaning is also essential to keeping the trigger area free of debris which can cause trigger hang-ups and failures.” Below, we present action cleaning advice from Sinclair’s Reloading Press Newsletter.
Cleaning the Chamber
Combustion by-products, lubricants, and solvent residues can collect in your chamber. Severe build-up of grease and carbon can interfere with chambering. Also some solvents will promote corrosion. You need to keep your chambers clean.
1) Install a clean cotton mop of the correct size on the end of a chamber rod and insert the mop into the chamber. Rotate the mop several times to remove any brush bristles left behind and any excess solvent that was between the rod guide snout and the end of the chamber. Make sure the chamber is dry. Prior to storing a rifle you can oil the chamber but make sure the oil is removed prior to firing the rifle.
2) Alternatively, install an old bore brush on a chamber rod, overlap a couple of patches on the brush bristles, and wrap them around the brush completely. Then insert the patch-covered brush into the chamber while rotating it to remove the excess solvent and debris. Push it firmly into the neck area of the chamber. A similar method is to pierce a large patch on the end of the brush loop and insert it into the action, again rotating the brush as you push the patch up against the breech.
Cleaning the Lug Recess Area
The action lug recess area is one of the dirtiest places on a bolt-action rifle. To properly clean this area, always use a tool designed for the task, such as the $21.50 Sinclair Action Cleaning Tool (part # ACT1) which is part of the Sinclair Action Cleaning Tool Kit (now on sale for $29.99, part #ACT2).
1) Insert a cotton roll or cleaning felt into your lug recess cleaning tool and wet both ends and the face of the cotton roll/felt with solvent.
2) Insert the tool into the action and push it forward until it is positioned fully in the lug recess area and rotate the tool head several times. Then reverse the rotation for another few turns. While rotating the tool move it slightly in and out to cover the entire recess area and to also clean the breech face.
3) Remove the tool from the action and inspect the surface of the felt or cotton roll. If there is quite a bit of residue on both sides of the felt/roll, then repeat with another wet felt/roll.
4) When you feel the recess area is completely clean, insert a dry cotton roll into the tool and rotate the tool head to remove any remaining solvent and debris. If necessary, use a second dry cotton roll.
5) You can follow this step up with another pass of a mop or patches into the chamber to get any debris or solvent that pushed forward out of the lug recess area.
Cleaning Tips from The Reloading Press, used courtesy Sinclair Int’l, All Rights Reserved.


 The shooting season is now in full swing. When you head to the range you’ll want to be prepared. That means collecting all the gear you’ll need at the range. It’s easy to forget small, critical items, so we’ve provided a checklist of the small “extras” you should pack before you head out to the range. In addition to rifle, rests, ammo, targets, and cleaning gear, here are a dozen essentials you should include in your range bag.
 • Shell-Holder — If you don’t have calipers, you can use a shell-holder to check for excessive case expansion from hot loads. If a fired case doesn’t slip into the shell-holder easily, your load is definitely TOO HOT.
 • Hex Wrench or Screwdriver for action screws — Action screws can work loose with time. Always bring the appropriate hex wrench or screwdriver whenever you go to the range.
 • Extra Batteries — Bring extra batteries for all your electronic gear — which can include chronograph, windmeter, digital camera, GPS etc.
 • Folding Chair or Camp Stool — This comes in handy if you’re spotting for another shooter, or if you reload away from the firing line.
 • Small Plastic Ruler — Use this to measure your group sizes. A transparent (see-through) ruler works best. Rulers are also useful for drawing lines on targets.
 The experts at


 The shooting season is now in full swing. When you head to the range you’ll want to be prepared. That means collecting all the gear you’ll need at the range. It’s easy to forget small, critical items, so we’ve provided a checklist of the small “extras” you should pack before you head out to the range. In addition to rifle, rests, ammo, targets, and cleaning gear, here are a dozen essentials you should include in your range bag.
 • Shell-Holder — If you don’t have calipers, you can use a shell-holder to check for excessive case expansion from hot loads. If a fired case doesn’t slip into the shell-holder easily, your load is definitely TOO HOT.
 • Hex Wrench or Screwdriver for action screws — Action screws can work loose with time. Always bring the appropriate hex wrench or screwdriver whenever you go to the range.
 • Extra Batteries — Bring extra batteries for all your electronic gear — which can include chronograph, windmeter, digital camera, GPS etc.
 • Folding Chair or Camp Stool — This comes in handy if you’re spotting for another shooter, or if you reload away from the firing line.
 • Small Plastic Ruler — Use this to measure your group sizes. A transparent (see-through) ruler works best. Rulers are also useful for drawing lines on targets.