This article was originally written by noted rimfire gunsmith Bill Myers. Sadly, Bill passed away in May 2010, but his legacy lives on. He pioneered many advancements in rimfire gunsmithing and Myers-built guns still win matches in benchrest competition.
Crafting competitive rimfire benchrest rifles is considered an art as much as a science. The smith must understand subtle, yet critical aspects of vibration control, barrel tuning, and rifle balance. In the United States, only a handful of gunsmiths consistently turn out rimfire BR rifles that consistently run at the front of the pack at major matches. Bill Myers was one of those master craftsmen. In this article Bill discussed the process of building a winning rimfire BR rig. He reveals some interesting secrets, including his procedures for testing bedding performance and his barrel indexing system. Bill’s methods obviously work, as the Suhl-actioned rifle featured here won a truckload of trophies in its very first match.
Building a Match-Winning Rimfire Benchrest Rig
by Bill Myers
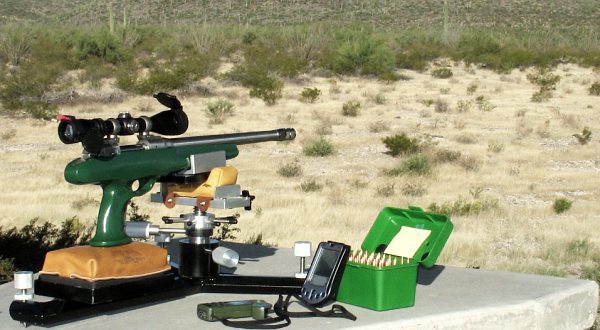
In my opinion, a winning rimfire benchrest rifle is probably twice as difficult to build as a competitive centerfire rifle. The relatively slow .22 LR bullets stay in the barrel much longer than centerfire bullets. This means that vibration control is critical. Likewise bedding is critical. Bore finish and lapping are very important. The amount of bore taper or “choke” can have a huge effect on accuracy. Ignition is also very important and above all, rimfire BR rifles need a very stable stock that tracks perfectly. A rimfire that shoots great is a marriage of all components and the shooter’s need to be aware of everything possible.
Click Photo to Zoom
The rifle featured in this article was built from scratch with attention to all the details that go into accuracy. The goal was to build a gun that could win from the get-go. This would be a “Spec Gun”, meaning a rifle that was personally tested and tuned by me for optimum performance before it went out to the customer.
The Suhl trigger is as good as it gets so no change was needed. It easily adjusts down to about 2 ounces.
Baer Stock in Bubinga Wood
There are many choices when you start to build a complete rifle. It has to shoot well and it has to catch ones eye, or it’s just another rifle on the line. I prefer wood stocks on rimfires for two reasons: they are very stable if the right wood is used and they have a certain traditional appeal to many shooters. I chose Bubinga wood for this particular gun because it is very stable and heavy, it has a very dense grain and a very pronounced figure with a natural red color. The Bubinga is a very forgiving wood to work with.
Gerry and Bruce Baer in Pennsylvania do all my stock blanks. I do all my own inletting and bedding. The blank weighed 4.5 pounds when it came off of Bruce Baer’s duplicator. This Bubinga wood is so hard that it did not need pillars, but I put them in anyway. I bed all my stocks with Loctite Steel Bed liquid and add filler to desired thickness. The final bedding is done with an aircraft tooling epoxy that does not deteriorate over time. The stock has an ebony butt plate and 6 coats of automotive clear, polished to a high finish.
Suhl 150-1 Action Accurized and BN-Nickel Plated
I used a new, unfired Suhl 150-1 action. As explained in the sidebar below, the Suhl 150 actions were originally crafted in East Germany for position rifles. They have a very fast lock-time and come with an outstanding trigger. However, they need some work when adapted to a modern BR gun. The action needed to be accurized and threaded. I have a special tool that I use to accurize actions. It uses two sets of spiders for dialing-in the bolt raceway. After the bolt raceway is running true, one can thread and true up all bearing surfaces so that everything is in perfect alignment with the action raceway bore.
BN-Nitride Plating on Action
I decided to plate the action and all bolt parts with Boron Nitride nickel plating. I bough the BN Electroless Nickel Kit from Caswell Plating and did the job myself. I started by bead-blasting the action so that it would end up with a “satin” finish. The plating material is then applied in a tank. The Boron Nitride goes directly into the plating solution, but you need to use a pump to keep the solution agitated so the BN distributes evenly.
Once the action is completely ready (the metal must be perfectly prepped, with no contaminants), the process goes easily and can be completed in about half an hour. The end result is a very slick, low-friction finish, that is .0002″ (two ten-thousandths) thick and hard as glass. The Boron Nitride makes everything very smooth. After the plating job, the action was noticeably slicker than before.
The cone breech (photo below) permits the barrel to be INDEXED (rotated around bore axis) to any position on the clockface. You then test various rotation settings to find the best accuracy. The system does work. Some barrels shoot best in a particular rotational setting. E.g. with index mark at 3 O’clock vs. 12 O’clock.
Fitting and Chambering the Barrel
As for a barrel, I had two good choices: one Shilen 1:16″-twist, 4-groove ratchet and one Benchmark 1:16″-twist, 3-groove. Both barrels were very accurate and at the end, I decided to leave the Shilen on the rifle because I wanted to put the Benchmark on another Suhl I’ve set aside for myself. I chambered the barrel for Eley flat nose EPS. We’ve found the gun also shoots the new Lapua X-ACT ammo very well.
The barrel finished at 25″ long and features a tuner by the Harrell brothers of Salem, Virginia. I use a flat 90° crown–it’s the most accurate and its gives a good seal against the tuner. I also use a 45°, 12-flute cutter that leaves no burr when cutting the crown. This chamfer protects the crown when cleaning the barrel. There is no sharp edge for the brush or jag to hit on the return stroke. The barrel was headspaced at .043″ and I use a tapered reamer ground by Dave Kiff of Pacific Tool & Gauge in Oregon. The chamber leade area is lightly polished to remove reamer burrs. The breech end of the barrel is machined with a 1/2″ ball end mill to produce what I call a “Myers cone breech.” Technically, it has a sloping radius as you can see, rather than a straight-sided cone. Finishing the breech in this fashion facilitates indexing the barrel, as the barrel can be rotated to any position (on the clockface), without requiring new extractor cuts.
Barrel Indexing — Finding the “Sweet Spot”
When indexing a barrel, one rotates it to different clockface positions relative to the action. Imagine marking a barrel at TDC or 12 o’clock, and then rotating it so the mark is at 3 O’clock, 6 )’clock, 9 O’clock and so on. At each position one shoots groups to determine at which index setting best accuracy is achieved.*
I know that barrel indexing is controversial. I don’t want to get into a lengthy debate other than to say that I believe that careful and thorough testing can reveal a “preferred” index position for a good barrel. With the barrel set in that particular position relative to the action I believe the barrel can yield optimal performance.
I perform the indexing tests indoors at 50 yards. I use a rail-gun with floating action. The barrel is held in place with a clamping fixture similar to an Anschutz 2000-series action. Basically, two vertically-stacked metal blocks clamp around the barrel. I can index the barrel this way simply by unclamping the barrel blocks, rotating the barrel and then re-clamping the system. I have a special system so the action can stay in the same position, even as the barrel is rotated.
It takes time and effort to get solid indexing results. Normally I shoot at least 400 rounds of ammo in 3-4 indexing sessions. Shooting a handful of groups is not enough. You may think you’ve identified the best index position, but you need to shoot many more rounds to verify that. Also, in a very good barrel, the effects of indexing may be subtle, so it will take many groups to confirm the optimal position. In my experience, really good “hummer” barrels do not benefit as much from indexing as an “average” barrel.
Accuracy Testing with Both Barrels
I tested the rifle indoors at 50 yards at the Piney Hill Benchrest Club range. There was no finish on the stock, but it shot well in my one-piece rest with the Benchmark 16-twist, 3-groove barrel and no added weight on the tuner. I shot 30 rounds of Eley Match EPS Black Box (1064 fps) and had 25 Xs and five 10s on the IR 50/50 style target. Not too shabby for a new barrel with no special break-in.
When the Shilen barrel arrived, I installed it on the rifle. By this time the stock had been clear-coated and finished, and the action had been polished and plated. I shot the Shilen barrel outside since it was too hot in the building. The first target was a 250-19X with a new lot of Eley Match EPS Black Box (1054 fps). The gun shot well. My friend Tony Blosser asked to shoot the gun, and he drilled a 250-20X in a steady wind using the same Eley ammo. See target at right.
Advanced Procedures — Vibration Control and Tuner Position
Barrel Tuning Using 2-Way Electronic Indicators
Before competing with this rifle, I put it in a firing fixture I use to tune the barrel. I employ a pair of very expensive Swiss 2-way electronic min/max hold indicators. These measure both up movement and down movement of the barrel as the gun is fired. I can measure the actual vertical travel of the barrel at any position from the front of the receiver to the tuner. I can also tell how long the barrel vibrates, time-wise. Using this fixture I found that the Shilen barrel was very consistent in readings and seemed to work well with no additional weight on the tuner. No barrel ever stops vibrating completely — but this was close, showing less than .002″ of total movement.
Bedding and Vibration Control
I have found that measuring the actual movement of the barrel during firing tells me a lot about the quality of the bedding. I have learned that if I see very big movements (e.g. .010″ up and .005″ down), then there may be a problem with the bedding. I saw this kind of big swing on a rifle with bedding that had not cured properly.
Another pattern I watch for is uneven vertical movement. For example, if the barrel vibrates .008″ up but only .002″ down, that tells me the bedding has issues. As noted above, I look for minimal vibration travel (after the tuner is fitted and optimized), and I also want that travel to be relatively equal both up and down. Good rimfire gunsmiths agree that proper bedding has an important influence on vibration control and tuning. By measuring actual barrel movement during firing, we can, to an extent, quantify how well the bedding is working. At a minimum, we can see if there’s a serious bedding problem.
Trial by Fire — Shooting the Gun in Competition
After semi-gluing in the action, the rifle was shooting great. So, I decided to take it to the Maryland State Unlimited Championship to see if it was truly competitive — whether it could “run with the big dogs”. As it turns out, the Bubinga Suhl was more than just competitive. The rifle won three of the six cards and won the meters championship. In the photo below you can see all the trophies the gun won in its very first match. One of the other competitors in Maryland, dazzled (and perhaps a bit daunted) by the Bubinga Suhl’s stellar performance, told me: “Sell that gun Bill. Whatever you do, just get that darn rifle out of here.” Confident that this was a rifle capable of winning major matches, I packed up the rifle and shipped it to Dan Killough in Texas. Killough has shot some impressive scores with the gun.
Suhl Target Rifles — East Germany’s Legacy
Suhl 150 rifles were manufactured in former East Germany (GDR) by the Haenel firearms factory in the town of Suhl. This region has a long history in arms production. In 1751, Sauer & Sohn founded the first German arms factory in Suhl. Following WWII, Suhl 150s were produced for Communist Bloc marksmen, including East German Olympic shooters. Prior to German unification, the East German national shooting arena was located at Suhl and hosted many top-level competitions including the 1986 ISSF World Championships.
Superb Rifles with Amazing Triggers
As a product of East Germany, the “mission” of the Suhl 150 was to rival the accuracy of the Anschütz, Walther and other premium match rifles built in the West. East German shooting teams wanted to finish on top of the podium, so they needed a rifle with superb inherent accuracy. The Suhl 150s have an outstanding trigger that can be adjusted down to about two ounces. The Suhl 150 action, like the Anschütz 54, boasts an extremely fast lock-time — an important factor in a position rifle. And Suhl barrels were legendary for accuracy.
Suhl 150 Benchrest Conversions
Many of the first used Suhl 150s that made it to America were converted to Benchrest rifles because the action/trigger/barrel combination was unbeatable for the price. Some of the barrels on these “surplus” Suhls were phenomenal — as good as any custom barrels available today. It was not unknown for a Suhl 150 barreled action, transplanted into a benchrest-style stock, to win BR matches with the original barrel. Today, however, most of the Suhl benchrest conversions end up with modern, American-made barrels. While some older Suhl barrels can “shoot with the best of ‘em”, new barrel designs optimized for use with tuners have an edge, at least in benchrest circles. That’s why builders such as Bill Myers swapped out the Suhl barrel with something like a Benchmark reverse-taper two-groove.
Today Suhl 150 rifles are very hard to find in North America. In 2006, a used Suhl 150, even without sights, might fetch $1200.00 or more. Then, in 2007 through early 2008, hundreds of Suhl match rifles were imported. This drove prices down, and those “in the know” snapped up complete Suhl 150s at prices ranging from $450 to $850 (see 2007 advert at right), depending on condition.
Many of these rifles were left “as built” and used successfully in prone competition. Others were converted into benchrest and silhouette rifles, “parted out” for the actions and triggers. If you were able to grab one of those imports at a good price–consider yourself lucky.
* Bill Myers actually created his own clamping rimfire action to facilitate barrel indexing. CLICK HERE to view Myers Rimfire Action. To index the barrel, Myers simply loosened three clamping-bolts and rotated the barrel in the action. Because there is no thread to pull the barrel in or out, the headspace stays the same no matter how much the barrel is rotated. With a threaded action, you might have to use shims to test different rotational positions, or otherwise re-set the shoulder with each change.
Top to bottom: Remington firing pin assembly with ISS, Tubb SpeedLock alloy-composite system without ISS (current versions have dual, opposite-wound springs), and Remington short action firing pin assembly without ISS.
The U.S. Army Marksmanship Unit regularly publishes technical articles on the USAMU Facebook page. One informative USAMU article covered mechanical issues and related ignition irregularities that can cause vertical fliers even with good ammunition in an otherwise excellent rifle. We highly recommend you read this article, which offers some important tech tips.
Vertical Dispersion: Mechanical/Ignition Issues?
Poor or inconsistent ignition has long been known to be one of the “usual suspects” when one encounters vertical fliers that just shouldn’t be there. By having a sense of some of the basic principles involved, and a few basic areas to check, the shooter may avoid colsiderable frustration, not to mention time, expensive loading components and barrel wear.
Is your well-built rifle of high-quality components plagued with vertical fliers across more than 1-3 handload combinations? Consider the bedding, crown and scope/sight mounts. Are they correct? If so, then you might check for ignition issues before boldly undertaking an extensive, expensive, and quite possibly fruitless quest for the “magic handload”.
SEEING IS BELIEVING: While the author had been aware for many years that poor ignition should be considered and ruled out when dealing with vertical fliers in an otherwise-excellent rifle, actually seeing the problem and its almost instantaneous cure really drove the lesson home.
He was working with a “dot” rifle – a .22 LR match rifle that really stacked bullets into little piles at 50 yards and beyond. With one lot of ELEY Tenex, it produced consistent “bughole” groups at 50, but with another, selected lot of Tenex, similar groups were regularly ruined by single, vertical fliers that did not appear in other rifles. Rather than spending days burning up expensive, select ammunition looking for “magic lots”, he contacted a well-respected rimfire gunsmith and explained the situation.
Without so much as batting an eye, the highly-experienced ‘smith tore into the rifle’s action, and quickly found the cause(s) of the problem. He discovered a demonstrably weak firing pin spring, plus a chip out of the face of the firing pin where it contacted the cartridge rim.
After replacing and tuning the offending parts, the rifle immediately began shooting tiny, bughole groups with the previously “unacceptable” lot of Tenex. Centerfire rifles can also benefit from ensuring positive, consistent ignition. A wise riflesmith is literally worth his weight in gold!
So, what are some issues we as shooters can inspect in our rifles to help determine if ignition woes could be part of our problem? At the club level, ask yourself if that “experienced” Remington, Winchester 70, or even Springfield-based match bolt gun you’re using is still running its’ original 40-80 year-old factory striker spring? If so, a new replacement is cheap insurance against current or future problems. (And BTW, it might be best to stick to the normal, factory-spec spring weight. A super-powerful spring can cause vertical, just as a weak one one can.) Along with that, a routine check for proper firing-pin protrusion is a quick preventive measure that can rule out potential issues.
Other areas to consider are the centering and consistency of the firing pin’s operation in the bolt. Admittedly, with the increasing use of precision-machined custom actions, this is becoming less an issue every day. Below is the firing pin assembly from a custom BAT action:
However, particularly with factory actions, a very quick and easy check is to remove the bolt, let the firing pin go forward, and look at the firing pin tip through the firing pin hole. Is the tip off-center in the hole, and possibly striking it as it moves forward? Is the hole out-of-round or burred from being struck repeatedly? If so, a trip to the riflesmith is likely in order.
Similarly, machining issues in the bolt/firing pin system can lead to rough and erratic firing pin movement, in which the firing pin drags against an internal surface of the bolt. In high-quality rifles these issues are relatively rare, but not unheard-of, and it takes mere minutes to rule them out. It may be worthwhile to remove the cocking piece/firing pin/spring assembly and look for any unusual gouges, dings, peening, burrs or signs of abnormal wear.
This task is especially easy with Winchester 70s, Springfields, and the similar Mauser 98s, involving little more than the push of a button and unscrewing the cocking piece assembly. This is just one of the many reasons these tried-and-true actions have earned such a loyal following in the field, among hunters who must maintain their rifles away from a shop.
Particularly with older rifles, watch for and remove excess grease (or even Cosmoline!) from both the firing pin assembly and inside the bolt. This can help improve firing pin speed and consistency. Other bolt-action designs may need a take-down tool or other measures.
As part of this inspection, AFTER ENSURING THE RIFLE IS UNLOADED, slowly cock the rifle, dry-fire, and repeat several times. Listen carefully near the action for inconsistency in the sounds it generates. Does the striker falling make the same sound each time? Do you hear or feel grinding upon operation? If so, where?
Be sure to check the operation of the cocking piece (bolt shroud), firing pin within the bolt shroud, the cocking piece cam and the rear of the bolt body where the cocking piece cam operates. As with our examination for abnormal wear marks discussed above, look for marks indicating roughness or a possible need for light polishing. Then, clean and lightly grease the bearing surfaces while you’re at it.
Remington 700 bolt shroud and cocking cam
These are relatively easy checks that shooters can undertake to perform a preliminary inspection on their own. Other mechanical issues can also cause ignition issues, chiefly centered around the action of the trigger, sear and sear spring. If these are suspected, a trip to an experienced, qualified riflesmith for diagnosis is recommended. We hope you find this information helpful! Join us again next week, and in the meantime, enjoy the shooting sports safely!
Here’s something you’ve probably never seen before — a single-shot, bolt-action pistol chambered for the 6mmBR Norma cartridge (aka 6BR). Featured as one of our Guns of the Week a while back, this Green Machine is a Savage Striker upgraded by Chuck G. from Arizona, a self-described “Savage Maniac”. This impressive bolt-action pistol has shown exceptional accuracy.
Chuck transformed this Savage Striker single-shot from a ho-hum .308 into a reliable half-MOA precision 6BR that can run with accurized rifles all the way out to impressively long ranges. Here we provide highlights from our original article. Click the link below to read our full Savage Striker article, which is three times longer than this story, and has more photos, plus videos and a detailed load development section.
The Striker Project — Pursuit of Precision, by Chuck G.
I didn’t even know Savage Strikers existed until I saw one for sale on Gunbroker.com. I snagged it with a $400 bid. My idea was to build an accurate, long-range pistol on a pauper’s budget. As purchased, the Striker had a .308 barrel with an unknown round count, the standard center-grip, black synthetic stock, an odd two-piece custom brake, and an old Burris 4X pistol scope in a Conetrol 2-piece ring set. The trigger was very heavy, 6-8 lbs I’d estimate, with a lot of take-up and over-travel.
Initial Disappointments — Too Much Recoil, Poor Accuracy
My initial attempts to get the Striker to shoot well at even 100 yards were disappointing. I was never able to get better than a 3″, 5-shot group at 100. Not what I was looking for. Being used to benchrest triggers, the pull on this one was hard for me to manage. The gun would roll around on any type of front rest I had, and from a cement bench on a bipod it would jump about 18 inches up and sideways with every round. Not being used to this type of gun, I found the recoil and muzzle blast to be unsettling. It was hard not to flinch. I started off using my 1K .308 rifle load, 175 SMKs over 44 grains of Varget. That probably would have knocked the hell out of a deer, but it wasn’t much fun to shoot from the bench.
New Caliber, New Barrel — Way Better Accuracy!
I decided to rebuild the Striker in a caliber that would be more fun to shoot. 6mmBR was an obvious choice for all the usual reasons–good brass, wide choice of match bullets, easy to load, low recoil, very accurate, and relatively cheap to shoot. As part of a SavageShooters.com group buy, I ordered a 15″, SS match grade, 3-groove, heavy varmint contour, 10-twist barrel from Pac-Nor. To set the freebore, I provided Pac-Nor with a dummy case with an 88gr LD Berger bullet seated to use as a guide. Total delivered price was $340 chambered and threaded for a muzzle brake from JP Rifles.
This image below features a target created by the founder of AccurateShooter.com and 6mmBR.com. You can CLICK HERE to visit our target page with this and many other free targets.
When I bought it, the Striker, with factory .308 barrel, shot 3″ groups at 100. Now, with a Pac-Nor 6BR Match barrel, 3″ fore-arm plate, upgraded trigger, 24X scope, and match bullets, the gun consistently groups 1/2″ or better at 100 yards. What a transformation!”
Striker Project — Mission Accomplished
With further load development and bench practice, the gun is showing even more accuracy potential. Using a 24X target scope, the Striker has delivered 5-shot groups in the 3s and 4s during recent range visits. All in all, I’m very satisfied with the project. I ended up with an accurate, fun-to-shoot gun for under $1,000 including scope, paint, and bedding materials.
Stock Modifications
While waiting for the barrel I started working on the stock. As virtually no aftermarket stocks were readily available for the center-grip Striker, I decided to rebuild the standard black synthetic stock. The grip fit my hand poorly so I worked it over with a Dremel tool and sandpaper, built up the grip with Bondo, filled in some holes and bedded the action using Devcon Plastic Steel. This was my very first attempt at these tasks so progress was slow. Once I had re-shaped the stock, I sprayed five coats of “John Deere” green topped by several coats of auto clear. It came out surprisingly well considering I had never painted a stock before. I had originally planned to build up the fore-end to 3″ wide using Bondo but later decided to just use a Sinclair Benchrest Adapter that I had on hand.
Chuck notes: “I’m really pleased with the C & J one-piece Rest. It’s solid, heavy, and well-designed. There is no real need for a windage top; small adjustments are easily made by slightly shifting the pistol butt. Elevation adjustments are positive and once the pistol is set up on this rest NOTHING moves.”
Hunting season is here. We know that many hunters would like to carry less weight in the field, but still want an accurate and rugged rifle. In our Shooters’ Forum, there’s an interesting thread about a very light hunting rifle. Featuring a Defiance ultra-light all-steel action, this 6.5×57 Lapua lightweight tips the scales at just 4.93 pounds including scope and rings! For reference, a half-gallon of milk weighs 4.3 pounds, so this rifle is LIGHT! Here’s a report from the proud owner who built the rifle for a future Kodiak Island Alaska mountain goat hunt.
Ultralight Rifle Report by Forum Member Dave
I decided I wanted the challenge of a Mountain Goat hunt after I turn 60. It was the perfect excuse to put together an ultralight, something I had wanted to do for years. I wanted to see how light a bolt action rifle could actually be. My goal was to stay under 5 pounds, without going to a Titanium action, including rings and scope. I knew this would be difficult but I did manage to achieve the goal.
I started with a Defiance anTi model Rem Model 7 short action. This is an extremely smooth action that weighs just 19.2 ounces in this size. I had Carson Lilja of Lilja Barrels program a barrel taper to my dimensions for a 6.5mm 1:8″-twist stainless, 3-groove 22″ barrel. As fitted in the rifle, the barrel is free-floated except for the first inch or so forward of the action.
Other rifle components are: Bix n Andy Dakota trigger, aluminum trigger guard, blind magazine with an aluminum follower, titanium action screws, and a Leupold 3-9X lightweight optic in Talley rings. I also had an aluminum adapter installed in the for-end to accept a magnetic mount Javelin carbon fiber bipod.
The rifle was chambered up in 6.5×47 Lapua by my friends at Sportsman’s Outfitters in Knox, Pennsylvania. Then I sent the barreled action to Wayne at Oregunsmithing (Pendleton, OR) to have a Kevlar stock built. The stock weighs a whopping 14 ounces! When it came back I had everything Cerakoted (see bottom photo before coating). This stock was a full custom, built around my barreled action. Wayne’s work was reasonably priced with a 3-month turn around.
Excellent Accuracy — 5/8″ Three-Shot Groups at 100 Yards
Now it was time to shoot the rifle and I was not disappointed. It shoots both Barnes TTSX 100s or Swift Scirocco II 130s into 5/8″ at 100 yards. Off a bipod at 400 yards, three go into 3″ or so. This thing is crazy light even though it wears a 22″ barrel.
Without scope and rings, before Cerakoting the action and barrel, this 6.5×47 rifle tipped the scales at a mere 4.20 pounds (67.2 ounces). Check it out:
KEY FEATURES: Ballistics Solver, GPS Tagging, Weather Forecast, Field Notes with Photos
ZEISS offers a FREE mobile Hunting APP for both Apple and Android systems. The ZEISS Hunting App offers many practical functions: full-featured ballistics calculator, field notes with photo archive, compass function, GPS tagging for documentation of hunting experiences, and a detailed weather forecast service. The Hunting App is offered as a FREE download for Android and iOS (iPhone/iPad) mobile devices.
Hunt Log and Photos
The Field Notes function can do many things. You can log all your shots and hits, and you can plot game sightings during the hunt. Events can be augmented with photos and GPS data. With the Field Notes mapping function, you can even locate game populations in the hunting territory. A compass and automatic night mode round off the list of smart features.
NOTE: The rifle featured in this story was built for an Alaska Mountain Goat Hunt. The ZEISS Hunting App can provide info by species type, including deer, elk, and yes, Mountain Goats.
How is a modern, metal-chassis rifle built? This very cool video from Masterpiece Arms answers that question. The nicely-edited video shows the creation of a Masterpiece Arms tactical rifle from start to finish. All aspects of the manufacturing process are illustrated: 3D CAD modeling, CNC milling of the chassis, barrel threading/contouring, chamber-reaming, barrel lapping, laser engraving, and stock coating. If you love to see machines at work, you will enjoy this video…
Kevin Muramatsu’s black rifle book, the Gun Digest Guide to Customizing Your AR-15, is a great resource for fans of AR-platform rifles. All the AR options you can imagine are covered: suppressors, premium barrels, adjustable stocks, free-float handguards, ergonomic grips, buffer systems, tactical lights and much more. Those planning an AR rifle build will find application-specific suggestions for 3-Gun, Service Rifle, High Power (Space Gun), Hunting, and Self-Defense use.
Firearms expert Muramatsu offers advice on choosing the right stock/barrel/optics configuration for your particular game. He also discusses the wide variety of options for slings, grips, magazines and other accessories. With over 520 photos, the book includes a large photo gallery of customized ARs, and includes bonus coverage of the FAL and other “tactical” firearms. The Gun Digest Guide to Customizing Your AR-15 is available from Amazon.com (#ad) for $35.95, and a Kindle eBook version is offered for $14.99. The book is also sold by Barnes & Noble, and most other major booksellers.
This video starts off slow, but it is worth watching if you own any AR-platform rifle. It illustrates the key operations during the charging, loading, firing, and ejection processes. The cutaway animation shows how rounds are stripped from the magazine and then chambered. It then shows how every part of the trigger group works, and how the firing pin strikes the primer.
As an Amazon affiliate, this site can earn revenues through sales commissions.
Jewell triggers are still the most-used triggers on competition benchrest and F-Class rifles and they are also popular for hunting, varmint, and tactical rifles (with or without safeties). While a Jewell trigger can work for years with minimal maintenance, if the trigger becomes gunked up, it may be necessary to disassemble the trigger for a thorough cleaning. Our friends Ed and Steve, aka the 6.5 Guys, have produced a helpful video that shows how to disassemble and then reassemble a Jewell trigger.
Why You May Need to Disassemble Your Jewell Trigger — the 6.5 Guys
Jewell triggers are a popular choice in the sport of long range precision shooting, and like everything else require regular cleaning and maintenance. In most cases they can be cleaned with charcoal lighter fluid or dropped into an ultrasonic cleaner. Should the situation require, they can be completely disassembled according to the Jewell Trigger Manual.
We ran into a situation where we had to dissemble a trigger due to the entrapment of some sticky dirt that couldn’t be removed with an ultrasonic cleaner. Our first step was to find some step-by-step instructions but we couldn’t find anything.
Recognizing that other shooters might be in the same situation we produced a step-by-step guide and video, published in full on 65Guys.com. These instructions will work with a left- or right-handed trigger. In our case we worked with a left-handed BR model trigger with safety and bolt release.
Step-by-Step Instructions are provided on 65Guys.com website. We recommend you read all the instructions carefully before you even think about disassembling your trigger. This video explains the process so you can get a sense of what is involved.
One of the most popular items in our Shooters’ Forum is the ongoing “Pride and Joy” thread. Since 2009, Forum members have posted photos and descriptions of their most prized firearms. Here are some of the most recent “Pride and Joy” rifles showcased in our Forum. Do you have a gun you’d like to see featured there? Register for the Forum and you can add your favorite gun to the list.
For this week’s Sunday GunDay we’ve selected five fan favorites from the Pride and Joy Archives. First up is a beautiful .284 Winchester with a one-of-a-kind Claro Walnut stock crafted by the owner.
.284 Winchester in Owner-Crafted Claro Walnut Stock
Here is a unique Claro Walnut tactical/practical rig. Notably, the rifle’s owner, Forum member CStuck, built the handsome stock himself: “I crafted the stock, installed the Remage barrel, pillar-bedded the rig, and put all the pieces together.” Key components for this wood-stocked beauty include a Defiance Tenacity RH Long Action mated to a McGowen 28″ Heavy Palma 1:9″-twist barrel chambered for the .284 Win GAP. The scope is a Burris XTR II 5-25x50mm in an MPA BA Mount. The trigger is a Timney HIT. The rifle feeds from a Hawkins DB magazine.
6BRA with BAT Action, Brux Barrel — The Blue Beauty
Next is a blue 6BRA beauty from Forum Member RiflePainter: “This is my brand new 6BRA Light Gun built by Jason Danley at Danley Precision! Jason did all of the work including paint. Brass was done by Darrel Jones at DJ’s brass service.” This features a Johnny Byers stock painted in HOK Custom Oriental Blue Candy mix. The action is a BAT DS Left-load, Right-eject, Right bolt fitted to a 1.5 oz. Jewell trigger. The barrel is a 28″ Brux HV 1:8″-twist chambered for the 6BRA (6mmBR Ackley) and fitted with a Harrell’s radial muzzle brake. On top is a Sightron SIII 10-50x60mm optic riding in BAT 1-piece scope rings.
Eye-Catching 30 PPC — 13-YO Grandson’s First Competition Rifle
We like this project because it connects a grandfather with his grandson. These family connections are very important. Forum member 20PPC posted: “Here is my 13-year-old grandson Remy’s first competition rifle. We just finished it up.” The rifle is chambered for a 30 PPC with a 1:17″-twist Lilja HV barrel fitted with an Ezell tuner up front. The action is a Stolle Panda RBLP, Right Eject fitted with a Kelbly trigger. The stock is a Robertson JTR model wearing a very snazzy finish, which looks like many coats of clear over an orange/gold hydro-dip (we think). On top is a 45X Sightron fixed-power scope. This eye-catching grandson’s rig will definitely get noticed at the range.
Click image for full-screen view.
Twin Grendels with Handsome Wood, One with Home-made Tuner
Here are a pair of 6.5 Grendel bolt-action rigs. Forum member Ramblerman posted: “The Twin Grendels are finished! My buddy Tom did the wood and I did the metal — more testing this weekend. Mine now sports a tuner I made (see bottom photo).”
6BRA in Green Wheeler Stock with Krieger Barrel
Last but not least, here is a serious IBS/NBRSA Light Gun for 600/1000-yard competition, owned by Forum member “6.5×47″. Chambered for the ultra-accurate 6BR Improved (aka 6BRA), this rifle features a polished BAT ‘B’ action with roller upgrade. The action is mated to a 28″ Krieger 1:7.5″-twist HV barrel. The 6mm Krieger is chambered for .272″ case-neck, with .115″ freebore. The BAT action is glued and screwed in an Alex Wheeler stock with green candy paint. Note the wide fore-end with side plates and the adjustable stock keel in the rear. Another advanced feature is a slick removable weight system in the butt stock. A Jewell benchrest trigger resides inside a BAT trigger guard.
Take a good look at this black-stocked, rimfire benchrest rifle. This just might be the most sophisticated (and accurate) Ruger 10/22 on the planet. This 10/22 was originally acquired as a used “donor gun” for just $98.00. Then its owner Les (aka “Scasa” in our Forum) completely upgraded the rifle from stem to stern. He added a rear lug to the receiver, threaded the receiver, installed a new barrel, and upgraded the trigger. Then he crafted the handsome benchrest stock from wood. He even designed and crafted the barrel tuner AND built the sophisticated shooting rest himself.
Overall, Les imagines he has over 1000 hours of design, fabrication, and fitting in this project. But the hard work paid off — this one-of-a-kind Ruger 10/22 shoots tiny groups. Is this the most accurate 10/22 on the planet? Possibly. But without question, it is the most sophisticated, do-it-yourself Ruger 10/22 project gun ever created.
$98 Ruger 10/22 Transformed into Tack-Driving Bench Gun
Report from Les E. (aka “Scasa” in our Forum)
I long thought I’d someday put an upgraded Ruger 10/22 together but the big hold-up was the receiver. I really wanted a threaded barrel/receiver and a rear lug for two-point mounting. They do make a rear lug that attaches to the rear of some aftermarket receivers but it’s just a little tab that attaches to the back, not what I would call really solid. So one day while hanging out at the local gun store I saw a Ruger 10/22 on the used gun rack for just $98.00. I latched onto it and I had my donor gun. This was an early gun that had the two guide rails for the bolt, walnut stock, and metal (not plastic) furniture.
Finished 10/22 rifle with rifle stock, tuner, and aluminum shooting rest all built by Les.
I then began a complete transformation of the rifle. Little did I know that, by the end of the project, I would put in about 1000 hours of labor. There were several things I wanted to make quite different than Ruger’s original design. First was to add the rear lug. Then get rid of the trigger pins. I also threaded the barrel hole in the receiver to get rid of the wedge. I also wanted to fix the bolt release. Of course that all required a new stock too.
In this video, Les explains the major upgrades he did to the Ruger 10/22:
Interested in this rifle build? Talk about it in our Shooter’s Forum. Rifle owner/builder Les can answer your questions about this Ruger 10/22 in this Forum Thread.
The Ruger 10/22 receiver was threaded to accept a more traditional barrel installation. Below is a conventional 10/22 drop-in barrel. Note that normal barrel is NOT threaded at receiver end, but slides in and then is held in place with a “wedge” locking block.
I made a rear lug that attaches to the back of the Ruger receiver with four, 6-32 screws and glued with JB Weld and filed to match the receiver contour.
Shown above is the completed gun before stock painting. The stock is made from nine pieces of Poplar 1x2s, with lots of sanding and black satin paint. Above is a photo of the stock before painting. As you can see, the laminations were stacked vertically. The rifle sits on a one-piece shooting rest I also built.
Editor: Les designed and crafted this sophisticated shooting rest himself. That’s right — this is a DIY rest! Les told us: “I built the rest from scrap aluminum. The design came from looking at rimfire rests online. Probably the Pappas Rest was the greatest influence. That Pappas rest cost about $1100.00 at the time for a polished one. I have less than a hundred dollars in mine now, but I’ve got a couple WEEKS of work in it. I’ve made two of them, one for my rifles and one for my benchrest pistol. It’s a lot of work to sand and polish, but in the end you have a solid shooting platform. Keep it waxed to preserve the shine.”
Watch Les shoot his fully-transformed and upgraded Ruger 10/22 with rest he built:
Editor: In the above video Les shoots his fully-upgraded Ruger 10/22 from a sophisticated one-piece rest he built himself. You can see how well the rest handles his upgraded Ruger 10/22. Below are the two 5-shot groups shot at 25 yards with this rig in the video. Very impressive! The ammo used was Wolf Match Extra.
More Upgrades — Trigger Pins, Bolt Release and More…
The trigger pins were replaced with 10-32 socket head screws which required threaded bushings to be put in the left side of the receiver and access holes in the right side of the stock. Now the trigger group and bolt can be removed without taking the action out of the stock. This also pulls the receiver sides together reducing bolt clearance. The trigger is shimmed with a piece of shim stock so it can’t be too tight.
There are several “How-Tos” which cover conversion of the manual bolt release to an auto bolt release, but it still requires a little fiddling with the darn thing. So instead of having it pivot on a slot, I welded up the slot and now it’s just a hole. I also welded on some more length and put a little knurled knob on it. With those modifications, it now works perfect.
The trigger housing is factory Ruger acquired at a gun show 25 years ago with Volquartsen hammer and sear. The barrel is a Green Mountain blank turned, threaded, and with a Bentz chamber. I made the barrel tuner. The rifle is fitted with a BSA 36-power scope I bought for $125.00 from the AccurateShooter Forum classifieds. There may be another $250.00 or so in parts and accessories I bought.
Editor’s Commentary — This project started with an old, used $98.00 Ruger 10/22 rifle. Now the transformation is complete. It took Les countless hours, and lots of effort, but he is deservedly proud of the end result. The excellence of the upgraded 10/22 is matched by the sophisticated, unitized aluminum shooting rest Les built. Very impressive design and execution.
So How Does it Shoot? Very Nicely Indeed!
Les reports: “Above is a target with some 3-shot groups while playing with the tuner. Those groups were shot at 25 yards. I figure at that distance I’m testing what the gun will do, not how well I can read the wind, not well and its been really windy. If I can get one clean hole 5 shots I’m pretty happy.”
Les electro-etched the caliber on the barrel. Les told us: “The machine was easy to make and works really well. It’s just a pain getting stencils.”
This barrel’s shoulder was 0.025″ off the action because Red Locktite had been used on the threads.
Gunsmith Thomas ‘Speedy’ Gonzales offered this interesting report about how NOT to headspace a barrel. Hopefully you never discover something like this…
“A good friend and customer sent this rig in for repair after FedEx damaged the rifle during inbound transport from another smith. After repairing the stock and rebedding it, I decided to re-polish the barrel to make the repair perfect. Well this just added insult to injury as the barrel did not want to come off. After a few choice words, the barrel finally broke free only to reveal something very disturbing. It seems the barrel had been ‘headspaced’ by using RED Loctite to hold it in place.” [Editor: That’s definitely NOT how barrels should be fitted.]
Speedy was not happy: “I hope the smith that did this sees the photos and realized what jeopardy he put my customer in or anyone who shot the rifle for that matter. When cleaned up, the shoulder on the barrel was over 0.0250″ (25 thousandths) away from the face of the receiver.” [Editor: That’s a lot in this business]. Check out the images below to see how much the barrel rotated further inward when cleaned up. The barrel spun in nearly another eighth-turn or more. Not good.


 Accurized and BN-Nickel Plated
 BN-Nitride Plating on Action
 Fitting and Chambering the Barrel
 Accuracy Testing with Both Barrels


 Today Suhl 150 rifles are very hard to find in North America. In 2006, a used Suhl 150, even without sights, might fetch $1200.00 or more. Then, in 2007 through early 2008, hundreds of Suhl match rifles were imported. This drove prices down, and those “in the know” snapped up complete Suhl 150s at prices ranging from $450 to $850 (see 2007 advert at right), depending on condition.


 Is your well-built rifle of high-quality components plagued with vertical fliers across more than 1-3 handload combinations? Consider the bedding, crown and scope/sight mounts. Are they correct? If so, then you might check for ignition issues before boldly undertaking an extensive, expensive, and quite possibly fruitless quest for the “magic handload”.


 Here’s something you’ve probably never seen before — a single-shot, bolt-action pistol chambered for the 6mmBR Norma cartridge (aka 6BR). Featured as one of our