This barrel’s shoulder was 0.025″ off the action because Red Locktite had been used on the threads.
Gunsmith Thomas ‘Speedy’ Gonzales offered this interesting report about how NOT to headspace a barrel. Hopefully you never discover something like this…
“A good friend and customer sent this rig in for repair after FedEx damaged the rifle during inbound transport from another smith. After repairing the stock and rebedding it, I decided to re-polish the barrel to make the repair perfect. Well this just added insult to injury as the barrel did not want to come off. After a few choice words, the barrel finally broke free only to reveal something very disturbing. It seems the barrel had been ‘headspaced’ by using RED Loctite to hold it in place.” [Editor: That’s definitely NOT how barrels should be fitted.]
Speedy was not happy: “I hope the smith that did this sees the photos and realized what jeopardy he put my customer in or anyone who shot the rifle for that matter. When cleaned up, the shoulder on the barrel was over 0.0250″ (25 thousandths) away from the face of the receiver.” [Editor: That’s a lot in this business]. Check out the images below to see how much the barrel rotated further inward when cleaned up. The barrel spun in nearly another eighth-turn or more. Not good.
Many of our readers use AR-type rifles for Service Rifle matches, varmint hunting, 3-Gun competition, or defensive use. AR-platform rifles can be configured in a multitude of ways to suit the application. But if you plan to put together your own purpose-built AR rifle, how do you get started?
For AR Do-It-Yourselfers, we suggest reading Glen Zedicker’s book, the Competitive AR-15 Builders Guide. Following on Zedicker’s The Competitive AR15: Ultimate Technical Guide, the Builders Guide provides step-by-step instructions that will help non-professional “home builders” assemble a competitive match or varmint rifle. This book isn’t for everyone — you need some basic gun assembly experience and an aptitude for tools. But the AR-15 Builders’ Guide provides a complete list of the tools you’ll need for the job, and Zedicker outlines all the procedures to build an AR-15 from start to finish.
One of our Forum members who purchased the AR-15 Builders Guide confirms it is a great resource: “Much like any of the books Mr. Zediker puts out this one is well thought-out and is a no nonsense approach to AR building. I can not stress how helpful this book is from beginner to expert level.”
Along with assembly methods, this book covers parts selection and preparation, not just hammers and pins. Creedmoor Sports explains: “Knowing how to get what you want, and be happy with the result, is truly the focus of this book. Doing it yourself gives you a huge advantage. The build will honestly have been done right, and you’ll know it! Little problems will have been fixed, function and performance enhancements will have been made, and the result is you’ll have a custom-grade rifle without paying custom-builder prices.” Other good resources for AR projects is Gunsmithing the AR: The Bench Manual, and the Building Your AR from Scratch DVD.
Are you seeing unpredictable changes in Point of Impact on your target? Think you may have a scope issue? Well maybe not — when was the last time you checked your BARREL?
Yes scopes do fail, and scope bases/rings do get loose. But sometimes problems with erratic POI shifts are caused by a LOOSE BARREL. This issue came up recently in our Shooter’s Forum. One member complained that his zero was shifting from day to day — by as much as two inches at 100 yards. He was convinced he had a scope problem, based on erratic POI:
“I think my scope loses 1 to 3 MOA per day. When I shot my rifle Monday it was dead on. On Tuesday it was 1″ low. Then on Wednesday it was 1 or 2″ lower. I don’t get it. — the elevation knob never touched. Scope will track and return to zero that day perfect. Yes EVERYTHING has been checked, nothing loose. What is the chance the erector tube spring has gone south? For the record this is a Vortex GE. Never had a bad scope, but this has me wondering”. — LB
On Forum member told LB to send the scope right back to the manufacturer. Two other members suggested mounting the scope on a different rifle to test. Good advice. That’s generally a smart strategy before you conclude a scope has gone bad…
Could Problem Be the Scope Base?
Two Forum members, ExPiper and Dickn52, suggested checking the scope base, recounting their past experiences with troublesome bases. This was intelligent — anyone with a POI problem should check all the optics attachments:
“Went crazy one day chasing my impacts on a 100-yard target. Shots would group fine for three then go nuts for 4-5. I cranked and un-cranked for about an hour. Then I reached up and the base wobbled on the rifle. Removed scope, tightened base screws and back in business.” — Dickn52
“Years ago I had a problem [where] shots were climbing with almost every shot. I was blaming the scope. However, when removing the scope I noticed that the 20 MOA base was cracked and getting wider with every shot. Needless to say I replaced the base and the problem was solved. — ExPiper
Eureka Moment — The problem was the BARREL, not the Scope
There were many helpful suggestions, but member PirateAmmo steered LB to the real problem — a loose BARREL: “We had a problem on a home-built AR-platform rifle once, barrel was loose a tad…”
Member Snert chimed in: “Yep — I had a PPC that suddenly went 19″ low. Picked up gun off bench by barrel and felt a wiggle. I tightened the barrel and the POI went 19 inches up”.
Problem Solved — Barrel Tightened up and POI Back to Normal
The gentleman with the POI problem took the advice of PirateAmmo and checked his barrel. BINGO! Low and behold, the barrel WAS loose.
LB posted: “Barrel loose by about 2%, checked it twice before and didn’t find it the first two times”.
After LB re-tightened his barrel, his rifle started shooting normally again. No more shooting low by 1-2 inches. Problem solved. The fix didn’t cost a penny and now LB doesn’t have to send a perfectly good optic back to the manufacturer.
Lesson learned? Check ALL the variables before you assume a scope has gone bad. Along with the barrel, also check your action screw tension, and of course the scope base and rings.
Emil Kovan is one of the top F-Class shooters in the world. He won the 2014 United States F-Open Championship, and finished second in F-Open Division at the 2016 Canadian National F-Class Championship in Ontario. He is a great shooter and a great gun-builder as well.
“What are the best components for an F-Open class rifle, and why?” That’s a question that I get asked all the time and will try to answer in this article. Two months ago, I was contacted by Duane, a gentleman I met at the 2015 F-Class Nationals. He was interested in building a rifle with the new Master Class Low Profile F-Open Stock, created by Carl Bernosky and Alex Sitman of Master Class Stocks.
I have known Alex Sitman for many years, and use his stocks exclusively, but was not very familiar with his new Low Profile F-Open stock. After a brief conversation with Alex, I placed an order, and had the stock inletted and bedded at my shop in a month. My first impression was “Wow that’s a long stock” — the forearm is significantly longer than on the original Master Class F-Class prone stock. I bolted the barreled action in, and squeezed the end of the forearm and barrel together, the stock flexed a little bit, but not as much as other designs that I have tested. I think that’s due to having “more meat” in the receiver area. The full stock depth continues farther forward that on some other “low profile” designs. That makes the stock stiffer in the vertical plane, reducing the hinging effect forward of the action. The stock was finished in gloss black per the customer’s request. Interestingly, I found that the multiple layers of paint and clearcoat stiffened the stock up quite a bit.
CLICK IMAGE below for full-screen version
Low Center of Gravity Tames Torque
Compared to the original Master Class F-Open stock, the barrel sits about an inch lower. Lower center of gravity equals less torque, and that is very important when shooting heavy bullets in fast twist barrels. Another significant improvement is that the toe of the stock is flat and parallel to the forearm. I added a 3/4″ track rail in the rear, and milled the underside of the fore-end to create two parallel “rails” in the front to help the stock track better.
One of the biggest reasons why I like Master Class stocks, is the pistol grip. I don’t shoot “free recoil” and a comfortable pistol grip is super important to me when selecting a stock. The new Master Class Low Profile stock shares the same grip as the old model. This allows the stock to accommodate either a “hard hold” style or a more free-recoil style of shooting — whatever the rifle’s owner prefers. This design versatility is one reason I recommend Master Class stocks. Shooters may experiment with either shooting style to find what suits them best.
Cartridge Choice — A 40° .284 Win Improved
Duane decided to have the barrel chambered for my 284 KMR IMP (Improved) wildcat. What is .284 KMR IMP and why choose it over the straight .284 Winchester? Improved by definition means “made better”, I took a great cartridge, and modified it to increase capacity, reduce pressure, and increase brass life.
There are many “improved” variants of the original .284 Winchester: 7mm Walker, .284 Shehane, .284 Ackley and so on. My version, the 284 KMR IMP, shares the .010″ blown-out sidewalls of the .284 Shehane, but I have further increased the case capacity by changing the shoulder angle from 35 to 40 degrees. The 284 KMR IMP allows you to almost match magnum cartridge velocity in a standard-bolt-face action. If you want to run 180gr-class 7mm bullets over 2900 FPS, it is cheaper and more convenient to have a barrel chambered in 284 KMR IMP than to spend $650 for a magnum bolt.
Tuning Loads for the .284 Win Improved Cartridges
The 284 KMR IMP seems to have two nodes, one around 2820 fps and other at 2940 fps. My match load clocks at 2935 fps with single-digit ES. Note –I selected that load based on accuracy, NOT raw speed. A lot of novice (or hard-headed) shooters make the mistake to push their cartridges to the max, and disregard more accurate loads at lower velocity.
The sport of F-Class is rapidly growing, and the equipment used is improving constantly. I remember that only few years ago, an F-Open rifle that could shoot sub-one-inch of vertical at 300 yards was considered competitive. Now, we are pursuing sub-one-inch vertical at 600 yards! It takes a great rifle to approach that goal, but it is also up to the shooter to learn and experiment as much as possible in order to achieve success.
Dies for an Improved .284 Win Cartridge
One of the biggest challenges in campaigning a wildcat cartridge has been obtaining great dies. When searching for custom dies, it almost seems like that the odds are stacked against us. The most common problem is wait-time — custom die orders can take months to be completed. Also, most custom die makers want you to send them two or three cases, each fire-formed three times. I find that funny because if could somehow properly size the cases for three fire-forming cycles, I would not need a sizing die.
Custom-made dies should size the case just right, but sometimes the die’s internal dimensions are slightly off, and this leads to problem number two: dies sizing too much (or even worse) too little. I had a one “custom” die that would not size the bottom of the case enough. This made the extraction of fired cases very difficult. I feel that the best option (if available) for shooters interested in wildcat chambers is to have their gunsmiths make the dies. I offer that die-making service in addition to barrel chambering.
BAT Machine “M” Action
Duane decided to use a BAT M action for this rifle, and I think that he could not have made a better choice. We are blessed with many good match-quality receivers: Barnard, BAT, Borden, Kelbly, Nesika, and Stiller just to mention a few. These are all very well-made and suitable for F-Class. Among BAT Machine Co.actions, I like BAT models M, MB, and 3LL best. I prefer these because because of their size (large bedding footprint) smoothness, timing, options available, and last but not least visual appearance.
Trigger: I recommend and use Jewell triggers. Other good options are: Kelbly, CG Jackson (good 2-Stage) Anschutz (best 2-Stage for Bat and Kelbly actions), Bix’N Andy, and David Tubb.
Barrel: Duane made another good choice here. He decided to go with a Brux 1:8.5″-twist, 4-groove cut-rifled barrel. If you look at the F-Class and Long Range benchrest equipment lists, you will see that cut-rifled barrels are currently dominating. Many records have been shot with both button-rifled, and cut-rifled barrels. I have shot both, and prefer cut-rifled barrels. I am not saying that button-rifled barrels are not capable of shooting as well as cut-rifled barrels, but on average, in my experience, four out of five cut-rifled barrels (from top makers) will shoot well, vs. three out of five buttoned barrels. YMMV, but this is what I’ve observed.
Scope: Duane’s rifle was fitted with a Nightforce 15-55x52mm Competition scope with DDR-2 reticle. This optic is ultra clear, reasonably lightweight (28 oz.), super reliable, and has 1/8 MOA clicks — what you want for long range F-Class competition. In this 15-55X NF model, I like the DDR-2 reticle best, because fine cross hairs (FCH) are hard to see in heavy mirage. The DDR-2 has a heavier horizontal line, with a center dot. March scopes are also very popular and very well-made.
Thanks for reading, and keep ‘em in the middle…
Emil Kovan Competition History:
– 2014 F-Class Open National Champion
– 2016 F-Class Open Canadian Championship, Silver Medal (tied for first on score)
– 2015 F-Class Open National Championship, Silver Medal
– F-Class Open National Championship Teams, 2015, 2014, 2013, Shooting Team Member
– Over 15 wins in Regional and State Championships in Palma, F-TR, F-Open
Kevin Muramatsu’s black rifle book, the Gun Digest Guide to Customizing Your AR-15, is a great resource for fans of AR-platform rifles. All the AR options you can imagine are covered: suppressors, premium barrels, adjustable stocks, free-float handguards, ergonomic grips, buffer systems, tactical lights and much more. Those planning an AR rifle build will find application-specific suggestions for 3-Gun, Service Rifle, High Power (Space Gun), Hunting, and Self-Defense use.
Firearms expert Muramatsu offers advice on choosing the right stock/barrel/optics configuration for your particular game. He also discusses the wide variety of options for slings, grips, magazines and other accessories. With over 520 photos, the book includes a large photo gallery of customized ARs, and includes bonus coverage of the FAL and other “tactical” firearms. The Gun Digest Guide to Customizing Your AR-15 is available from Amazon.com for $20.13, and a Kindle eBook version is offered for $14.99. The book is also sold by Barnes & Noble, and most other major booksellers.
This is good news for gun-owners. Sportsman’s Warehouse (SW), which operates 92 retail stores in 23 states, now offers gunsmithing. Gun enthusiasts can get complete firearms gunsmithing services at the new Sportsman’s Warehouse Gunsmith Center in Utah. You can ship your rifles, pistols, or shotguns to the SW Gunsmith Center, or simply drop off your firearm at ANY Sportsman’s Warehouse store. The SW Gunsmith Center, equipped with mills and lathes, offers complete repair, refinishing, threading, metal, and stock work. For more info, visit: www.Sportsmans.com/gunsmith.
“Customers can quickly and easily drop off their firearms directly at our new Gunsmith Service Center in Utah, take them to any Sportsman’s Warehouse store, or ship them in for service,” states Jon Barker, Sportsman’s Warehouse President/CEO. “Expanding from the Utah market, we now offer this unique service to customers nationwide, including our 92 store locations.” SW has a loyalty program — each dollar spent at the Gunsmith Center gives members a point towards earning SW gift cards.
Fees Are Reasonable — $200 for Barrel Chambering
There is a $45 minimum charge for guns left overnight, and a $68/hour labor rate. A barrel chambering/fitting job costs $200. Threading a muzzle costs $100.00. Fitting an aftermarket AR trigger is $45. Blue-printing a bolt-action receiver costs $175.00. Glass-bedding an action costs $90-$175. CLICK HERE for Gunsmithing Fee Schedule.
The new Sportsman’s Warehouse gunsmith shop is located in SW’s Salt Lake City Distribution Center. The workspace features four stations for gunsmiths to work on rifles, shotguns, pistols, and muzzleloaders. They also have added a full production lathe that is designed for 24-hour-a-day operation, as well as a large end mill for a variety of metal working operations.
Finish tanks, a spray booth and oven for Cerakote, along with other pieces of equipment that will allow them to perform almost any gun service or customization are being installed.
“The only thing we won’t offer is custom wood stock building,” said Bill Sturtevant, Head Gunsmith. “The time necessary for that service takes too much time and pulls our gunsmiths off of other projects for too long. But just about anything else, including refinishing stocks, is on the table.”
Sportsman’s Warehouse will offer 1-year and 3-Year Firearm Service Plans supported by the company’s gunsmiths. Plans include: mounting and bore sighting, field cleaning, factory-service augmentation, free shipping to the factory for repair, and discounts on Gunsmith Service Center work.
Story Tip from EdLongrange. We welcome reader submissions.
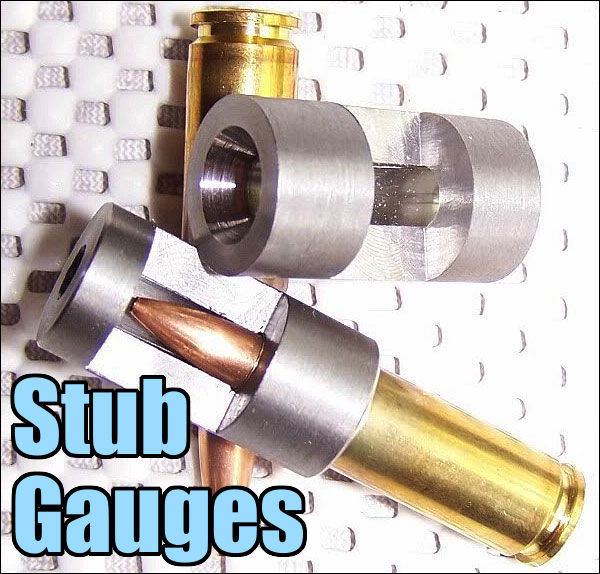
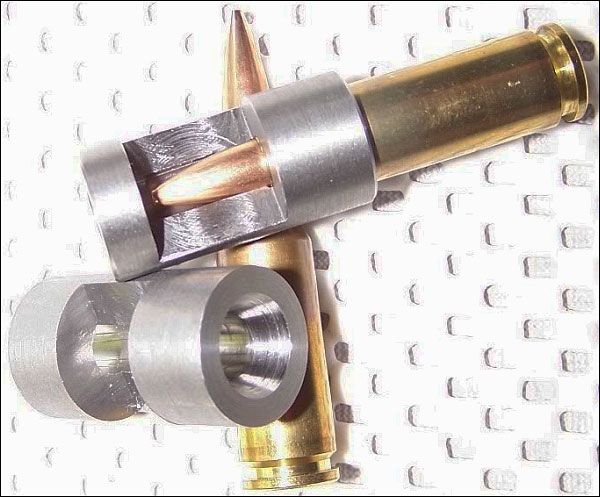
Next time you have a barrel fitted, consider having your gunsmith create a “stub gauge” from a left-over piece of barrel steel (ideally taken from your new barrel blank). The outside diameter isn’t important — the key thing is that the stub gauge is created with the same reamer used to chamber your current barrel, and the stub must have the same bore diameter, with the same land/groove configuration, as the barrel on your rifle. When properly made, a stub gauge gives you an accurate three-dimensional model of the upper section of your chamber and throat. This comes in handy when you need to bump your case shoulders. Just slide a fired case (with spent primer removed) in the stub gauge and measure from base of case to the end of the gauge. Then, after bumping, re-measure to confirm how much you’ve moved the shoulder.
In addition, the stub gauge lets you measure the original length to lands and freebore when your barrel was new. This gives you a baseline to accurately assess how far your throat erodes with use. Of course, as the throat wears, to get true length-to-lands dimension, you need take your measurement using your actual barrel. The barrel stub gauge helps you set the initial bullet seating depth. Seating depth is then adjusted accordingly, based on observed throat erosion, or your preferred seating depth.
Forum member RussT explains: “My gunsmith [makes a stub gauge] for me on every barrel now. I order a barrel an inch longer and that gives him enough material when he cuts off the end to give me a nice case gauge. Though I don’t have him cut that nice-looking window in the side (as shown in photos). That’s a neat option. You can tell how much throat erosion you are getting from when it was new as well. For measuring initial seating depths, this is the most useful item on my loading bench next to calipers. Everyone should have a case gauge made by their smith if you have a new barrel put on.”
Forum member Lawrence H. has stub gauges made with his chamber reamers for each new barrel He has his smith cut a port in the stub steel so Lawrence can actually see how the bullet engages the rifling in a newly-cut chamber. With this “view port”, one can also see how the case-neck fits in the chamber. Lawrence tells us: “My stub gauges are made from my barrels and cut with my chamber reamers. With them I can measure where my bullets are ‘touching the lands’ and shoulder bump dimensions. This is a very simple tool that provides accurate information.” The photos in this article show the stub gauges made for Lawrence by his gunsmith.
How is a modern, metal-chassis rifle built? This very cool video from Masterpiece Arms answers that question. The nicely-edited video shows the creation of a Masterpiece Arms tactical rifle from start to finish. All aspects of the manufacturing process are illustrated: 3D CAD modeling, CNC milling of the chassis, barrel threading/contouring, chamber-reaming, barrel lapping, laser engraving, and stock coating. If you love to see machines at work, you will enjoy this video…
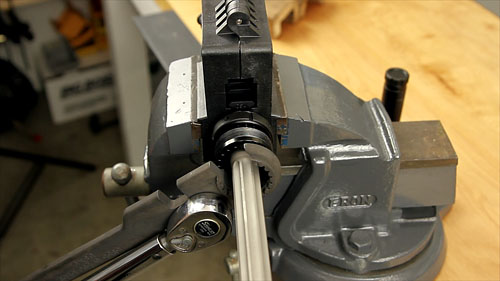
Here are the main tools you’ll need to assemble an AR-platform rifle
Planning to put together an AR-platform rifle? Or are you looking to upgrade your AR with a new barrel, stock, or trigger group? Then you should check out the AR-15 Rifle Build DVD from our friends at UltimateReloader.com. This DVD covers all the details of a custom build, using high-resolution video sequences, and helpful supporting graphics.
In this DVD, Ultimate Reloader’s Gavin Gear guides you through the entire process including selecting components, acquiring and using the necessary tools, assembly steps and details for each component, and even mounting a scope. Building an AR-15 can be overwhelming, but with the right guidance and help it’s not difficult and can be very rewarding. With this DVD you’ll be able to build your AR-15 with confidence.
Upper: Barrel / Gas Block / Gas Tube
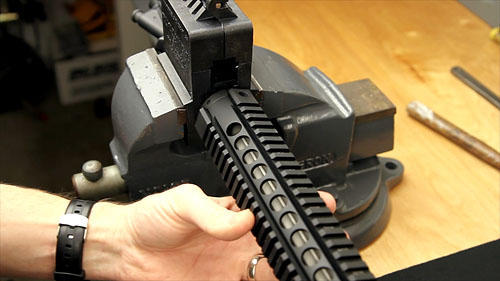
Upper: Handguard Installation
UltimateReloader.com’s AR-15 Build DVD is available just $9.90 (plus $3.80 shipping/handling). This DVD can pay for itself many times over by showing you how to do your own gunsmithing (and get quality AR components at attractive prices).
Gavin in Action — Seven-minute AR-15 Build
To preview the AR Build DVD, check out this YouTube video from UltimateReloader.com. This 12-minute video shows the basics of assembling a standard AR15 with Del-ton components. Gavin shows how to install the AR trigger group and other parts in an AR-15 lower. You’ll also see the basics of barrel and handguard installation. This video covers the highlights, but we strongly recommend you buy the full DVD before starting your first AR-15 build.
AR-platform rifles are fun and versatile, but the standard, mil-spec triggers leave much to be desired. They tend to be gritty, with creep and heavy pull weight. One of the easiest, most effective AR upgrades is a trigger group swap. An improved fire control group makes a huge difference. There are many aftermarket trigger options for the AR platform rifles. Choose single-stage or two-stage, either standard trigger assembly or unitized “drop-in” trigger, such as those made by Timney or Triggertech.
When upgraded with a precision trigger and match barrel, AR-platform rigs work great in NRA High Power competitions (Photo from NRA Blog, at Camp Perry).
Two-Stage vs. Single-Stage Triggers
Two-stage triggers have two separate movements. The first stage offers a light, spring-loaded pressure that works against the shooter’s pull until stopping at the second stage – this is called “take-up”. If there is no spring pressure, it is known as “slack”. Should the shooter continue to pull the trigger once he’s arrived at the second stage, the mechanism will operate like a single-stage trigger from there until engaging the sear and firing the gun. Good trigger reset requires the shooter to keep pressure on the trigger, even during reset, to minimize movement of the muzzle.
Single-stage triggers feature no take-up or slack, as they begin engaging the sear as soon as the shooter begins pulling the trigger. Some competitive shooters prefer the two-stage trigger because of the feedback it provides during its first stage, while other shooters, including those using their rifle in tactical scenarios, may want the surety of a single-stage trigger, ready to engage and fire once their finger is inside the trigger guard. Regardless of preference, a good trigger will feature minimal creep and should be free of grittiness, providing a smooth, even break.
Drop-In Trigger Assembly vs. Standard Trigger Group
Once you decide between a single-stage or two-stage trigger, you can choose between standard and drop-in trigger groups. Standard trigger groups feature all the fire control group parts separated, and need to be pieced together and installed much like a mil-spec trigger, while drop-in trigger are pre-assembled and contained within a casing that simply drops in to the receiver and accepts the pins, hence the name.
After-Market Trigger Comparison
Some shooters prefer drop-in triggers due to the ease of installation, while others opt for standard groups so they can access the components individually for cleaning adjustment or replacement. If one piece of a drop-in trigger fails, you’ll need to either replace the entire unit or send it to the manufacturer for repair, whereas you may be able to simply replace the broken component of a standard trigger without needing a whole new trigger set.
Trigger Terminology — “Creep”, “Stacking”, “Overtravel”
“Creep” or “travel” is the distance the trigger moves between the end of take-up and when the trigger breaks to fire the fun. Too much creep can affect accuracy, but no creep can be unsafe, as the shooter may not be prepared to fire. “Stacking” occurs when the trigger weight actually increases during travel — this shouldn’t happen. Lastly, “overtravel” is the distance the trigger continues moving back after the gun fires.
This article is based on a longer story in the NRA Blog.


 Many of our readers use AR-type rifles for Service Rifle matches, varmint hunting, 3-Gun competition, or defensive use. AR-platform rifles can be configured in a multitude of ways to suit the application. But if you plan to put together your own purpose-built AR rifle, how do you get started?


 Emil Kovan Competition History:


 The new Sportsman’s Warehouse gunsmith shop is located in SW’s Salt Lake City Distribution Center. The workspace features four stations for gunsmiths to work on rifles, shotguns, pistols, and muzzleloaders. They also have added a full production lathe that is designed for 24-hour-a-day operation, as well as a large end mill for a variety of metal working operations.