Craters may look interesting on the moon, but you don’t want to see them on your primers. Certain mechanical issues that cause primer craters can also cause primer piercing — a serious safety problem that needs to be addressed. If you have a gun that is cratering primers (even at moderate pressure levels), there is a solution that works with many rifles — send your bolt to Greg Tannel to have the firing pin hole bushed.
Shooters who convert factory actions to run 6BRs, 6PPCs or other high-pressure cartridges should consider having the firing pin bushed. These modern cartridges like to run at high pressures. When running stout loads, you can get cratering caused by primer flow around the firing pin hole in the bolt face. The reason is a little complicated, but basically the larger the hole, the less hydraulic pressure is required to crater the primer. A limited amount of cratering is normally not a big issue, but you can reduce the problem significantly by having a smith fit a bushing in the firing pin hole. In addition to reduced cratering, bushing the firing pin often produces more consistent ignition.
This is a highly recommended procedure that our editors have had done to their own rifles. Greg Tannel (Gre-Tan Rifles) is an expert at this procedure, and he does excellent work on a wide variety of bolts. Current price for a bushing job, which includes turning the firing pin to .062″, is $80.00, or $88.00 with USPS Priority Mail return shipping.
If you have a factory rifle, a bushed firing pin is the way to go if you are shooting the high-pressure cartridges such as 6PPC, 6BR, 6-6.5×47 and 6.5×47. This is one of the most cost-effective and beneficial upgrades you can do to your factory rifle. For more info on the Firing Pin Bushing process, visit GreTanRifles.com, or email greg [at] gretanrifles.com. (After clicking the link for GreTanRifles.com, Click on “Services” > “Shop Services” > “Bolt Work”, and you’ll see a listing for “Bush Firing Pin Hole & Turn Pin”. Select “View Details”.)
Firing Pin Hole Bushing by Greg Tannel
Work Done: Bush firing pin hole and turn pin.
Functions: Fixes your cratering and piercing problems.
Price: $80.00 + $8.00 return shipping Total Price: $88.00
Actions for which Bushing is Offered: Remington, Winchester, Savage multi-piece pin, Sako, Kimber, Nesika, Stiller, BAT Machine, Kelbly, Lawton, Surgeon, Borden, Wichita, Hall, Ruger, Howa, Weatherby, Dakota, Pacific Tool, Phoenix, and Defiant bolt action rifle or pistol.
Actions for which Bushing is NOT Available: Case hardened receivers, ARs, Accuracy International (AI), Barnard, Big Horn, Cooper, Desert Tactical Arms, Kimber, Rosenthal, New Savage single piece pin, Rimfires, Falling block, Break-open, Lever, Pump rifles, 1903-A3, CZ, Mauser.
How to send your bolt in to be bushed:
You can send your bolt snail mail, priority mail, or UPS (Please do not use FEDEX as it sometimes has delivery delays). Pack your bolt carefully and ship to: Gre’-Tan Rifles, 24005 Hwy. 13, Rifle CO 81650. Please include your name, phone number, and return shipping address.
Due to the high volume of work, turn around is 5 to 8 weeks on bushing a bolt. Three or more bolts will be sent back to you UPS and we will have to calculate shipping. We can overnight them at your expense. You can pay by check, money order, or credit card. For more information visit GretanRifles.com.
This is good news for gunsmiths and small manufacturers who have been threatened by onerous regulations (and huge fees), under ITAR. With a Republican President in the White House, it looks like the Departments of Commerce and State are moving towards removing common gunsmithing activities (such as threading barrels or fitting brakes) that were potentially under the purview of ITAR. In addition, possible Federal rule changes would broadly move firearms and ammunition out from ITAR regulation. Generally speaking, it appears that the proposed rule changes will make Federal law more tolerant, so that producers of small firearms accessory parts would no longer have to register as ITAR manufacturers (with hefty annual fees).
As part of the Export Control Reform (ECR) initiative and ahead of expected publication in the Federal Register this week, the Departments of Commerce and State have posted the new proposed rules transitioning export licensing of sporting and commercial firearms and ammunition from the ITAR-controlled U.S. Munitions List (USML) to the EAR-controlled Commerce Control List. Thus, items removed from the USML would become subject to the Export Administration Regulations (EAR).
The NSSF states: “The new proposed rules represent significant change in the regulations controlling exports of our products, and all exporters need to review these important proposed rules.
NSSF is preparing comments on the rules for formal submission. We will be sending out a recap of the changes in the next few days. Please make sure all your export specialists have a chance to review and provide comments. NSSF will be drafting a comments letter for both rules based on this review.”
SUMMARY: This proposed rule describes how articles the President determines no longer warrant control under United States Munitions List (USML) Category I – Firearms, Close Assault Weapons and Combat Shotguns; Category II – Guns and Armament; and Category III – Ammunition/Ordnance would be controlled under the Commerce Control List (CCL). This proposed rule is being published simultaneously with a proposed rule by the Department of State that would revise Categories I, II, and III of the USML to describe more precisely the articles warranting continued control on that list.
SUMMARY: The Department of State (the Department) proposes to amend the International Traffic in Arms Regulations (ITAR) to revise Categories I (firearms, close assault weapons and combat shotguns), II (guns and armament) and III (ammunition and ordnance) of the U.S. Munitions List (USML) to describe more precisely the articles warranting export and temporary import control on the USML. Items removed from the USML would become subject to the Export Administration Regulations (EAR).
There is a new book, Chambering Rifles for Accuracy, that will benefit folks who want to understand the chambering process, and potentially learn to chamber a barrel on their own. We caution, however — you really need a skilled, hands-on mentor for this this task. For someone without a lot of machining experience, chambering can be tricky, and working with lathes can be dangerous to say the least.*
With those cautions stated, this book will help any gun-owner understand how chambering is done, and what to look for when assessing chambering work by commercial gunsmiths. Chambering Rifles for Accuracy is co-authored by Gordy Gritters and Fred Zeglin. The methods detailed in this book can be used equally well by gunsmiths in a professional shop, and by skilled, well-trained hobbyists working in a home workshop. The book costs $49.95 from Amazon.
Gordy Gritters is a highly-respected gunsmith and gunsmithing instructor. Gordy has built many match-winning competition rifles so he knows his stuff. Fred is a gunsmith, gunsmithing instructor, author, and is the owner of 4-D Reamer Rentals, so he is very knowledgeable on the use and care of reamers. Fred has extensive experience building high-accuracy hunting rifles.
Fred wrote the first half of the book, which covers what is needed to prepare for and chamber high-accuracy hunting barrels. Zeglin lists all the tools needed such as reamers, micrometer reamer stops, headspace gauges, and more.
Gordy wrote the second half of the book, which goes beyond basic chambering. Gordy covers setting up a lathe for chambering barrels through the headstock, various dialing-in methods commonly used, how to deal with curvature in rifle bores, and how to deal with reamer chatter (especially prevalent in 5R-type barrels). Then Gordy covers the entire dialing-in/threading/fitting/chambering/crowning process used to build a benchrest-quality rifle. Gordy also explaines how to ream custom chamber necks, and how to throat the chamber for specific bullets or for a specific purpose.
Gordy Gritters also created an excellent DVD, “Chambering a Championship Match Barrel”. No other chambering video shows the entire chambering process step-by-step with the advanced, precision techniques used by master gunsmiths. Gordy has built several rifles that hold world records and have won National Championships. This is a professional 90-minute production from Grizzly Industrial. You can purchase this $69.95 DVD from Gordy’s website or from Grizzly Industrial.
*This Editor’s own uncle suffered a severe arm injury while working with a lathe. He was not an amateur — he had done lathe and mill work for over 40 years. But a shirt-sleeve caught in the spinning chuck. The results were horrific.
This barrel’s shoulder was 0.025″ off the action because Red Locktite had been used on the threads.
Gunsmith Thomas ‘Speedy’ Gonzales offered this interesting report about how NOT to headspace a barrel. Hopefully you never discover something like this…
“A good friend and customer sent this rig in for repair after FedEx damaged the rifle during inbound transport from another smith. After repairing the stock and rebedding it, I decided to re-polish the barrel to make the repair perfect. Well this just added insult to injury as the barrel did not want to come off. After a few choice words, the barrel finally broke free only to reveal something very disturbing. It seems the barrel had been ‘headspaced’ by using RED Loctite to hold it in place.” [Editor: That’s definitely NOT how barrels should be fitted.]
Speedy was not happy: “I hope the smith that did this sees the photos and realized what jeopardy he put my customer in or anyone who shot the rifle for that matter. When cleaned up, the shoulder on the barrel was over 0.0250″ (25 thousandths) away from the face of the receiver.” [Editor: That’s a lot in this business]. Check out the images below to see how much the barrel rotated further inward when cleaned up. The barrel spun in nearly another eighth-turn or more. Not good.
If you are a gunsmith, or do any machine works on firearms, you need to know about ITAR, the International Traffic in Arms Regulations which are enforced through the U.S. Department of State (DOS). ITAR applies to companies that create sophisticated weapons systems. However, under DOS interpretations in recent years, ITAR may also apply to persons and businesses that do simple, basic gunsmithing tasks. That could require filling out lots of paperwork, and paying the Fed’s hefty fees, starting at $2250 per year. A Guidance Statement issued by the DOS Directorate of Defense Trade Counsels (DDTC) in July, 2016 (under the Obama Administration) gave rise to serious concerns that DOS was going to require every gunsmith to register under ITAR, under threat of massive fines and penalties. READ About DDTC ITAR Guidance.
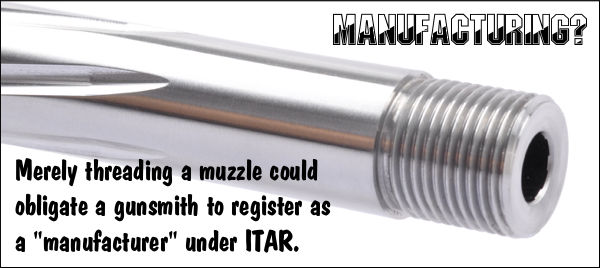
Thankfully, it appears that the Trump Administration is working to narrow the scope of ITAR so that it would NOT apply to basic gunsmithing activities, and not apply to common gun accessories that are not exported. IMPORTANT: Changes have NOT been made yet, but it appears the Feds are heading in the right direction, with the DOS willing to modify its definition of “manufacturing” so ITAR would not embrace basic gunsmithing tasks such as threading a muzzle.
The Gun Collective reports that: “The Directorate of Defense Trade Counsels (DDTC) is working on revising the ITAR regulations which will help the gun industry[.] Gunsmiths having to pay hefty fees, register and comply with ITAR may no longer be a problem if this goes through as planned. Fortunately, we don’t have to wait for Congress to take action, but rather an agency, which appears to be taking initiative to get it done. As always, time will tell, so be sure to keep your eye on the Federal Register….”
While nothing has happened yet, it appears that this administration is working to revise ITAR. For members of the firearms industry, this is a big deal and will be beneficial to all. There is no reason that a gunsmith should be required to register and comply with ITAR to simply thread a muzzle. It will also allow companies to more easily export their products around the world. (Source: The Gun Collective)
The Gun Collective further noted that: “The topic that will be of the most interest to us would be the definition of manufacturing[.] You may remember DDTC’s July 2016 letter, which issued “Guidance” as to who would have to register under ITAR [and suggested] that now gunsmiths would have to register as well. The definition of manufacturing is an important one to define and one that had broad ranging implications as the industries covered under ITAR are wide ranging, everything from the firearms industry to airplanes and missiles. The Guidance stated that ITAR registration was required for gunsmiths who machined or cut firearms, such as the threading of muzzles or muzzle brake installation which required machining. At a hefty $2,250 a year to register, ignoring all of the other things that go along with ITAR, it is easy to see why this would be problematic for most small businesses.”
Here is the key language in the DDTC’s “ITAR Registration Requirements – Consolidated Guidance” Ruling of 7/22/2016:
2. Registration Required – Manufacturing: In response to questions from persons engaged in the business of gunsmithing, DDTC has found in specific cases that ITAR registration is required because the following activities meet the ordinary, contemporary, common meaning of “manufacturing” and, therefore, constitute “manufacturing” for ITAR purposes:
a) Use of any special tooling or equipment upgrading in order to improve the capability of assembled or repaired firearms;
b) Modifications to a firearm that change round capacity;
c) The production of firearm parts (including, but not limited to, barrels, stocks, cylinders, breech mechanisms, triggers, silencers, or suppressors);
d) The systemized production of ammunition, including the automated loading or reloading of ammunition;
e) The machining or cutting of firearms, e.g., threading of muzzles or muzzle brake installation requiring machining, that results in an enhanced capability;
f) Rechambering firearms through machining, cutting, or drilling;
g) Chambering, cutting, or threading barrel blanks; and
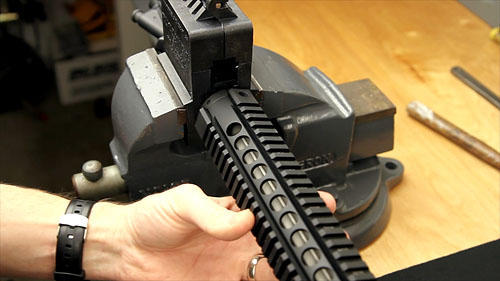
Rifleshooter.com built this tactical rifle (top image) with a Howa 1500 action, Shilen barrel, and MDT chassis. Below is a factory Howa 1500 Multi-Cam rifle.
Many of our readers are thinking of purchasing a Howa rifle or barreled action. These feature smooth-running actions with a good two-stage HACT trigger. But some folks have heard that it may be difficult to find stocks, or to fit an after-market barrel. That’s not true. There are many stock options available, and in this article, Bill of RifleShooter.com shows that it is easy to remove the factory-installed barrel with the right tools. We think a Howa makes a fine basis for a varmint rig or field rifle. Or you can build a tactical as Bill did. You can start with the factory barrel and when you want/need more accuracy, then have a gunsmith install a custom barrel from Krieger, Shilen, or other quality brand.
What You Need to Know About Howa 1500-series Rifles
Tech Feature by RifleShooter.com
Consider this article the “Howa 1500 Overview”. AccurateShooter.com’s editor mentioned there’s been a lot of interest in Howa rifles and barreled actions imported by Legacy Sports International. In addition to being able to buy a complete rifle from a dealer, Brownells sells barreled actions in a wide variety of calibers and configurations. In this post we are going to take a look at the Howa 1500 series.
Howa Rifles — General Background
Howa is a Japanese heavy machinery company. One of its product lines are firearms, which, are imported into the United States of America by two different companies, Legacy Sports International and Weatherby. Legacy sells the 1500 under the manufacturers name while Weatherby re-brands the guns as the Weatherby Vanguard. In general, the finishes on the Weatherby rifles are more refined than the LSI-imported 1500s.
General Evaluation of Howa 1500 Rifles
I’ve found Howa 1500s to be solid, entry-level rifles that are capable of sub-MOA accuracy out of the box. I’ve actually purchased two Howa rifles I’ve tested because I like them so much. The gun below, a Howa Mini-Action in 7.62×39 Russian, is one of my favorite factory guns to shoot. I’m running a Tract Optics Toric on it, these are solid little rifle scopes that offer great performance for the money.
Check out this three-shot group I drilled at 100 yards with the rifle above and 125-grain Sierras. It took a lot of work and load development to get there, but when it did, it worked well.
Howa 1500 HACT 2-Stage Trigger
Howa 1500s feature the very nice Howa HACT trigger. This is an adjustable, two-stage trigger, set for about 3 pounds (combined stages). Crisp and repeatable, this is an excellent trigger for a factory gun. There is no annoying Glock-style safety lever in the middle of the trigger blade. The 2-stage design and pull weight range works well for a hunting rifle or a rig for PRS competition. Rifleshooter.com says the Howa trigger is “one of the best factory triggers, along with Tikka. I’ve found the Howa trigger superior to a Remington 700 — the Howas doesn’t need to be replaced.
Writing for the Western Outdoor News, WONews.com, Steve Comus has field-tested the new HACT Trigger. Steve writes: “I always liked two-stage triggers, because of the way I could take-up the slack and then actually know when the rifle was going to go off. The take-up on the [HACT] trigger was fast and easy. The crisp, positive release when pressure was put on during the second stage [reminded me] of some of the target rifles I shot through the years.”
Howa Actions — Three Options
Howa offers three action lengths: Mini, Short, and Long. You can see the bolts for the three action lengths in the image below. The Mini-Action has similar external dimensions to the Remington Model Seven, however, the Mini-Action’s bolt does not travel as far to the rear. This is a mixed bag. The upside is you have a quicker action (shorter bolt throw). The downside is you are limited to shorter rounds such as the .223 Remington, 7.62×39mm Russian, and 6.5 Grendel. But if you need a bigger cartridge, just choose the standard or long action Howa variant.
Howa 1500 vs. Remington 700 — Important Differences
Is the Howa 1500 a Remington 700 clone, or some kind of improved Remington 700? No, not really. While the top radius of the Howa 1500 does match the Model 700, and they can both use the same two-piece scope bases, there area number of differences.
If you look at the Howa 1500 alongside the Remington 700 you’ll note the M700 is a round action, while the Howa is a flat-bottom action. In many ways the Howa’s bottom half reminds me of a push-feed Winchester. This means the chassis and stocks that support a Howa 1500 are not V-block based like you’ll find on a 700, instead they have a flat bottom. While the bolt of the Howa is similar in external appearance to the Model 700, it does offer some improvements, notably an M16-style extractor and a firing pin assembly that can be easily removed without tools.
Howa 1500 action screws are metric and are in a different location from the 700. The Howa 1500 has an integral recoil lug that accepts the front action screw, this means you have more of the front action screw engaging the action. WARNING: If you install it into a poorly-fitted stock or action you may bind it.
Can a Howa Action Be Used for a Custom Rifle Project?
Absolutely! You can either buy a barreled action from Brownells and throw it in a chassis system/stock of your choice or you can use a stripped action to build a custom rifle. If you are in the chassis market, MDT offers a wide variety of chassis in different price ranges. All have worked well for me.
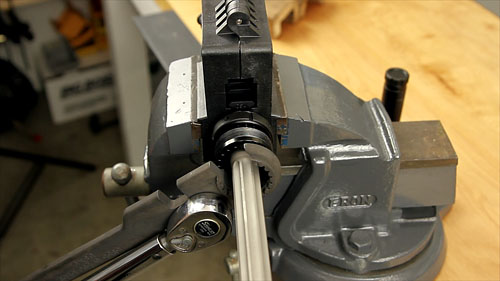
How to Remove Howa Factory Barrel from Action
You may have heard internet grumblings about removing Howa barrels. Some keyboard commandos say they are extremely difficult to remove without a relief cut. Well Bill at Rifleshooter.com demonstrates that Howa barrels can be removed without trouble, provided you have the right tools. Watch this video:
Watch Howa Barrel Removal Video — Quick and Easy (Click Speaker Icon for Audio)
Q: Is it difficult to remove a barrel from a Howa 1500?
A: Not very. I’ve heard from some smiths that worked on Howas (years ago) that the factory barrels are difficult to remove. However of the half dozen or so Howa barrels that I’ve pulled, they’ve been very easy. I use a Brownells action wrench with the top piece for a Rem Model 700 and the flat bottom resting against the flat on the wrench.
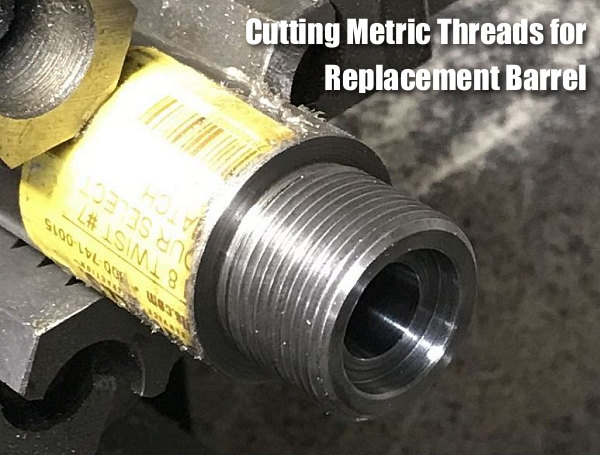
Howa Actions Require Metric Barrel Threads
It’s easy to thread a barrel for a Howa Action. You just have to cut metric threads — most lathes out there can cut them. I cut the threads below on a manual lathe using change gears. [Editor: John Whidden cuts metric tenon threads with a CNC lathe. “It’s easy,” John tells us, “No issue whatsoever.”]
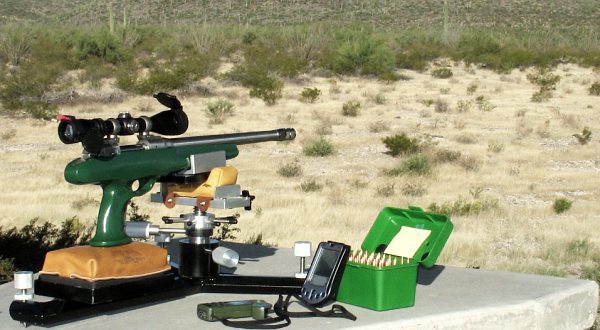
Here’s something you’ve probably never seen before — a single-shot, bolt-action pistol chambered for the 6mm BR Norma cartridge. Featured as one of our Guns of the Week a while back, this Green Machine is a Savage Striker upgraded by Chuck G. from Arizona, a self-described “Savage Maniac”.
Chuck transformed this Savage Striker single-shot from a ho-hum .308 into a reliable half-MOA precision 6BR that can run with accurized rifles all the way out to impressively long ranges. Here we provide highlights from our original article. Click the link below to read our full Savage Striker article, which is three times longer than this story, and has more photos, plus videos and a detailed load development section.
The Striker Project — Pursuit of Precision, by Chuck G.
I didn’t even know Savage Strikers existed until I saw one for sale on Gunbroker.com. I snagged it with a $400 bid. My idea was to build an accurate, long-range pistol on a pauper’s budget. As purchased, the Striker had a .308 barrel with an unknown round count, the standard center-grip, black synthetic stock, an odd two-piece custom brake, and an old Burris 4X pistol scope in a Conetrol 2-piece ring set. The trigger was very heavy, 6-8 lbs I’d estimate, with a lot of take-up and over-travel.
Initial Disappointments — Too Much Recoil, Poor Accuracy
My initial attempts to get the Striker to shoot well at even 100 yards were disappointing. I was never able to get better than a 3″, 5-shot group at 100. Not what I was looking for. Being used to benchrest triggers, the pull on this one was hard for me to manage. The gun would roll around on any type of front rest I had, and from a cement bench on a bipod it would jump about 18 inches up and sideways with every round. Not being used to this type of gun, I found the recoil and muzzle blast to be unsettling. It was hard not to flinch. I started off using my 1K .308 rifle load, 175 SMKs over 44 grains of Varget. That probably would have knocked the hell out of a deer, but it wasn’t much fun to shoot from the bench.
New Caliber, New Barrel — Way Better Accuracy!
I decided to rebuild the Striker in a caliber that would be more fun to shoot. 6mmBR was an obvious choice for all the usual reasons–good brass, wide choice of match bullets, easy to load, low recoil, very accurate, and relatively cheap to shoot. As part of a SavageShooters.com group buy, I ordered a 15″, SS match grade, 3-groove, heavy varmint contour, 10-twist barrel from Pac-Nor. To set the freebore, I provided Pac-Nor with a dummy case with an 88gr LD Berger bullet seated to use as a guide. Total delivered price was $340 chambered and threaded for a muzzle brake from JP Rifles.
When I bought it, the Striker, with factory .308 barrel, shot 3″ groups at 100. Now, with a Pac-Nor 6BR Match barrel, 3″ fore-arm plate, upgraded trigger, 24X scope, and match bullets, the gun consistently groups 1/2″ or better at 100 yards. What a transformation!”
Striker Project — Mission Accomplished
With further load development and bench practice, the gun is showing even more accuracy potential. Using a 24X target scope, the Striker has delivered 5-shot groups in the 3s and 4s during recent range visits. All in all, I’m very satisfied with the project. I ended up with an accurate, fun-to-shoot gun for under $1,000 including scope, paint, and bedding materials.
Stock Modifications
While waiting for the barrel I started working on the stock. As virtually no aftermarket stocks were readily available for the center-grip Striker, I decided to rebuild the standard black synthetic stock. The grip fit my hand poorly so I worked it over with a Dremel tool and sandpaper, built up the grip with Bondo, filled in some holes and bedded the action using Devcon Plastic Steel. This was my very first attempt at these tasks so progress was slow. Once I had re-shaped the stock, I sprayed five coats of “John Deere” green topped by several coats of auto clear. It came out surprisingly well considering I had never painted a stock before. I had originally planned to build up the fore-end to 3″ wide using Bondo but later decided to just use a Sinclair Benchrest Adapter that I had on hand.
Chuck notes: “I’m really pleased with the C & J one-piece Rest. It’s solid, heavy, and well-designed. There is no real need for a windage top; small adjustments are easily made by slightly shifting the pistol butt. Elevation adjustments are positive and once the pistol is set up on this rest NOTHING moves.”
Craters may look interesting on the moon, but you don’t want to see them on your primers. Certain mechanical issues that cause primer craters can also cause primer piercing — a serious safety problem that needs to be addressed. If you have a gun that is cratering primers (even at moderate pressure levels), there is a solution that works with many rifles — send your bolt to Greg Tannel to have the firing pin hole bushed. CLICK HERE.
Shooters who convert factory actions to run 6BRs, 6PPCs or other high-pressure cartridges should consider having the firing pin bushed. These modern cartridges like to run at high pressures. When running stout loads, you can get cratering caused by primer flow around the firing pin hole in the bolt face. The reason is a little complicated, but basically the larger the hole, the less hydraulic pressure is required to crater the primer. A limited amount of cratering is normally not a big issue, but you can reduce the problem significantly by having a smith fit a bushing in the firing pin hole. In addition to reduced cratering, bushing the firing pin often produces more consistent ignition.
This is a highly recommended procedure that our editors have had done to their own rifles. Greg Tannel (Gre-Tan Rifles) is an expert at this procedure, and he does excellent work on a wide variety of bolts. Current price for a bushing job, which includes turning the firing pin to .062″, is $80.00, or $88.00 with USPS Priority Mail return shipping.
If you have a factory rifle, a bushed firing pin is the way to go if you are shooting the high-pressure cartridges such as 6PPC, 6BR, 6-6.5×47 and 6.5×47. This is one of the most cost-effective and beneficial upgrades you can do to your factory rifle. For more info on the Firing Pin Bushing process, visit GreTanRifles.com, or email greg [at] gretanrifles.com. (After clicking the link for GreTanRifles.com, Click on “Services” > “Shop Services” > “Bolt Work”, and you’ll see, in the lower left, a listing for “Bush Firing Pin Hole & Turn Pin”. Click on that box.)
Firing Pin Hole Bushing by Greg Tannel
Work Done: Bush firing pin hole and turn pin.
Functions: Fixes your cratering and piercing problems.
Price: $80.00 + $8.00 return shipping Total Price: $88.00
Actions for which Bushing is Offered: Remington, Winchester, Savage multi-piece pin, Sako, Kimber, Nesika, Stiller, BAT Machine, Kelbly, Lawton, Surgeon, Borden, Wichita, Hall, Ruger, Howa, Weatherby, Dakota, Pacific Tool, Phoenix, and Defiant bolt action rifle or pistol.
Actions for which Bushing is NOT Available: Case hardened receivers, ARs, Accuracy International (AI), Barnard, Big Horn, Cooper, Desert Tactical Arms, Kimber, Rosenthal, New Savage single piece pin, Rim fires, Falling block, Break open, Lever, Pump rifles, 1903-A3, CZ, Mauser.
How to send your bolt in to be bushed:
You can send your bolt snail mail, priority mail, or UPS (Please do not use FEDEX as it sometimes has delivery delays). Pack your bolt carefully and ship to: Gre’-Tan Rifles, 24005 Hwy. 13, Rifle CO 81650. Please include your name, phone number, and return shipping address.
Due to the high volume of work, turn around is 5 to 8 weeks on bushing a bolt. Three or more bolts will be sent back to you UPS and we will have to calculate shipping. We can overnight them at your expense. You can pay by check, money order, or credit card. For more information visit GretanRifles.com.
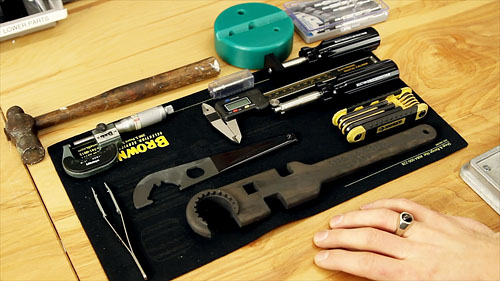
Here are the main tools you’ll need to assemble an AR-platform rifle
Planning to put together an AR-platform rifle? Or are you looking to upgrade your AR with a new barrel, stock, or trigger group? Then you should check out the AR-15 Rifle Build DVD from our friends at UltimateReloader.com. This DVD covers all the details of a custom build, using high-resolution video sequences, and helpful supporting graphics.
In this DVD, Gavin Gear guides you through the entire process including selecting components, acquiring and using the necessary tools, assembly steps and details for each component, and even mounting a scope. Building an AR-15 can be overwhelming, but with the right guidance and help it’s not difficult and can be very rewarding. With this DVD you’ll be able to build your AR-15 with confidence.
Upper: Barrel / Gas Block / Gas Tube
Upper: Handguard Installation
UltimateReloader.com’s AR-15 Build DVD is available just $9.90 (plus $3.80 shipping/handling). This DVD can pay for itself many times over by showing you how to do your own gunsmithing (and get quality AR components at attractive prices).
See Parts Installed in See-Through AR-15 Lower
This isn’t part of UltimateReloader.com DVD, but this YouTube video shows how to install the AR trigger group and other parts in an AR-15 lower. A transparent, see-through Tennessee Arms Company lower receiver was chosen to make it easier to see how the parts are installed.
Can sustained rapid-fire shooting with no cool-down period wear out a quality barrel more quickly? The answer is “Yes” according to Forum member LCazador, who did an interesting comparison test with two .243 Winchester barrels. He started off with two, identical, match-grade HV taper stainless barrels. Both were NEW at the start of testing, and LCazador shot the same load through each: 95gr match bullets with 38 grains of Hodgdon Varget. After giving both barrels the same, gentle 20-round break-in, 300 rounds were then fired through each barrel — in very different ways. Barrel condition and wear were monitored with a borescope.
Barrel One — Slow Fire, Cool Down Periods, Cleaning Every 50 Rounds
At the end of the 300-round test, Barrel One looked brand new. There was none of the severe fire cracking found in Barrel Two. This barrel was shot no more than 10 times without a cool down and firing was done at a much slower pace. Cleaning for this barrel was done every 50 shots.
Barrel Two — Fast Firing, No Waiting, Cleaning Every 100 Rounds
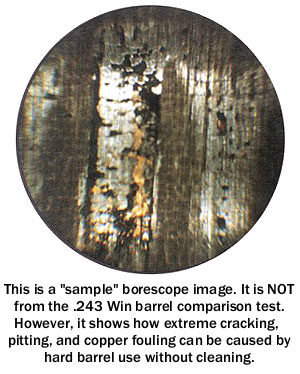
The second barrel, which received hard use and minimal cleaning, was severely damaged with severe fire cracking at the leade and throat. As a result, the barrel had to be re-chambered. This barrel was shot 100 rounds at time without cleaning and was shot up to 20 times in succession without a cool down.
LESSON LEARNED — Heat Kills Barrel Life
Don’t let your barrel get too hot, and keep it clean. One afternoon can ruin a barrel!
Monitoring Barrel Wear with Borescope
Some folks worry too much about what their borescopes reveal — many barrels do not have to be “squeaky clean” to perform well. In fact some barrels run better after ten or more fouling shots. However, a borescope can be very helpful when your barrel starts losing accuracy for no apparent reason. Forum member FdShuster writes:
“A borescope is a positive way of backing up your suspicions when the rifle starts to throw an occasional (soon followed by more frequent) wild shot. Using the scope is also an excellent way to determine that the cause is barrel wear and not simply a need for a concentrated cleaning session to remove built up copper and more importantly, carbon fouling.
I’ve had a few barrels that gave every indication of being shot out. But I ‘scoped them out and found the cause to be nothing more than requiring a good cleaning. They then returned to their usual performance. There’s no guessing involved when you are able to get ‘up close and personal’ using the scope. The borescope also provides an excellent view of the all-important condition of the crown. My borescope is one of the most valuable investments I’ve ever made.”


 Craters may look interesting on the moon, but you don’t want to see them on your primers. Certain mechanical issues that cause primer craters can also cause primer piercing — a serious safety problem that needs to be addressed. If you have a gun that is cratering primers (even at moderate pressure levels), there is a solution that works with many rifles — send your bolt to Greg Tannel to have the firing pin hole bushed.
Firing Pin Hole Bushing by Greg Tannel


 Howa 1500 HACT 2-Stage Trigger


 Monitoring Barrel Wear with Borescope


