2017 IBS 1000-Yard Benchrest Nationals Report By Boyd Allen
On September 1-4, the IBS held its 2017 1000-yard Benchrest Nationals at the Whitehorse Shooting Center in Peeltree, West Virginia. There was a great turn-out this year, with 118 entries in Light Gun Class (17-lb limit, 5 shots per target) class and 107 shooters in Heavy Gun Class (Unlimited weight, 10 shots per target). The conditions this year were challenging to say the least, with rain storms, spiraling winds, and fog. In fact, rain and fog on Saturday (with cancelled relays) caused the Nationals to be extended by one day through Monday, September 4th. What’s more, of the 107 shooters listed in the Two-Gun Overall results who actually shot both guns, there were dozens of DQs. (Yes, the wind was a bit tricky at this year’s Nationals.)
Sam Hall, past IBS Shooter of the Year, provided this image and most of the photos in this report.
Congratulations to the “top guns” at the Nationals: Edward Kenzakoski (Two-Gun Overall Champion), Mike Gaizauskas (Light Gun Overall, plus LG Score Agg), and Mike Brennan (Heavy Gun Overall, plus HG Score Agg). Group Agg winners were Richard Schatz for LG, and Charlie Lentz for Heavy. Two ladies also deserve mention. Sally Bauer shot the smallest group of the match, a 1.923″ 5-shot group in LG — that’s 0.184 MOA! Ruth Edwards drilled a 2.104″, also mighty impressive. Nice shootin’ ladies…
White Horse Wind and Weather Factors — and Topography
The firing line for the 1000-yard range has a covered structure with 14 well-spaced masonry benches with block bases and cast concrete tops. Facing southwest, the firing line is above the land between it and the target butts, which are at the head of a canyon. There is a low area with trees on the left with an elevated flat area on the right.
This topography create unpredictable wind patterns that can change rapidly with no warning. Those changes can wreak havoc with competitors’ groups and scores. The wind direction at the targets can be opposite that at the firing line, with the result that a let-off down range not only carries the penalty of making a hold-off incorrect, but because the wind at the firing line can continue, adding the additional penalty of a reversal. This was the common cause of disqualifications, which were numerous at this year’s Nationals.
Light Gun and Heavy Gun Equipment Lists (Partial Sample):
Barrel-Block Heavy Gun with a handsome wood stock. Wide fore-ends enhance stability.
Delay Caused by Fog and Rain
On Saturday, rain and fog delays, caused the match to be extended through Monday. The rules dictate that if a full match cannot be finished because of weather, then all of the day’s results are discarded. This meant that even those shooters who completed their relays on Saturday had to shoot them over — hence another day was added to the event. Because of the prospect of worsening conditions on Saturday afternoon, even though there was daylight left, the decision was made to extend the match through Monday.
Profile of 2017 IBS 1000-Yard National Champion Edward Kenzakoski
Commenting on his performance at the Nationals, Ed said modestly:
“I didn’t shoot really good. I just shot better than them other guys.”
Winning Hardware (with a 110-lb Heavy Gun)
Notably, Ed does all of his own gunsmithing, and he built his Championship-winning rifles. Both guns featured 1:11″-twist, 30″ Krieger barrels. (LG: 1.250″ shank and .950 muzzle; HG: 2″ contour untapered). Ed’s Light Gun has a BAT action, no barrel block, Jewell trigger, and McMillan Tooley MBR stock. His Heavy Gun boasts a 10″-long BAT action in a two-piece aluminum stock with barrel block. That HG beast weighs 110 pounds! Both of Ed’s rifles (light and heavy) wore Nightforce 12-42x56mm BR scopes.
Winning Numbers
To win the Two Gun Overall, Ed posted 137 LG Score, 262 HG Score, and 399 Two-Gun Score Agg. His Group numbers were: LG Group 5.659, HG Group 7.483, Two-Gun Agg: 6.571.
Winning Loads and Reloading Methods
Both rifles are chambered in 300 WSM. Ed shoots 210gr Berger VLDs (sorted every way possible), with Norma brass, Hodgdon H4350 powder, and CCI BR2 primers. For the two guns he used very different seating depths — barely touching for the HG, 0.100″ jump for the LG. He said that it takes him a full four days to load the ammunition for both rifles for a match. Yes, he weighs primers, and he even passes his bullets through a .309 bushing.
No Dark Horse at White Horse — Kenzakoski is a Proven Winner
One shouldn’t be surprised at Edward Kenzakoski’s success. Ed really cleaned up at Williamsport this year, winning one 6-match Aggregate and two 10-match score and group Aggregates. He also established a new Williamsport club Light Gun record of 3.2″.
Last year’s winner Tom Mousel sitting at the bench on Sunday. Tom finished third overall this year.
Record-Setting Asymmetry
In 2016 Michael Gaizauskas set the current 1000-yard IBS Heavy Gun (10 shot) group and score records. He set those records with the rifle on the left (below), then chambered in 6.5×47 Lapua. In this match, Mike won LG Group and LG Overall with the rifle on the right as chambered in his own 7mm short magnum wildcat. Mike designed and built both these distinctive assymetric stocks.
Prizes and Gift Certificates Galore at White Horse
The prize table at the IBS 1000-yard Nationals was impressive, with many scopes and stocks as prizes, plus a treasure trove of gift certificates:
White Horse Shooting Center Facilities, Organization, and Location
The 1000-yard range used at the IBS 2017 Nationals is part of a large shooting facility run by Whitehorse Firearms Outdoor Education Center in cooperation with the West Virginia Division of Natural Resources. White Horse is located off of Route 20 near the small community of Peeltree, WV. The nearest town of any size, ten miles to the south, is Buckhannon, WV, which has about 5600 residents.
White Horse Geography and Climate
The White Horse range is set in wooded hill country, with lots of creeks and some smaller rivers all kept green and running by an annual rainfall of about 48 inches and about the same for snowfall. To my eyes it is beautiful county, pleasingly rural and lush, in marked contrast to where I live where every plant must be served by some sort of irrigation.
Deep Creek is a beautiful range, lined with tall timber on both sides.
Report by Jamey Williams
The second phase of the Northern Rockies Long Range Tournament was held at the Deep Creek Range outside Missoula, Montana last weekend. The F-Class portion was held two weekends before, under very different but also favorable conditions. The F-Class event was at the tail end of a very bad fire year, and the conditions were hot, dry, and at times, smoky. Nonetheless, great scores were fired, including a pending National Team Record by the Washington F-Open Team.
This past weekend was very different, with low temps, rain, and fog — a very dramatic shift in a very short time. The 1000-yard team matches on Friday took place under a light rain, and several cleans were fired — a prelude of thing to come. Saturday brought cold conditions and fresh snow on the surrounding mountains. While it was cold and cloudy, several shooters fired high scores with some only dropping only a handful of points or less over the Palma match and the 1000-yard match. This brought us into Sunday morning with a fog starting to settle over the range during the 800 yard stage of the last Palma match. As the day went on, the conditions gradually improved and with some outstanding shooting, a couple of pending NRA National Records were set.
This past weekend was time for the sling-shooters, the “hard-holders” who shoot prone with sling, coat, and glove. There were some very impressive performances — including two pending records, one by an All National Guard marksman SSG John Coggshall, and the other by Kerry Spurgin, who shot incredibly well, to break a long-standing Open Record.
Note: The upper left image shows SSG Coggshall at Deep Creek in 2010.
SSG John Coggshall of the Connecticut Army National Guard and member of the All National Guard Rifle Team fired an outstanding 1093-61X (out of a possible 1100 points), earning him the NRA Silver medallion. This score should earn him the Service Category National Record for the Long Range Regional Aggregate by one point and a bunch of Xs over the previous record set by SGT Eric Smith, USAR. SSG Coggshall previously held this record, which was set several years ago at the Deep Creek Range in Montana. Along with Palma rifle, Coggshall has a lot of experience shooting smallbore as well as service rifle. His Team Coach described him as a hard-holder who can hold half the X-Ring with his iron-sighted Palma rifle.
L to R: Todd Branin, Kerry Spurgin, SSG John Coggshall
Also having a fantastic weekend was U.S. Palma Team member, Kerry Spurgin of Hillsboro, Oregon. Spurgin (above center) was an All-American Rifle Team shooter for Murray State University in Kentucky, and brother to Patricia Spurgin, 1984 Olympic air rifle Gold medalist. Spurgin started out day three of the tournament with an strong score fired in mildly foggy conditions at the 800-yard line, a 149-14X. He continued to fire very well, and ended the individual matches with the Gold Medallion and a pending Open and Civilian record score of 1097-75X. With less than perfect conditions, Spurgin managed to only drop three (3) points all weekend, breaking a National Record that had stood for 17 years.
Deep Creek Range
The Deep Creek Range in Missoula, MT is one of the nicest places to shoot in the Intermountain West region. The range is located in the mountains within a few minutes drive of Missoula, and there is camping on-site. When conditions are good at Deep Creek, records get broken. To learn more about shooting at Deep Creek, contact Jamey Williams at jameydan[at]gmail.com.
Here is an aerial view of the Deep Creek Range (Drone video by David Gosnell):
We’ve seen new shooting disciplines emerge in recent years (3-Gun, PRS, ELR to name a few) and now we’re seeing another trend — shooting matches that combine action shooting with precision Long Range competition. The latest and greatest example of that is the Nosler King of the Range event slated for late October in Oregon. 3-Gun, Long Range, and a combined match title will all be up for grabs in this two-day, combo event. Competitors can shoot either the 3-Gun or Long Range match, or shoot both, going after the title of “King of the Range”.
It is unusual for a 3-Gun action match to be combined with a long-range competition, because few venuea offer the right combination of terrain and facilities for both disciplines. Mason Payer, Nosler Marketing Manager says: “The size and varied terrain of the COSSA park facility [near Bend, OR] presents the opportunity to combine both 3-Gun and Long Range, making this a truly multi-discipline match that will be fun for and challenging for everyone.”
The Nosler King of the Range, presented by MGM Targets and COSSA, will be a combined-match format, spread over two days of competition. Day One will feature 5 or 6 stages of 3-Gun, while Day Two will be comprised of 5-6 stages of Long Range, for both Bolt Guns and Gas Guns.
Nosler King of the Range Course of Fire:
Day 1: Match consists of 5-6 stages of 3-Gun that run anywhere from 30 to 160 seconds.
Day 2: Long Range 5-Stage Match with Bolt Guns out to 1000 yards and Gas Guns out to 800 yards.
NOTE: Separate rifles can be used for the 3-Gun half and the Long Range half.
The Nosler Cup 3GN Long Range Match will be comprised of approximately 10 stages of challenging precision shooting. This will be a standard 3-Gun match running concurrent with the long range match. Ten stages with 6-8 rifle targets per stage, and 4-10 pistol targets on most stages.
The Nosler Cup 3-Gun Match, hosted by COSSA, will be a one-day competition, featuring 5-6 stages of running and gunning. Shooters will have the opportunity to shoot on Saturday OR Sunday (either day).
Photo Credits Laura Perry(top) and Kelly McMillan (bottom)
The 2017 F-Class World Championships wrapped up August 17 with the final day of Team competition. Over the past two days, 8-shooter squads competed in the major international challenge match while 4-shooter teams vied for honor in the Rutland match. Team USA F-TR stole the show with a stirring come-from-behind victory over a very strong Australia F-TR squad. Not to be denied, Aussie F-Open shooters countered America’s F-TR success with a solid win for Australia in the 8-shooter F-Open match. It was Deja Vu… this result was a replay of the 2013 Worlds, where Team USA won the F-TR Team Title, while Team Australia won F-Open.
F-TR World Champions: Team USA, Richardson Trophy — Score: 3400-264V
PERRY, LAURA, AL — 419v31
DROELLE, JOHN, MI — 418v27
BARNHART, ALAN, MI — 433v36
HOGG, TRACY, NC — 424v31
KLEMM, IAN, WI — 426v39
RODGERS, DEREK, NM — 435v39
RORER, JEFFREY, NC — 429v35
POHLABEL, DANIEL, OH — 416v26
GROSS, RAYMOND, MI
HARDIN, CARLTON, GA
PHILLIPS, PAUL, MI
LENTZ, DANIEL, WI
LITZ, BRYAN, MI
FULMER, SCOTT, NY
REEVE, KENT, NC
BOYER, DOUGLAS, MI
F-Open World Champions: Team Australia, Farquharson Trophy — Score: 3511-342V
DAVIES, ROD — 441v45
CARTER, PETER — 437v37
LARSEN, PETER — 442v38
LOBERT, MARTY — 437v43
POHL, ADAM — 440v48
BRAUND, STUART — 431v39
BUNYAN, BRETT — 440v40
NUGENT, TIM — 443v52
MCGOWAN, CRAIG
BRAUND, RICHARD
WAITES, MICHAEL
LAZARUS, STEVE
REID, JOSH
FERRARA, BEN
TILLACK, LOWELL
DOBSON, DAVID
Team USA — Three-time World Champions deliver a come-from-behind win at the 900 meter line.
Along with winning F-Open, the Aussies did well in the 8-man F-TR competition, finishing second overall with a score of 3394-237V, six points behind Team USA F-TR (3400-264V). Third in F-TR was Team South Africa, with 3376-250V.
Team Canada (3506-346V) finished second in F-Open, while Team USA (F-Open) finished third with the interesting score of 3500-350V (that’s not a misprint). We believe Calvin Waldner of Canada had the top individual F-Open score for the match — 444-51V.
The F-TR Team Battle — It Paid to Wait
The top two F-TR squads, Team USA and Team Australia, followed very different strategies. The Australians got off to a quick start, while the Americans waited… and waited … and waited. Being patient and waiting for more readable and stable wind conditions proved a winning strategy for the Yanks who overcame a 9-point deficit to finish with a six-point margin as time closed down in the firing period.
Team USA Captain Ray Gross reports: “The match came down to the last yard line. The Australians were up 11 points to start the day and the Canadians were 6 points behind. We made up 2 points at 700m and shot even with the Australians at 800m, leaving us 9 points down going into the final 900m stage.
The Aussies chose to start shooting right away in what looked liked easy conditions and we waited, hoping for better. While we waited the team stayed focused and ready. Luck was on our side, it calmed down and the shooters and coaches performed flawlessly, making up the nine points and finally pulling ahead in the last few minutes of the match.
We were the last team on the line shooting and everyone was behind us watching. After two days of very close competition, the match was not decided until our last two shooters. Our last shooter started with only 12 minutes left in the match and he finished his string of 15 shots in about five minutes. He only dropped two points giving us a six point victory.
We were so focused on delivering our best performance that we weren’t sure how the other teams had finished. After the last shot the Australian captain came over and congratulated me. They had been watching our score after they had finished and knew that we had won the match. Our gritty determination had paid off and it had been one of the most exciting matches that I’ve ever been a part of. Everyone on the team should be proud that they did not let our slim chances discourage them going into that last yard line. They stayed focused and each delivered a top performance.”
American F-Open Squads Dominate 4-Shooter Rutland Match
In the F-Open Rutland competition for 4-shooter teams, American squads dominated, taking the top 4 places. Team USA Blue (1758-177V) won the Rutland title, edging Spindle Shooters by a slim one-point margin. In third place was Team USA Red followed by the Texas State Rifle Association team.
In F-TR Rutland competition, Team “Da Bulls” secured a very convincing win. Da Bulls’ 1709-131V score was a full 14 points ahead of Team KP Ballistics. This was sort of an American victory… though Da Bulls did have one Canadian “ringer” on the squad, Stephen Ireland of Toronto. Runner-up KP Ballistics was just the opposite — KP had all Canadian members except one Yank, Wade Fillingame of New Hampshire.
Above Team Da Bulls member James Crofts waives “good-bye” from the Connaught Ranges in Ottawa, Ontario, Canada. The next F-Class World Championships will be held in South Africa in 2021. ICFRA Web Page for 2021 FCWC.
Getting started in long-range shooting? Need some pointers on gun set-up and hardware options? Bryan Litz of Applied Ballistics has created a helpful series of videos for the NSSF covering long range shooting. Bryan, a past F-TR Long-Range National Champion and Chief Ballistician for Berger Bullets, knows his stuff. His Applied Ballistics squad was the winning team at the 2016 King of 2 Miles event. Here are four (4) videos, each covering a topic of interest for long-range shooters. Running 3-4 minutes each, these videos can help you get started, and invest wisely when acquiring your next long-range rifle, scope, and accessories.
Long Range Precision — The Keys to Success
TIP for Plotting Long Range Trajectories: You want to know the true, actual ballistic coefficients of your loads. The BCs listed by manufacturers for their projectiles may be somewhat unreliable — the real BC could be higher or lower (and BC can change with velocity). That can result in problems at longer distances. Using sophisticated equipment, Applied Ballistics has measured true BCs for hundreds of projectiles. Plugging these verified numbers into your Ballistics App can improve your hit percentage at long range.
Tools of Choice — Purpose-Built Long Range Rifles
TIP for Choosing a Rifle: When you’re selecting a rifle for long range shooting, it’s important to understand your application and objectives. The applications for long-range shooting can be very refined. You have to select all the details of your application to select the correct rifle. Here are two examples — a semi-auto AR-platform rifle with scope and a bolt-action Fullbore (Palma) rifle with aperture sights. There are many other long range disciplines — F-TR for example. The F-TR rig uses a bipod and rear bag and a scope. To be competitive, a modern F-TR rig should shoot well under half-MOA.
Equipment Advice — Upgrading Your Hardware
TIP for Upgrading Your Rifle: At some point factory rifle owners will recognize weak links in the equipment chain. You can run that factory rifle for quite some time, but the barrel is eventually what’s going to hold you back. The twist-rate may not be high enough to stabilize the high-BC bullets. So the first thing you’re going to want to upgrade is the barrel. You want to get a fast twist-rate barrel with a chamber that is optimized for the bullet you’ll be shooting. A good-quality, custom barrel will be easier to clean, and it will improve the overall accuracy and precision of your shooting.
Big Boomers — Large-Caliber Rifles for Long Range
TIP for Shooting Hard-Recoiling Rifles: Bryan Litz defines “Large Caliber” as .338 caliber and bigger. These rifles can shoot heavy bullets with high BCs. However there are some trade-offs. It can be hard to maintain good fundamentals of marksmanship (trigger control, sight alignment) when you’re fighting heavy recoil and burning 100+ grains of powder. You’re dealing with the challenges that high energy brings. You want a muzzle brake with any cartridge .338 or above. Also, when considering lathe-turned solid bullets, remember that these typically have less sectional density compared to lead-cored bullets with similar profiles. This affects ballistics as well as recoil energy.
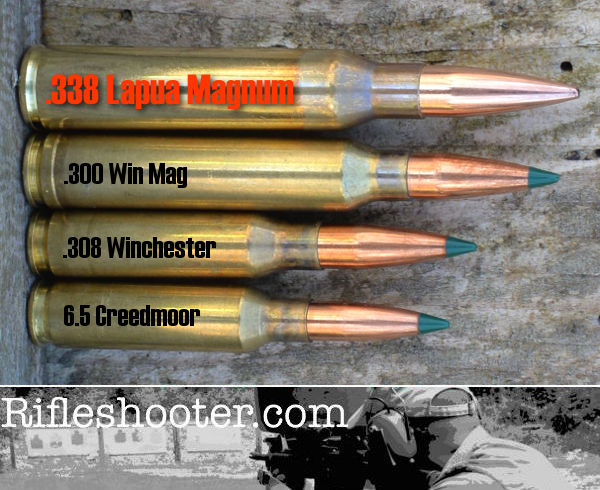
Shooters contemplating purchase of a .338 LM rifle often ask: “What length barrel should I get?” Rifleshooter.com recently performed a test that provides interesting answers…
Our friends at RifleShooter.com like to slice and dice — barrels that is. They have done barrel length cut-down tests for popular calibers like the .223 Rem, 6.5 Creedmoor, and .308 Winchester. But now they’ve tackled something way bigger — the .338 Lapua Magnum, a true “Big Boomer”. Starting with a beefy 30″-long Pac-Nor Barrel, RifleShooter.com chopped the tube down in one-inch increments all the way down to 17 inches (that’s 14 different lengths). At each new (shorter) barrel length, velocity was measured with a MagnetoSpeed chronograph using two different loads, 250gr SMKs with H4831sc and 300gr SMKs with Retumbo. Four shots were fired at each length with each load, a total of 112 rounds.
Load #1: 250gr Sierra MK, Lapua brass, CCI #250 primer, H4831SC, OAL 3.720″.
Load #2: 300gr Sierra MK, Lapua brass, Win WLRM primer, Retumbo, OAL 3.720″.
The .338 Lapua Magnum is a jumbo-sized cartridge, that’s for sure…
Donor Barrel Sacrificed for Science
Rifleshooter.com’s Editor explains: “Brandon from Precision Addiction offered to send us his .338 barrel for our .338 Lapua Mag test. I took him up on his offer and he sent me his used Pac-Nor chrome-moly barrel with about 600 rounds though it. This thing was a beast! A heavy 1.350″ shank that ran straight for 6″, until tapering to 1″ at 30″ in length.”
Results Summary
.338 Lapua Magnum with 250gr Sierra MatchKings
After shortening the barrel from 30″ to 17″, total velocity reduction for the 250-grainers was 395 FPS, an average loss of 30.4 FPS per 1″ cut. The amount of velocity loss per inch rose as the barrel got shorter, with the biggest speed reduction, a loss of 55 FPS, coming with the cut from 18″ to 17″.
Start Velocity: 2942 FPS | End Velocity: 2547 FPS | Average Loss Per Inch: 30.4 FPS
.338 Lapua Magnum with 300gr Sierra MatchKings
Shooting the 300-grainers, total velocity reduction was 341 fps, an average of 26.2 FPS loss per 1″ cut (30″ down to 17″). However, the speed actually increased with the first cut from 30 inches to 29 inches. The tester noted: “The 300 SMK load showed a slight increase from 30″ to 29″. I’ve recorded this in other tests and it seems to be more common with a heavier load. I suspect it is primarily due to the small sample sizes being used along with the relative proximity of muzzle velocities in adjacent lengths.”
Start Velocity: 2833 FPS | End Velocity: 2492 FPS | Average Loss Per Inch: 26.2 FPS*
*Velocity rose with first cut. Velocities ranged from 2,871 FPS (29″) to 2,492 FPS (17″) for a total velocity loss of 341 FPS.
RifleShooter.com crunched the velocity numbers in some interesting ways. For example they analyzed rate of velocity loss, concluding that: “after the initial rate change, the rate of the change in velocity is fairly consistent.” (View Rate of Change Graph)
How Velocity Loss Alters Long-Range Ballistics
The testers wanted to determine how the velocity reductions “affect our ability to hit targets downrange”. So, Rifleshooter.com plotted changes in elevation and wind drift at all barrel lengths. This revealed something interesting — drift increased significantly below 26″ barrel length: “Above 26″ things look pretty good, below 22″ they change quickly.”
We highly recommend you read the whole story. Rifleshooter.com put in serious time and effort, resulting in solid, thought-provoking results. The data is presented in multiple tables and graphs, revealing inch-by-inch velocities, change “deltas”, and SDs at each length.
Applied Ballistics has produced a series of YouTube videos about precision long range shooting. Featuring ace long-range shooter and professional ballistician Bryan Litz, these videos address various topics of interest to long-range marksmen. This featured video looks at Long Range mistakes — Bryan Litz reveals the most common ballistics-related shooting errors at Long Range. And then Bryan explains how to improve your shooting (and wind reading) to eliminate those common errors.
Watch Applied Ballistics Video about Common Mistakes in Long Range Shooting:
Bryan Litz of Applied Ballistics often hears the question: “What are the main reasons people miss their target at long range?” To answer that question, in this video, Bryan explains the most important variables in Long Range shooting. Bryan says: “Probably the number one thing is range — you have to have a [precise] range to your target because your bullet is dropping, and to hit the target you need to correct for bullet drop.” Distance may be indicated on the target bay (or berm), but for open ranges you should ascertain distance-to-target with a quality laser rangefinder. Even when the distance to target is shown with a sign or marker, you may want to confirm the distance with your rangefinder. (You may be surprised — we’ve seen marked target distances at commercial ranges off by 25+ yards!) Bryan says: “Get a good laser range to the target and you’ll be within a couple yards”.
After distance to target, the most important variable is the wind. This is the most challenging factor because the wind is constantly changing. Bryan explains: “After 300 or 400 yards, the wind [will] move your shots off the target if you don’t correct for it. The best way to account for the wind is to measure it at your location with a Kestrel. The Kestrel can give you the speed and direction of the wind at your location, which can baseline your wind call for your long-range shot.” Bryan acknowledges that there will still be variables: “The wind isn’t always blowing the same downrange as at your location… and the wind is always changing”. Bryan notes that you need to account for variances in wind between the time you gauge the wind angle and velocity and the time you actually you take your shot.
There was an excellent article about Mirage created for the South Texas Marksmanship Training Center (STMTC) website a while back. This article explains what causes mirage and how mirage can move the perceived aiming point on your target. Most importantly, the article explains, in considerable detail, how you can “read” mirage to discern wind speeds and wind directions.
Mirage Is Your Friend
While hot days with lots of mirage can be frustrating, mirage can reveal how the wind is flowing (and changing). If you learn how to recognize and read mirage patterns, you can use that information to shoot higher scores. That’s why many leading long-range shooters tell us: “Mirage is your friend.” As the STMTC article explains: “A mirage condition is not a handicap, since it offers a very accurate method of perceiving small wind changes[.]”
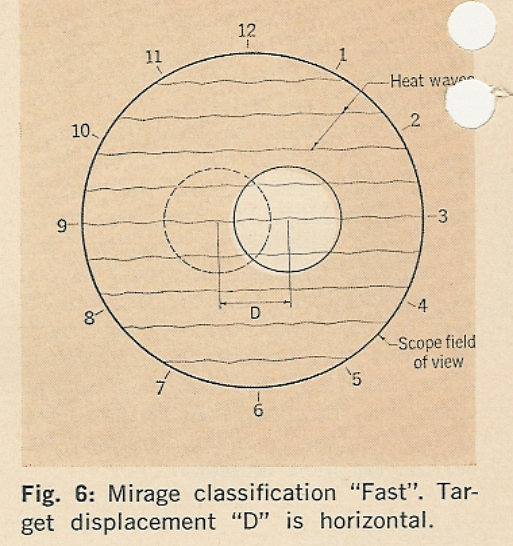
Mirage Illustrated with Diagrams
With simple but effective graphic illustrations, this is one of the best explanations of mirage (and mirage reading) we have found on the internet. This is a “must-read” for any serious competitive shooter. Here is a brief sample from the article, along with an illustration. NOTE: the full article is six times longer and has 8 diagrams.
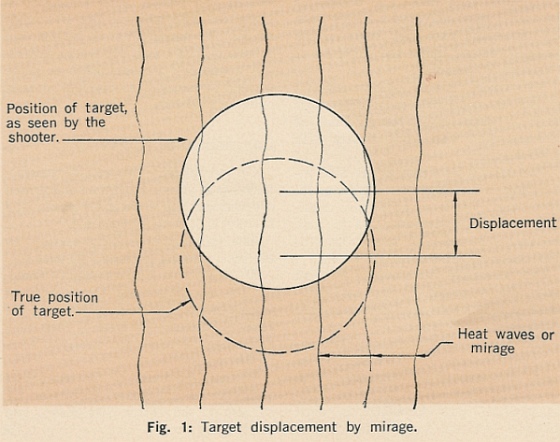
The term “mirage” as used by the shooter does not refer to a true mirage, but to heat waves and the refraction of light as it is bent passing through air layers of different density. Light which passes obliquely from one wind medium to another it undergoes an abrupt change in direction, whenever its velocity in the second medium is different from the velocity in the first wind medium; the shooter will see a “mirage”.
The density of air, and therefore its refraction, varies with its temperature. A condition of cool air overlaying warm air next to the ground is the cause of heat waves or “mirage”. The warm air, having a lower index of refraction, is mixed with the cooler air above by convection, irregularly bending the light transmitting the target image to the shooter’s eye. Figure 1 shows (greatly exaggerated) the vertical displacement of the target image by heat waves.
Heat waves are easily seen with the unaided eye on a hot, bright day and can be seen with spotting scope on all but the coldest days. To observe heat waves, the scope should be focused on a point about midway to the target. This will cause the target to appear slightly out of focus, but since the high power rifle shooter generally does not try to spot bullet holes, the lack in target clarity is more than compensated by clarity of the heat waves.
Story tip from Boyd Allen. We welcome reader submissions.
Applied Ballistics has created a series of YouTube videos about precision long range shooting. Featuring ace long-range shooter and professional ballistician Bryan Litz, these videos will address various topics of interest to long-range marksmen. In this video, the first in the series, Bryan Litz answers the question, “Just What Is Long Range Shooting?” Bryan discusses how we define “long range” and the key factors shooters need to consider.
Applied Ballistics Video — What Is Long Range Shooting?
Bryan states: “I don’t think there is a clear definition of where Long Range starts.” But he offers this practical guideline: “The way I think of it, any time you’re making major adjustments to your zero in order to hit a target, due to gravity drop and wind deflection, THEN you’re getting into ‘Long Range’. For example, if you are zeroed at 100 yards and need to shoot to 600 yards, you have many feet of elevation [drop] to account for, and to me, that’s where it becomes Long Range.”
Extended Long Range and the Transonic Zone
Bryan adds a second concept, namely “Extended Long Range”. Litz says that: “Extended Long Range starts whenever the bullet slows to its transonic range. As the bullet slows down to approach Mach 1, it starts to encounter transonic effects, which are more complex and difficult to account for, compared to the supersonic range where the bullet is relatively well-behaved.” Bryan notes that bullets start to encounter transonic effects at about 1340 fps, quite a bit faster than the speed of sound, which is about 1116 fps at sea level in normal conditions (59° F).
Get ready for a revolution in the F-Open, ELR, and Long-Range Benchrest games. Sierra just introduced a new 7mm bullet with a stunning 0.780 G1 BC. This new 197-grain HPBT MatchKing is one of the highest-BC, jacketed .284-caliber projectiles ever offered to the public. By comparison, Sierra’s own advanced 183-grain 7mm Matchking has a .707 G1 BC. That means the new 197-grainer has a 10% higher BC than the already slippery 183-grainer. That’s an impressive achievement by Sierra.
We expect top F-Open and long-range shooters will be trying the new 197-grainer as soon as they can get their hands on this new projectile. They may need new barrels however, as Sierra states: “This bullet requires a barrel twist rate of 1:7.5″ or faster”. Sierra expects to start shipping these slippery 7mm 197s very soon. You can order directly from Sierra’s website, stock code #1997, $54.20 for 100 bullets.
Factory Uniformed Bullet Tips
Sierra has officially announced that the 197gr SMK will come “pointed” from the factory. These impressive new 197s will have a “final meplat reducing operation” (pointing). This creates a higher BC (for less drag) and also makes the BC more uniform (reducing vertical spread at long range). Our tests of other factory-pointed Sierra MKs have demonstrated that Sierra does a very good job with this pointing operation. The “pointed” MatchKings we’ve shot recently had very nice tips, and did hold extremely “tight waterline” at 1000 yards, indicating that the pointing process does seem to enhance BC uniformity. Morever, radar-derived “real-world” BCs have been impressively uniform with the latest generation of pointed Sierra MKs (such as the new 110gr 6mm MatchKing).
Here is the statement from Sierra about the new bullets:
Shooters around the world will appreciate the accuracy and extreme long range performance of our new 7mm 197 grain HPBT (#1997). A sleek 27-caliber elongated ogive and a final meplat reducing operation (pointing) provide an increased ballistic coefficient for optimal wind resistance and velocity retention. To ensure precise bullet to bore alignment, a unique bearing surface to ogive junction uses the same 1.5 degree angle commonly found in many match rifle chamber throats.
While they are recognized around the world for record-setting accuracy, MatchKing® and Tipped MatchKing® bullets are not recommended for most hunting applications. Although MatchKing® and Tipped MatchKing® bullets are commonly used for varmint hunting, their design will not provide the same reliable explosive expansion at equivalent velocities in varmints compared to their lightly jacketed Hornet, Blitz BlitzKing, or Varminter counterparts.
New product tip from EdLongrange. We welcome reader submissions.