NRA publication Shooting Sports USA (SSUSA) has thousands of articles online, all free for the reading. Many of these stories have been written by top competitors, including National and Olympic Champions. You will find SSUSA articles spotlighted every week on the NRA Competitive Shooting Facebook page. We recommend you bookmark that page as a valuable resource. Here are four notable SSUSA articles that have been featured on Facebook this month. Go to SSUSA.org to see even more current articles, with new content every day.
Here is an insightful, fairly lengthy 1850-word article about the phenomenon we call mirage. The article explains how and why mirage appears, how it can best be monitored, and how mirage can indicate both wind velocity and direction. Top competitors follow the adage “Mirage is your friend”, because mirage can often be the most important indicator of wind variables — sometimes even more important than wind flags. “The mirage is more sensitive than the flags since it has less inertia and momentum”, wrote Desmond T. Burke, in his book, Canadian Bisley Shooting, an Art and a Science.
Well worth reading, this SSUSA article talks about the properties of mirage. Here is a sample:
“Mirage — can make all the difference between a shot landing squarely in the X-ring or being victimized by an undetected downrange breeze. The true power of mirage is found in its ability to betray the subtlest of breezes downrange. Its fluid movement… can not only provide wind direction, but speed as well.
Typically, the ability to detect mirage is maximized on warm, sunny and sultry days. Expect mirage to be most pronounced in mid-morning or early afternoon, although it ignores these rules with regularity[.]
Mirage is extremely powerful at identifying winds of less than 12 mph, particularly those gentle breezes subtle enough to not even bother moving the flags.
When there is no wind, or a gentle head or tail wind, mirage will appear to be ‘bubbling’ directly up from the ground. Many call this ‘boiling’, and it is probably the easiest of all to detect.
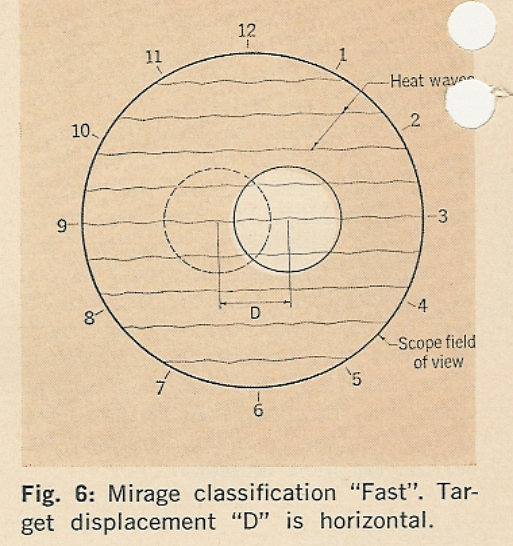
As a general rule of thumb, when wind speed increases, overall height of the waves produced by the mirage is reduced. Large peaks and valleys in the waves mean that particular mirage is being driven by a very slight breeze. Conversely, crest size is reduced with wind speed, making it harder and harder to detect, until the mirage disappears entirely at somewhere around 12 miles per hour. In other words, the taller mirage’s waves appear, the slower the breeze.”
Authored by the late Glen Zediker, this article covers barrel break-in procedures. It is particularly useful for dealing with factory barrels. We CAUTION readers — with outstanding, hand-lapped custom barrels from top barrel-makers, you may want to do very little break-in — clean sparingly and keep barrel heat low. Do NOT use abrasives aggressively. On our Krieger and Brux barrels, we simply wet-patched every 2-3 rounds for 20 rounds and the barrels shot superbly from the start with minimal fouling. But for factory barrels, a moderate break-in process may prove beneficial.
Zediker explains: “Lesser, lower-cost barrels are going to have more pronounced … imperfections within the bore[.] These imperfections are largely tool marks resulting from the drilling and rifling processes. And if it’s a semi-automatic, like an AR-15, there might be a burr where the gas port was drilled. The goal of break-in is to knock down these imperfections, thereby smoothing the interior surface.”
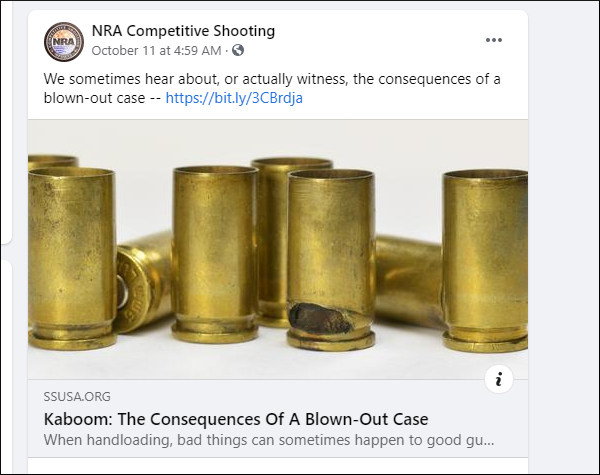
As one who has experienced a cartridge case-head blow-out with a 9mm pistol, this Editor is very conscious of the risks involved and the damage a blow-out can do to the pistol, to the magazine, and (worst of all) to the shooter. Even with new brass, the possibility of a case failure is always present. And even if the case remains intact, we’ve seen primer failures that create a dangerous jet back towards the pistol shooter. That’s why shooters should always employ protective eyewear whenever they shoot.
We love our wheelguns, but there’s no doubt that forcing cone damage can occur, particularly with hot loads and if your cylinder-to-barrel gap is excessive. This article explains how to inspect your revolvers, and how to mitigate the likelihood of forcing cone damage. The article also explains how to clean your revolvers properly. This is very important to avoid build-up of lead and powder residues.
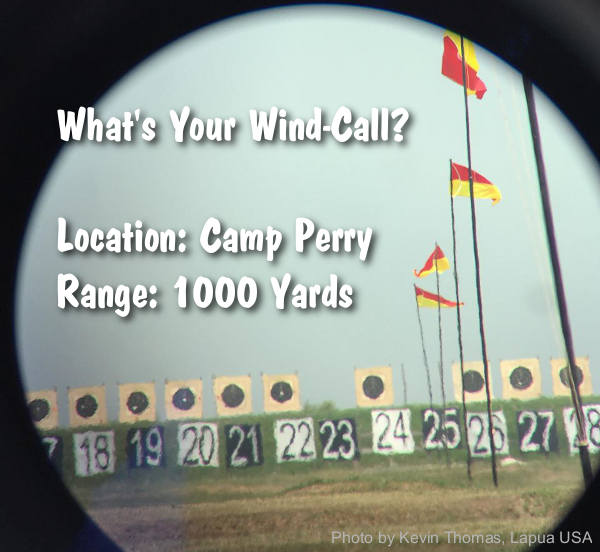
“The pessimist complains about the wind; the optimist expects it to change; the realist adjusts the sails.” — William Arthur Ward
Readers often ask us: “Is there a decent, easy-to-comprehend book that can help my wind-reading?” Many of our Forum members have recommended The Wind Book for Rifle Shooters by Linda Miller and Keith Cunningham.
New Edition Released in May 2020
A NEW hardback edition of The Wind Book for Rifle Shooters was released a year ago in May 2020. This 144-page book, first published in 2007, is a great resource. But you don’t have to take our word for it. If you click this link, you can read book excerpts and decide for yourself. When the Amazon page opens, click the book cover photo (labeled “Look Inside”) and another screen will appear. This lets you preview chapters from the first edition, and view some illustrations. Along with the new hardback edition ($19.48), Amazon offers a Kindle (eBook) edition for $14.99.
Other books cover wind reading in a broader discussion of ballistics or long-range shooting, such as Applied Ballistics for Long-Range Shooting by Bryan Litz. But the Miller & Cunningham book is ALL about wind reading from cover to cover, and that is its strength. The book focuses on real world skills that can help you accurately gauge wind angle, wind velocity, and wind cycles.
All other factors being equal, it is your ability to read the wind that will make the most difference in your shooting accuracy. The better you understand the behavior of the wind, the better you will understand the behavior of your bullet. — The Wind Book for Rifle Shooters
The Wind Book for Rifle Shooters covers techniques and tactics used by expert wind-readers. There are numerous charts and illustrations. The authors show you how to put together a simple wind-reading “toolbox” for calculating wind speed, direction, deflection and drift. Then they explain how to use these tools to read flags and mirage, record and interpret your observations, and time your shots to compensate for wind.
I believe this is a must-have book if you are a long-range sport shooter. I compete in F-Class Open and when I first purchased this book and read it from cover to cover, it helped me understand wind reading and making accurate scope corrections. Buy this book, read it, put into practice what it tells you, you will not be disappointed. — P. Janzso
If you have one book for wind reading, this should be it. Whether you’re a novice or experienced wind shooter this book has something for you. It covers how to get wind speed and direction from flags, mirage, and natural phenomenon. In my opinion this is the best book for learning to read wind speed and direction. — Muddler
Note: This article was written by Glen Zediker. Sadly, Glen passed away in October of 2020. However, you can still order his books from Midsouth and read his articles in the Midsouth Blog.
Most good shooters use mirage as their leading indicator to spot changes in the wind. With well-designed stand, the scope can be set it up where you can see the wind with the left eye and see the sight with the right without anything more than a visual focus shift. That gets the shooter back on the trigger with the least chance of missing another change. In the photo below e you can see 11-time National High Power Champion David Tubb using a spotting scope set up for his left eye.
David Tubb sets up his spotting scope so he can easily see through it with his LEFT eye, without shifting his head and body position.
There are multiple resources that give clues or evidence of wind direction and strength: wind flags, observation of grass and trees, and mirage.
Almost always I use mirage as my leading indicator. Mirage (heat waves) is always present but you’ll need a scope to read it. For 600 yards I focus my scope about halfway to the target. Mirage flows just like water and the currents can be read with respect to wind speed as well, but it’s not clearly accurate beyond maybe a 15 mph speed. The thing is that mirage shows changes, increases or decreases, and also direction shifts, really well.
A couple more things about mirage flow: when mirage “boils,” that is appears to rise straight up, either there’s no wind or the scope is dead in-line with wind direction. And that’s a quick and accurate means to determine wind direction, by the way, move the scope until you see the boil and note the scope body angle. Here’s another tip — the boil can predict when a “fishtail” wind is about to change, a boil precedes a shift.
You don’t need to spend big bucks for an effective spotting scope to view mirage. You can get the Vortex 20-60x60mm Diamondback angled spotting scope for just $399.99 from Midsouth. That’s complete with 20-60X zoom eyepiece. Though inexpensive, the Vortex Diamondback is popular with many competitive shooters and hunters. No, it doesn’t offer the sharpness of an 80mm Kowa Prominar or Swarovski spotting scope, but you’ll pay $2400+ just for the body of those high-end optics.
Choice of EyePiece — Wide-Angle LERs Work Well
I use a long-eye-relief 20X to 25X wide-angle eyepiece. That setup shows the flow best. And pay attention to where the wind is coming from! See what’s headed your way, because what’s passed no longer matters. That’s true for any indicator. Right to left wind? Read off the right side of the range.
Once I get on target then all I am doing is watching for changes. It’s really uncommon to make a big adjustment between shots. The fewer condition changes you are enduring, the easier it is to keep everything on center. That’s why I shoot fast, and why I start at the low point in a wind cycle.
Making Corrections with Limited Sighters
Here’s a Tip for NRA High Power matches where only two sighters are allowed: “Make a full correction off the first sighting shot location! Even if there are minor changes afoot, that’s how to know how well you assessed condition influence pre-shot. Don’t second-guess. After the second sighter you should be on target and then simply watching for changes. Pay attention, correlate visible cues to the results of prior shots, and if in doubt, click into the wind.”
Information in this article was adapted from material in several books published by Glen Zediker and Zediker Publishing. Glen, who passed away in 2020, was an NRA High Master who earned that classification in NRA High Power Rifle using an AR15 Service Rifle. For more information and articles visitZedikerPublishing.com.
Emil Praslick III is widely recognized as one of the greatest wind wizards on the planet — a master at identifying wind value and direction, and predicting wind cycles. As coach of the USAMU and top civilian teams, Emil has helped win many high-level championships. In the three videos we feature today, Emil, who works with Capstone Precision Group (Berger, Lapua, SK, Vihtavuori) and Team Applied Ballistics, explains how to determine wind direction and velocity using a variety of indicators. Praslick, now retired from the U.S. Army, was an 18-time National and 2-time World Champion coach with the USAMU.
Video ONE: Wind Theory Basics — Understanding “Wind Values”
In this video from UltimateReloader.com, Emil explains the basics of modern wind theory. To properly understand the effect of the wind you need to know both the velocity of the wind and its angle. The combination of those variables translates to the wind value. Emil also explains that the wind value may not be constant — it can cycle both in speed and velocity. Emil also explains some of the environmental conditions such as mirage that can reveal wind conditions.
Video TWO: Determining the Direction of the Wind
Key Point in Video — Find the Boil
Emil explains how to determine wind direction using optic. The method is to use spotting scope, riflescope, or binoculars to look for the “Boil” — the condition in mirage when the light waves rising straight up. The wind will generate that straight-up, vertical boil in your optics when it is blowing directly at you, or directly from your rear. To identify this, traverse your scope or optics until you see the boil running straight up. When you see that vertical boil, the direction your optic is pointing is aligned with the wind flow (either blowing towards you or from directly behind you).
Video THREE: The No Wind Zero Setting
In this second video, Emil defines the “No-Wind Zero”, and explains why competitive shooters must understand the no-wind zero and have their sights or optics set for a no-wind zero starting point before heading to a match. In order to hit your target, after determining wind speed and direction, says Emil, “you have to have your scope setting dialed to ‘no wind zero’ first.”
Coach of Champions — Emil Praslick III
SFC Emil Praslick III, (U.S. Army, retired) works with Berger Bullets and Applied Ballistics. Emil served as the Head Coach of the U.S. National Long Range Rifle Team and Head Coach of the USAMU for several years. Teams coached by Emil have won 33 Inter-Service Rifle Championships. On top of that, teams he coached set 18 National records and 2 World Records. Overall, in the role of coach, Praslick can be credited with the most team wins of any coach in U.S. Military history.
Nikon offers eyepieces with reticles for its flagship Monarch Fieldscopes. Eyepiece reticles help spotters call shot corrections with precise click values (MOA or Mils).
Using a spotting scope seems simple. Just point it at the target and focus, right? Well, actually, it’s not that simple. Sometimes you want to watch mirage or trace, and that involves different focus and viewing priorities. Along with resolving bullet holes (or seeing other features on the target itself), you can use your spotting scope to monitor mirage. When watching mirage, you actually want to focus the spotting scope not on the target, but, typically, about two-thirds of the distance downrange. When spotting for another shooter, you can also use the spotting scope to watch the bullet trace, i.e. the vapor trail of the bullet. This will help you determine where the bullet is actually landing, even if it does not impact on the target backer.
In this video, SFC L.D. Lewis explains how to use a spotting scope to monitor mirage, and to watch trace. SFC Lewis is a former Army Marksmanship Unit member, U.S. Army Sniper School instructor, and current U.S. Army Reserve Service Rifle Shooting Team member. In discussing how precision shooters can employ spotting scopes, Lewis compares the use of a spotting scope for competition shooters vs. military snipers. NOTE: You may wish to turn up the audio volume, during the actual interview segment of this video.
In the digital archives of Shooting Sports USA, we’ve found some great features that deserve a second look. A few years back, Shooting Sports USA published Sights, Wind and Mirage, an outstanding article that explains how to judge wind speed/direction and adjust your sights accordingly. Authored by highly respected shooter Ernest (Ernie) Vande Zande, this article is a definite “must-read” for all competitive rifle shooters — even those who shoot with a scope rather than irons. Vande Zande’s discussion of mirage alone makes the article well worth reading. Highly recommended.
Invaluable Insights from a World-Class Shooter
The article covers a wide variety of topics including Wind Reading, Mirage, Effects of Sight Canting, Quadrant Shooting, and Sight Adjustment Sequencing. Vande Zande offers many jewels of insight from his decades of experience shooting and coaching in top level tournaments. U.S. Shooting Team Leader at the 1996 Olympics, Vande Zande has set more than 200 records in National and International competition. He was the Smallbore Rifle Prone Champion at Camp Perry in 1980. An International Distinguished shooter, Ernie has been on nine Dewar teams and he was a member of the USAR Shooting Team from 1982. No matter what your discipline, if you are a competitive rifle shooter, you should CLICK HERE to read Sights, Wind, and Mirage.
by Glen Zediker
Most good shooters use mirage as their leading indicator to spot changes in the wind. With well-designed stand, the scope can be set it up where you can see the wind with the left eye and see the sight with the right without anything more than a visual focus shift. That gets the shooter back on the trigger with the least chance of missing another change. In the photo below e you can see 11-time National High Power Champion David Tubb using a spotting scope set up for his left eye.
David Tubb sets up his spotting scope so he can easily see through it with his LEFT eye, without shifting his head and body position.
There are resources that give clues or evidence of wind direction and strength: wind flags, observation of grass and trees, and mirage.
Almost always I use mirage as my leading indicator. Mirage (heat waves) is always present but you’ll need a scope to read it. For 600 yards I focus my scope about halfway to the target. Mirage flows just like water and the currents can be read with respect to wind speed as well, but it’s not clearly accurate beyond maybe a 15 mph speed. The thing is that mirage shows changes, increases or decreases, and also direction shifts, really well.
A couple more things about mirage flow: when mirage “boils,” that is appears to rise straight up, either there’s no wind or the scope is dead in-line with wind direction. And that’s a quick and accurate means to determine wind direction, by the way, move the scope until you see the boil and note the scope body angle. Here’s another tip — the boil can predict when a “fishtail” wind is about to change, a boil precedes a shift.
You don’t need to spend big bucks for an effective spotting scope to view mirage. You can get the Vortex 20-60x60mm Diamondback angled spotting scope for just $399.99 from Midsouth. That’s complete with 20-60X zoom eyepiece. Though inexpensive, the Vortex Diamondback is popular with many competitive shooters and hunters. No, it doesn’t offer the sharpness of an 80mm Kowa Prominar or Swarovski spotting scope, but you’ll pay $2400+ just for the body of those high-end optics.
Choice of EyePiece — Wide-Angle LERs Work Well
I use a long-eye-relief 20X to 25X wide-angle eyepiece. That setup shows the flow best. And pay attention to where the wind is coming from! See what’s headed your way, because what’s passed no longer matters. That’s true for any indicator. Right to left wind? Read off the right side of the range.
Once I get on target then all I am doing is watching for changes. It’s really uncommon to make a big adjustment between shots. The fewer condition changes you are enduring, the easier it is to keep everything on center. That’s why I shoot fast, and why I start at the low point in a wind cycle.
Making Corrections with Limited Sighters
Here’s a Tip for NRA High Power matches where only two sighters are allowed: “Make a full correction off the first sighting shot location! Even if there are minor changes afoot, that’s how to know how well you assessed condition influence pre-shot. Don’t second-guess. After the second sighter you should be on target and then simply watching for changes. Pay attention, correlate visible cues to the results of prior shots, and if in doubt, click into the wind.”
Information in this article was adapted from material in several books published by Glen Zediker and Zediker Publishing. Glen is an NRA High Master who earned that classification in NRA High Power Rifle using an AR15 Service Rifle. For more information and articles visitZedikerPublishing.com.
This was one of our 25 Most Popular Articles in 2017. We’re repeating it for those of you who may have missed it the first time around. Diagrams from STMTC.org.
There was an excellent article about Mirage created for the South Texas Marksmanship Training Center (STMTC) website a few seasons back. That article explains what causes mirage and how mirage can move the perceived aiming point on your target. Most importantly, the article explains, in considerable detail, how you can “read” mirage to discern wind speeds and wind directions.
Mirage Is Your Friend
While hot days with lots of mirage can be frustrating, mirage can reveal how the wind is flowing (and changing). If you learn how to recognize and read mirage patterns, you can use that information to shoot higher scores. That’s why many leading long-range shooters tell us: “Mirage is your friend.” As the STMTC article explains: “A mirage condition is not a handicap, since it offers a very accurate method of perceiving small wind changes[.]”
Mirage Illustrated with Diagrams
With simple but effective graphic illustrations, this is one of the best explanations of mirage (and mirage reading) we have found on the internet. This is a “must-read” for any serious competitive shooter. Here is a brief sample from the article, along with an illustration. NOTE: the full article is six times longer and has 8 diagrams.
The term “mirage” as used by the shooter does not refer to a true mirage, but to heat waves and the refraction of light as it is bent passing through air layers of different density. Light which passes obliquely from one wind medium to another it undergoes an abrupt change in direction, whenever its velocity in the second medium is different from the velocity in the first wind medium; the shooter will see a “mirage”.
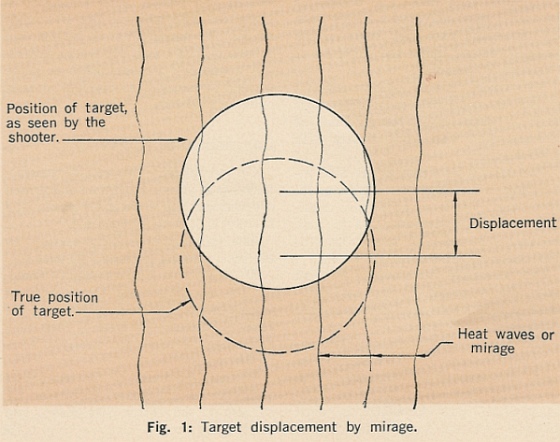
The density of air, and therefore its refraction, varies with its temperature. A condition of cool air overlaying warm air next to the ground is the cause of heat waves or “mirage”. The warm air, having a lower index of refraction, is mixed with the cooler air above by convection, irregularly bending the light transmitting the target image to the shooter’s eye. Figure 1 shows (greatly exaggerated) the vertical displacement of the target image by heat waves.
Heat waves are easily seen with the unaided eye on a hot, bright day and can be seen with spotting scope on all but the coldest days. To observe heat waves, the scope should be focused on a point about midway to the target. This will cause the target to appear slightly out of focus, but since the high power rifle shooter generally does not try to spot bullet holes, the lack in target clarity is more than compensated by clarity of the heat waves.
Story tip from Boyd Allen. We welcome reader submissions.
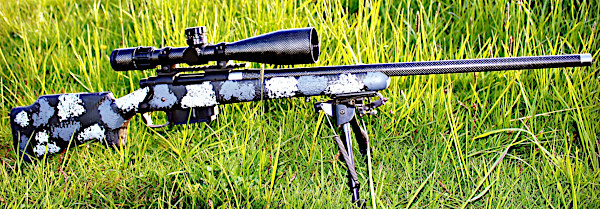
Are you looking to shave POUNDS from your hunting rig or varmint rifle? There is a new option for folks looking for a weight-saving, carbon fiber-wrapped barrel. You’ve probably heard about Proof Research. That’s a good company that crafts good products. But now Proof Research has some competition — Helix 6 Precision in Washington State.
Helix 6 Precision crafts button-rifled, carbon-wrapped barrels in both conventional and “pre-fit” configurations. Pre-fits are offered for Savage rifles as well as the Ruger Precision Rifle (RPR) series. These pre-fit barrels are not cheap. A 6.5 Creedmoor RPR pre-fit costs $995.00, while the Savage pre-fits are also just under a grand. The conventional barrel blanks cost $895.00 in .224, .243, .264, .284, and .308 calibers. The larger .338 caliber barrels run $945.00.
While Helix 6 barrels do offer significant weight savings, the founders of Helix 6 say low mass wasn’t the number one design goal: “Accuracy was paramount and weight reduction was secondary. We’ve taken the industry’s most advanced carbon fiber engineering and pushed the technology further with our proprietary … carbon fiber process.”
The founders of Helix 6 Precision say they build some of the best carbon/steel hybrid barrels on the market: “Our unique carbon fiber-layup design dampens barrel harmonics for better accuracy. Each barrel is cut from a 416R stainless steel core, and carbon fiber-wrapped using the Helix 6 Precision’s advanced process. This creates match-grade accuracy barrels with high heat dispersion that are 30% lighter than a steel barrel of the same contour. The bores are … hand-lapped for precision accuracy.” Helix 6 claims its barrels are “lighter, stronger, and faster cooling than anything else available on the market.”
Myth vs. Reality — What Carbon Can and Cannot Do
Carbon fiber is formed using thin strands of carbon bonded together with a plastic polymer resin. The resulting material is very strong and light weight. There’s a reason Formula 1 cars are crafted with carbon-fiber composites. But is a carbon-wrapped barrel the right option for you? Here are some factors to consider:
Weight Savings — There’s no doubt that a carbon-wrapped barrel will weigh less than an unfluted stainless steel barrel with identical length and contour (outside diameters). Helix 6 claims a 30% weight reduction compared to a conventional stainless steel barrel. That’s significant.
Accuracy — Carbon-wrapped barrels are NOT commonly being used for F-Class or Benchrest competition. However, Proof Research carbon-wrapped barrels have performed well in PRS competitions in the hands of top shooters. So, we can conclude that carbon accuracy is good enough for the PRS/NRL tactical game, at least at the local club level.
Heat Dispersion — Carbon-wrapped barrel-makers claim their hybrid design disperses heat better than an all-steel barrel. Some independent testers disagree, saying: “hold on now — the carbon actually acts as an insulator, so more heat is retained in the barrel”. The jury is still out. One thing that is true is that the carbon barrels seem to generate less mirage from barrel heat. Ask yourself, “if less heat is coming OFF the barrel, where is that heat retained?” But the reduced mirage could be a function of the black woven surface which may release heat differently than polished steel.
Standard, Pre-Fit, and Custom Barrel Options
Helix 6 Precision barrels are available as pre-fit barrels for both Savage and the Ruger Precision Rifle in many popular long-range cartridges. Barrel blanks are sold in five calibers from .224 to .338. Helix 6 can also thread and chamber a barrel for any precision rifle. Helix 6 Precision also builds one-off barrels to fit individual needs.
Savage Arms has completed a major overhaul of the Savage website. Now the SavageArms.com site is more mobile-friendly and easier to navigate. Savage has expanded information on its rifle products, and also updated the Expert Advice area. This section of the website offers informative technical articles/videos, as well as numerous helpful tips for hunters.
You’ll find 30 informative topics in the Expert Advice section of the updated Savage Arms website. Below are FIVE of our favorites. Click each item to view the full text and linked VIDEOS. Even if you don’t own a Savage, these features are useful. And all new shooters should definitely check out the Advanced Optics selection. This features a good video covering mirage and light refraction.
1. Advanced Optics — Stan Pate
Light refraction can wreak havoc on your ability to connect with a target at extreme long range. Stan Pate offers some good advice concerning mirage and refraction.


 Making Corrections with Limited Sighters


 Using a spotting scope seems simple. Just point it at the target and focus, right? Well, actually, it’s not that simple. Sometimes you want to watch mirage or trace, and that involves different focus and viewing priorities. Along with resolving bullet holes (or seeing other features on the target itself), you can use your spotting scope to monitor mirage. When watching mirage, you actually want to focus the spotting scope not on the target, but, typically, about two-thirds of the distance downrange. When spotting for another shooter, you can also use the spotting scope to watch the bullet trace, i.e. the vapor trail of the bullet. This will help you determine where the bullet is actually landing, even if it does not impact on the target backer.
 In the digital archives of Shooting Sports USA, we’ve found some great features that deserve a second look. A few years back,