There are many products used successfully for case lubrication for case sizing. And for neck-turning a variety of lubricants are favored. The video above explains the basics of case lubrication with die wax, and spray lubricants. Below we mention three products that have proven very effective. For cases that have a close fit to your chamber via custom FL dies, Ballistol works well and is easy to apply and remove. For neck-turning, some of our Forum members have had great success with some automotive lubricants.
Three Good Lubricants You May Not Have Tried Before If you’re using a body die or a full-length sizing die, try using Ballistol (in the aerosol can) as a lube. It works GREAT without the tacky or gooey residue left by most case lubes. It will also clean off carbon residues on the neck as you lube the case. Just spray a little on a cotton patch (or your fingertips) and wipe each case before you run it up into the die. If you are using a steel neck bushing, be sure to wipe the neck as well. You can usually do a half-dozen BR-sized cases before you need to re-apply Ballistol on the patch. Ballistol is non-toxic, bio-degradeable, and will not harm your skin. It is very slippery, but can easily be removed with a rag or paper towel. Try it–you may retire your One-Shot. Ballistol can also be used to protect wood stocks.
Note, for heavy case-forming or necking up case necks, we still recommend a thicker lubricant, such as Imperial Die Wax. But for normal case sizing, after your neck has been expanded, Ballistol will do the job, and you won’t need to tumble the brass afterwards. All you need is a very thin layer of Ballistol, and this easily wipes off with a paper towel.
For Neck-Turning, Try STP Blend or Assembly Lube
For lubing the neck-turning tool mandrel while turning case necks, many folks use a blend of STP® Oil Treatment and Mobil 1 lube. Chuckw2 reports: “Try STP and Mobile 1 Synthetic oil in a 50/50 mixture. Very slick, you will need to tumble your cases after turning.” STP is a very thick lubricant, that flows and clings almost like honey. Jason reports the STP blend comes off easily in an ultra-sound bath, using a bit of detergent. At many retailers, STP is also available in a convenient 7-ounce tube, so you don’t have to buy a large bottle.
Another even cheaper option is assembly lubricant. For turning his case necks, RStreich uses assembly lube from an auto parts store. He notes: “The brand I have is reddish in color and kind of sticky like honey. It’s far better than the Imperial die wax I was using before.” There are a variety of types, both with and without moly additive, and you can select the viscosity you prefer if you sample a few brands. Be sure to clean out any lube residue from the inside of your necks when you have completed your neck-turning.
When neck-turning cases, it’s a good idea to extend the cut slightly below the neck-shoulder junction. This helps keep neck tension more uniform after repeated firings, by preventing a build-up of brass where the neck meets the shoulder. One of our Forum members, Craig from Ireland, a self-declared “neck-turning novice”, was having some problems turning brass for his 20 Tactical cases. He was correctly attempting to continue the cut slightly past the neck-shoulder junction, but he was concerned that brass was being removed too far down the shoulder.
Craig writes: “Everywhere I have read about neck turning, [it says] you need to cut slightly into the neck/shoulder junction to stop doughnutting. I completely understand this but I cant seem to get my neck-turning tool set-up to just touch the neck/shoulder junction. It either just doesn’t touch [the shoulder] or cuts nearly the whole shoulder and that just looks very messy. No matter how I adjust the mandrel to set how far down the neck it cuts, it either doesn’t touch it or it cuts far too much. I think it may relate to the bevel on the cutter in my neck-turning tool…”
Looking at Craig’s pictures, we’d agree that he didn’t need to cut so far down into the shoulder. There is a simple solution for this situation. Craig is using a neck-turning tool with a rather shallow cutter bevel angle. This 20-degree angle is set up as “universal geometry” that will work with any shoulder angle. Unfortunately, as you work the cutter down the neck, a shallow angled-cutter tip such as this will remove brass fairly far down. You only want to extend the cut about 1/32 of an inch past the neck-shoulder junction. This is enough to eliminate brass build-up at the base of the neck that can cause doughnuts to form.
The answer here is simply to use a cutter tip with a wider angle — 30 to 40 degrees. The cutter for the K&M neck-turning tool (above) has a shorter bevel that better matches a 30° shoulder. There is also a 40° tip available. PMA Tool and 21st Century Shooting also offer carbide cutters with a variety of bevel angles to exactly match your case shoulder angle*. WalkerTexasRanger reports: “I went to a 40-degree cutter head just to address this same issue, and I have been much happier with the results. The 40-degree heads are available from Sinclair Int’l for $15 or so.” Forum Member CBonner concurs: “I had the same problem with my 7WSM… The 40-degree cutter was the answer.” Below is Sinclair’s 40° Cutter for its NT-series neck-turning tools. Item NT3140, this 40° Cutter sells for $14.99. For the same price, Sinclair also sells the conventional 30° Cutter, item NT3100.
Al Nyhus has another clever solution: “The best way I’ve found to get around this problem is to get an extra shell holder and face it off .020-.025 and then run the cases into the sizing die. This will push the shoulder back .020-.025. Then you neck turn down to the ‘new’ neck/shoulder junction and simply stop there. Fireforming the cases by seating the bullets hard into the lands will blow the shoulder forward and the extra neck length you turned by having the shoulder set back will now be blended perfectly into the shoulder. The results are a case that perfectly fits the chamber and zero donuts.”
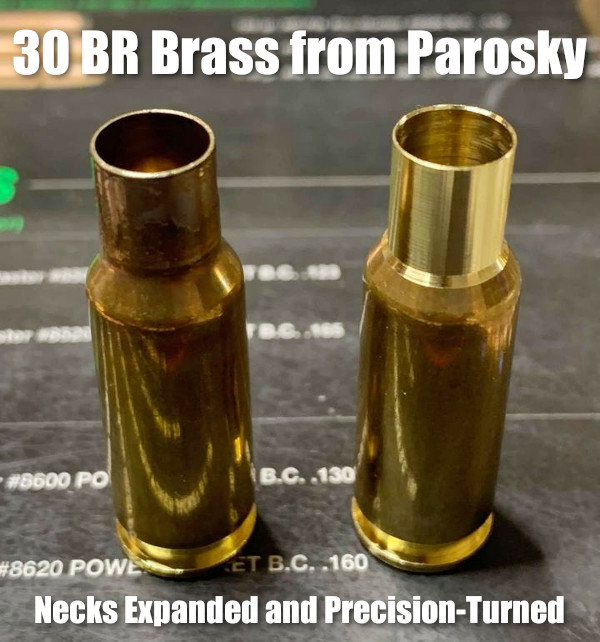
Here’s good news for 30BR shooters. Paul Parosky, maker of the excellent PRP Custom Bullets, is now offering 30BR neck-turned brass. This can save you considerable time and effort forming 30BR cases from Lapua 6mmBR brass. And the neck-turning is superb, again representing time savings (and no tools to buy). You can order this 30BR brass from PRPbullets.com. If you communicate with the PRP team, Paul may be able to neck-turn to your specific thickness. Paul notes: “Here are necks turned for a 0.330 neck. I’ll try my best to accommodate anyone’s neck dimensions as they wish. Just contact us through our website PRPBullets.com.”
About this Neck-Turning set-up — Paul Parosky notes: “For neck-turning I’m using an old drill press that has been re-worked. The cutter and spindle are all indicated before neck turning to ensure no runout. The RPM is around 520. The lube I use is a mixture of royal and mystery oil.”
Why the 30 BR Dominates 100/200 Benchrest for Score Competition
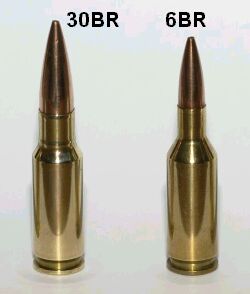
The 30BR, along with some wildcat variants, remains the dominant cartridge in short-range (100/200) benchrest-for-score competition. The 30BR’s .308″-diameter bullets are larger than the 6mm bullets used by the 6PPC (which rules group BR competition). The bigger 30-Cal diameter has an advantage in touching scoring rings. In addition, the 30BR is also relatively easy to tune, and barrel life is considerably better than with smaller-caliber benchrest cartridges. For more information, see our AccurateShooter 30BR Cartridge Guide.
Cases are Expanded, Then Neck-Turned
To produce his 30BR brass, Parosky first uses a series of expander mandrels. Then he neck-turns with power using a converted drill press. Paul tells us: “This is done the old school way, I use three different tapered expander mandrels, then neck-turn it to the proper neck chamber, then run them up through a FL expander mandrel to ensure necks are straight. Then I clean all the cases.”
Paul Parosky Can Also Neck-Turn 6PPC Brass
Paul Parosky also expands and neck-turns 6PPC cases that are made from parent Lapua .220 Russian cartridge brass. Here, illustrating his 6PPC neck-turning operation, is a Paul Parosky post on the USA Benchrest & Extreme Precision Shooters Facebook page.
He who dies with the most toys wins — right? Well Sinclair has another interesting gadget you can add to your reloading bench. The Sinclair Case Neck Sorting Tool lets you quickly sort brass by neck-wall thickness. For those who shoot “no-turn” brass, this can improve neck-tension consistency. Large variances in neck-wall thickness can cause inconsistent neck “grip” on the bullet. Generally, we’ve found that more consistent neck tension will lower ES and (usually) improve accuracy. We know some guys who shoot no-turn 6mmBR brass in competition with considerable success — but their secret is pre-sorting their brass by neck-wall thickness. Cases that are out-of-spec are set aside for sighters (or are later skim-turned).
Watch Case Neck Sorting Tool Operation in Video
How the Case Neck Sorting Tool Works
Here’s how the Sinclair tool works. Cases are rotated under an indicator tip while they are supported on a case-neck pilot and a support pin through the flash hole. The unit has a nice, wide base and low profile so it is stable in use. The tool works for .22 through .45 caliber cases and can be used on .17- and .20-caliber cases with the optional carbide alignment rod. The MIC-4 pin fits both .060 (PPC size) and .080 (standard size) flash holes. Sinclair’s Case Neck Sorting Tool can be ordered with or without a dial indicator. The basic unit without dial indicator (item item 749006612) is priced at $59.99. You can also buy the tool complete with dial indicator (item 749007129) for $89.99. IMPORTANT: This sorting tool requires caliber-specific Case Neck Pilots which must be ordered separately.
Editor’s Comment: The purpose of this Sinclair tool is rapid, high-quantity sorting of cartridge brass to ascertain significant case-neck-wall thickness variations. Consider this a rapid culling/sorting tool. If you are turning your necks, you will still need a quality ball micrometer tool to measure neck-wall thickness (to .0005) before and after neck-turning operations.
The 30BR is an amazing little cartridge. However, 30BR shooters do have to neck-up 6mmBR brass and then deal with some issues that can arise from the expansion process. One of our Forum members was concerned about the donut that can form at the new (expanded) neck-shoulder junction. Respected bullet-maker Randy Robinett offers tips on how to deal with the “dreaded donut”.
The Forum member was concerned about thinning the brass if he turned his 30BR necks after expansion: “Everything I have found on 30BR case-forming says to simply turn off the bulge at the base of the neck caused by the old 6BR shoulder. I expanded my first case and measured the neck at 0.329″ except on the donut, where it measures 0.335″. Looking inside the case… reveals a groove inside the case under the donut. Now, it is a fact that when I turn that neck and remove the donut, the groove is still going to be there on the inside? That means there is now a thin-spot ring at the base of the neck that is .005 thinner than the rest of the neck. Has anyone experienced a neck cracking on this ring?”
Randy Robinett, who runs BIB Bullet Co., is one of the “founding fathers” of the 30BR who help prove and popularize the 30 BR for benchrest score shooting. Randy offers this advice on 30BR case-forming:
While the thinner neck-base was one of our original concerns, unless one cuts too deeply INTO the shoulder, it is not a problem. For my original 30BR chamber, thirty (30) cases were used to fire 6,400 rounds through the barrel. The cases were never annealed, yet there were ZERO case failures, neck separations, or splits. The case-necks were turned for a loaded-round neck diameter of .328″, and, from the beginning, sized with a .324″ neck-bushing.
The best method for avoiding the ‘bulge’ is to fire-form prior to neck-turning (several methods are successfully employed). Cutting too deeply into the shoulder can result in case-neck separations. I have witnessed this, but, with several barrels and thousands to shots fired, have not [personally] experienced it. The last registered BR event fired using that original barrel produced a 500-27x score and a second-place finish. [That’s] not bad for 6K plus shots, at something over 200 firings per case.
Check out the 30BR Cartridge Guide on AccurateShooter.com
You’ll find more information on 30BR Case-forming in our 30 BR Cartridge Guide. Here’s a short excerpt from that page — some tips provided by benchrest for score and HBR shooter Al Nyhus:
30BR Case-Forming Procedure by Al Nyhus
The 30BR cartridge is formed by necking-up 6BR or 7BR brass. You can do this in multiple stages or in one pass. You can use either an expander mandrel (like Joe Entrekin does), or a tapered button in a regular dies. Personally, I use a Redding tapered expander button, part number 16307. This expands the necks from 6mm to .30 cal in one pass. It works well as long as you lube the mandrel and the inside of the necks. I’ve also used the Sinclair expander body with a succession of larger mandrels, but this is a lot more work and the necks stay straighter with the Redding tapered button. This button can be used in any Redding die that has a large enough inside diameter to accept the BR case without any case-to-die contact.
Don’t be concerned about how straight the necks are before firing them the first time. When you whap them with around 50,000 psi, they will straighten out just fine! I recommend not seating the bullets into the lands for the first firing, provided there is an adequate light crush-fit of the case in the chamber. The Lapua cases will shorten from approx. 1.550″ to around 1.520″ after being necked up to 30-caliber I trim to 1.500″ with the (suggested) 1.520 length chambers. I don’t deburr the flash holes or uniform the primer pockets until after the first firing. I use a Ron Hoehn flash hole deburring tool that indexes on the primer pocket, not through the case mouth. — Al Nyhus
When neck-turning cases, it’s a good idea to extend the cut slightly below the neck-shoulder junction. This helps keep neck tension more uniform after repeated firings, by preventing a build-up of brass where the neck meets the shoulder. One of our Forum members, Craig from Ireland, a self-declared “neck-turning novice”, was having some problems turning brass for his 20 Tactical cases. He was correctly attempting to continue the cut slightly past the neck-shoulder junction, but he was concerned that brass was being removed too far down the shoulder.
Craig writes: “Everywhere I have read about neck turning, [it says] you need to cut slightly into the neck/shoulder junction to stop doughnutting. I completely understand this but I cant seem to get my neck-turning tool set-up to just touch the neck/shoulder junction. It either just doesn’t touch [the shoulder] or cuts nearly the whole shoulder and that just looks very messy. No matter how I adjust the mandrel to set how far down the neck it cuts, it either doesn’t touch it or it cuts far too much. I think it may relate to the bevel on the cutter in my neck-turning tool…”
Looking at Craig’s pictures, we’d agree that he didn’t need to cut so far down into the shoulder. There is a simple solution for this situation. Craig is using a neck-turning tool with a rather shallow cutter bevel angle. This 20-degree angle is set up as “universal geometry” that will work with any shoulder angle. Unfortunately, as you work the cutter down the neck, a shallow angled-cutter tip such as this will remove brass fairly far down. You only want to extend the cut about 1/32 of an inch past the neck-shoulder junction. This is enough to eliminate brass build-up at the base of the neck that can cause doughnuts to form.
The answer here is simply to use a cutter tip with a wider angle — 30 to 40 degrees. The cutter for the K&M neck-turning tool (above) has a shorter bevel that better matches a 30° shoulder. There is also a 40° tip available. PMA Tool and 21st Century Shooting also offer carbide cutters with a variety of bevel angles to exactly match your case shoulder angle*. WalkerTexasRanger reports: “I went to a 40-degree cutter head just to address this same issue, and I have been much happier with the results. The 40-degree heads are available from Sinclair Int’l for $15 or so.” Forum Member CBonner concurs: “I had the same problem with my 7WSM… The 40-degree cutter was the answer.” Below is Sinclair’s 40° Cutter for its NT-series neck-turning tools. Item NT3140, this 40° Cutter sells for $14.99. For the same price, Sinclair also sells the conventional 30° Cutter, item NT3100.
Al Nyhus has another clever solution: “The best way I’ve found to get around this problem is to get an extra shell holder and face it off .020-.025 and then run the cases into the sizing die. This will push the shoulder back .020-.025. Then you neck turn down to the ‘new’ neck/shoulder junction and simply stop there. Fireforming the cases by seating the bullets hard into the lands will blow the shoulder forward and the extra neck length you turned by having the shoulder set back will now be blended perfectly into the shoulder. The results are a case that perfectly fits the chamber and zero donuts.”
* 21st Century sells carbide cutters in: 15, 17, 20, 21.5, 23, 25, 28, 30, 35, 40, 46 and 50 degrees. PMA Tool sells carbide cutters in: 20, 23, 30, and 40 degrees, plus other angles by special order.
Every Saturday we present interesting, informative videos for our Daily Bulletin readers. Here we feature five YouTube videos that offer a ton of useful information for serious shooters. We start with a great video about setting up rifle, rest, and bag on the bench. Then Hall-of-Fame benchrest shooter Speedy Gonzalez shows smart methods for cleaning barrels. Next F-Class Ace Keith Glasscock explains how to optimize your rifle after travel. In the fourth video, AutoTrickler inventor Adam MacDonald shows how to optimize the AutoTrickler V4. Next the truly outstanding 21st Century Power Neck-Turning lathe is showcased.
How to Set Up Your Rifle, Rest, and Bag on the Bench
To get the best results in benchrest shooting, you need to set up all the gear on your bench properly. That includes front rest placement, rear bag position, spotting scope set-up, and placement of cartridge holder/caddy, and possibly an elbow/forearm rest. When setting up the hardware, you need to align the front rest and rear bag properly to get optimal tracking. In addition you want to make sure the rear bag doesn’t slide or rotate a bit from shot to shot. And you also want to set your seat height/location so the shooter’s position is optimal and comfortable. This helpful video shows how to set up your rifle and gear for a benchrest match or load development/practice at the range. Credit to Boyd Allen for finding video.
Cleaning Barrels with Speedy — Smart Techniques
There are many effective methods to clean barrels. But some are more efficient that others and can help you do the job more quickly, with less effort. Here respected gunsmith and Hall-of-Fame benchrest shooter Speedy Gonzalez shows his procedures for cleaning competition barrels. He uses Sharpshoot-R Liquid Patch-Out and Wipe-Out Accelerator as primary solvents. Watch carefully — Speedy has some clever techniques for starting a patch in the rifling, and he is also careful about exiting the muzzle when brushing. Speedy also explains the importance of keeping your rods clean. And he prefers nylon brushes because, as the barrel starts to get wear in the throat, “the bronze bristles will actually start eating into that and you’ll see little grooves if you have a good borescope.” (See video 00:38-01:35)
Getting Rifle Ready After Traveling — Keith Glasscock
Keith Glasscock is one of America’s top F-Class shooters, having finished Second at the National Championships multiple times. Keith, who has an engineering background, runs the popular Winning in the Wind YouTube channel. There you’ll find great advice on wind reading, load tuning, precision reloading and many other topics. In this video, Keith offers very smart advice on how to re-assemble your rifle after you have traveled to a match or practice destination. Keith explains how to check the fasteners on the gun and set up the scope properly if you removed it while traveling.
Adjusting AutoTrickler V4 with its Inventor, Adam MacDonald
Adam MacDonald is the brilliant Canadian engineer who created the AutoTrickler series of automated powder dispensing systems. These work with advanced scales to dispense powder rapidly, but with a precise final trickle accurate to a single kernel. In this video, Adam explains how best to adjust and calibrate the AutoTrickler V4 when using powders that flow at different rates.
21st Century Power Neck-Turning Lathe — Great Tool
Turning case-necks can be tedious and tough on older hands if you’re using hand-held tools. Quite a few years ago 21st Century released a great compact, neck-turning lathe that delivers superb, consistent results. This Editor uses that original lathe with hand crank and I can affirm that it works great. It is easy to use, fast, and the turned necks come out smooth with consistent rim thickness. But you still had to turn a crank. Well, in 2018, 21st Century created an upgraded Power Neck-Turning Lathe with an electric motor and lever to advance the cases to the cutter. The power head glides on stainless steel guide rails. Power is controlled with a red button in the feed handle.
This advanced, powered mini-lathe is absolutely superb. It works brilliantly and makes the task of turning case-necks fast and VERY easy. And there is even a 3-Way trimmer upgrade that will trim cases to length at the same time as the necks are turned.
BONUS — How to Spot Fake Online Sellers of Components
With the shortage of premium reloading components, particularly powder and primers, many handloaders are desperate to find components when even big companies such as Midsouth and MidwayUSA are completely sold out. Enter the scammers. There are criminals, many based overseas, who have created entire websites designed to steal your money. You might find such a site when searching for “Varget powder in stock” or “CCI BR4 primers”. These sites look like regular business webstores, with product photos and modern shopping cart systems. But it’s all a scam.
Key giveaways are: 1) The site does NOT take Visa, Mastercard, or Discover but requires payment with Zelle, Venmo, Bitcoin, or AppleCash only; and 2) The site has hard-to-find powders, such as Varget and H4350, that nobody else has, and you can put thousands of pounds in the shopping cart.
Bottom line here — if the site allows you to order vast amounts of powder and/or primers, and does not take ANY major Credit Card types, it is almost surely a scam. If you see links to pay with Crypto-Currency (such as Bitcoin) run away!
Here’s good news for 30BR shooters. Paul Parosky, maker of the excellent PRP Custom Bullets, is now offering 30BR neck-turned brass. This can save you considerable time and effort forming 30BR cases from Lapua 6mmBR brass. And the neck-turning is superb, again representing time save (and no tools to buy). You will soon be able to order this 30BR brass from Bruno Shooters Supply. If you communicate with Amy at Bruno’s, Paul may be able to neck-turn to your specific thickness. Paul notes: “Here are necks turned for a 0.330 neck. I’ll try my best to accommodate anyone’s neck dimensions as they wish. Just message Amy Bruno Parosky (at Bruno’s) for details.”
About this Neck-Turning set-up — Paul Parosky notes: “For neck-turning I’m using an old drill press that has been re-worked. The cutter and spindle are all indicated before neck turning to ensure no runout. The RPM is around 520. The lube I use is a mixture of royal and mystery oil.”
Why the 30 BR Dominates 100/200 Benchrest for Score Competition
The 30BR, along with some wildcat variants, remains the dominant cartridge in short-range (100/200) benchrest-for-score competition. The 30BR’s .308″-diameter bullets are larger than the 6mm bullets used by the 6PPC (which rules group BR competition). The bigger 30-Cal diameter has an advantage in touching scoring rings. In addition, the 30BR is also relatively easy to tune, and barrel life is considerably better than with smaller-caliber benchrest cartridges. For more information, see our AccurateShooter 30BR Cartridge Guide.
Cases are Expanded, Then Neck-Turned
To produce his 30BR brass, Parosky first uses a series of expander mandrels. Then he neck-turns with power using a converted drill press. Paul tells us: “This is done the old school way, I use three different tapered expander mandrels, then neck-turn it to the proper neck chamber, then run them up through a FL expander mandrel to ensure necks are straight. Then I clean all the cases.”
Paul Parosky Can Also Neck-Turn 6PPC Brass
Paul Parosky also expands and neck-turns 6PPC cases that are made from parent Lapua .220 Russian cartridge brass. Here, illustrating his 6PPC neck-turning operation, is a Paul Parosky post on the USA Benchrest & Extreme Precision Shooters Facebook page.
Here’s good news for 30BR shooters. Paul Parosky, maker of the excellent PRP Custom Bullets, is now offering 30BR neck-turned brass. This can save you considerable time and effort forming 30BR cases from Lapua 6mmBR brass. And the neck-turning is superb, again representing time save (and no tools to buy). You will soon be able to order this 30BR brass from Bruno Shooters Supply. If you communicate with Amy at Bruno’s, Paul may be able to neck-turn to your specific thickness. Paul notes: “Here are necks turned for a 0.330 neck. I’ll try my best to accommodate anyone’s neck dimensions as they wish. Just message Amy Bruno Parosky (at Bruno’s) for details.”
About this Neck-Turning set-up — Paul Parosky notes: “For neck-turning I’m using an old drill press that has been re-worked. The cutter and spindle are all indicated before neck turning to ensure no runout. The RPM is around 520. The lube I use is a mixture of royal and mystery oil.”
Why the 30 BR Dominates 100/200 Benchrest for Score Competition
The 30BR, along with some wildcat variants, remains the dominant cartridge in short-range (100/200) benchrest-for-score competition. The 30BR’s .308″-diameter bullets are larger than the 6mm bullets used by the 6PPC (which rules group BR competition). The bigger 30-Cal diameter has an advantage in touching scoring rings. In addition, the 30BR is also relatively easy to tune, and barrel life is considerably better than with smaller-caliber benchrest cartridges. For more information, see our AccurateShooter 30BR Cartridge Guide.
Cases are Expanded, Then Neck-Turned
To produce his 30BR brass, Parosky first uses a series of expander mandrels. Then he neck-turns with power using a converted drill press. Paul tells us: “This is done the old school way, I use three different tapered expander mandrels, then neck-turn it to the proper neck chamber, then run them up through a FL expander mandrel to ensure necks are straight. Then I clean all the cases.”
Paul Parosky Can Also Neck-Turn 6PPC Brass
Paul Parosky also expands and neck-turns 6PPC cases that are made from parent Lapua .220 Russian cartridge brass. Here, illustrating his 6PPC neck-turning operation, is a recent Paul Parosky post on the USA Benchrest & Extreme Precision Shooters Facebook page.
He who dies with the most toys wins — right? Well Sinclair has another interesting gadget you can add to your reloading bench. The Sinclair Case Neck Sorting Tool lets you quickly sort brass by neck-wall thickness. For those who shoot “no-turn” brass, this can improve neck-tension consistency. Large variances in neck-wall thickness can cause inconsistent neck “grip” on the bullet. Generally, we’ve found that more consistent neck tension will lower ES and (usually) improve accuracy. We know some guys who shoot no-turn 6mmBR brass in competition with considerable success — but their secret is pre-sorting their brass by neck-wall thickness. Cases that are out-of-spec are set aside for sighters (or are later skim-turned).
Watch Case Neck Sorting Tool Operation in Video
How the Case Neck Sorting Tool Works
Here’s how the Sinclair tool works. Cases are rotated under an indicator tip while they are supported on a case-neck pilot and a support pin through the flash hole. The unit has a nice, wide base and low profile so it is stable in use. The tool works for .22 through .45 caliber cases and can be used on .17- and .20-caliber cases with the optional carbide alignment rod. The MIC-4 pin fits both .060 (PPC size) and .080 (standard size) flash holes. Sinclair’s Case Neck Sorting Tool can be ordered with or without a dial indicator. The basic unit without dial indicator (item 749-006-612WB) is priced at $59.99. You can also buy the tool complete with dial indicator (item 749-007-129WB) for $89.99. IMPORTANT: This sorting tool requires caliber-specific Case Neck Pilots which must be ordered separately.
Editor’s Comment: The purpose of this Sinclair tool is rapid, high-quantity sorting of cartridge brass to ascertain significant case-neck-wall thickness variations. Consider this a rapid culling/sorting tool. If you are turning your necks, you will still need a quality ball micrometer tool to measure neck-wall thickness (to .0005) before and after neck-turning operations.


 If you’re using a body die or a full-length sizing die, try using Ballistol (in the aerosol can) as a lube. It works GREAT without the tacky or gooey residue left by most case lubes. It will also clean off carbon residues on the neck as you lube the case. Just spray a little on a cotton patch (or your fingertips) and wipe each case before you run it up into the die. If you are using a steel neck bushing, be sure to wipe the neck as well. You can usually do a half-dozen BR-sized cases before you need to re-apply Ballistol on the patch. Ballistol is non-toxic, bio-degradeable, and will not harm your skin. It is very slippery, but can easily be removed with a rag or paper towel. Try it–you may retire your One-Shot. Ballistol can also be used to protect wood stocks.
 For Neck-Turning, Try STP Blend or Assembly Lube
 Another even cheaper option is assembly lubricant. For turning his case necks, RStreich uses assembly lube from an auto parts store. He notes: “The brand I have is reddish in color and kind of sticky like honey. It’s far better than the Imperial die wax I was using before.” There are a variety of types, both with and without moly additive, and you can select the viscosity you prefer if you sample a few brands. Be sure to clean out any lube residue from the inside of your necks when you have completed your neck-turning.
 When neck-turning cases, it’s a good idea to extend the cut slightly below the neck-shoulder junction. This helps keep neck tension more uniform after repeated firings, by preventing a build-up of brass where the neck meets the shoulder. One of our Forum members, Craig from Ireland, a self-declared “neck-turning novice”, was having some problems turning brass for his 20 Tactical cases. He was correctly attempting to continue the cut slightly past the neck-shoulder junction, but he was concerned that brass was being removed too far down the shoulder.


 He who dies with the most toys wins — right? Well Sinclair has another interesting gadget you can add to your reloading bench. The Sinclair
 The 30BR is an amazing little cartridge. However, 30BR shooters do have to neck-up 6mmBR brass and then deal with some issues that can arise from the expansion process. One of our Forum members was concerned about the donut that can form at the new (expanded) neck-shoulder junction. Respected bullet-maker Randy Robinett offers tips on how to deal with the “dreaded donut”.


 He who dies with the most toys wins — right? Well Sinclair has another interesting gadget you can add to your reloading bench. The Sinclair


