This impressive 15-round group was shot by Jim See of Elite Accuracy.
Different Shooting Disciplines Demand Different Levels of Precision/Accuracy
In the rapid-fire 3-Gun game, you could probably “clean” most stages with a 2-MOA rifle. By contrast, in the short-range group benchrest game, to compete with the best, you’ll need a rifle that shoots in the “ones” (i.e. 0.1-0.19 MOA) in perfect conditions. In 1000-yard F-Class competition, the top shooters want a rifle that will hold one-third-MOA of vertical at that distance.
What is your standard of accuracy? How good is “good enough”. Jim See, a skilled gunsmith and successful PRS competitor, recently answered that question for his tactical discipline. For the kind of matches Jim shoots, he likes to have a rifle that will hold half-MOA for five (5) shots, 3/4-MOA for 15 shots, and 1 MOA for twenty shots. Remarkably, Jim’s rifle can do that with factory ammo. Above is an impressive 15-shot group shot with .260 Remington Federal Premium Ammo.
“I say it all the time, my loads need to print 5 under 1/2″, 10 under 3/4″, and 20 under 1″. It’s simple, if a hot barrel will keep 20 rounds fired in succession under my standard it will be a good barrel and load for Precision Match Shooting. Federal Premium Gold Metal Match .260 with Sierra bullets made the cut for me today. 15 consecutive shots under 3/4 MOA.” –Jim See
It’s said that you “can never have too much accuracy”, but there are acceptable standards for each discipline, and they’re not the same. A 100/200 yard Benchrest shooter will be sorely disappointed with a rifle/ammo set-up that can only deliver half-MOA. On the other hand, a PRS competitor like Jim See can achieve great success with a lesser degree of precision. This means you can save time and money. You can run your barrels longer between cleanings, and you don’t have to go “full OCD” when loading your ammo. The PRS shooter does not need to weigh-sort primers, or load powder to single-kernel standards. Proof is the performance. Jim See has been a podium finisher at many PRS and tactical events. Learn more about Jim’s gunsmithing and training operations at Jim’s Facebook Page.
Download This Load Development Target
Jim’s target seemed a bit familiar. AccurateShooter.com created this Diamond and Dot Target a few years back. On each aiming point, there are high-contrast black horizontal and vertical lines for aligning your cross-hairs. The gray circle lets you see the bullet impacts above, without obliterating the red diamond, which is quite useful for precise aiming (we put fine cross-hairs on the points of the diamond). This target sheet includes data entry tables below each of the three aim points. There are many other free targets out there, but this format is very popular. We’re pleased to see Jim using it. You can download this and dozens of other FREE Targets from the AccurateShooter.com Target Page.
Photo by Forum member GAT. Chambered in 6-6.5×47 Lapua, this rifle features a Stiller TAC30 action, Krieger barrel, Harrells brake, Konohawk Stock, and Sightron SIII 6-24x50mm scope.
Ryan Cleckner has created many good shooting videos for the NSSF, such as his excellent Understanding MOA Video. Ryan is noted for his ability to explain complex topics in an easy-to-comprehend manner. This video, covering the fundamentals of shooting, has been viewed over 1.6 million times. It’s worth watching, particularly for guys getting started in PRS/practical competitions.
In this video, Ryan Cleckner reviews proper technique for rifle shooters. A stable platform, sight alignment, sight picture, and trigger control are key fundamentals to shooting properly. This is basic stuff, but Cleckner presents it in a clear, logical fashion. This is a good video for novice shooters.
Tip on Viewing Your Reticle:
Cleckner: “Sometimes it can be difficult to focus between the target and the reticle, even with the parallax adjusted properly. I recommend you focus only on the reticle. Just like the front sight on a rifle or a handgun, that reticle is what you can control, and it’s what matters. Focus on a crisp, clear reticle, in a stable platform, and all that’s left is trigger control.”
Tip on Trigger Control:
Cleckner: “Trigger control is pretty straightforward, as long as you think about it as a continuous process, and not just one thing that happens. I like to think about it as drawing a line in the dirt. I like to think about this constant pressure that I’m adding as I draw this line straight back, and then… continuing to draw that line even as the rifle goes off. That’s the good follow-through you’ll need.”
Long Range Shooting Handbook — A Good Resource
Cleckner has authored a book, the Long Range Shooting Handbook, which expands on the topics covered in the above video. You can view Sample Chapters from Ryan’s Book on Amazon.com.
Ryan Cleckner’s LR Shooting Handbook is designed as an intro to important fundamental concepts such as MOA vs. Mils, External Ballistics, and Environmental Effects. Included are personal tips and advice based on Cleckner’s years of experience as a sniper instructor and special operations sniper.
The Long Range Shooting Handbook is divided into three main categories: What It Is/How It Works, Fundamentals, and How to Use It. “What It Is/How It Works” covers equipment, terminology, and basic principles. “Fundamentals” covers the theory of long range shooting. “How to Use It” gives practical advice on implementing what you’ve learned, so you can progress as a skilled, long range shooter.
As a long-range shooting expert, Ryan Cleckner has impressive credentials. Cleckner was a special operations sniper (1/75 RGR) with multiple combat deployments, and he has served a U.S. Army sniper instructor. Currently he works as a firearms industry executive and attorney.
Report by Craig Arnzen, Area 419
As the PRS and other tactical/practical competitions continue to grow, a guy tends to wonder, just how good are the top competitors? And what are they actually doing (and viewing) as they complete a stage? Well, a great video from the Long Range Precision Shooters YouTube Channel let us see what the best in the sport see through their scopes when they shoot.
This video features Dave Preston, 2015 National Champion and consistent top performer, shooting the PRS Skills barricade. Dave Preston has been considered among the very best in the nation running this PRS stage. Dave nearly always shoots 100% with the fastest recorded time. In this video you’ll see him successfully engage all eight shots in under 43 seconds — that’s crazy fast. This includes a POV sequence (4:35 time-mark) showing the actual view through Dave’s scope as he completes the stage.
Watch this video! Dave offers excellent advice on gun-handling and body positioning for barricades. Listen to what he says and you WILL shoot better.
This video features the PRS Skills Barricade, an 8-round, 4-position stage featured at the majority of PRS matches throughout country. It’s called a “Skills Stage” as it is run the same way at every national match and gives shooters the ability to compare skill levels based on hit percentage and speed.
The target is a 10″ plate at 400 yards. There are four different positions, with two shots each. Most people run this stage in about 70 seconds, some in the mid-60s, the greats in the high 50s, and Dave does it in the low 40s… mighty impressive!
The Right Gear Aids Stability and Lets You Shoot Faster
Let’s also take a look at two pieces of gear that really helped Dave Preston get stable and shoot fast.
1. BARRICADE BAG — To Get Stable, Really Stable
In the video Dave is using a Solo Sac from Short Action Precision This bag was designed by USMC Solomon Mansalala. It’s a very soft/dense bag and is popular at matches.
The other bag that sees a LOT of use, and is far and away the most used, is the patented Gamechanger Bag from Reasor Precision Solutions and Armageddon Gear.
2. MUZZLE BRAKE — To Make Your Follow-Up Faster
You’ll notice that in the video the rifle is very steady through firing, even though he is not applying a lot of pressure to the rifle. Dave is using a Hellfire Muzzle Brake from Area 419. Combined with the soft-recoiling 6mmBR cartridge he is able to spot his impacts and make adjustments, and can also make very fast follow-up shots as his rifle hasn’t bounced way off target.
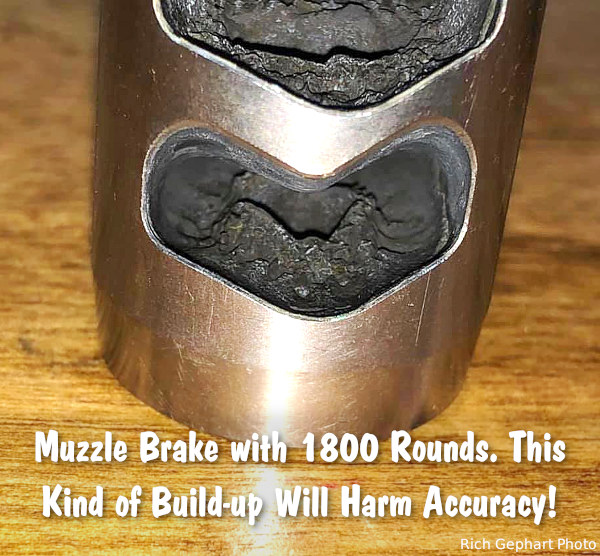
Many hunters and precision rifle competitors use muzzle brakes because these ported devices reduce felt recoil significantly. That make s real difference getting back on target for quick follow-up shots. While many rifle owners appreciate the benefits of muzzle brakes, they may also neglect their brakes, allowing hard carbon and powder residue to build up. Not good. You should regularly clean your muzzle brake to remove fouling and carbon build-up.
As Mark Edgreen posted: “Carbon build up on the crown and in the brake is a recipe for poor accuracy.” And another gunsmith reported that customers complained about guns that “shot out way too early” but they only needed to have the brakes cleaned.
Gunsmith and PRS/NRL competitor Jim See recently reminded his Facebook Fans about the importance of cleaning muzzle brakes: “How many times do I have to say it? You need to maintain your rifles. Clean your muzzle brakes people!”. Jim, who runs Elite Accuracy LLC, notes that hard carbon build-up in brakes can definitely harm accuracy. Look at this example:
Muzzle Brake Cleaning Methods
There are various methods for cleaning a brake, we list a variety of techniques, but we would start with NON-corrosive ultrasound. You’ll want to remove the muzzle device before doing these tasks.
1. Use Ultrasonic Cleaning Machine with cleaning solution. This may be the most efficient method: “I place my brake in the ultrasonic cleaner. Shiney as new.” (Jim Moseley).
2. Spray with commercial Carb Cleaner and brush. Then apply anti-corrosion coating.
3. Soak in half hydrogen peroxide and half vinegar. Suggestion: “Let sit over night and carbon melts off. Brush remaining carbon off, rinse and put the brake back on.” Apply anti-corrosive before mounting.
4. Soak in 50/50 solution of water and white vinegar and brush. (Be sure to apply anti-corrosion coating, such as Eezox, after soaking).
5. Tumble in liquid solution with stainless pins. Comment: “Comes out slightly faded, but perfectly clean on stainless, non-painted brakes though.” Warning — do NOT do this with threaded brakes — tumbling could affect threads of screw-on brakes. Also, tumbling can harm painted or Cerakote finishes.
Gunsmithing Tip: By fitting the muzzle brake so that the barrel crown is slightly forward, it is easier to wipe carbon fouling off the end of the barrel. See photo:
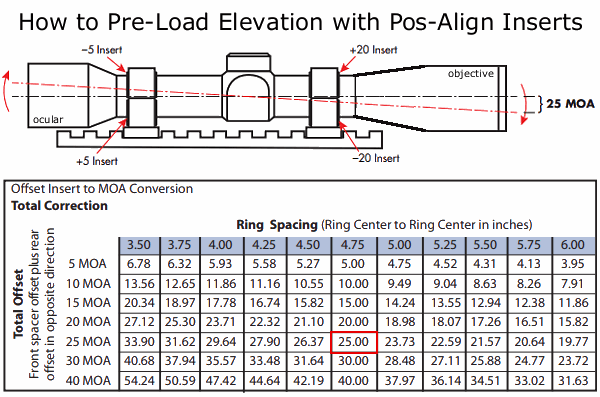
For years we have touted the advantages of Burris Signature rings, with polymer Pos-Align Inserts. PRS/NRL shooters take note — this technology is available in a beefier, heavy-duty ring system for tactical rifles. The impressive Burris XTR Signature Rings offer six (6) clamping bolts per ring plus strong, dual steel base-clamps that self-center on Weaver or Picatinny rails. These aluminum XTR Signature Rings provide strength and holding power, plus the key benefits of Pos-Align inserts. As impressive as XTR rings are — they aren’t that expensive, with 1″-diameter XTRs starting at about $87.00 per pair (30mm and 34mm XTRs cost a bit more).
The polymer inserts in Signature rings perform three key functions. First, the inserts provide full, uniform scope-to-ring contact, with no need for lapping. You get a very secure “grip” on your scope without ring marks. Second, the Pos-Align inserts can provide elevation “pre-load”. With eccentric (offset) inserts, you can raise the back of the scope relative to the front, gaining up to 54 MOA of built-in elevation, without the need for expensive tapered bases. Third, the offset inserts can be rotated clockwise or counter-clockwise to shift point of impact. This lets you zero your rifle easily while keeping the turrets in the center of their travel.
Burris XTR Signature Rings are offered in 1″, 30mm, and 34mm diameters, and three (3) different heights: 1″, 1.25″, and 1.5″. Each ring set includes two sets of concentric inserts and one set each of the following offset inserts: +/-5 MOA, +/-10 MOA, +/-20 MOA. These allow you to “pre-load” elevation and/or center up your cross-hairs.
– Pre-load Elevation. No need for expensive tapered bases for long-range shooting.
– Correct misalignment caused by off-center receiver holes.
– Correct for bases or rings being slightly off-center.
How to Pre-load Elevation
To add elevation, set the Pos-Align Offset Inserts to raise the rear of the scope and lower the front. As long as there remains sufficient clearance between the front objective bell and the barrel, Burris recommends lowering the front of the scope the most and raising the rear of the scope the least. The amount of actual elevation “pre-load” will depend on the ring spacing (see chart). In the illustration, with 4.75 inches between ring centers, a +/- 20 MOA pair in the front combined with a -/+ 5 MOA pair in the rear will yield +25 MOA of total elevation. (If the rings are positioned further apart, you’ll get less elevation pre-load.)
Using Inserts to Adjust Point of Impact in Any Direction
Although it is convenient and most understandable to refer to the ring inserts as a “bottom” or “top” insert, the inserts may be rotated to any angle within the scope rings. This allows the shooter to correct the point-of-impact in any direction. The drawings below show how the inserts can be rotated to induce both elevation and windage changes at the same time.
Product tip from Boyd Allen. We welcome reader submissions.
Precision Rifle fans should watch Shooting USA this week. On Wednesday, April 30, 2025 Shooting USA features the sixth annual Armageddon Gear (AG) Cup Invitational. The 3-day AG Cup posts the biggest cash money match in precision rifle competition. This challenging multi-stage, elimination-format competition took place in December 2024 at the Clinton House Plantation Range in South Carolina. On the final day, the top competitors face ten courses of fire to determine who will claim the Armageddon Gear AG Cup. This is an invitation-only match for America’s top Precision Rifle shooters, with the potential reward of huge cash prizes — $20,000 for the winner plus $1000 for each top scorer on the ten final courses of fire.
This Video Shows Highlights of the Armageddon Cup
Shooting USA runs on the Outdoor Channel Wednesdays 9:00 PM Eastern and Pacific, 8:00 PM Central. No Outdoor Channel on cable or if you miss the regular broadcast, you can stream the show online at any time on Vimeo for $0.99 per episode.
The AG Cup is the brainchild of Tom Fuller, the owner of Armageddon Gear, and to say it’s a success is a bit of an understatement. This invitation-only match is the richest tactical/precision competition on the planet.
This AG Cup video has good footage of the stages in a previous 2022 AG Cup.
Celebrating the Winners in 2024 AG Cup
This video shows the 2024 AG Cup winners celebration at the Clinton House Plantation Range.
Armaggedon Gear — Tactical Accessories Armageddon Gear, founded by former U.S. Army Ranger Tom Fuller, sells support bags, gun cases, slings, suppressor covers, scope covers, and a wide variety of other accessories popular with the PRS/NRL crowd. Armageddon Gear now provides products to the U.S. Military, Law Enforcement, as well as PRS/NRL competitors.
Good Guide for PRS/NRL Competitors
Currently, PRS/NRL tactical competition is the fastest growing rifle shooting discipline with both centerfire and rimfire matches around the country. Are you thinking of getting started in the Practical/Tactical shooting game? Looking for ways to be more stable when shooting from unconventional positions? Then you may want to read Marcus Blanchard’s Practical Shooter’s Guide (A How-To Approach for Unconventional Firing Positions and Training).
Unlike almost every “how to shoot” book on the market, Blanchard’s work focuses on the shooting skills and positions you need to succeed in PRS and NRL matches and similar tactical competitions.
Blanchard provides clear advice on shooting from barricades, from roof-tops, from steep angles. Blanchard says you need to train for these types of challenges: “I believe the largest factor in the improvement of the average shooter isn’t necessarily the gear; it’s the way the shooter approaches obstacles and how they properly train for them.”
Blanchard also offers good tips on shooting fundamentals. Here’s an example:
Blanchard on Trigger Control
“There will always be some amount of wobble when shooting in positions other than prone, and timing the shot to go off when the reticle is within the target is difficult to accomplish when poor trigger techniques are employed. The most common [mistake] I have seen is ‘slapping’ the trigger. The finger is usually hovering off the trigger, and when the shooter determines that NOW is the time to fire, they quickly pull their finger to the rear and ‘slap’ the trigger. The finger never pulls the trigger in the same place and often provokes a sympathetic contraction of the rest of the muscles in the hand, which results in unwanted movement before the bullet exits the muzzle.”
Author Marcus Blanchard has the credentials. A Marine Corps veteran, Blanchard is a regular Top 10 finisher in Precision Rifle Series events. In 2015 Blanchard was ranked 8th overall (nationwide) in the PRS series at year’s end. In 2016 Blanchard won the New Mexico Precision Rifleman’s Championship.
Check out the Table of Contents to see the Topics Covered:
Click image above to view larger Table of Contents.
6.5 Guys Recommend Practical Shooter’s Guide
The 6.5 Guys have reviewed Blanchard’s book and they recommend it highly: “What’s a good book for the beginning shooter who wants to get into long range precision rifle or the intermediate shooter who wants to improve his scores? [The Practical Shooter’s Guide] is particularly useful because it explores firing from various positions and props that are encountered in long range precision rifle [events]. This knowledge is completely missing from more traditional books where the shooter is usually slung up and shooting at a paper target. Marcus… goes into considerable detail about shooting from rooftops, reverse rooftops, side slopes, tank traps, barricades etc. This is the type of information that is very difficult to find. We consider ourselves reasonably knowledgeable shooters and this book provided us with new and useful information.” CLICK HERE for 6.5 Guys REVIEW.
6.5 Guys Review Marcus Blanchard’s Practical Shooter’s Guide
Former USMC scout-sniper Frank Galli explains that there is no voodoo when it comes to precision rifle marksmanship, but there ARE techniques that, when practiced, make the difference between good marksmanship and great marksmanship. Understanding the reasons that a bullet hits or doesn’t hit its intended target at ultra-long distances is a crucial element to learning.
Galli’s explanations of how to understand and compensate for wind speed and direction are excellent. In this book, Galli offers great wind-reading advice.
Published in 2020, Galli’s treatise is four years newer than Blanchard’s book, so it includes more of the latest gear and equipment. Galli’s book covers the fundamentals of precision marksmanship with easy-to-understand methodology. The book follow the same instruction process Galli uses in his live marksmanship classes (CLASS REPORT HERE).
This well-illustrated, 272-page book (2020 ed.) covers the latest equipment (scopes, LRFs, chassis systems, magazines, bags, bipods, tripods) favored by tactical competitors in PRS/NRL type matches.
Rifle accuracy is pointless unless you can see your target and aim precisely. That’s why good optics are so important for precision shooting — from 50 yards out to a mile and beyond. Top quality scopes can be very expensive — you’ll see optics costing $3000 or more on many competition F-Class and PRS rifles. Today’s video showcase covers important “Riflescope Knowledge”, including how to adjust for parallax, and how to properly sight-in your scoped rifle. In addition there’s a helpful video defining Minute of Angle (MOA) plus videos showing how to mount optics correctly (and avoid common scope-mounting mistakes).
Rifle Sight-In Process — Start to Finish
Here Ryan Cleckner shares his process for sighting in a scoped rifle. This helpful video covers the full process: bore-sighting, 25-yard shot confirmation, shooting groups, making adjustments at 100 yards, and finding mechanical zero. Looking for more valuable rifle instruction? Then check out Ryan Cleckner’s book, Long Range Shooting Handbook.
How to Adjust for Parallax
Most precision rifle scopes have parallax adjustment, but what is it and why do you need to adjust it? In this Shooting USA video, John Paul of JP Rifles defines parallax and explains why you need to set parallax correctly for the distance to your target. The video then show how to adjust parallax correctly, a process which should start with the scope’s ocular focus.
Understanding Minute of Angle (MOA)
In this video, Ryan Cleckner explains the measurement term “minute of angle” (MOA) and how to use MOA adjustments on your scope to compensate for bullet drop at varying distances. MOA is an angular measurement, used often in long range shooting, that is 1/60th of one degree of a circle. One MOA represents 1.047″ at 100 yards and 10.47″ at 1000 yards. Want to learn more? Read Ryan Cleckner’s article Understand and Using Minute of Angle.
Scope Mounting: Common Scope-Mounting Mistakes To Avoid
Mounting a scope isn’t a super-complex or highly technical job, but there are ways you can mess it up. This Brownells video explains common pitfalls to avoid when you’re mounting a rifle scope.
1. Make sure the rings don’t touch any part of the turret housing, objective bell, or eyepiece. Any one or combination of those will throw off your shot groups big time. Make sure those rings are clamping ONLY the scope’s main tube.
2. Ensure that the scope rings are properly clamped to the scope base. If you can grasp the scope with one hand and the rifle with the other and there’s play between them, your groups are going to be all over the place! Scope rings come with torque specs for a reason.
3. Make sure there’s clearance between the objective bell and the rifle. No part of the scope should touch the rifle itself. The only nexus between the scope and the rifle should be the scope rings — and they’re not actually part of the rifle. This also applies to a removable lens cover. When it’s on the scope, it should not touch any part of the gun.
4. Don’t mount the scope too low on an AR-15. On most rifles, you do want the centerline of the optic as close to the bore as you can get it. But the AR-15’s stock is on almost the same plane as the top of the receiver, so you need some height on the scope. Otherwise, it’ll be too low for you to look through it.
5. Overtightening the scope rings is VERY BAD. You can actually crush the scope tube and damage the optic beyond repair. Stick to those torque specs! If the rings come with a little wrench, that wrench is all you need to tighten them.
How to Sight In a Riflescope — Vortex Tech Talk
This popular video from Vortex Optics explains how to sight-in a rifle so that the reticle is aligned correctly and the scope is zeroed properly for your intended application/discipline. People need to remember that the sight height established by the rings will affect their zero, as the centerline of the scope is above the centerline of the barrel.
Scope Mounting — Proper Alignment and Torque Values
An improperly installed scope can cost you points at a match. In this video, MDT Pro Shooter Keith Baker explains the simple steps required to ensure your scope is secured properly with the reticle aligned correctly. The video centers on a typical Precision Rifle PRS/NRL optics installation, but the techniques will also work for hunting, varmint, and benchrest rifles.
This Gun Digest book has become a “go-to” resource for NRL22 and PRS Rimfire (RF) shooters. Key topics included in this 2021 Edition full-color Gun Digest book include: rimfire semi-autos and how they work; bolt-action accuracy; match shooting skills; DIY precision gunsmithing; hunting with rimfires; and the future of the rimfire market.
With the growth of rimfire tactical competition, the .22-Caliber rimfire rifle is more popular than ever. Every major gun manufacturer has brought at least one new .22 LR rimfire rifle to the market in the last two years. Gun Digest’s Rimfire Revolution has extensive coverage of new models from major manufacturers.
The .22 Long Rifle (.22 LR) is the planet’s most popular ammunition type and firearm chambering. The .22 LR is used in the Olympics by 3P marksmen, but it also serves benchrest competitors, NRL22 shooters, backyard plinkers, small-game hunters, and tactical trainers. With the expansion of NRL22 matches (and the PRS equivalent), the humble .22 LR is undergoing a major resurgence in the USA. And with centerfire reloading components being so costly and difficult to find, many folks are shooting less centerfire, but way more rimfire.
This 272-page book also covers .17-caliber rimfire cartridges: 17 HM2 (Mach 2), 17 HMR, and 17 WSM. These are all excellent varmint rounds, with the 17 WSM effective out to 250 yards. The 17 HM2 will run in a normal .22 LR action and feed from standard .22 LR magazines. So, for most rifles, all you need to do a .22 LR to 17 HM2 conversion is a barrel switch. That gives your rimfire rig twice the versatility. Shoot .22s and .17s with the same gun.
NRL22 — Challenging Practical Competition with .22 LR Rifles
The USA has seen a big growth in rimfire tactical matches over the last five years. Right now there are probably ten times as many rimfire tactical matches as sanctioned PRS and NRL centerfire matches. The reason is simple — rimfire ammo is much less costly, and clubs can run challenging rimfire tactical matches at nearly any outdoor gun range that allows shooting out to 200+ yards.
NRL22 Competition — Tactical Rimfire Matches
The NRL22 match format is a great shooting discipline. NRL22 offers a high fun factor at relatively low cost. You don’t have to reload match ammo. A couple of 50-round boxes of .22 LR ammo will get you through the match. While some people bring lots of gear to matches, that’s by choice and not by necessity. You can keep it simple and still be competitive (and win).
Tips for NRL22 Competitors by Jonathan Ocab
I am a match director at my gun club and run our local NRL22 matches. People often ask me for tips for competing in NRL22. First, I recommend getting the course of fire for the month in advance and practicing those stages at the range. Here are other specific tips that should help NRL22 competitors improve their gun-handling and match results.
1. Dry Fire Practice — If you are not able to do live fire practice at the range, I encourage shooters to practice their shooting positions at home via dry fire. Setup props or barricades with pasters or other faux targets on a wall in the garage or inside the house and run through each stage.
2. Scope Magnification Level — The most common issue I see with newer shooters in NRL22 is the tendency to maximize their scope magnification. The timer will start, and the shooter gets into position on a target, but the scope is set to 15x or higher and the shooter can’t find the target. The shooter lowers the magnification, locates the target, and then increases the magnification again, takes the shot, transitions to another target, and repeats the process of decreasing magnification, locating target, etc. Novice NRL22 shooters should try using the mid-range magnification. Try shooting 7x-12x and learn to balance field of view and target image.
Many guys getting started in long range shooting are confused about what kind of scope they should buy — specifically whether it should have MIL-based clicks or MOA-based clicks. Before you can make that decision, you need to understand the terminology. This article, with a video by Bryan Litz, explains MILS and MOA so you can choose the right type of scope for your intended application.
You probably know that MOA stands for “Minute of Angle” (or more precisely “minute of arc”), but could you define the terms “Milrad” or “MIL”? In a helpful video, Bryan Litz of Applied Ballitics explains MOA and MILs (short for “milliradians”). Bryan defines those terms and explains how they are used. One MOA is an angular measurement (1/60th of one degree) that subtends 1.047″ at 100 yards. One MIL (i.e. one milliradian) subtends 1/10th meter at 100 meters; that means that 0.1 Mil is one centimeter (1 cm) at 100 meters. Is one angular measurement system better than another? Not necessarily… Bryan explains that Mildot scopes may be handy for ranging, but scopes with MOA-based clicks work just fine for precision work at known distances. Also because one MOA is almost exactly one inch at 100 yards, the MOA system is convenient for expressing a rifle’s accuracy. By common parlance, a “half-MOA” rifle can shoot groups that are 1/2-inch (or smaller) at 100 yards.
What is a “Minute” of Angle?
When talking about angular degrees, a “minute” is simply 1/60th. So a “Minute of Angle” is simply 1/60th of one degree of a central angle, measured either up and down (for elevation) or side to side (for windage). At 100 yards, 1 MOA equals 1.047″ on the target. This is often rounded to one inch for simplicity. Say, for example, you click up 1 MOA (four clicks on a 1/4-MOA scope). That is roughly 1 inch at 100 yards, or roughly 4 inches at 400 yards, since the target area measured by an MOA subtension increases with the distance.
MIL vs. MOA for Target Ranging
MIL or MOA — which angular measuring system is better for target ranging (and hold-offs)? In a recent article on his PrecisionRifleBlog.com website, Cal Zant tackles that question. Analyzing the pros and cons of each, Zant concludes that both systems work well, provided you have compatible click values on your scope. Zant does note that a 1/4 MOA division is “slightly more precise” than 1/10th mil, but that’s really not a big deal: “Technically, 1/4 MOA clicks provide a little finer adjustments than 1/10 MIL. This difference is very slight… it only equates to 0.1″ difference in adjustments at 100 yards or 1″ at 1,000 yards[.]” Zant adds that, in practical terms, both 1/4-MOA clicks and 1/10th-MIL clicks work well in the field: “Most shooters agree that 1/4 MOA or 1/10 MIL are both right around that sweet spot.”