|
|
October 13th, 2014
by Philip Mahin, Sierra Bullets Ballistic Technician
This article first appeared in the Sierra Bullets Blog
The ANSI / SAAMI group, short for “American National Standard Institute” and “Sporting Arms and Ammunition Manufacturers’ Institute”, have made available some time back the voluntary industry performance standards for pressure and velocity of centerfire rifle sporting ammunition for the use of commercial manufacturers. [These standards for] individual cartridges [include] the velocity on the basis of the nominal mean velocity from each, the maximum average pressure (MAP) for each, and cartridge and chamber drawings with dimensions included. The cartridge drawings can be seen by searching the internet and using the phrase ‘308 SAAMI’ will get you the .308 Winchester in PDF form. What I really wanted to discuss today was the differences between the two accepted methods of obtaining pressure listings. The Pounds per Square Inch (PSI) and the older Copper Units of Pressure (CUP) version can both be found in the PDF pamphlet.

Image by ModernArms, Creative Common License.
 CUP Pressure Measurement CUP Pressure Measurement
The CUP system uses a copper crush cylinder which is compressed by a piston fitted to a piston hole into the chamber of the test barrel. Pressure generated by the burning propellant causes the piston to move and compress the copper cylinder. This will give it a specific measurable size that can be compared to a set standard. At right is a photo of a case that was used in this method and you can see the ring left by the piston hole.
PSI Pressure Measurement
What the book lists as the preferred method is the PSI (pounds per square inch or, more accurately, pound-force per square inch) version using a piezoelectric transducer system with the transducer flush mounted in the chamber of the test barrel. Pressure developed by the burning propellant pushes on the transducer through the case wall causing it to deflect and make a measurable electric charge.
Q: Is there a standardized correlation or mathematical conversion ratio between CUP and PSI values?
Mahin: As far as I can tell (and anyone else can tell me) … there is no [standard conversion ratio or] correlation between them. An example of this is the .223 Remington cartridge that lists a MAP of 52,000 CUP / 55,000 PSI but a .308 Winchester lists a 52,000 CUP / 62,000 PSI and a 30-30 lists a 38,000 CUP / 42,000 PSI. It leaves me scratching my head also but it is what it is. The two different methods will show up in listed powder data[.]
So the question on most of your minds is what does my favorite pet load give for pressure? The truth is the only way to know for sure is to get the specialized equipment and test your own components but this is going to be way out of reach for the average shooter, myself included. The reality is that as long as you are using printed data and working up from a safe start load within it, you should be under the listed MAP and have no reason for concern. Being specific in your components and going to the load data representing the bullet from a specific cartridge will help get you safe accuracy. [With a .308 Winchester] if you are to use the 1% rule and work up [from a starting load] in 0.4 grain increments, you should be able to find an accuracy load that will suit your needs without seeing pressure signs doing it. This is a key to component longevity and is the same thing we advise [via our customer service lines] every day. Till next time, be safe and enjoy your shooting.

October 5th, 2014
We recommend that all hand-loaders have a couple reliable reloading manuals as reference guides. Berger, Hornady, and Sierra all offer well-respected load manuals. These can provide starting load information for a wide variety of cartridge types and bullet selections. We do like to cross-check any printed load recipes with current online data, to ensure you have the latest info.
Along with a good load manual, those getting started in metallic cartridge reloading can benefit from a good basic reloading treatise. There’s a new intro guide from the publishers of Gun Digest.

|
The New Gun Digest Shooter’s Guide To Reloading, by Phillip Massaro, was created for shooters new to reloading. This is a good starting point for those who want to learn to hand-load safely and efficiently. Hundreds of photos illustrate the text — and we all know a picture can be worth a thousand words.
After discussing the benefits of hand-loading, Massaro’s book covers the basics of metallic cartridge reloading, step by step. Along the way Massaro recommends appropriate presses and tools for reloading both pistol and rifle cartridges. Massaro also explains the variations in bullet and powder types, and how they affect ballistics. In addition, Massaro includes a “Specialty Situations” chapter that reveals common reloading mistakes and issues and offers practical solutions. This section on avoiding common mistakes is one of book’s best features. We wish all reloading guides had a similar section. |
|
Editor’s NOTE: This book will be released next week. Accordingly, we have not seen the final, printed version yet. At $14.79, the Gun Digest Shooter’s Guide to Reloading is relatively inexpensive. The sample chapters we reviewed provided good basic information in a well-organized fashion. Certainly, we would not tell advanced reloaders and/or competition shooters to rush out and buy this book. However, for folks getting started in hand-loading, this resource should be helpful.
September 29th, 2014
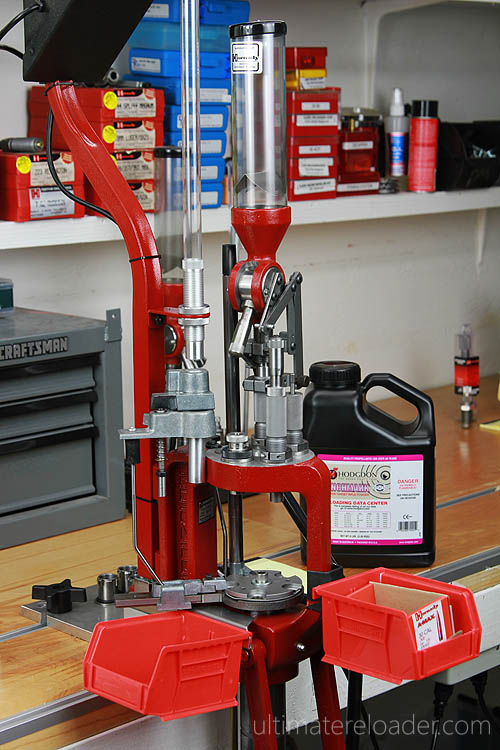
When you need ammo fast — lots of ammo, it’s hard to beat a progressive reloading press for output. We use progressive presses to load handgun ammo and .223 Rem cartridges for varmint safaris. With good dies, and proper press set-up, today’s progressive presses can produce surprisingly uniform and accurate ammo. No, you won’t see Benchrest Hall-of-Famers loading PPC cartridges on progressives. However, if you need 1000 rounds for your next prairie dog adventure, you should consider getting a progressive. Below you can see a Hornady Lock-N-Load AP configured to load .308 Winchester in bulk.
CLICK HERE to Read Full Article

UltimateReloader.com has published helpful Tips to Optimize Progressive Rifle Loading. No matter whether you have a Red (Hornady), Green (RCBS), or Blue (Dillon) progressive, this article can help you load more efficiently and produce better results. Here are some highlights:
Proper Brass Prep
Just like a good paint job requires good prep work, great rifle ammo requires good brass prep. In order to make sure your rifle loading goes smoothly, make sure to perform the following brass prep steps:
- Clean the brass (tumble, ultrasonic, etc.)
- Inspect brass for cracks, deep dents, etc.
- For military brass: de-prime, ream/swage primer pockets, size with small-base sizer die (small base usually optional).
- Measure brass length — if too long, size and then trim.
- Final inspection before loading.
- Cleaning primer pockets may be something you’ll consider (I don’t clean primer pockets except for rare cases or match ammo).
Smooth and Steady Pace
Since you’re loading rifle ammunition on a progressive, you’re already saving a load of time, so there’s no need to rush things! Attention to detail is super-important for safety and for good results. Always keep an eye on powder level (goes down FAST) and what’s happening at each station.
The Right Press and Press Setup
Look for a heavy-duty, well-built press that will stand up to rifle loading. You’ll also want to make sure your powder measure will have the proper capacity (~25 grains for .223, ~50 grains for 308). If you are bulk reloading, ensure you have enough stations for sizing, charging, powder check, bullet feed, bullet seating, and (optional) bullet crimp.
More Ultimate Reloader Resources for Users of Progressive Presses:
September 26th, 2014
If you haven’t visited the Norma website recently, you should click over to www.norma.cc/en/ (the ‘en’ is for English version). There you will find Norma’s “Ammo Academy”, a technical resource that provides information on: Ballistics, Powder Storage, Barrel Wear, and Bullet Expansion. In addition, the Ammo Academy now links to Norma’s Reloading Data Center, where you’ll find loads for nearly 70 cartridge types including: .223 Rem, .22-250, 6mmBR Norma, 6XC, 260 Rem, 6.5-284, 6.5×55, 7mm-08, .270 Win, .284 Win, .308 Win, .30-06, 300 Win Mag, .338 Lapua Mag and dozens more.

The Ammo Academy’s Ballistics section contains some fascinating technical facts:

- After the trigger is pulled, it takes around 0.005 seconds before the firing pin reaches the primer.
- From the firing of the primer it takes 0.0015-0.002 seconds until the bullet exits the muzzle.
- When the bullet leaves the muzzle, the hot gases surround and overtake the bullet, continuing the acceleration for a few centimeters.
- Because the barrel is always angled slightly upwards, the bullet’s flight starts about 3-5 cm below the line of sight.
Norma also offers some good advice about Powder and Cartridge Storage:
To maintain the product quality for as long as possible, you have to keep the powder in a suitable place under suitable conditions. Where possible, store the powder at a constant temperature, ideally between 12 and 15°C (54°F to 59°F), and a relative humidity of 40–50%. If the air is too dry, it will dry out the powder, which will cause the pressure to be higher, thus affecting performance. Also make sure that you close the powder container properly afterwards. Cartridges should be stored under the same ambient conditions to maintain their quality.
For more info on Norma products, CLICK HERE to access Norma’s Catalog Download Page.
Story Tip by EdLongrange. We welcome submissions from our readers.
August 30th, 2014
 The February 2013 edition of Shooting Sports USA magazine has an interesting feature by Glen Zediker. In this Transporting Success, Part I article, Zediker explains the advantages of loading at the range when your are developing new loads or tuning existing loads. Glen, the author of the popular Handloading for Competition book, discusses the gear you’ll need to bring and he explains his load development procedure. In discussing reloading at the range, Glen focuses on throwing powder and seating bullets, because he normally brings enough sized-and-primed brass to the range with him, so he doesn’t need to de-prime, re-size, and then re-prime his cases. The February 2013 edition of Shooting Sports USA magazine has an interesting feature by Glen Zediker. In this Transporting Success, Part I article, Zediker explains the advantages of loading at the range when your are developing new loads or tuning existing loads. Glen, the author of the popular Handloading for Competition book, discusses the gear you’ll need to bring and he explains his load development procedure. In discussing reloading at the range, Glen focuses on throwing powder and seating bullets, because he normally brings enough sized-and-primed brass to the range with him, so he doesn’t need to de-prime, re-size, and then re-prime his cases.
Zediker writes: “Testing at the range provides the opportunity to be thorough and flexible. You also have the opportunity to do more testing under more similar conditions and, therefore, get results that are more telling. Once you are there, you can stay there until you get the results you want. No more waiting until next time.”
Zediker starts with three-shot groups: “I usually load and fire three samples [with] a new combination. I’ll then increase propellant charge… based on the results of those three rounds, and try three more. I know that three rounds is hardly a test, but if it looks bad on that few, it’s not going to get any better.”
Glen reminds readers to record their data: “Probably the most important piece of equipment is your notebook! No kidding. Write it down. Write it all down.”

 There’s More to the Story… There’s More to the Story…
Editor’s Note: In Zediker’s discussion of loading at the range, he only talks about throwing powder and seating bullets. In fact, Glen opines that: “there is little or no need for sizing.” Well, maybe. Presumably, for each subsequent load series, Zediker uses fresh brass that he has previously sized and primed. Thus he doesn’t need to de-prime or resize anything.
That’s one way to develop loads, but it may be more efficient to de-prime, re-size, and load the same cases. That way you don’t need to bring 50, 80, or even 100 primed-and-sized cases to the range. If you plan to reload your fired cases, you’ll need a system for de-priming (and re-priming) the brass, and either neck-sizing or full-length sizing (as you prefer). An arbor press can handle neck-sizing. But if you plan to do full-length sizing, you’ll need to bring a press that can handle case-sizing chores. Such a press need not be large or heavy. Many benchresters use the small but sturdy RCBS Partner Press, an “O-Design” that costs about $79.00. You may even get by with the more basic Lee Precision Compact Reloading Press, shown in Zediker’s article. This little Lee press, Lee product #90045, retails for under $30.00.

August 5th, 2014
One of our Forum members complained that he wasn’t able to set his primers flush to the rim. He tried a variety of primer tools, yet no matter what he used, the primers still didn’t seat deep enough. He measured his primers, and they were the right thickness, but it seemed like his primer pockets just weren’t deep enough. He was mystified as to the cause of the problem.
Well, our friend Boyd Allen diagnosed the problem. It was the decapping rod. If the rod is adjusted too low (screwed in too far), the base of the full-diameter rod shaft (just above the pin) will contact the inside of the case. That shaft is steel whereas your case is brass, a softer, weaker metal. So, when you run the case up into the die, the shaft can actually stretch the base of the primer pocket outward. Most presses have enough leverage to do this. If you bell the base of the primer pocket outwards, you’ve essentially ruined your case, and there is no way a primer can seat correctly.
The fix is simple. Just make sure to adjust the decapping rod so that the base of the rod shaft does NOT bottom out on the inside of the case. The pin only needs to extend through the flash hole far enough to knock the primer out. The photo shows a Lyman Universal decapping die. But the same thing can happen with any die that has a decapping rod, such as bushing neck-sizing dies, and full-length sizing dies.

Whenever you use a die with a decapping pin for the first time, OR when you move the die to a different press, make sure to check the decapping rod length. And it’s a good idea, with full-length sizing dies, to always re-check the height setting when changing presses.
Lee Universal Decapping Die on SALE for $9.89
Speaking of decapping tools, Midsouth Shooters Supply sells the Lee Universal Decapping Die for just $9.34 (item 006-90292), a very good deal. There are many situations when you may want to remove primers from fired brass as a separate operation (prior to case sizing). For example, if your rifle brass is dirty, you may want to de-cap before sizing. Or, if you load on a progressive press, things will run much more smoothly if you decap you brass first, in a separate operation. The Lee Universal Decapping Die will work with cartridges from 17 Fireball all the way up to 45-70. However, NOTE that the decapping pin supplied with this Lee die is TOO LARGE for LAPUA 6.5×47, 6BR, 220 Russian, and Norma 6 PPC flash holes. Because the pin diameter is too large for these brass types, you must either turn down the pin, or decap with a different tool for cases with .059″ flash-holes. Otherwise, the Lee Decapping Die works well and it’s a bargain.

July 18th, 2014
Do you use bushings to size your case-necks? Are you assuming that your bushings are actually round on the inside, with a hole that’s centered-up properly? Well you may be in for an unpleasant surprise, based on what our friend Jim de Kort recently discovered. Jim was concerned about the run-out on his brass. His cases went into his bushing-equipped FL die pretty straight, but came out of the die with up to .004″ run-out. “What gives?”, Jim wondered. “Could the problem be the bushings themselves?”
To answer that question, Jim decided to examine his bushings. Using an Accuracy One Wheel-drive concentricity gauge, Jim checked out some of his neck bushings. What he discovered may surprise you…
Neck Bushing Flaws Revealed
Trust no one… — Jim de Kort
Jim writes: “I measured the concentricity of my 6BR rounds today. I noticed they went into the neck-bushing equipped full-length sizing die with <.001" deviation but came out with .003-.004". The culprit, it appears, was the bushing itself. Without it the cases stayed within .0005" to .001" deviation, so something was happening with the bushing.
One bushing had .00025" deviation on the outside, yet almost .003" on the inside, so it is crooked. But even when using a bushing that is within .001" I still get .003" runout after sizing. I repeated the same procedure for my 6x47 and got the same results. When using the bushing, concentricity suffers a lot."
Before we bash the bushing-makers, we must acknowledge that many different things can contribute to excessive run-out and/or mis-alignment of case-necks. We don’t have all the answers here, and Jim would be the first to say that some mysteries remain. Still, these are interesting results that give all precision hand-loaders something to think about.
Jim Borden also offers this tip: “Check the trueness of the face of the die cap. That has more to do with trueness than the bushing. Also check perpendicularity of hole in bushing to top surface. When I was making dies, the cap was made by threading and facing the threaded tenon in same setup.”

Editor’s Comment: Many people have great results with neck-bushing dies, but Jim isn’t the only fellow who has seen some very odd results. I personally employ honed, non-bushing dies for many of my chamberings. These non-bushing dies (with the necks honed for .002-.003″ neck tension) produce extremely straight ammo, with run-out consistently under .0015″.
July 10th, 2014
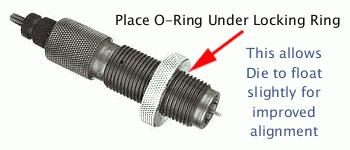
Here’s an inexpensive procedure that can help you load straighter ammo, with slightly better measured concentricity (i.e. less run-out) on the case necks and bullets. Simply use a rubber O-Ring on the underside of the die locking ring. This allows the die to self-align itself (slightly) to the case that is being sized. Without the O-Ring, if the flat surface on the top of your press is not perfectly square with the thread axis, your die can end up slightly off-angle. This happens when the bottom of the locking ring butts up tight against the top of the press. The O-Ring allows the die to float slightly, and that may, in turn, reduce the amount of run-out induced during case sizing.
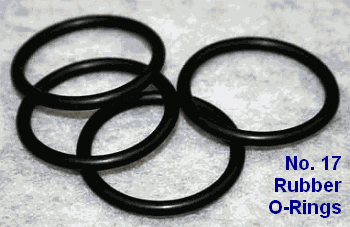
Top prone shooter GSArizona has tried this trick and he says it works: “Go to your local hardware store and get a #17 O-Ring (that’s the designation at Ace Hardware, don’t know if its universal). Slip the O-Ring on the die and re-adjust the lock ring so that the O-Ring is slightly compressed when the die is at the correct height. Size and measure a few more cases. You will probably see a slight improvement in neck concentricity as the die can now float a bit as the case enters and leaves it. This isn’t going to be a dramatic improvement, but it’s a positive one.” We want to stress that adding O-Rings to sizing dies may help some reloaders, but we don’t offer this as a panacea. Try it — if using the O-Ring reduces measured runout that’s great. If it doesn’t, you’ve only spent a few pennies to experiment.
Lee Precision makes die lock rings with built-in O-Rings. Lee’s distinctive lock ring design allows the same kind of self-alignment, which is good. However, Lee lock rings don’t clamp in place on the die threads, so they can move when you insert or remove the dies — and that can throw off your die setting slightly. By using an O-Ring under a conventional die lock ring (that can be locked in place), you get the advantages of the Lee design, without the risk of the lock ring moving.
July 1st, 2014
 A while back, Sinclair International’s Reloading Press Blog featured a “round-table” discussion of reloading techniques. Sinclair’s team of tech staffers were asked: “What do you feel is the one-most crucial step in precision reloading?” A while back, Sinclair International’s Reloading Press Blog featured a “round-table” discussion of reloading techniques. Sinclair’s team of tech staffers were asked: “What do you feel is the one-most crucial step in precision reloading?”
Here are their responses (along with comments from our Editors):
Phil Hoham: “I feel that when working up a load do not go too high or too low in your powder charge. Stay away from “suggested loads” you hear at the range, or on the internet. Always be sure to use a published reloading manual that presents not only minimums and maximums, but also pressure, velocity, and a proper range of powders used. Do not get distracted in the reloading process, and remain focused at all times during each step involved.”
AccurateShooter.com: Some loads presented on the Internet are OK as a starting point, but it is absolutely critical to understand that pressure maximums will vary considerably from one rifle to another (of the same chambering). For example, one 6mmBR rifle shooting 105gr bullets can max out with 30.0 grains of Varget powder, while another rifle, with the same chamber dimensions, but a different barrel, could tolerate (and perform better) with half a grain more powder. You need to adjust recommended loads to your particular rifle and barrel.

Pete Petros: “This could be a very broad topic, but if I were to pick one, it would be making sure to pay close attention, and weigh each and every powder charge to ensure that each load is exact and consistent. This is important not only for accuracy, but also for safety reasons.”
AccurateShooter.com: If you’re shooting beyond 200 yards, it is critical to weigh your loads with an accurate scale. Loads that are uniform (within a few kernels) will exhibit lower Extreme Spread and Standard Deviation. And remember, even if you stick with the same powder, when you get a new powder lot, you may have to adjust your load quite a bit. For example, .308 Palma shooters have learned they may need to adjust Varget loads by up to a full grain from one lot of Varget to the next.
Ron Dague: “I feel that the most important step(s) in reloading for accuracy are in the initial case prep. Uniforming the primer pocket to the same depth to ensure consistency in primer seating is a crucial step. Additionally de-burring the flash holes, each in the same way to clean up and chamfer the inside is important. It ensures that the ignition from the primer is uniform and flows out in the same consistent pattern. Doing so will create uniform powder ignition and tighten up your velocity Extreme Spread.”
AccurateShooter.com: With some brands of brass, primer pocket uniforming and flash-hole deburring is useful. However, with the best Lapua, Norma, and RWS brass it may be unnecessary, or worse, counter-productive. So long as your Lapua brass flash-holes are not obstructed or smaller than spec, it may be best to leave them alone. This is particularly true with the small flash holes in 220 Russian, 6BR, and 6.5×47 cases. MOST of the flash-hole reaming tools on the market have cutting bits that vary in size because of manufacturing tolerances. We’ve found tools with an advertised diameter of .0625″ (1/16″) that actually cut an 0.068″ hole. In addition, we are wary of flash-hole deburring tools that cut an aggressive inside chamfer on the flash-holes. The reason is that it is very difficult to control the amount of chamfer precisely, even with tools that have a depth stop.
Rod Green: “I feel that bullet seating is the most important step. If you had focused on making sure all prior steps (case prep, powder charge, etc.) of the process have been carefully taken to ensure uniformity, bullet seating is the last step, and can mean all the difference in the world in terms of consistency. Making sure that the bullet is seated to the same depth each time, and time is taken to ensure that true aligned seating can make the load.”
Bob Blaine: “I agree with Rod. I strongly feel that consistent bullet seating depth is the most important step in creating the most accurate hand loads. I have seen the results in both my bench and long range rifles. Taking the time to ensure exactness in the seating process is by far, the number one most important step in my book.”
AccurateShooter.com: Agreed. When loading match ammo, after bullet seating, we check every loaded round for base of case to ogive length. If it varies by more than 3 thousandths, that round is segregated or we attempt to re-seat the bullet. We measure base of case to bullet ogive with a comparator mounted on one jaw of our calipers. You may have to pre-sort your bullets to hold the case-base to ogive measurement (of loaded rounds) within .003″.
May 27th, 2014
|
New handloaders often ask us for advice on reloading techniques and equipment selection. It’s always best for novice reloaders to work under the guidance of an experienced mentor. Nothing beats “learning the ropes” with an experienced reloader at ones side. In addition, new handloaders should acquire one or more good reloading manuals, such as the Hornady Reloading Handbook (9th Ed.). We recommend reading the introductory chapters of a reloading manual to get a good understanding of the basic principles involved.
Along with print manuals, instructional DVDs are available. RCBS sells a 32-minute, step-by-step Precisioneered Handloading DVD, narrated by Shooting USA’s Jim Scoutten. This $9.19 DVD covers the basics of metallic cartridge reloading and shotshell reloading.
|
|
For those who have already mastered the basics, Redding offers a 45-minute instructional DVD, appropriately named Advanced Handloading: Beyond The Basics ($17.52 at Amazon.com). The Redding DVD, produced with help from Sierra Bullets, is narrated by John Barsness, field editor of Rifle and Handloader magazines. The Redding DVD does go “Beyond the Basics” but it really is more an intermediate resource — it doesn’t reveal some of the most sophisticated methods of case prep and load tuning used by competitive benchrest shooters. Nonetheless it is a good resource for those getting started with rifle cartridge reloading.

|


